
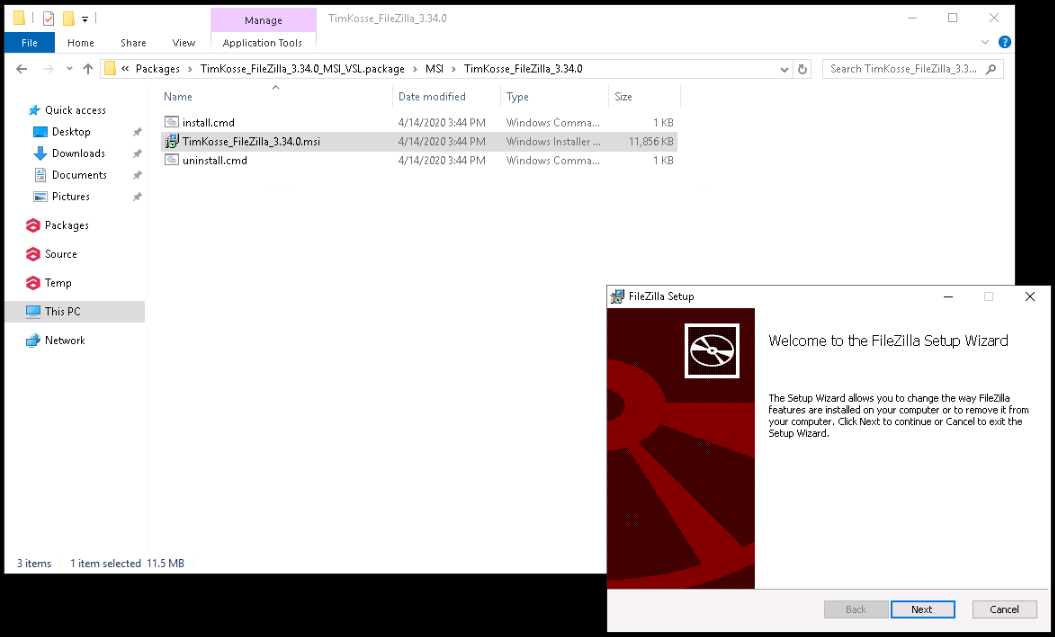
Packaging
The following scenarios to open the transition screen available:
- My Dashboard > My Applications > Choose the project > Actions column > Process option;
- Project menu > Dashboards > Overview > Your assignments module > Choose the application > Actions column > Process option;
- Project menu > Dashboards > Portfolio > Actions column > Process option;
- Project menu > Import > Start import > Classic import / Import from CSV file / SCCM Import /Catalogue & UM Import > Application upload session > Finish
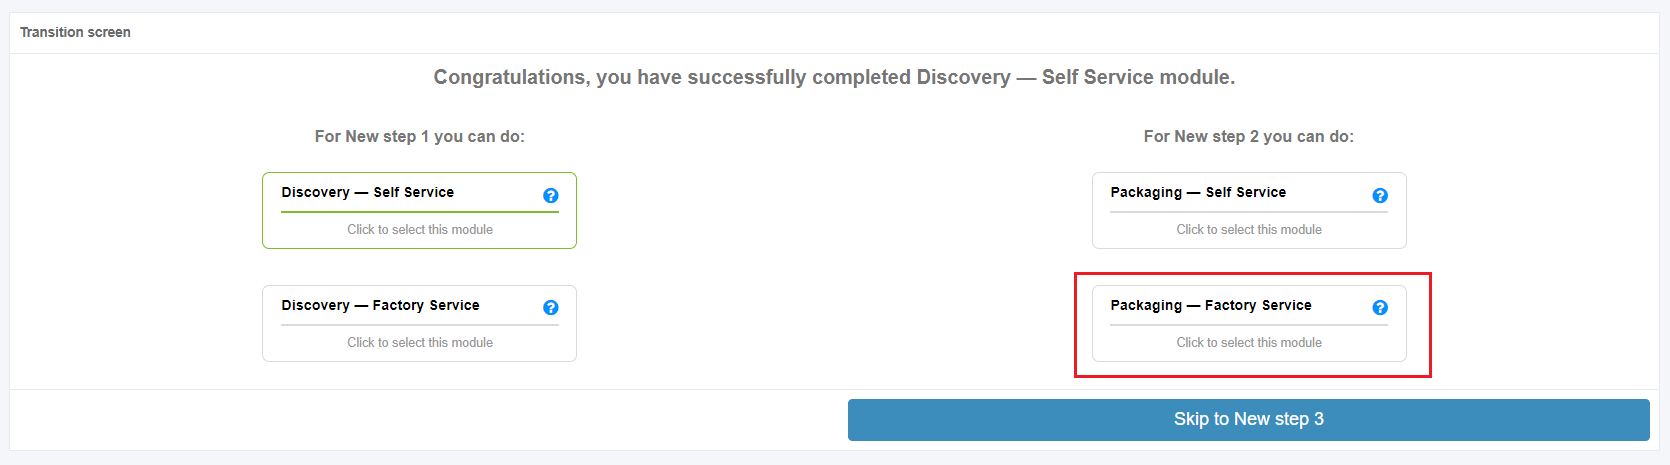
Apptimized shows the following screen when successful:
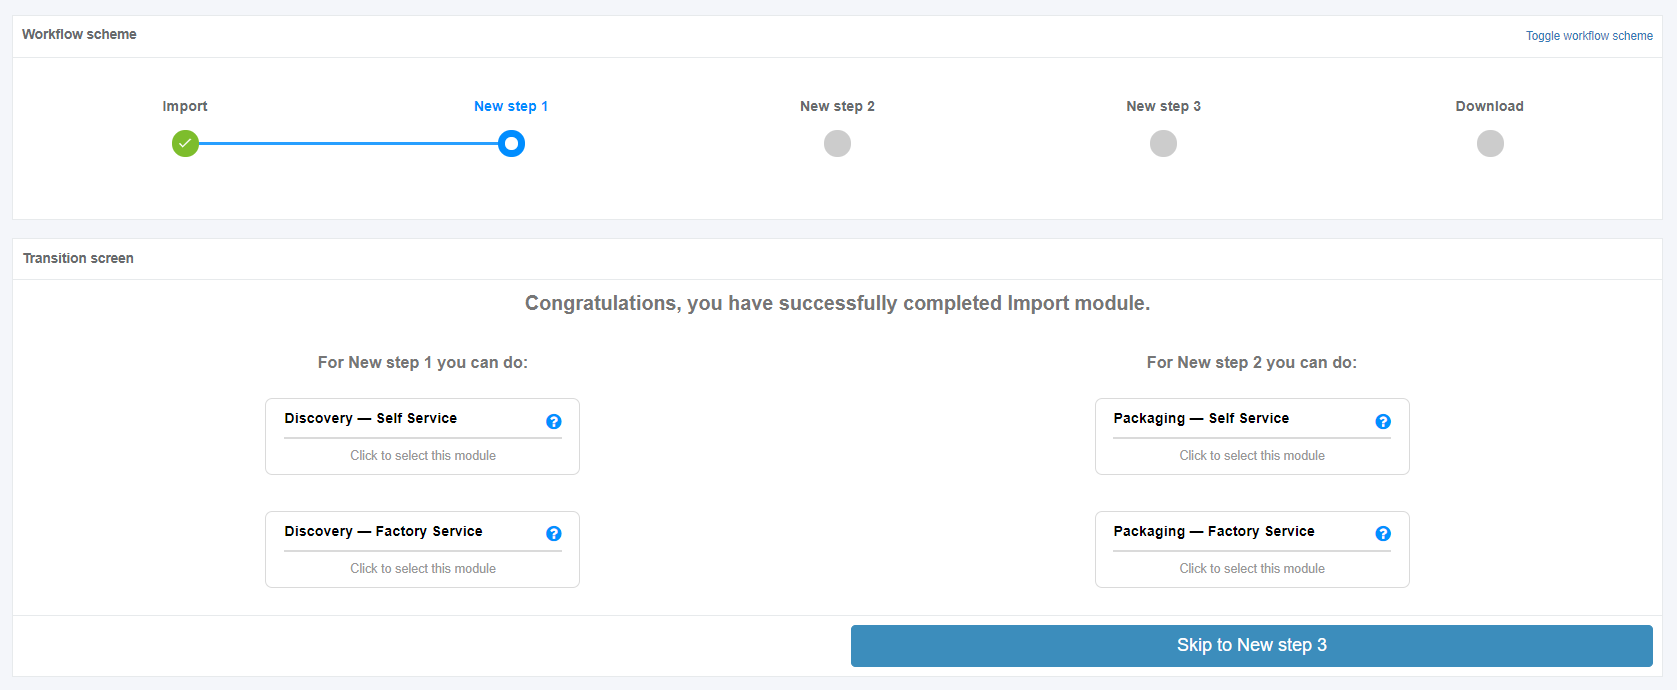
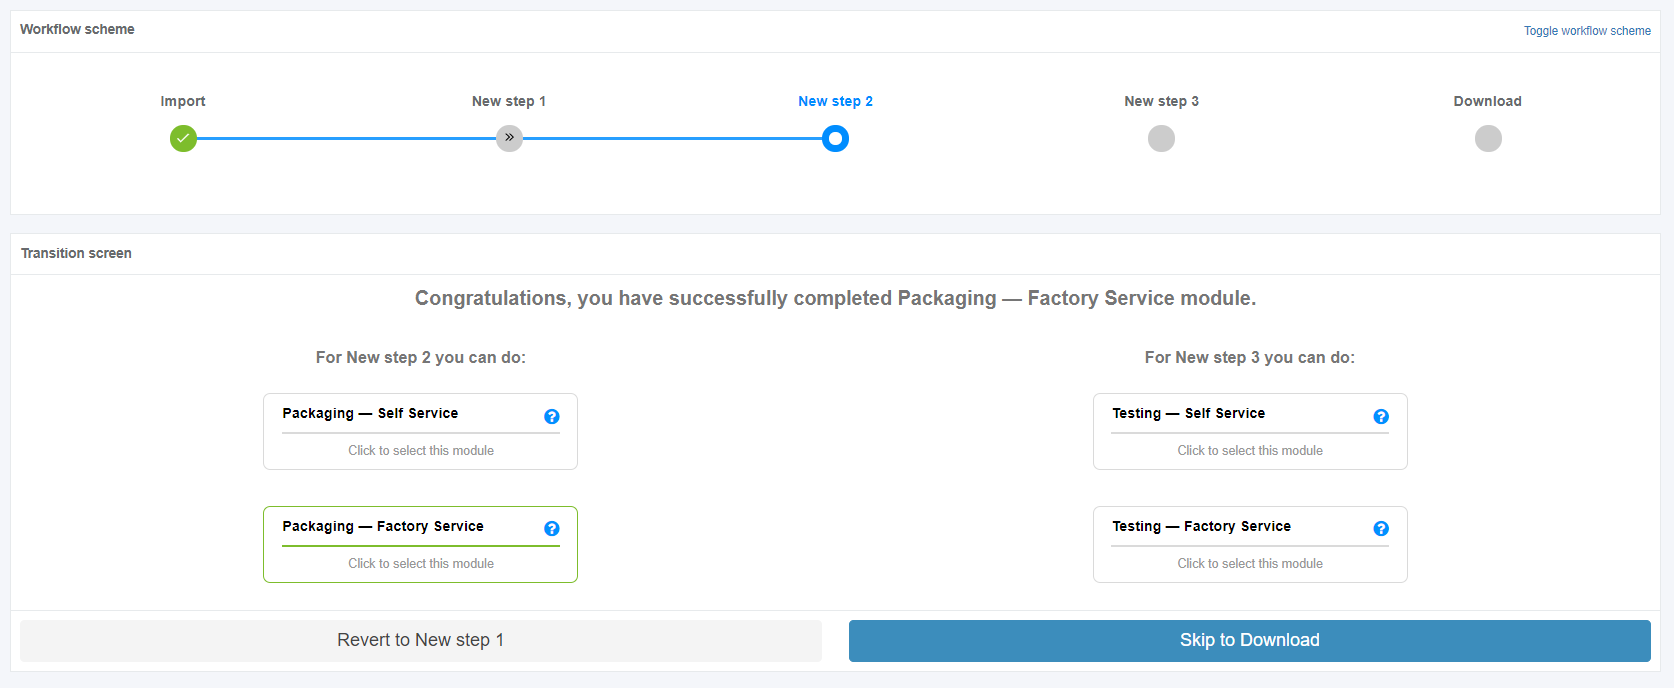
The packaging process starts by clicking the Packaging module on the Transition screen. An imported application into a project is a prerequisite.
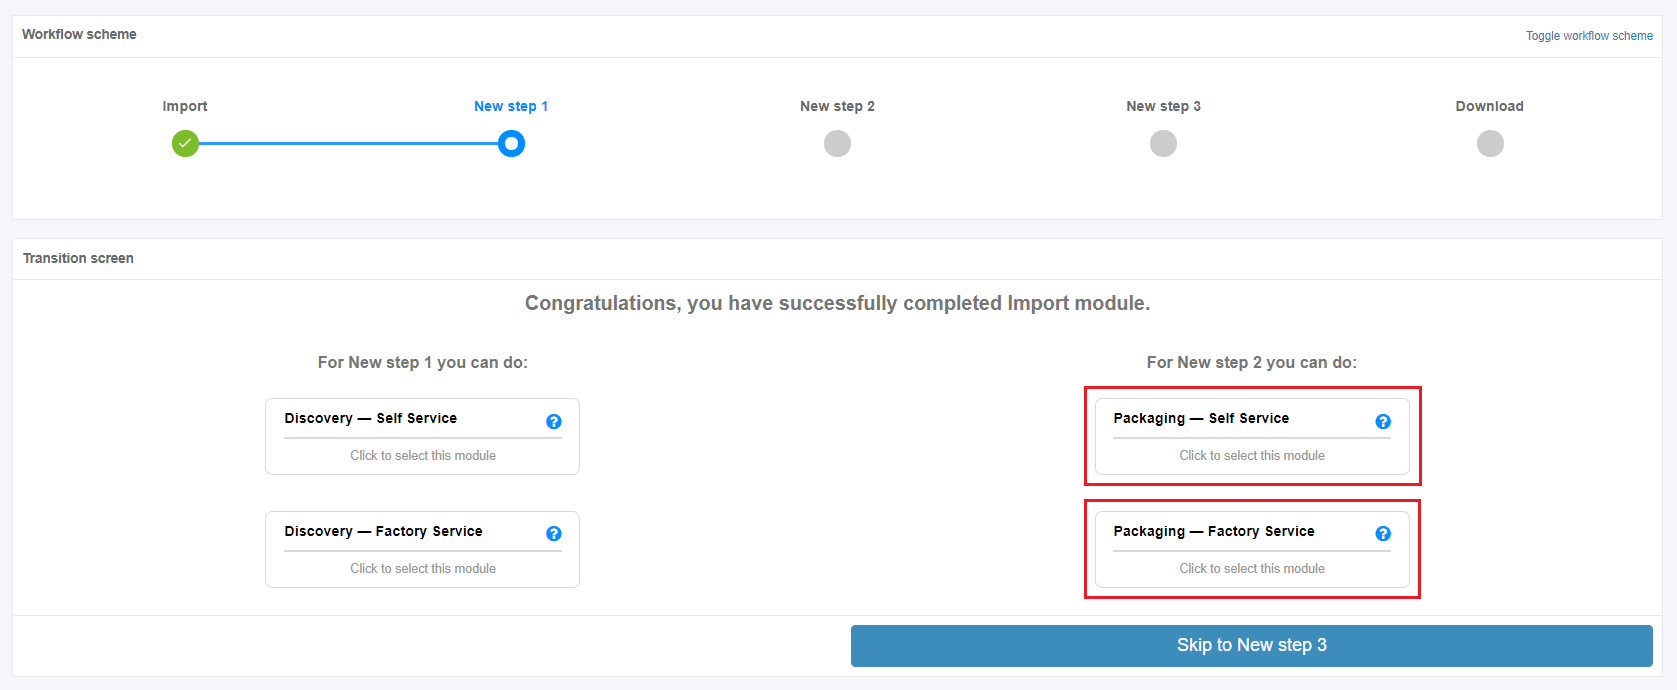
Two packaging scenarios available in Apptimized portal:
- Packaging – Self Service;
- Packaging – Factory Service.
Packaging – Self Service
A user implements a built-in packaging tool on VMs – Apptimized Workspace. A user can easily in a couple of clicks create one or several packages of multiple formats and send them to Apptimized for further testing or deployment.
Packaging – Self Service characteristics:
- A user packages the application using the Apptimized Packaging Tool;
- A user creates and customizes MSI, App-V, MSIX, VSL packages;
- A user customizes an existing package or sequence;
- A user tests and debugs installations.
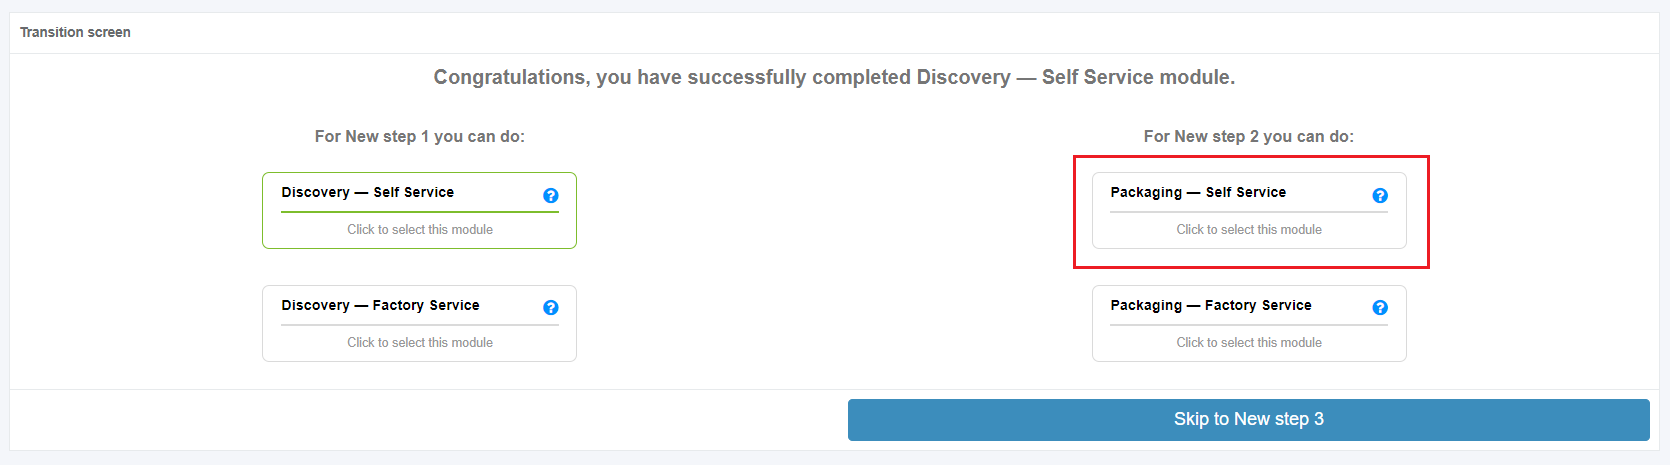
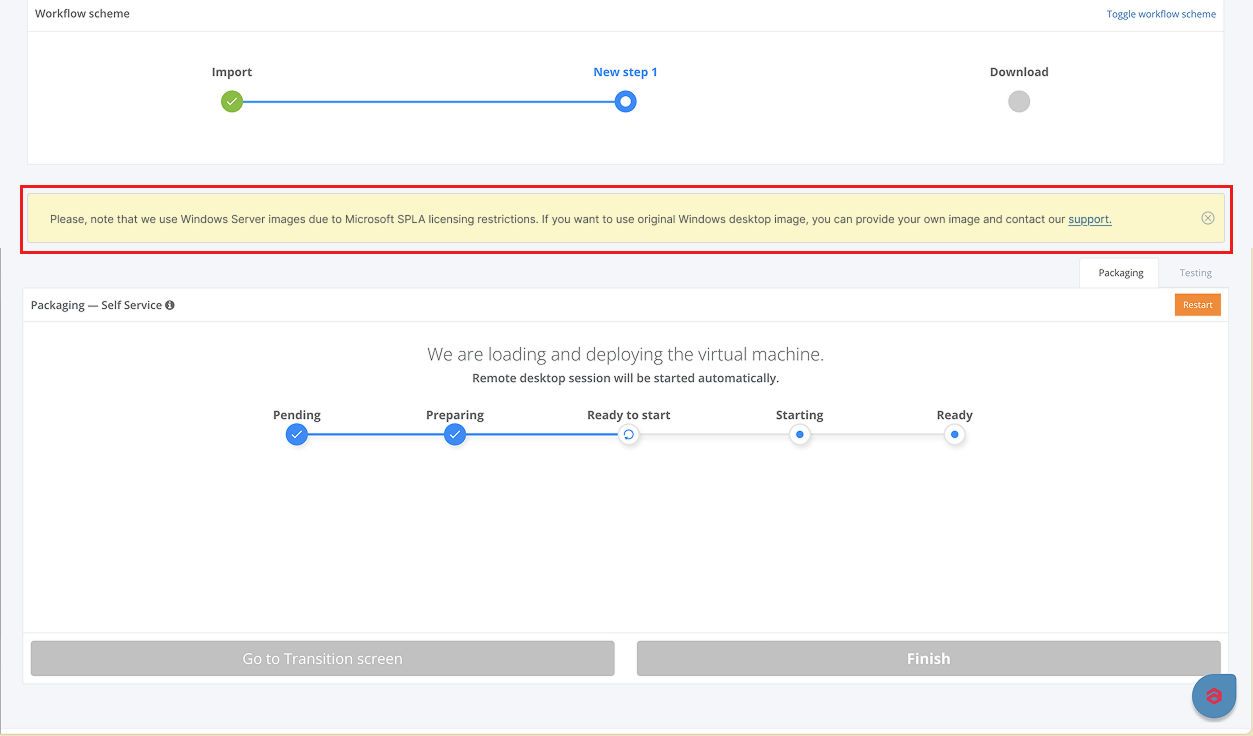
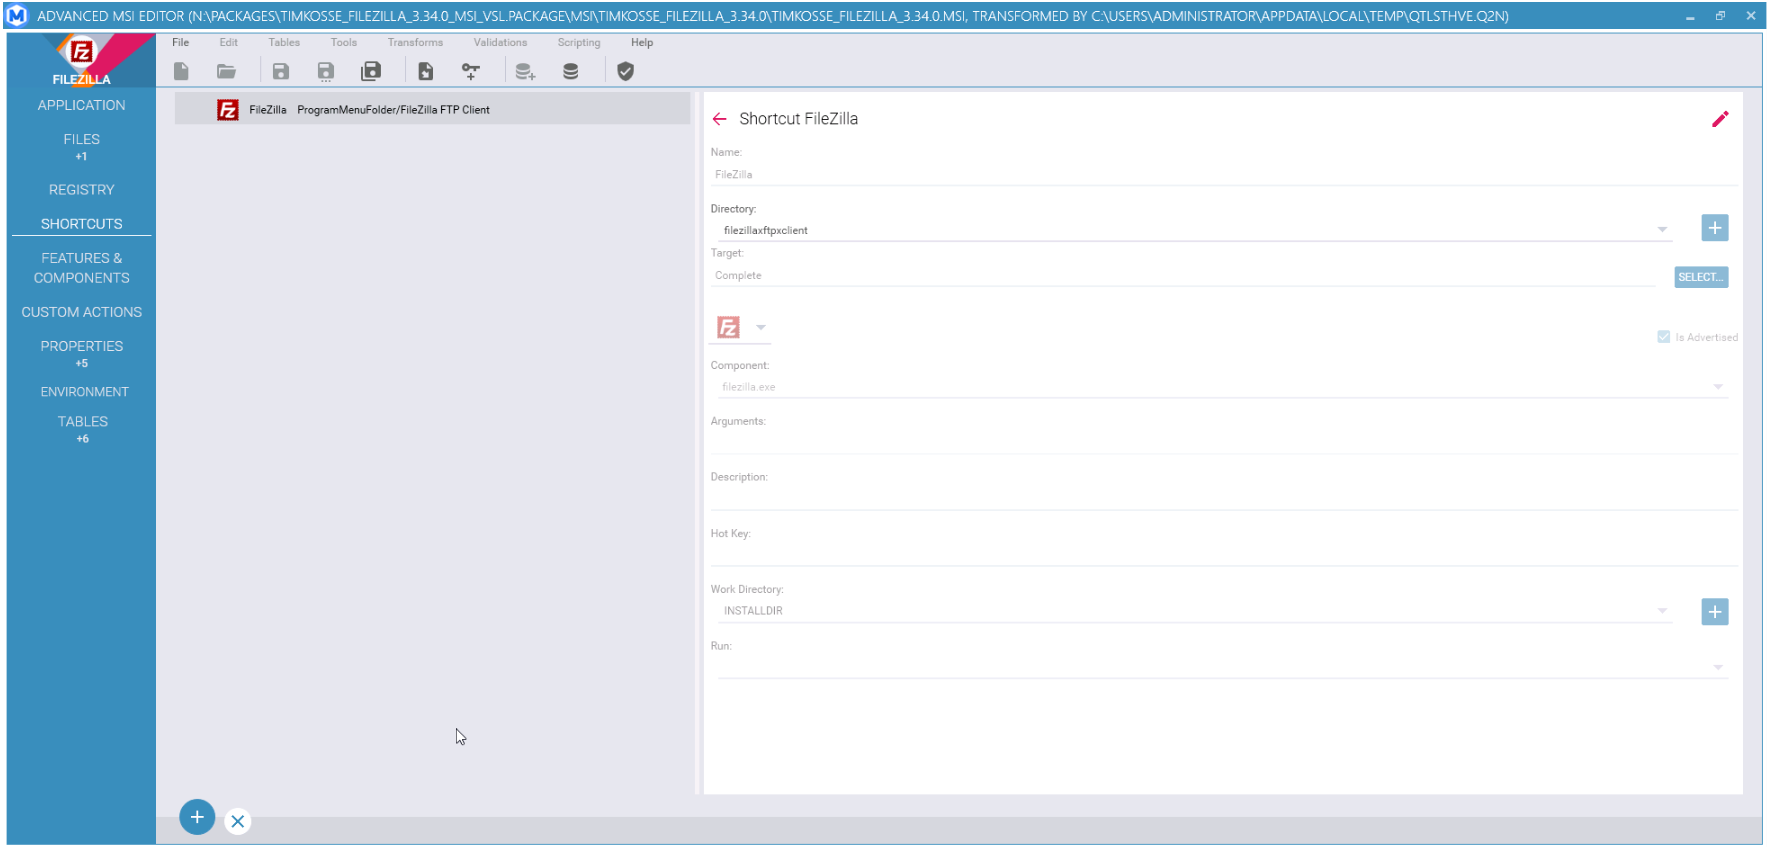
The Packaging - Self Service option is available under the Packaging - Self Service module in the Transition screen.
Apptimized shows the following screen when successful:
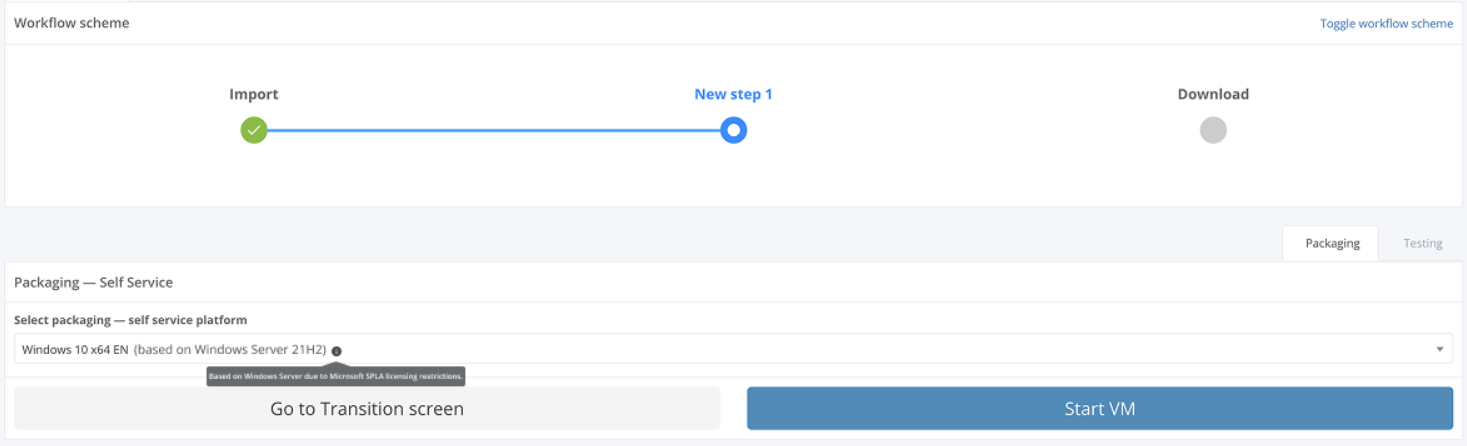
Packaging tab
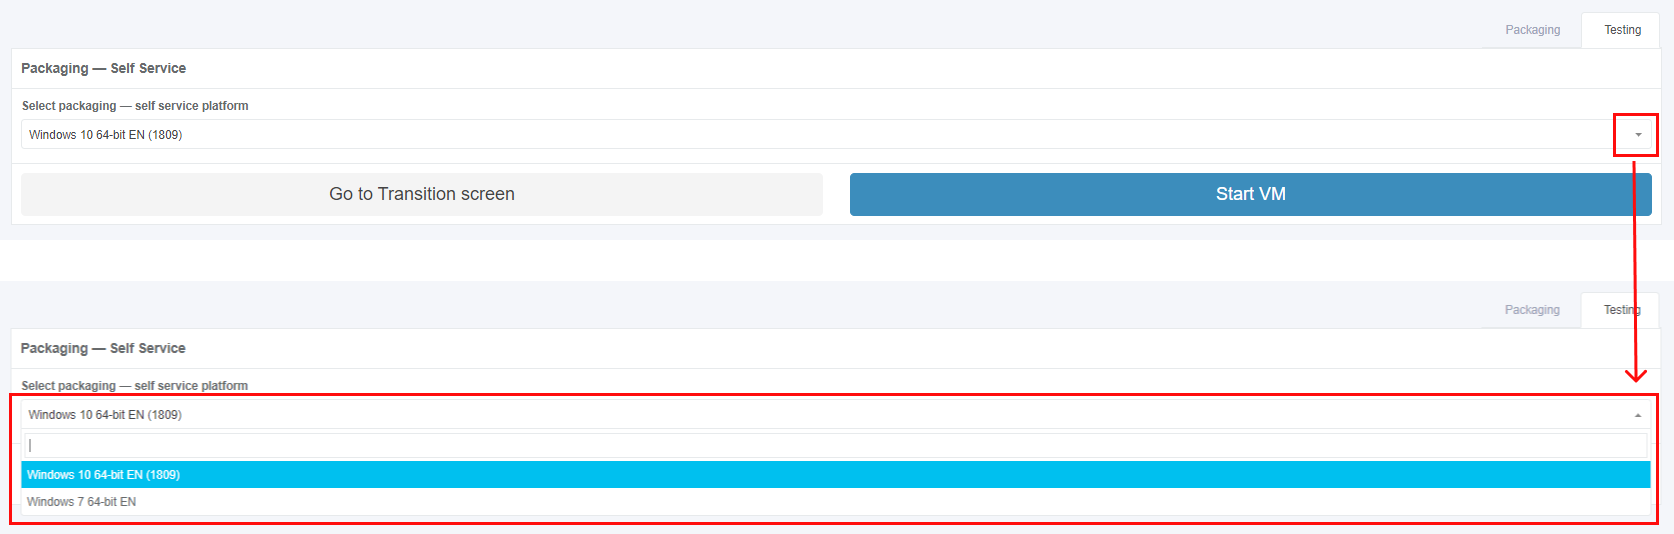
Start VM
The field Select packaging – self service platform is filled automatically and can be changed if needed. To change the packaging – self service platform, click the drop-down menu as it is shown in the screenshot below:

The option to revert to the transition screen is available under the Go to Transition screen button.
The option to use an original Windows desktop image is available via the support link on the Packaging — Self Service screen.
The option to start the packaging – self service process is available under the Start VM button.
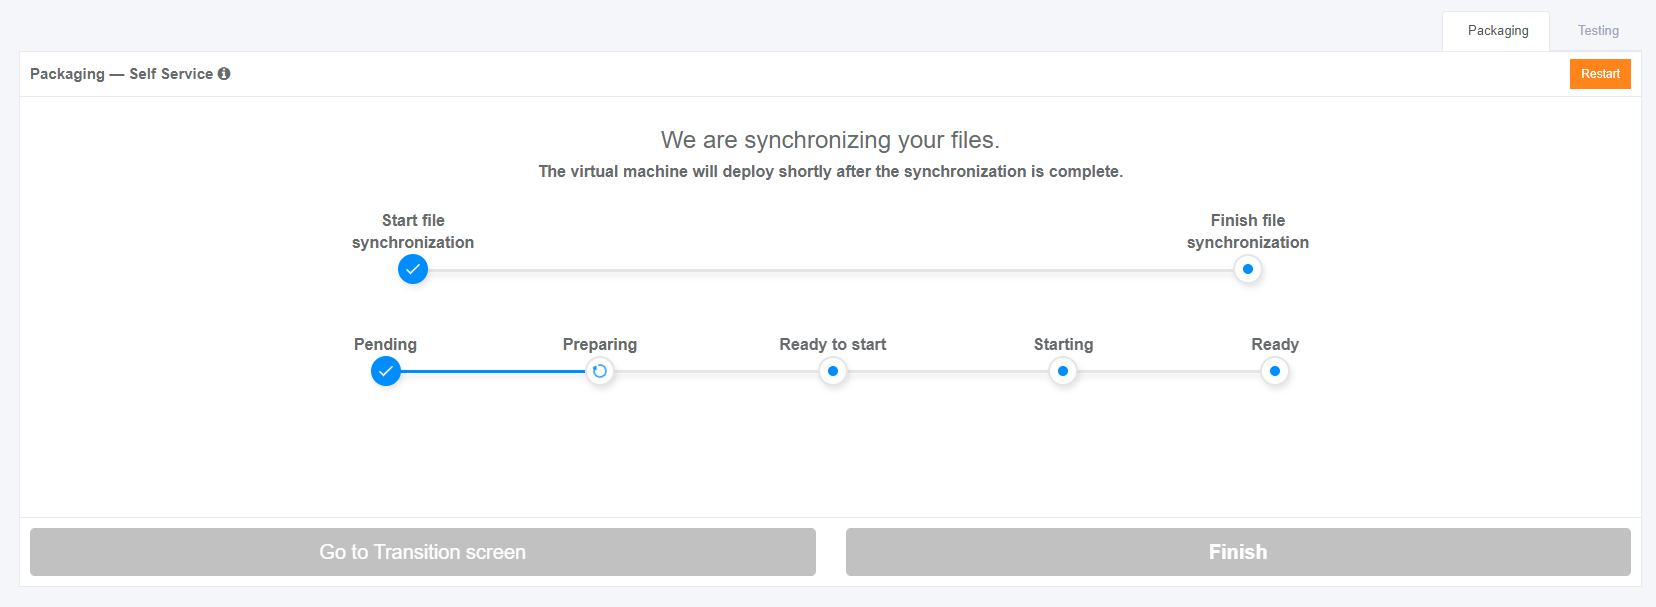
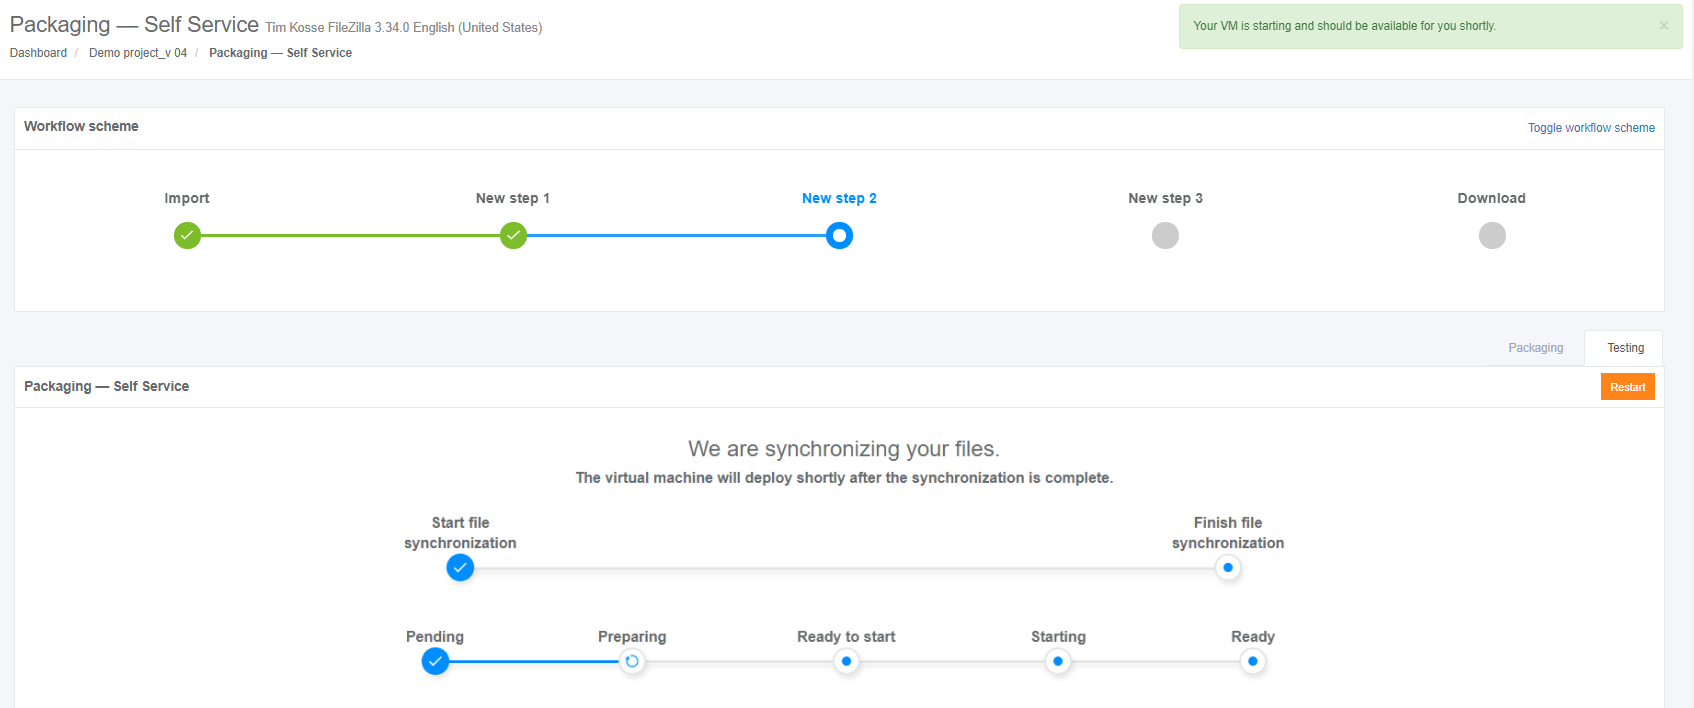
A user can track the VM loading and deploying. Apptimized shows the following screen:
Note. There is often a situation when a user has already run 2 VMs in parallel. To continue planned activities within the current workflow step, a user must terminate an irrelevant VM. In this case, Apptimized shows the warning box with a list of VMs which are currently running by the user:
The information is grouped into the following categories in the modal window:
1. Application
2. VM started time
3. Workflow progress
4. Link
The option to select a VM for termination is available under the Go to VM link. A new tab opens when successful:.png)
When a VM is terminated, a user returns to the screen where he needs to restart a VM (previously a user started a VM but received a modal window with a list of running VMs).
Apptimized shows the following screen when successful:
.png)
Note. If the internal error while starting VM occurred, Apptimized shows the following screen: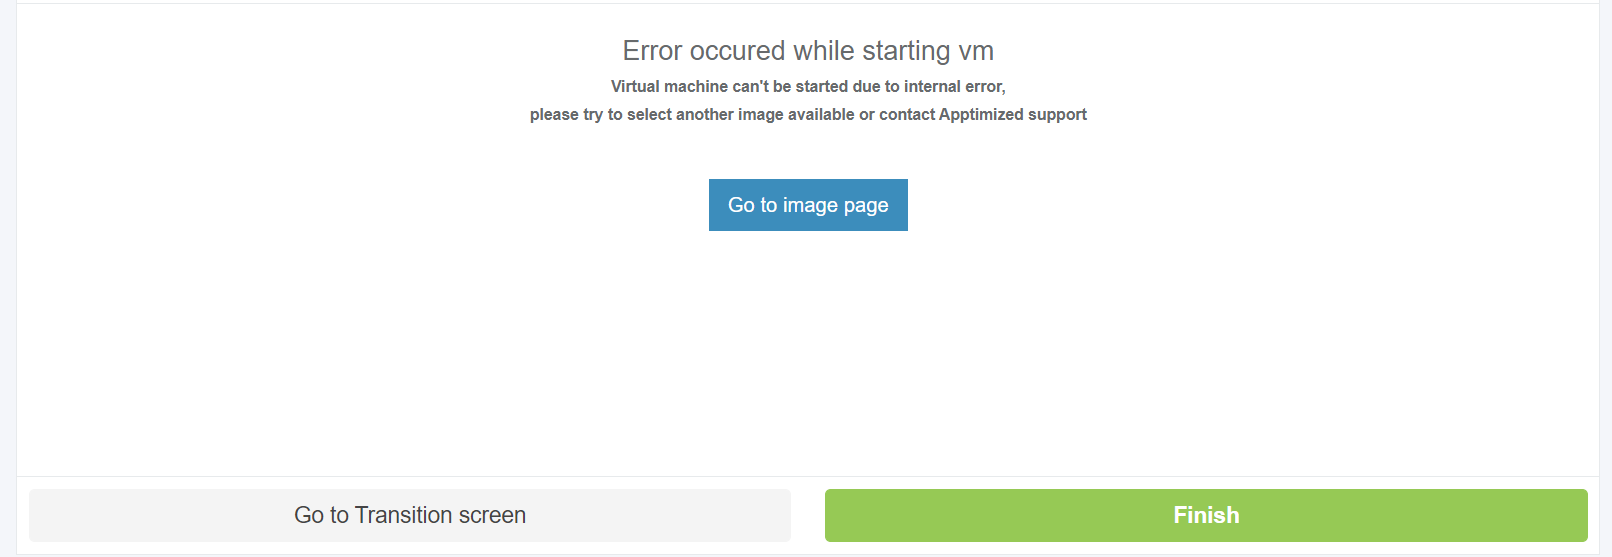
The following actions are recommended for consideration by a user:
1. Contact the Apptimized support
2. Go to image page button > Select discovery – self-service platform field > Start VM button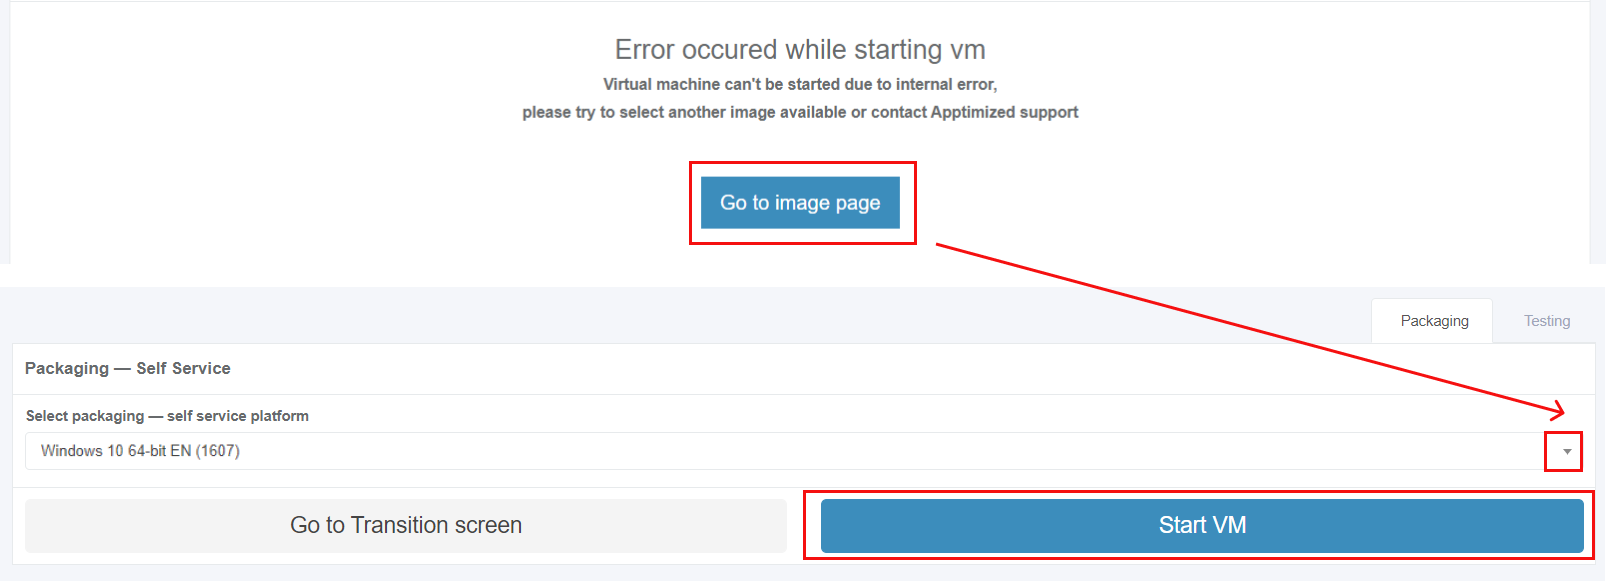
The option to copy files to Temp storage is available under Explorer context menu > Copy To Temp:

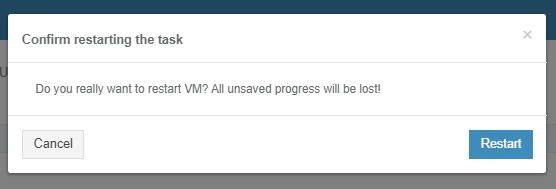
The option to restart VM is available under the Restart button.

Apptimized shows the following modal window to confirm restart the task:
Apptimized shows the following notification when successful:

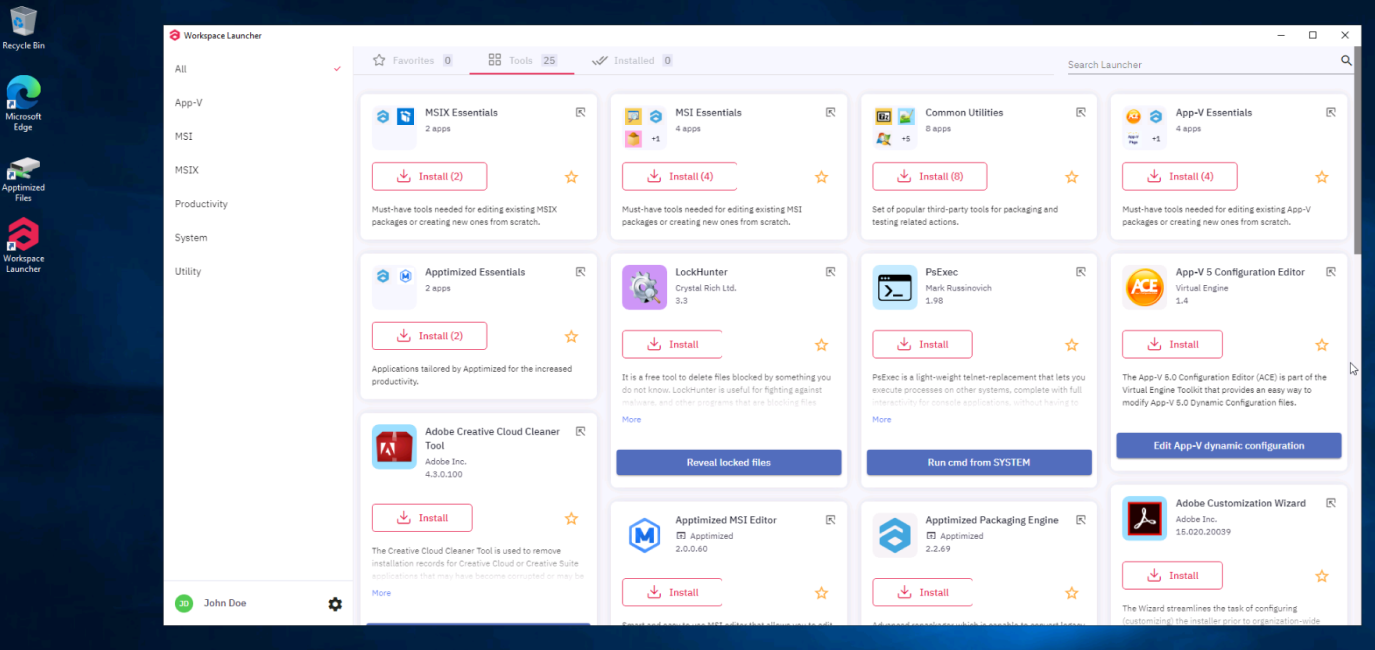
Workspace Launcher
General overview
Apptimized Workspace Launcher is a Windows-based application that provides a user with a packaging toolset within Apptimized cloud environment.
With the Apptimized Workspace Launcher, the cloud environment is prepared according to a user’s preferences so that any additional activities to start packaging are not needed.
With the release of the Workspace Launcher, new shared storage implemented that empowers a user with the enhanced upload and editing capabilities:
- Editing packages is available both via Apptmized Packaging Engine and favorite third-party tools.
- All packages synchronize automatically from the VM to the project once it is located in the Packages folder.
Apptimized Workspace Launcher enables the user with additional tools, as part of their daily packaging experience. With Apptimized Workspace (providing Discovery, Packaging, Testing as Self-Service) by implementing Workspace Launcher, users can add to the functionality already offered to overcome many packaging scenarios. The Apptimized Workspace Launcher comes preinstalled on Apptimized VMs and could be launched by a shortcut on the VM’s desktop.
Note. When the VM starts, the application imported within the project and the VM’s shortcut are available. The packaging toolset is no installed. Once the user selects tools to implement for the desired deliverable, the application starts automatically.
The Apptimized Workspace Launcher applications have no impact on an operating system. The operating system always stays clean, so no repackaging conflicts occur, or system noise does not affect the user’s packaging session.
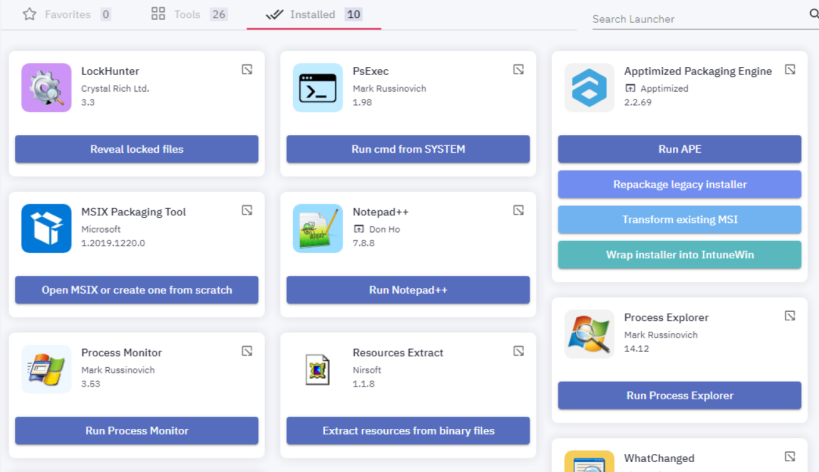
By default, Apptimized Workspace Launcher comes with the following user interface (UI).

The Apptimized Workspace Launcher UI consists of the following elements:

|
UI element |
Description |
| 1. Categories filter |
This component allows a user to navigate between different categories of applications (bundles) and filter the content pane. The following categories available:
|
|
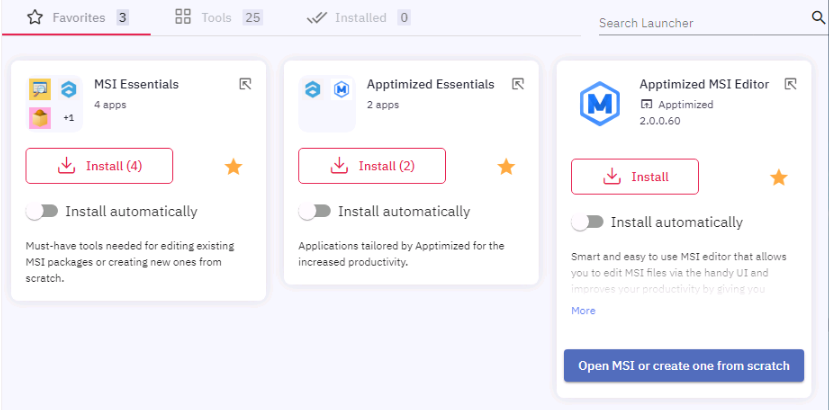
2. Top panel 2.1. Favorites tab |
This component contains a list of applications (bundles) a user marked as a favorite.
|
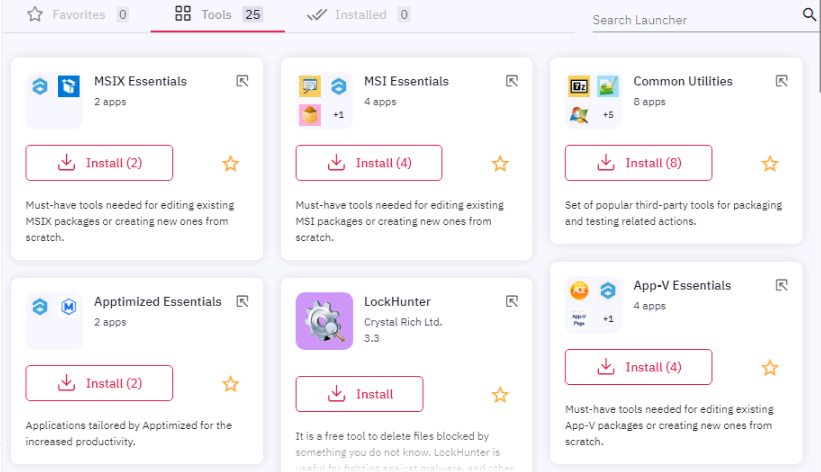
| 2.2. Tools tab |
This component includes a full list of applications in a current category.
|
| 2.3. Installed tab |
This component contains a list of applications a user installed.
|
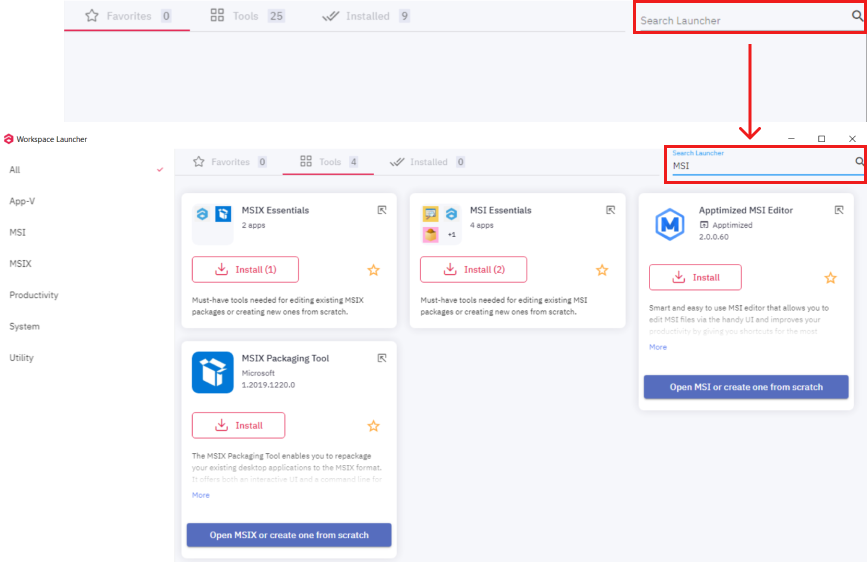
| 2.4. Search Launcher field |
This component enables a user to apply search activities within the current applications pane. Keyword search mode available under the Search Launcher field > Enter a search request. The search result appears when successful:
|
| 3. Applications pane |
This component contains a list of applications (bundles) within the current pane. The list of displayed applications on the Applications pane varies according to the implemented Categories filter and the selected tab. The Applications pane contains items of 2 different types:
|
|
4. Current user information 4.1. Launcher settings |
This component provides information about the logged-in user. Apptimized Platform automatically identifies a user who started the VM within the specific project and step, which considers the user’s preferences. The icon |
Launcher settings
Workspace Launcher settings allow a user to create customizable bundles with applications available in Workspace Launcher.
Workspace Launcher settings provide a user with two options:
- Options
- Manage bundles
- Exit application
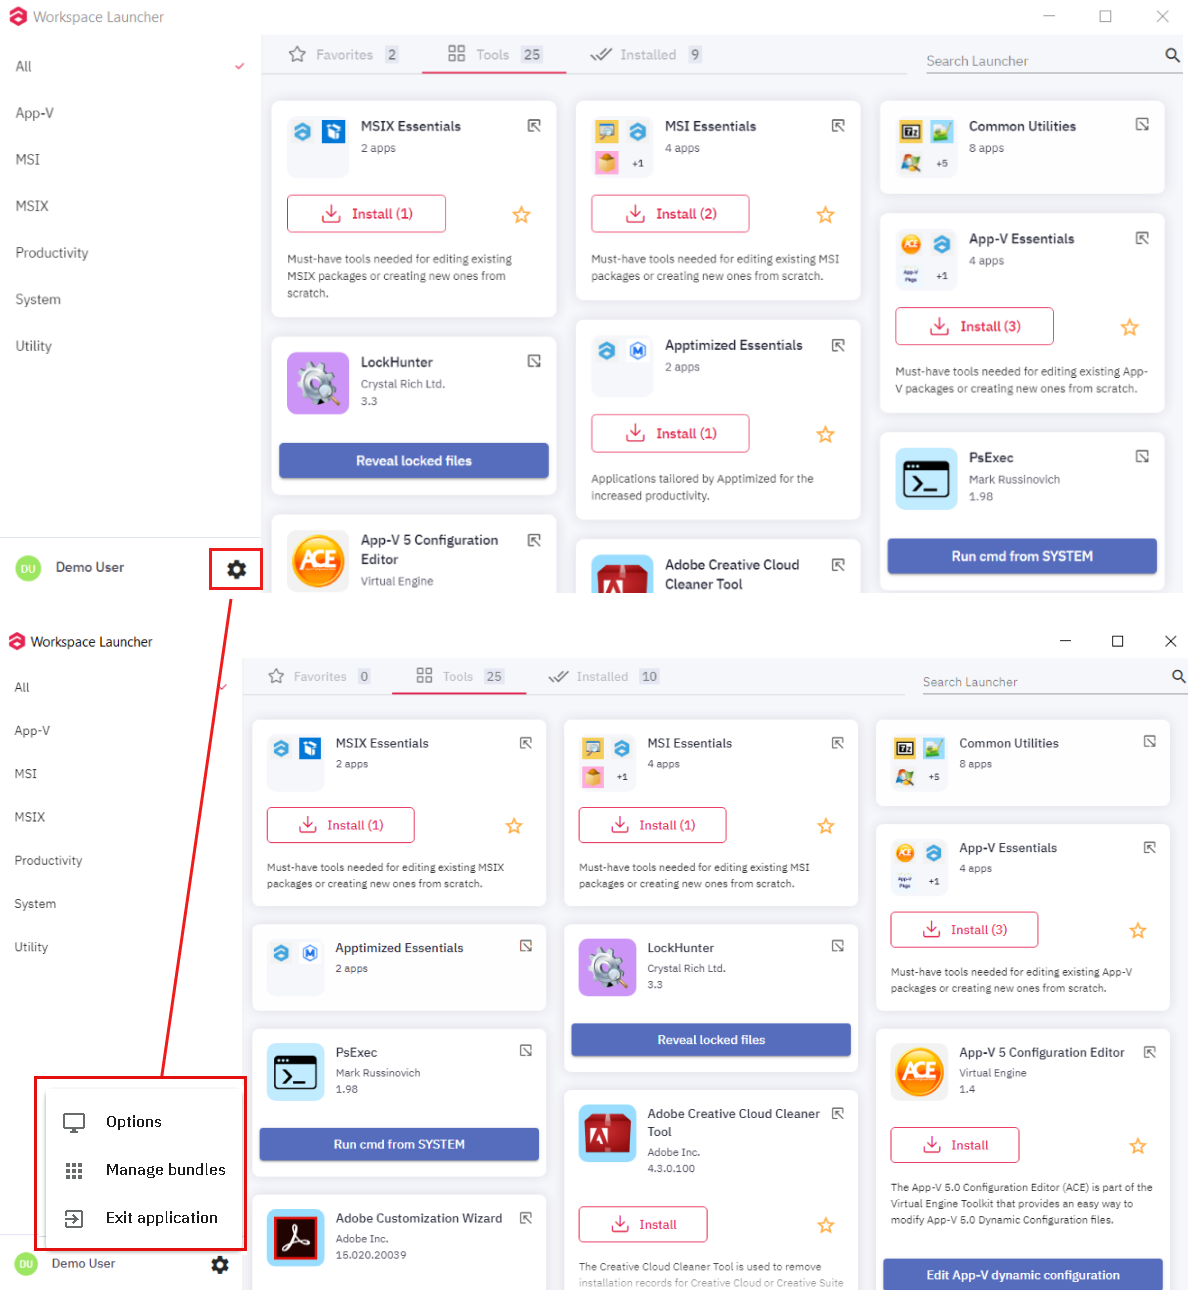
The option to close Apptimized Workspace Launcher application on the VM is available under the Exit application button.
The option to enable shortcuts for Laucnher applications is available under the Options bundle.
Apptimized shows the following screen when successful:
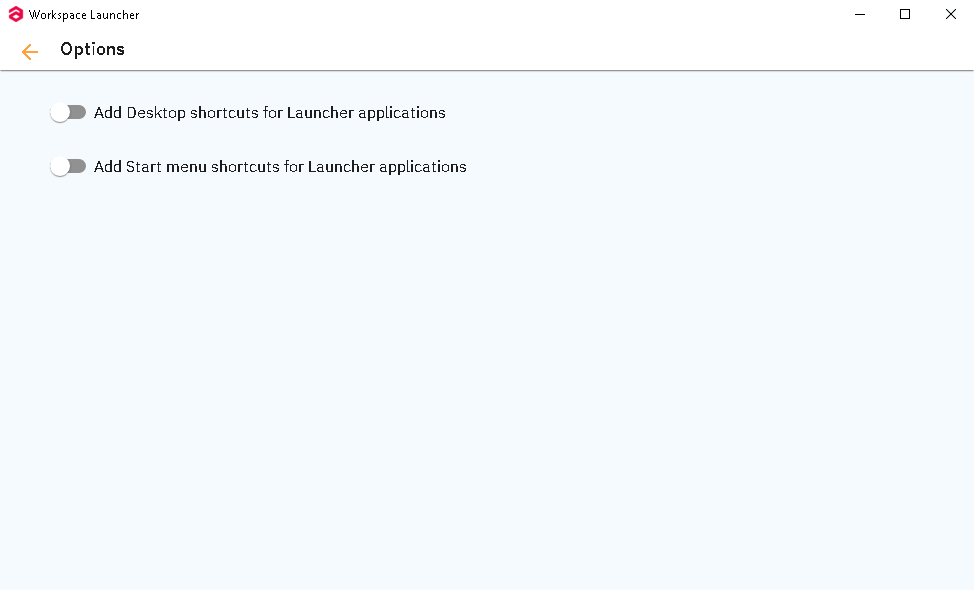
The options to Add Desktop shortcuts and Start menu shortcuts become available when switched on:
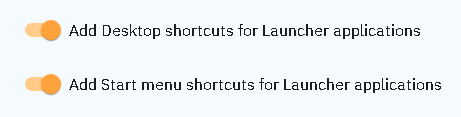
If applications are installed, then shortcuts are available on the desktop or/and the start menu, according to switched on option.
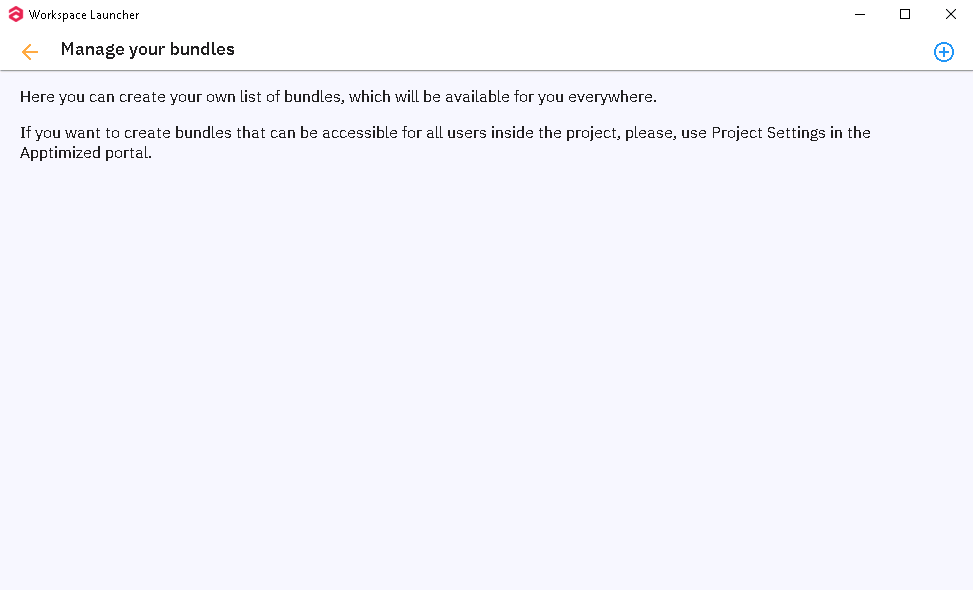
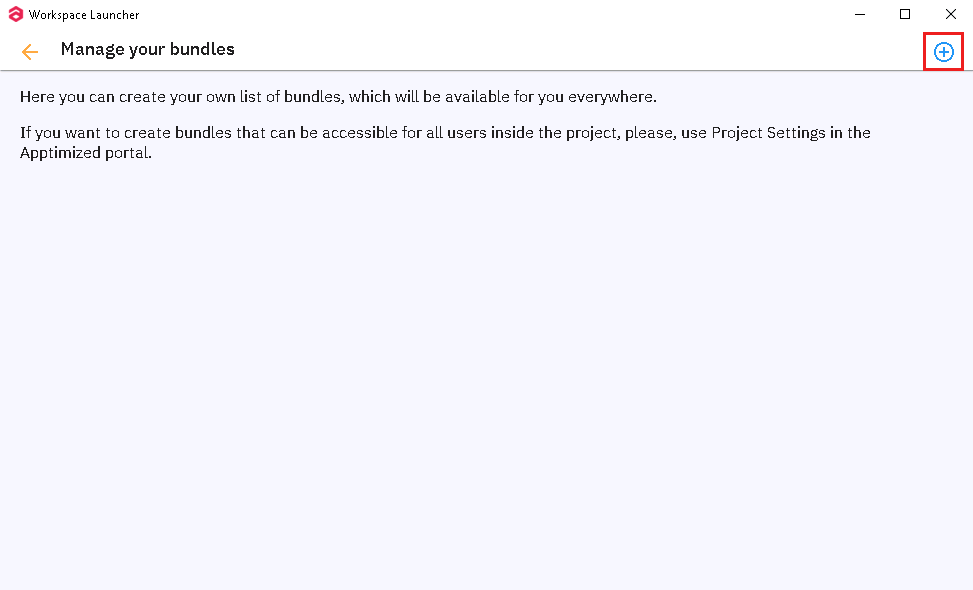
The option to create and manage bundles is available under the Manage bundles button.
Apptimized shows the following screen when successful:
The option to create a new bundle is available under plus symbol.
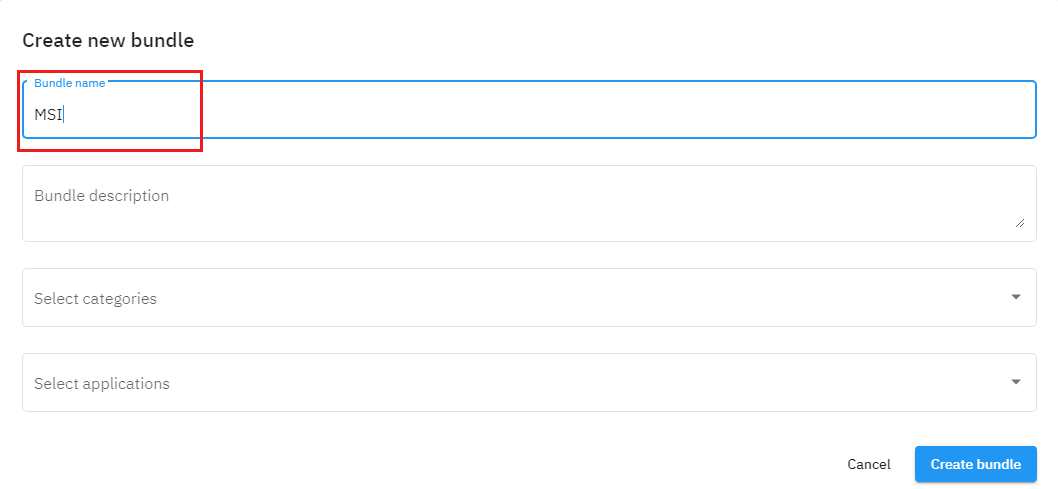
Apptimized shows the following modal window:
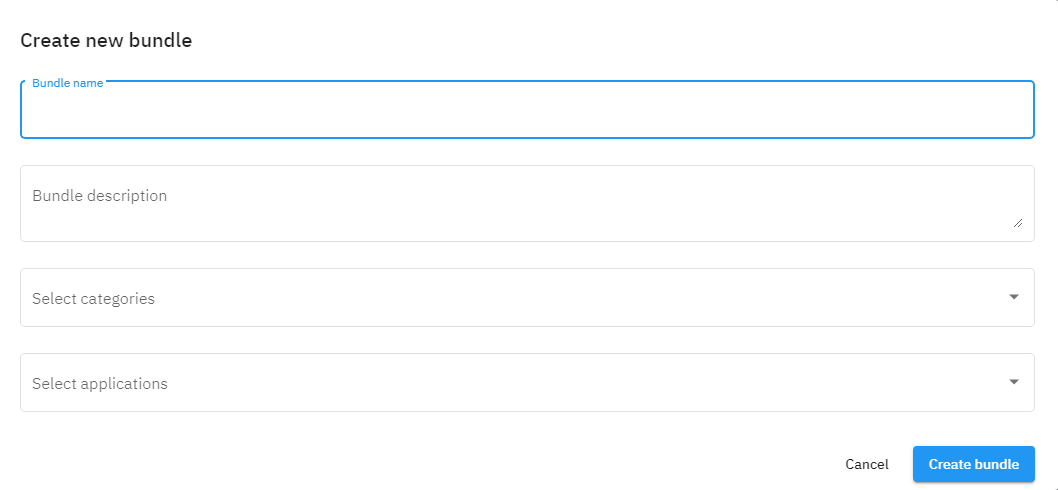
| Setting | Details |
| Bundle name |
The bundle name field allows defining the bundle name (e.g., MSI). There is no default value for this field.
|
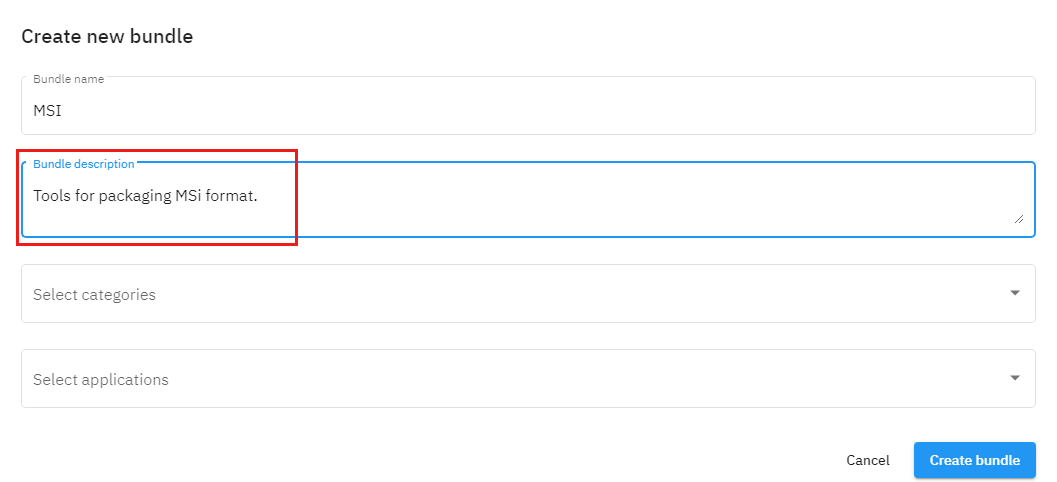
| Bundle description |
The bundle description field allows defining the bundle description (e.g., Tools for packaging MSI format). There is no default value for this field.
|
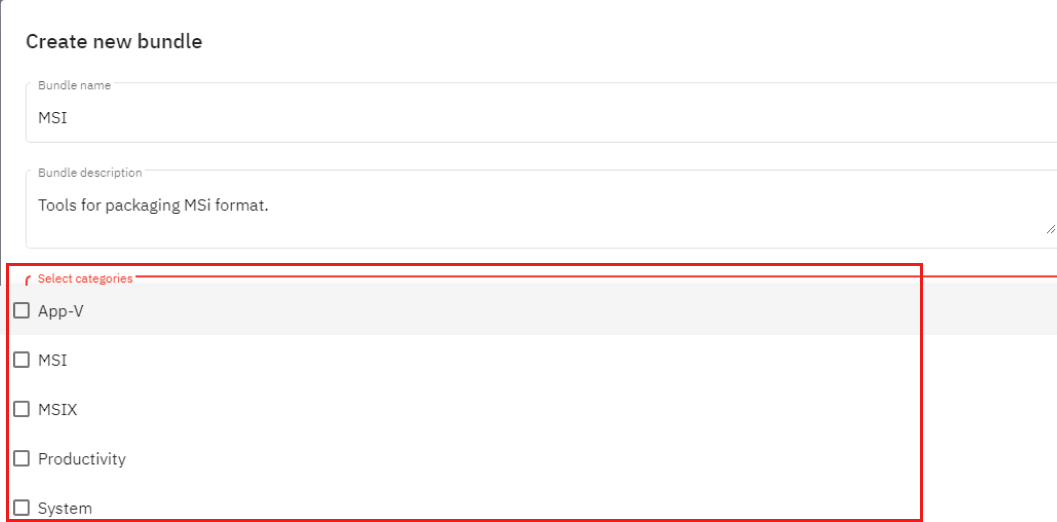
| Select categories |
The select categories field allows defining the categories for a new bundle. The following options available:
There is no default value for this field.
The option to choose a few categories is available. |
| Select applications |
The select applications field allows defining the applications included in a new bundle. The following options available:
There is no default value for this field.
The option to choose a few applications is available. |

To apply the settings, click the Create bundle button. Cancel - reverts to the Manage bundle section.
Apptimized shows the following notification when successful:

The screenshot below shows a result for the creation of a new bundle:
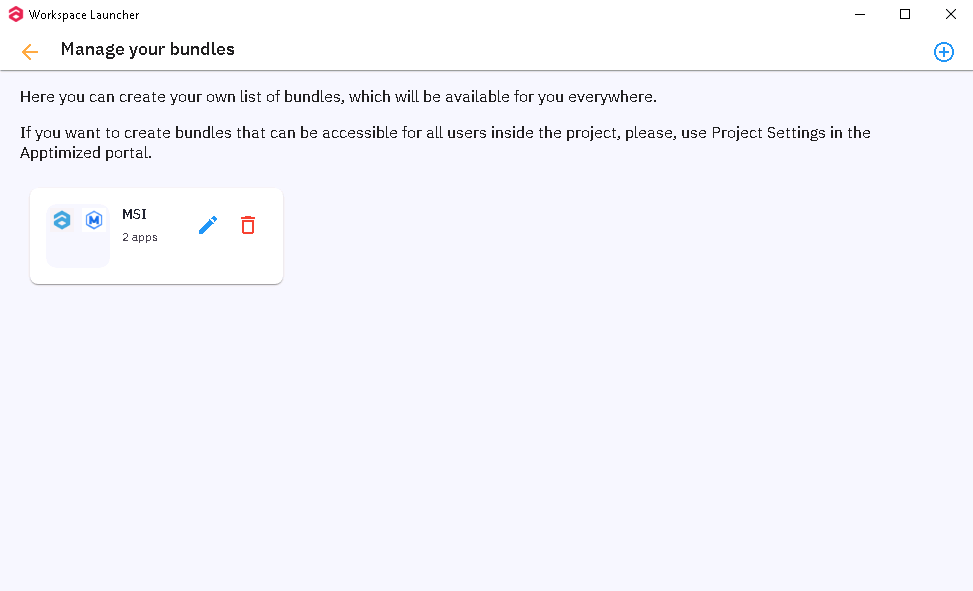
The icon ![]() allows a user to edit a bundle, the icon
allows a user to edit a bundle, the icon ![]() - delete a bundle.
- delete a bundle.
Application
Application is the smaller actionable item of the Apptimized Workspace Launcher.
The application is represented in the form of a card:
Each application card consists of the following elements:
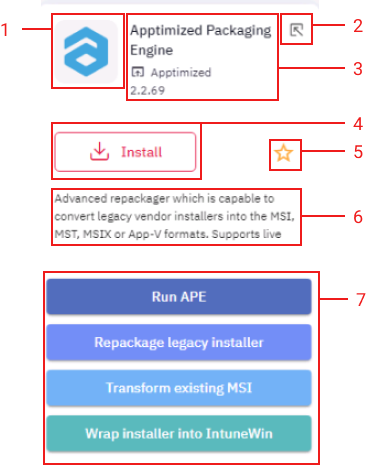
| Element | Description |
| 1. Icon | This block contains a visual logo of an application. |
| 2. Icon to minimize / maximize application card |
An icon that allows a user to expand or collapse the application card.
|
| 3. Application metadata |
This block contains the meta information of an application. Application metadata is provided by the template (from top to bottom):
Note. The icon |
| 4. Installation button | This button enables a user to install an application. |
| 5. Icon to favorite / unfavorite an application |
An icon that allows a user to toggle the favorite status for an application.
The Install automatically switch becomes available when successful:
|
| 6. Application description | This block provides a brief description of the purpose of an application |
| 7. Shortcut buttons |
This block provides the set of shortcuts to most usable actions with an application. A process (action) gets started by the click on the shortcut button.
Note. If a user has not yet installed the application, the Apptimized Workspace Launcher will proceed following steps after clicking on the Shortcut button: |


Bundle
The bundle is the set of applications that have been grouped by certain usage logic (e.g., a toolset for MSI packaging/ editing).
The screenshot below shows the examples of the Apptimized Workspace Launcher build-in bundles:

The bundle is represented in the form of a card:

Each bundle card consists of the following elements:
| Element | Description |
| 1. Icon | This block contains a set of visual logos of applications the bundle consists of. |
| 2. Icon to minimize / maximize bundle card |
An icon that allows a user to expand or collapse the bundle card.
|
| 3. Bundle name |
This block contains the name of the bundle and the number of applications the bundle consists of. Application metadata is provided by the template (from top to bottom):
|
| 4. Installation button | This button enables a user to install a bundle. |
| 5. Icon to favorite / unfavorite a bundle |
An icon that allows a user to toggle the favorite status for an application.
The Install automatically switch becomes available when successful:
|
| 6. Bundle description | This block provides a brief description of the purpose of a bundle |
Key functionality
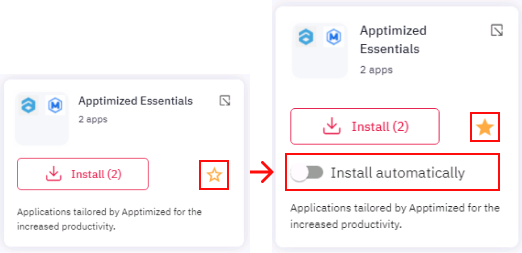
Mark as a favorite
The option to mark an application or a bundle as a favorite is available under the Star symbol.
The application (bundle) becomes available in the Favorites tab when successful:

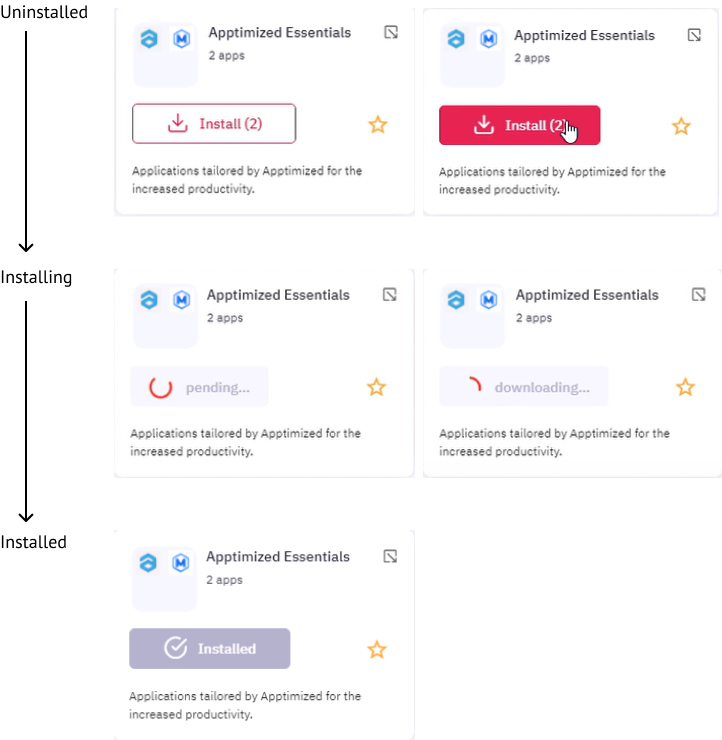
Application installation
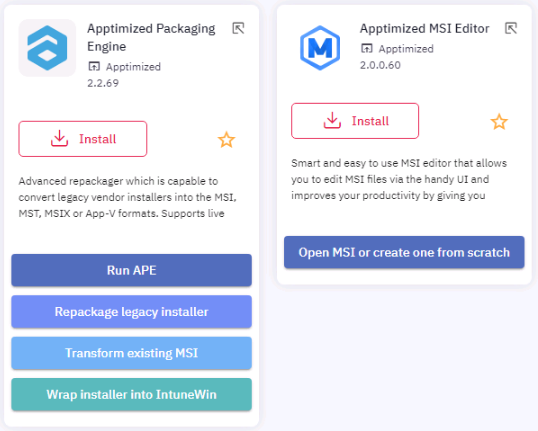
The option to install an application is available under the Install button:
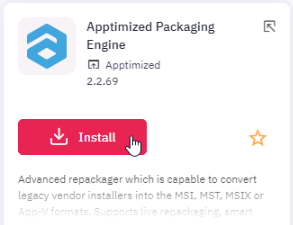
Note. All applications are in the uninstalled state by default.
Every application goes through 3 states:

Bundle installation
The option to install a bundle is available under the Install button:
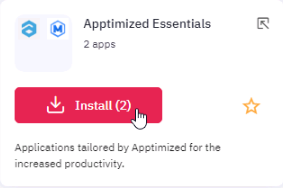
In this case, the Apptimized Workspace Launcher installs all applications that are part of the bundle collection. The progress bar shows the aggregated process of the collection installation.
Note. All bundles are in the uninstalled state by default.
Every bundle goes through 3 states:
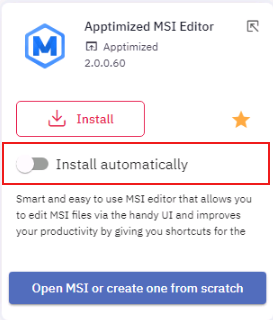
Install automatically
The Install automatically switch becomes available after an application or a bundle was marked as a favorite:
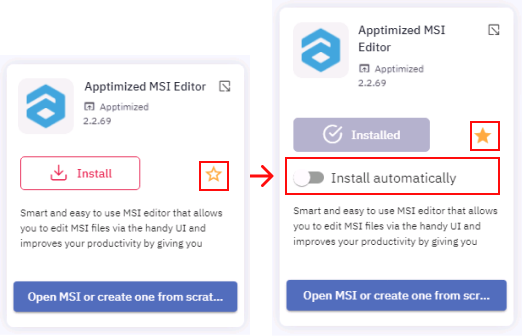

The option to install an application or a bundle automatically becomes active when switched on. The option is inactive by default.
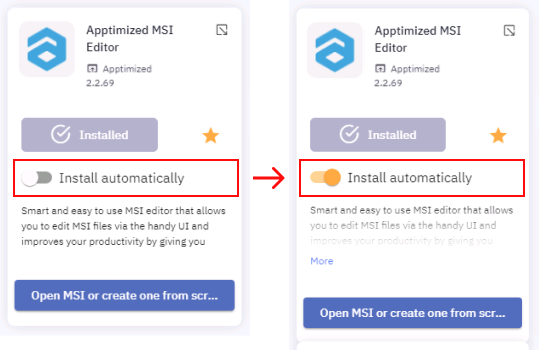
Note. If a user has not yet installed the application, the Apptimized Workspace Launcher will install an application after enabling the Install automatically switch.
In the case of a bundle, all contained applications (regardless of the status of an application: favorite / unfavorite) will be installed automatically when the Install automatically switch is enabled.
Run application
The following scenarios to run an application available:
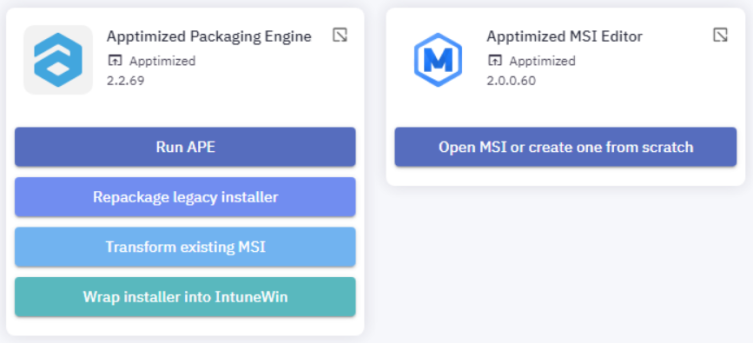
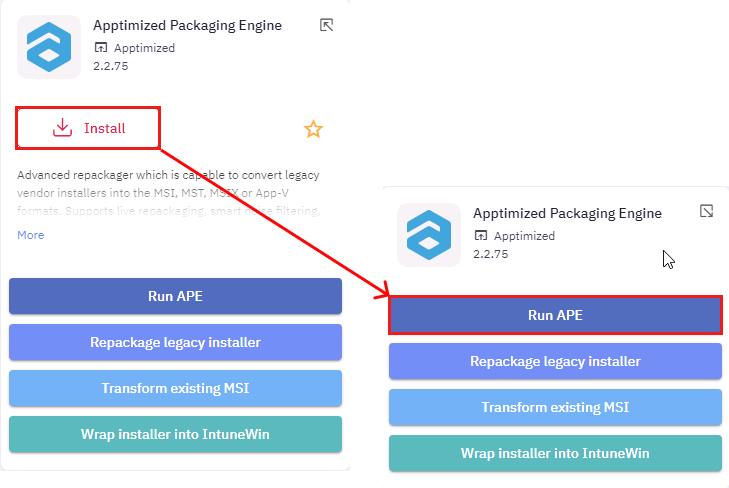
- Select an application > Click on the Shortcut button (e.g., Run APE)
- Select a bundle > Select an application > Click on the Shortcut button (e.g., Transform existing MSI)

Note. If a user has not yet installed the application, the Apptimized Workspace Launcher will proceed following actions after clicking on the Shortcut button:
1. Application installation.
2. Application launch with the required functionality.
Upload results from VM to Apptimized Portal
To upload created via Workspace Launcher deliverables to Apptimized Portal a user needs to place them into the Packages folder before VM is finished (VM desktop > Apptimized files icon > Packages folder).
Note. By default, the Packages folder comes with the Log folder which contains system information. It is prohibited to a user to add any files to this folder. The Log folder will not be uploaded to the Apptimized Portal after VM is finished.
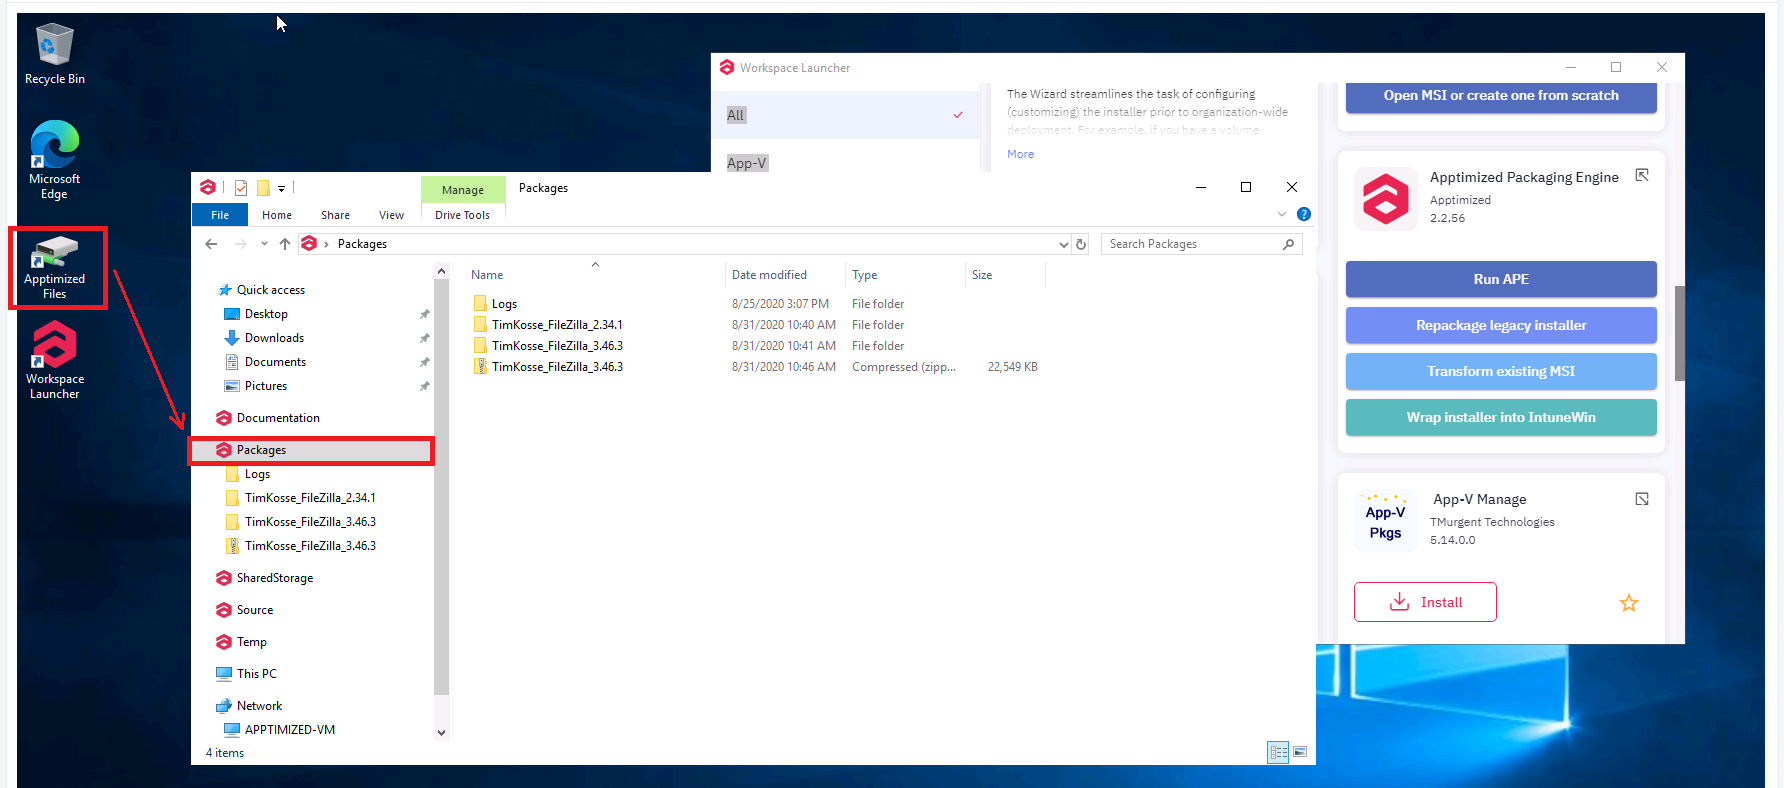
During the synchronization process, every file is treated as a unique package. In case a user created a complex deliverable (i.e., a folder contains 2 or more files) this folder must be compressed into a ZIP archive.
The naming of files, folders, and archives should be consistent with the name patterns indicated in the Project settings.
Apptimized shows the following screen when successful:
Apptimized Packaging Engine
The Apptimized Packaging Engine (APE) launches when clicking Install the Apptimized Packaging Engine > Run APE.
The process may take few moments.

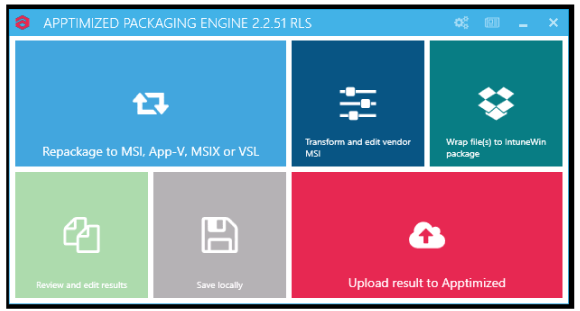
Apptimized shows the Apptimized Packaging Engine (APE) main screen when successful:
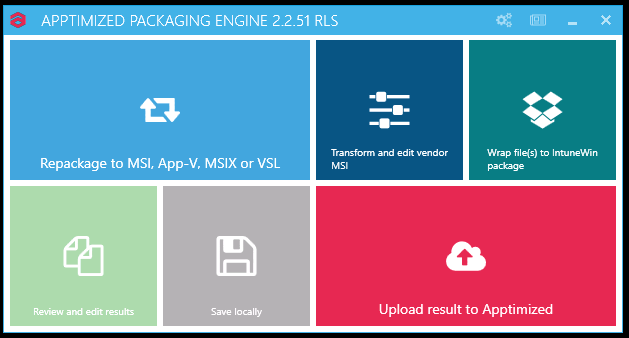
Table 1. Apptimized Packaging Engine options
|
Option |
Details |
|
Repackage to MSI, App-V, MSIX, IntuneWin or VSL |
This option is snapshot-based and enables to create a completely new installer. This option is applicable when a user has a non-MSI vendor installer. A user converts it to MSI or App-V or virtualizes MSI installer into App-V. |
|
Transform and edit vendor MSI |
This option enables the transformation or customizing the existing Windows Installer. This option is applicable when a user has an MSI-based vendor installer and needs to produce an MST for it containing changes made during the installation process and/or configuration post-installation settings. |
|
Review and edit result |
This option enables to review the packages. The option becomes available only after a user completed the repackaging or transformation procedure. |
|
Save locally |
This option enables saving the output locally to verify before uploading back to Apptimized. |
|
Upload result to Apptimized |
This option enables uploading verified output back to Apptimized. A user can upload the output generated by Apptimized or select an archive with modified files to be used as an output. |
APE general settings
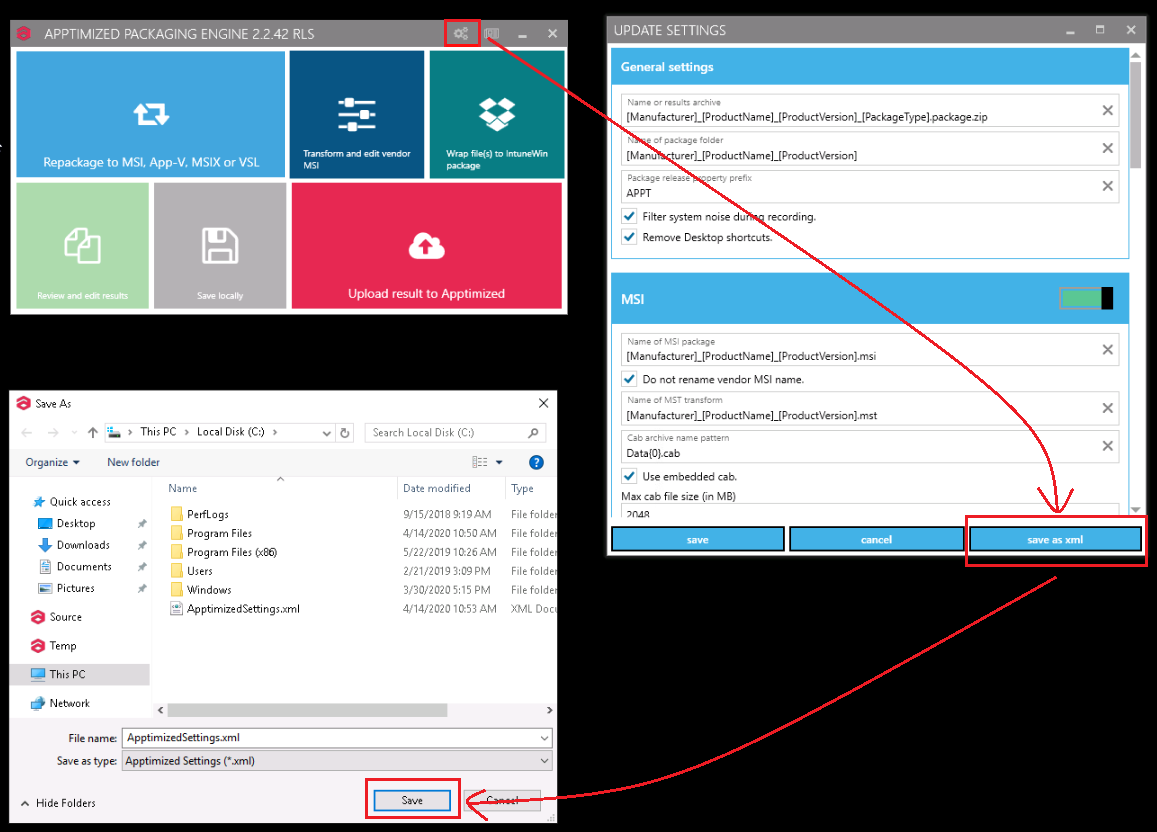
The option to review the package formats settings is available under the gear-wheel symbol. When successful APE shows the following screen:
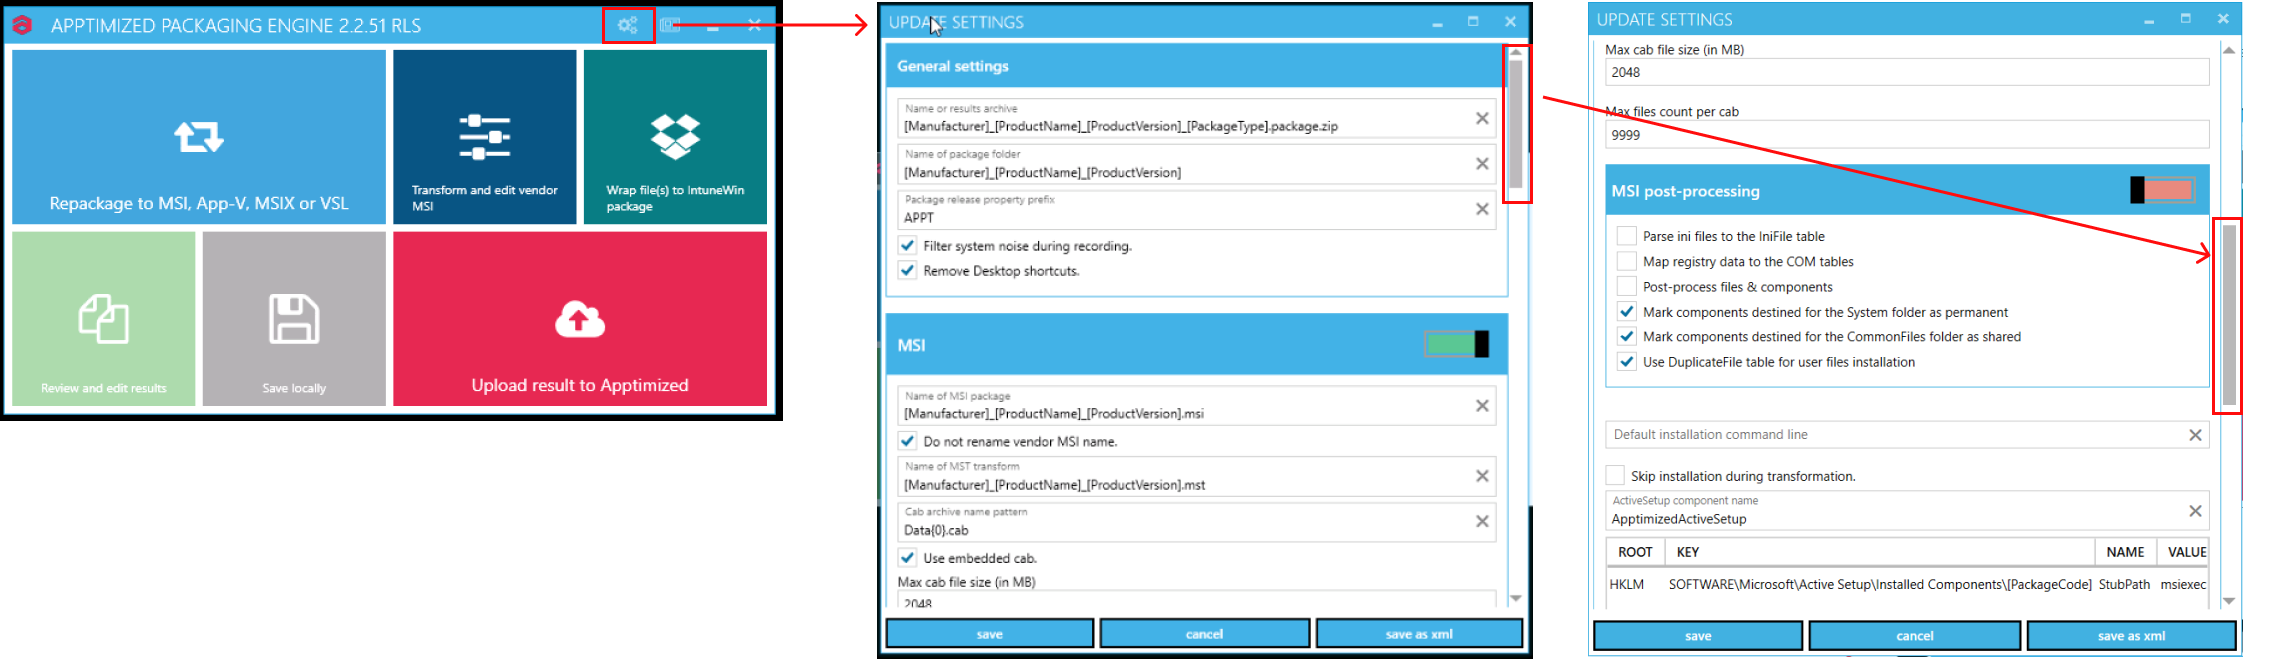
A user can scroll down and review the package format settings.
The package formats settings are predefined and correlate with the Project settings (Workflow settings).
A user can provide changes to the settings if needed. When changes to the package formats settings applied, click the Save button.
The option to save settings as XML file is available under the Save as xml button (Choose the root to save XML file > Save button).
Apptimized packaging engine release notes
The option to open Apptimized packaging release notes is available as a TXT file under the file symbol on the APE menu (top right corner).

Repackage to MSI, App-V, MSIX, or VSL
When clicking the Repackage to MSI, App-V, MSIX, or VSL option, the APE will redirect a user to a Wizard. A user needs to provide input at each step.
Capturing installation and configuration
APE will capture all changes made to the system by scanning a file and registry changes, after that converting it to a machine-readable form. Those changes will typically include the installation of the application and the features selection, as well as customization of the application's settings to reflect the desired result as documented during the Discovery step.
VM preparation and prerequisites installation must proceed before packaging. The prerequisites are considered as applications that need to be present for a user’s software or its installer to function, but a user does not want those software products to be included into the package (e.g., because a prerequisite is already installed on the user’s machines or is managed as a separate dependency package).
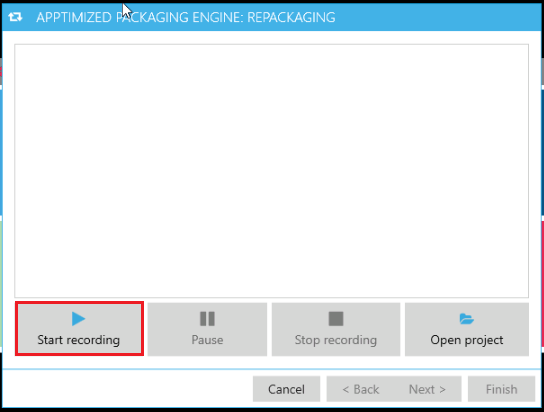
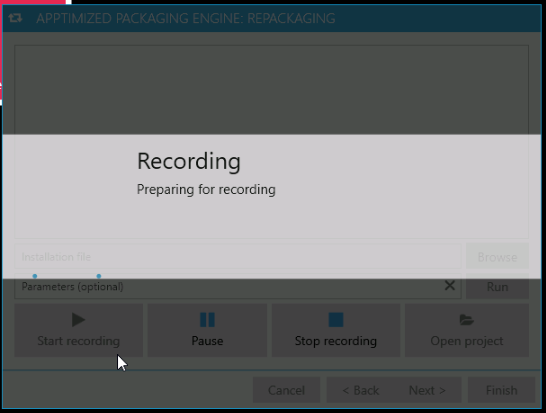
The option to start a recording session is available under the Start recording button.
Note. Any VM activity or inactivity can leave traces in the captured result (including those not relevant to the package or application results). A user needs to confine to the activities needed for packaging and finish the process as quickly as possible).
APE shows the following notification when successful:
The option to suspend capturing changes made to the filesystem and registry is available under the Pause button. The option to resume the recording is available under the Pause button (click the Pause button again).

Once the recording has started a user enables a user to browse the path of the installation file (Browse button).
The option to provide the additional parameters (i.e., to specify additional launch arguments) is available under the Parameters (optional) field.
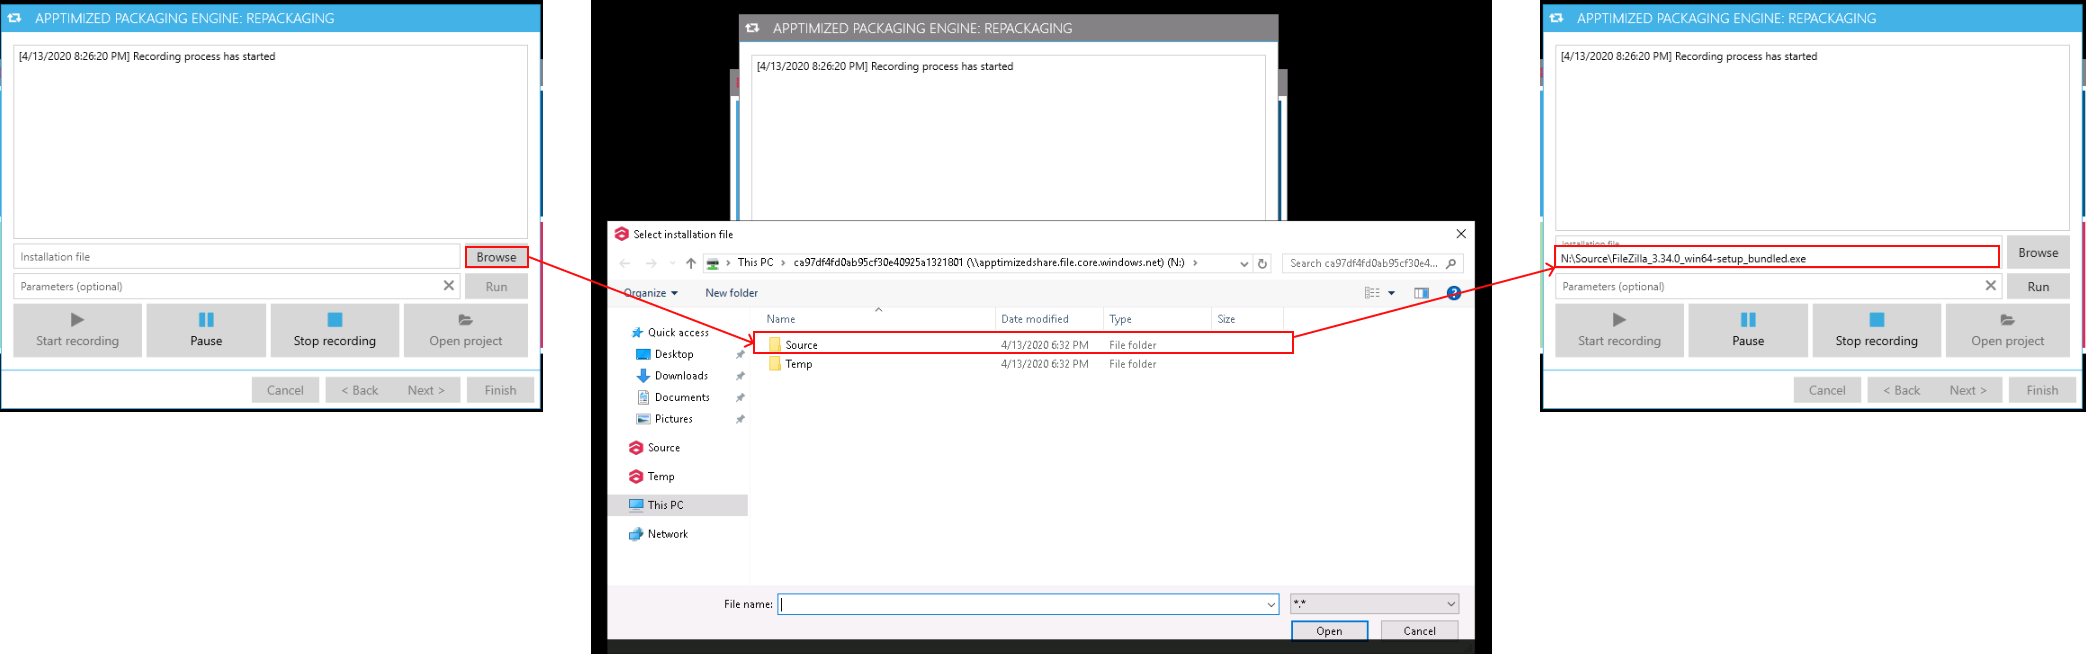
Once the file has been selected, the Run button becomes active.

When the synchronization process is finished, APE shows the following screen: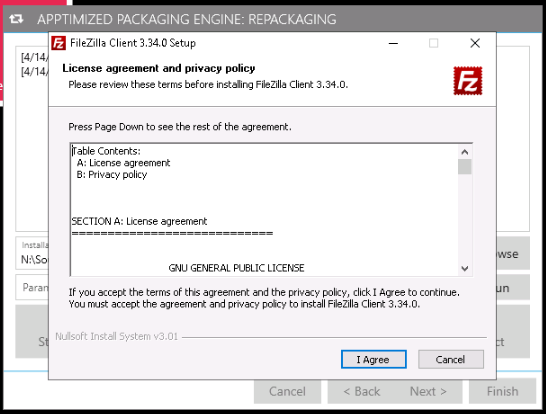
When the installation and configuration activities are completed, the record must be finished. The option to stop the record is available under the Stop recording button.
This will terminate the recording process and prepare the captured system changes for producing an MSI, MSIX, App-V, or VSL. The terminating process may take few moments (additional post-processing and cleanup will be applied to the output).
Note. Apptimized applies advanced logic and filters to keep the snapshot result clean from unneeded or dangerous files and registry keys. However, typically captured results require manual review and adjustments to achieve the desired result or to apply further cleanup from the captured system or user activity.
The processing file system changes may take few moments:

When successful APE shows the screen:

Editing Application Metadata
A user can review and adjust the application metadata if required.
The default values generate from the portfolio metadata provided during the file import process and do not need to be changed in most of the cases.
If the installation session consisted of more than one installer, select the primary installer to extract the metadata.
Review captured content
The option to the recorded content for the files, registry entries, services, and other system items that were modified or created during the installation is available under the Review recorded content button.

APE shows the snapshot editor screen when successful: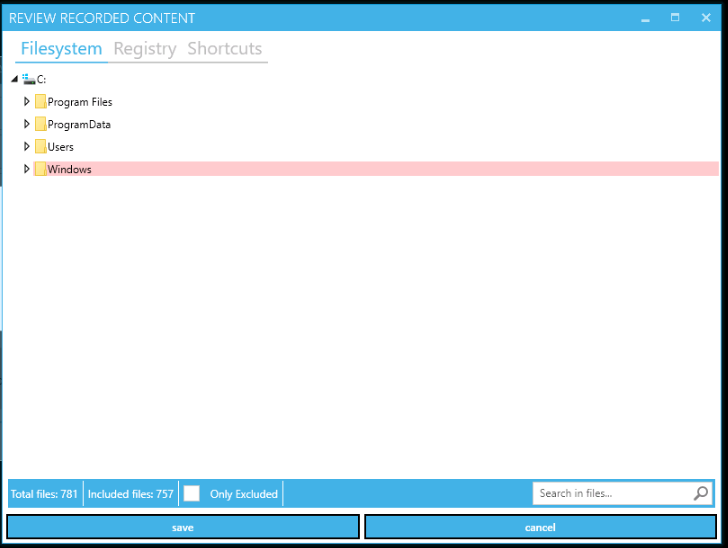
- Filesystem;
- Registry;
- Shortcuts;
- Drivers;
- Services;
- Certificates;
- Environment;
- Registry ACL;
- Filesystem ACL;
- Firewall Rules.
Filesystem and Registry tabs are presented in a tree structure view.
Shortcuts, Environment, ACL, Services, and other tabs are presented in a table-based view.
The Filesystem tab shows captured changes to the filesystem (file & folders).
The Registry tab shows captured changes to the Windows registry.
The Shortcuts tab shows captured shortcuts.
The Drivers tab shows captured drivers.
The Services tab shows all services which were created during source installation.
The Certificates tab shows all changes which were added to the Certificate Stores.
The Environment tab shows captured environment variables created during the source installation.
The Registry ACL tab shows captured permission changes in the Windows registry.
The Filesystem ACL tab shows captured changes to filesystem ACLs. An Access Control List (ACL) is a list of Access Control Entries (ACE). Each ACE in an ACL identifies a trustee and specifies the access rights allowed, denied, or audited for that trustee.
The Firewall Rules tab shows firewall rules created during the source installation.
Due to the nature of the recording process, unwanted resources, also known as system activity or noise, might be captured into the recording result. These happen because the system is altered by the installation (or by the application, by the user, by the other applications, and by the operating system itself) during packaging in areas that are unrelated to the application and are not needed in the package. Those unwanted resources might negatively influence the installation or uninstallation of the package, or other applications and the operating system's stability, or, at least, create unneeded bloat. System activity traces and noise cleaning is required to receive good-quality packages.
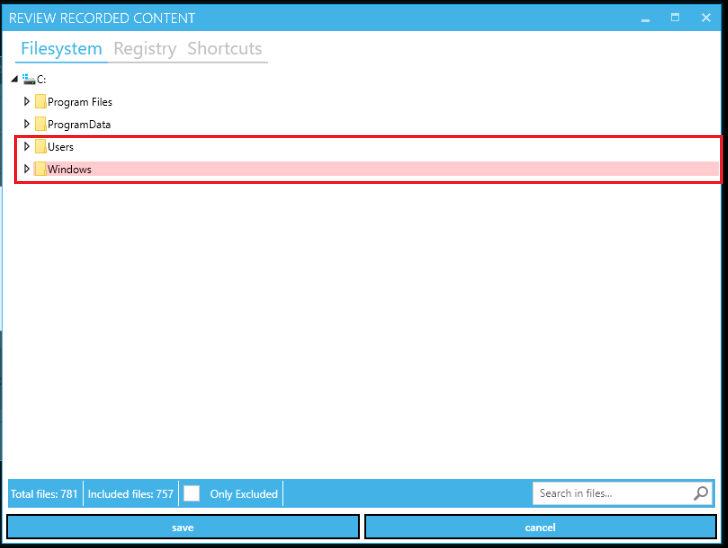
When recording completed, APE applies a default exclusion list, which filters most of the unwanted system changes from the package (which need to be removed from the package).
A user can additionally exclude unwanted resources or re-include resources that were automatically excluded from the list. Such actions should only cover specific scenarios involving changes to the operating system.
The option to exclude the files from the package is available under the context menu or using the keyboard shortcuts Ctrl+E or Del.
The option to include the files to the package is available under the context menu or using the keyboard shortcut Ctrl+I.
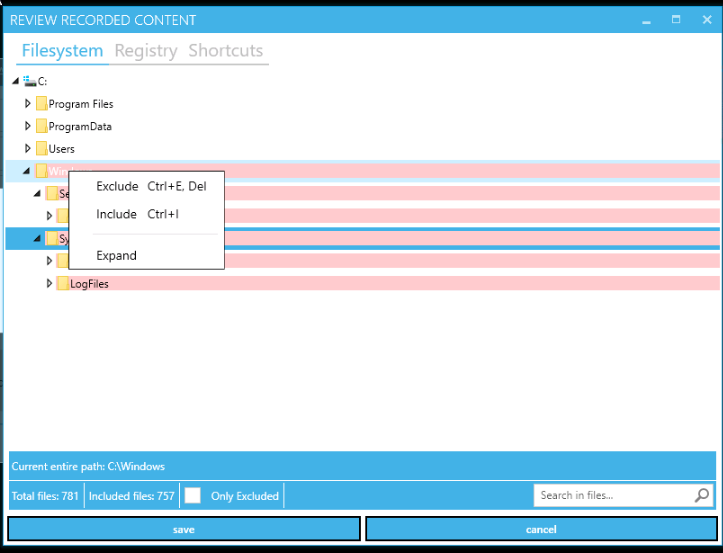
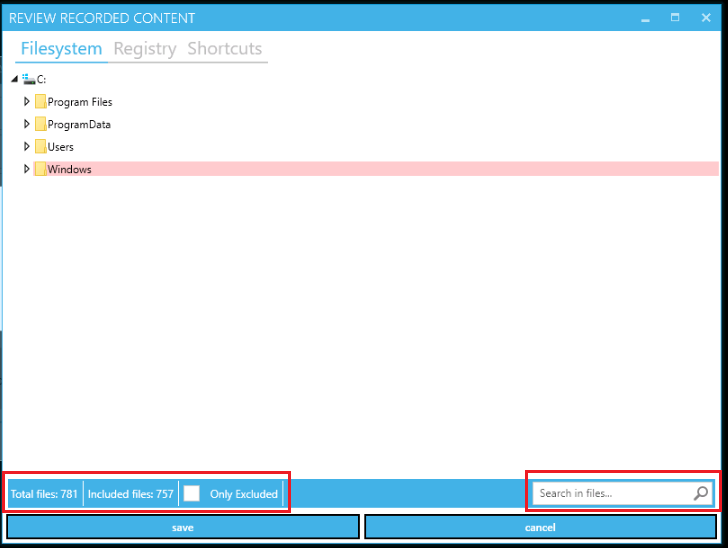
Captured resources that are intended to exclude from the package are shown with a red overlay.
Captured resources that are intended to include the package are shown with no overlay.
The status bar with the total number of files and the number of included files is available in the footer of the Review recorded content window.
The option to search files or folders by name is available under the Search in files field available in the footer of the Review recorded content window.
The screenshot below shows the tab interface with table-based view (i.e., Shortcuts tab):

To exclude the item, tick the checkbox in front of its name.
Table 2. Shortcuts tab structure
|
Column name |
Details |
|
Exclude |
This column provides the option to include or exclude entities. |
|
Icon |
This column provides the shortcut icon. |
|
Location |
This column provides details on the shortcut location (i.e., a physical location of the shortcut file). |
|
Destination |
This column provides details on the shortcut’s target (usually target is an executable file). |
To exclude the item, tick the checkbox in front of its name.
Table 3. Filesystem ACL tab structure
|
Column name |
Details |
|
Exclude |
This column provides the option to include or exclude entities (i.e., detected file or folder ACL). |
|
Review |
This column provides the option to open the Permission properties for the selected file or folder.
This dialogue window enables a user to Set, View, Change, or Remove permissions for the current item. Permissions are set recursively, so to set permissions onto a folder, its subfolders and files only configure permission changes on the parent folder level. The option to set permissions for a group or user that does not appear in the Group or user names box is available under the Add button (Type the name of the group or user > OK button). The option to remove permissions for a group or user that appears in the Group or user names box is available under the Remove button (Type the name of the group or user > OK button). The options to allow or deny permission are available under the Permissions for <User or Group> box (Select the Allow or Deny column > Check / Uncheck the box). The option to set the special permissions or advanced settings is available under the Advanced button. |
|
Path |
This column provides details on file or folder with detected, modified or created permissions. |
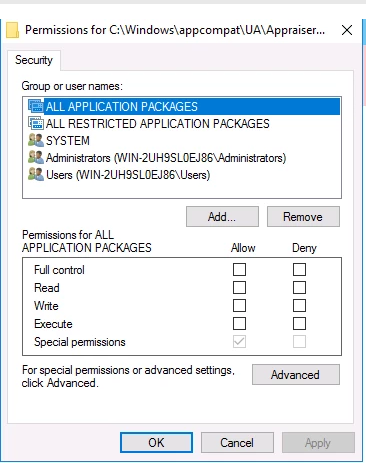

Table 4. Drivers tab structure
| Column name | Details |
| Exclude | This column provides the option to include or exclude entities (i.e., detected driver file). |
| Name | This column indicates the name of the driver file. |
| Location | This column provides details on the driver location (i.e., a physical location of the driver file). |
| Add ARP entry | This column provides an option to add ARP (Add-Remove Program) entry which is based on ARPSYSTEMCOMPONENT property value. |
| Remove on uninstall | This column provides an option to automatically delete the driver during the uninstallation process. |
The option to apply the changes to the recording result is available under the Save button.
Analyze for common issues
The option to review the most common issues which might lead to a non-working or incomplete installation is available on metadata reviewing screen under the Analyze for common issues button.
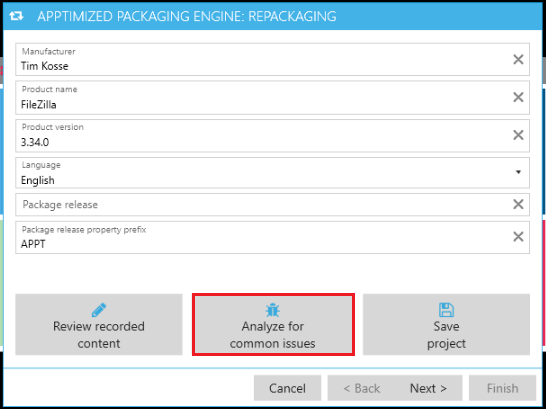
APE shows a screen when successful:

This will show the severity of problems, problem codes, and issue description, both with the recommendations on how to reduce the risk.
Table 5. Possible values of the analyzer
|
Severity |
Problem code |
Description |
|
High |
DriversInSnapshot |
The installation driver is not supported in repackaging mode. It won't be included in the final package. |
|
Medium |
ServicesInSnapshot |
Installation services are detected. This can lead to problems with App-V or AppX packaging formats. |
|
EnvironmentalVariablesChanged |
The environmental variables change is detected. A user must sure this won't overwrite existing entries during installation. |
|
|
Low |
MSIExecLaunched |
MSI installation is detected. It's recommended to use transformation instead of repackaging until a user converts the installer to the not MSI format. |
|
AutoStartDetected |
Auto-start modification is detected during the installation. |
|
|
DllHostDetected |
COM registration is detected. An application may not work when packaged in App-V or AppX formats. |
|
|
SystemFilesIncluded |
System files were modified during the installation. A user must review captured content and exclude unneeded entries. |
When the review of the common issues is finished, click the Close button.
Save project
The option to save settings and apply them in the future is available under the Save project button.
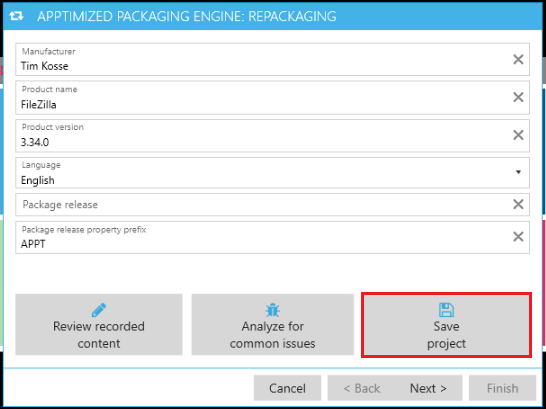
APE shows the following window (Choose the root to save project > Save button):

When the metadata review completed, the option to proceed to the next step is available under the Next > button.
Adjust Format Details
The following screen shows the default values for package formats:
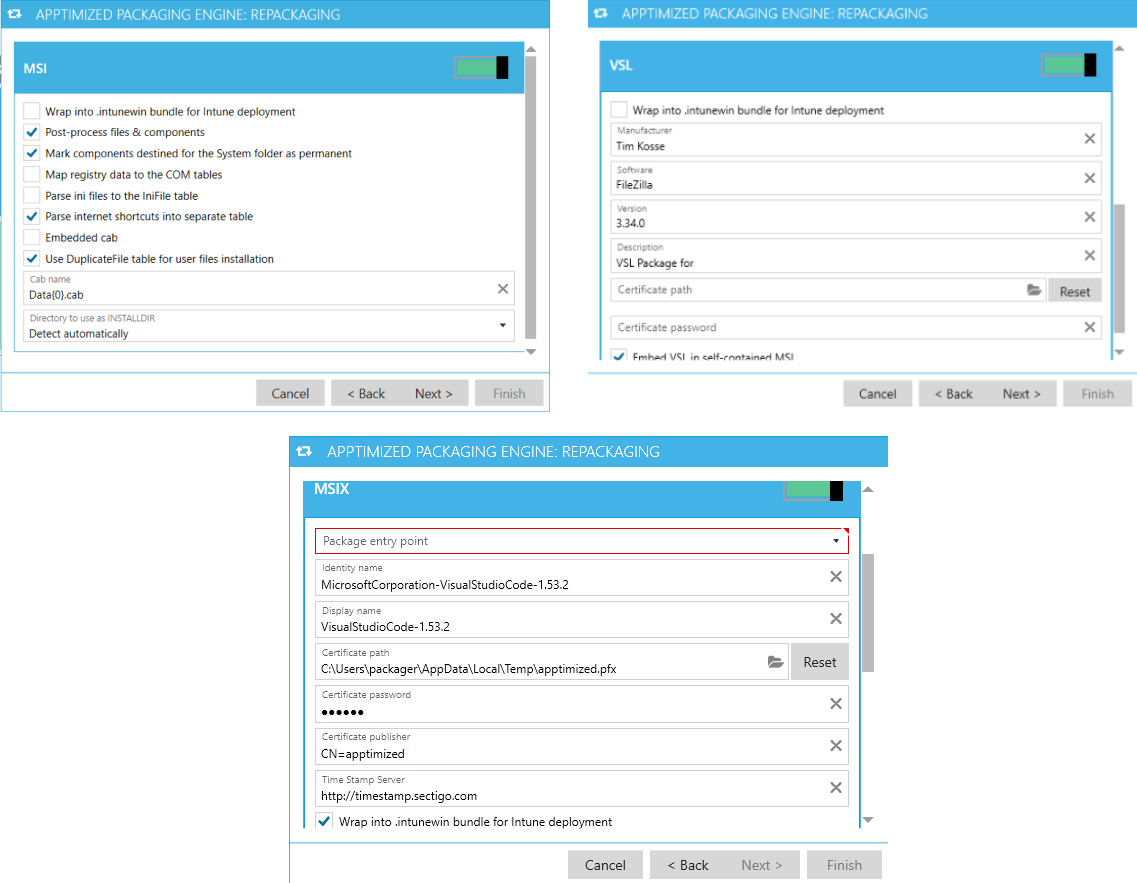
The adjustment of the format-specific settings is available. These settings are typically pre-defined by Apptimized project administrator in the project settings in accordance with the appropriate Packaging Standards.
Before overriding any of pre-defined settings, a user must ensure the feasibility and correctness of provided changes.
The option to exclude or to include the package formats is available under the switch in front of their names.
When the package format review is completed, the option to proceed to the next step is available under the Next > button.
When the packages build, the log information is written to the console. In case of a failure this log may be requested by Apptimized support:
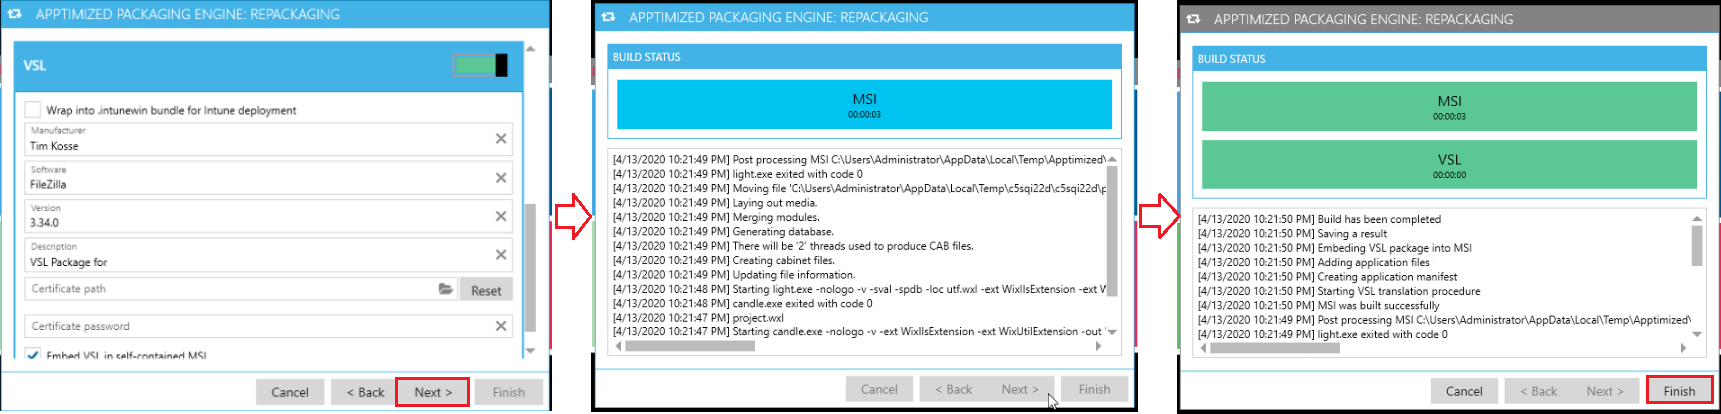
The blue background indicates that the build process is still in progress. When it turns to a green background the package type/format has been successfully built.
The build time will depend on the number and size of the captured files and may take few minutes.
The APE finalizes when clicking the Finish button.
Transform and edit vendor MSI
The option “Transform and edit vendor MSI” is applicable when:
- A necessity to provide changes to existing (vendor) MSI's (i.e., installation options, application configuration) appears. This means the vendor provides the source media in MSI format
- A user’s target format is also MSI.
This is also applicable when nested MSI's were found and extracted during the repackaging of a legacy setup. Any changes to the original MSI will be added by a transform file or MST; the original MSI will remain unchanged.
It is not recommended to edit vendor MSI directly or even to repackage to another MSI. Repackaging MSI to App-V by is acceptable.
The option to transform and edit the existing MSI is available under the Review and edit vendor MSI button.
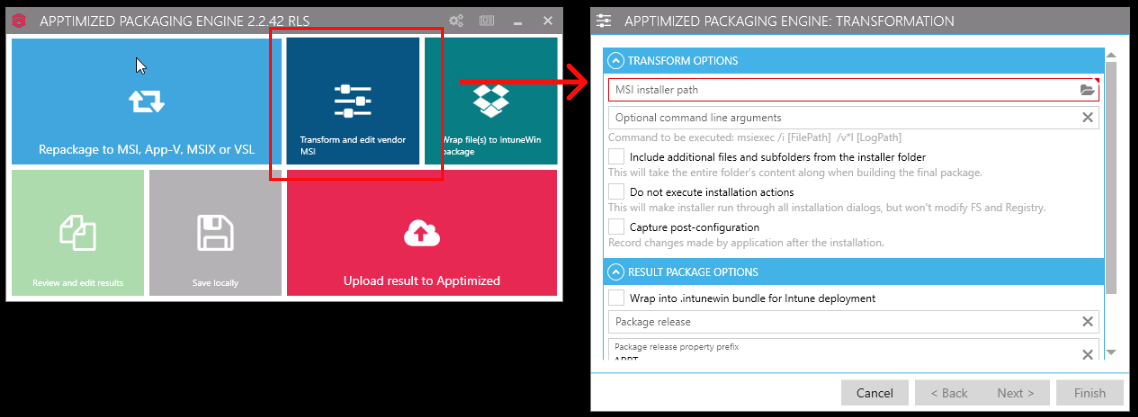
The option to provide the full MSI installer path is available under the MSI installer path field.
Table 6. APE transformation settings (transform options)
|
Settings |
Details |
|
Optional command line arguments |
This setting provides the command to be executed (i.e., msiexec /i [FilePath] /v*l [LogPath]). |
|
Include additional files and subfolders from the installer folder |
This setting specifies if all files and (sub)folders from the folder in which the MSI locates will use. If the setting is enabled, all folder content will use to build the final package. If the setting is disabled, only the MSI and CAB files will use (everything else will be ignored). The setting is disabled by default. |
|
Do not execute installation actions |
This setting enables a user to run through the MSI's setup screens and do not need to perform a true installation. In that case, only property changes captured by inputs into the MSI's dialog will be taken. The filesystem and registry will remain untouched. The setting is disabled by default. |
|
Capture post-configuration |
This setting enables a user to include additional configuration items outside the MSI setup screens into the MST after the installation (i.e. post-configuration), e.g.: adding extra files or adding extra registry keys. The following cases to capture changes in the MST available:
|
|
Wrap into .intunewin bundle for Intune deployment |
This setting enables a user to create the .intunewin bundle for Intune deployment. The setting is disabled by default. |
|
Package release |
This is the package version. It is used in the package name. Initially, a release version is 01. If something needs to be changed in this package, then release 02 is made, and the package name differs from the initial one. The package release is not similar to the application version ( (i.e. the application version can be the same but the release will be 02 because some files were added). The field can stay blank. |
|
Package release property prefix |
This prefix is used in the names of the created MSI components, properties, and custom actions. This is the element of branding. |
|
Install/Uninstall script file type |
This setting indicates the script file type. The following script file types available; Batch, PowerShell, and Vbs. The default value is Batch. |
The APE transform options finalized when clicking the Next button. APE shows the following screen:

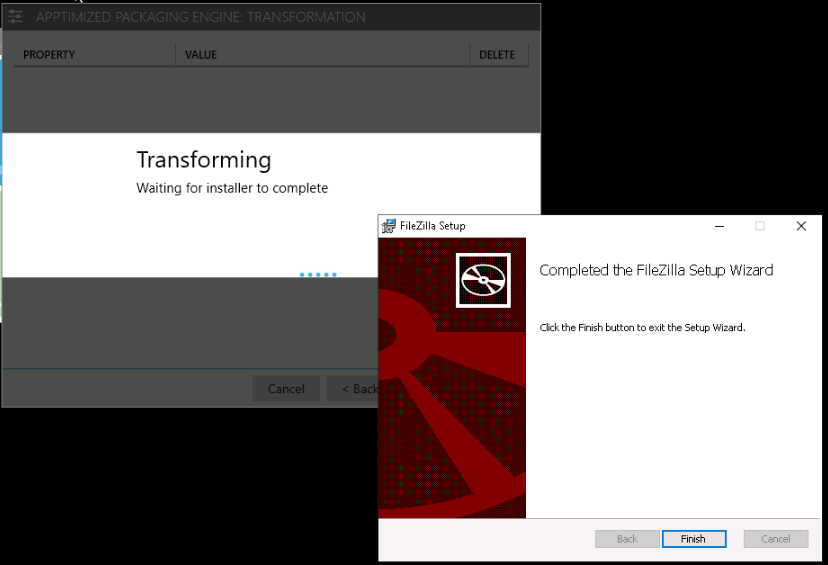
When the setup wizard procedures are finished, click the Finish button. APE shows the following screen:
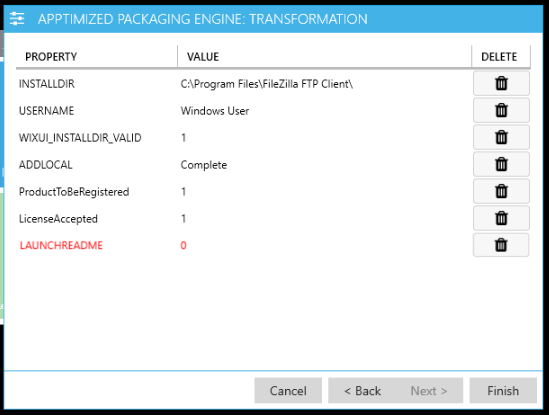
When the installation completes, a list of MSI properties which were added or changed during the installation is available:
- PROPERTY = Windows Installer Property name
- VALUE = Windows Installer property value set during installation
- DELETE = Delete properties you do not want to include in the MST.
The option to change the property name or value is available by double-clicking on the relevant cell.
The option to delete an item is available under the bin symbol (Delete column).
Note. Apptimized always replaces special properties. The following properties are marked as red under the transformation screen: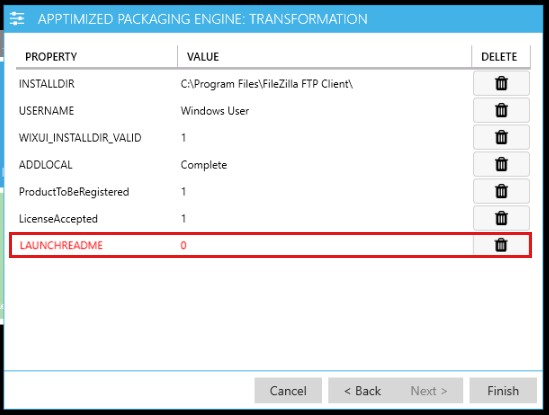
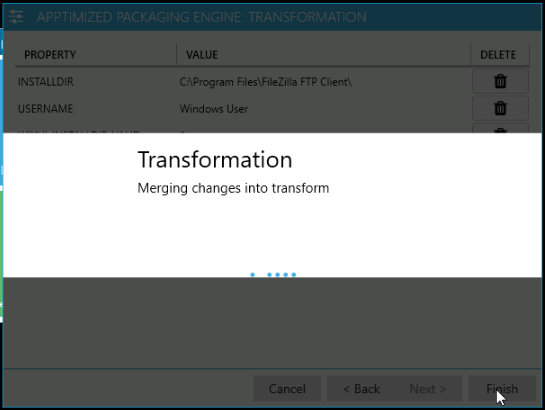
When the MSI properties list is reviewed, click the Finish button. The transformation process may take few moments:
APE shows the following screen when successful:

The option to launch the built-in MSI editor and edit the output is available under the OK button.
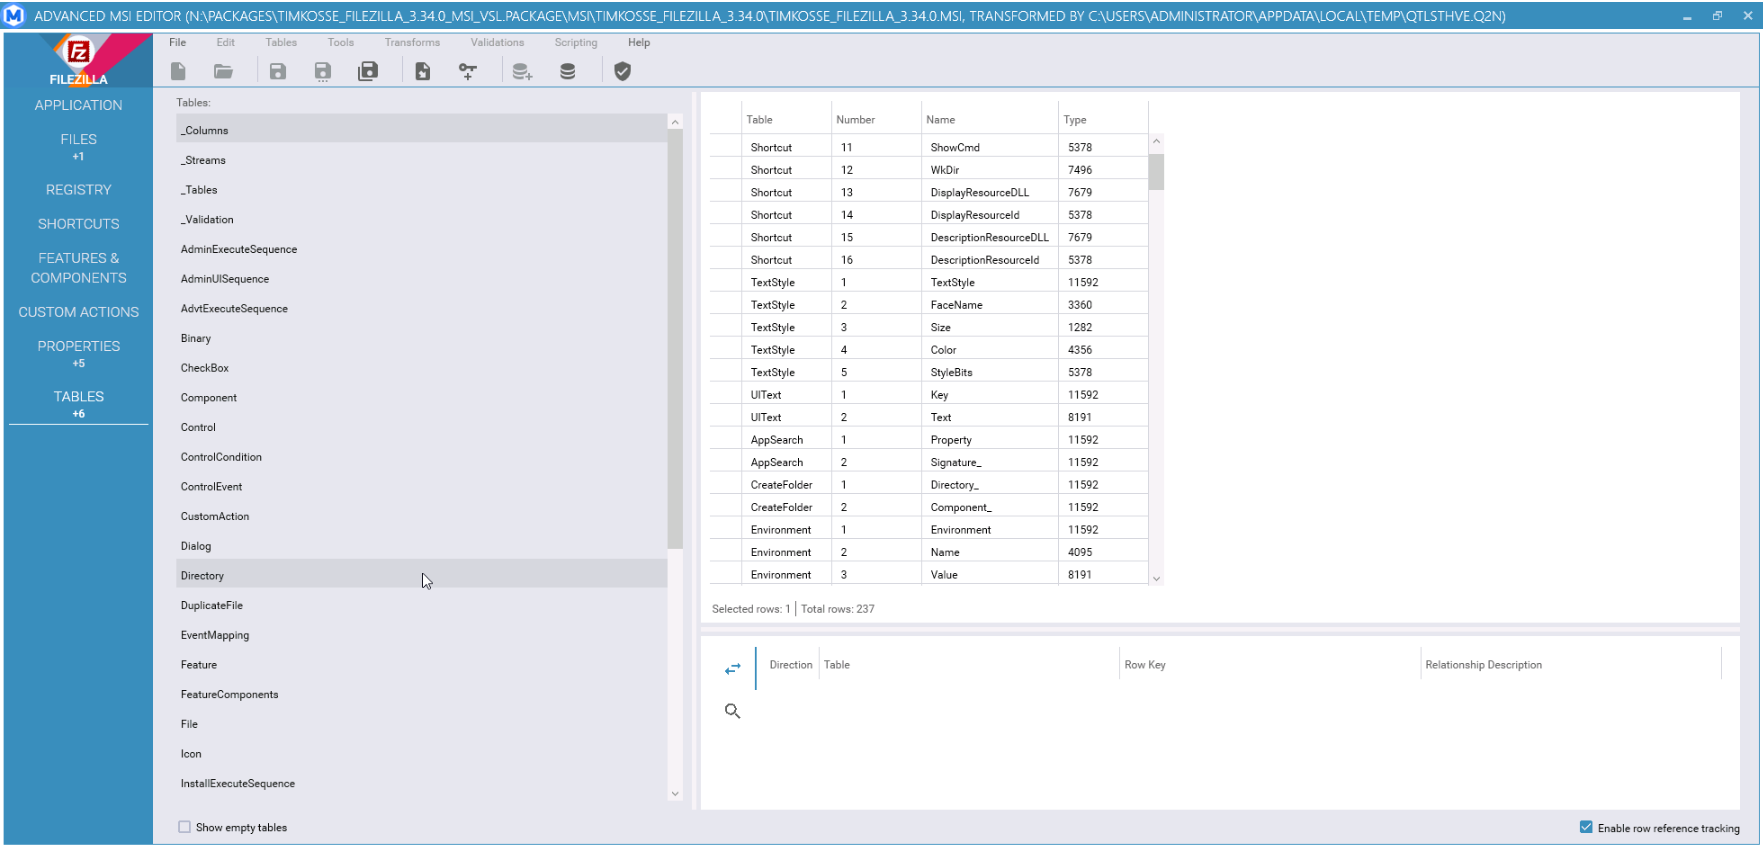
This case provides changes in the application's settings store in registry keys, which are captured and subsequently merged into the MST file by the "post-configuration capturing" process.
The instructions on editing the result in Advanced MSI Editor are provided below.
Wrap file(s)
Create Wrapper
The option to wrap files i.e., wrap fully configured package - repackaged MSI, MSI+MST, Silent EXE, or package with Apptimized Wrapper) is available under the Wrap file(s) > Create Wrapper tab
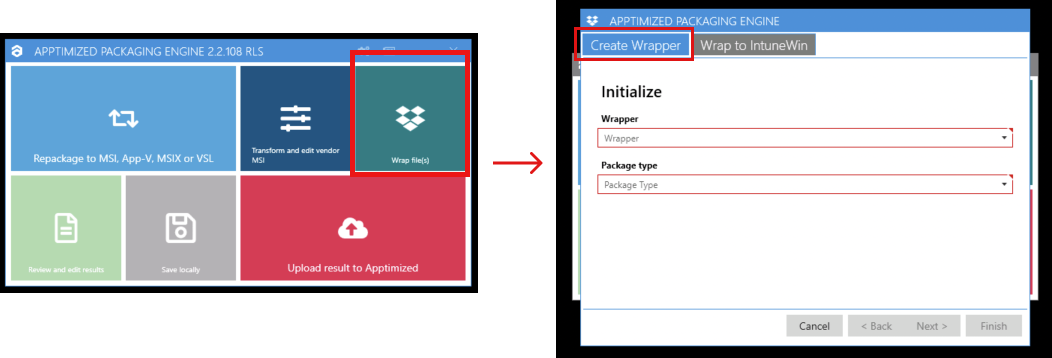
The process includes the following steps:
- Choose the wrapper

Default wrapper is available by default.
- Enter the package type
The following package types are available:
MSI
Transform
Legacy
App-V
Empty Wrapper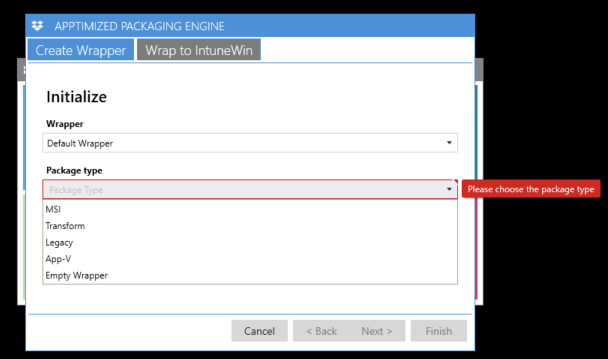
- Clicking the Next button enables proceeding to the Configuration step. APE shows the following windows when successful:

- Select source folder or archive files, select necessary file in package format
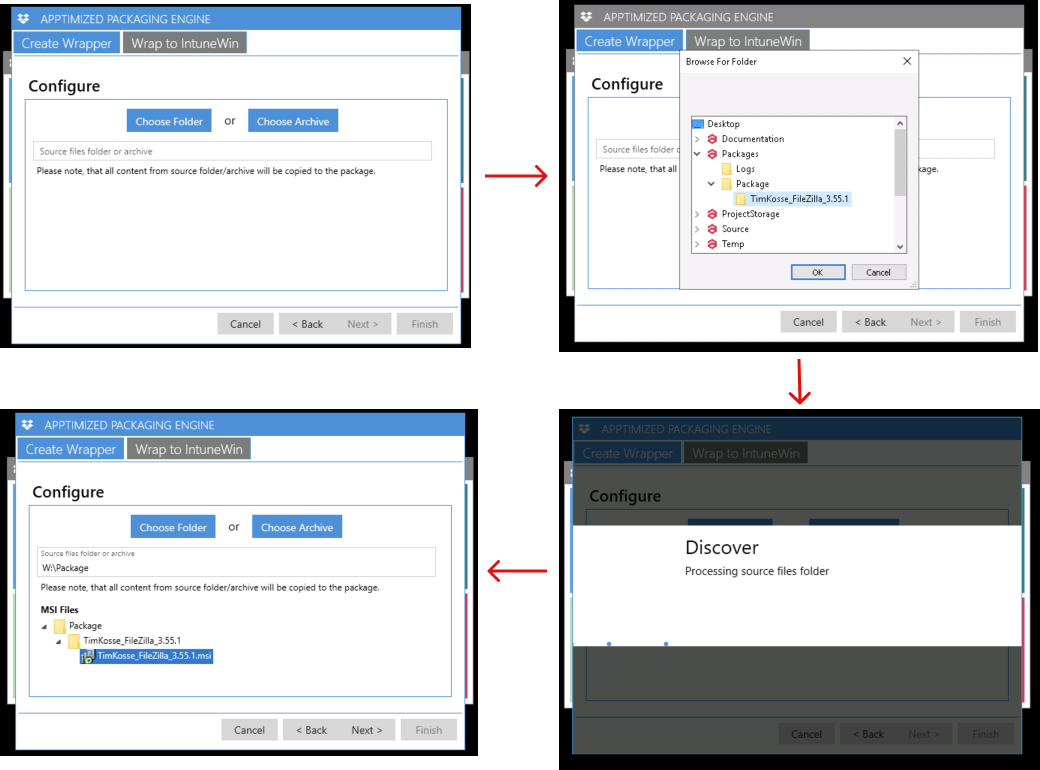
Note. All content from source folder/archive will be copied to the package
- Clicking the Next button enables proceeding to the Review step. APE shows the following window when successful:
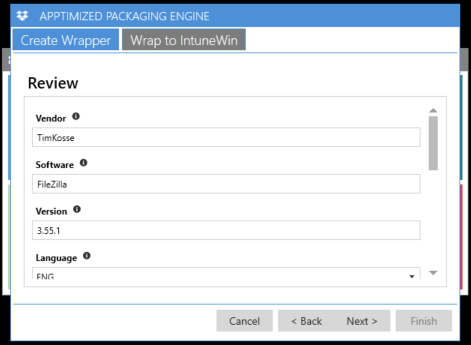
The following options to change are available:


|
Option |
Description |
|
Vendor |
Indicates application vendor short name |
|
Software |
Indicates application software short name |
|
Version |
Indicates application version |
|
Language |
Indicates language of the application. The following options available:
|
|
Architecture |
Indicates architecture of the package. The following options available:
|
|
PackageRelease |
Indicates number of package release |
|
Platform |
Indicates platform where package was tested |
|
ScriptDate |
Indicates script create/change date in format MM/DD/YY |
|
MSIName* |
Indicates MSI location and name(e.g. $env:ProgramFiles/.../Setup.msi) |
|
PackageNameAppv** |
Indicates Package Name of AppV package without extension ** - available only for AppV package type. |
|
APPVPath** |
Indicates path to directory with .appv file ** - available only for AppV package type. |
|
VendorEXESilentInstall*** |
Indicates path to vendor exe for legacy installation e.g. $env:ProframFiles/.../Setup.exe) *** - available only for Legacy package type. |
|
VendorEXESilentUninstall*** |
Indicates path to vendor exe for legacy uninstallation e.g. $env:ProframFiles/.../unin000.exe) *** - available only for Legacy package type. |
|
SilentInstallParameters*** |
Indicates silent parameters for installation(e.g. /silent). *** - available only for Legacy package type. |
|
SilentUninstallParameters*** |
Indicates silent parameters for uninstallation(e.g. /silent). *** - available only for Legacy package type. |
|
Uninstall hives*** |
Indicates all uninstall hives that must be updated, separated by “;”.(e.g. HKLM:SOFTWARE\Microsoft\Windows\CurrentVersion\Uninstall\18469ED8-8C36-4CF7-BD43-OFC9B1931AF8);HKLM:SOFTWAREWOW6432Node\Microsoft\' dows\CurrentVersion\UninstallV0240359E-6A4C-4884-994-B397A02D89301) *** - available only for Legacy package type. |
|
MSTName**** |
Indicates MST location and name(e.g. $env:ProgramFiles/.../Setup.mst) **** - available only for Transform package type. |
Clicking the Next button initiates the Wrapper creation

Wrapper file generating finalizes when clicking the Finish
To finalize the packaging activities, a user must proceed to the reviewing and editing results in APE.
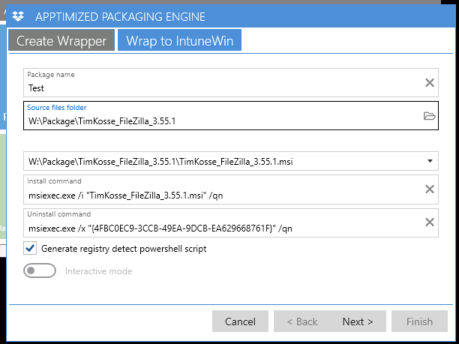
Wrap to IntuneWin
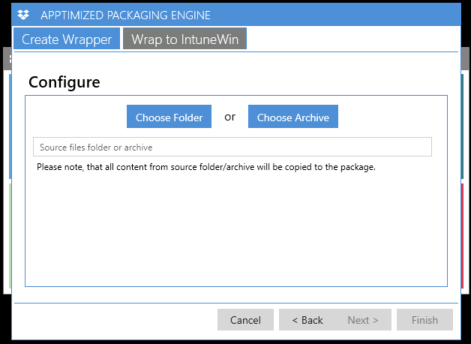
The option to create the IntuneWin package (i.e., wrap fully configured package - repackaged MSI, MSI+MST, Silent EXE, or package with Apptimized Wrapper) is available under the Wrap file(s) > Wrap to IntuneWin tab

The process includes the following steps:
1. Enter the package name;
2. Select source files folder (Folder icon > Navigate to source files folder > OK button). The processing source folder may take a while.
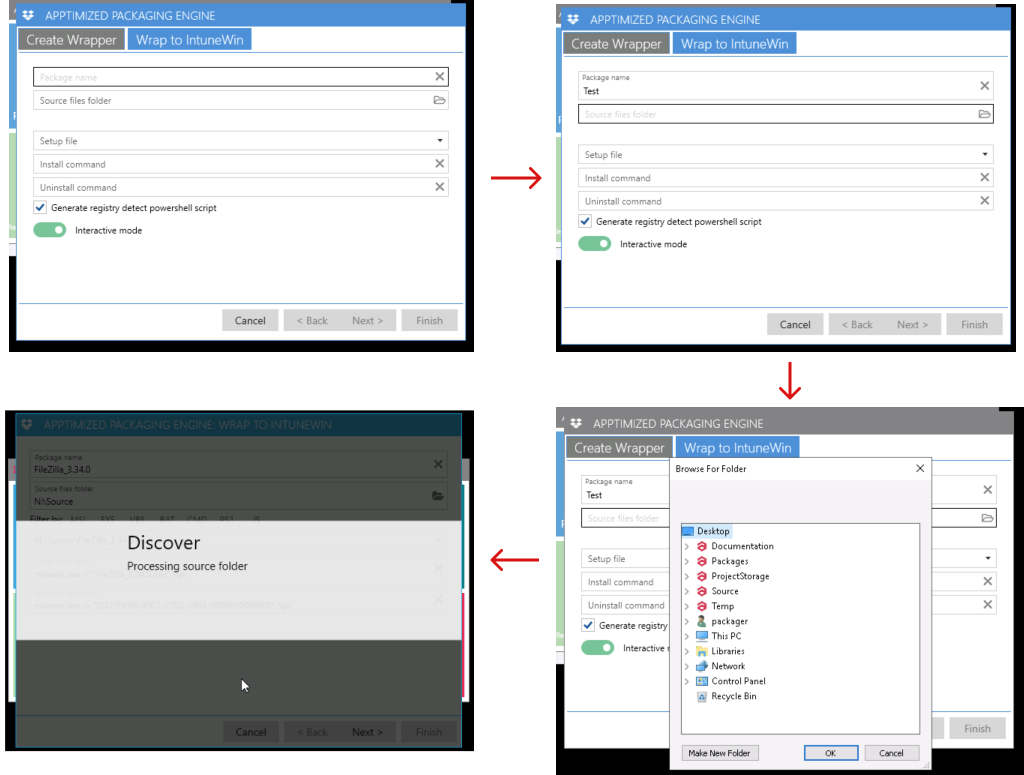
3. The Setup file, Install command, and Uninstall command fields are filled-in automatically according to the source files
A user can change the prefilled values for these fields.
The following setup file types are available: MSI, EXE, VBS, BAT, CMD, PS1, and JS. APE selects the MSI / EXE by default. The option to select the executable file type is available when clicking the drop-down menu in the Setup file field. When choosing an executable file (other than MSI), install and uninstall commands must be set manually.
A user can enable Interactive mode.
Clicking the Next button enables proceeding to the IntuneWine package creation. APE shows the following windows when successful:

4. IntuneWin file generating finalizes when clicking the Finish
APE shows the following windows when successful:
As a result, a user receives the IntuneWin file and text file with the install / uninstall commands, and detection method.
To finalize the packaging activities, a user must proceed to the reviewing and editing results in APE.
Review and edit results
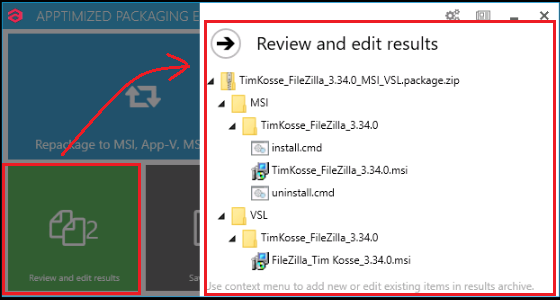
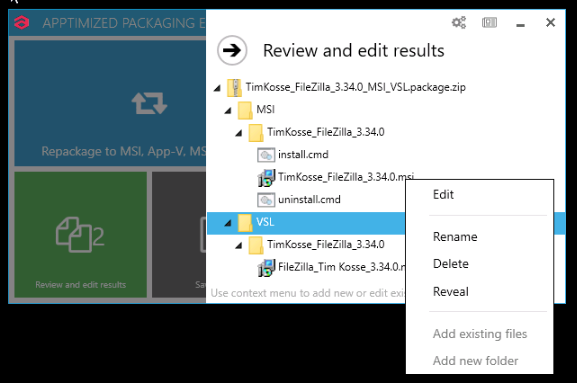
The option to review and edit the packaging result is available under the Review and edit results button. APE shows the package hierarchical tree structure view.
The option to rename components is available under the context menu (Context menu > Rename option > Enter a new name > OK / Cancel button).

The option to delete components is available under the context menu (Context menu > Delete option > OK / Cancel button).

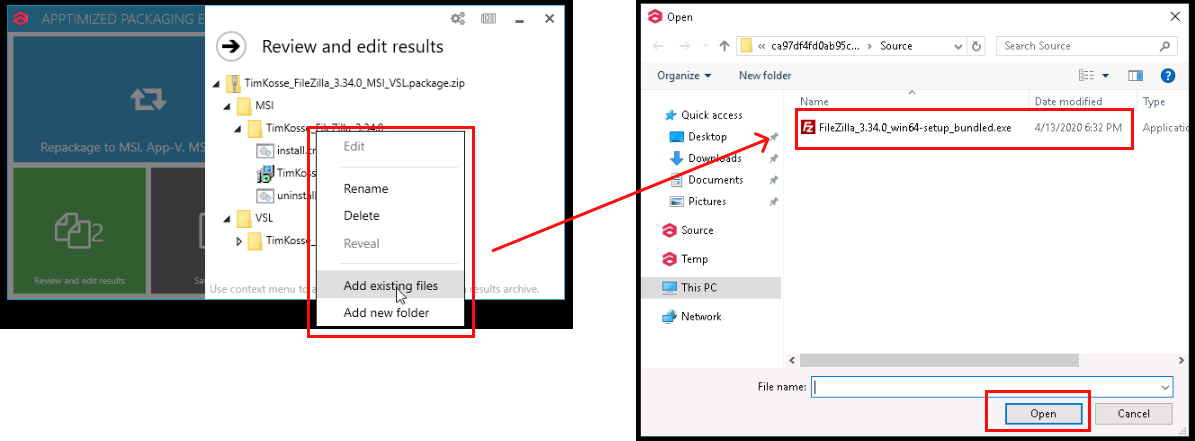
The option to add components is available under the context menu (Context menu > Add existing files option > OK / Cancel button).
The option to add components is available under the context menu (Context menu > Add new folder option > Enter a folder name > OK / Cancel button).

The option to add components is available under the context menu (Context menu > Add new folder option > Enter a folder name > OK / Cancel button).
The option to launch the Advanced MSI Editor is available under the context menu (Context menu > Edit option).
The preparation procedure will take a few moments.
Advanced MSI Editor main window appears when successful:
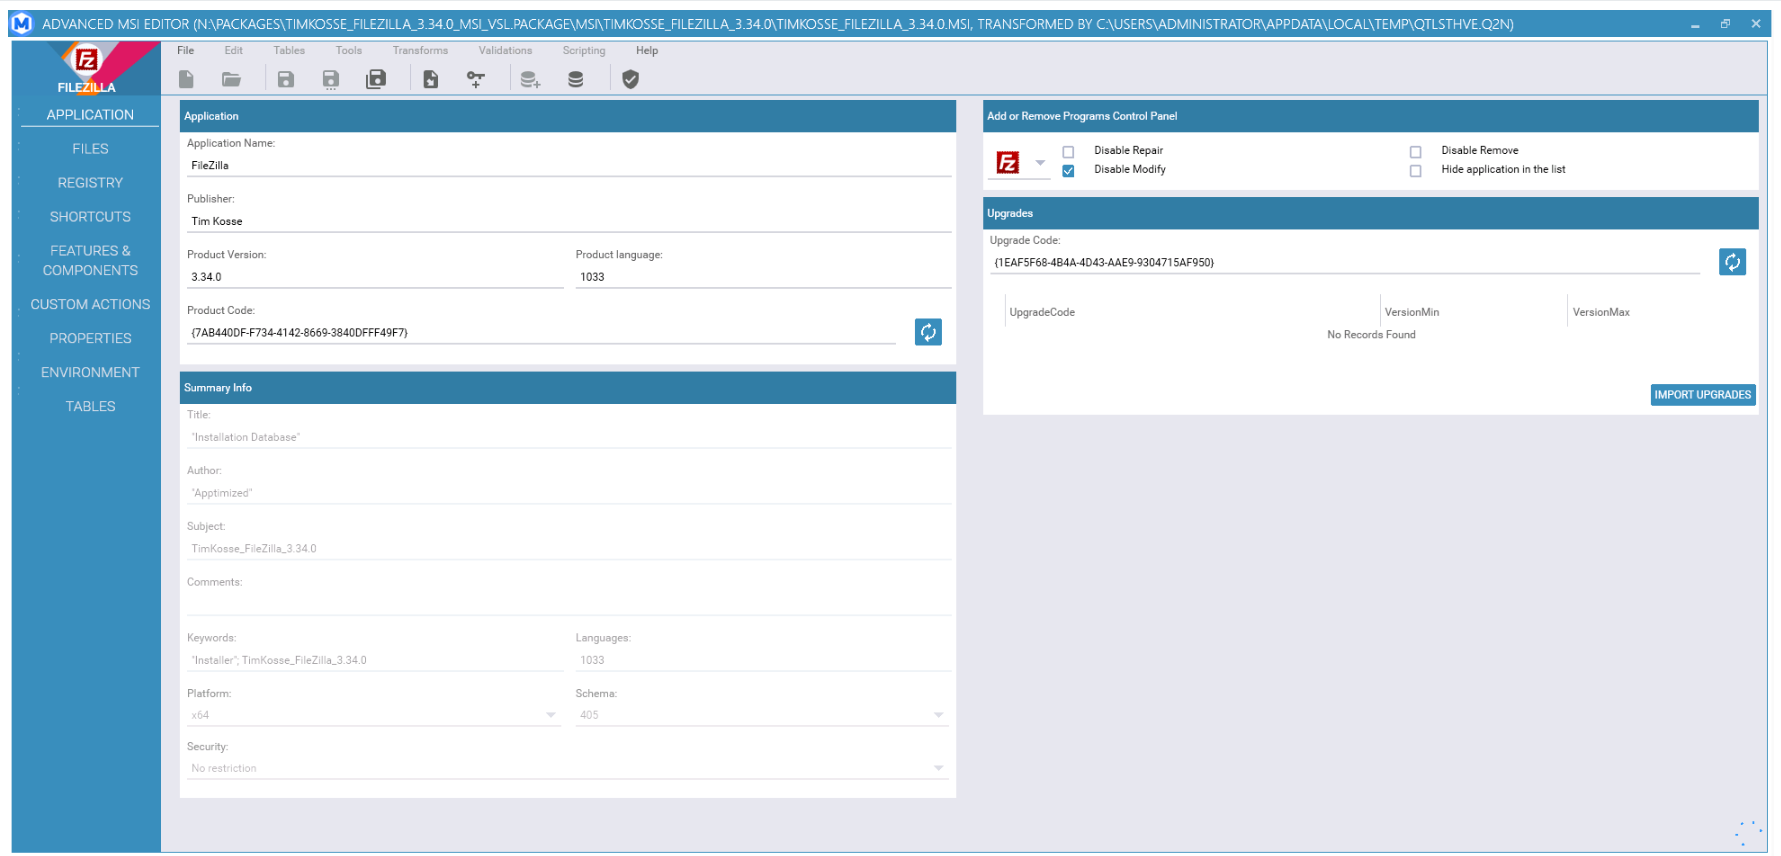
Table 7. MSI Advanced Editor menu components
|
Component |
Details |
|
File |
This component provides the commands for working with the installer file. The following options available:
|
|
Edit |
This component provides the commands to apply/cancel last committed action as well as the command to enable the search window. The following options available:
|
|
Tables |
This component provides the commands for manipulating the MSI tables, to enable the Summary info and Code Page. The following options available:
|
|
Tools |
This component provides access to the import commands to perform install and uninstall processes. The following options available:
|
|
Transforms |
This component provides access to commands for working with the transforms. The following options available:
|
|
Validations |
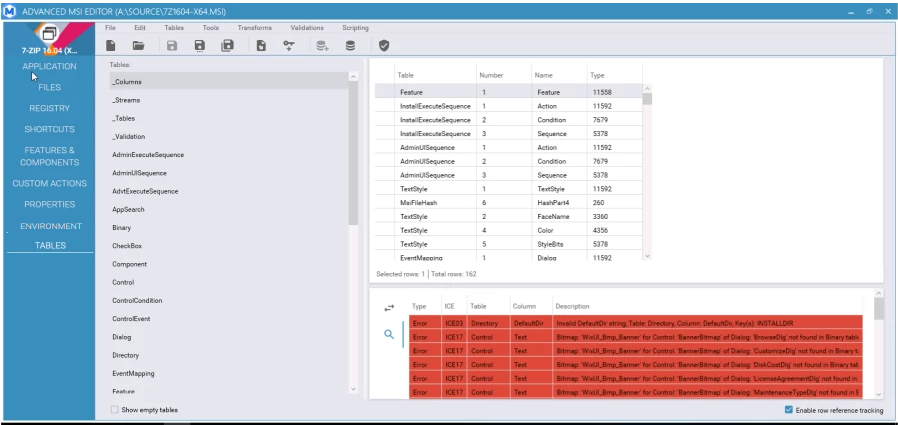
This component allows ICE validation using existing or custom cub files. The following ICE validations options available:
|
|
Scripting |
This component executes an existing or custom script. The following options available:
|
|
Help |
This component enables the help mode. |
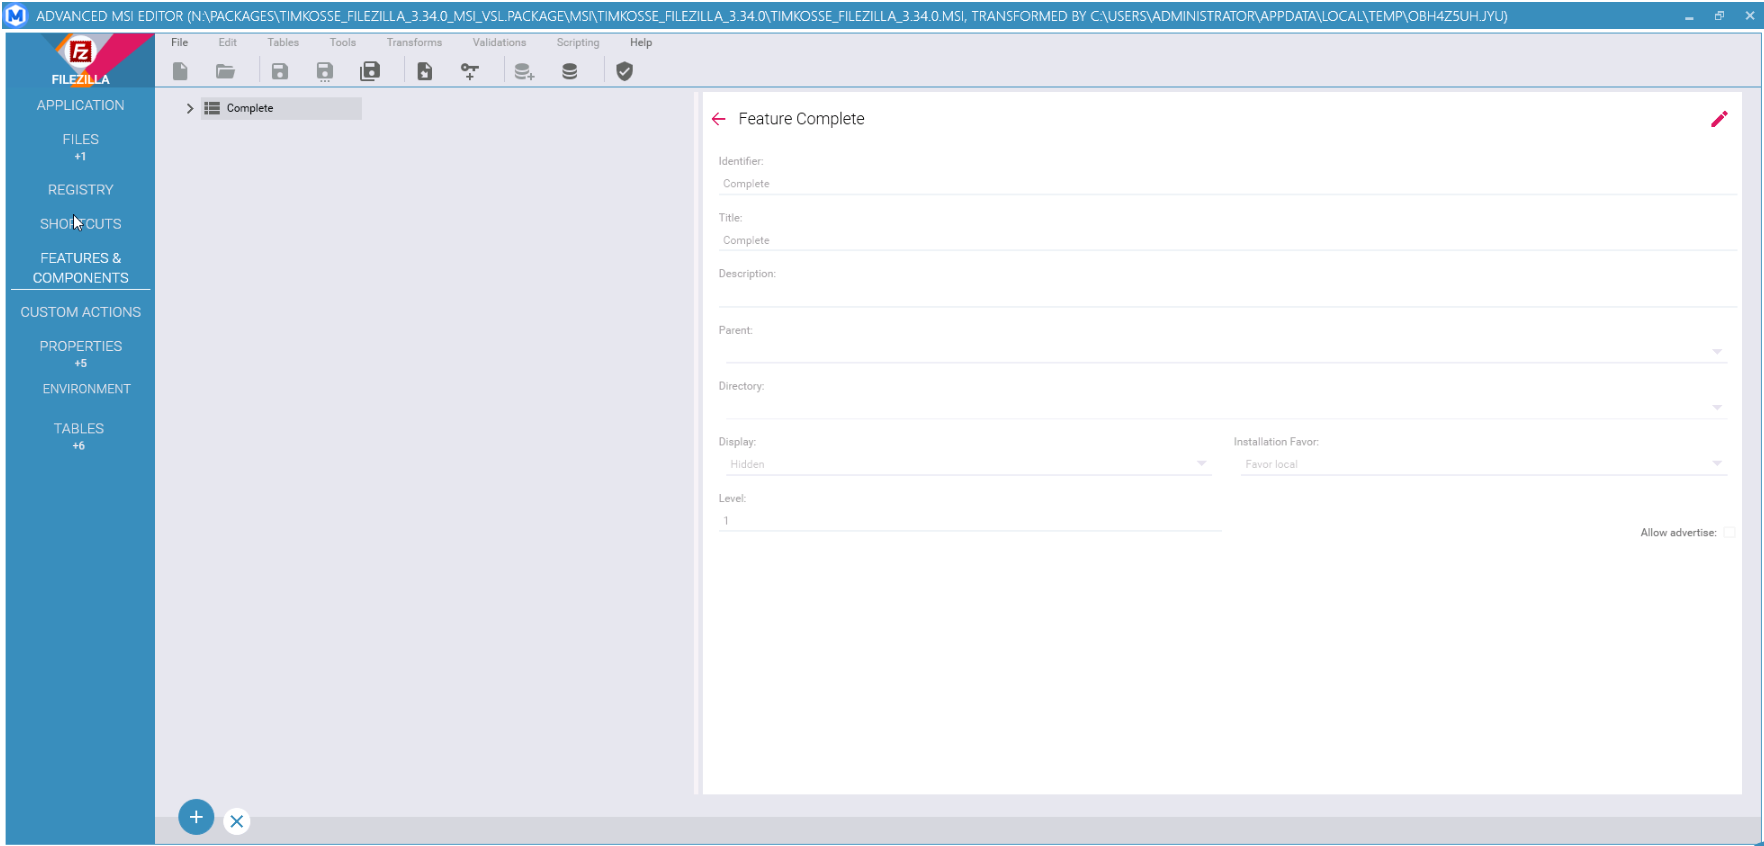
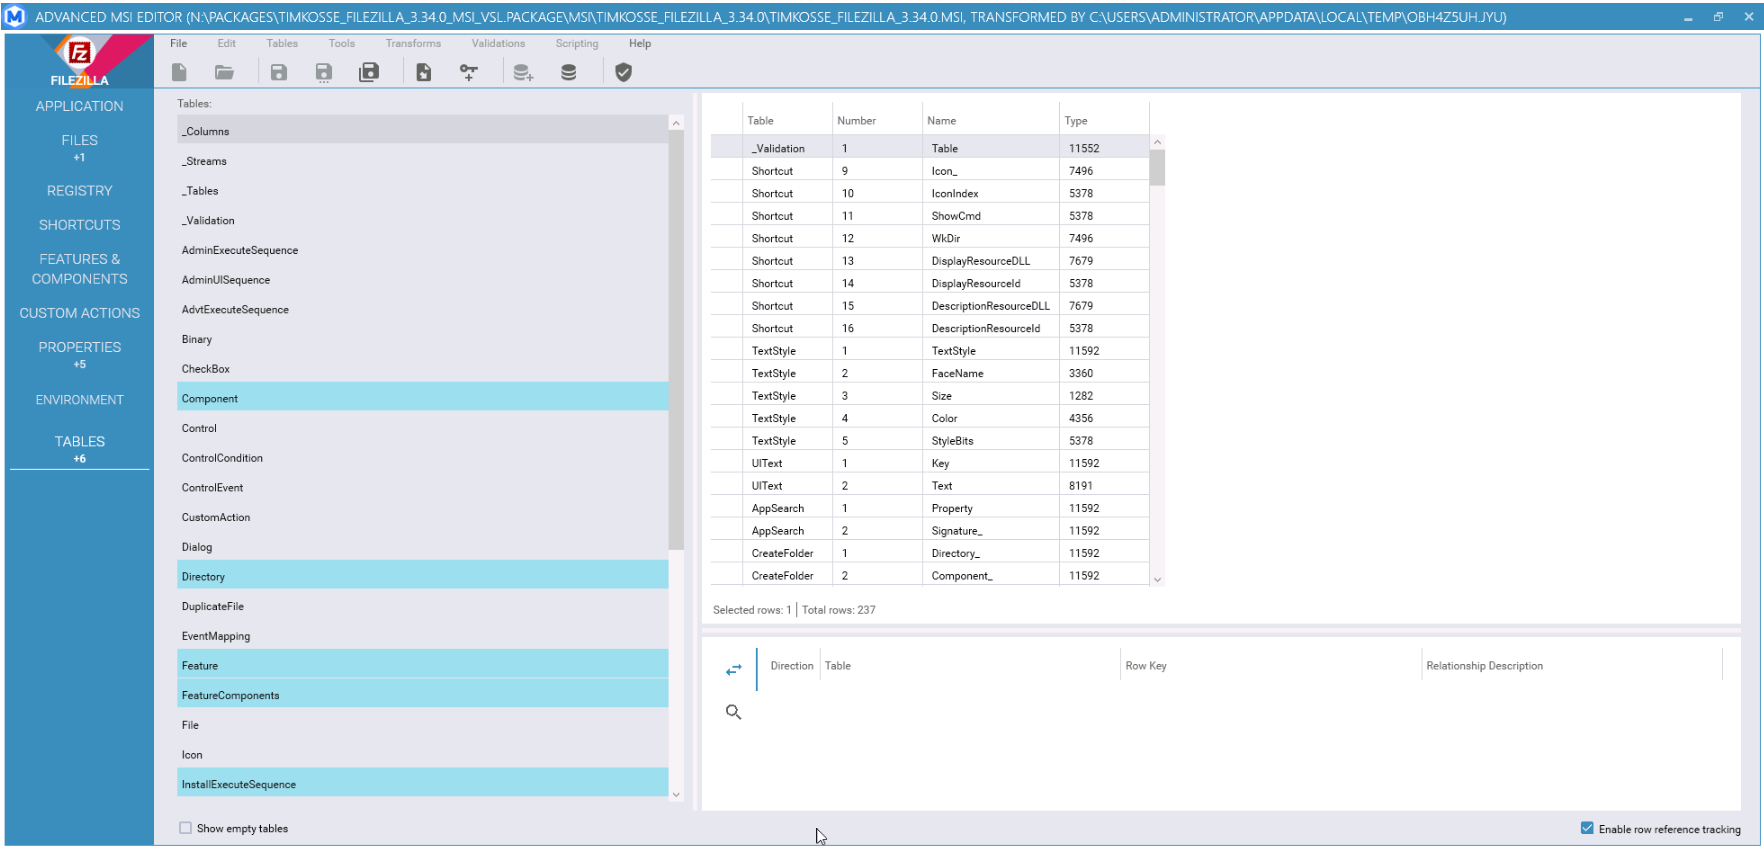
The MSI Advanced Editor contains the following tabs:
- Application;
- Files;
- Registry;
- Shortcuts;
- Features & components;
- Custom actions;
- Properties;
- Environment;
- Tables.
Table 8. MSI Advanced Editor menu tabs
|
Tab name |
Details |
|
Application |
This tab provides basic information about MSI.
|
|
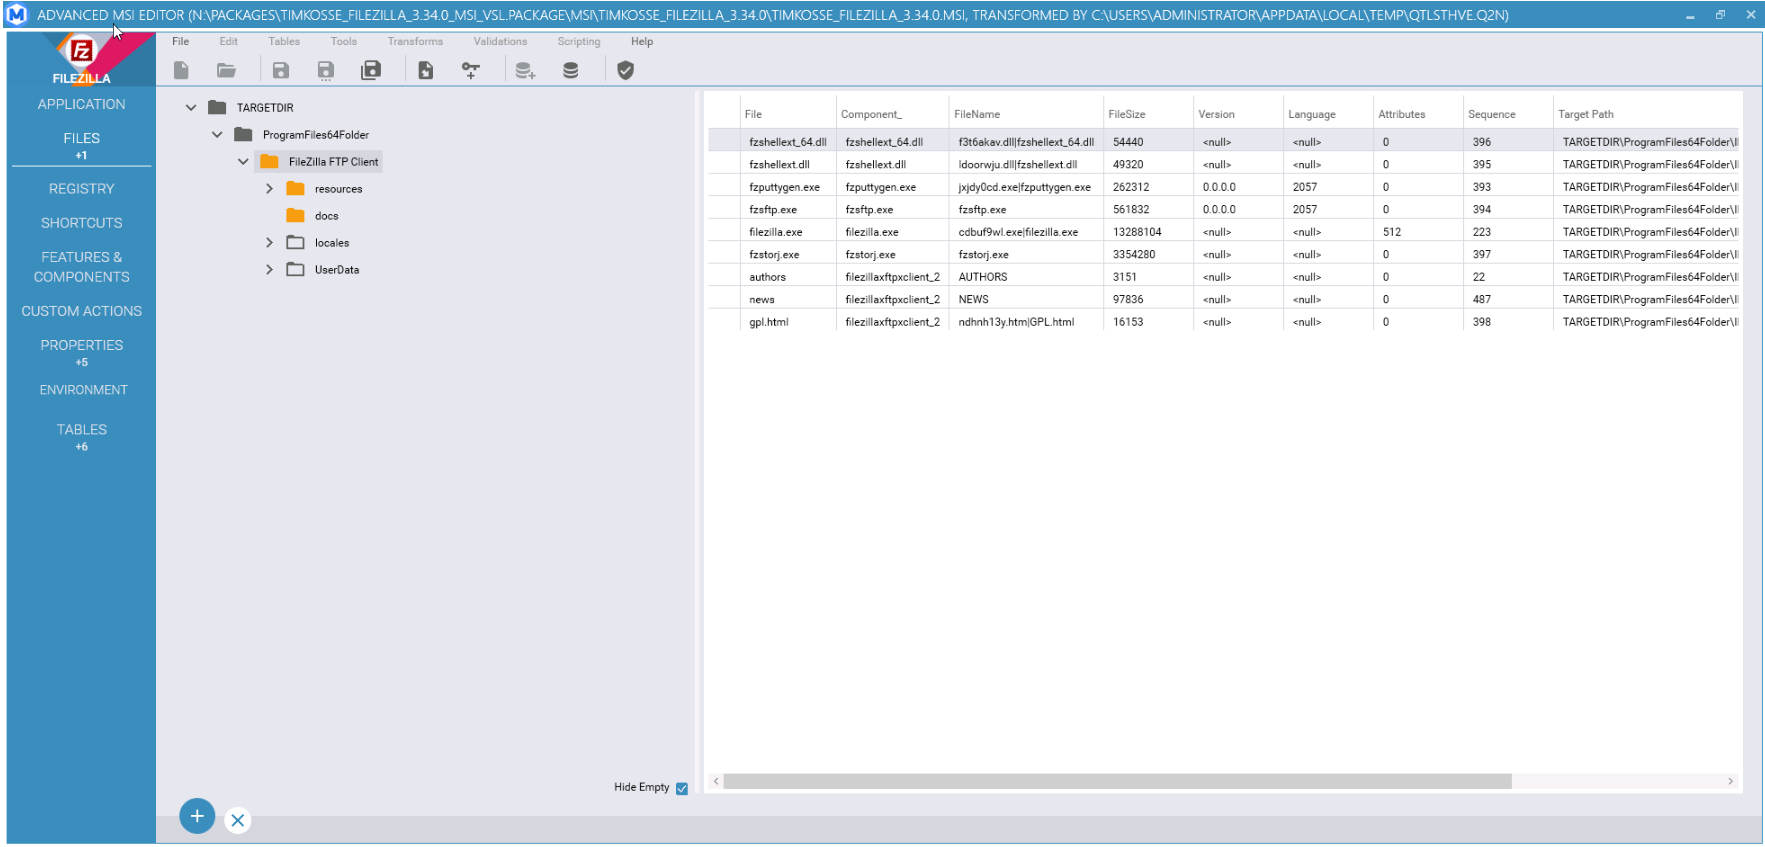
Files |
This tab enables to work with files associated with the MSI. The files are presented in a hierarchical tree structure view. Folders that contain files are displayed in yellow. The folder’s content is displayed in the table on the right side of the MSI Advanced Editor window. The files in the table on the left can be edited. It is also possible to add and remove custom and standard directories.
The option to delete files is available under the:
The option to rename files or folders is available under the:
The option to add folders is available under the:
The option to add files is available under the:
The files import process involves the following iterations:
1. Select the target directory:
2. Select files or folders to import: Click the Plus symbol > Add files / Add folder button > Browse to find the file > Double click to add the file > Continue button.
3. Select features to assign new components (Select the Feature > Select the Cab type > OK button). 4. The added file appears in the tree.
The option to hide empty folders is available under the Hide empty checkbox on the bottom side of the MSI Advanced Editor window.
Note. When a user adds files & folders that already exist, Advanced MSI Editor shows the following modal window: |
|
Registry |
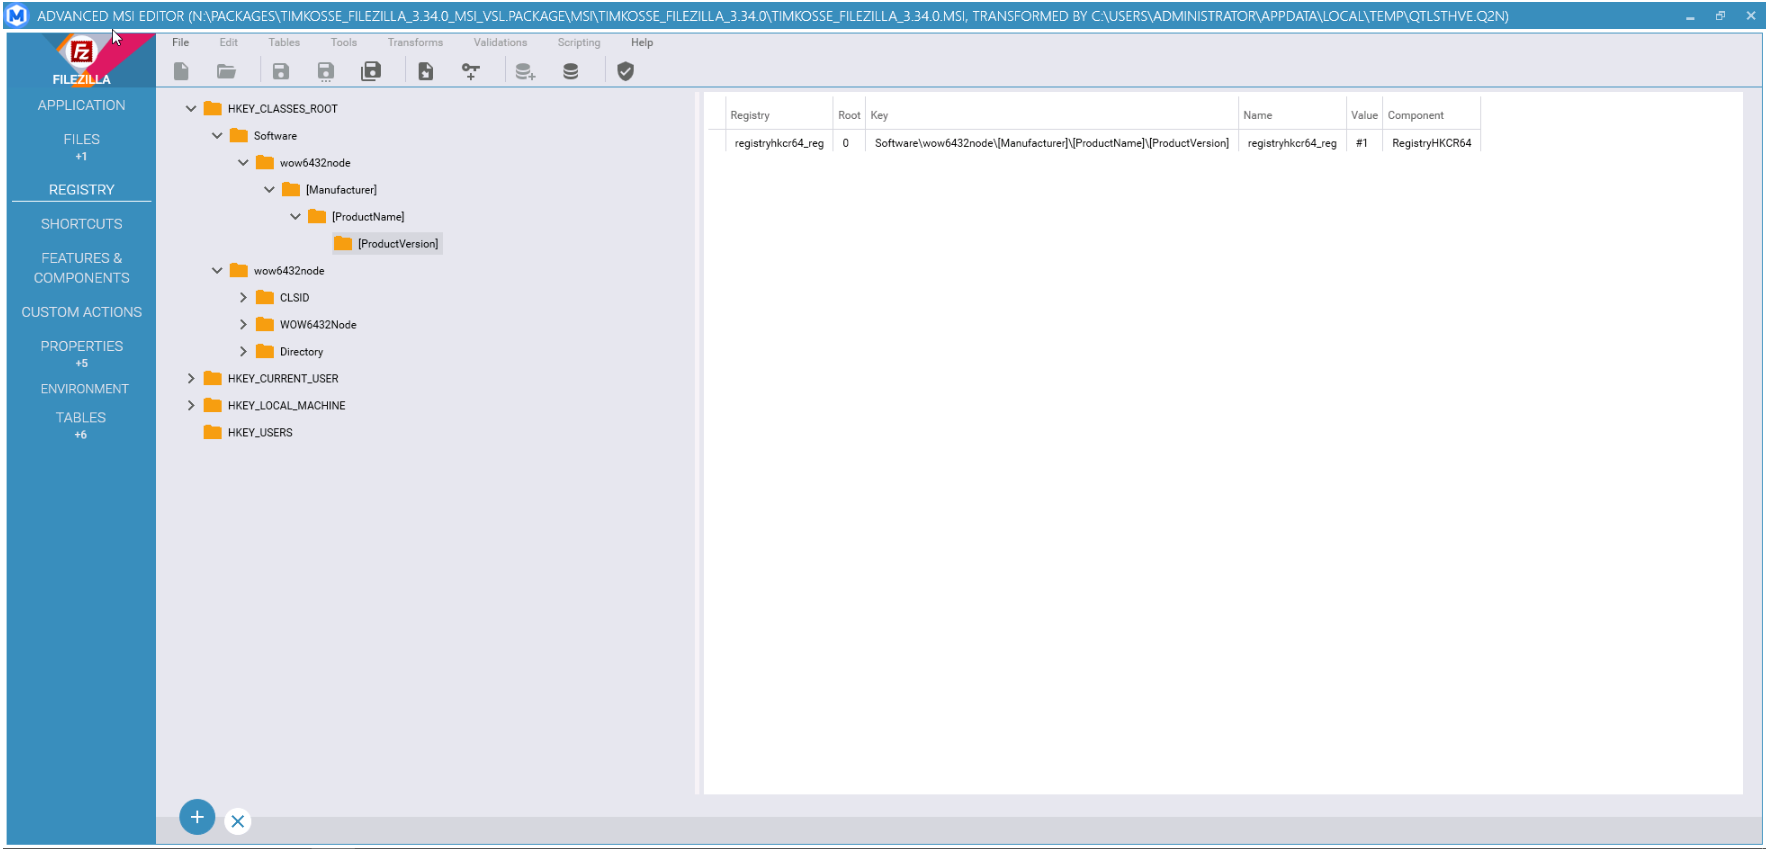
This tab enables editing registry keys (i.e. add/remove registry keys, import from the file).
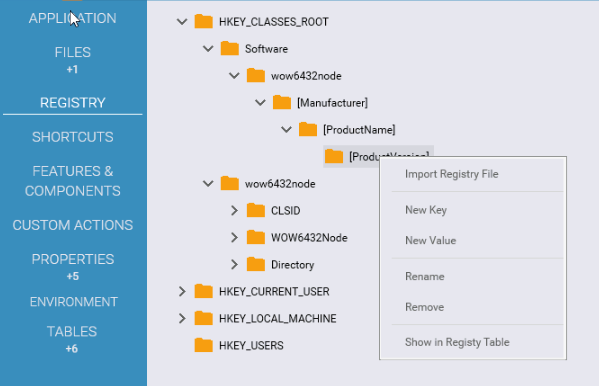
The registry keys are presented in a hierarchical tree structure view. The registry keys details are presented in the table on the right side of the MSI Advanced Editor window. The option to add a key, registry value or import from a file is available under the Context menu.
The option to add a new value is available under the Context menu > New value option:
A new variable creates an empty name and value fields. Double click sets the values of the corresponding fields.
The following registry key values available:
The default value is String.
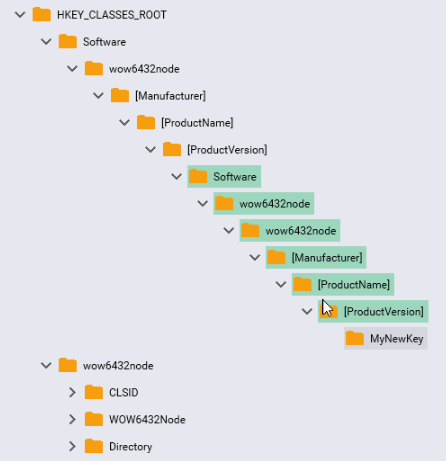
The option to create the new key is available under the Context menu > New key option > Enter a new key name > Save button:
The generated key will appear in the tree:
The renaming and importing activities are the same as in the previous tab. |
|
Shortcuts |
This tab enables a user to create, delete or edit shortcuts. The buttons indicated in block 1 on the screen below are used to add and remove shortcuts. The button indicated in block 2 is used to edit the parameters of the selected shortcut.
The option to delete the shortcut is available under the Context menu > Remove shortcut option:
When creating a shortcut, an entry with default values appears:
The shortcut changes save when clicking the Save button. |
|
Features & components |
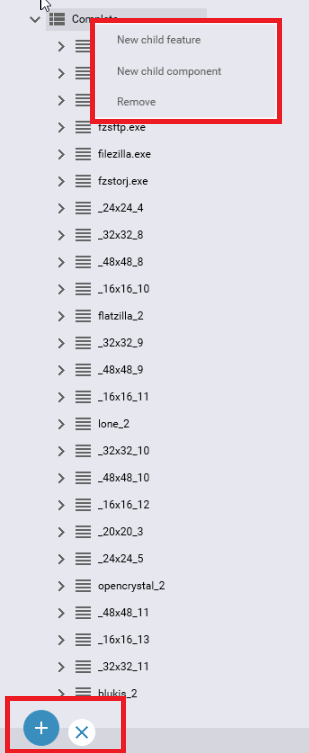
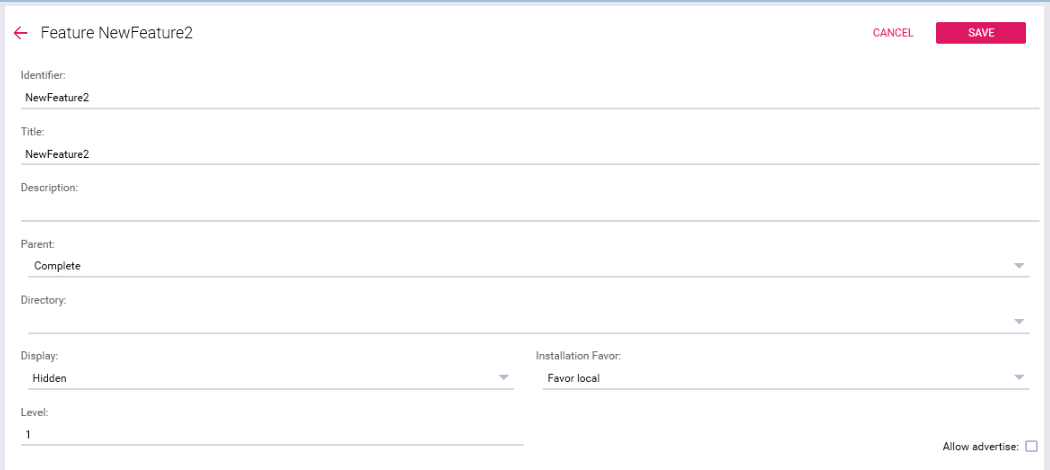
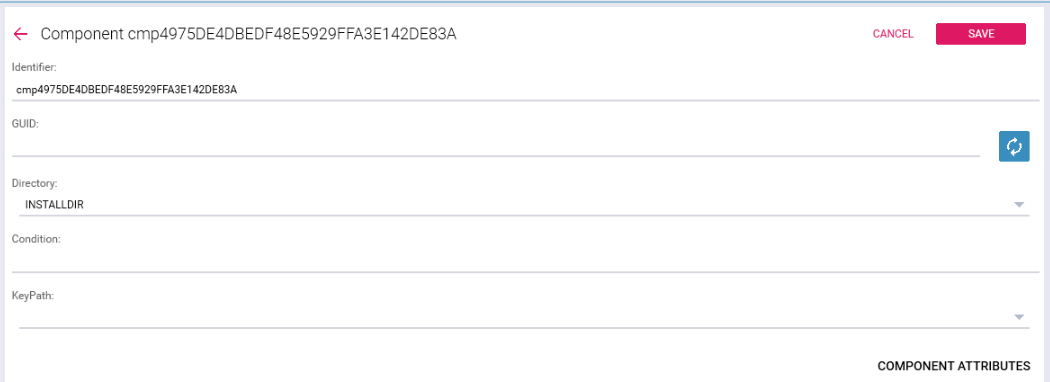
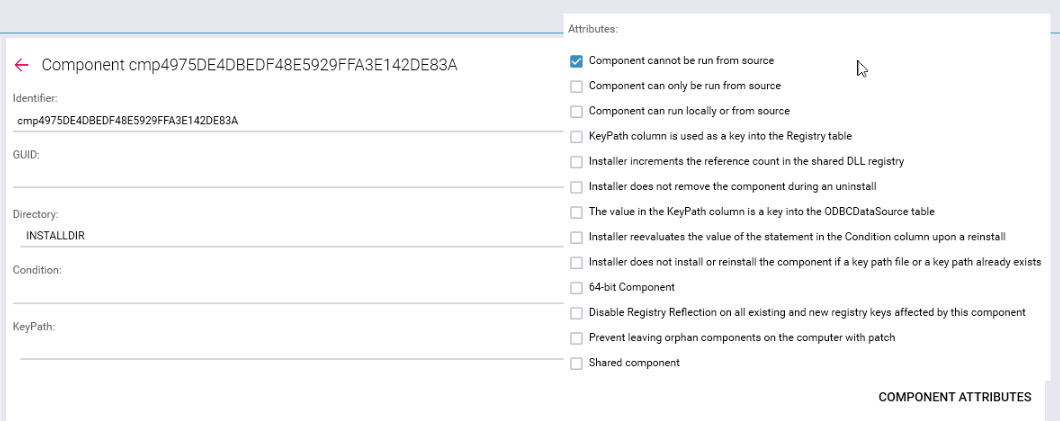
This tab enables a user to add, remove and edit features and components.
The option to add a new feature is available under the:
The option to add a new component is available under the:
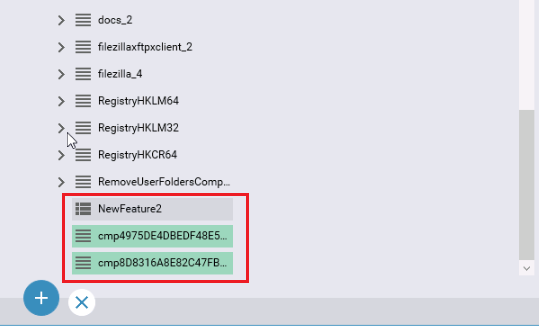
When a new feature or component is added it appears at the end of a tree view:
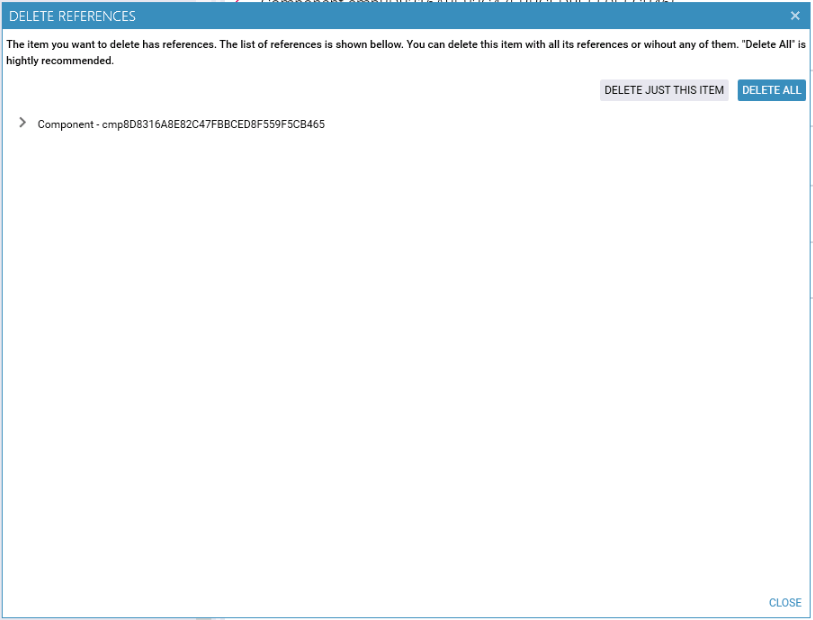
The option to delete an item is available under the:
When creating a new feature, an entry with default values appears:
When creating a new component, an entry with default values appears:
The features and components changes save when clicking the Save button. |
|
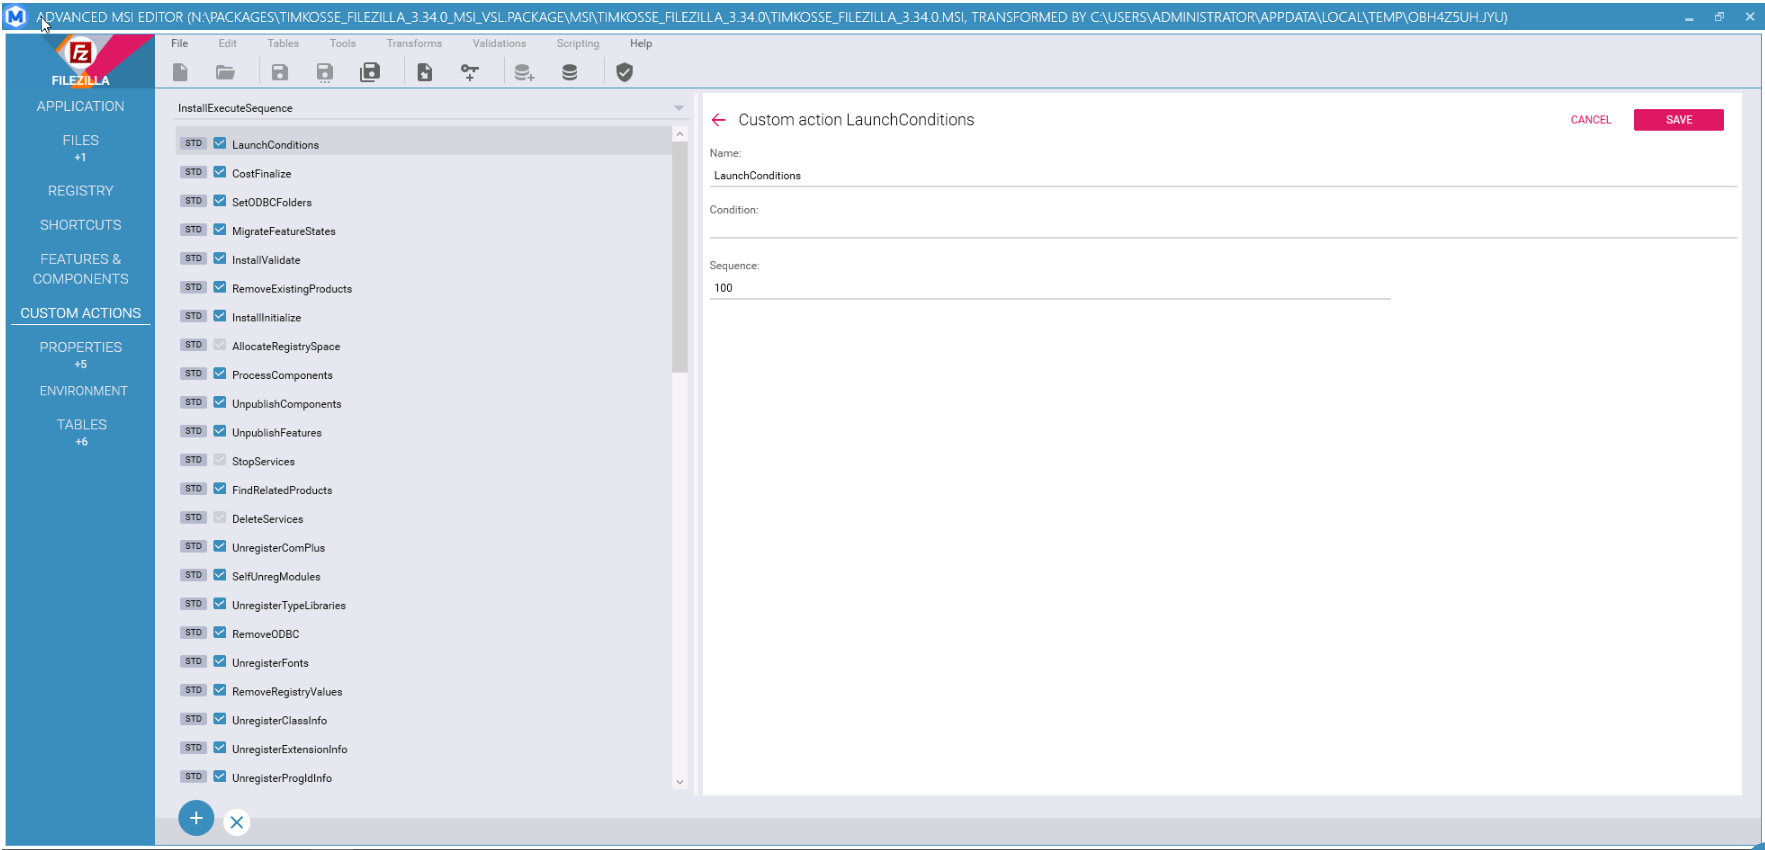
Custom actions |
The tab enables to view and edit custom or standard Windows Installer actions.
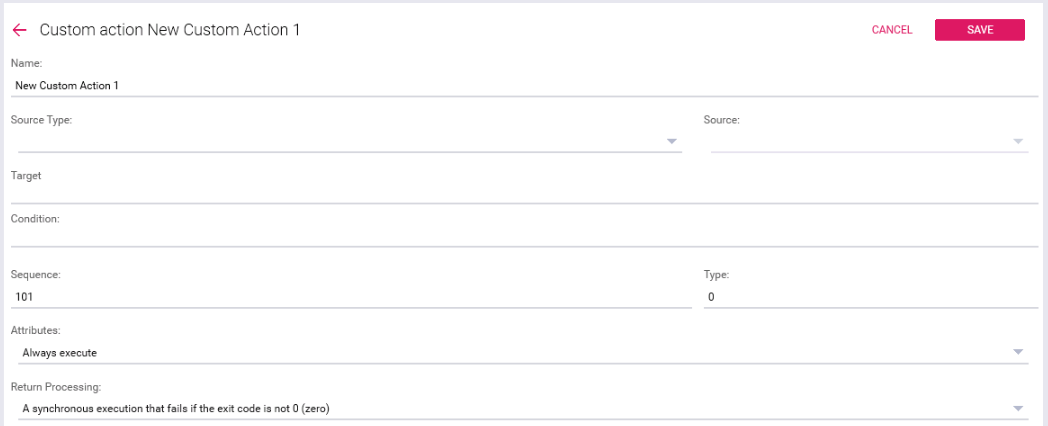
The option to add a new custom action is available under the:
When creating a new custom action, an entry with default values appears:
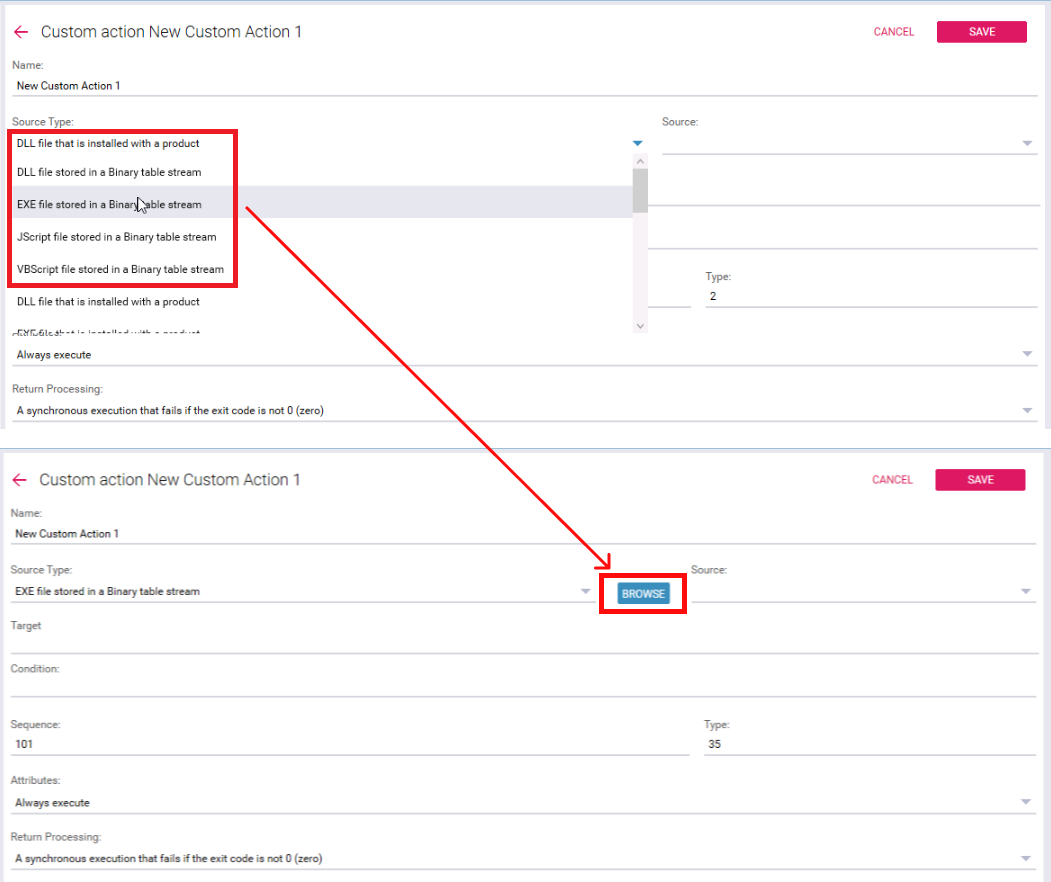
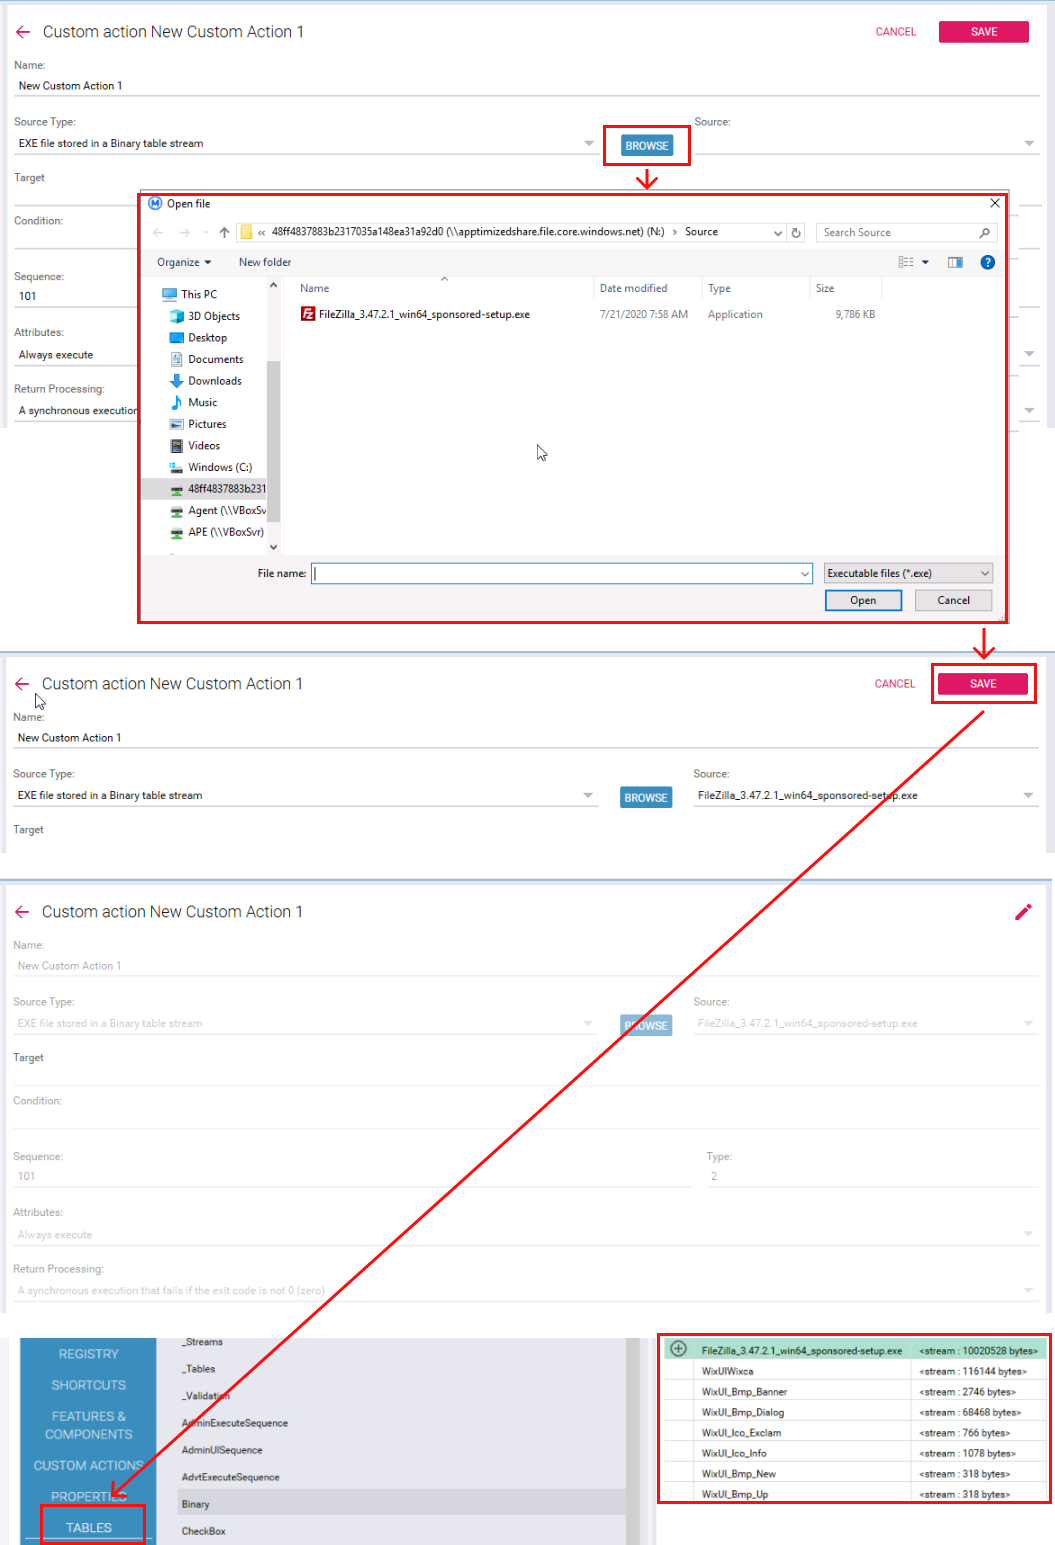
The option to choose a binary resource from the file system while creating new custom action is available under the Browse button. MSI advanced editor enables the Browse button when one of the “ … file stored in a Binary table stream” source types is selected.
MSI advanced editor automatically creates a row in Binary table when successful:
The option to add a new standard action is available under the:
When creating a new custom action, an entry with default values appears:
New action is enabled by default. To disable the action, uncheck the checkbox in front of its name (or Context menu > Disable option). The option to delete action is available under the:
|
|
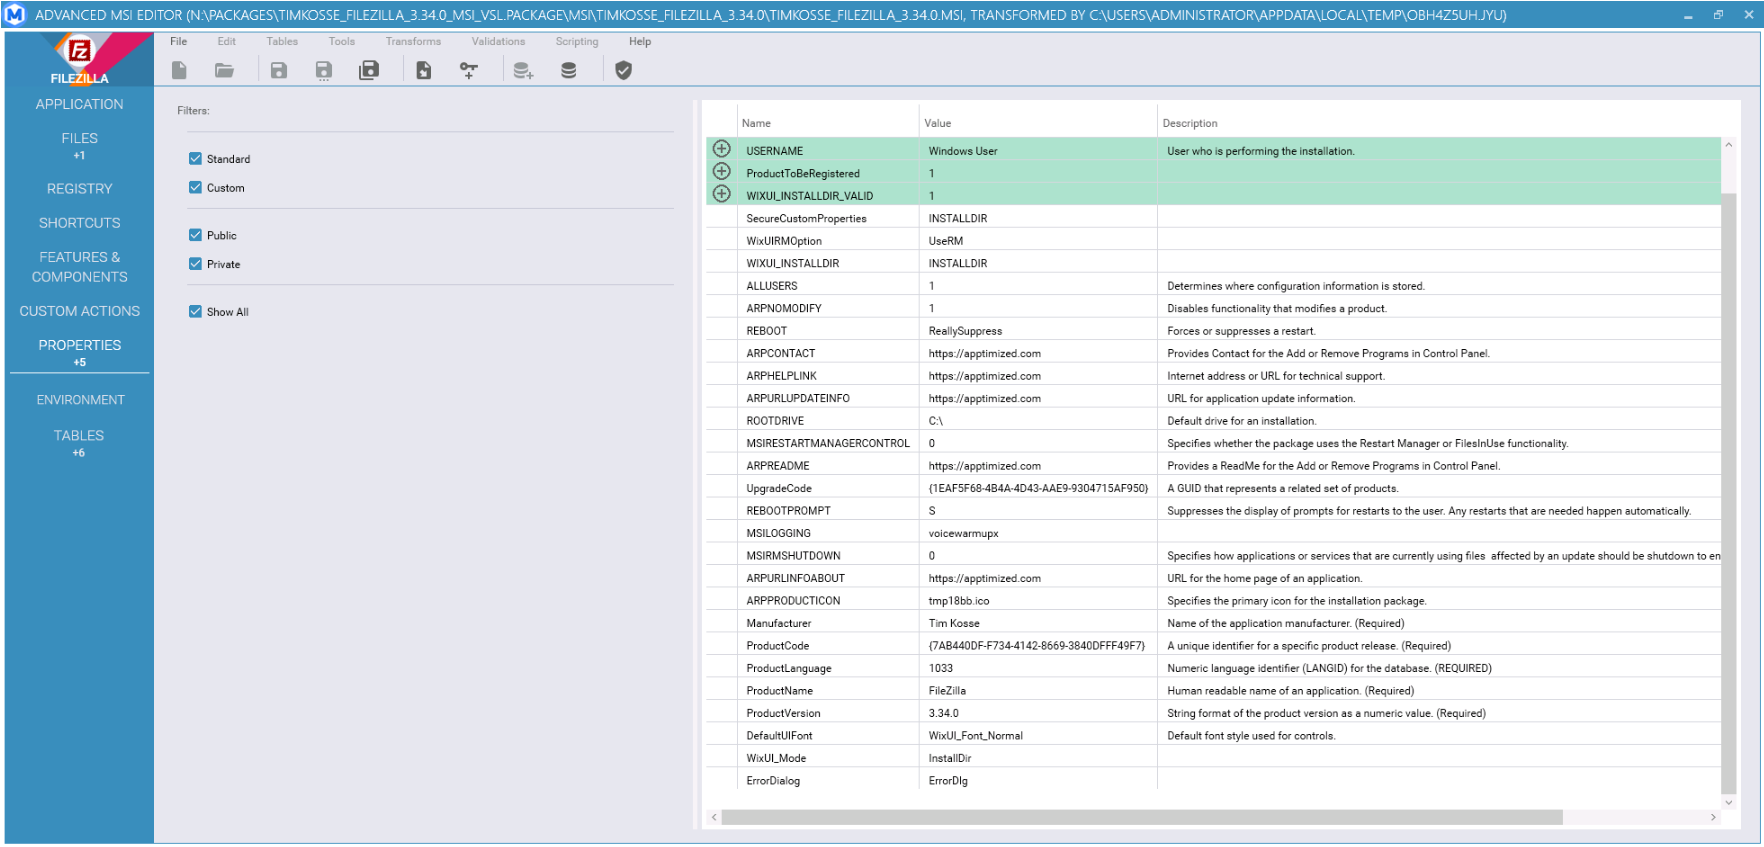
Properties |
This enables a user to work with the global variables that Windows Installer uses during an installation. The checkboxes on the left enable filtering by property type.
Note. Advanced MSI Editor mark additional properties added under the Project settings (see ARP & Properties): |
|
Environment |
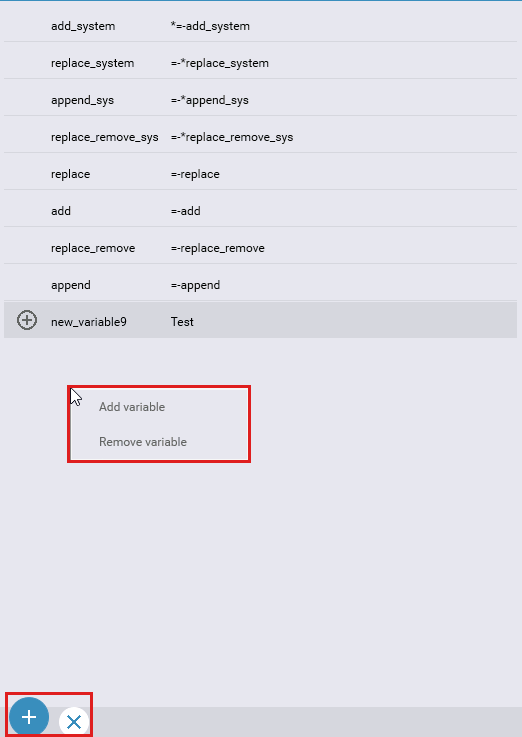
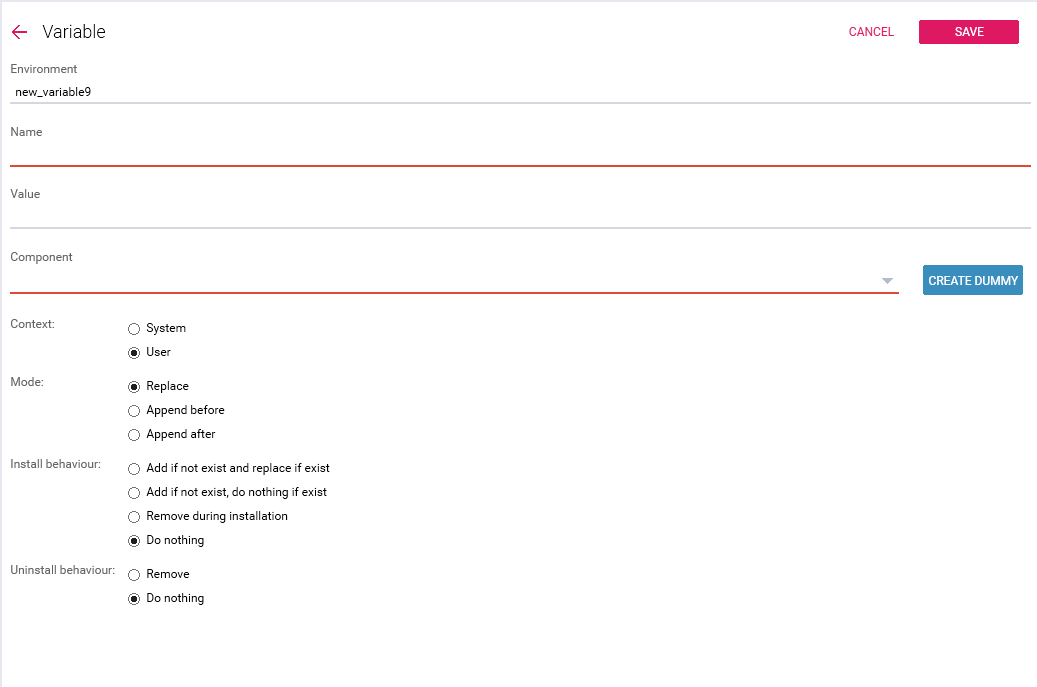
This tab enables a user to work with environment variables that Windows Installer uses during an installation. The option to add new envrionemt variable is available under the:
When creating a new custom action, an entry with default values appears:
The option to create dummy component is available after choosing Component under Component drop-down list > Create Dummy button. The option to create variable is available after filling Environment, Name, Value, Component fields > setting Context, Mode, Install behaviour, Uninstall behaviour options > Save button. AME shows the following screen when successful:
|
|
Tables |
This tab enables to work with MSI tables. The list of available tables is on the left. Empty tables are hidden by default. The checkbox on the bottom of the list enables a user to see empty tables. The grid on the left displays the contents of the table. The content is editable if the table is not read-only.
|


.png)


.png)
The table below is the table of contents:

The first tab shows the records associated with the selected item, the second tab shows the result of the validation:
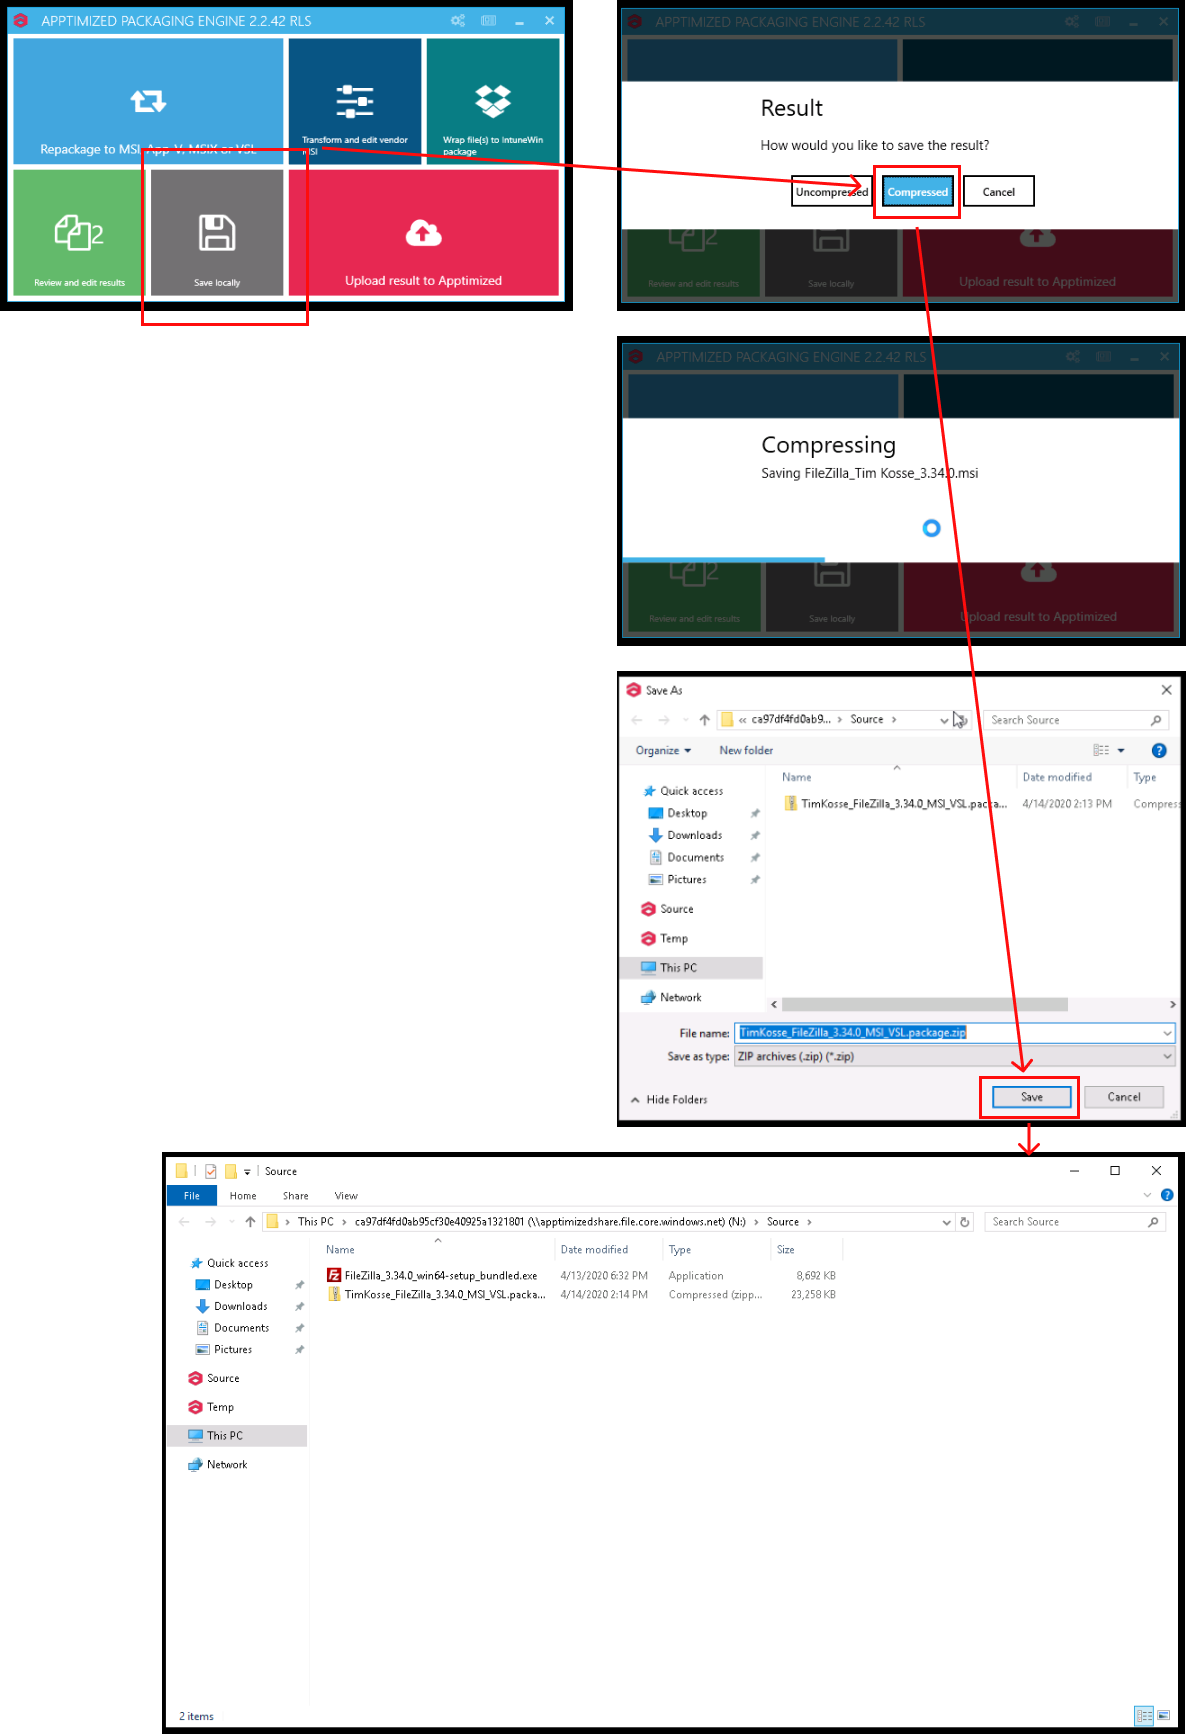
Save locally
The option to save results to the local filesystem for further editing or inspection is available under the Save locally button.
The Save locally option becomes active when a package produced.
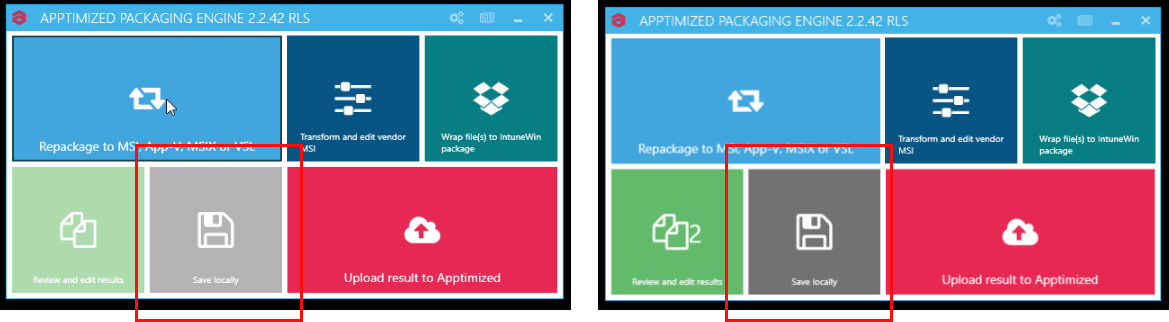
To options to save results available: Uncompressed and Compressed. The default value is Compressed.
The result comes compressed in a ZIP file.
Upload result to Apptimized
The option to transfer the package(s) from the VM to the Apptimized frontend is available under the Upload result to Apptimized button.
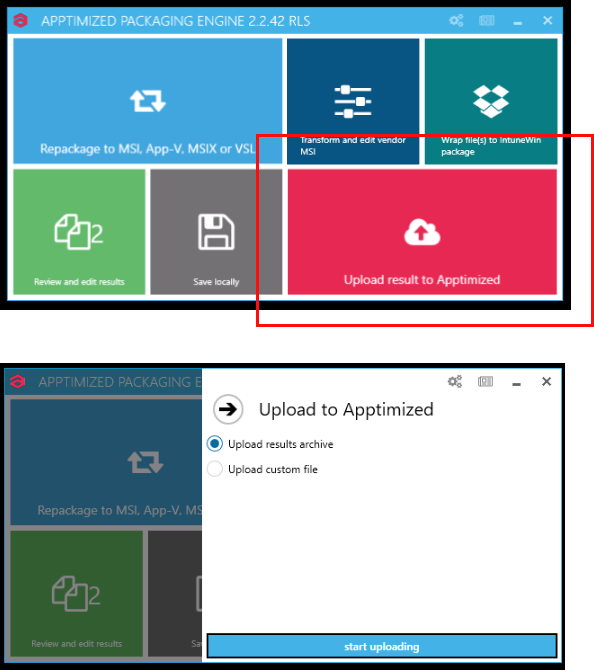
Two options available:
- Upload results archive produced during the repackaging/transformation processes from the VM to the frontend;
- Upload custom file from the VM's file system (ZIP archive) to the frontend.
To select the option, check the box in front of its name (Check the box > Start uploading button).
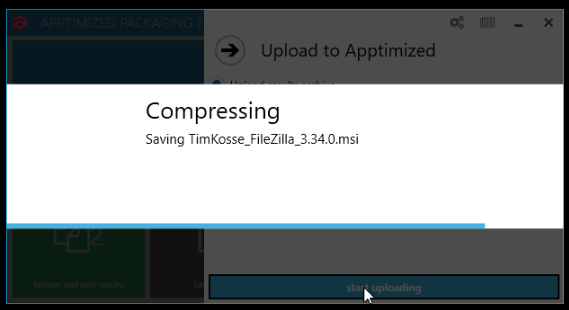
The upload process time depends on the file size and may takea few moments:
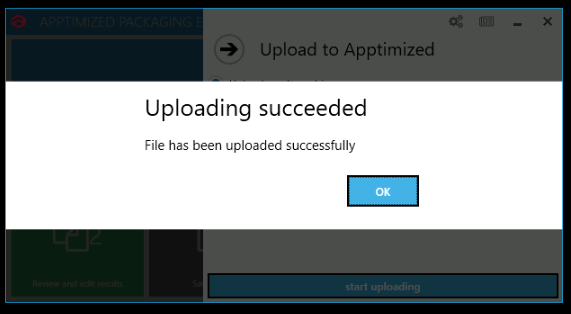
APE shows the following notification when successful:
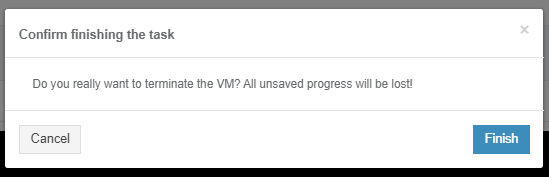
When the files uploading process is completed, the VM can be terminated.
The options to finish the VM session is available under the Finish button.
.png)
Apptimized shows the following modal window:
The following interface will appear when recording session with Apptimized VM finishes:

Apptimized MSIX AppAttach Converter
General Overview
MSIX App Attach is a way to deliver MSIX applications to both physical and virtual machines. A Microsoft technology allowing to make MSIX packages compliant for virtualized desktop environments such as Windows Virtual Desktop.
The Apptimized MSIX AppAttach Converter is a tool that allows to automatically convert the existing MSIX packages to VHD (Virtual Hard Disk) files based on MSIX App Attach technology.
The tool is available in the Workspace Launcher (see the Workspace Launcher).
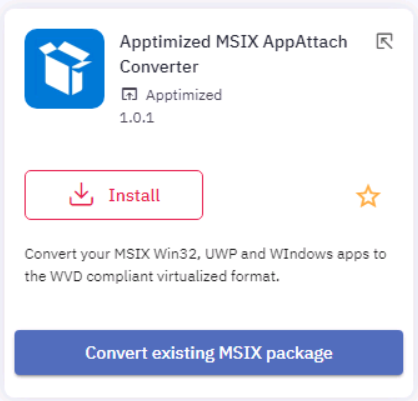
The option to install the application is available under the Install button (see the Application installation).
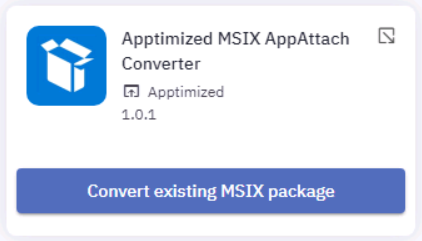
Convert existing MSIX package
A user can convert the existing MSIX package into MSIX app attach package. This option is available under Convert the existing MSIX package button.
Apptimized shows the following screen when successful:
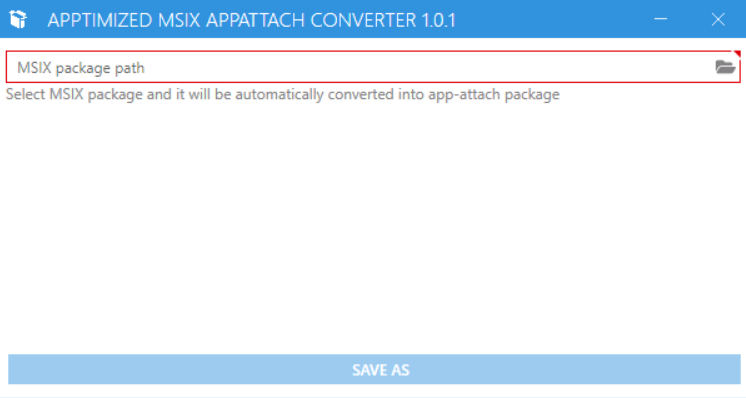
A user can select the existing MSIX package by clicking the Folder icon.
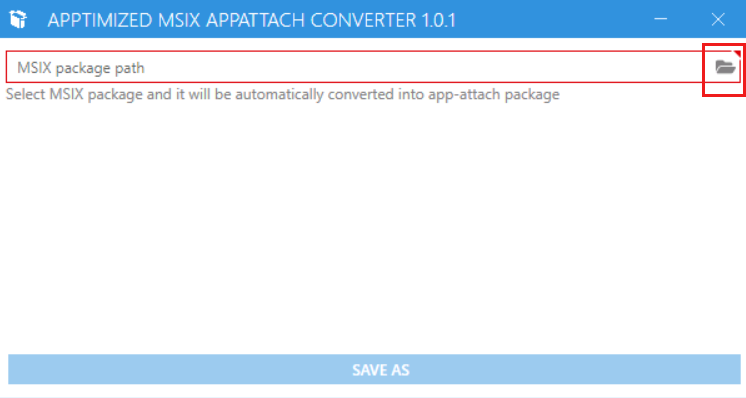
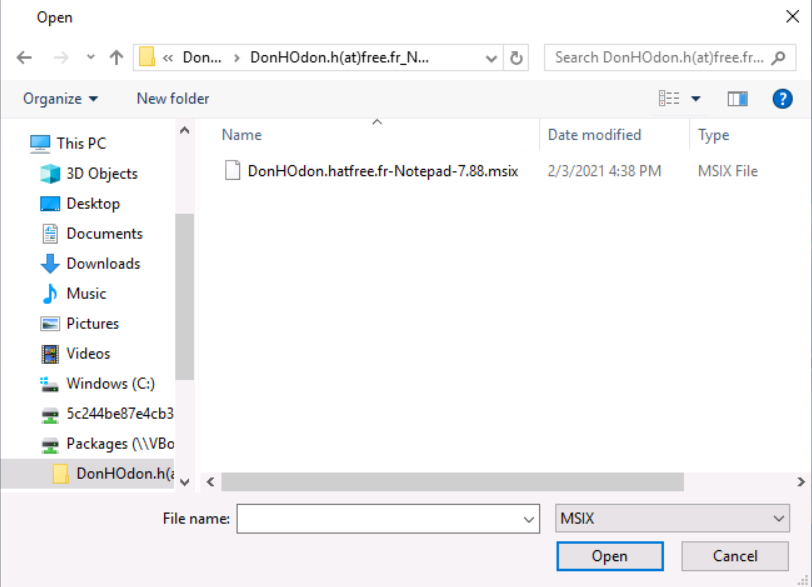
A user can select an MSIX file that will be automatically converted to the app-attach package and click the Open button to start the converting process.

Apptimized shows the following screen when successful:
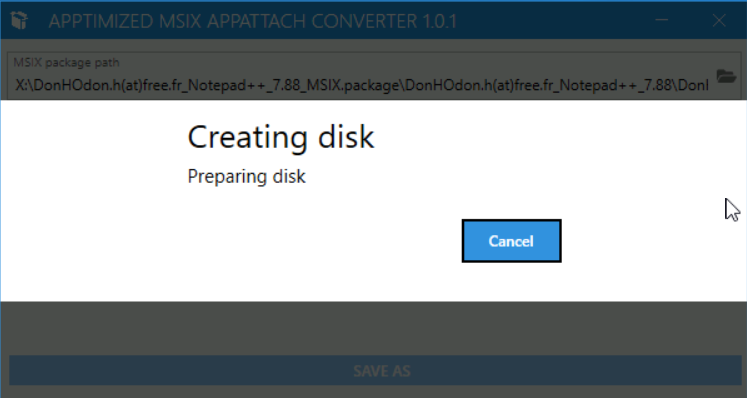
The creation process may take few moments. Cancel - stop the VHD file creation.
After completing the creation a user can save the app-attach package (VHD file by clicking the Save button.
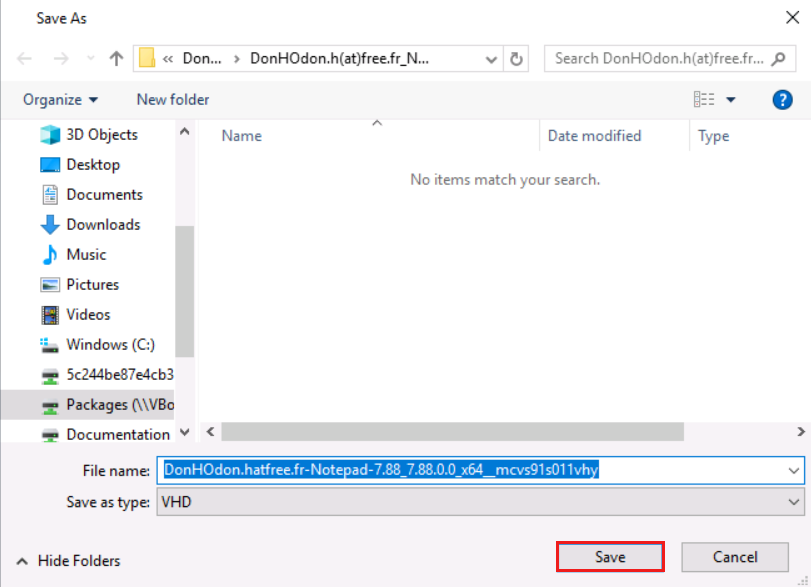
The process may take few moments.
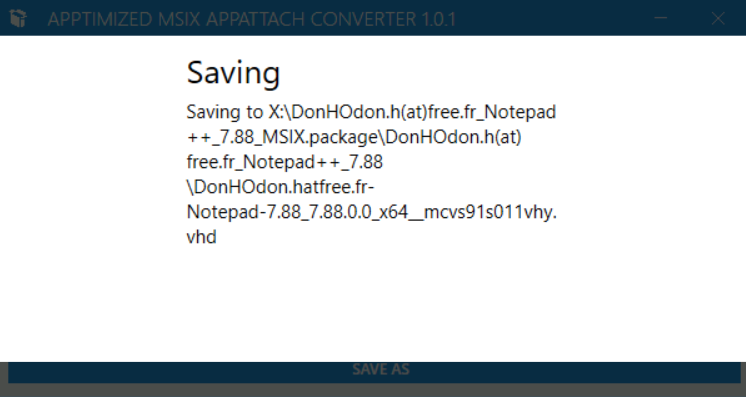
Apptimized shows the following screen when successful:
Package wrapping
A wrapper is a set of PowerShell scripts that provides a set of functions to perform common application deployment tasks and to interact with the user during deployment activities. It provides information about the package, commands for installation, de-installation, and post configuration. Regardless of the number of installers in the package, a customer needs to run only the executing wrapper.
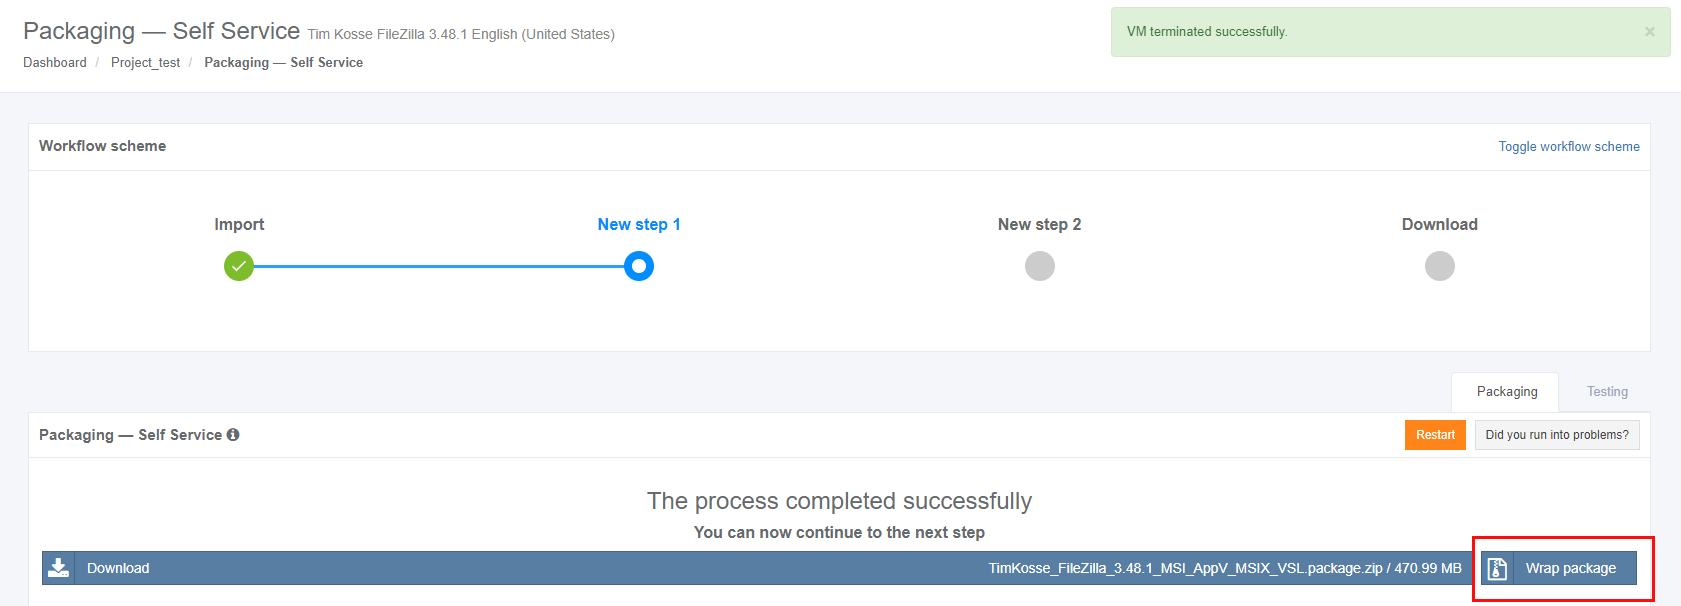
The option to wrap a recently produced package is available under the Wrap package button. The Wrap package button becomes available when a user has completed the packaging activities and finished the VM.
Note. To apply custom templates, a user needs to configure them in Project settings.
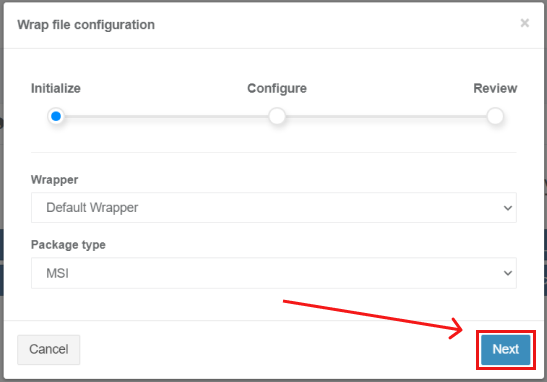
Apptimized shows the following modal windows:
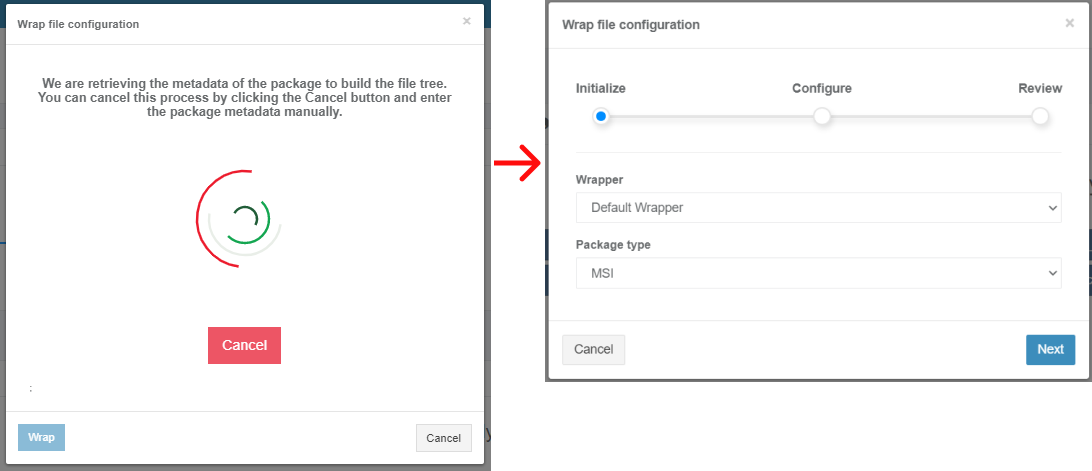
The table below shows the components of the default wrap file configuration at Initialize step:
| Setting | Details |
| Wrapper |
This field indicates the wrapper to be used for wrapping. The following options are available:
The default value is Default Wrapper. |
| Package type |
This field indicates the list of package types for which this template will be applicable. The following package types available:
The default value is MSI. |
The option to switch to step Configure is available under Next button.
Apptimized shows the following modal window when successful:
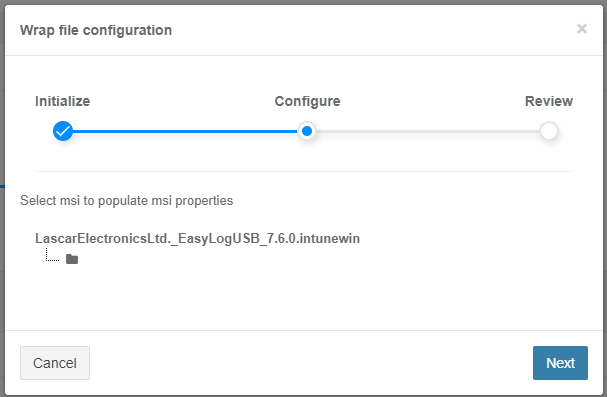
The option to populate MSI properties is available under package folder > package file
.png)
The option to switch to step Review is available under Next button.
Apptimized shows the following modal window when successful:
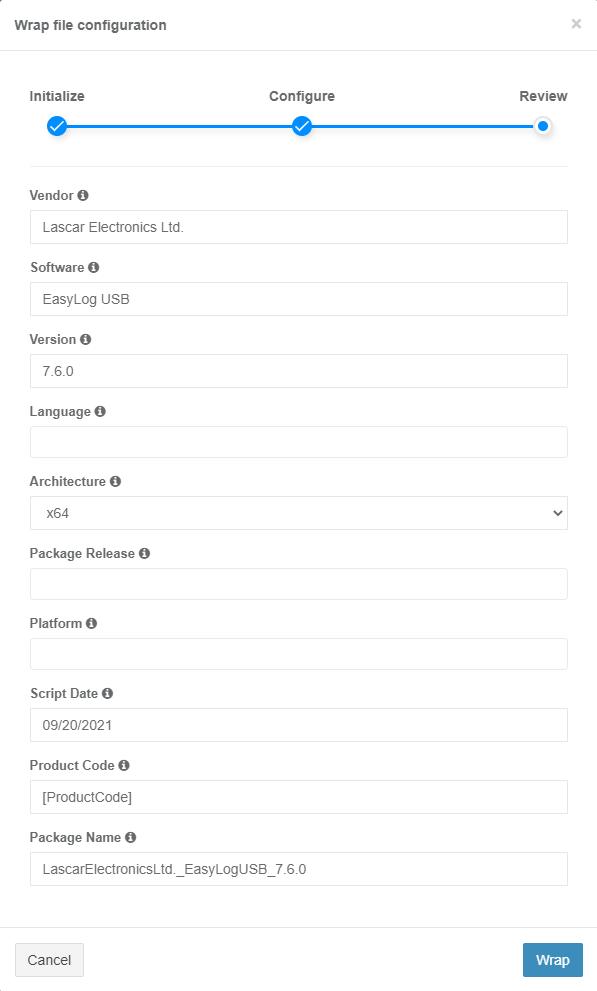
The table below shows the components of the default wrap file configuration at Review step:
|
Setting |
Details |
|
Vendor |
This field indicates the vendor of the application. The data synchronizes from the metadata collected at the Import step. |
|
Software |
This field indicates the name of the application. The data synchronizes from the metadata collected at the Import step. |
|
Version |
This field indicates the version of the application. The data synchronizes from the metadata collected at the Import step. |
|
Language |
This field indicates the language of the application. The following options available:
The multiple-choice is available. |
|
Architecture |
This field indicates the package architecture. The following options available:
The default value is x64. |
|
Package Release |
This field indicates the package’s version number. The following options available:
|
|
Platform |
This field indicates the platform the test activities were provided. The following options available:
The multiple-choice is available. |
|
Vendor M S I |
This field indicates the Vendor name of the selected MSI (i.g., Setup.msi).
Note. This field appears only if the Transform package type was selected under Initialize step and the MSI file was selected under Configure step. |
|
Script Date |
This field indicated the date when the script was created or changed. The default value sets to the package creation date (i.e., Month/Day/Year). |
|
Product Code |
This field indicates the MSI product code using the template {ProductCode}. |
|
MST Name |
This field indicates the MST file name(i.g., Setup.mst).
Note. This field appears only if the Transform package type was selected under Initialize step and the MSI & MST files were selected under Configure step. |
|
Package Name |
This field indicates the name of the package installation file (i.e., TimKosse_FileZilla_3.48.1). The package name generates according to the Project settings. A user must follow the naming templates indicated in the Project settings > Workflow settings > Packaging – Self Service > General. |
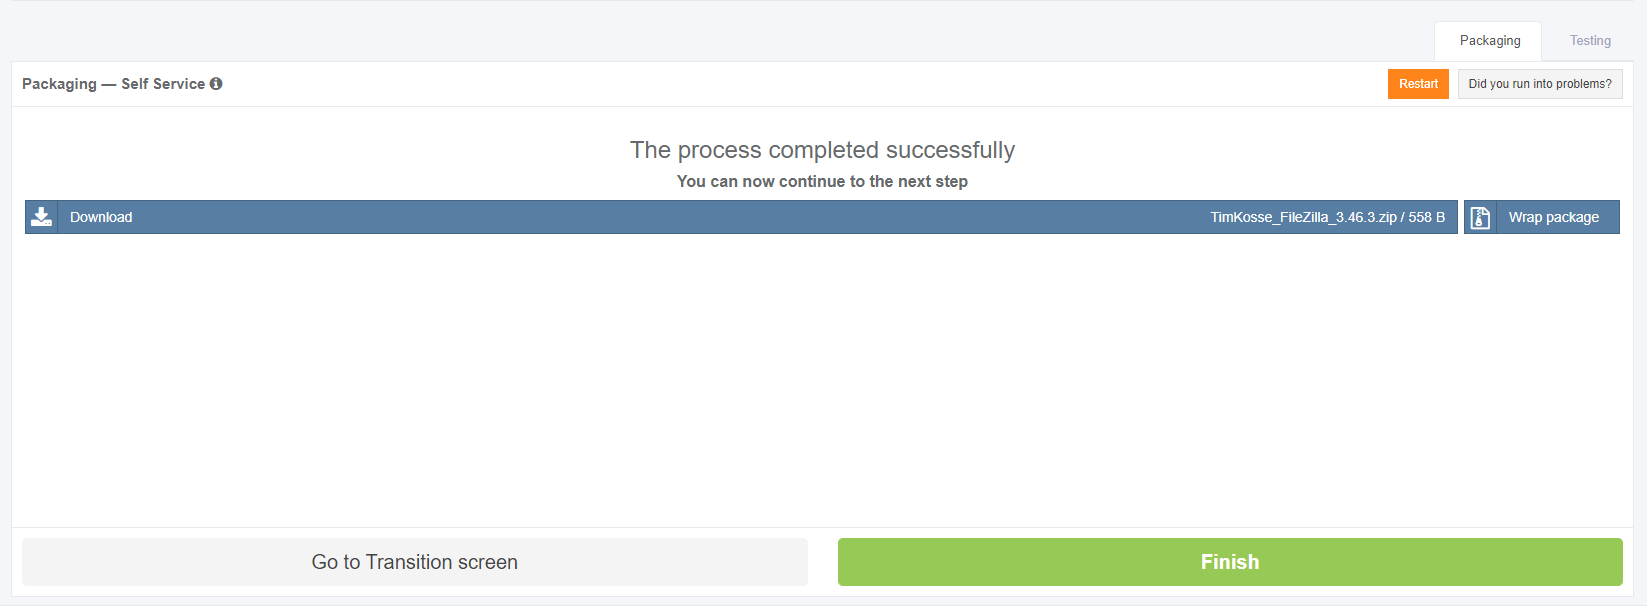
The wrap file configuration is applied when clicking the Wrap button. Apptimized shows the following screen:
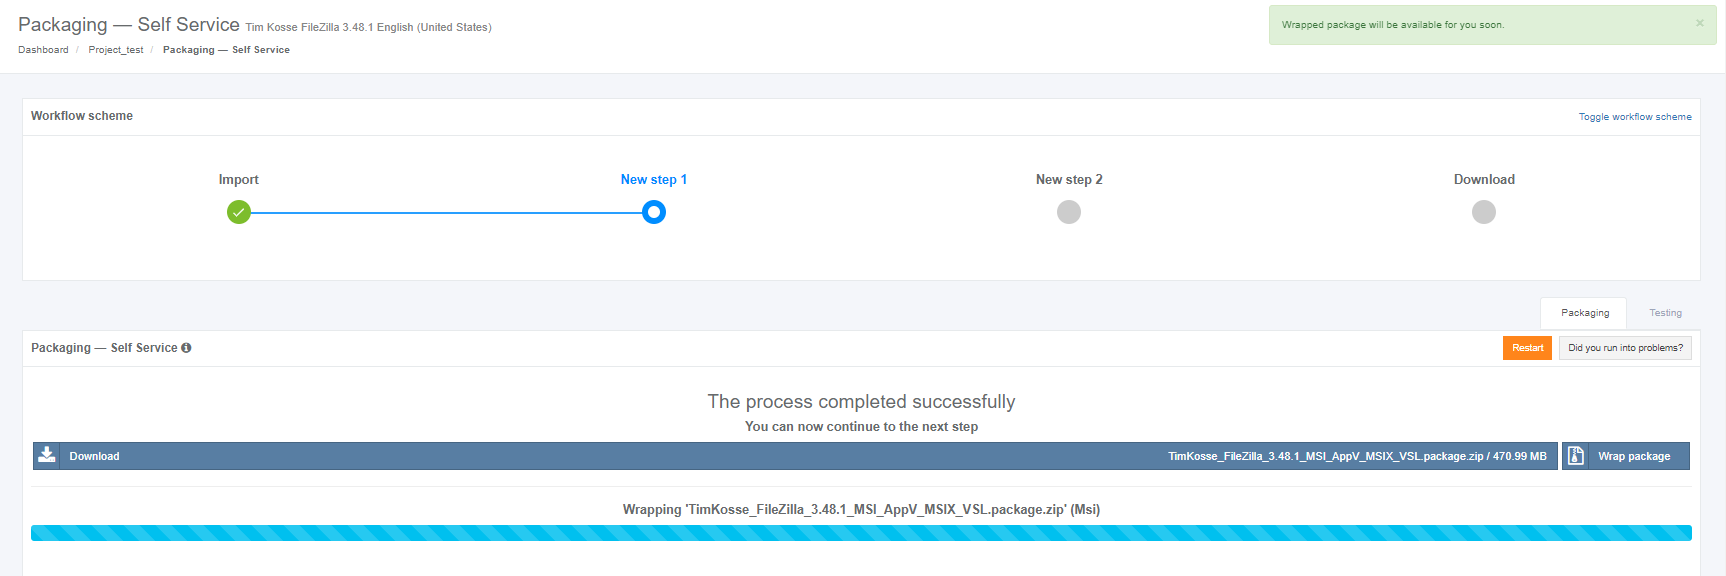
The wrapped package appears in the list when successful:

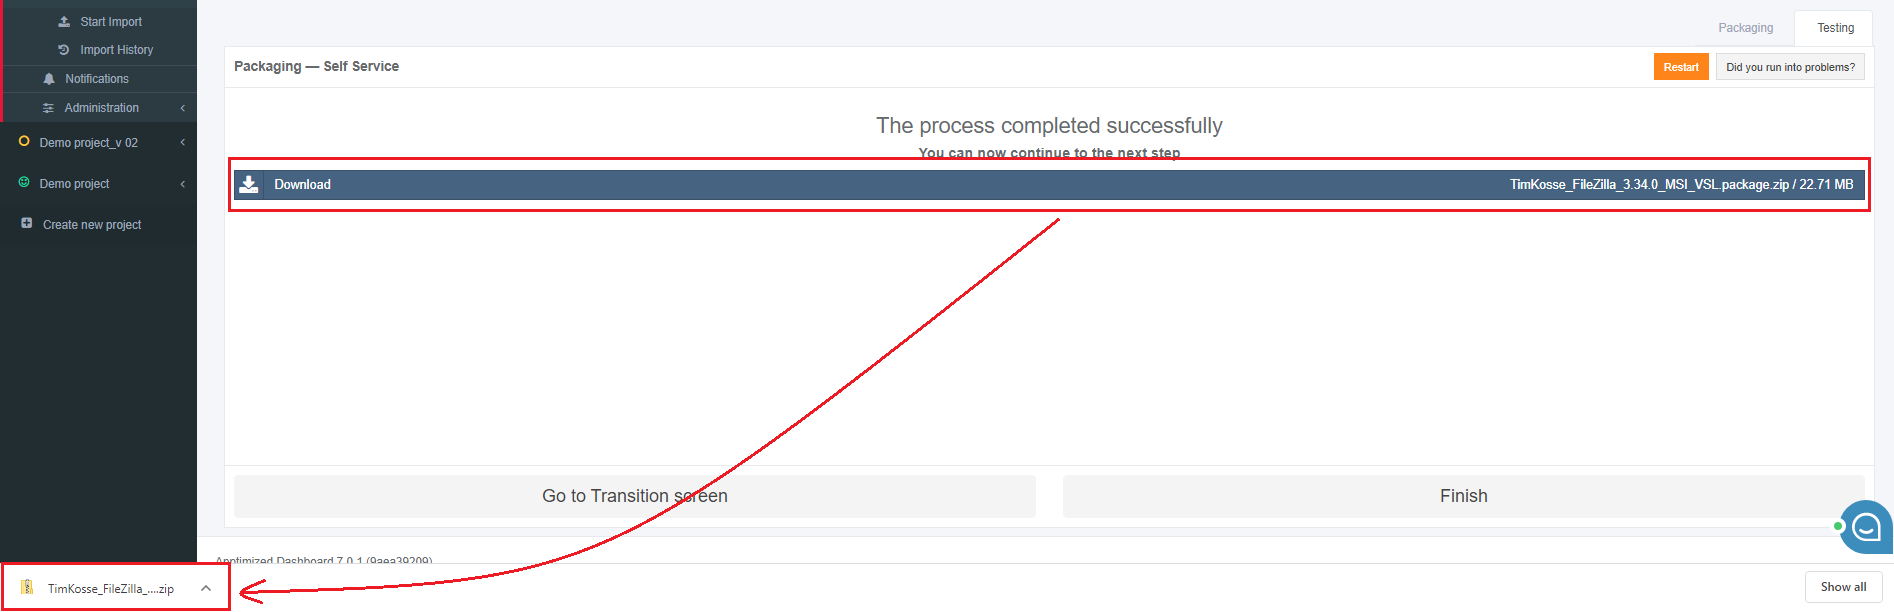
The option to download packaging results is available under the Download button.
When the packaging results downloaded, a user can proceed to the next step by clicking the Finish button or can test the package by clicking the Testing tab.
Testing tab
The best practice is to test packages on a clean machine, i.e. on a different VM than the one the package was created. This also applies to package iterations performed to test the impact of changes made to the package during packaging and editing, also known as trial and error. At the same time, it makes sense to keep the actual packaging machine as a reference for a working installation.
Therefore, Apptimized provides a second VM within the Packaging step under the Testing tab. It is possible to switch between the Testing and the Packaging tabs while both VM's are up and running.
Again, the Packaging and the Testing VM's act independently but share the A:\ drive.
Whenever a clean VM is needed again (e.g., after some tests), click the Restart button on the Testing tab, and a VM will be provisioned instantly. A user can do the same on the Packaging tab but must be aware that this will discard "reference installation".
Apptimized shows the following screen when clicking the Testing tab.
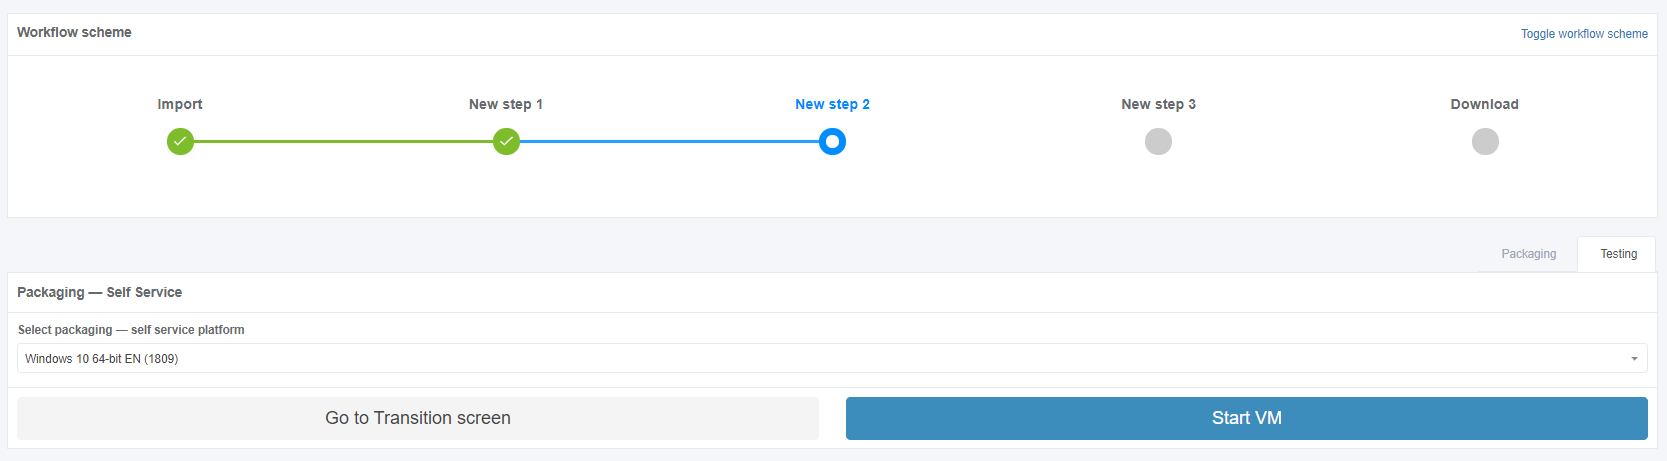
The field Select packaging – self service platform is filled automatically and can be changed if needed. To change the packaging – self service platform, click the drop-down menu as it is shown in the screenshot below:
The option to revert to the transition screen is available under the Go to Transition screen button.
The option to start the packaging – self service (package testing) process is available under the Start VM button.
Apptimized shows the following screen when successful:
.png)
The option to restart VM is available under the Restart button.

Apptimized shows the following modal window to confirm the restart task: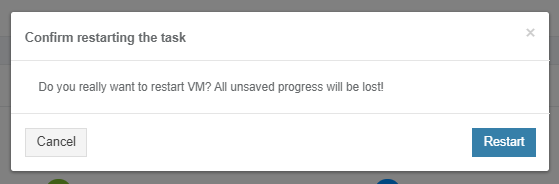
Apptimized shows the following notification when successful:

The option to launch the package is available under Packages folder > [Package name]> [Package type] > install.cmd.

A package will install automatically without requiring any user input:
The packaged application must be launched, to check that all configuration settings are correct. A setup wizard will appear:
When the package testing activities finish, the VM must be terminated. The options to finish the VM session is available under the Finish button.
.png)
Apptimized shows the following modal window:

The following interface will appear when recording session with Apptimized VM finishes:

The option to download package testing results is available under the Download button.
When the packaging results are downloaded, a user can proceed to the next step by clicking the Finish button.
VM control menu
.png)
Next, each settings category is shown in more detail.
Table 9. VM control menu
|
Control menu category |
Details |
|
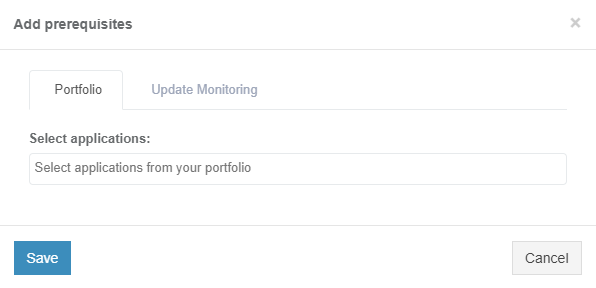
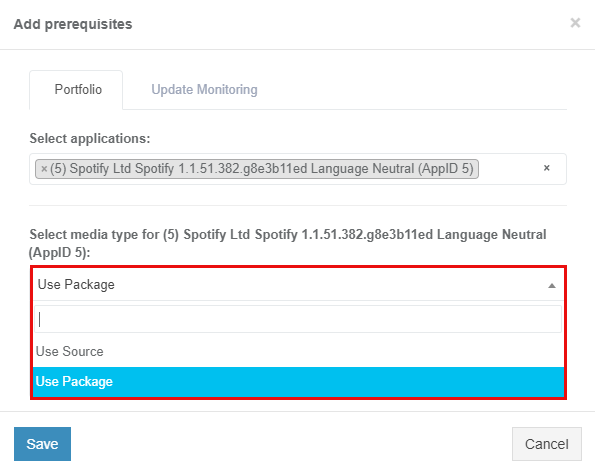
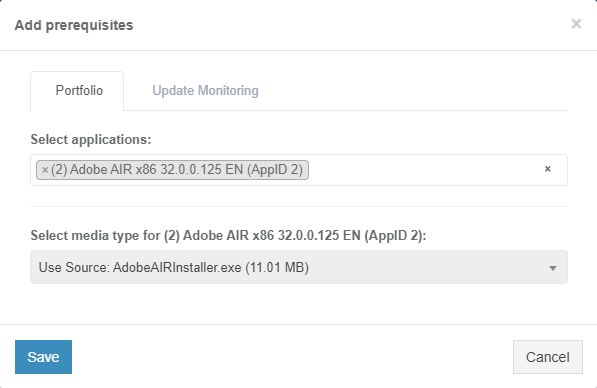
Add prerequisites/Edit prerequisites |
This setting enables a user to add prerequisite applications. Portfolio tab is available by default. Update Monitoring & Catalogue tabs become available if there are delivered packages on them.
Portfolio tab
The option to select application is available under Select applications field.
The option to select media type for applications is available after the application was selected. The following media types available:
Note. One media type is automatically selected if others are missing.
The option to use Source media type is available under Use Source > Select Media > select source file.
The option to use Package media type is available under Use Package > Select Media > select package file.
Update Monitoring
Update Monitoring tab allows to add prerequisites as applications from Update Monitoring delivered packages.
The option to Select application from Update Monitoring is available under Select applications: field > Select Version for application.
Catalogue
Catalogue tab allows to add prerequisites as applications from Catalogue delivered packages.
The option to select applications from the Catalogue is available under Selec applications: field > Select Version for application.
The option to Save Changes is available under Save button.
Apptimized shows the following notifications when successful:
The option to Edit prerequisites becomes available after the prerequisites were added. |
|
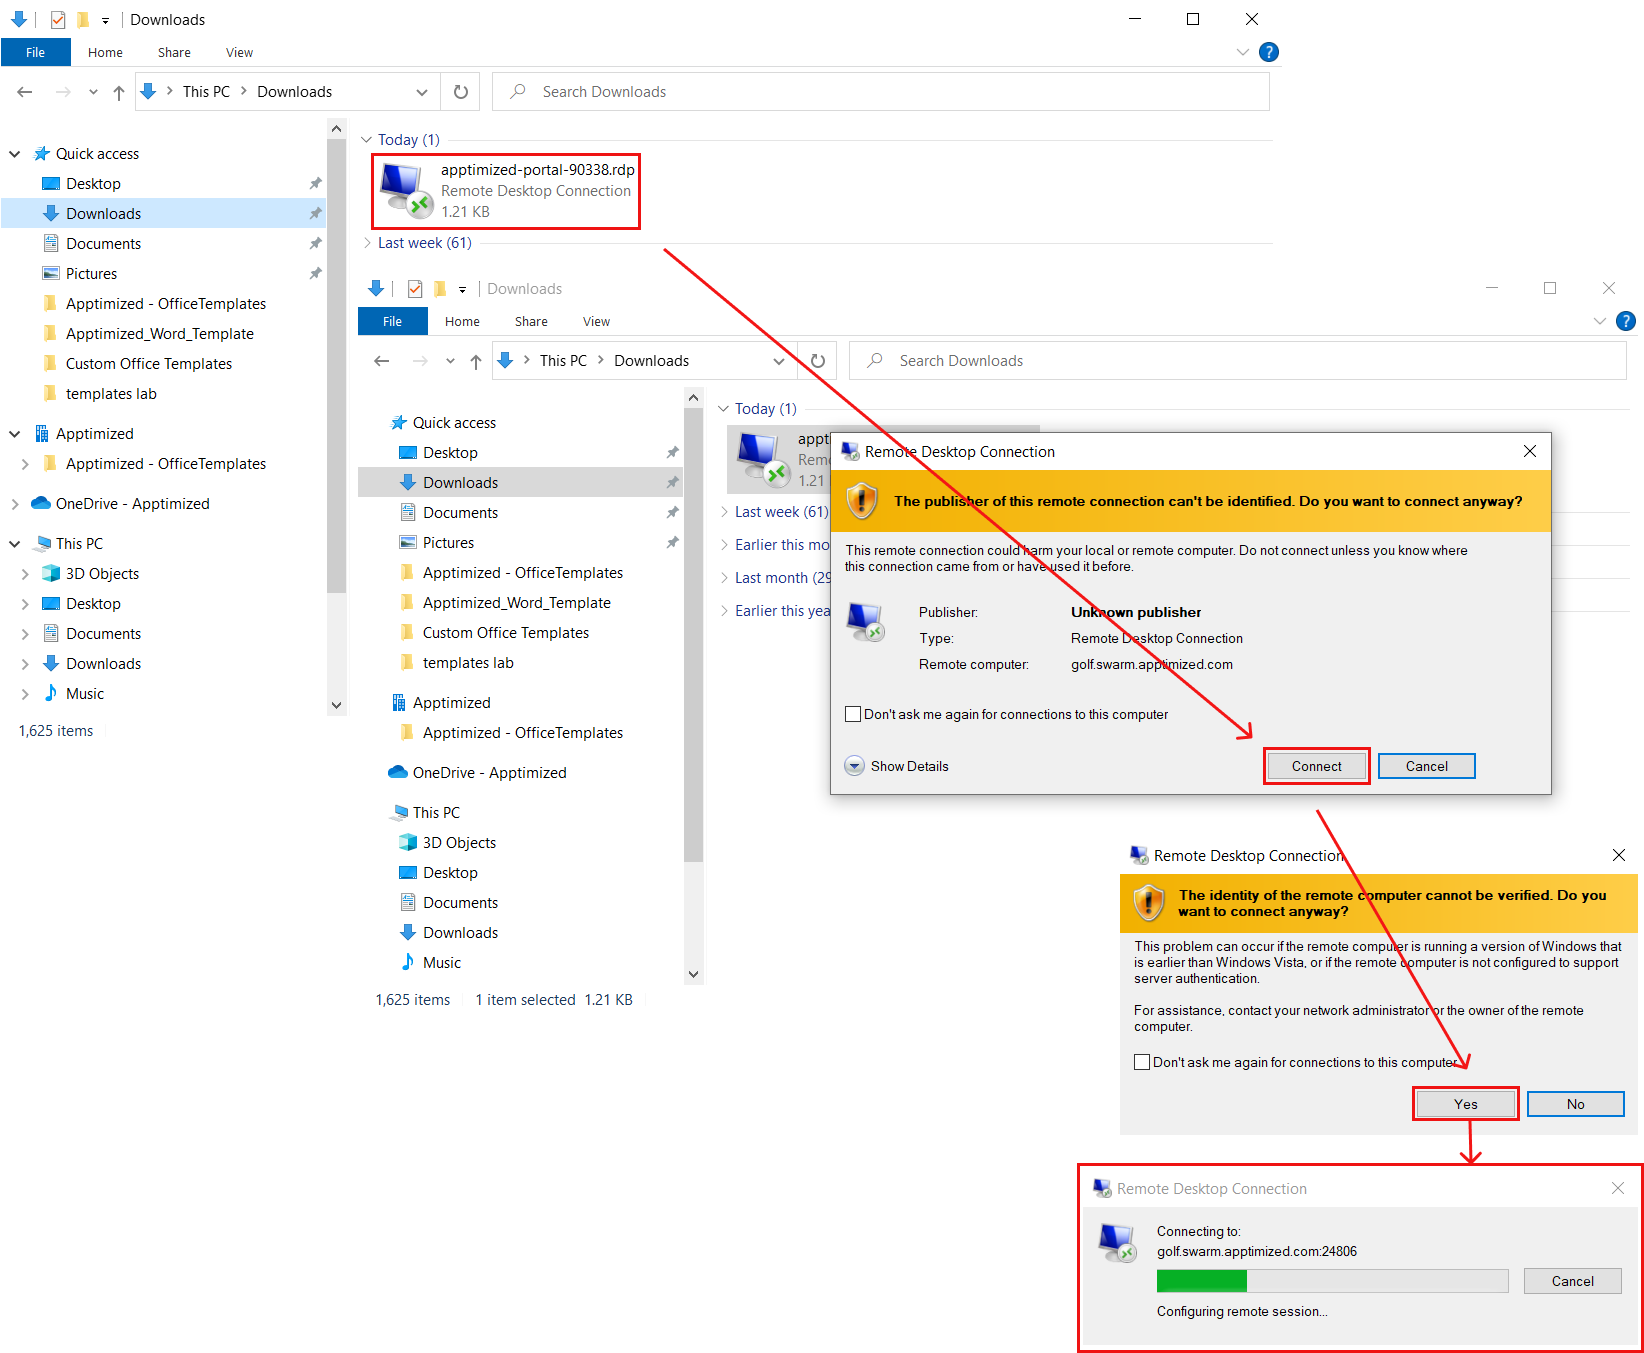
RDP |
This setting enables a user to work on the VM directly via RDP rather than a browser window.
The option to download a file is available under the Download RDP file. The RDP file is available in the Downloads folder in user’s PC.
When the remote connection is set, copy the RDP password paste to the modal window. The remote desktop connection window appears when successful:
|
|
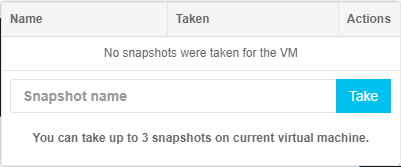
VM Snapshots |
The setting enables to create a snapshot of the VM to save its current state or to revert to a state saved earlier. This is applicable when the application has prerequisites that need to be present before a certain action (i.e., Discovery, Packaging, or Testing) can be started.
The snapshot option is available under the VM snapshot button > Snapshot name field > Take button. |
|
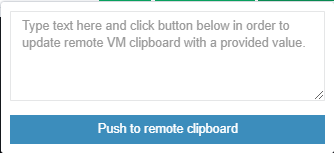
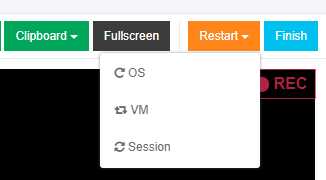
Clipboard |
This setting enables a user to put text from the user’s system to the VM clipboard. Transferring clipboard content between the host machine and the VM is performed via "Cut & Paste" in most user scenarios. If the user experiences any issues with "Cut & Paste", the Clipboard button can be used to put the text to the VM's clipboard.
|
|
Fullscreen |
This setting enables to put a browser in a full-screen mode. |
|
Restart |
This setting enables a user to redo the testing session on a restarted VM. The following restart options available:
When the restart option is chosen, the confirmation model window appears. |
|
Finish |
This setting finishes the VM when the testing session is completed. |
.png)
.png)
.png)
.png)
.png)


.png)
Apptimized MSIX PSF Tool
General overview
Package Support Frameworks is an open-source kit that helps apply fixes to the existing desktop application without access to the source code. It can run in an MSIX container.
Apptimized MSIX PSF Tool allows applying fixups semi-automatically to a Win32 application in existing MSIX files.
The tool is available in the Workspace Launcher (see the Workspace Launcher)

The option to install the application is available under the Install button (see the Application installation)
Run Apptimized MSIX PSF Tool
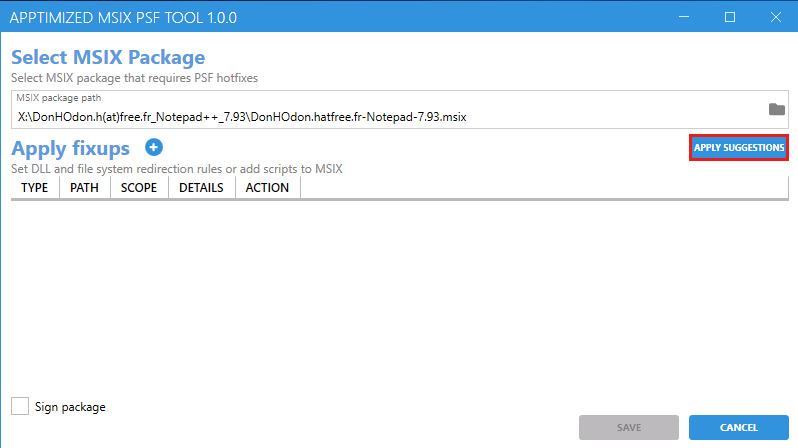
A user can apply the fixes in existing MSIX files. The option is available under Run Apptimized MSIX PSF tool button.

Apptimized shows the following screen when successful:
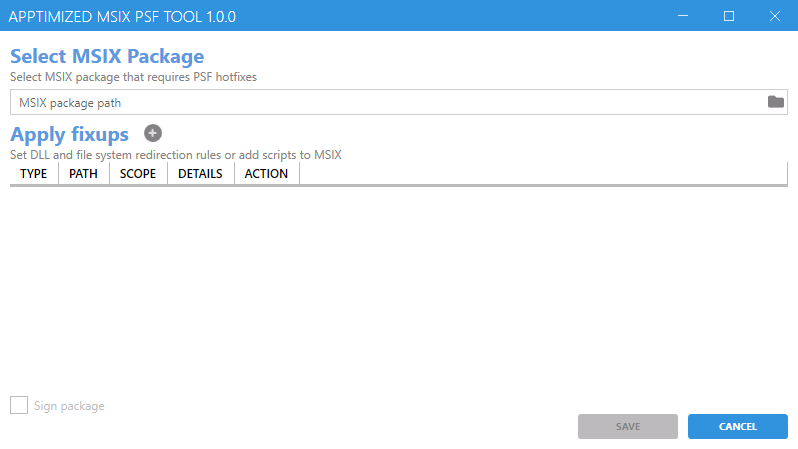
Select MSIX package
A user can select the existing MSIX package by clicking the Folder icon.
.png)
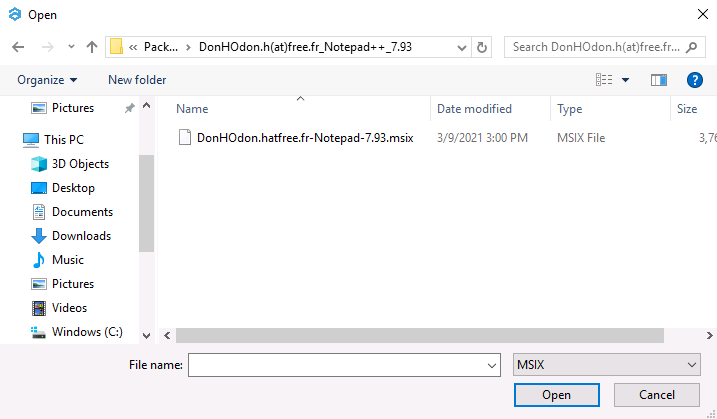
A user can select an MSIX file to automatically check for errors and all the appropriate fixes for them and click the Open button to start the checking process.
.png)
Apptimized shows the following screen when successful:
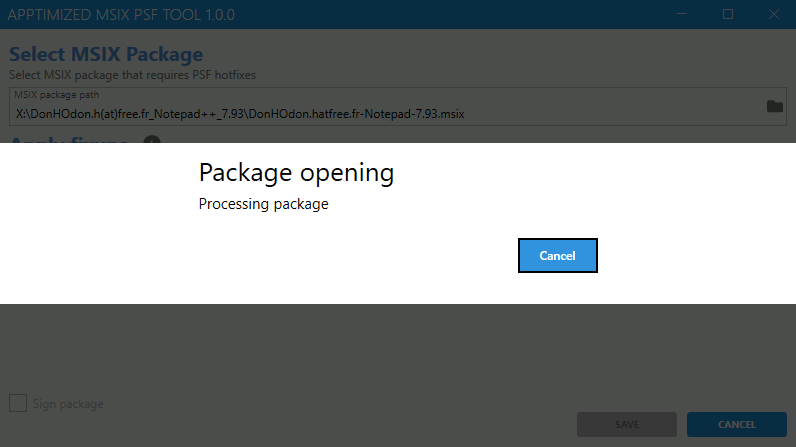
The opening process may take a few moments. Cancel – stops the package opening.
Apptimized shows the following screen after successfully opening:

Fixup suggestions are automatically provided after the package opens. They can be manually added, by clicking the Apply suggestions button.
To create default fixups based on package content, click Create. Cancel – reverts to general Apptimized MSIX PSF Tool section.
Apptimized shows the following screen when successful:

Apply fixups
Fixup suggestions will be provided in the general Apply fixups section. Apply fixups allow setting DLL and file system redirection rules or setting command-line arguments to the MSIX package.
.png)
The fixups data is performed in 2 blocks:
- Information block – this block contains detailed information about fixups.
- Action block – this block provides options to configure the fixups.
.png)
Fixup's data is grouped into the following categories:
- Type
- Path
- Scope
- Details
.png)
|
Column name |
Details |
|
Type |
This field indicates the type of provided fixup |
|
Path |
This field provides the file system path to the place fixup effects |
|
Scope |
This field indicates the target application (file.exe or regular expression pattern) |
|
Details |
This field shows the redirect options (files pattern, dll name, etc.) patterns of the fixup |
Fixup’s actions are grouped into the following categories:
- Edit fixup
- Delete fixup
- Make copy
To apply fixups provided by the Apptimized MSIX PSF Tool, click the Save button.
.png)
Apptimized provides the following screen:
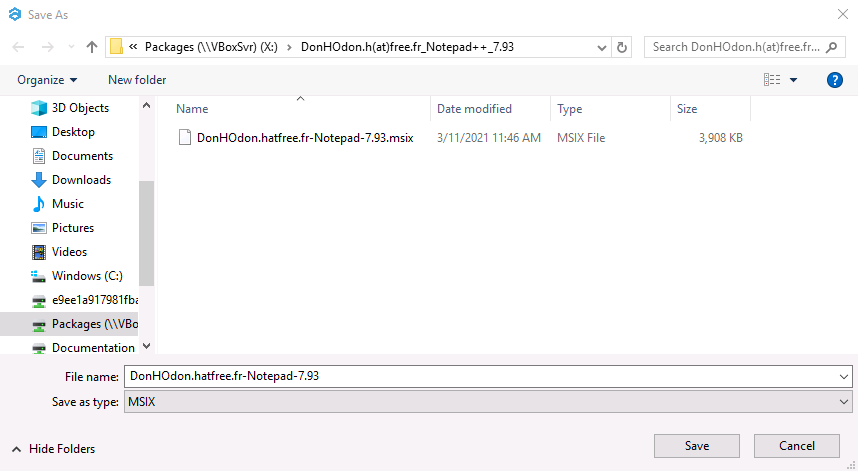
A user can save an MSIX file with all the provided fixes by clicking the Save button to start the saving process.
.png)
Apptimized provides the following screen when successful:

To cancel implementing the fixups, click the Cancel button.
.png)
Apptimized provides the following modal window when successful:
.png)
Click OK to continue canceling process. Cancel – refers to Apply fixups section.
Apptimized provides the following screen when successful:
Edit fixup
To edit fixup, click ![]() button in the Action tab or double click the Fixup row.
button in the Action tab or double click the Fixup row.
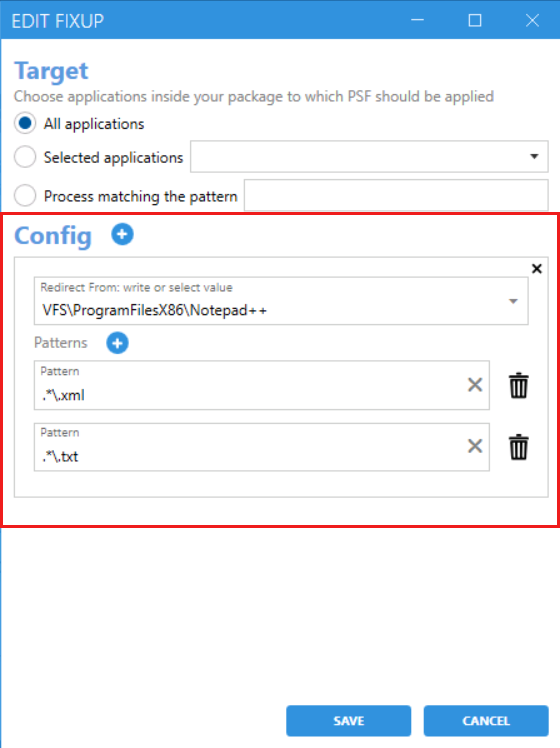
Apptimized shows the following screen when successful:

Edit section is divided into 2 blocks:
- Target – indicates the applications as a target for fixups;
- Config – allows to change the path and add patterns for fixups.
Target section provides three options to change:
- All applications – fixup affects all applications inside of the MSIX package. This option is selected by default;
- Selected applications – allows to choose the optional application for fixup to be provided;
- Process matching the pattern – allows to set up fixup pattern as a regular expression target;
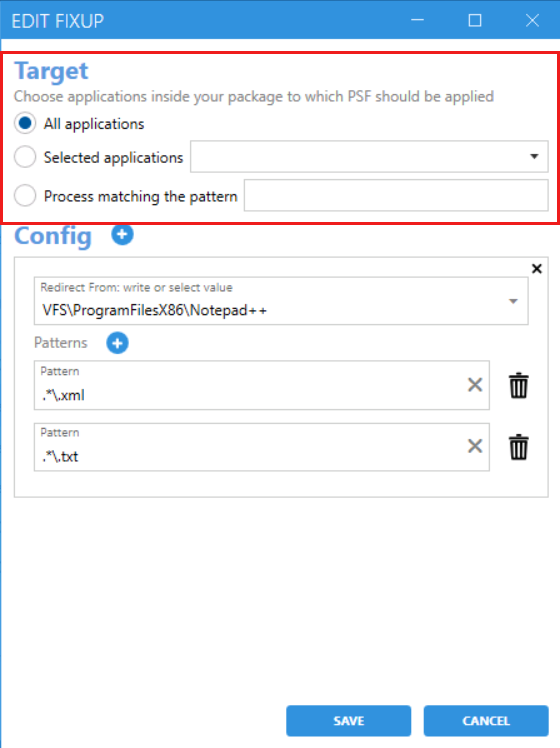
Config section is divided into two fields:
- Path field – allows to change the path of the fixup;
- Patterns – allows to set up patterns for the fixup;
Delete fixup
To delete fixup, click ![]() button in the Action tab.
button in the Action tab.
Apptimized provides the following modal window:
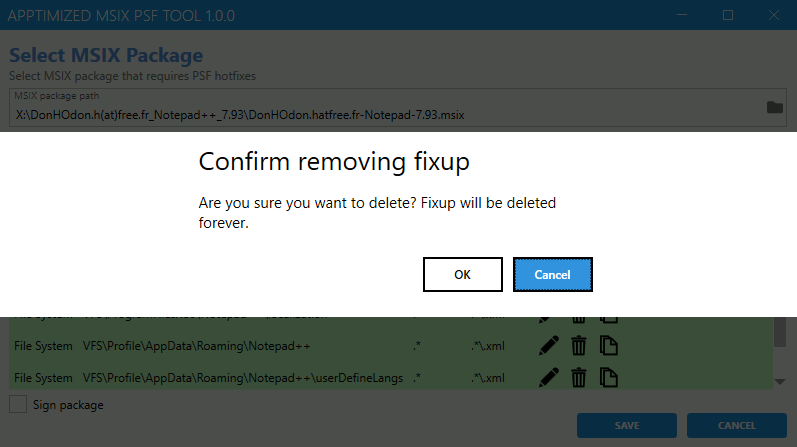
To confirm removing fixup, click Ok. Cancel – refers to the general Apptimized MSIX PSF Tool menu.
Make a copy
To make a copy of a fixup, click  button in the Action tab.
Apptimized shows the following screen when successful:
.png)
Sign package
To sign a package with a PFX certificate, check the box next to the option name.
.png)
Apptimized shows the following screen when successful:
.png)
Sign package section contains the following fields:
- PFX certificate – allows to set up the path of a PFX certificate to be provided;
- Password – allows to set up the password for a PFX certificate;
- Timestamp server – allows to set up a timestamp server for a PFX certificate.
Packaging – Factory Service
Packaging – Factory Service characteristics:
- Apptimized packages an application for a user;
- Apptimized customizes the MSI or App-V output to meet user’s requirements;
- Apptimized contacts a user if any details are needed while packaging an application;
- Apptimized notifies a user when the application is ready for testing.
The Packaging - Factory Service option is available under the Packaging - Factory Service module in the Transition screen.
To proceed packaging the application a user needs to create (see Discovery manual) or upload the discovery document.
If before the Packaging step of the workflow, the Delivery step has been completed, Apptimized shows the following screen:

If before the Packaging step of the workflow, the Delivery step has not been completed, but a user has a discovery document the option to download, the discovery document is available.
The option to download the discovery document is available under the Discovery document field (Click the field > Select the discovery file > Finish upload and continue work button).
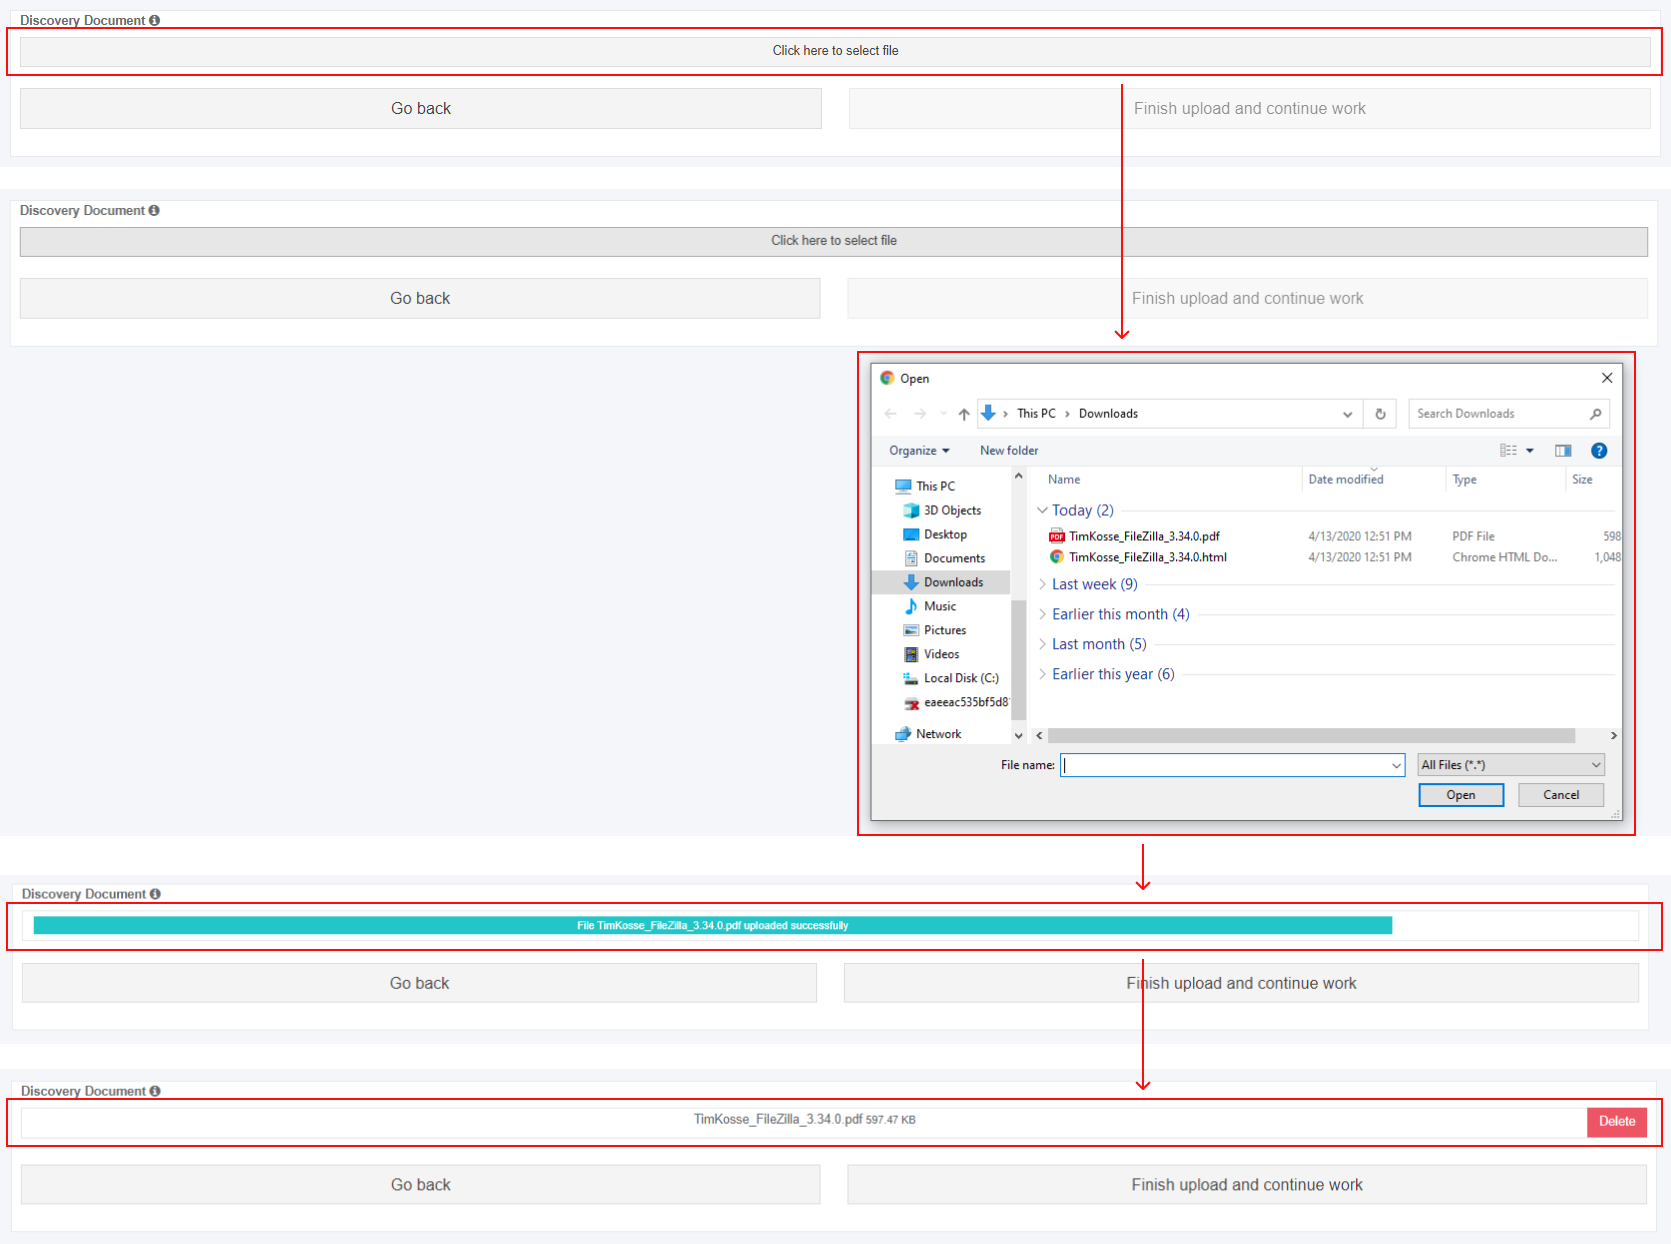
The option to revert to the transition screen is available under the Go back button.
The option to finalize the Discovery document upload is available under the Finish upload and continue work button. Apptimized shows the following interface when successful:
All required fields are marked with an asterisk *.
The option to provide comments is available under the Reference field.
The option to identify packaging technology is available under the Packaging technology field.
Table 10. Packaging technologies
|
Packaging technology |
Details |
|
Apptimized Best Practice |
The MSI of Legacy package will be created by the decision of Apptimized team. |
|
MSI |
The source will be repackaged and the batch file will be used for installation and uninstallation of the package (if another was not agreed with the delivery manager) |
|
MSIX |
MSIX package will be created |
|
App-V (latest version) |
The latest App-V sequencer will be used for creating App-V package |
|
App-V 4.6 |
The 4.6 version of App-V sequencer will be used for creating App-V package |
|
App-V 5.0 |
The 5.0 version of App-V sequencer will be used for creating App-V package |
|
App-V 5.1 |
The 5.1 version of App-V sequencer will be used for creating App-V package |
.png)
The option to choose the discovery platform is available under the Packaging platform field. A user can select several packaging platforms simultaneously.
.png)
The option to choose the Wrapper format is available under Wrapper format field.
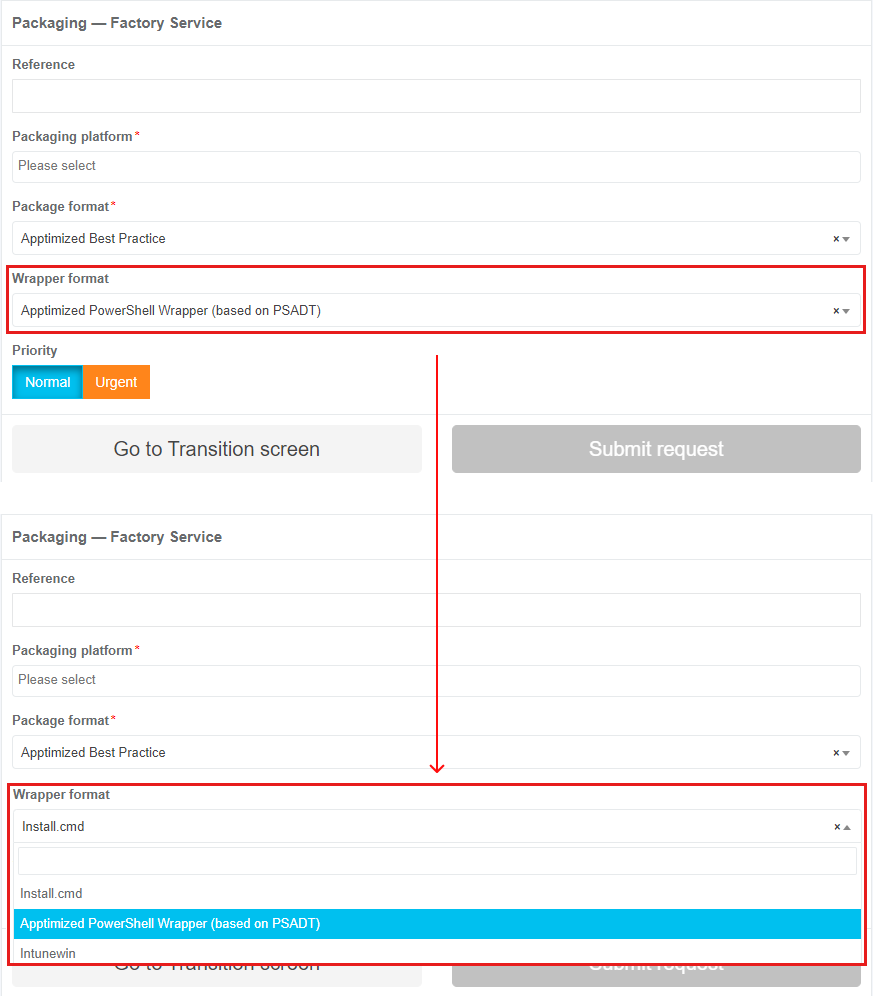
Table 11. Wrapper formats
| Wrapper format | Details |
| Install.cmd | This files are used for transferring application parameters. |
| Apptimized PowerShell Wrapper (based on PSADT) | Depending on the customer's requirement and the vendor's logic the package can be repackaged or silent installation can be used. The package will be wrapped in the PowerShell Application Deploy Toolkit. This wrapper will be used for configuration, installation, and uninstallation if the package |
| Intunewin | Intunewin package will be provided to the package. |
If a previous application version is selected in the Previous version of application field during the Import step, the platform and packaging formats used in the selected application version are displayed during Factory request creation.
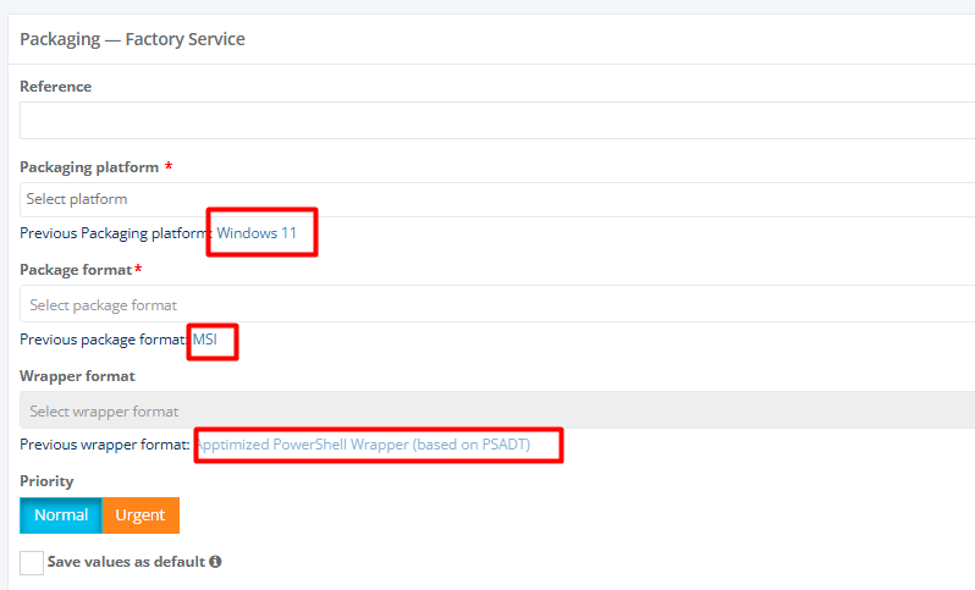
Two priority options are available: Normal and Urgent. The default value is Normal.
The option to submit the packaging request is available under the Finish button.
Apptimized shows the following modal window:
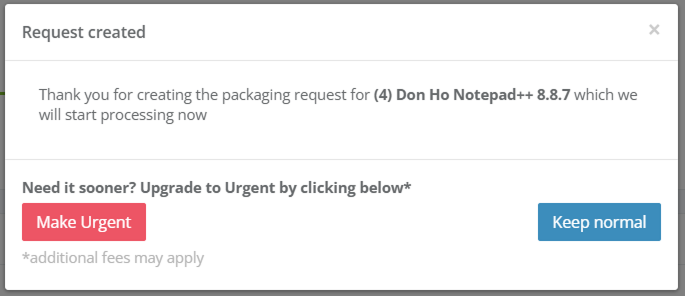
The option to change the Normal priority to Urgent before approving the request is available under the Make urgent button.
After the request is created, the current priority is displayed on the Factory Service page. Clicking the Priority field opens a modal window allowing the priority to be increased to Urgent.

The option to create the request is available under the OK button.
Note. If Apptimized Portal can’t connect to SDC, the following error notification appears: 
Apptimized shows the following screen when successful:
.png)
This is an initial screen, and all blocks except the Status block are empty.
Note. If Apptimized Portal can’t connect to SDC, the following error notification appears: 
This screen provides information on the Apptimized Packaging – Factory Service request (i.e., request progress and status). Additional information that might be needed during the packaging process will be exchanged here.
Next, each Packaging – Factory Service block is shown in more detail.
Status block
The Status block shows packaging progress. The following request statuses appear depending on the Packaging – Factory Service progress:
Table 11. Discovery request statuses
|
Request status |
Description |
|
Incoming check |
The request has not been processed by the Apptimized team yet. The request is in the queue. |
|
In progress |
The request was processed by the Apptimized team. The request is in progress. |
|
Factory QA |
Deliverables are testing by the Apptimized team. |
|
Action required |
The Apptimized team asked the user a question. The user answer is needed. |
|
Delivered |
Packaging results are available to the user. Packaging results are as a package (i.e. MSI). The package extension depends on packaging technology. |
|
Error analysis |
The user rejected the Packaging results. Apptimized team fixes bugs in the package. |
|
Approved |
The user has confirmed the Packaging results. |
|
Canceled |
The user canceled the Packaging request at the processing stage. |
Note. When public holidays are approaching that affect the factory packaging performance, Apptimized Portal shows the following notification above the Status block:.png)
The option to cancel the request is available under the Cancel Request button.


Apptimized shows the following modal window to confirm the request cancellation:
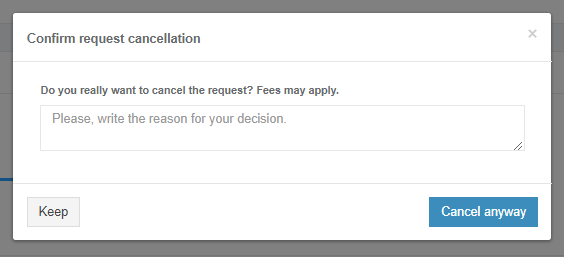
Apptimized shows the following modal window when successful:
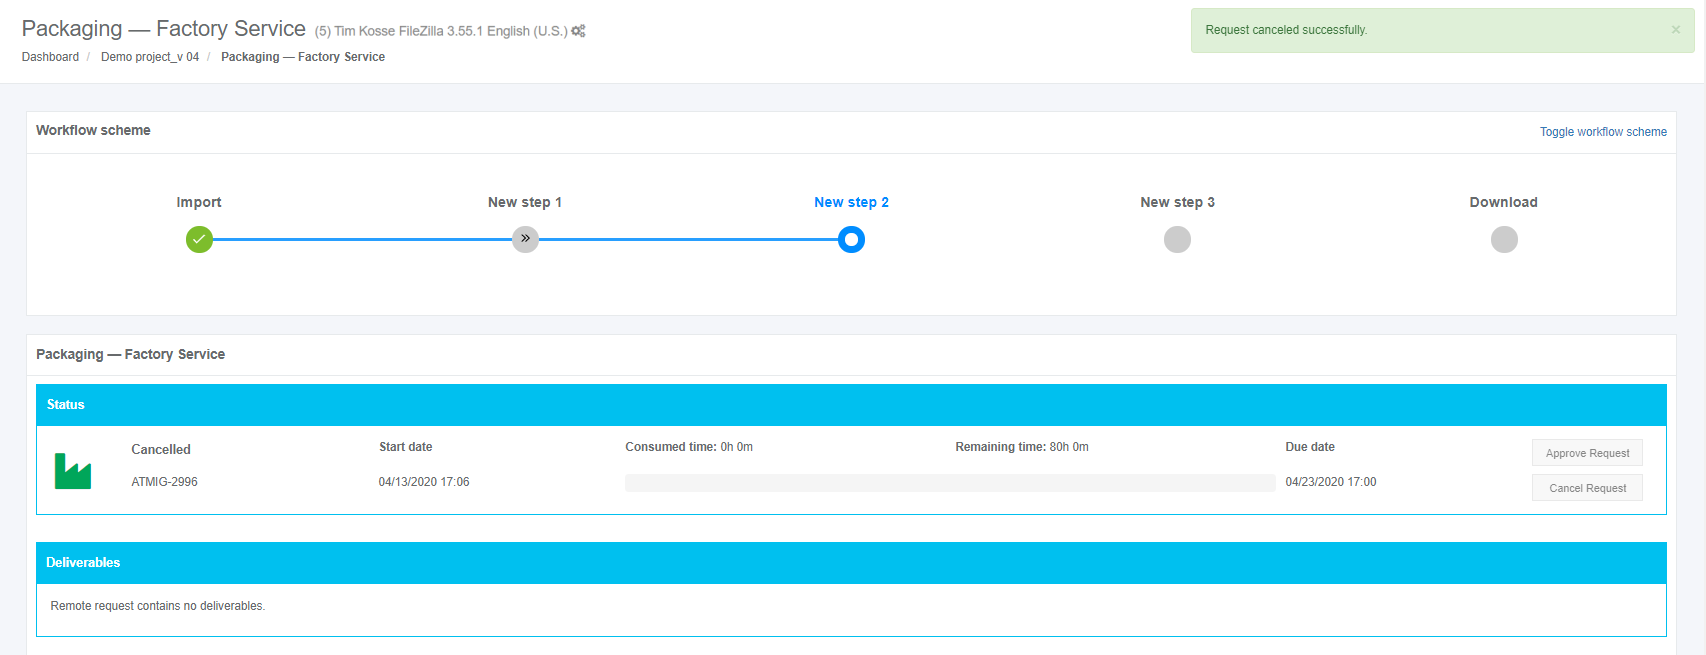
A user can cancel the packaging request until the Delivered status is achieved, and the discovery deliverables are available.
.png)
If a user is not unsatisfied with the packaging results, they can be rejected in the Factory request section under the Factory activity block.
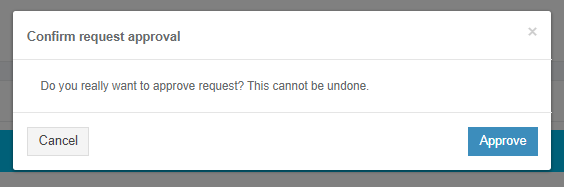
When a user is satisfied with the packaging results, they must be approved in the Status block. The option to approve the request is available under the Approve Request button. The Approve Request button becomes active when the Delivered status is achieved, and the packaging deliverables are available.
Apptimized shows the following modal window to confirm the request approval:
Apptimized shows the following screen when successful:
.png)
Note. When a user approves the request, the option can`t be canceled.
Deliverables block
This block provides the packaging results to a user. Discovery results are provided as a package. The package extension depends on the selected packaging technology.
The option to download the testing results is available under the Download button.
.png)
If a user is not satisfied with the testing results, they can be rejected to further processing by the Apptimized team. The option to reject the testing results is available in the Factory request section under the Factory activity block. (see Factory activity block)
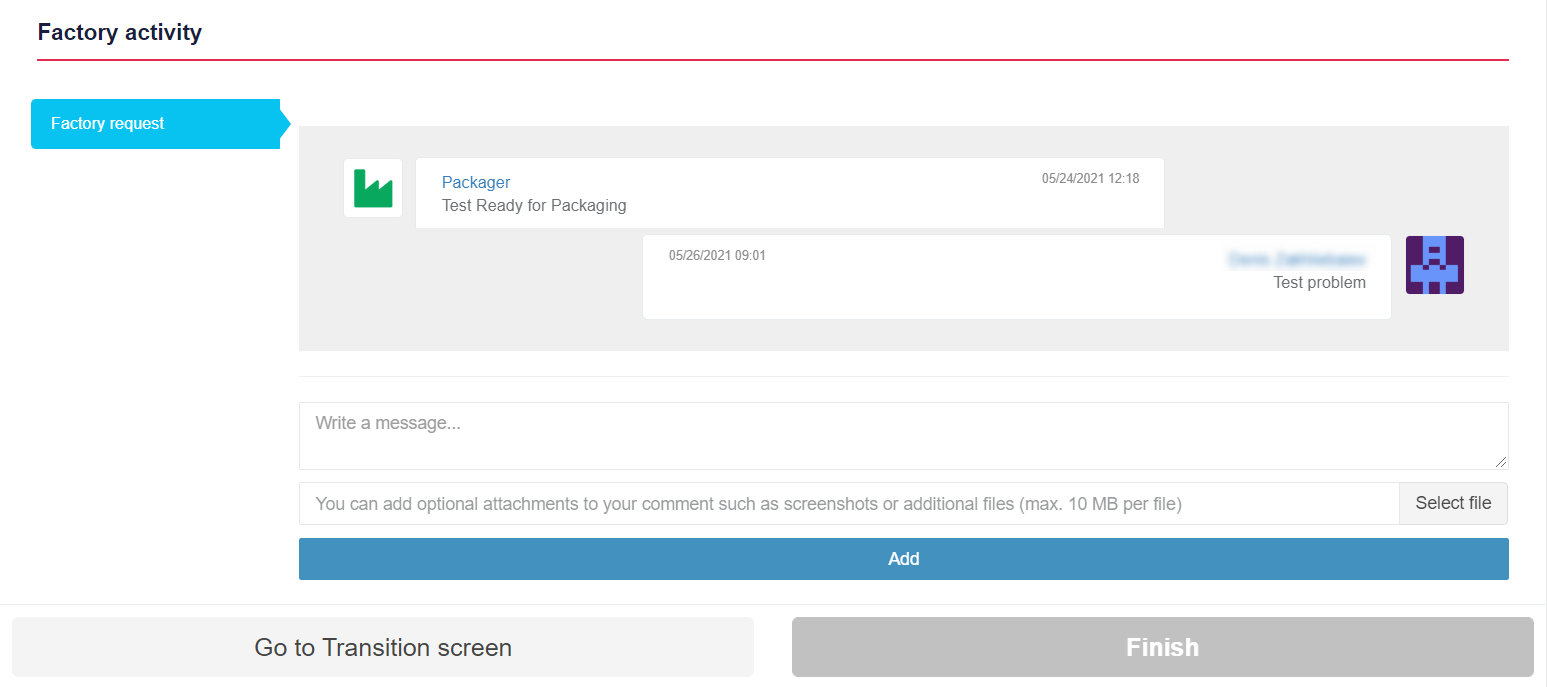
Factory activity block
The option to contact the specialist from the team is available under the Factory activity block > Factory request > Write a message... field.
.png)
The option to add supplementary attachments (i.e., screenshots, additional file) is available under the Select file button (Choose a file > Open button > Add button). The file can be a maximum of 10 MB.
.png)
The option to send a message is available under the Add button.
.png)
Apptimized shows the message history interface when successful:
The option to provide additional comments or attachments to the Apptimized team is available under the Factory activity block after the Factory request was solved.
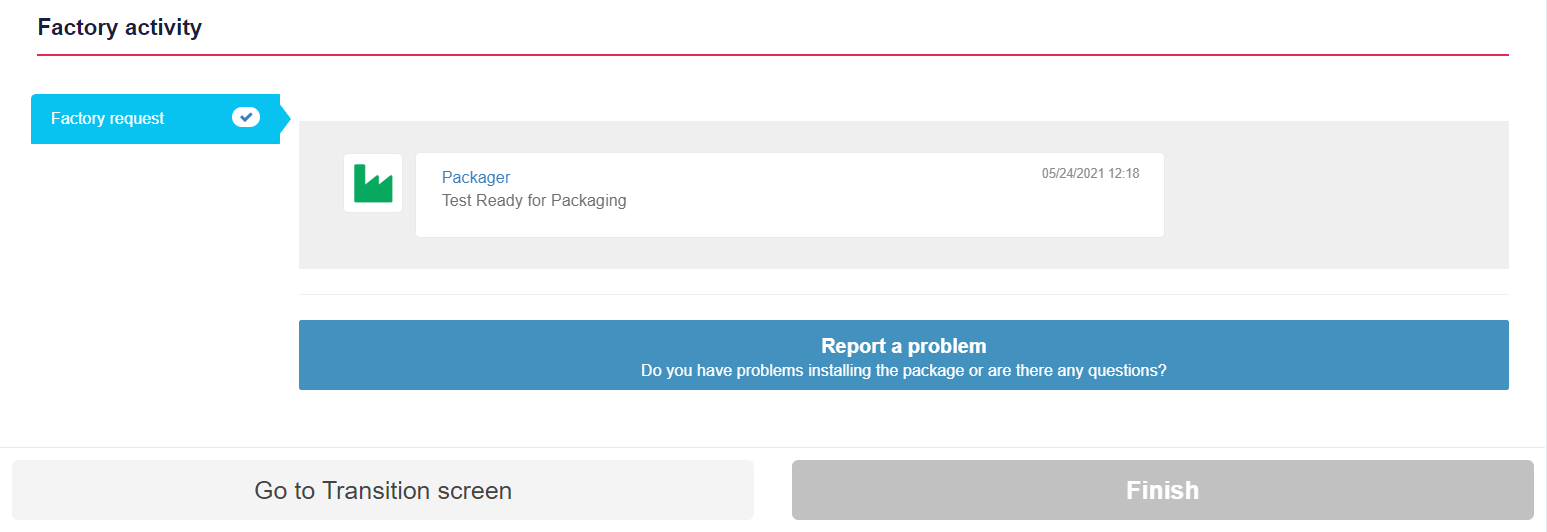
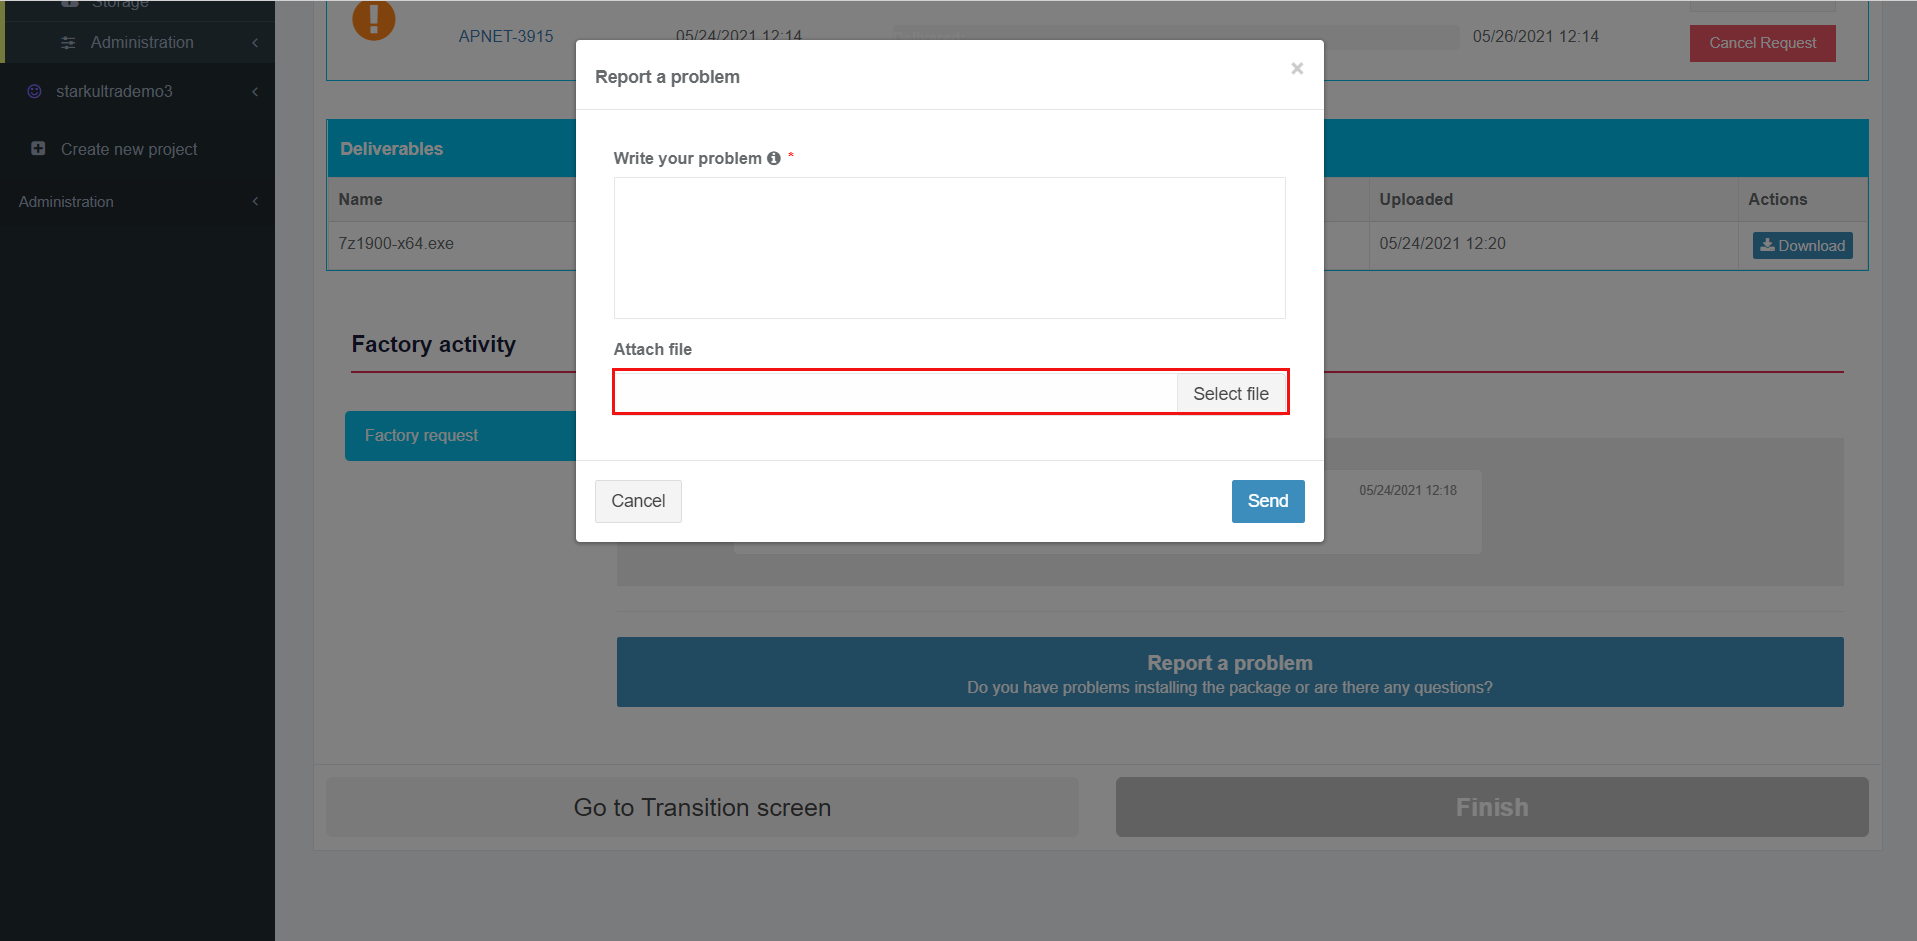
The option to ask additional questions to the Apptimized team is available under the Report a problem button.
.png)
Apptimized provides the following modal window when successful:
.png)
The option to write a text message is available under the Write your problem field

Note. This field is mandatory.
The option to attach a file is available under the Select file field.
The option to change the attached file is available under the Change button.
.png)
The option to remove the attached file is available under the Remove button.
.png)
The option to send a message is available under Send field. Cancel – reverts to general Factory process workflow.

Apptimized shows the message history interface when successful:
.png)
Note. The attached files appear above the message history interface.
.png)
If Apptimized needs some additional information, a user will receive notifications and a warning icon in the dashboard:
.png)
.png)
If there is feedback from the user regarding the Factory Request, the following notification and status in the dashboard appear:
.png)
.png)
Apptimized provides the following notification and statuses in the workflow and dashboard after the request is resolved:
.png)
.png)
Virus Checker
Virus Checker automatically scans package deliverables uploaded to Packaging Factory.
The scan result is displayed next to each deliverable before the file is downloaded. This allows users to check the file security status before using the package deliverable.
Scan results are available under Packaging Factory > Deliverables.
The scan result is displayed next to the corresponding package deliverable.
The following screen provides an example of the scan process started for a package deliverable.

The following scan results are available for package deliverables scanned by Virus Checker.
The Clean status means that the file was successfully scanned and no threats were detected. The file can be downloaded and used.

The Malicious status means that the scan identified a potential security threat. If this status is displayed, the package deliverable should be reviewed before use.

The Scan Error status means that the scan could not be completed.
The following screen provides an example of a scan error caused by the maximum scan size limit.

The following screen provides an example of a scan error caused by the maximum scan time limit.

Virus Checker supports automatic scanning of files up to 4 GB.
Files larger than 4 GB cannot be scanned automatically. These files are scanned manually after the report.
Finish Packaging - Factory Service
.png)
The option to create a new request is available under the Create new request button. Apptimized shows the following modal window to confirm the request approval:

Apptimized shows the following screen when successful:

The option to finish Packaging - Factory Service process is available under the Finish button.
.png)
Apptimized shows the following screen when successful:
No comments to display
No comments to display