
Echo
Apptimized Echo provides test automation capabilities so that repeated app and package testing is simplified. A user can record a test case, and Echo will play it back automatically when needed.
Note. Enabling Echo in Project settings by a project administrator is a prerequisite.
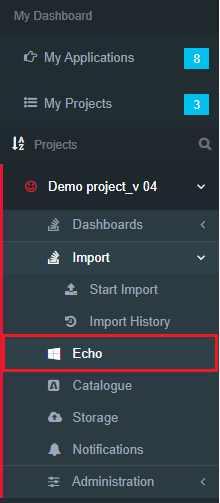
Apptimized Echo is available under the Project menu > Echo:
Apptimized shows the following screen when successful:

This is an initial screen when no Echo activities are implemented.
Echo dashboard
The Echo statistics tab opens by default.
The option to manage Echo platforms is available under the Manage Echo platforms button. Apptimized shows the following modal window when successful:
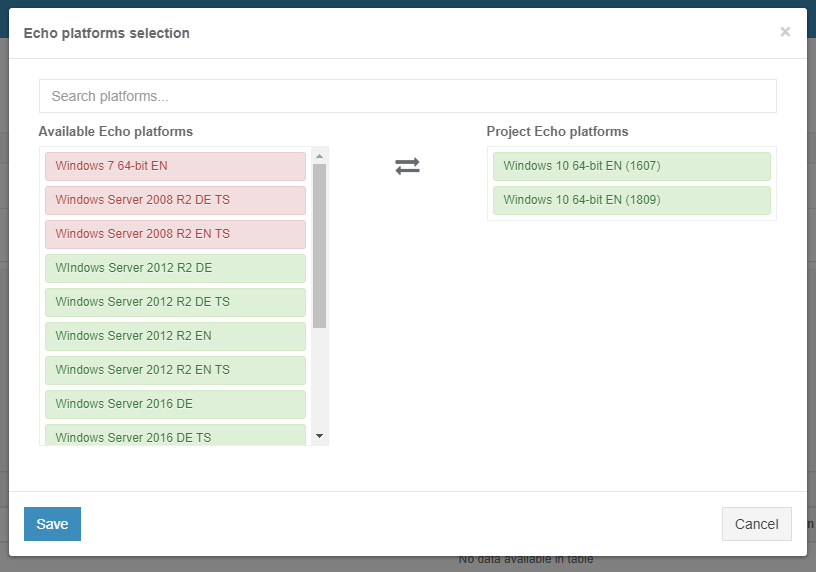
To choose an Echo platform, a user can drag and drop a suitable platform from the Available Echo platform / Available non-public Echo platforms container to the Project Echo platforms / Project non-public Echo platforms container. The activities on managing Echo platforms finalize when clicking the Save button.
The Echo platforms colors indicate the status of platform support by Microsoft:
- Green – the platform is currently supported by Microsoft;
- Yellow - the platform is currently supported by Microsoft. The Microsoft support will end in 2 months;
- Red - Microsoft does not support the platform.
The option to filter Echo platforms in the Echo statistics table is available under the Filter platforms columns button. To exclude entities from the table, uncheck boxes next to the name not required in view.

The echo reports overview is available under the Echo reports tab > Get report button:
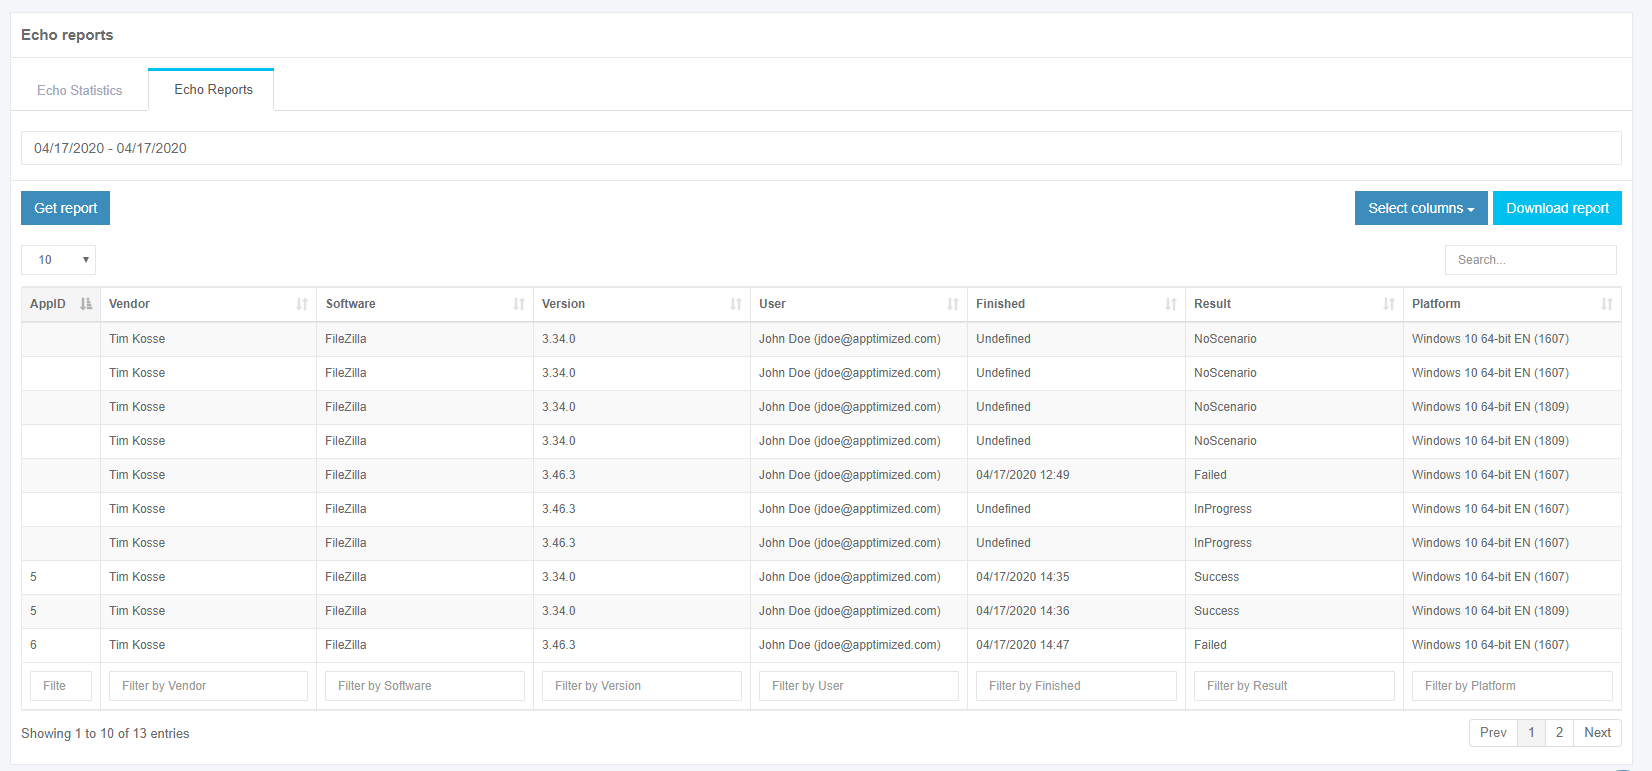
The option to set the Echo report time frames is available under the date field (Click the date field > Set the start date > Set the end date > Apply button).

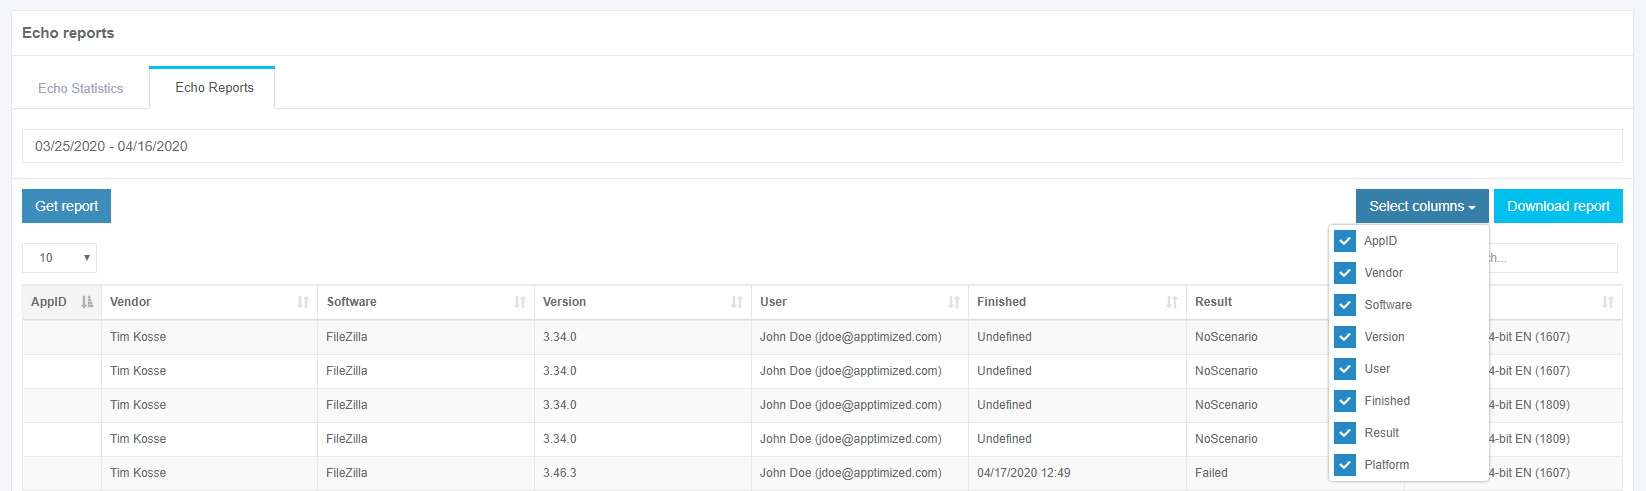
The option to customize columns in the Echo reports table is available under the Select columns button. To exclude entities from the table, uncheck boxes next to the name not required in view.
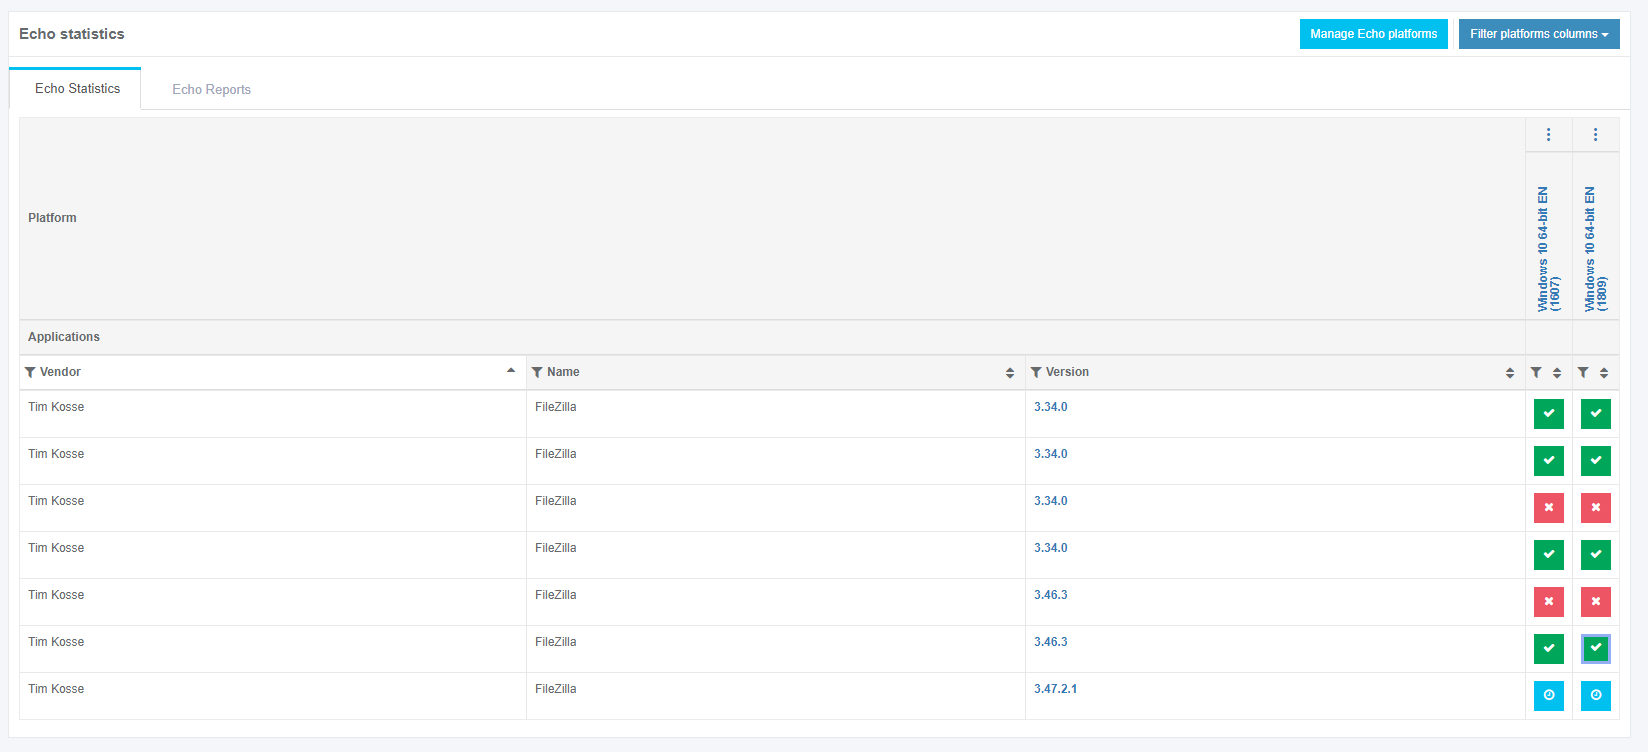
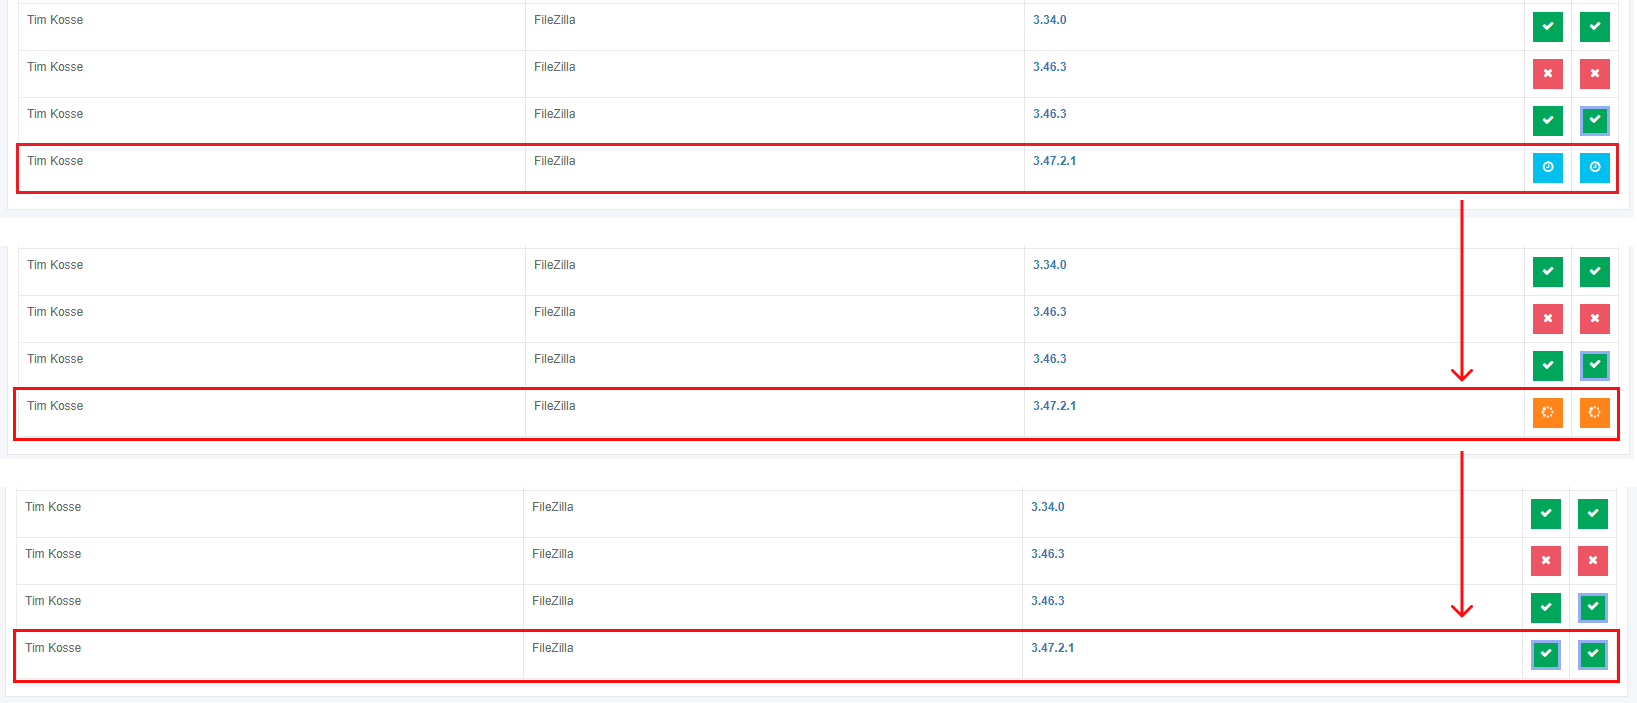
When Echo activities are implemented, Apptimized shows the following screen:
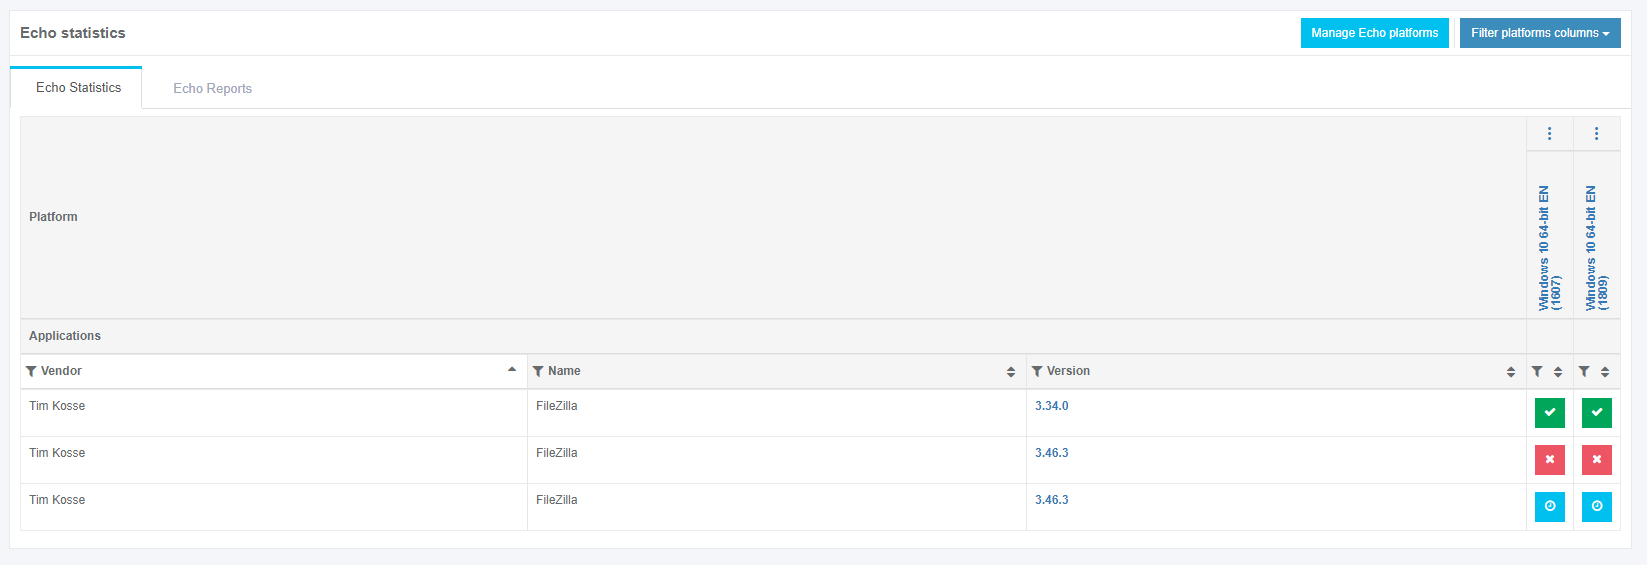
Table 1. Echo results statuses (Echo states)
|
Icon |
Status |
Details |
|
Pending |
Tests are scheduled to start in a moment. Echo results will be available after the VM termination. |
|
|
Progress |
Tests will be completed in a moment. Echo results will be available after finishing the VM. |
|
|
Success |
Tests were completed as it was expected. |
|
|
Review |
A minor discrepancy between test results and the reference test case occurs. |
|
|
Failed |
A major discrepancy between the test result and the reference test case occurs. |
Echo statistics and overview
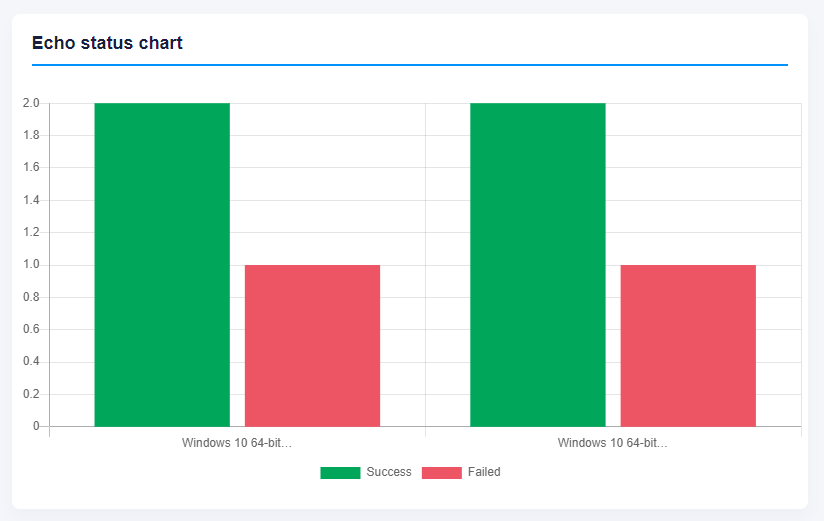
Echo test cases statistics is available at Dashboards > Overview >Echo status chart. The instructions on how to set the overview page are available in the Dashboards chapter.
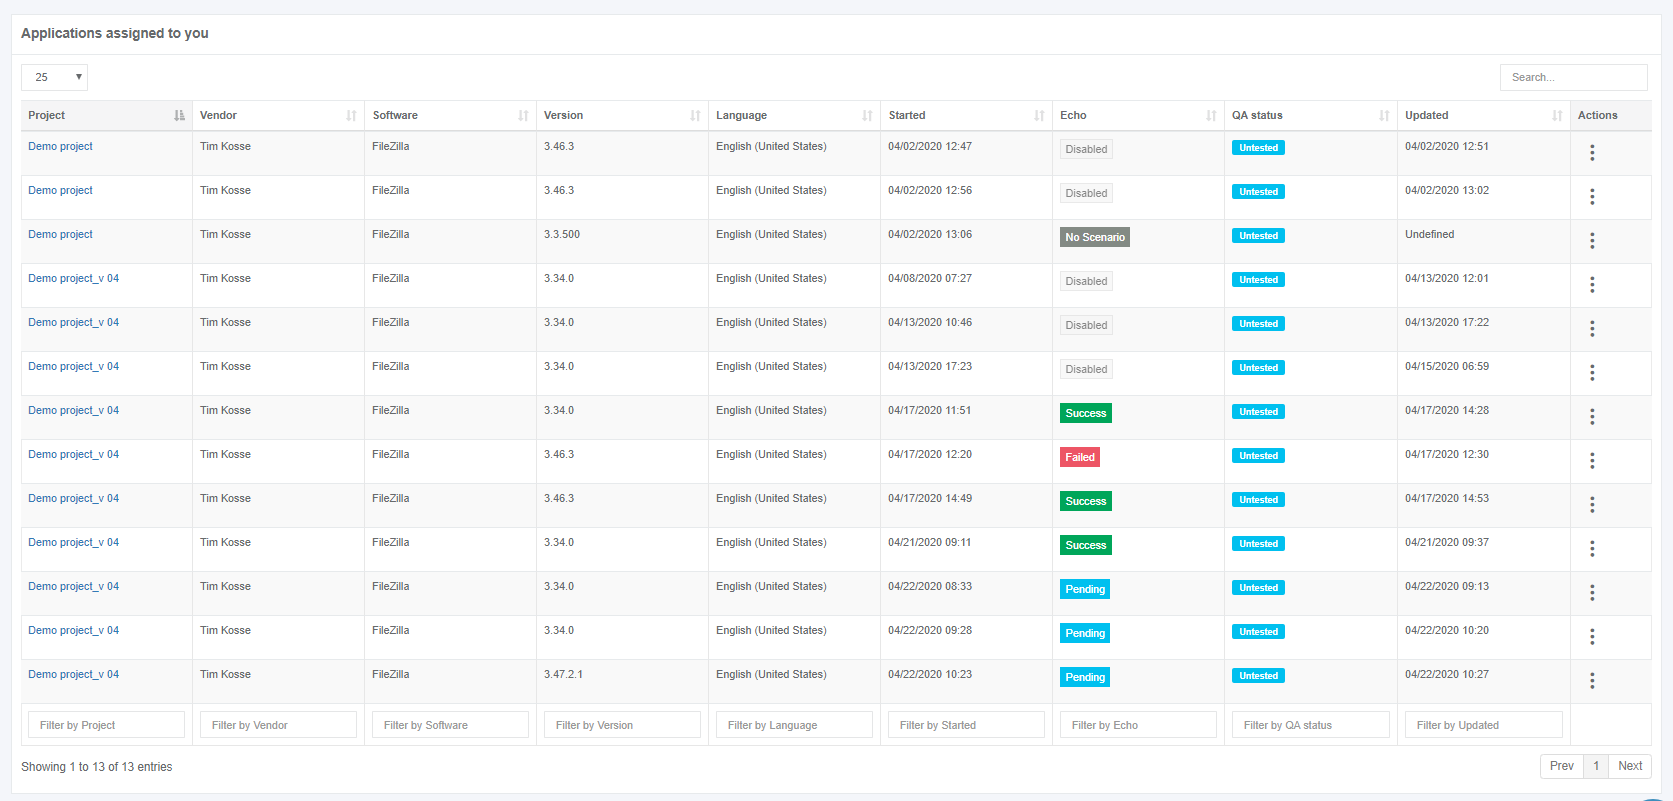
Echo results are also available at My Dashboard > My Applications > Applications table > Echo column:
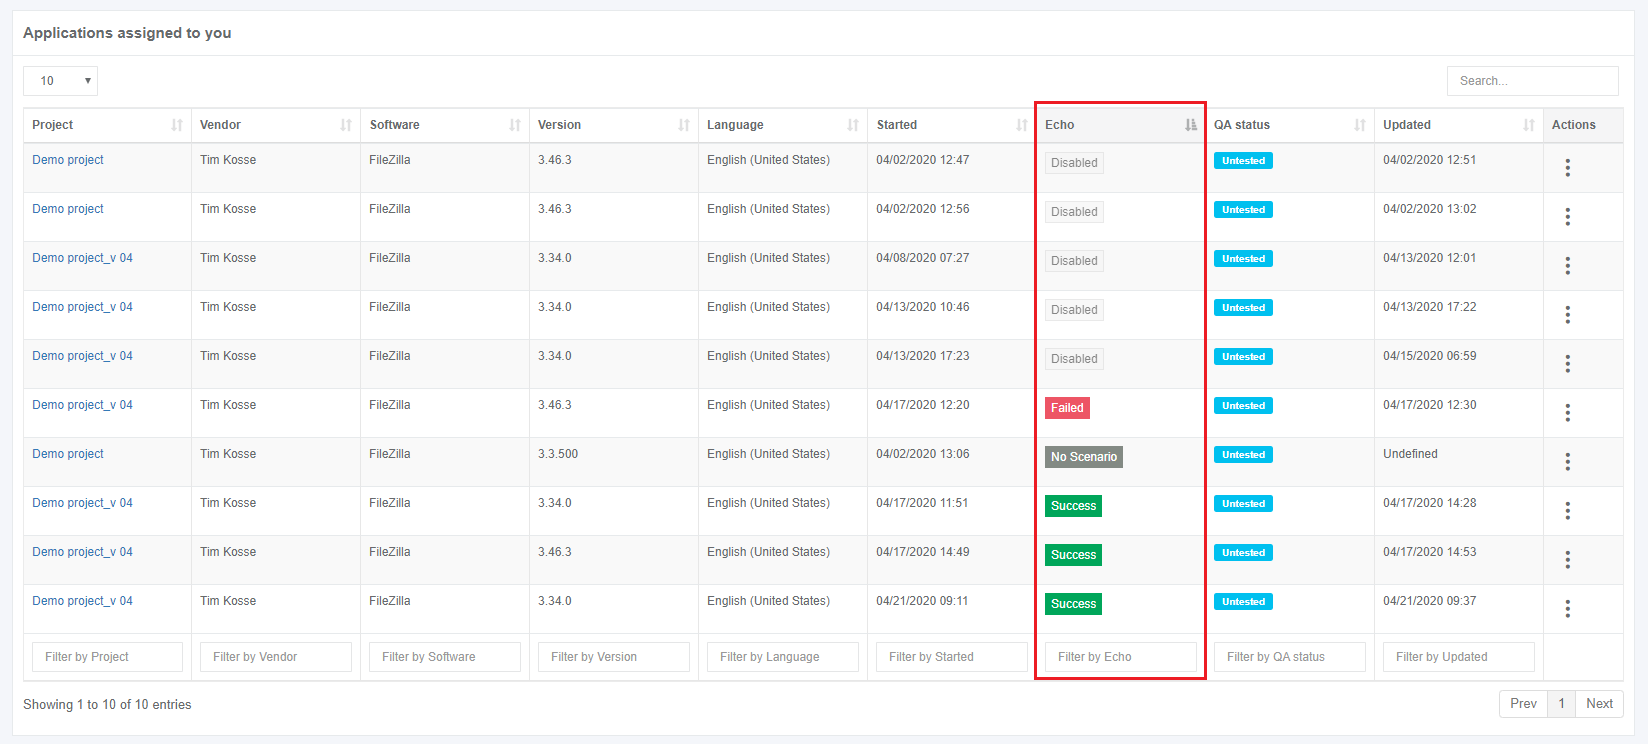
The following statuses available:
Table 2. Echo statuses
|
Icon |
Status |
Details |
|
Disabled |
Status for the application with the disabled Echo option. |
|
|
No scenario |
Status for the application with enabled Echo option with no Echo scenario provided. |
|
|
Pending |
The echo is preparing to work on the application. Tests are scheduled to start momentarily. Echo results will be available after finishing the VM. |
|
|
In Progress |
The echo is working on the application. Tests will be completed momentarily. Echo results will be available after finishing the VM. |
|
|
Review |
At least one test failed, but all have finished and are no longer running or waiting. A minor discrepancy between test results and the reference test case occurs. |
|
|
Success |
The echo is ready to use. All tests are finished and succeeded. |
|
|
Failed |
Something went wrong with the Echo. All tests have finished and are no longer running or waiting. A major discrepancy between test results and the reference test case occurs. In this case, a user needs to run Echo Discovery again. |
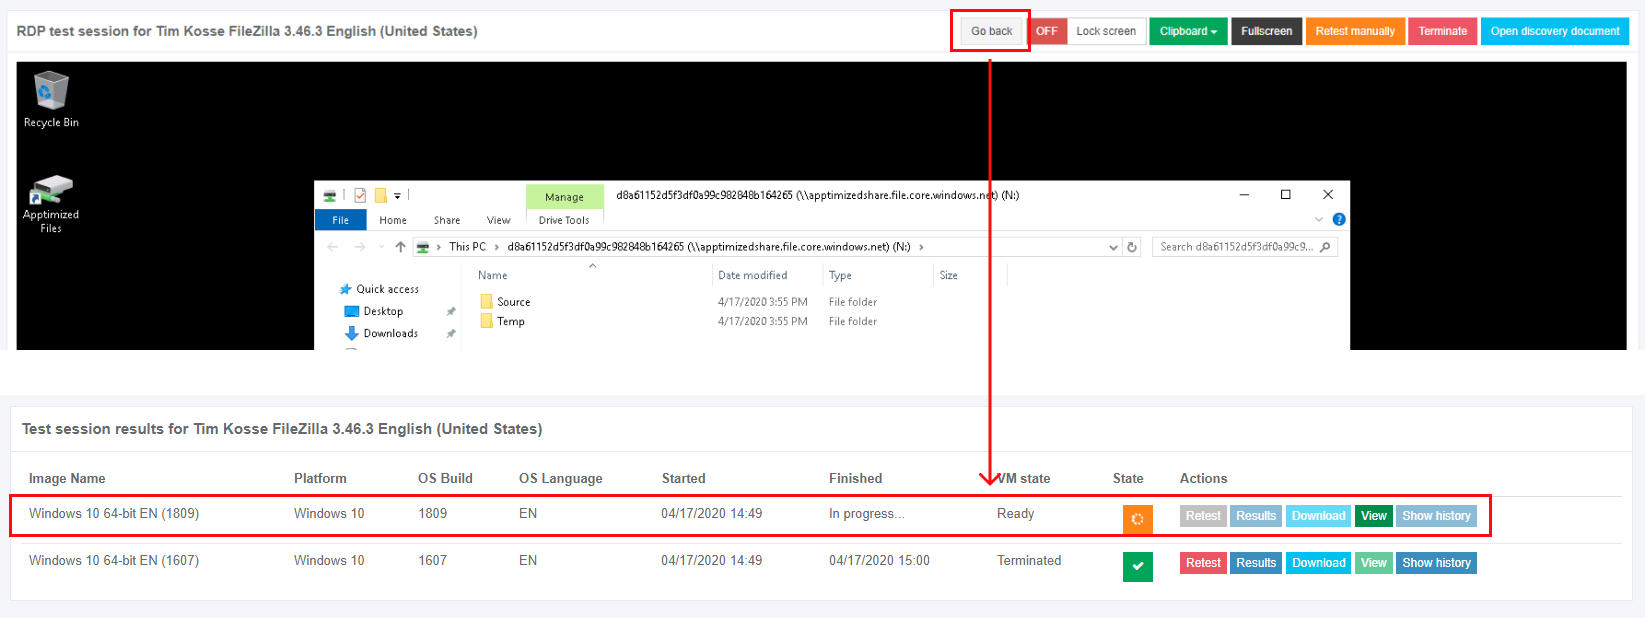
The option to see the Echo performance is available under the echo status button:
Test session results are grouped into the following columns:
- Image name;
- Platform;
- OS build;
- OS language;
- Start time and date;
- End time and date;
- VM state;
- Actions.
Table 3. Actions with the application test session results
|
Action |
Details |
|
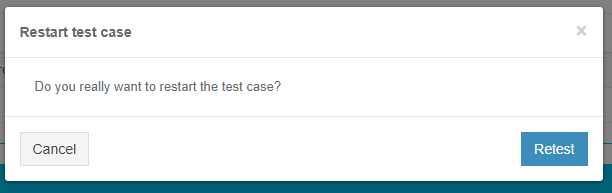
Retest |
This option provides the possibility to run the VM one more time (e.g., if progress failed).
Apptimized shows the following modal window:
When clicking the Restart button, the retesting process launches automatically and Apptimized shows the following screen:
Apptimized shows the following screen when successful:
|
|
Results |
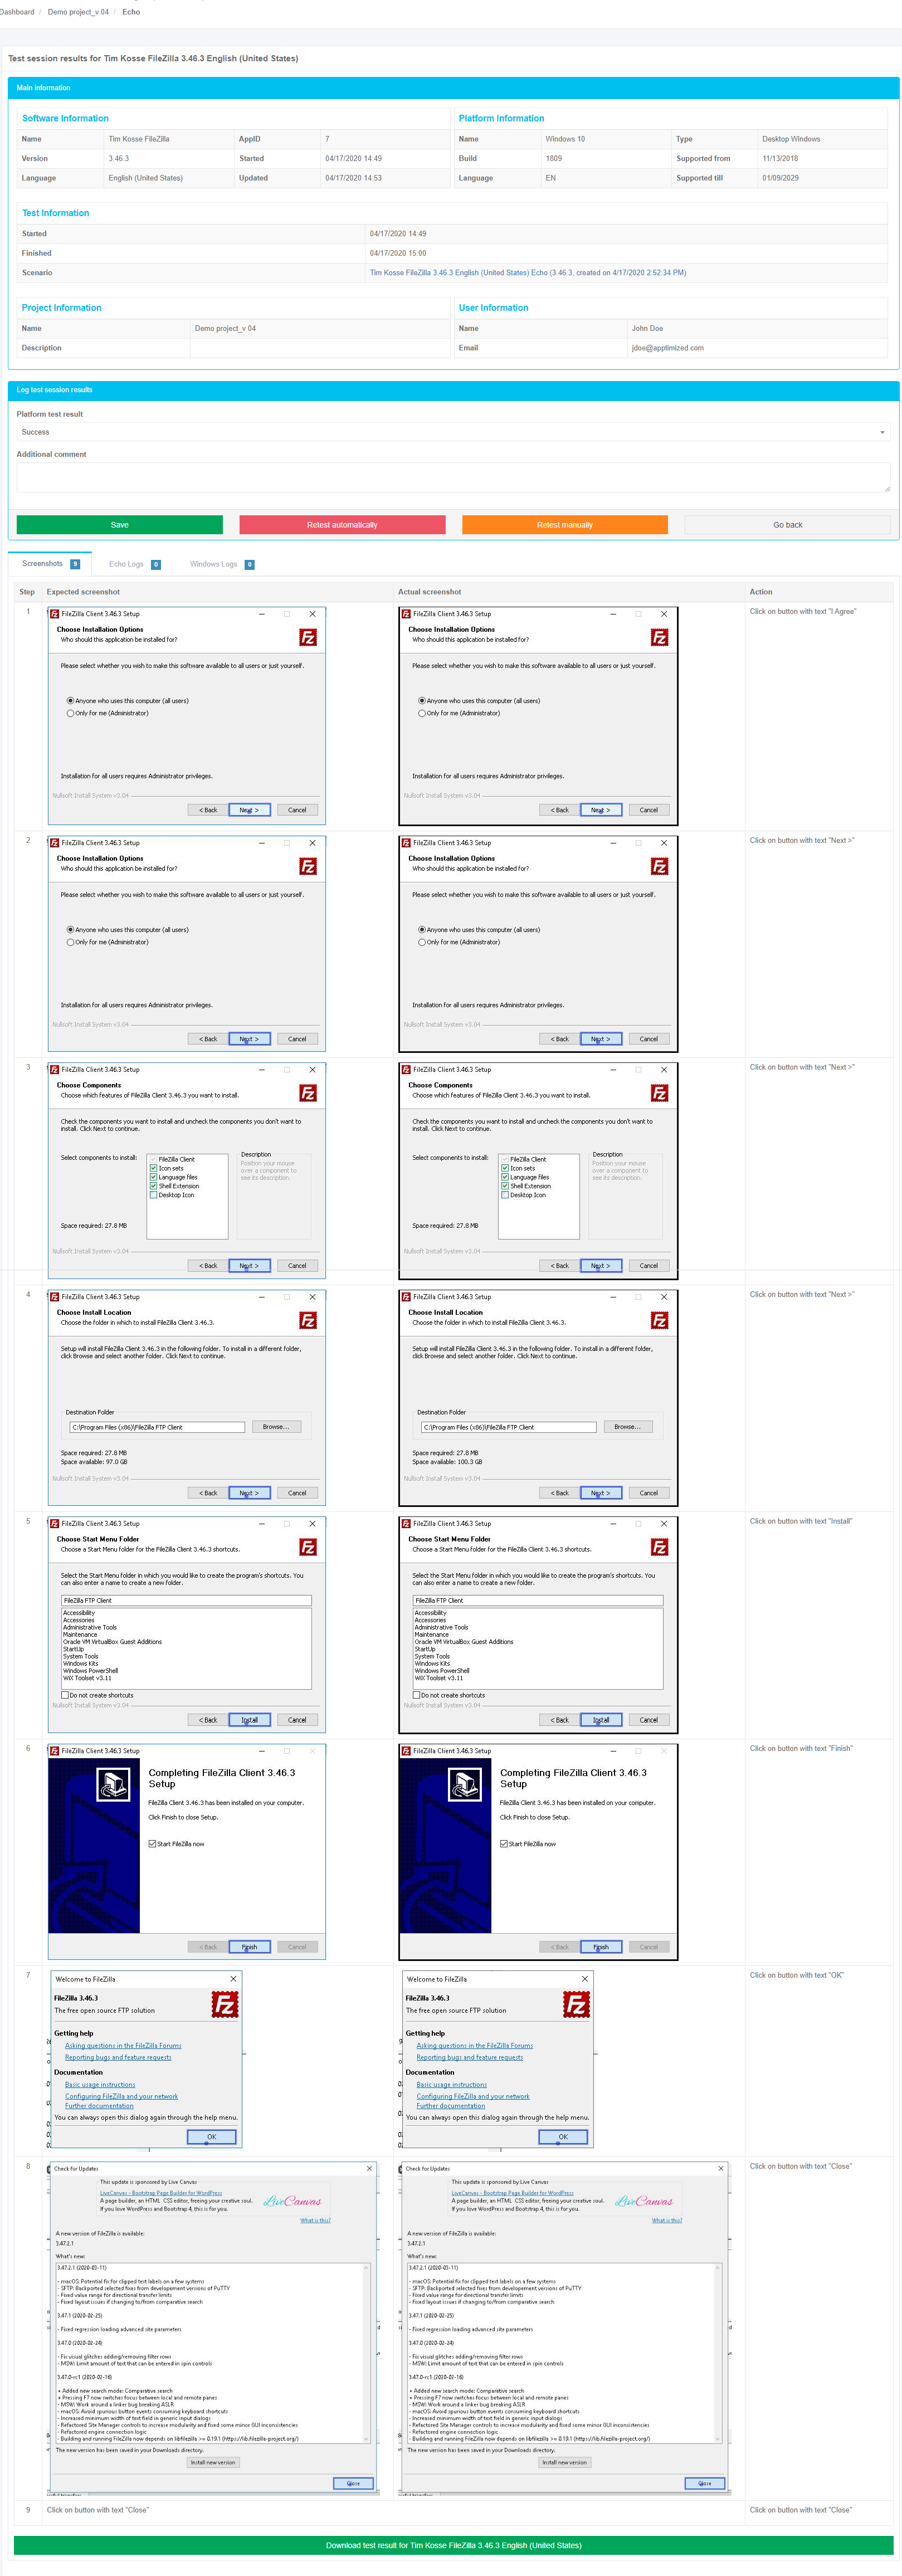
This option provides the ability to review the Echo performance and check the generated screenshots. Apptimized shows the following screen, when clicking the Result button:
Test session results for the applications consist of the following components:
Next, Log test session results block is shown in more detail. The option to log the platform test result is available under the Platform test result field (Log test session results block > Platform test result field > Select the test result > Save button). Review, Success and Failed options available.
The field Additional comment is optional and can stay blank. The option to revert to the test session results screen is available under the Go back button. The option to restart the test case automatically is available under the Retest automatically button (Results button > Log test session results block > Retest automatically button).
Apptimized shows the following modal window to confirm restart activities:
Apptimized shows the following screen when successful:
The retesting process my take a few minutes. Apptimized shows the following screen when successful:
The option to restart the test case manually is available under the Retest manually button (Results button > Log test session results block > Retest manually button). This option provides the ability to change the Discovery result. Note. When clicking the Retest manually button the previous Echo deletes.
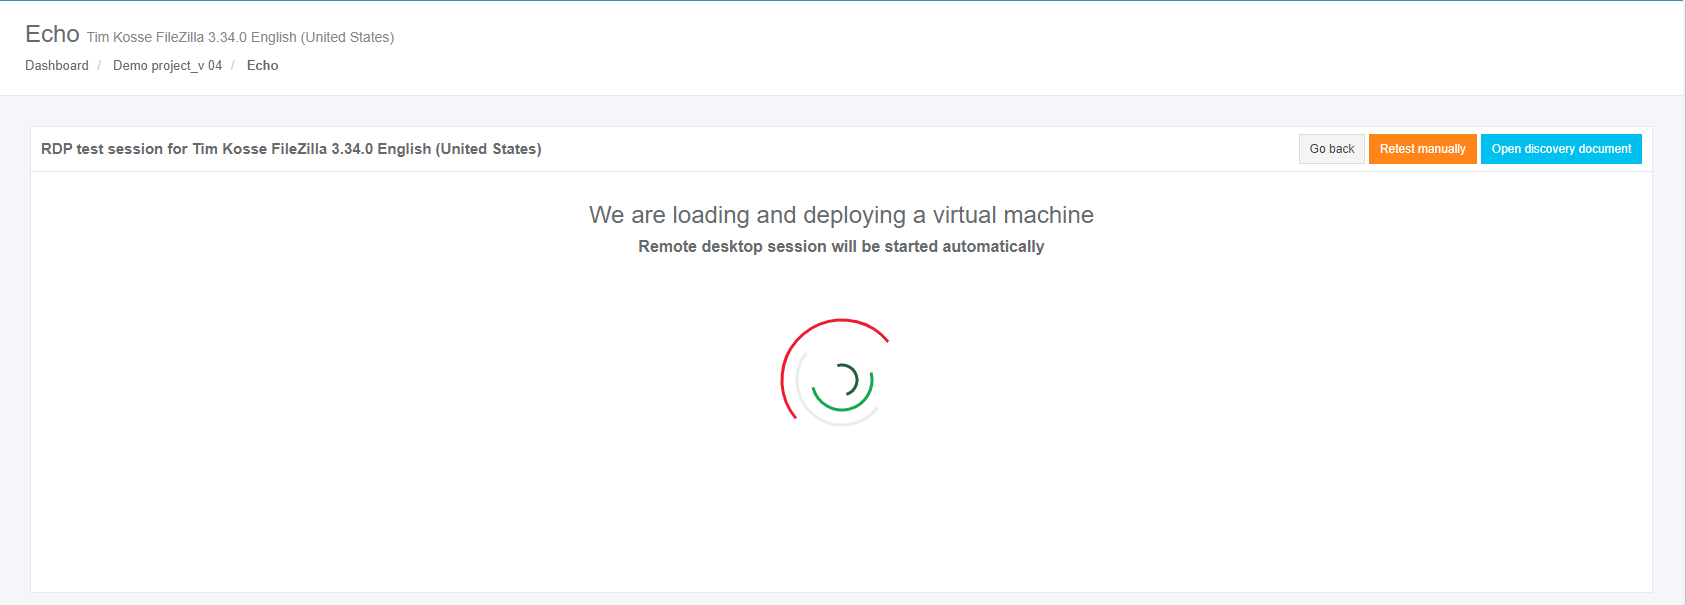
VM preparation process may last a few moments:
Apptimized shows the following screen:
To receive new test results all installation and settings activities for the application must be proceeded.
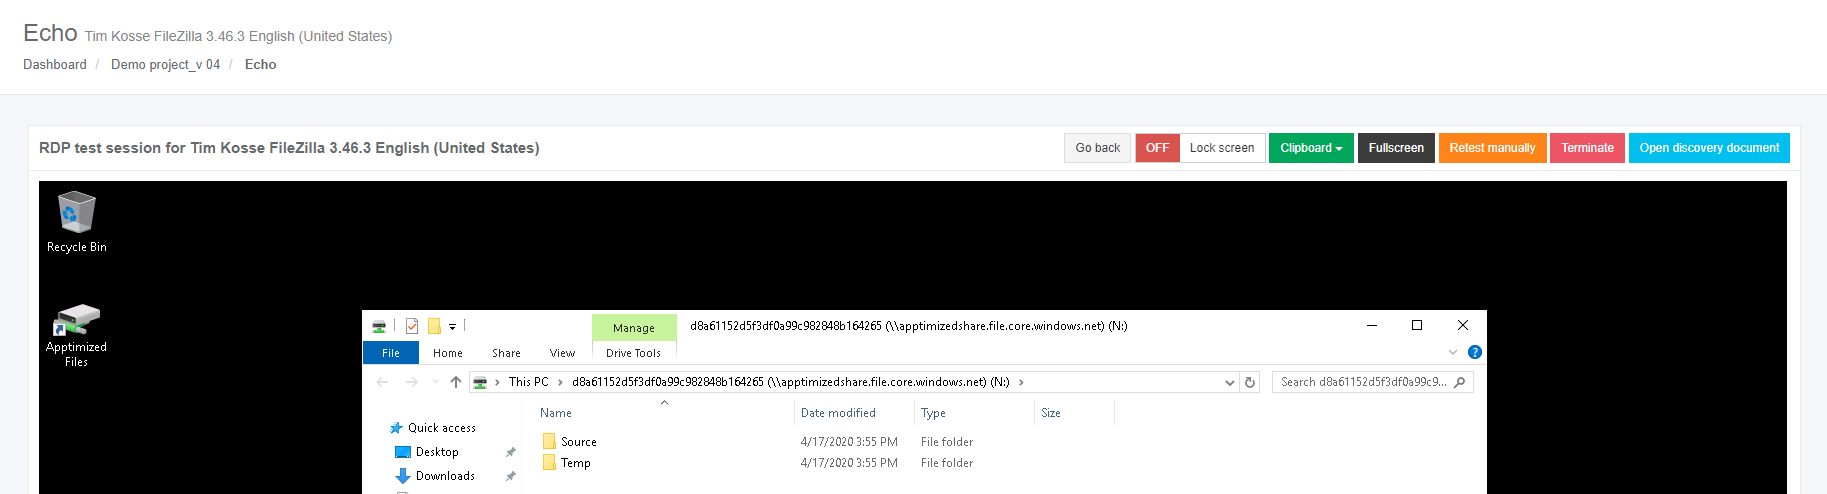
The option to revert to the previous screen (i.e., Test session results) is available under the Go back button. Apptimized shows the following screen when successful:
When a user runs the retest activities, a screen of the VM is locked for not to disturb the Echo work. But a user can enable the Lock screen switch to involve in Echo process:
The option to put text from the user’s host machine VM clipboard is available under the Clipboard button. Transferring clipboard content between the host machine and the VM works via "Cut & paste" in the majority of user scenarios.
The option to provide a full-screen mode for a browser is available under the Fullscreen button.
The option to stop the current VM session and to start it from scratch manually is available under the Retest manually button.
The option to review discovery documentation is available under the Open discovery document button.
Apptimized opens the discovery document in a new tab:
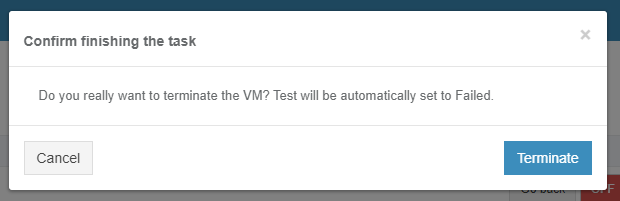
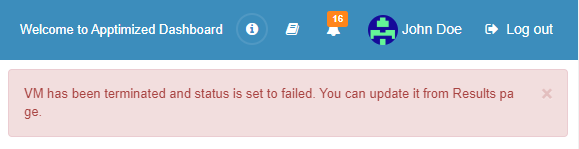
The option to stop the VM is available under the Terminate button. All screenshots which were already produced will be saved and the Echo script will be changed.
Apptimized shows the following modal window and notification:
If a user fails test result this status will keep in the test session results. To proceed with the manually retest results, a user changes a platform test result from Failed to Success (Log test session results block > Platform test result field > Success > Save button):
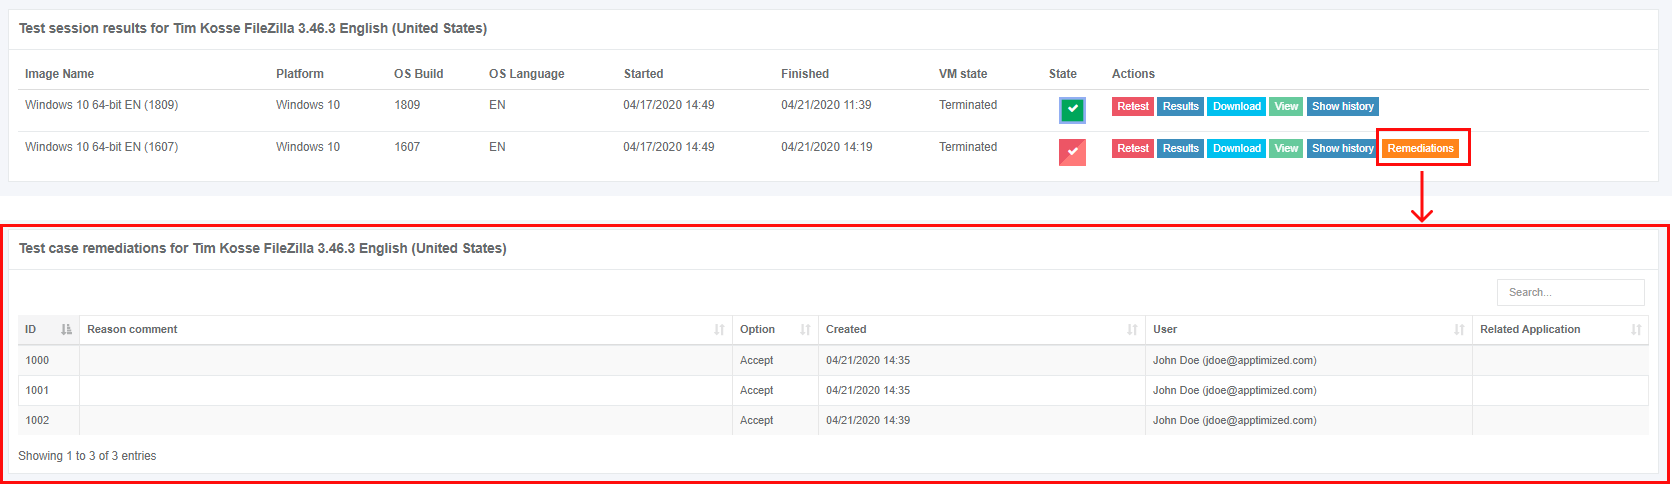
If the test fails, there is an opportunity to choose one of the following remediation options:
Apptimized shows the following screen when the remediations applied:
The option to review the test case remediations is available under the Remediators button.
|
|
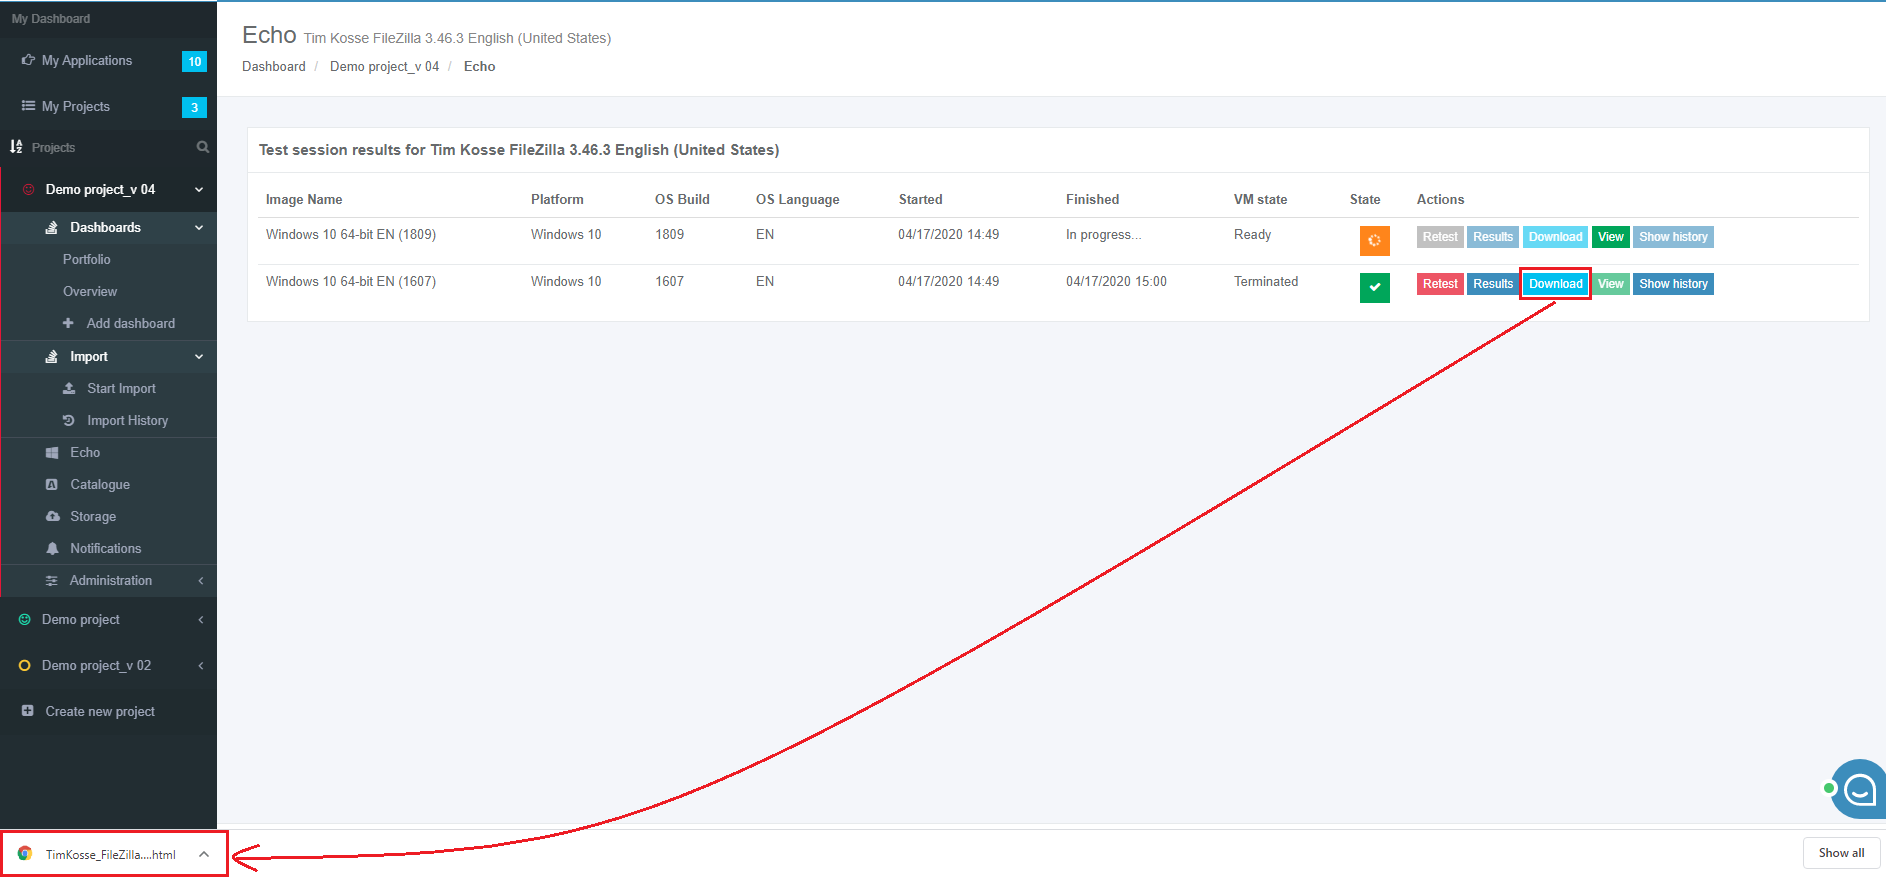
Download |
This option provides the ability to download test case results documentation in HTML.
|
|
View |
This option provides the ability to check the VM current session. The View button is disabled by default and becomes active when the VM restarts and retesting activities are in progress. |
|
Show history |
This option provides the ability to see the test case history.
The option to clean all test case history is available under the Delete all history button. The option to delete a specific test case is available under the Remove button.
The option to download test case results documentation in HTML is available under the Download button. The option to review test case results is available under the Results button. The keyword search available. |


Echo notifications
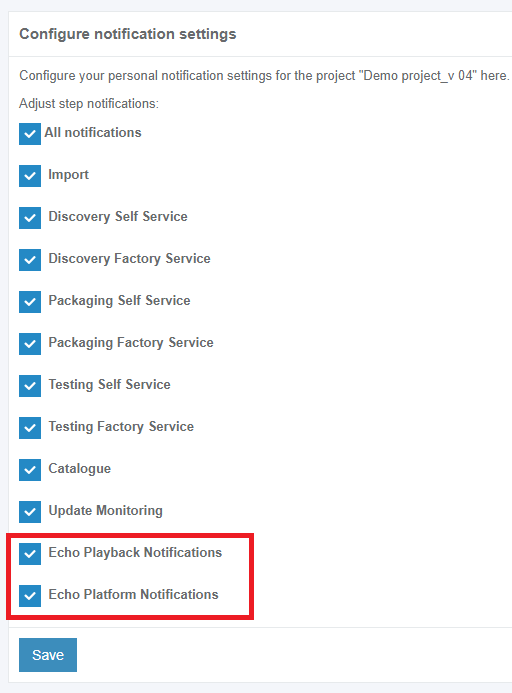
The option to set the Echo notifications within the project is available under the Project menu > Notifications > Echo Playback Notifications checkbox and Project menu > Notifications > Echo Platform Notifications checkbox. To disable the notification, uncheck the box in front of the notification’s name not need in use.
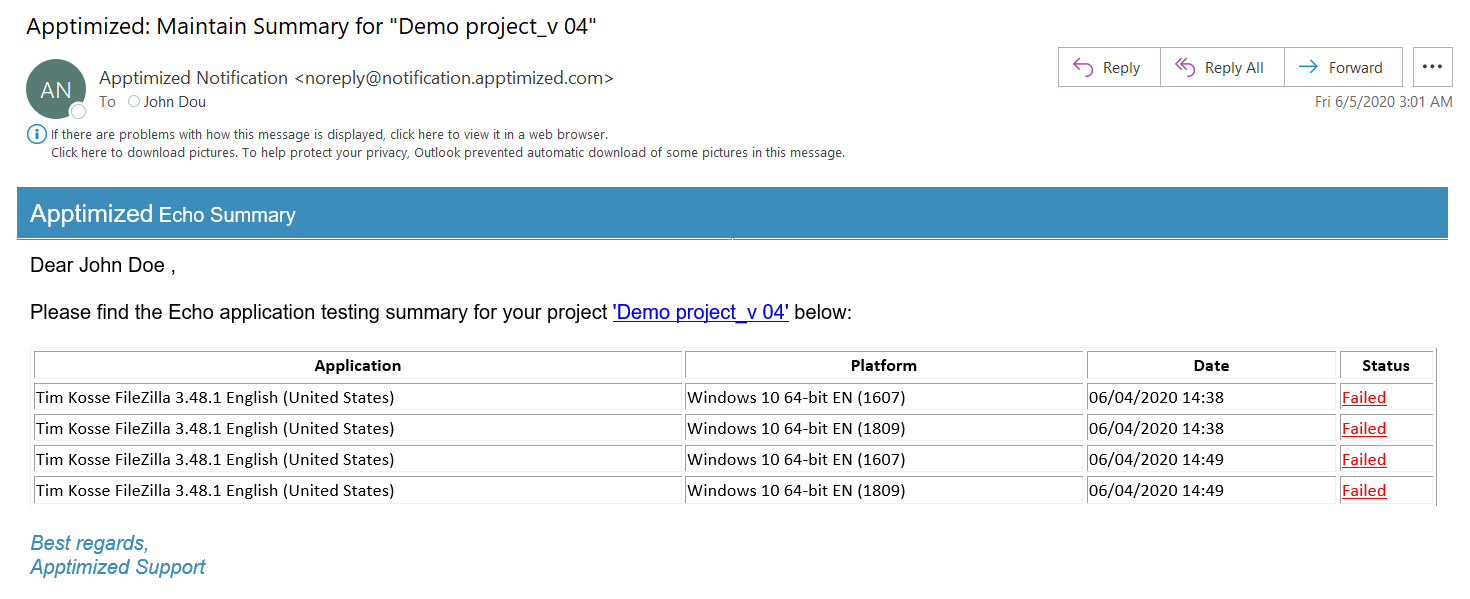
Apptimized sends to a user the Echo application testing summary within a project on a daily basis. The screenshot below shows an example of the email notification:
Echo with vendor media (Discovery)
If a user wants to automate testing of original vendor media (i.e., "raw, unpackaged software") as it was provided by the software vendor to the internal IT department or dev team, the Echo must be implemented at the Discovery - Self Service step.
The following use cases available:
- Providing a manual installation (e.g., installation from exe, including feature selection and configuration);
- Providing a post-installation configuration (e.g., changing the application's setting after launching the application);
- Providing a typical use case like creating a file, entering, manipulating, and saving data.
The following scenarios to open the transition screen available:
- My Dashboard > My Applications > Choose the project > Actions column > Process option;
- Project menu > Dashboards > Overview > Your assignments module > Choose the application > Actions column > Process option;
- Project menu > Dashboards > Portfolio > Actions column > Process option;
- Project menu > Import > Start import > Classic import > Application upload session >
Apptimized Echo plays back test cases automatically in the following cases:
- a new version of the application released by the vendor uploaded to Portfolio and pushed to Discovery again (see Playback: Apptimized Assisted Discovery for future application versions);
- a new version of Windows released by Microsoft (Playback: WaaS automated OS compat testing for vendor media).
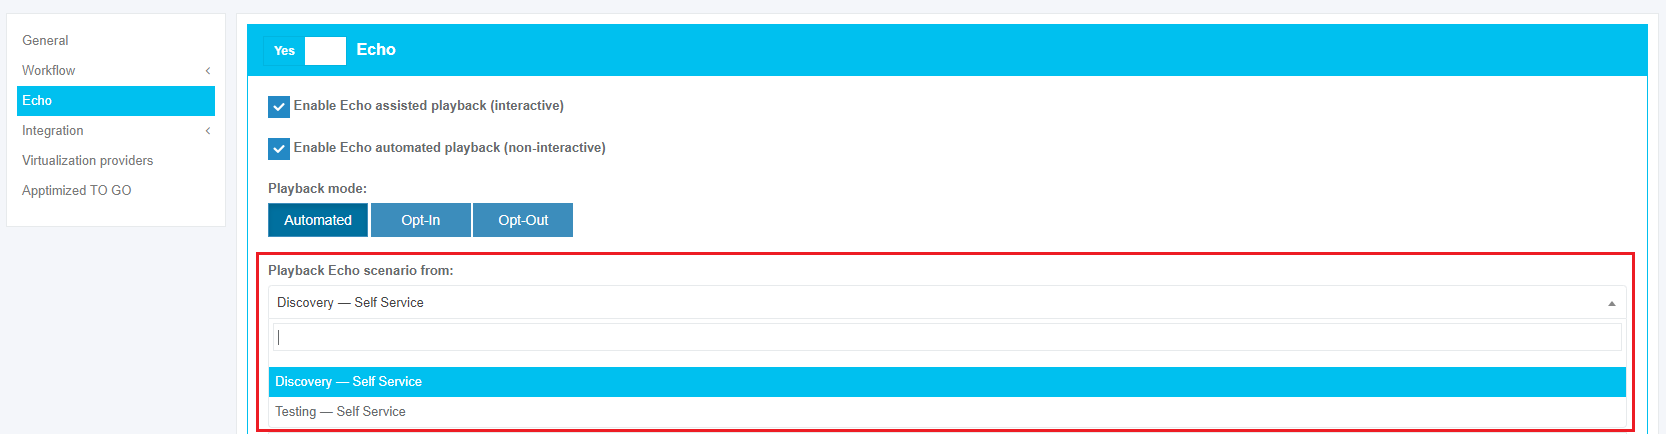
To start producing the Echo scenario via Discovery - Self Service, the relevant Playback Echo scenario form must be selected in the Project menu > Settings > Echo > Playback Echo scenario from field > Discovery – Self Service.
Recording: Discovery – Self Service
The option to import application is available under the Project menu > Import > Start import > Classic import > Application upload session > Next button.
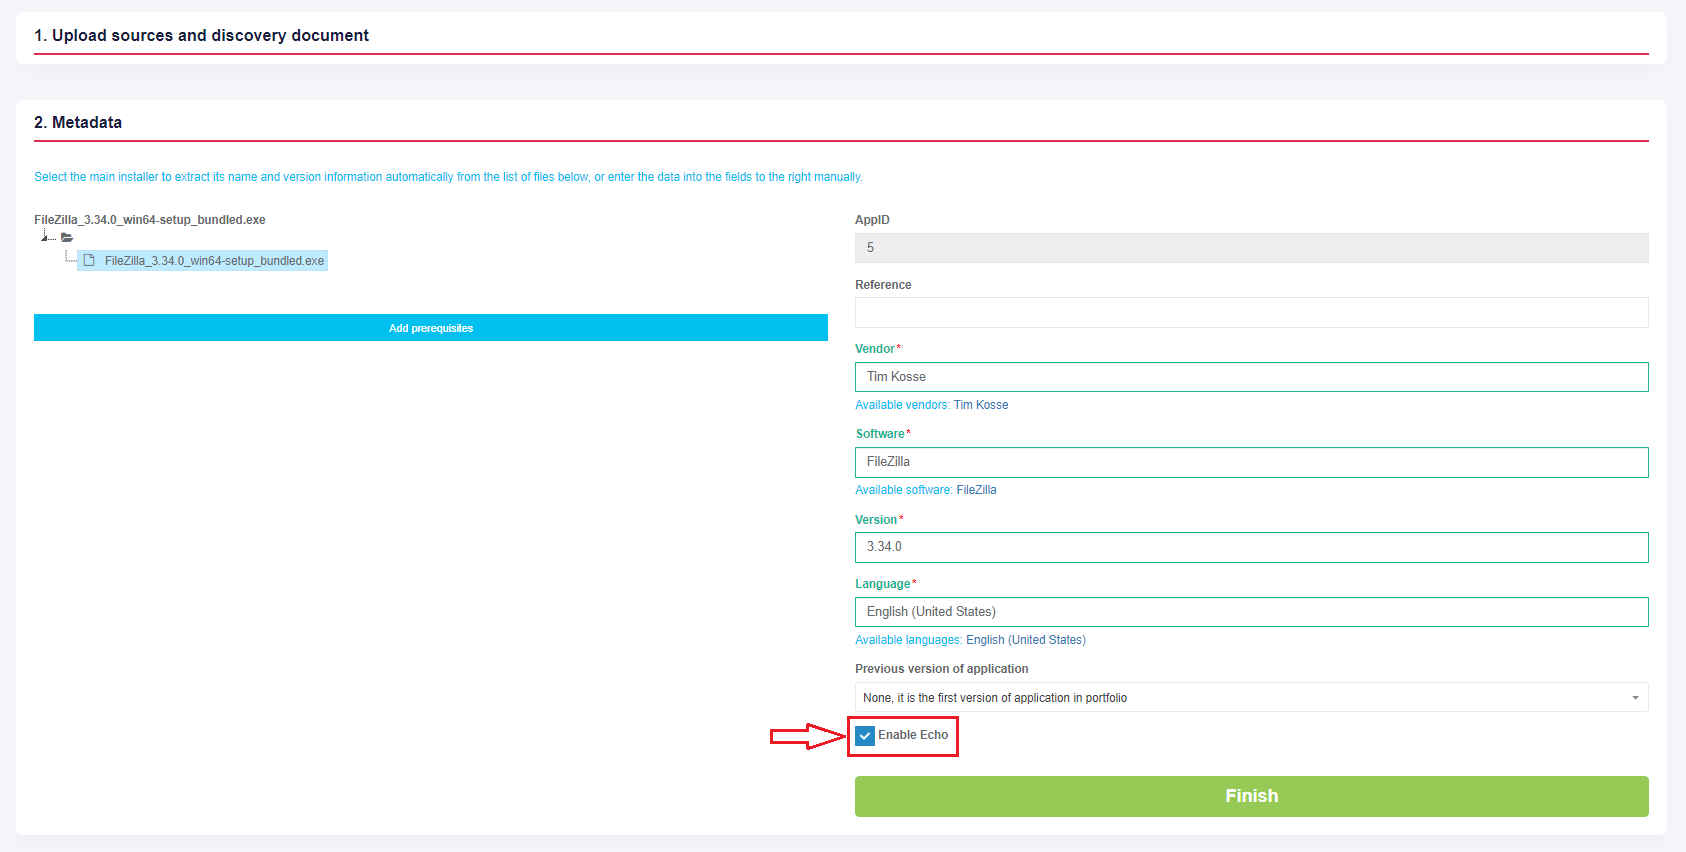
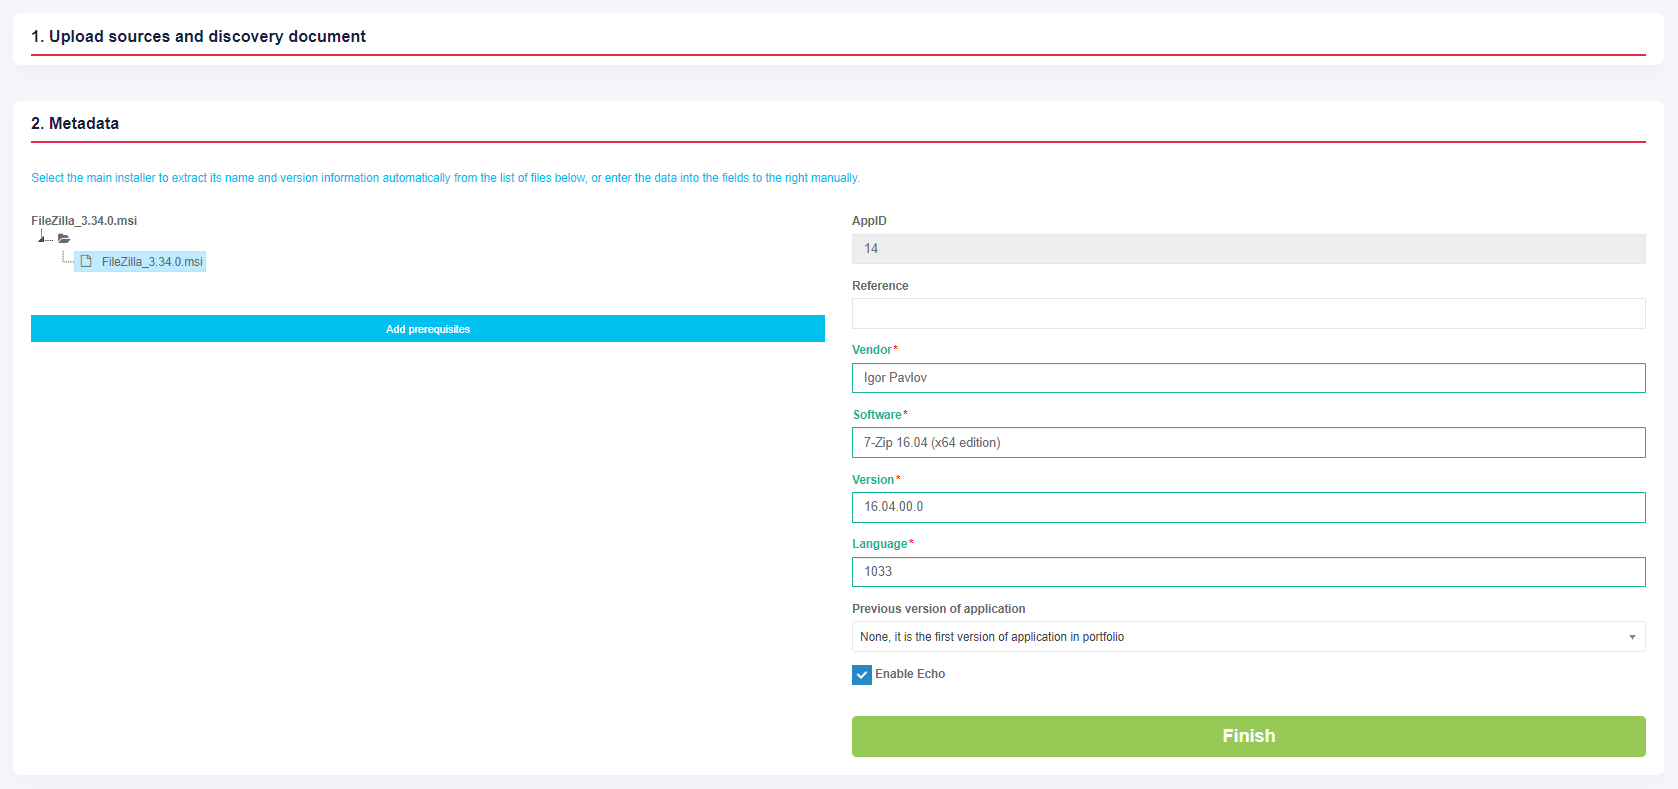
When the application is uploaded, and the metadata is reviewed, the Enable Echo option must be activated as it is shown on the screenshot below:
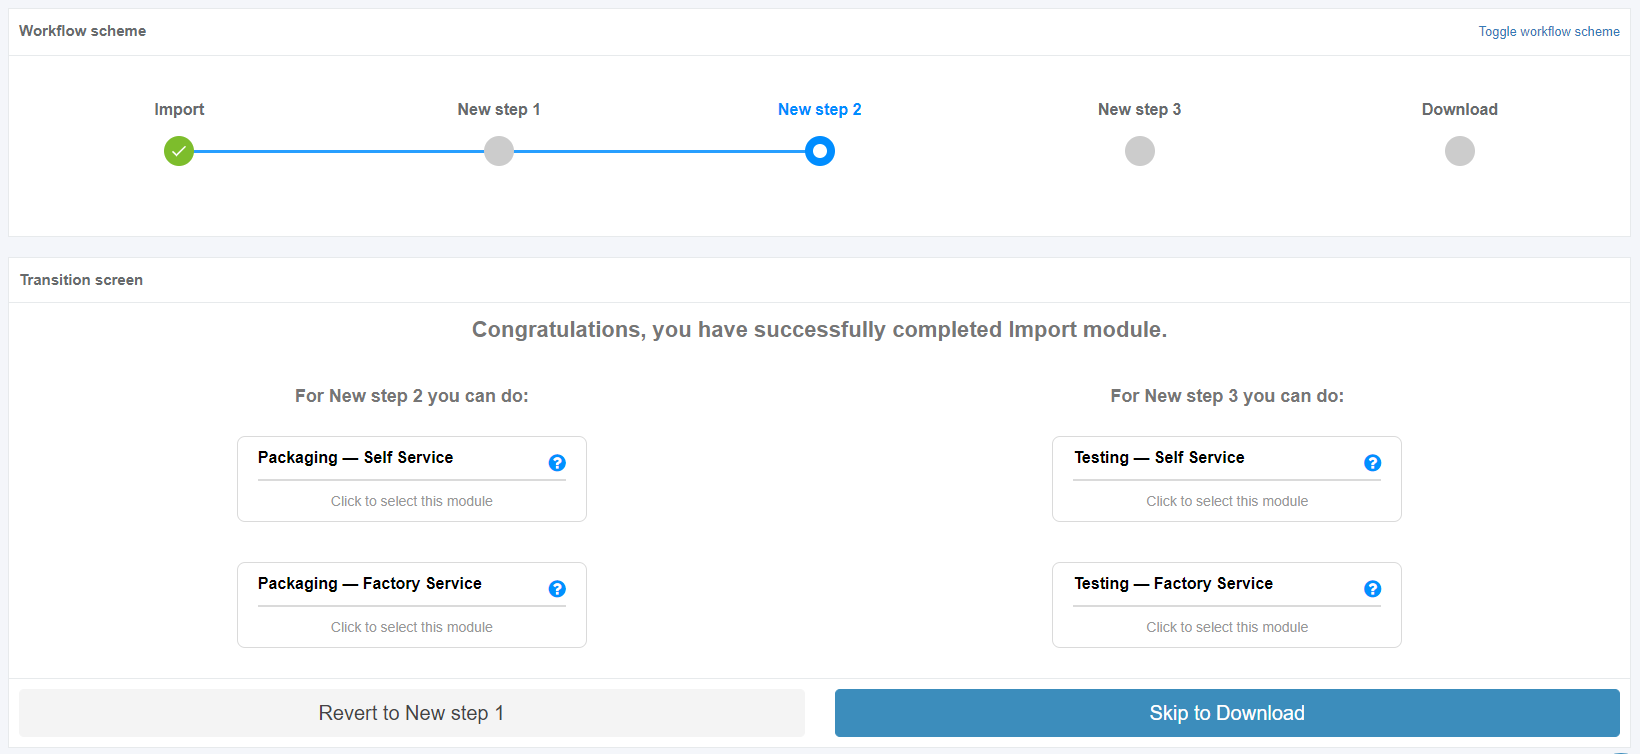
Apptimized shows the transition screen when successful:
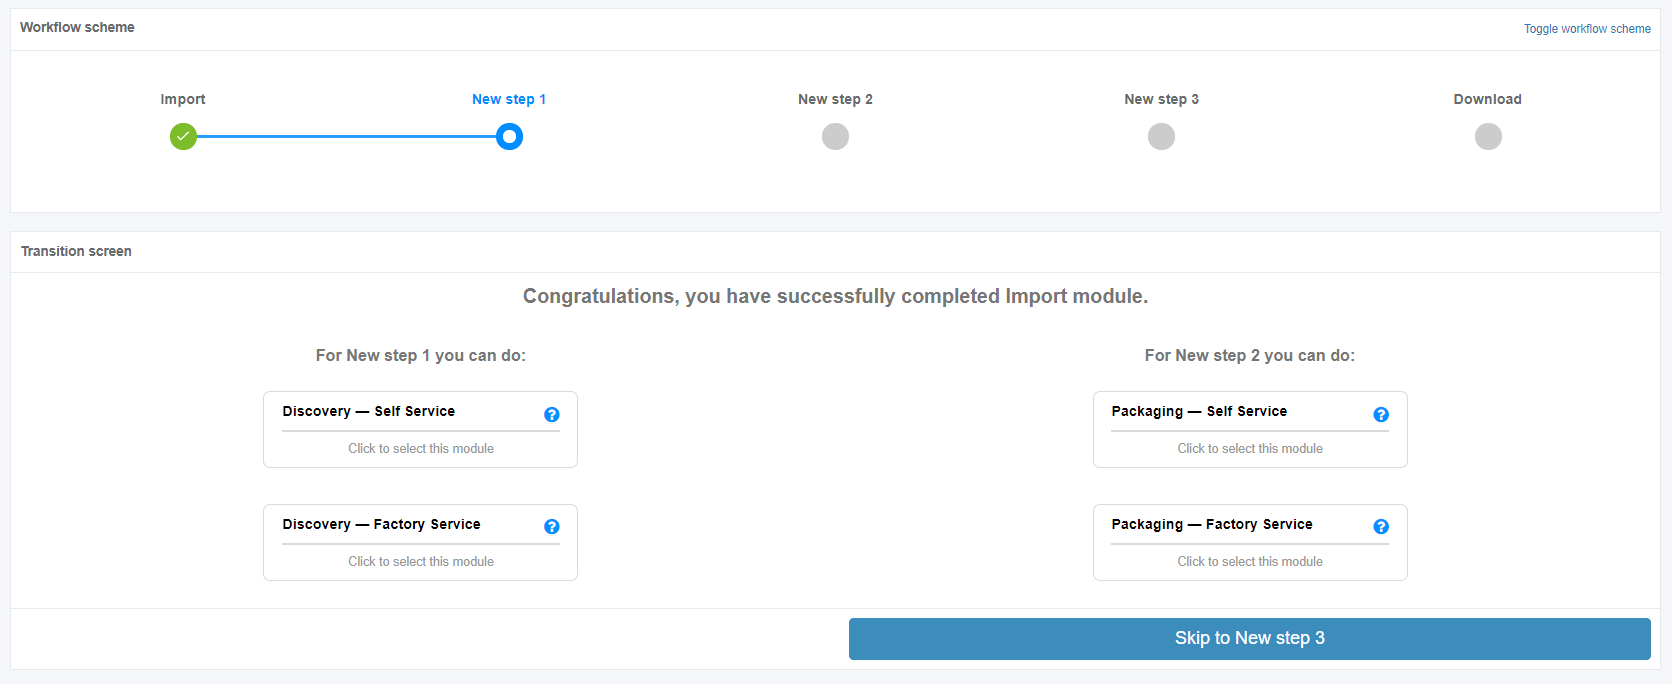
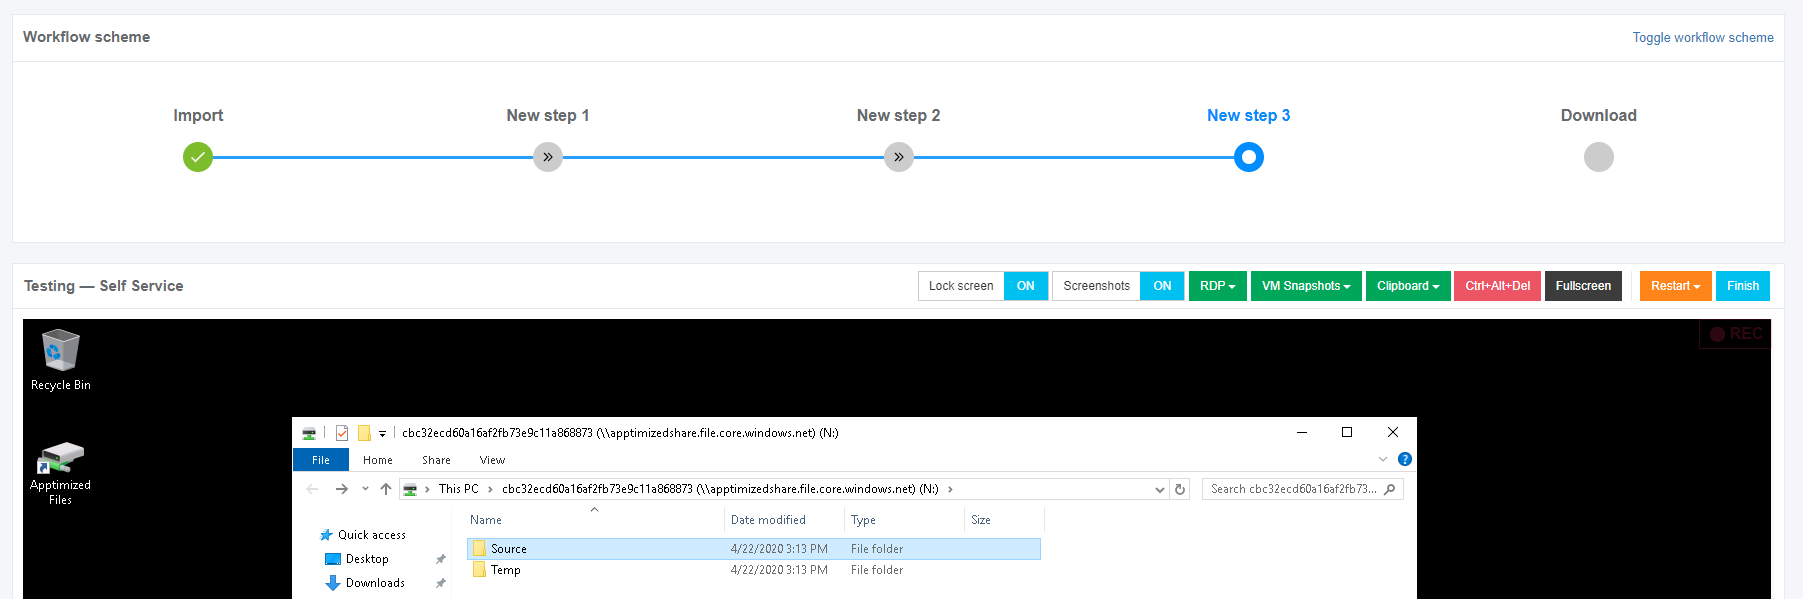
The next step is available when clicking the Discovery – Self Service block. Apptimized shows the following screen when successful:
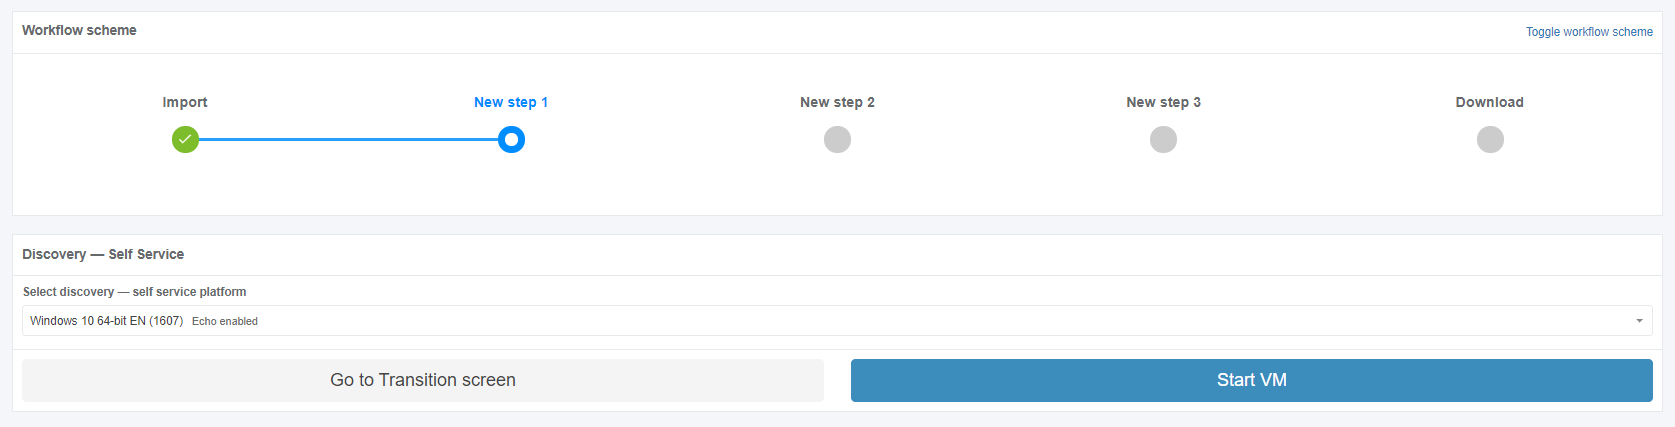
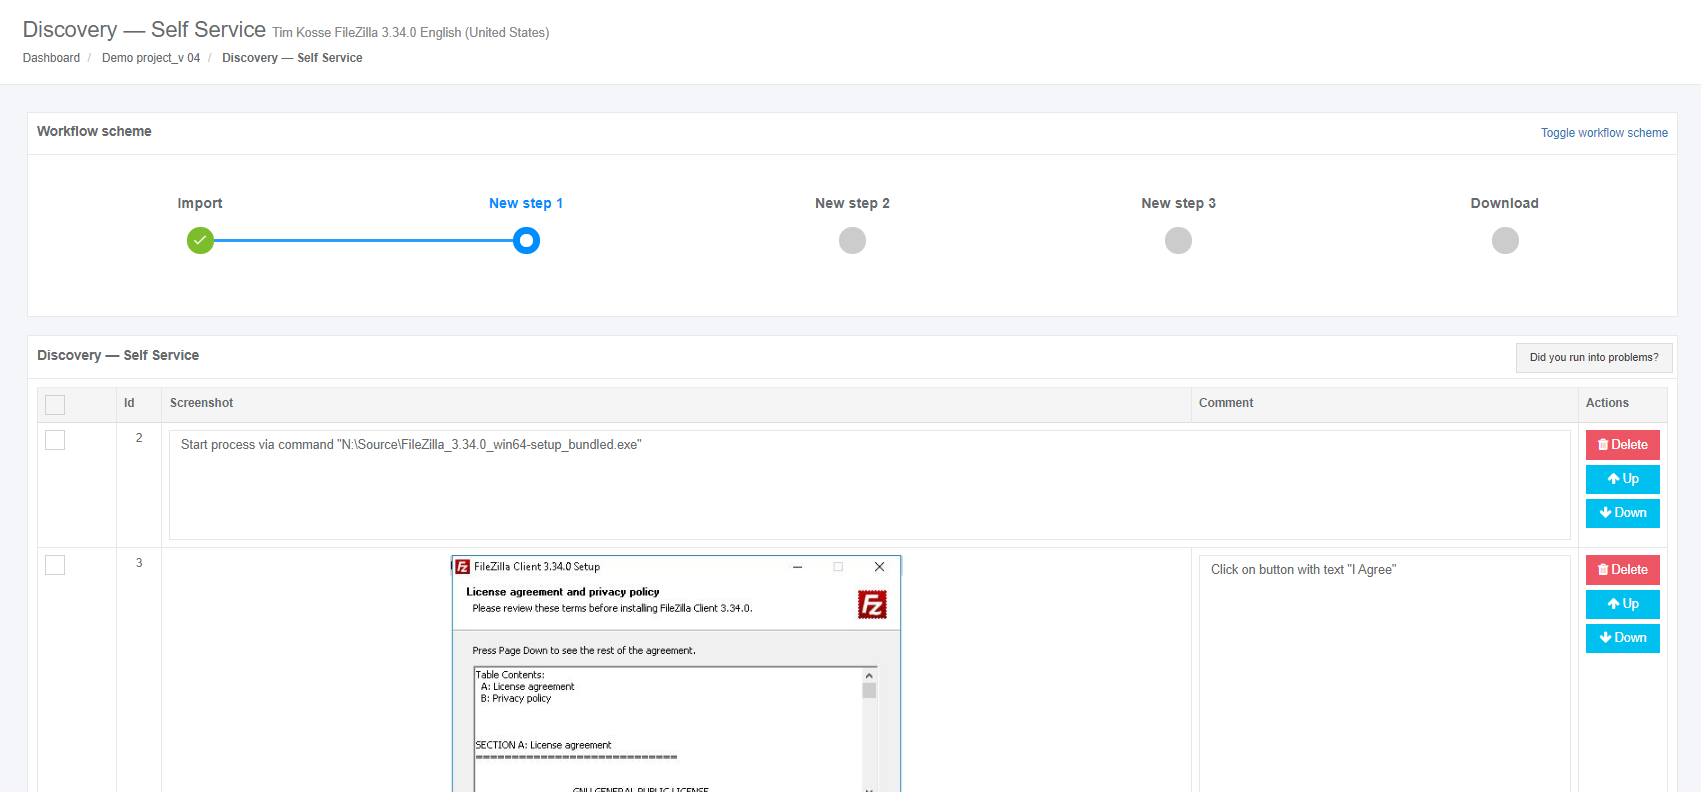
The discovery process actions with Echo are similar to discovery process actions without Echo (see Discovery – Self Service manual).
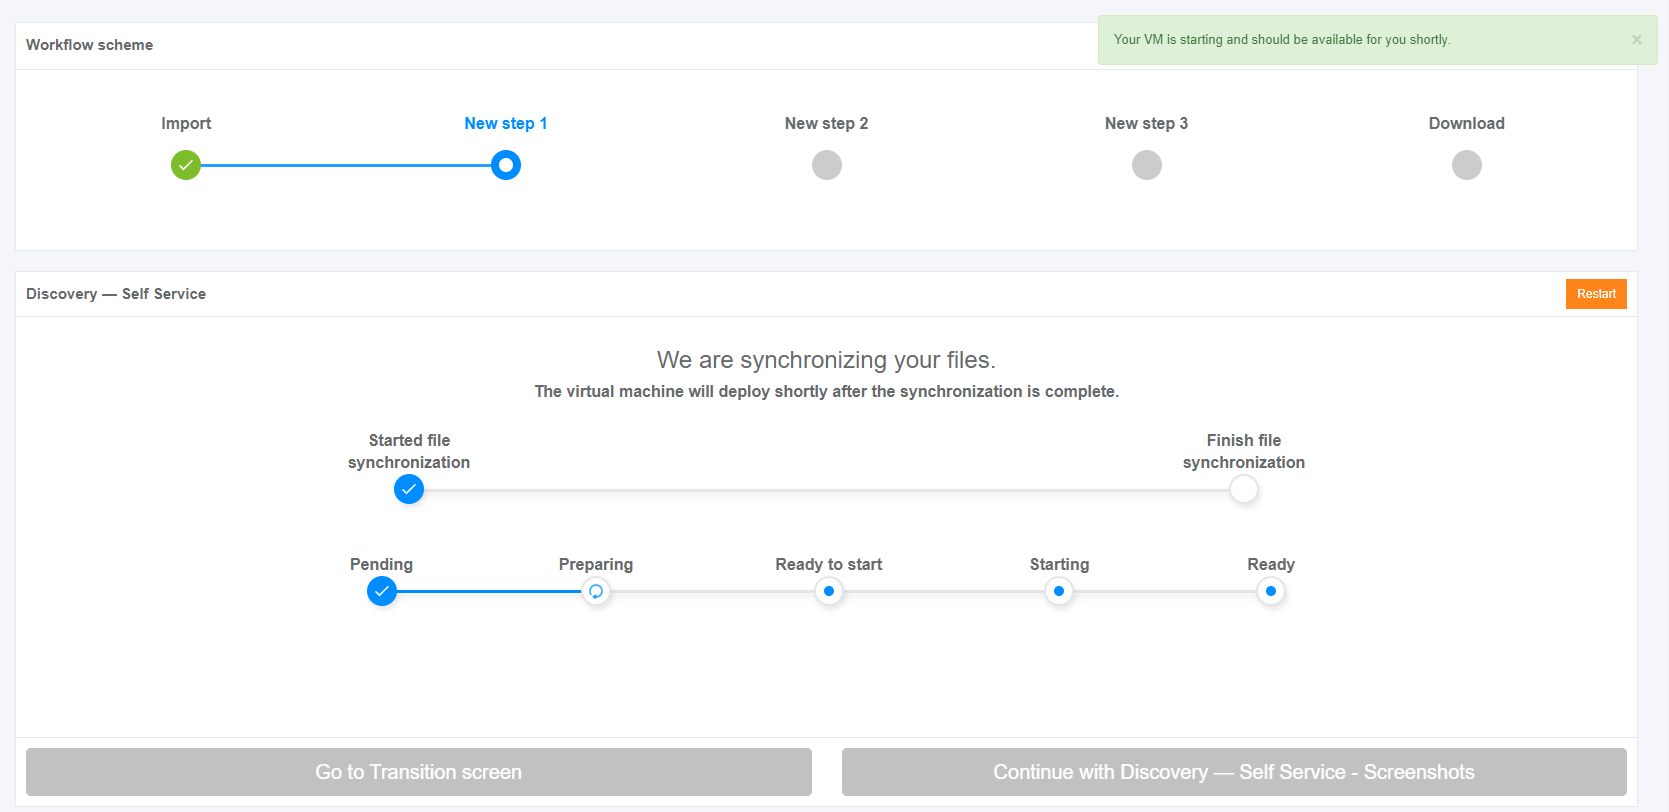
VM preparation may take a few moments:
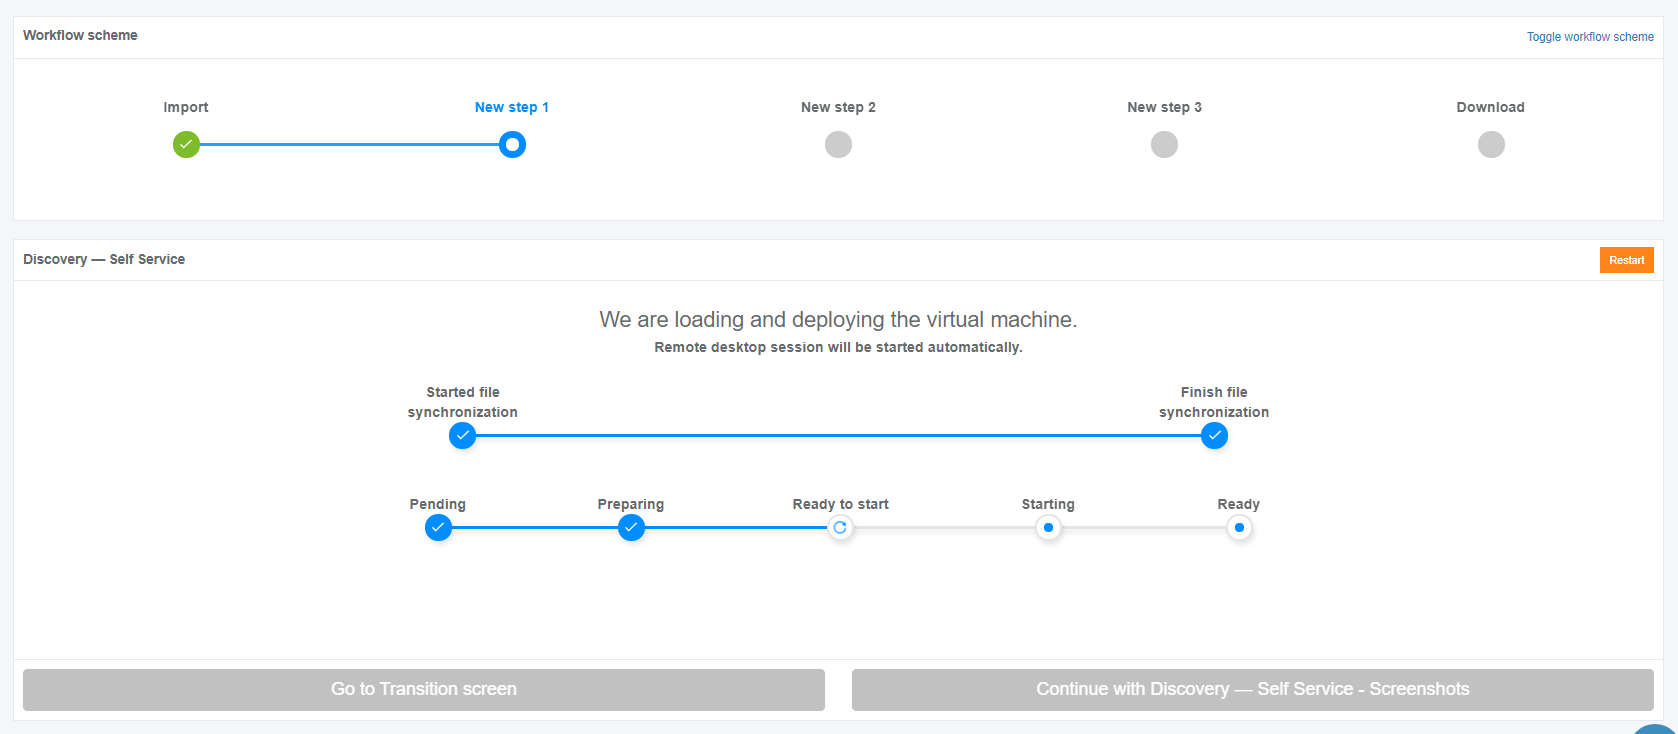
When the synchronization process is finished, Apptimized shows the following screen:
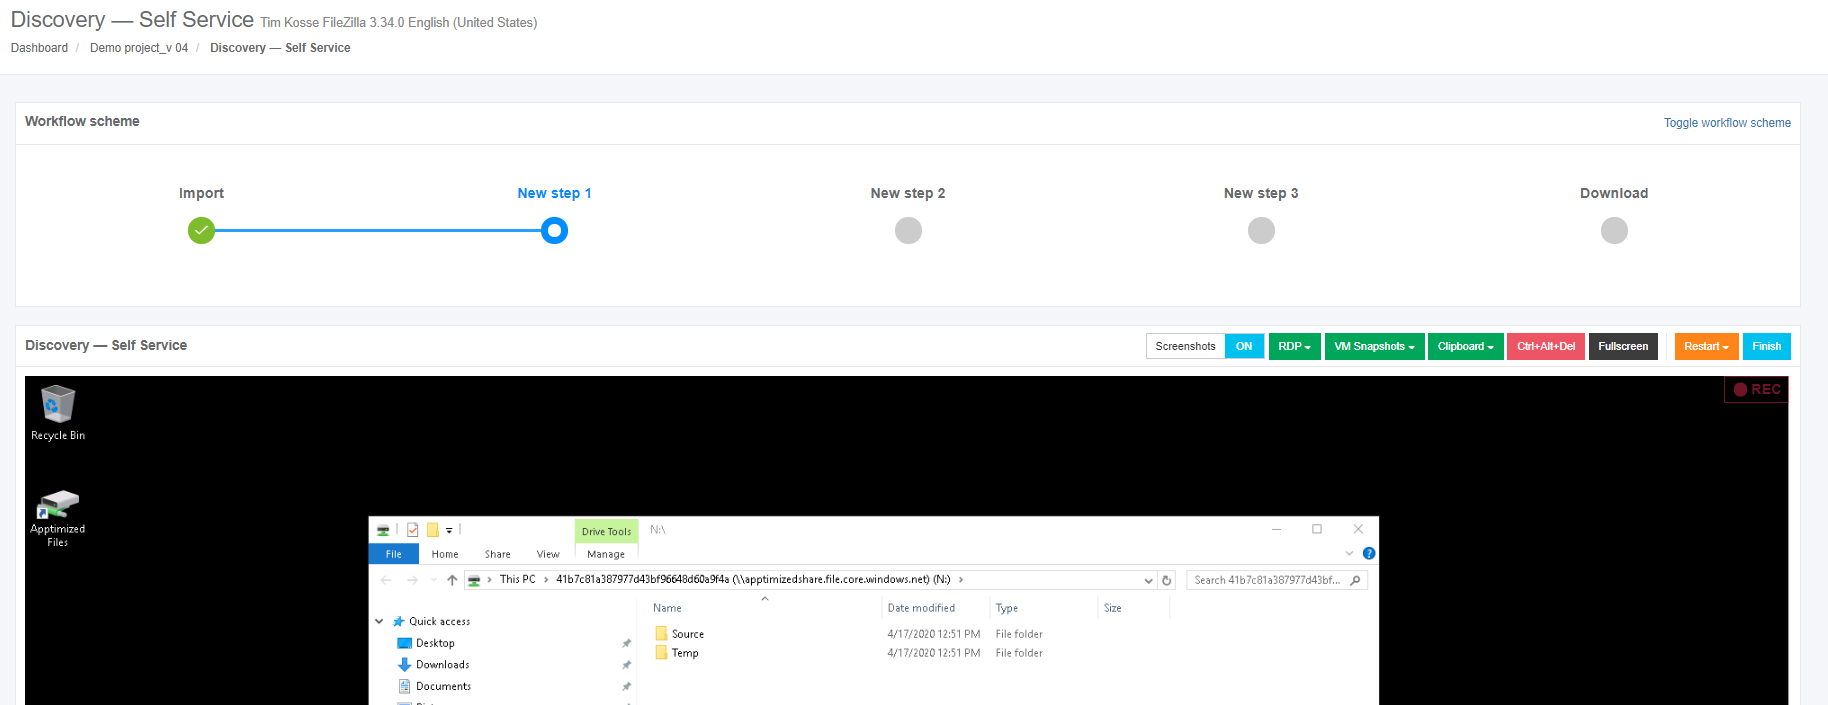
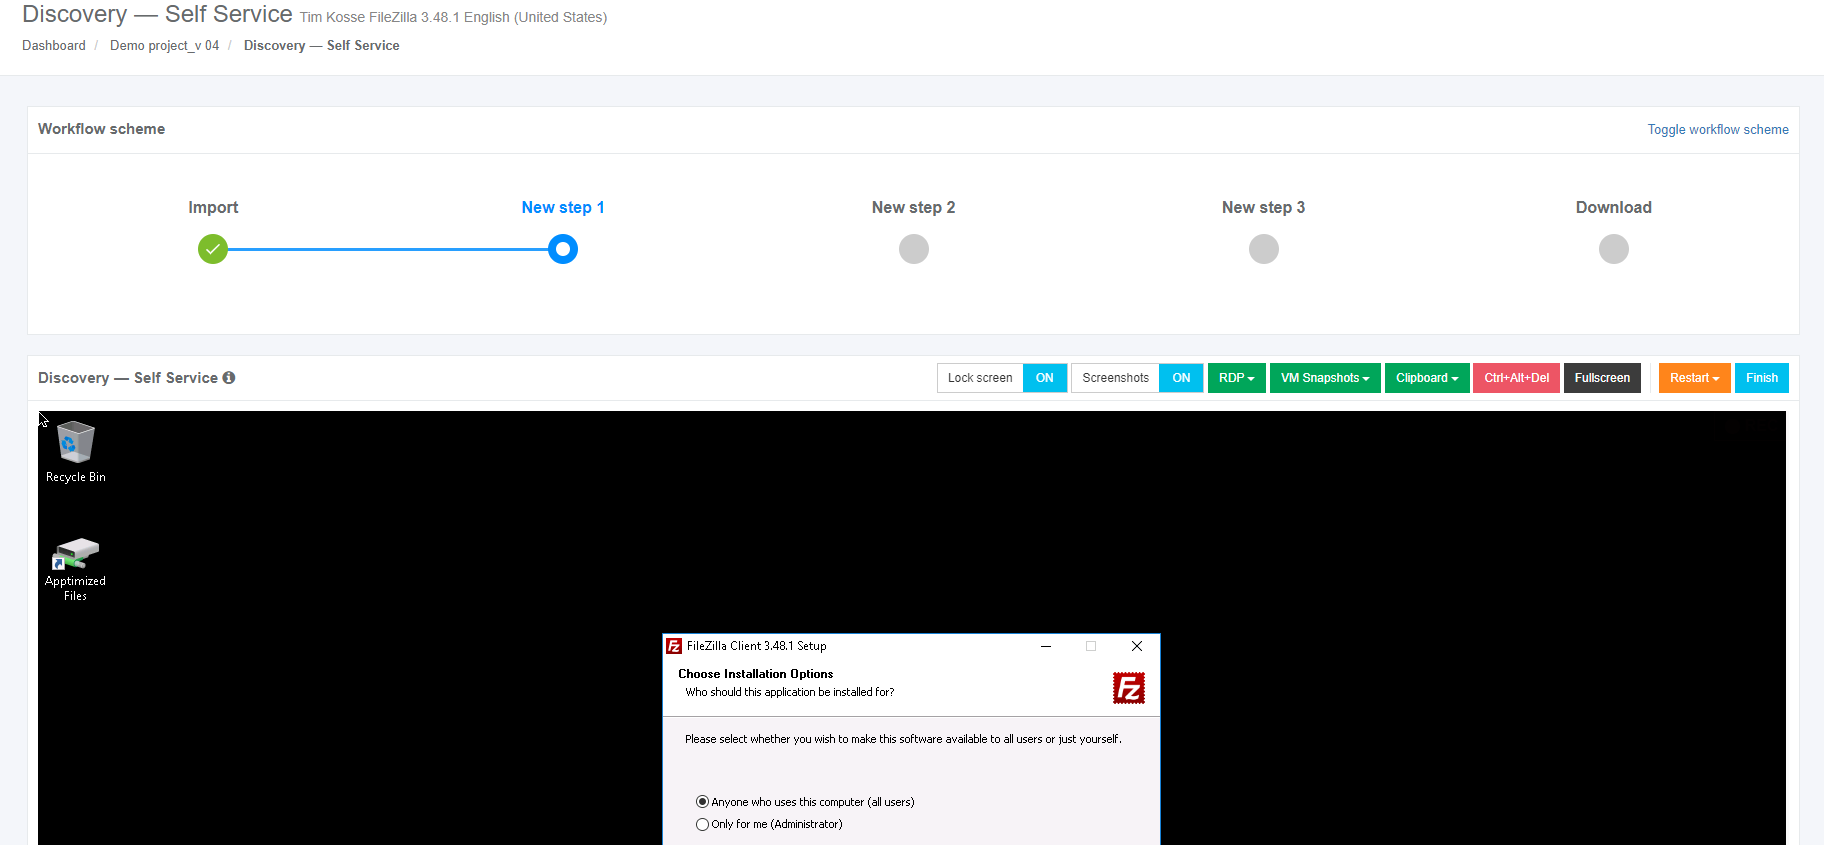
The uploaded files locate in the Apptimized files folder on the VM desktop.
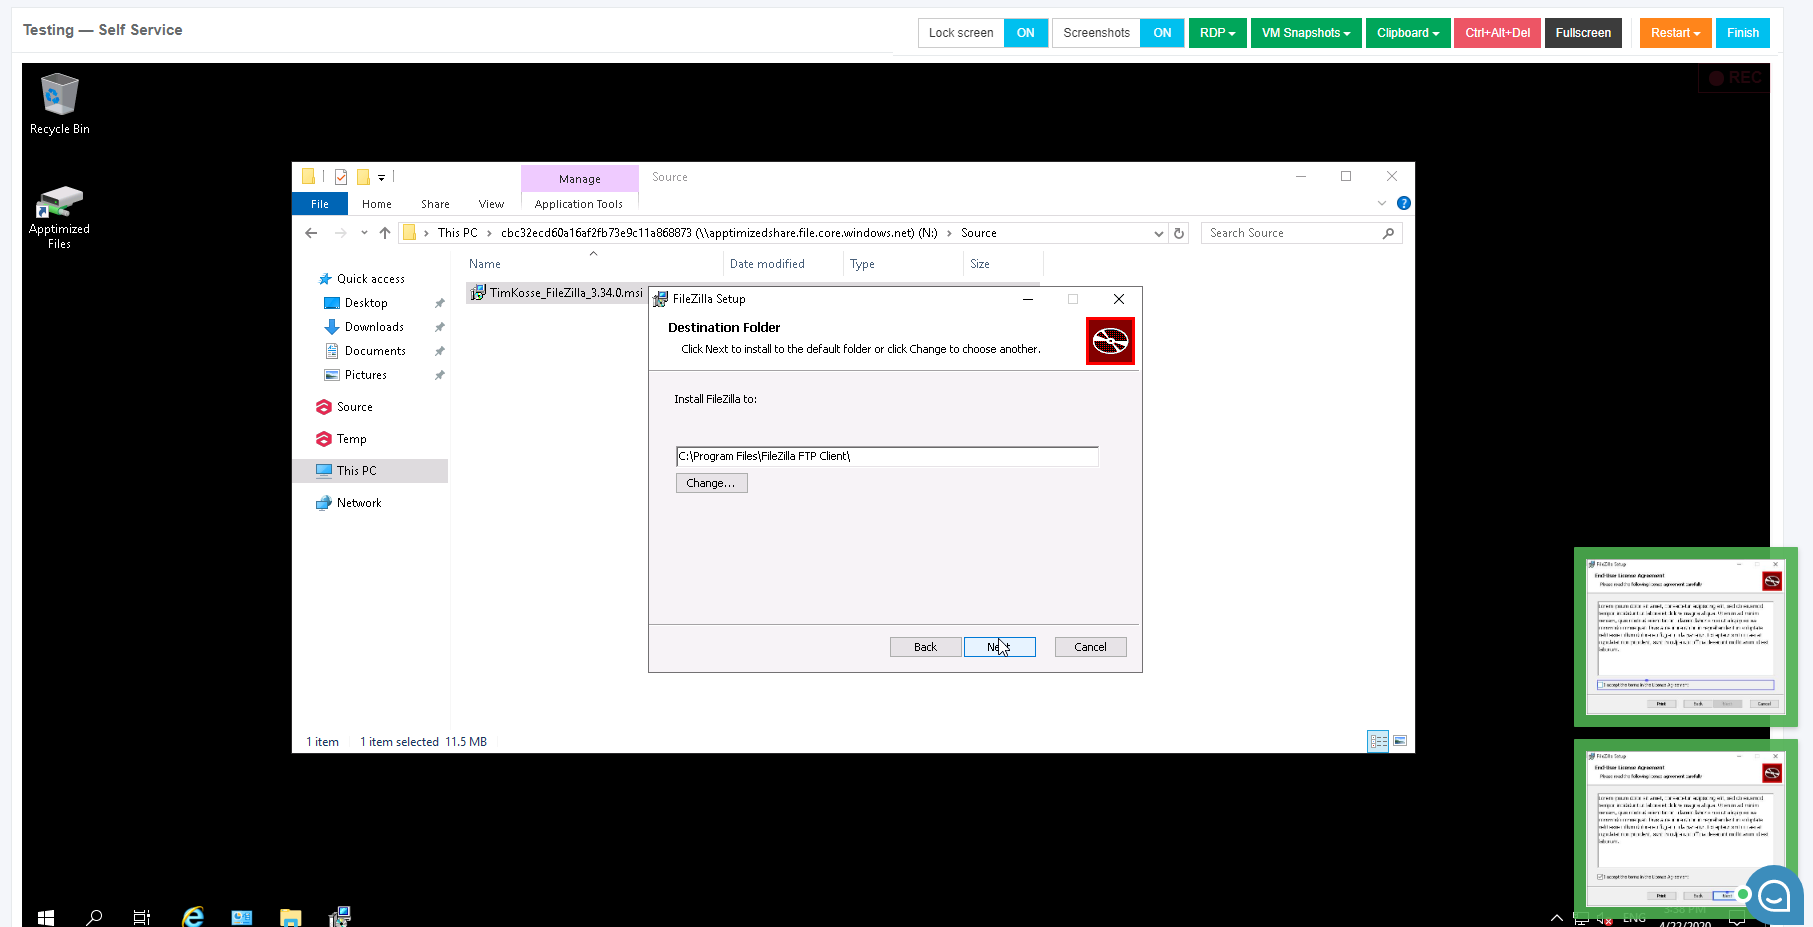
To start the installation process, a user opens the .EXE file located in the Source folder.
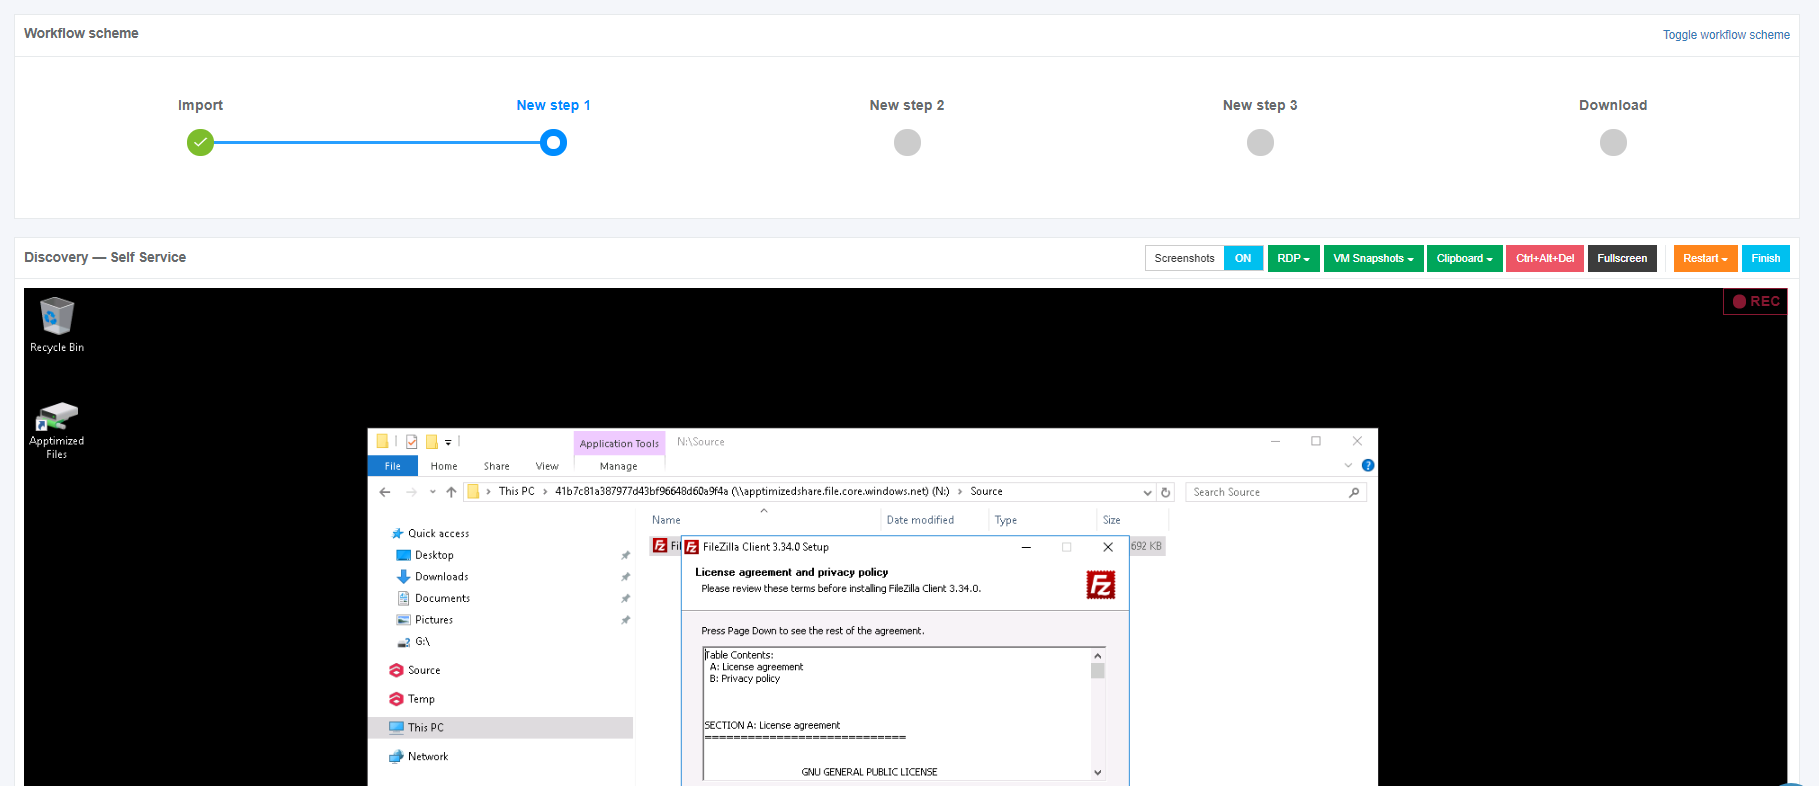
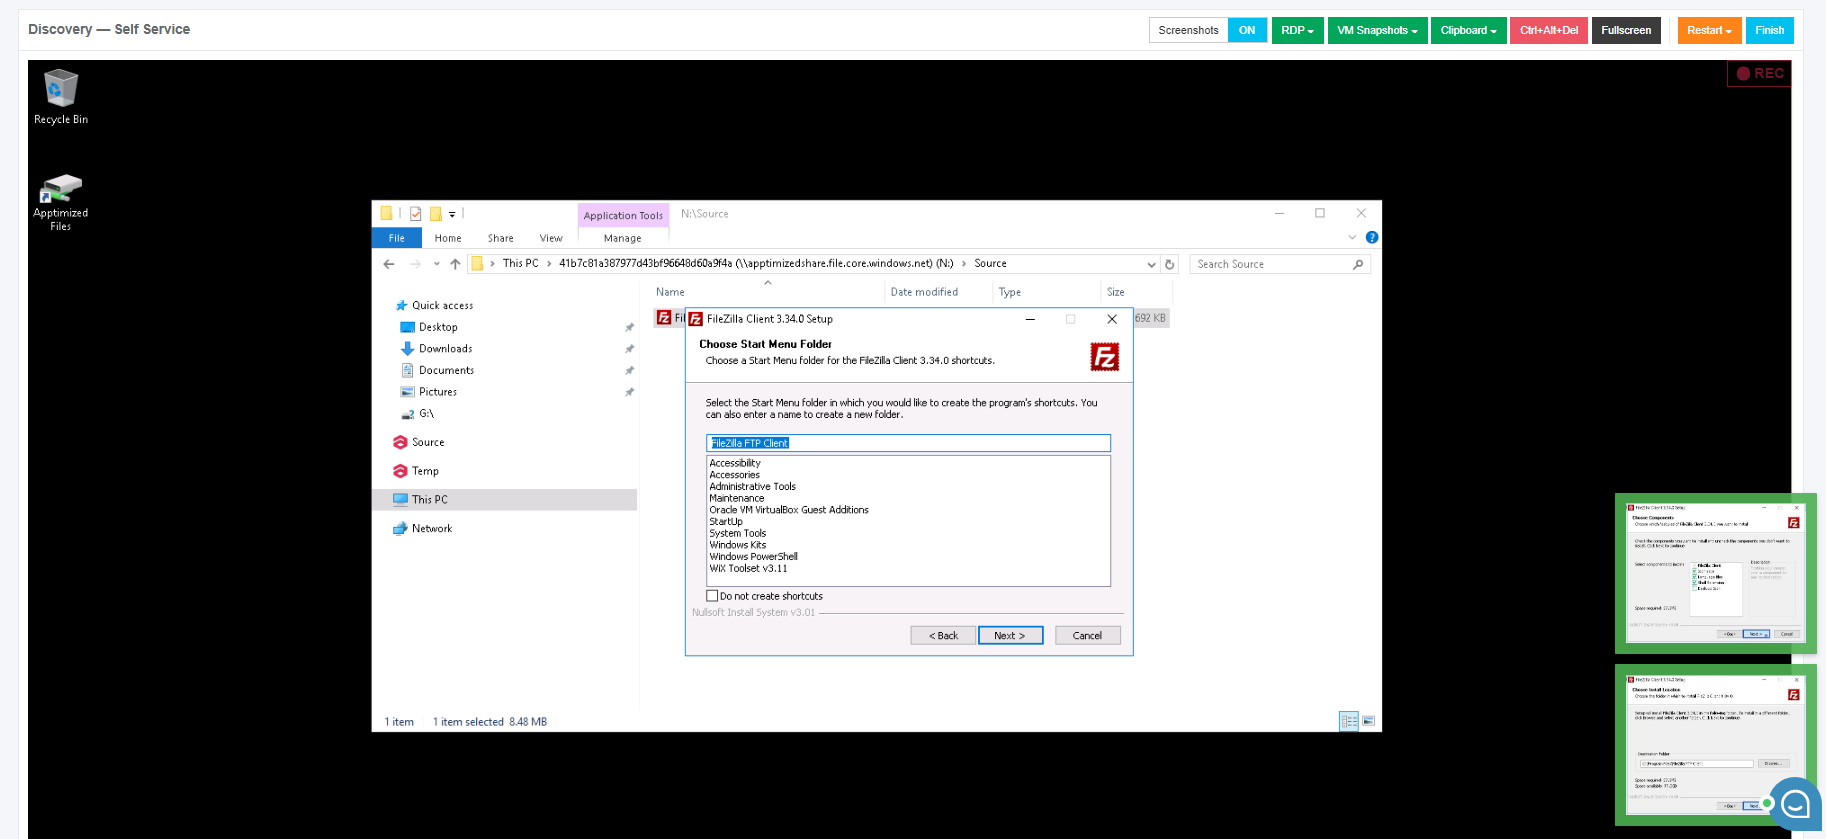
Every action is captured as a screenshot which is shown in green boxes appearing on the right-hand side:
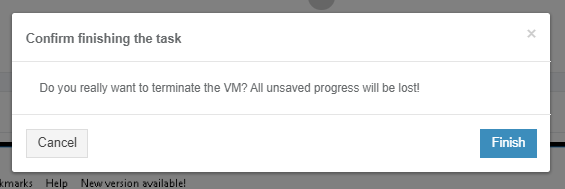
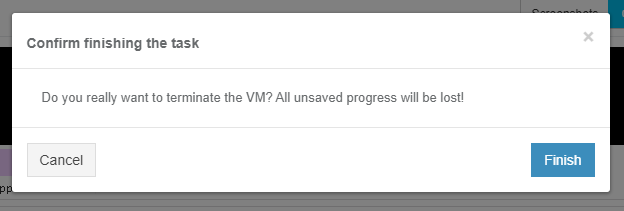
When installation session and configuration settings completed, click the Finish button to terminate the VM. Apptimized shows the following modal window:
Apptimized shows the following screen when successful:
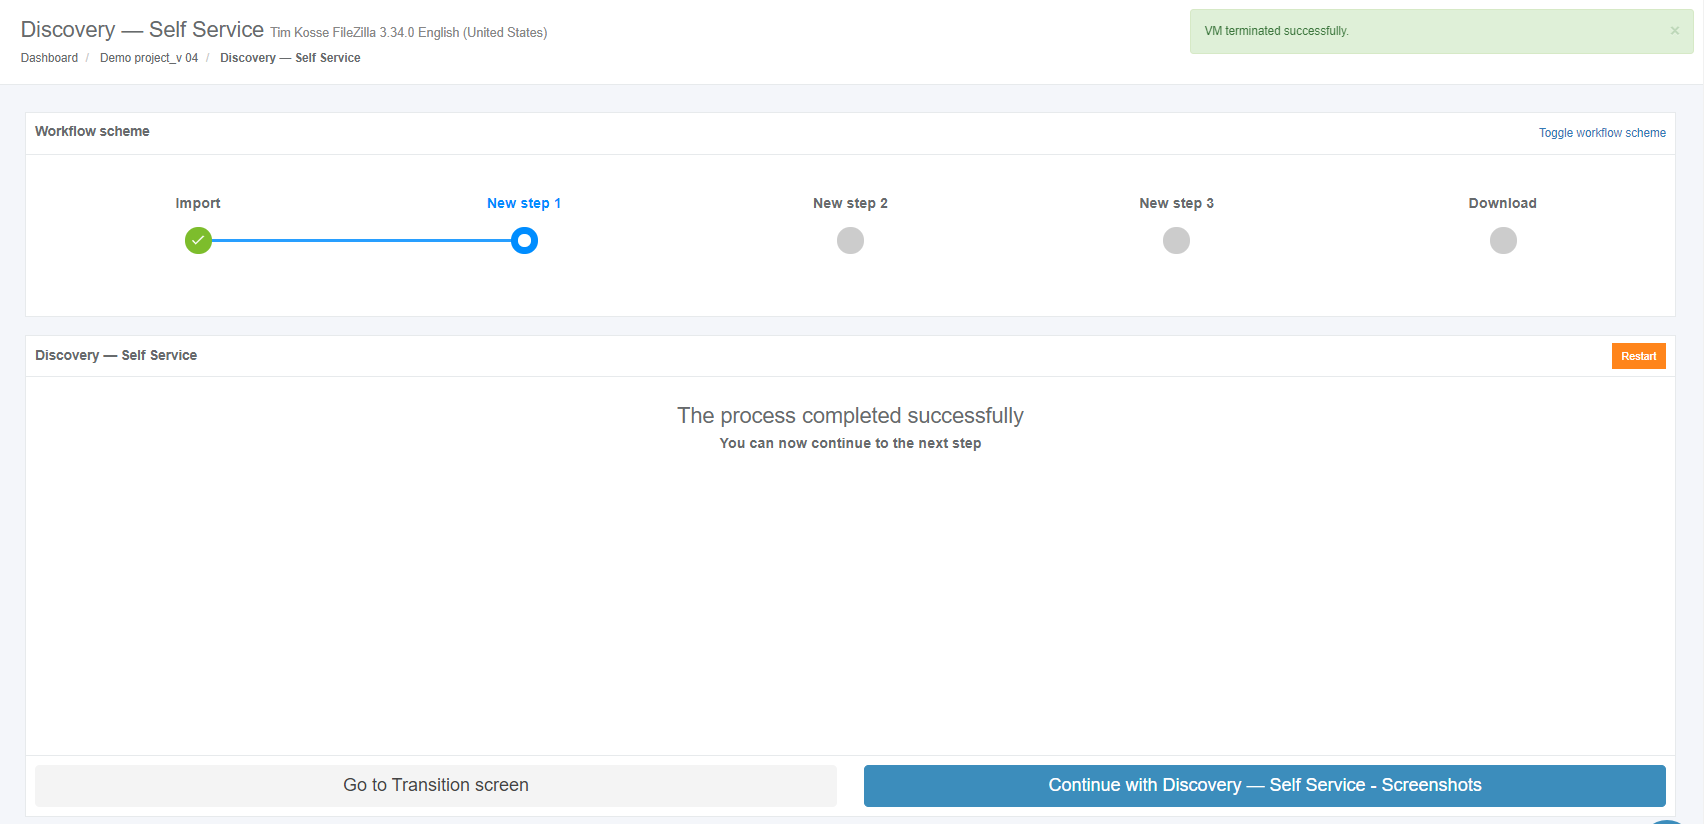
The next step available when clicking the Continue with Discovery - Self Service – Screenshots button.
The screenshots review is finished when clicking the Save changes button.

Apptimized shows the following screen when successful:

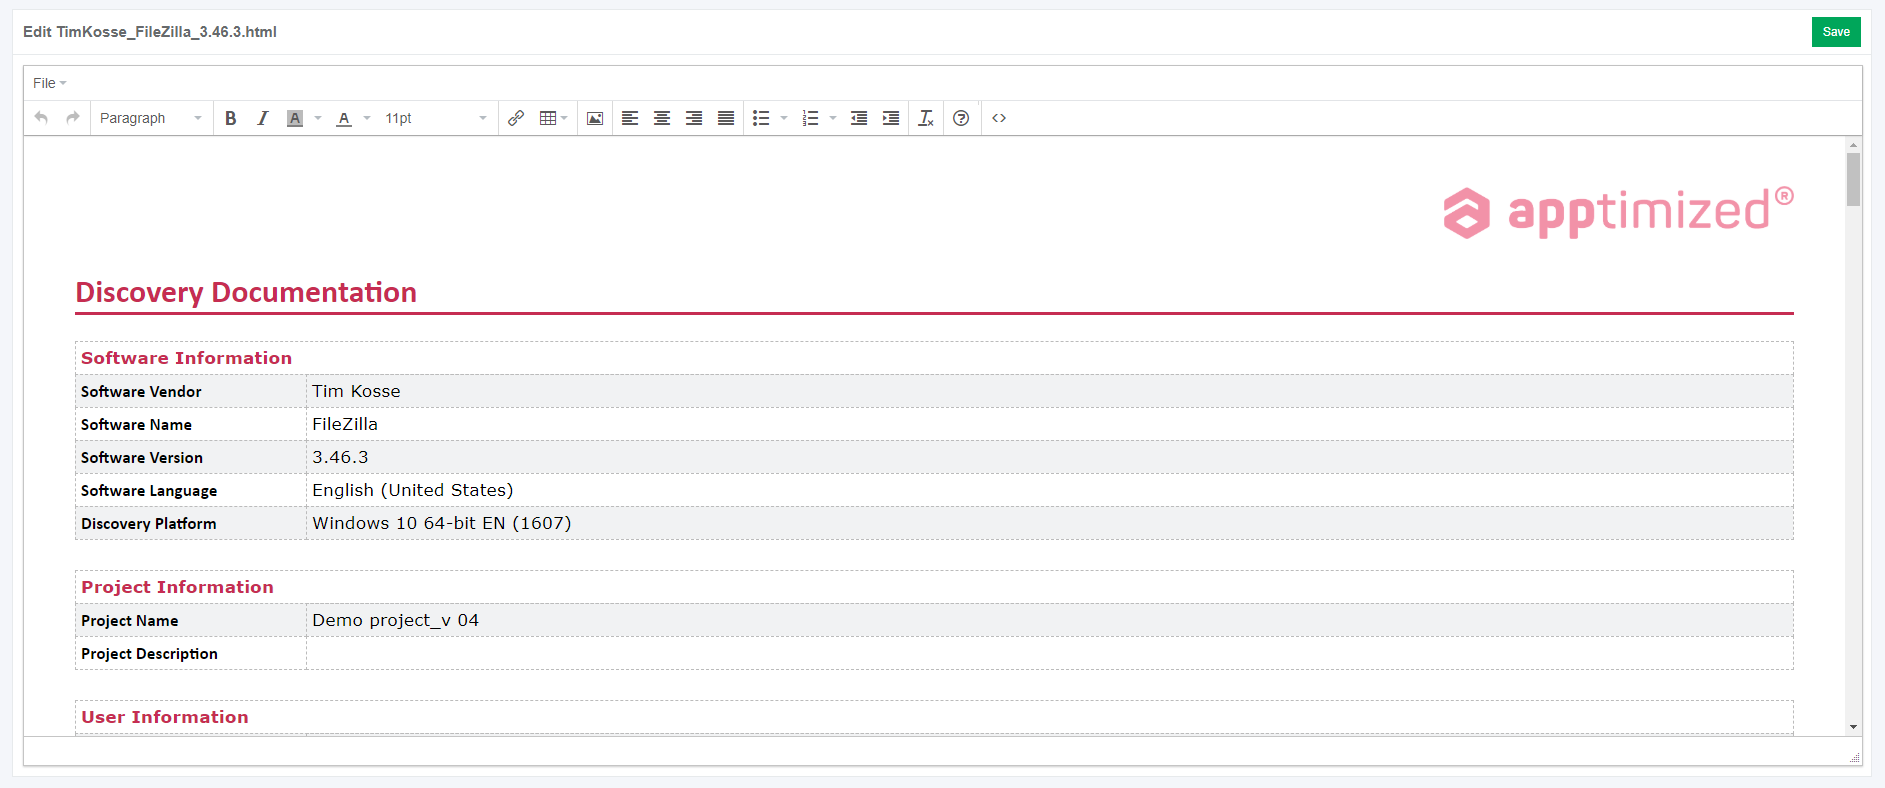
The generated document is available in PDF and HTML formats. To download a document, click the Download generated HTML document or Download generated PDF document buttons.
The option to edit a discovery document is available under the Edit generated document button. The document editing finalizes by clicking the Save button.
The option to return to the discovery self-service screen mode is available under the Revert to Discovery – Self Service button.
The option to finish the discovery process is available under the Finish button.

The option to inspect the Echo results is available under the Project menu > Echo. Apptimized shows the following screen when successful:

Playback: Apptimized Assisted Discovery for future application versions
With Apptimized Echo a user can record the Discovery step activities for the application, and then (if the newer version of the application is released and a user added it to project’s portfolio), a user can specify the initial version of the application for which the Discovery step was recorded. By doing so, a user doesn’t need to perform a Discovery step for the newer version of the application anymore. When the workflow proceeds to the Discovery step, it will replay the recorded installation and configuration activities of the application from the initial version. So, a user saves time significantly. This feature is called Apptimized Assisted Discovery.
To run Apptimized Assisted Discovery the new version of the application must be imported.
The option to import application is available under the Project menu > Import > Start import > Classic import > Application upload session > Next button.
When the application is uploaded, and the metadata is reviewed, the previous version of the application must be indicated, and Enable Echo option must be activated as it is shown on the screenshot below:

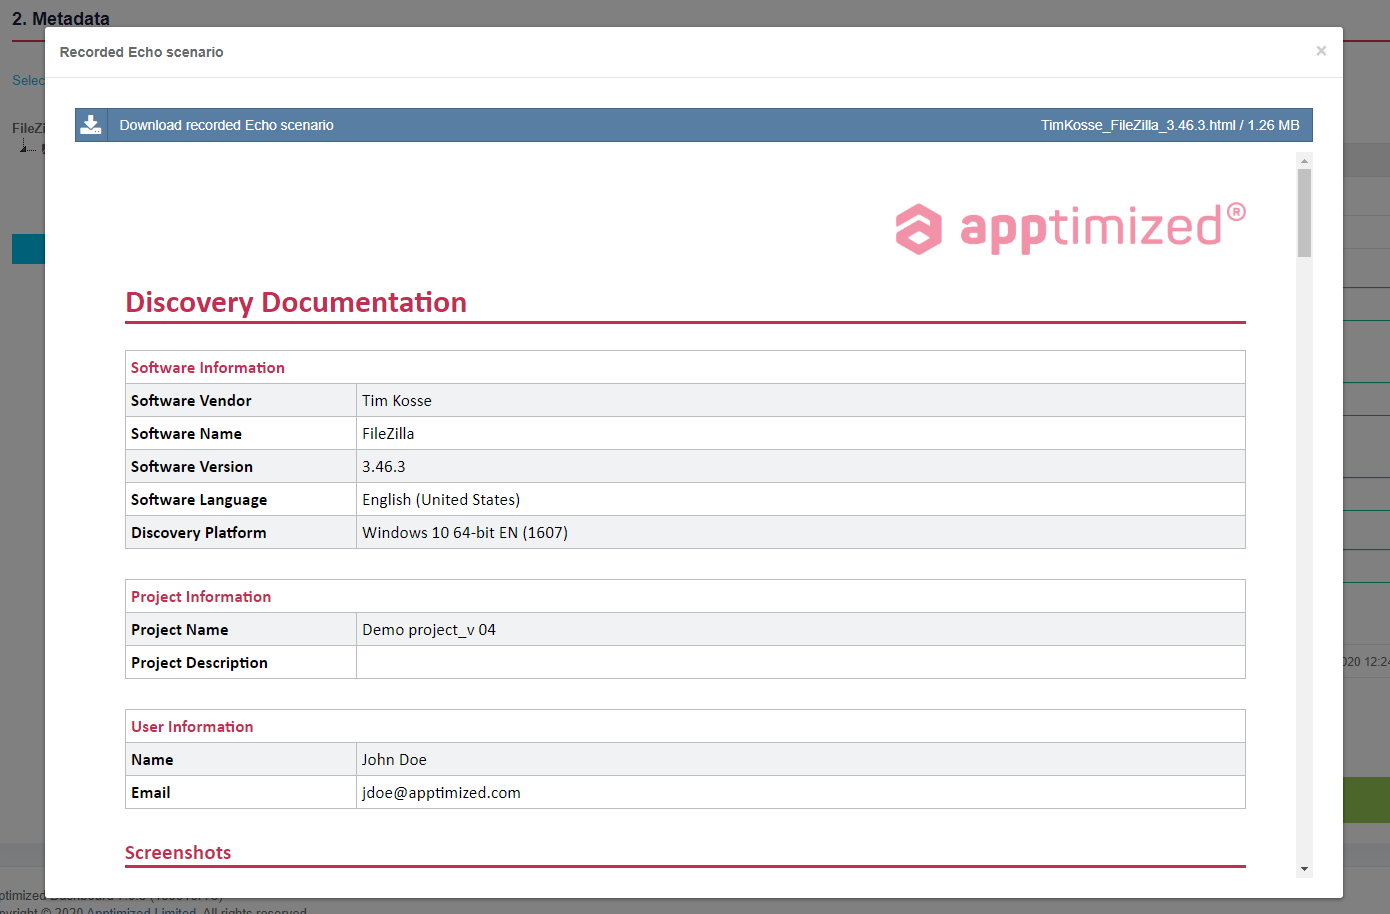
When changes to the Previous version of the application field applied, the Show recorded Echo scenario option becomes available. A user can click on it to make sure that the needed Echo Discovery was selected:

The import step finalizes when clicking the Finish button. Apptimized shows the transition screen when successful:

The next step is available when clicking the Discovery – Self Service block. Apptimized shows the following screen when successful:
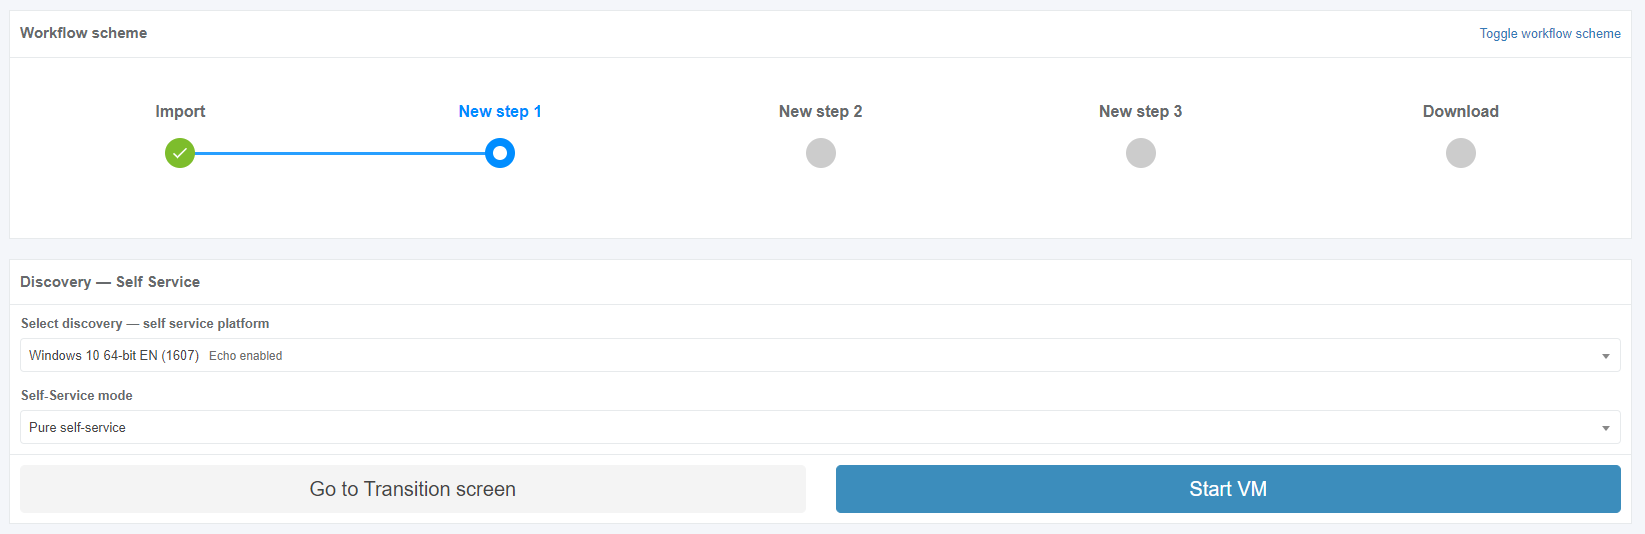
The option to set the platform is available under the Select Discovery -Self-Service platform field (select a value from the drop-down list).
The option to set the Echo assisted self-service mode is available under the Self-Service mode field (select a value from the drop-down list):

The VM starts when clicking the Start VM button. VM preparation may take a few moments:
Apptimized shows the following screen when successful:
User’s interactions to VM are not needed. The Echo provides the Discovery activities automatically. When the playback scenario finished, Apptimized shows the following screen:

The VM will be terminated automatically.
Note. When any issues occur, the notification comes in yellow (i.e., minor issues) or red (i.e., major issues) color.
A user can Retest results or Continue with Discovery – Self Service – Screenshots. When the review of the generated screenshots completed, click Save changes button. Apptimized shows the following screen when successful:
The generated document is available in PDF and HTML formats. To download a document, click the Download generated HTML document or Download generated PDF document buttons.
The option to edit a discovery document is available under the Edit generated document button. The document editing finalizes by clicking the Save button.
The option to return to the discovery self-service screen mode is available under the Revert to Discovery – Self Service button.
The option to finish the discovery process is available under the Finish button.
The option to inspect the Echo results is available under the Project menu > Echo. Apptimized shows the following screen when successful:
Echo with packages (Testing)
Apptimized Echo provides test automation capabilities by which repeated application and package testing is simplified. Echo will playback a recorded test case automatically when needed.
If a user wants to automate testing of packages or software that has been prepared for automated and silent installation (e.g., for mass deployment via ESD), the Echo must be implemented at the Testing - Self Service step.
The following use cases available:
- Automated installation (e.g., from install.cmd;
- Providing a typical use case like creating a file, entering, manipulating, and saving data.
The following scenarios to open the transition screen available:
- My Dashboard > My Applications > Choose the project > Actions column > Process option;
- Project menu > Dashboards > Overview > Your assignments module > Choose the application > Actions column > Process option;
- Project menu > Dashboards > Portfolio > Actions column > Process option;
- Project menu > Import > Start import > Classic import > Application upload session >
Apptimized Echo plays back test cases automatically in the following cases:
- a new version of the package is released by the packaging group (or by the packaging self-service or by the Apptimized packaging factory), is uploaded to Portfolio and is pushed to Testing again (see Playback: Apptimized Assisted Testing for future package versions and repeated testing (iterations));
- a new version of Windows is released by Microsoft (see Playback: WaaS automated OS compat testing for vendor media).
To start producing the Echo scenario via Testing - Self Service, the relevant Playback Echo scenario form must be selected in the Project menu > Settings > Echo > Playback Echo scenario from field > Testing – Self Service.
Recording: Testing – Self Service
The option to import package (e.g., MSI) is available under the Project menu > Import > Start import > Classic import > Application upload session > Next button.
When the application is uploaded, and the metadata is reviewed, the Enable Echo option must be activated as it is shown on the screenshot below:
Apptimized shows the transition screen when successful:
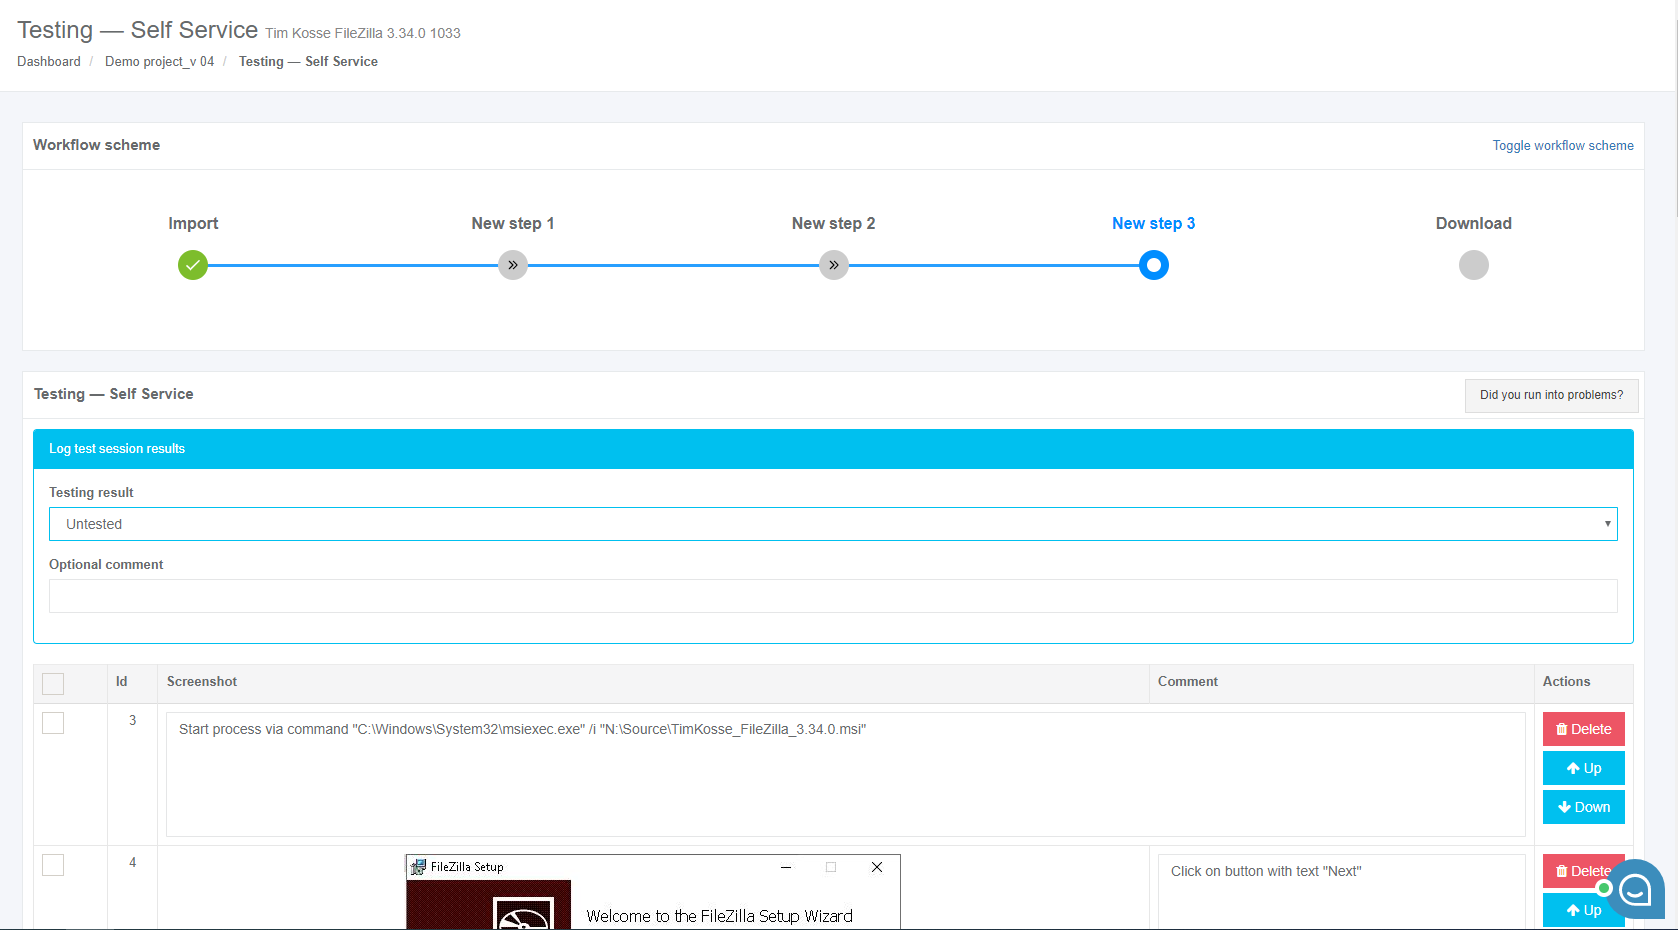
Skipping to the Testing modules required. The next step is available when clicking the Testing – Self Service block. Apptimized shows the following screen when successful:

The testing process actions with Echo are similar to testing process actions without Echo (see Testing – Self Service manual).
VM preparation may take a few moments:
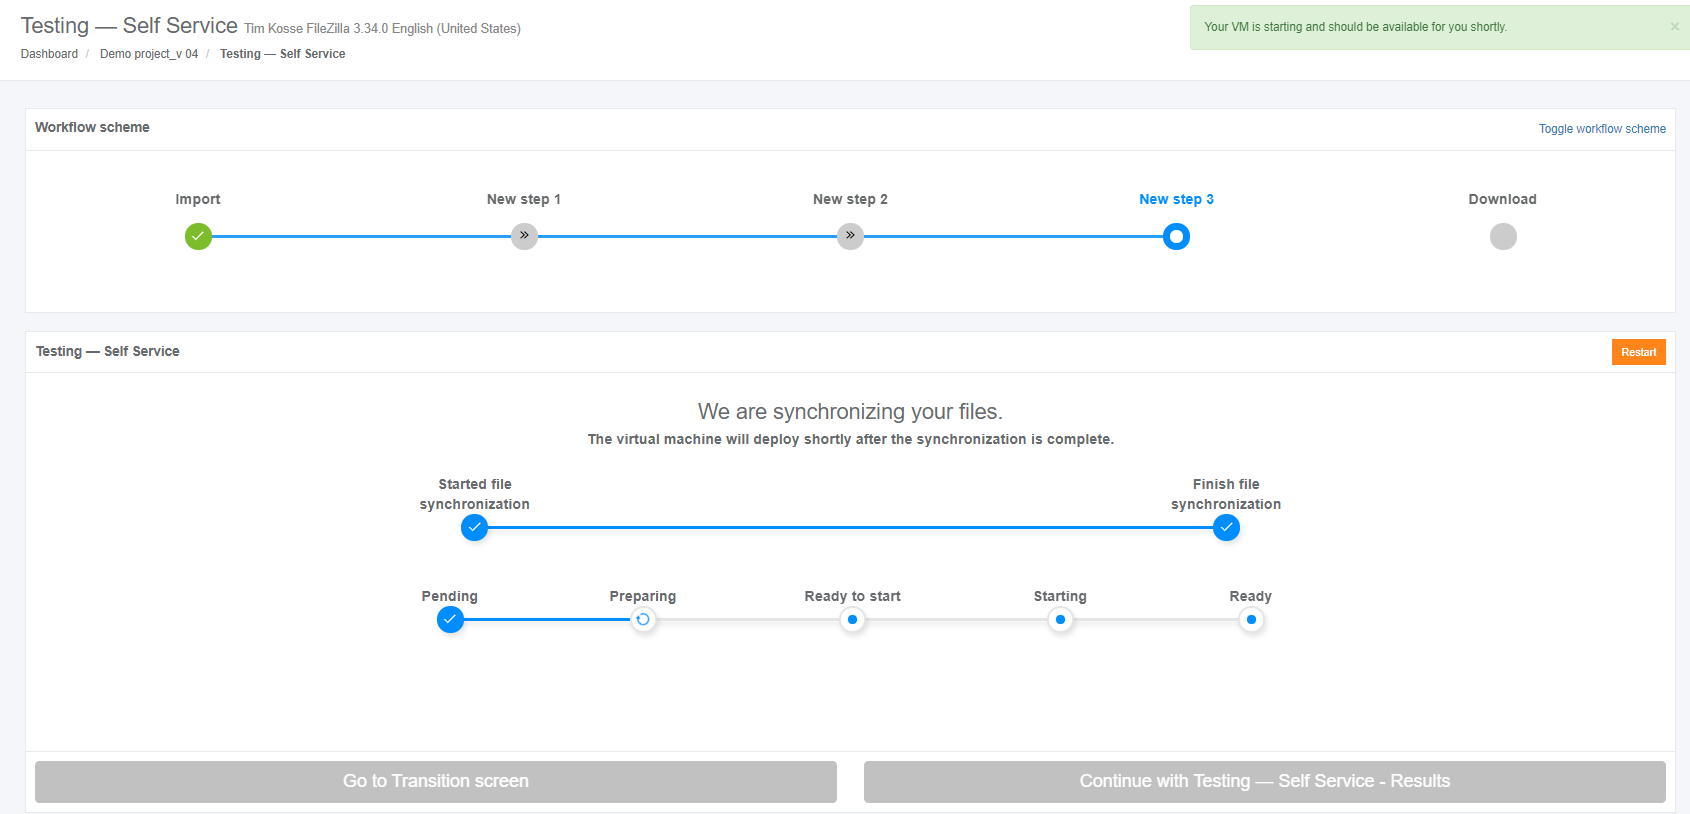
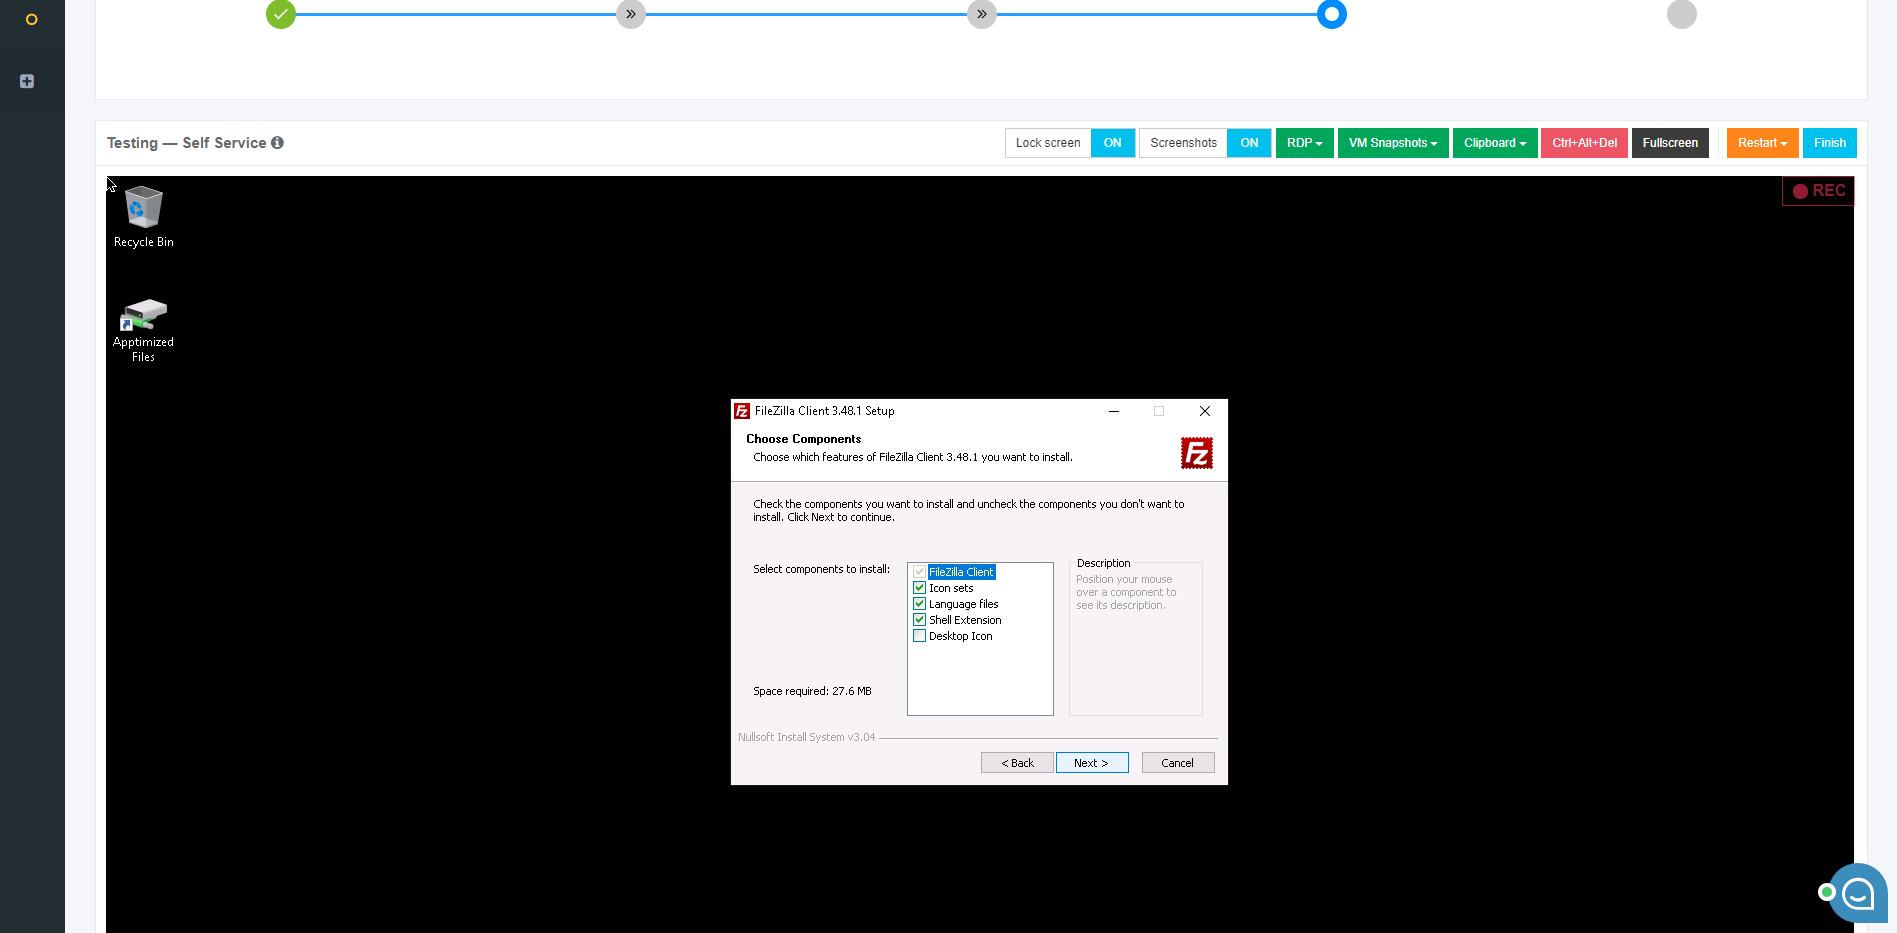
When the synchronization process is finished, Apptimized shows the following screen:
The uploaded files locate in the Apptimized files folder on the VM desktop.
To start the installation process, a user opens a file (i.e., EXE, MSI) located in the Source folder (or an installation file in the Packages folder).
Every action is captured as a screenshot which is shown in green boxes appearing on the right-hand side:
When installation session and configuration settings completed, click the Finish button to terminate the VM. Apptimized shows the following modal window:
Apptimized shows the following screen when successful:
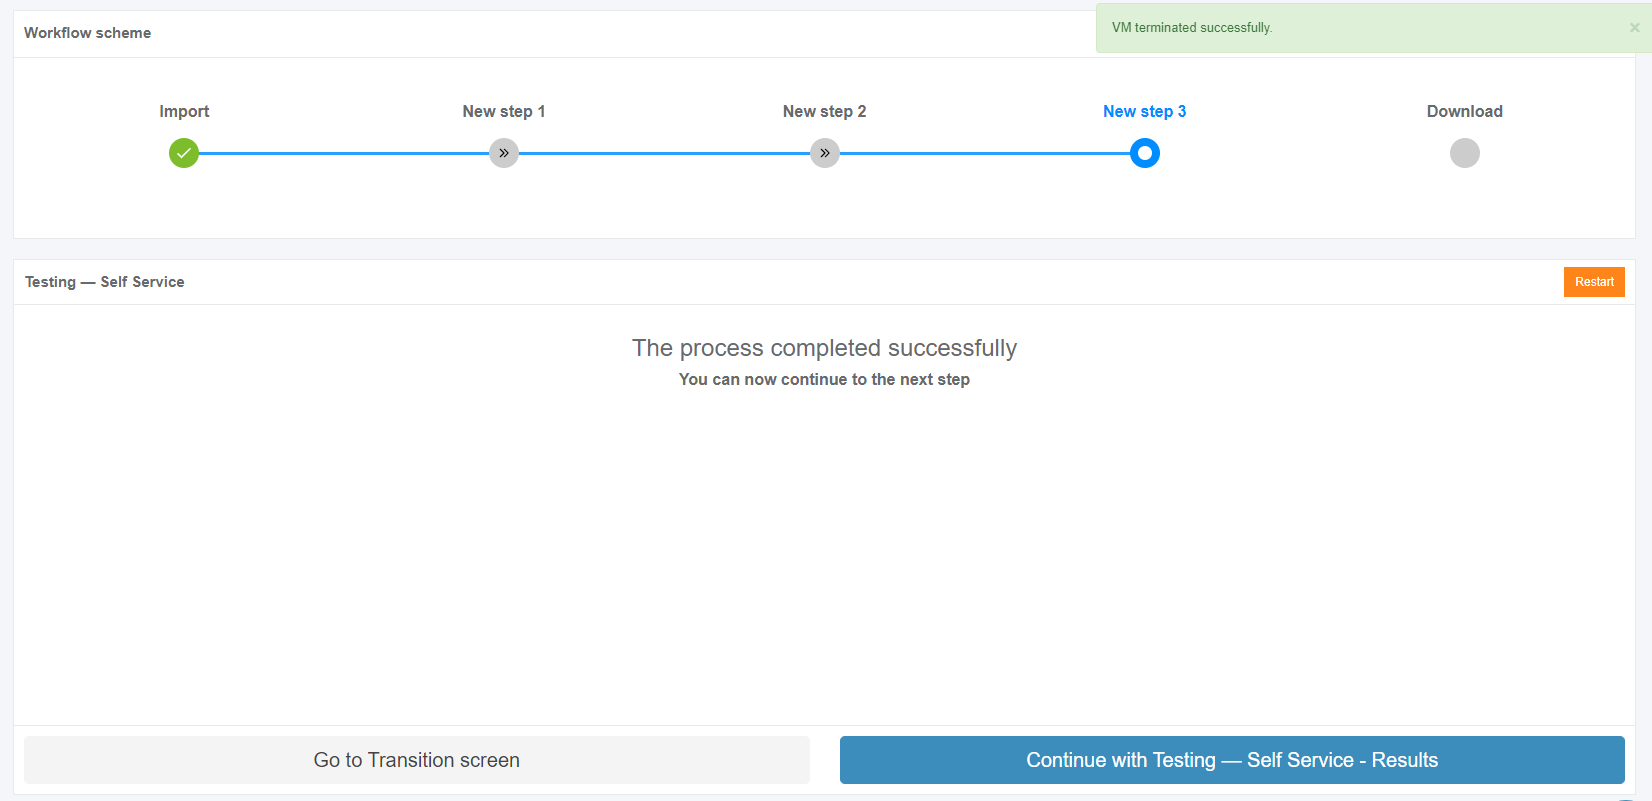
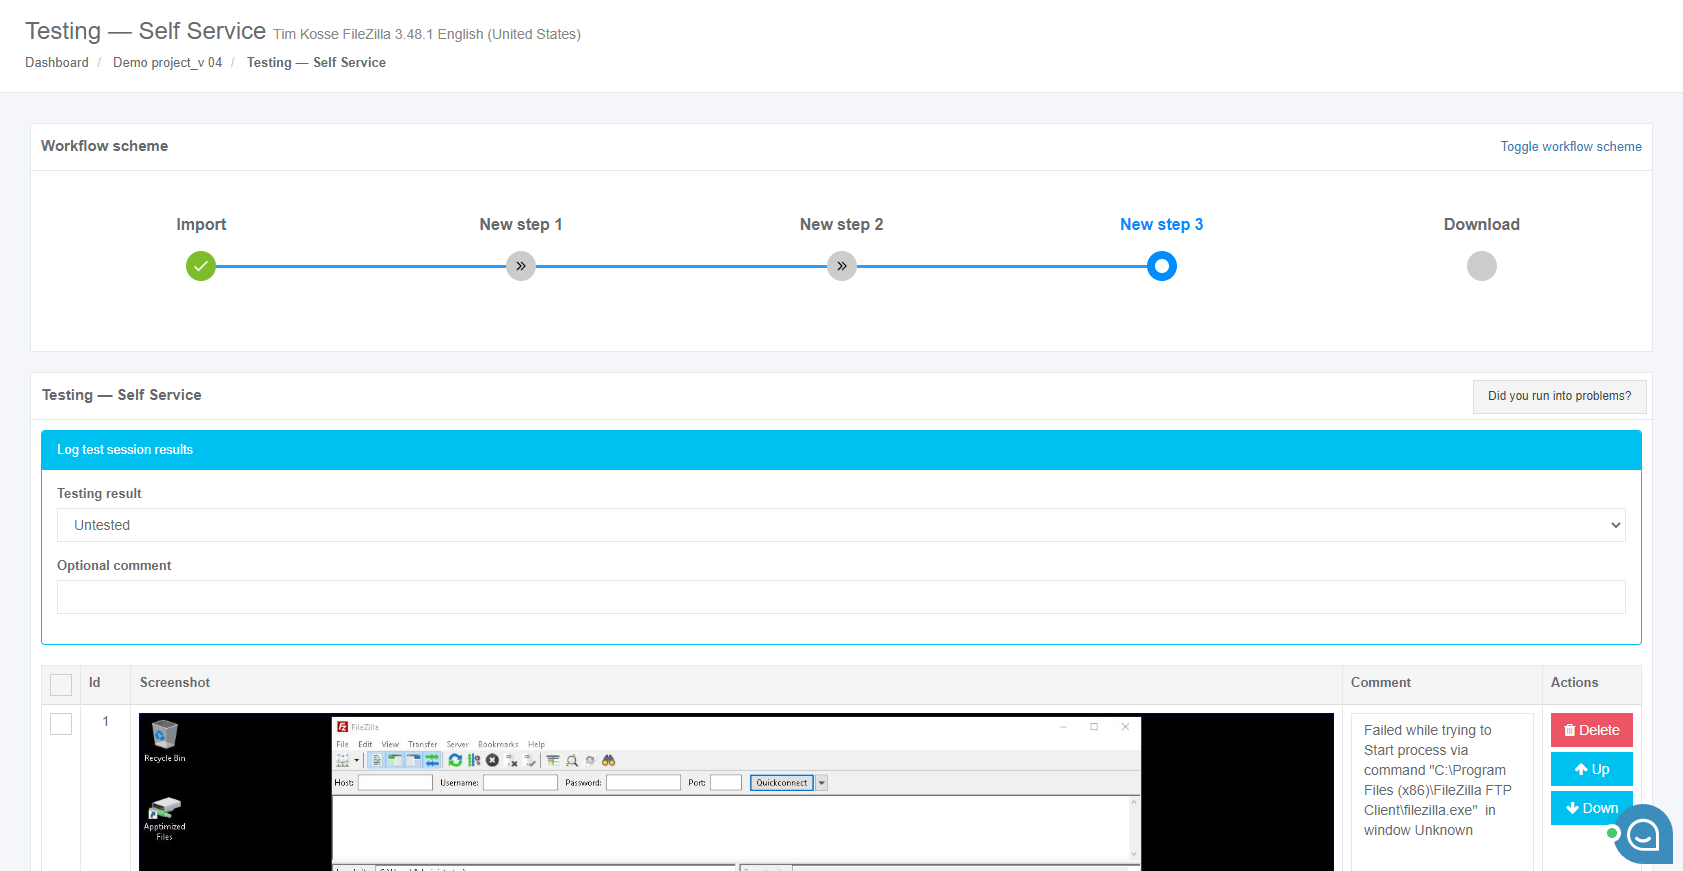
The next step available when clicking the Continue with Testing - Self Service – Screenshots button.
The following options to log test session results are available:
- Untested;
- Success;
- Failed.

The default value is Untested.
The field Optional comment can stay blank.
The screenshots review is finished when clicking the Save changes button.
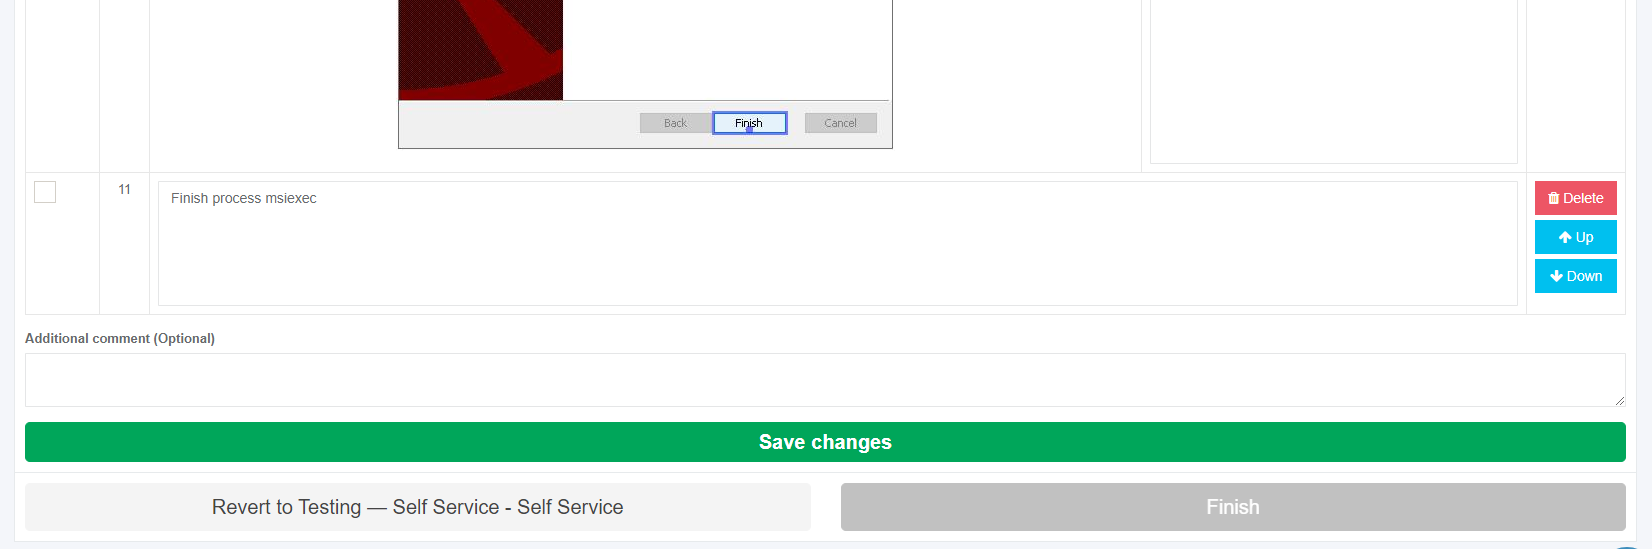
Apptimized shows the following screen when successful:

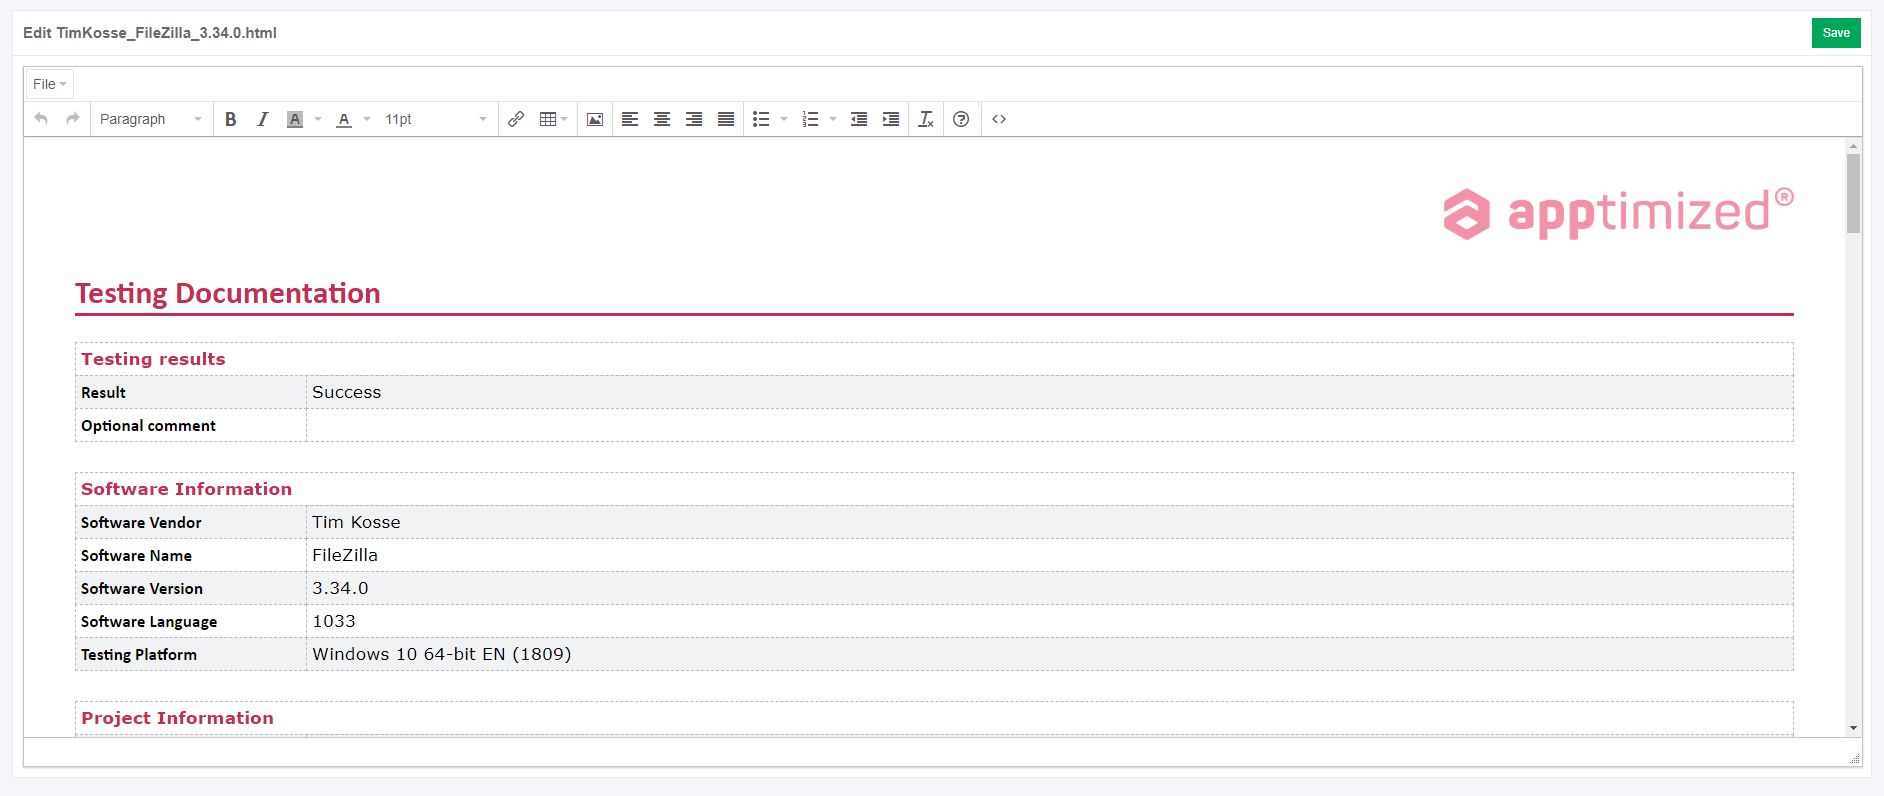
The generated document is available in PDF and HTML formats. To download a document, click the Download generated HTML document or Download generated PDF document buttons.
The option to edit a testing document is available under the Edit generated document button. The document editing finalizes by clicking the Save button.
The option to return to the discovery self-service screen mode is available under the Revert to Testing – Self Service button.
The option to finish the discovery process is available under the Finish button.
The option to inspect the Echo results is available under the Project menu > Echo. Apptimized shows the following screen when successful:
Playback: Apptimized Assisted Testing for future package versions and repeated testing (iterations)
Apptimized Echo enables a user to record Testing step activities for the package, and then (if the newer version of the application is released, a new package of it is created and added to project’s portfolio), a user can specify the initial version of the application on which Testing step was recorded. By doing so, a user doesn’t need to perform the Testing step for the newer version of the package anymore. When the workflow proceeds to the Testing step, it will replay the recorded installation and configuration activities of the package. So, a user saves time significantly. This feature is called Apptimized Assisted Testing.
To run Apptimized Assisted Testing the new version of the application (or package) must be imported.
The option to import application is available under the Project menu > Import > Start import > Classic import > Application/ package upload session > Next button.
When the application (package) is uploaded, and the metadata is reviewed, the previous version of the application must be indicated, and Enable Echo option must be activated as it is shown on the screenshot below:

When changes to the Previous version of the application field applied, the Show recorded Echo scenario option becomes available. A user can click on it to make sure that the needed Echo Discovery was selected:


The import step finalizes when clicking the Finish button. Apptimized shows the transition screen when successful:
The next step is available when clicking the Testing – Self Service block. Apptimized shows the following screen when successful:
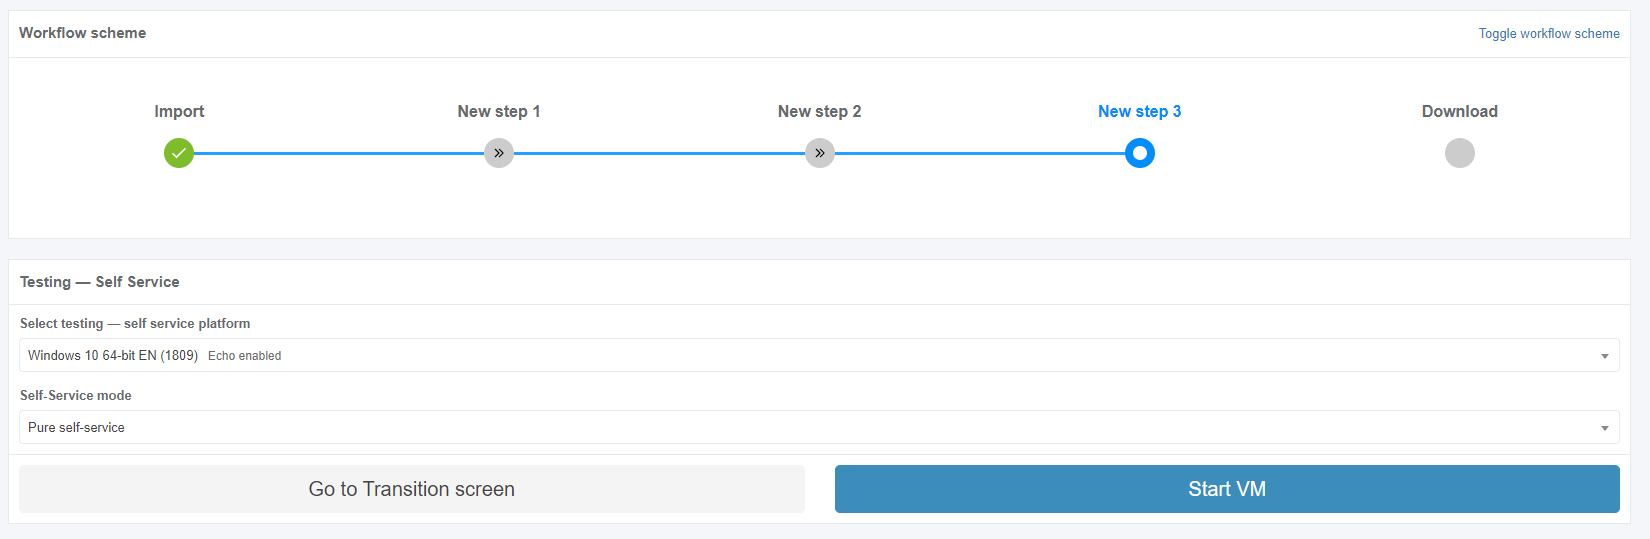
The option to set the Echo assisted self-service mode is available under the Self-Service mode field (select a value from the drop-down list):

The VM starts when clicking the Start VM button. VM preparation may take a few moments. Apptimized shows the following screen when successful:
User’s interactions to VM are not needed. The Echo provides Testing activities automatically. When the playback scenario finished, Apptimized shows the following screen:

User’s interactions to VM are not needed. The Echo provides the Discovery activities automatically. When the playback scenario finished, Apptimized shows the following screen:
The VM will be terminated automatically.
Note. When any issues occur, the notification comes in yellow (i.e., minor issues) or red (i.e., major issues) color.
A user can Retest results or Continue with Testing – Results.
When the review of the generated screenshots completed, click Save changes button. Apptimized shows the following screen when successful:

The generated document is available in PDF and HTML formats. To download a document, click the Download generated HTML document or Download generated PDF document buttons.
The option to edit a testing document is available under the Edit generated document button. The document editing finalizes by clicking the Save button.
The option to return to the testing self-service screen mode is available under the Revert to Testing – Self Service button.
The option to finish the discovery process is available under the Finish button.
The option to inspect the Echo results is available under the Project menu > Echo.
Playback: WaaS automated OS compat testing for vendor media
Apptimized Echo allows a user to understand, will the package work properly on the next releases of the Windows platform or not. The next Windows releases are available to Apptimized as Windows Insider builds.
When Echo enabled and the non-public testing platforms (Windows Insider builds) are selected in project settings, Echo will record the installation and configuration of created packages, and then recorded steps will be replayed automatically against the selected Windows Insider builds. A user will receive an automatic notification if playback succeeds on a new Windows update.
To implement saved Echo, a new version of the application must be imported via the Classic import (Project menu > Import > Start import > Classic import > Application upload session > Next button).
When the application is uploaded, and the metadata is reviewed, the previous version of the application must be indicated, and Enable Echo option must be activated as it is shown on the screenshot below:

When changes to the Previous version of the application field applied, the Show recorded Echo scenario option becomes available. A user can click on it to make sure that the needed Echo Discovery was selected:
The import step finalizes when clicking the Finish button. Apptimized shows the transition screen when successful:
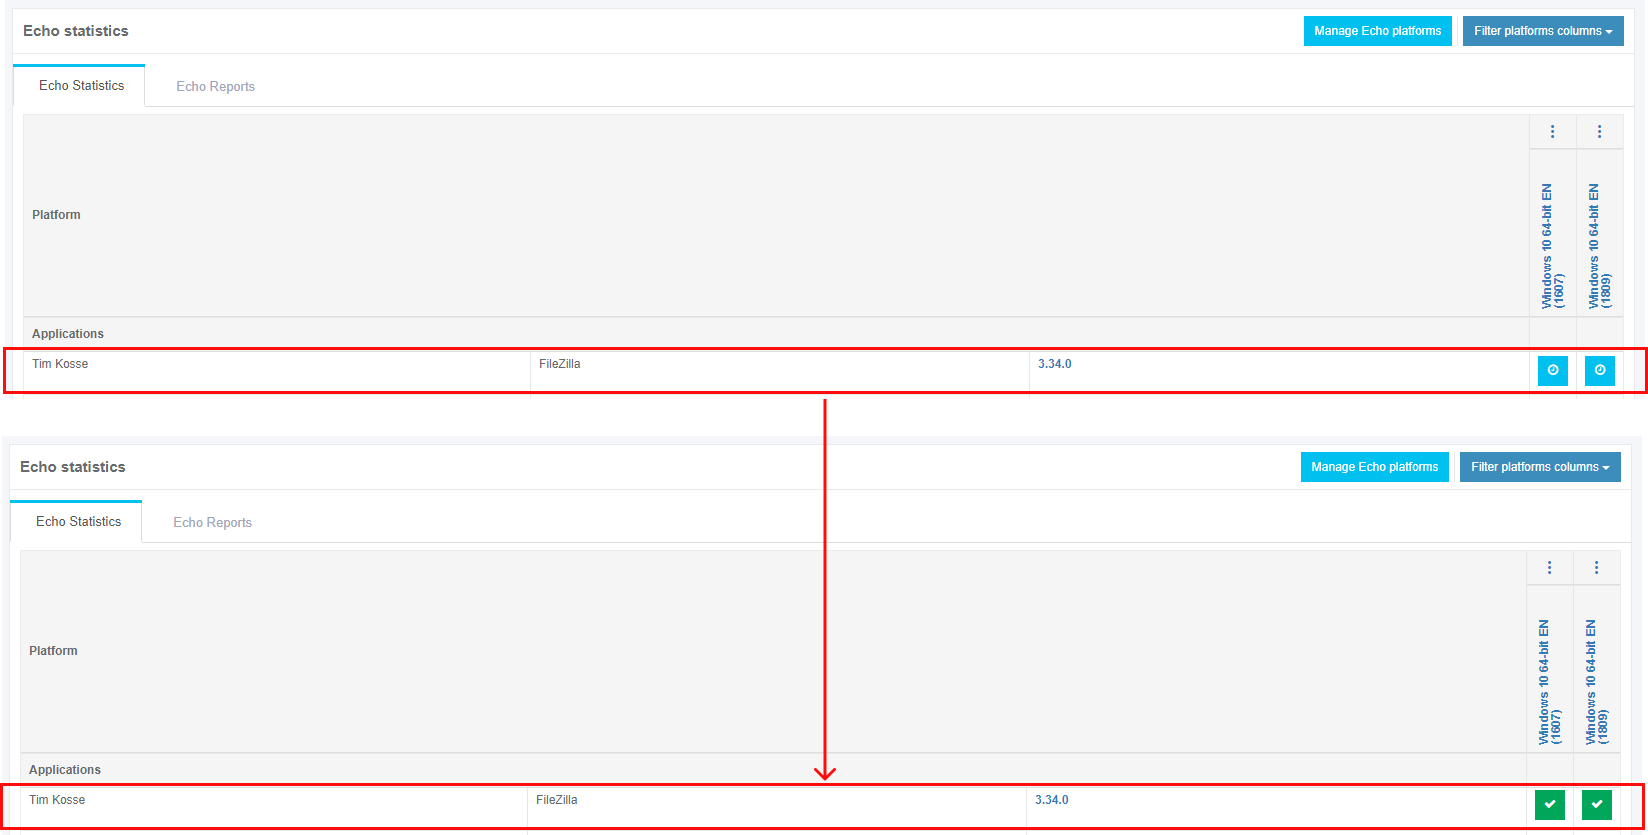
Any other actions with the Discovery - Self Service are not needed. The option to check the Echo status of the new application is available under the:
Note. The Echo status of the new application in a portfolio will change to Pending.
The Success Echo status of new application means that new application processed through Testing as it was saved in the previous version via Echo:
- My Dashboard > My Applications. Apptimized shows the following screen when successful:
Note. The Echo status of the new application in a portfolio will change to Pending.
The Success Echo status of new application means that new application processed through Testing as it was saved in the previous version via Echo:
Echo Assumptions
Summarizing the FAQ on Echo results Apptimized support team assumes that a user is not trying to do the following actions during the recording step or Echo playback:
- Mouse gestures: drag & drop of windows or individual elements of a window.
- Recording actions in web browsers (i.e., Internet Explorer, Edge, Chrome, Firefox, etc.) and web applications (i.e., Slack, Microsoft Teams, GitHub Client).
- Recording actions on applications without a graphical user interface (GUI). Echo is a GUI-based testing automation tool for Windows applications. It supports win32 and UWP applications.
It cannot be used to test GUI-less applications such as services, drivers, and other types of applications that do not have a graphical user interface. However, you can still record the installation and launch of such applications. - Interaction with Windows Explorer: Echo does not record and replay the next actions made in Windows Explorer:
- opening the context menu by click on the right mouse button and work with the context menu;
- creating, deleting, copying and pasting folders and files manually (installation process of an application will be recorded properly);
- working with tray icons and calling the application’s main GUI from the tray. - Entering text in Java-based applications (software that requires "Oracle Java" prerequisite or works based on Java core technologies).
- Working with CMD: switching between folders, adding, deleting, copying, cutting and pasting files, launching executable and other files via CMD. Echo filters interaction with CMD during recording, because there is much of system noise that processing in the background through CMD.
In terms of changes in the application’s logic, core technologies and UI from one version of the application to another, Echo does support:
- Change of text, color, and font of the application’s UI element ( * );
- Change of position of the application’s UI element within one page (except Java-based applications);
- Change of graphical design (size, color, form) of the page-container of the application’s UI element (except Java-based applications);
Echo does not support the next changes between different version of the application:
- Change of sequence of windows for the installation process, the application’s startup and configuration, including adding new windows or removal of old ones;
- Removal of application’s UI elements. Example: user clicked on button “OK” in the application’s settings in the previous version of the application during recording, but in the new version, this button doesn’t exist;
- Change of type of the application’s UI element. Example: element previously was a checkbox, but in the new version, it is an item of the dropdown list;
- Moving the application’s UI element from one UI’s page to another. Example: “Ask for updates” dropdown list was on “General” tab of app’s settings, but in the new version it is on the “Miscellaneous” tab;
- Change of location for menu list items within different parent items. Example: a user clicked on “Tools” menu on app’s main page, then selected the dropdown list “Options”, and “Advanced” list item. On the newer version of the app “Options” dropdown list is located under another list “Miscellaneous”, which is under “Tools” menu. In such case, Echo will not play click on “Options” dropdown list on the newer version and will fail.
( * ) “application’s UI element(s)” means UI element which was a part of recorded (Discovery or Testing) document.
Example:
A user enabled the recording of the Discovery step of the application “Mozilla Firefox” (version 61). A user added the newer version (i.e., 65) of this application, in which a vendor changed the sequence of windows of the installation process. If a user wants the Echo to perform Assisted Discovery on version 65 but based on recorded steps with version 61, Echo will fail because of changed GUI logic.
Some applications are built by their vendors to contain complex logic regards to the interaction of users with GUI elements.
Examples:
- Echo supports Java-based applications partially, but input in text fields in such applications is not supported;
- Some UI elements are too complicated for automatic testing by Echo: windows that are built as panels, text boxes with complex logic of implementation, etc.
Apptimized Echo might fail with recording or playback of such test cases. When a user encounters an issue, contact with the Apptimized support team (to provide the needed information to reproduce the issue) is required.
No comments to display
No comments to display