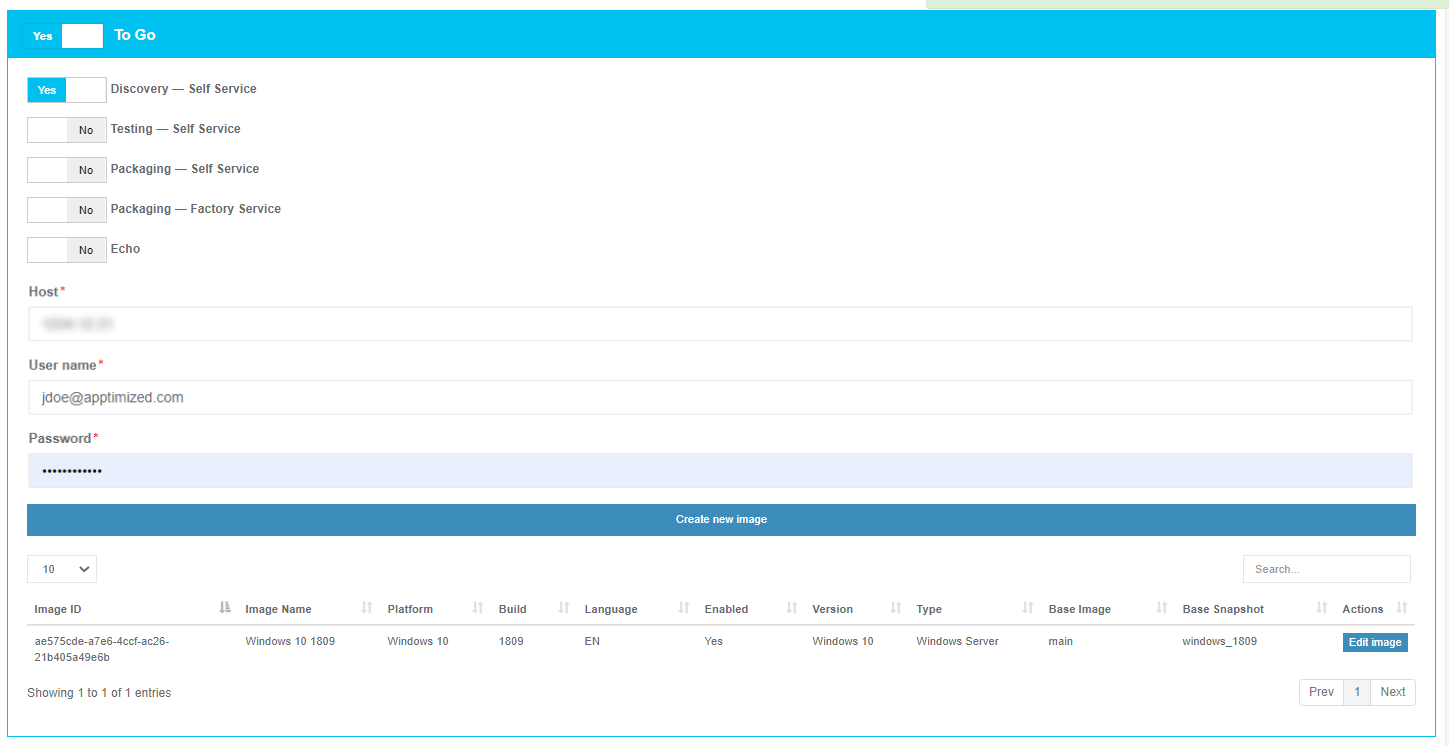
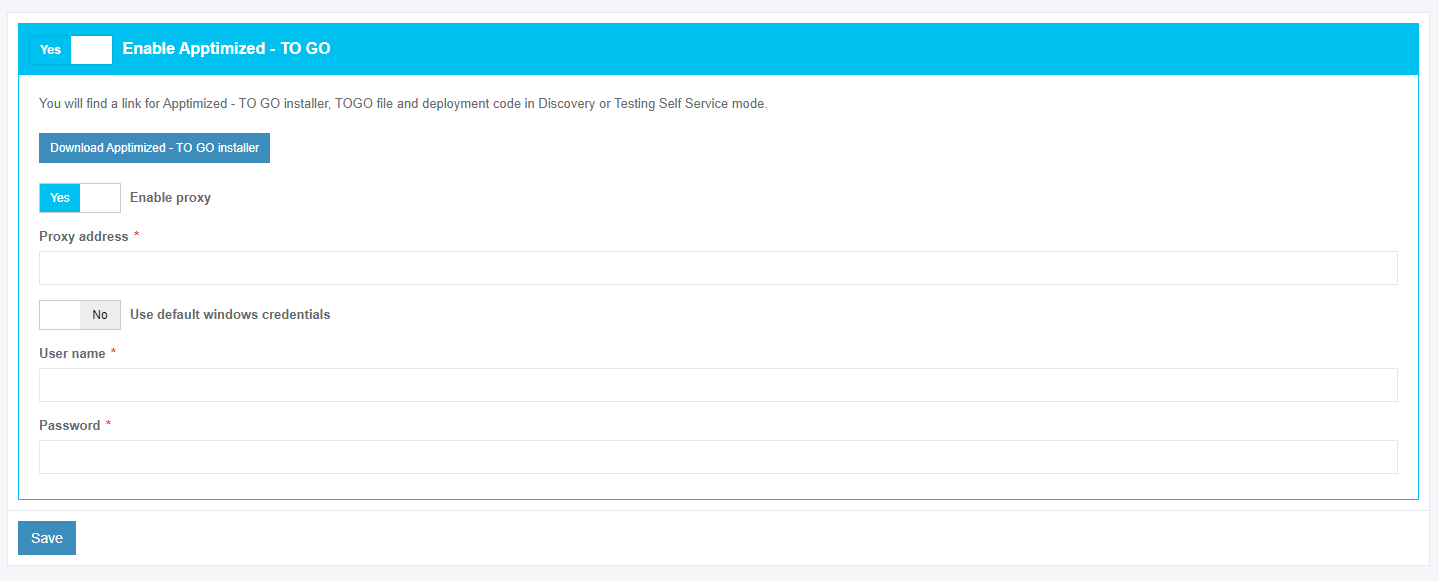
Project settings
Apptimized projects can be configured to meet specific needs, for instance, to deliver output meeting the user's packaging standards.
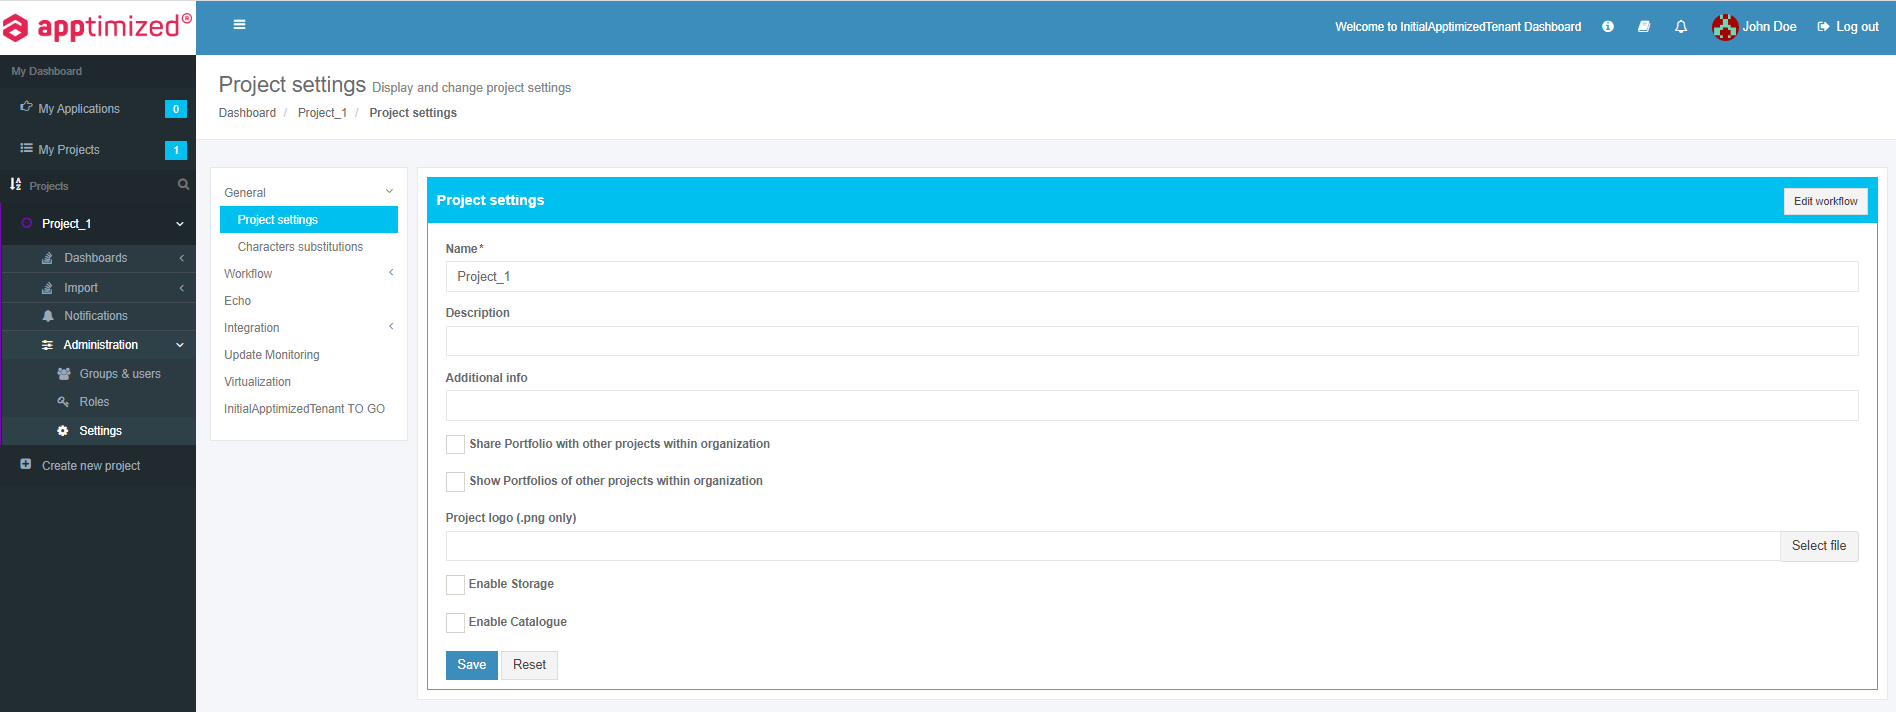
Project settings are available under the Project menu > Administration > Settings.
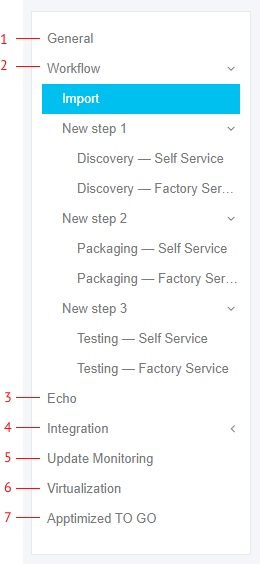
The project settings menu contains the following categories:
Next, each setting block is shown in more detail.
General settings
Project settings
The “Project settings” block sets the primary information for the project. All required fields are marked with an asterisk *. This block corresponds to the settings of the Project information block in the Create project step.
The screenshot below shows the default values of General project settings:
The following additional options can be enabled:
To enable the option required in the project, check the box in front of the option name.
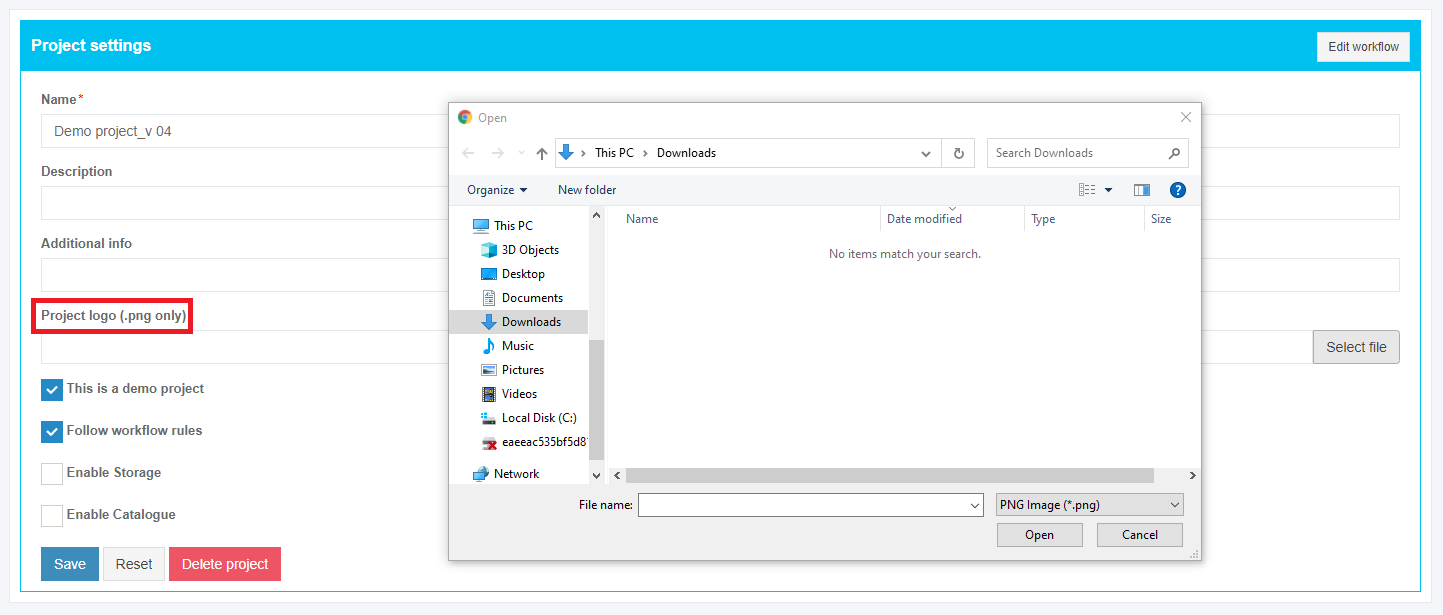
The project logo is set by clicking on the Project logo field. The project logo is user preference. The project logo is used to identify projects on the dashboard quickly. The logo must be downloaded as a PNG file only.
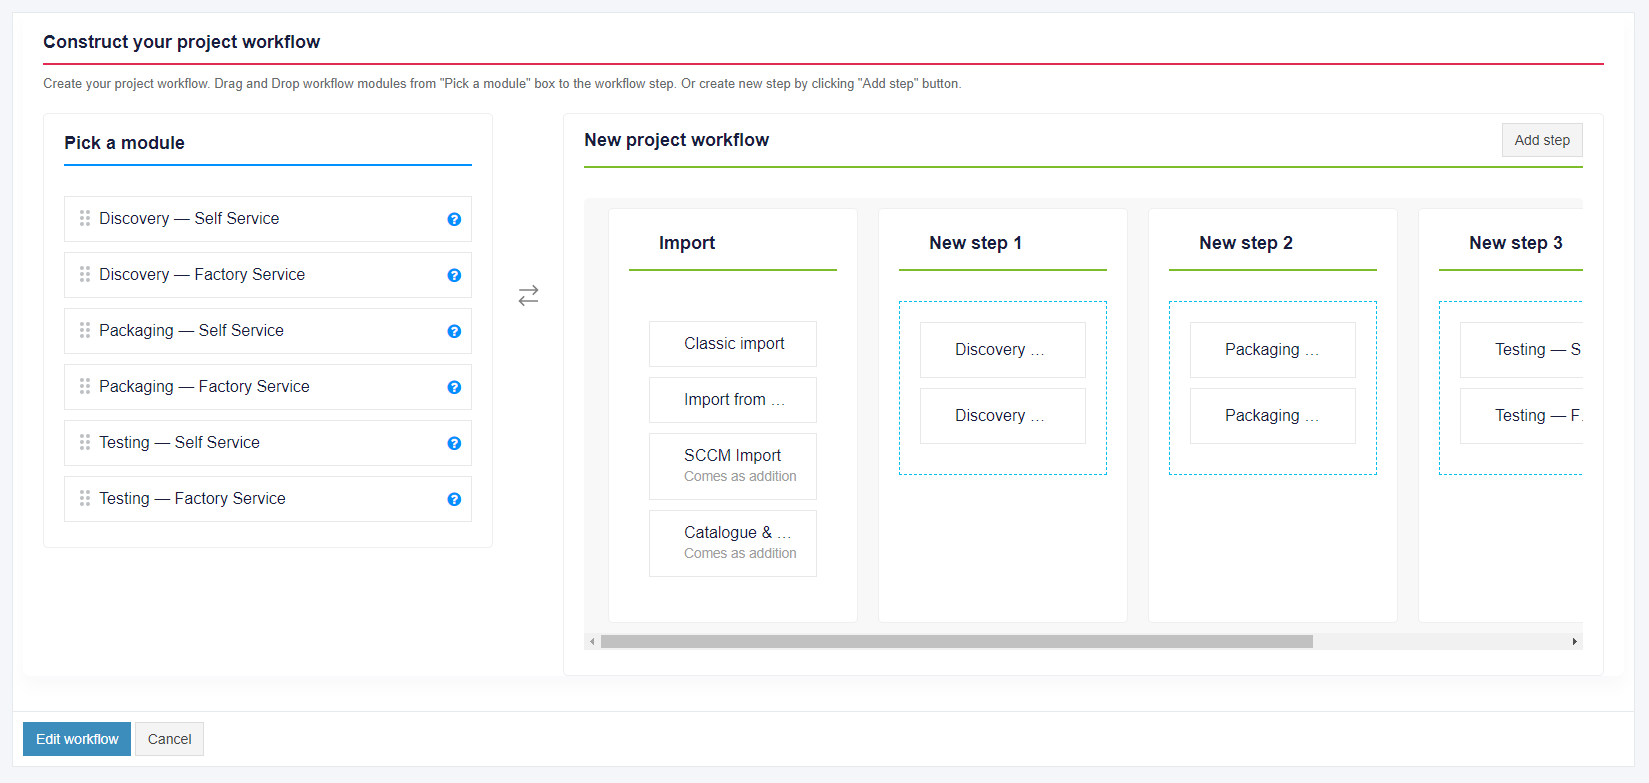
An option to provide changes to the project workflow is available under the Edit workflow button.
Apptimized shows the following screen when successful:
The changes in the project workflow are applied when clicking the Edit workflow button.
The changes into the Project settings are applied when clicking the Save button.
Apptimized shows the following notification when successful:
Character substitutions
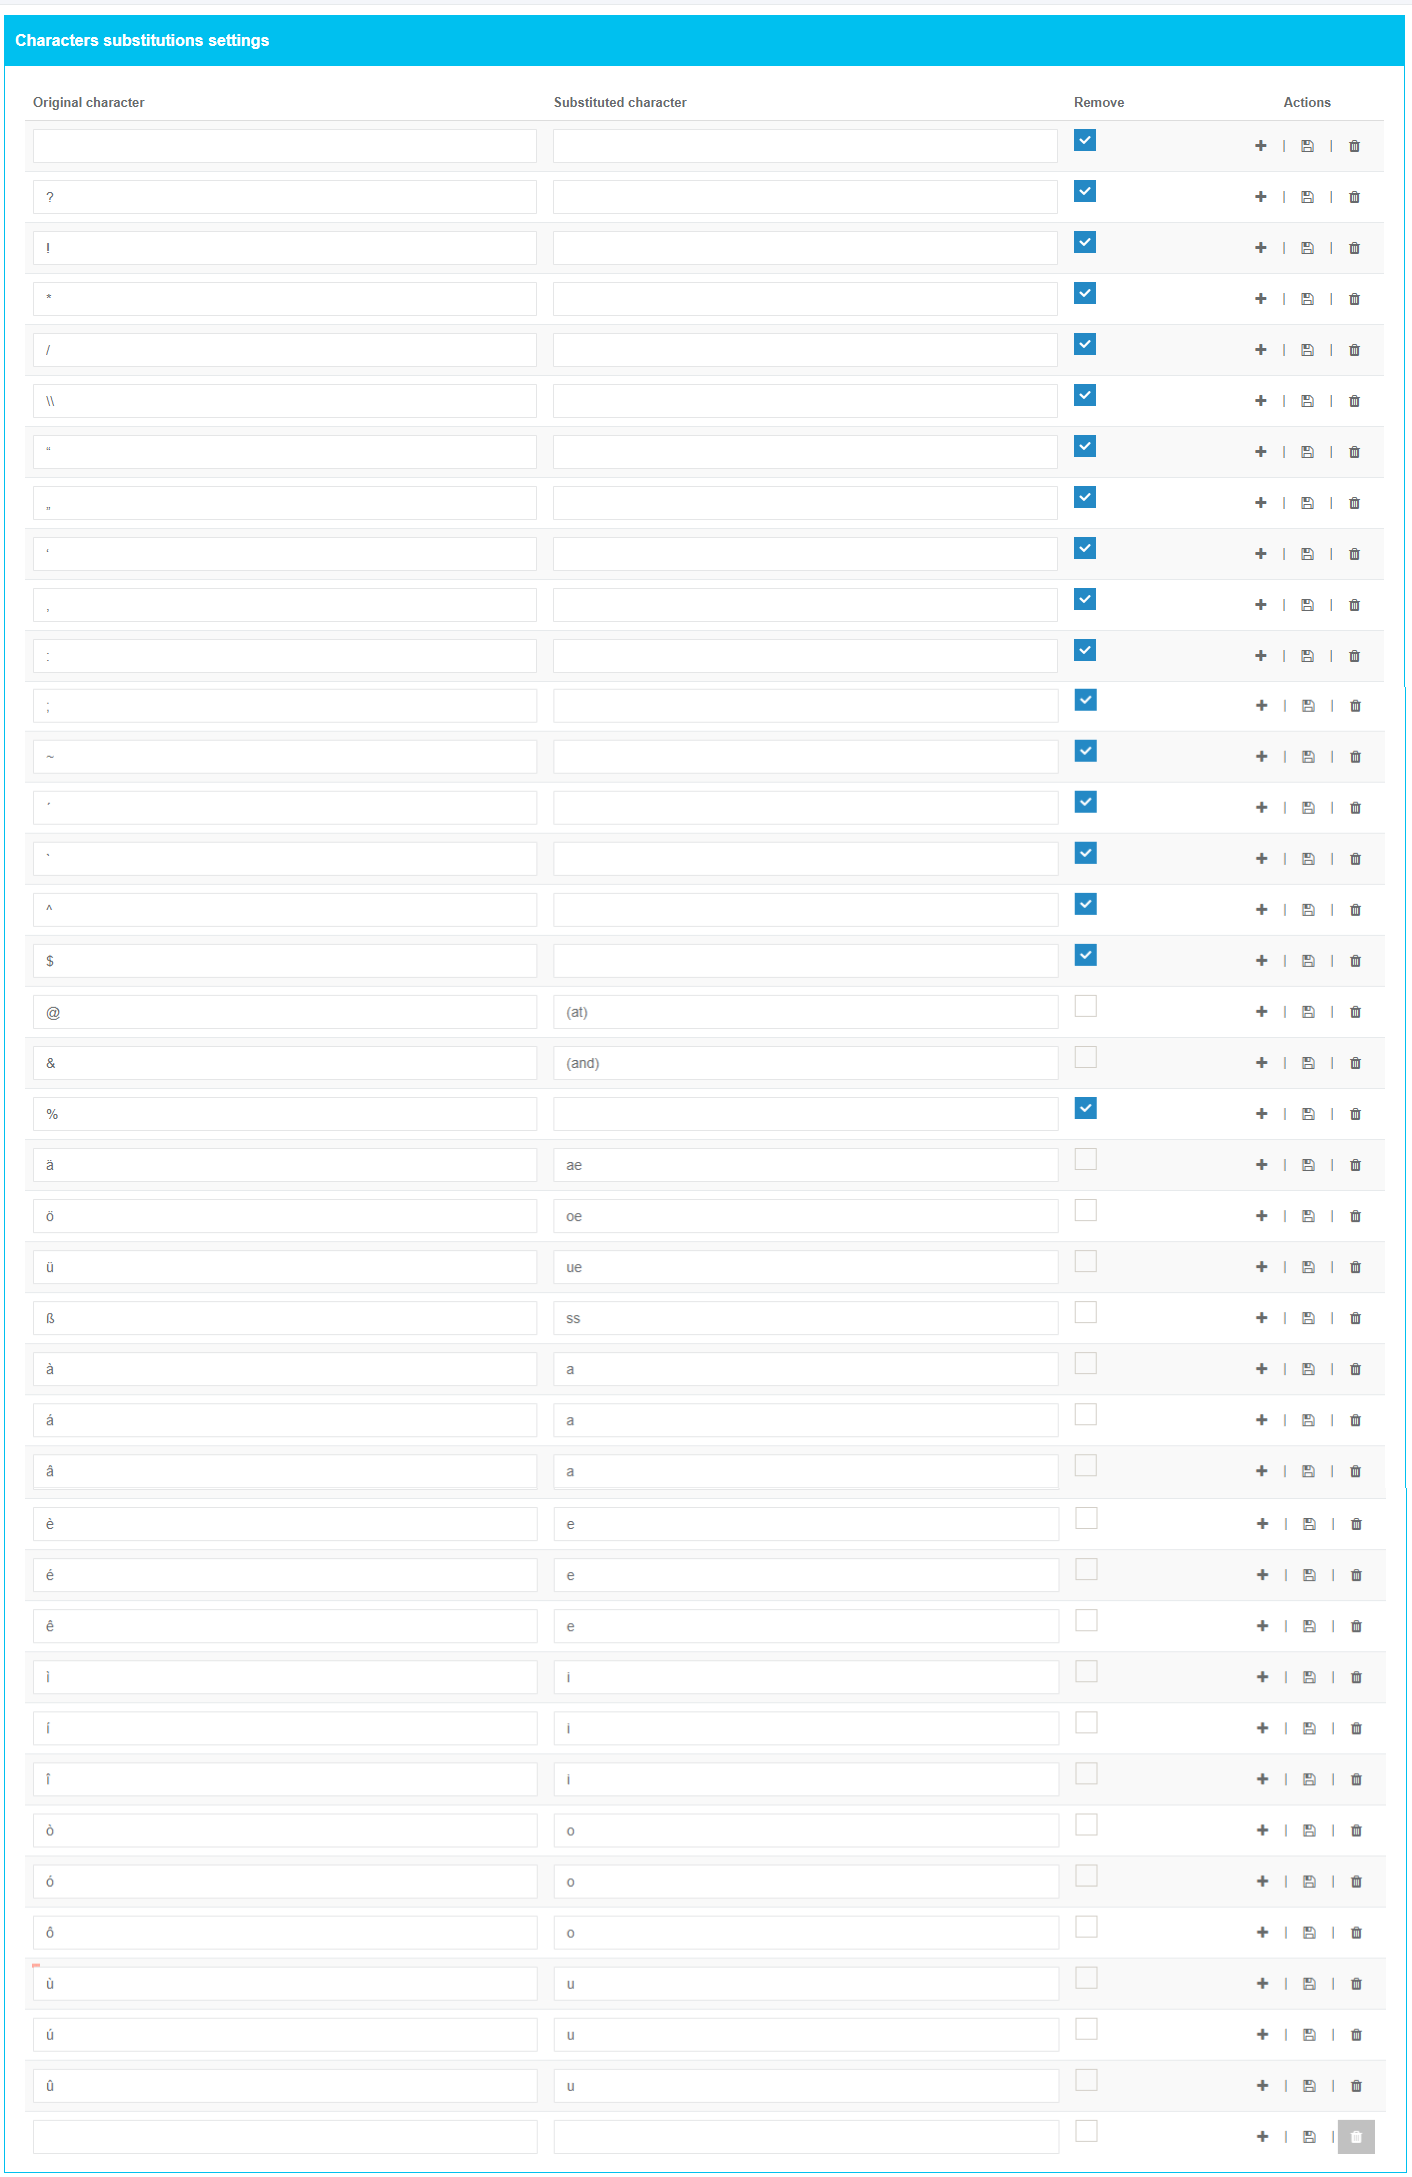
The option to specify characters and ways to substitute them is available under the “Characters substitutions” block. To exclude characters, uncheck the box in front of the characters not required in the project (available in the Remove column).
The option to create the character substitutions is available under the plus symbol in the Actions column: Add the character in the Original character field > Add the character in the Substituted character field > Save symbol.
The option to delete the character substitutions is available under the bin symbol in the Actions column.
Workflow settings
Import
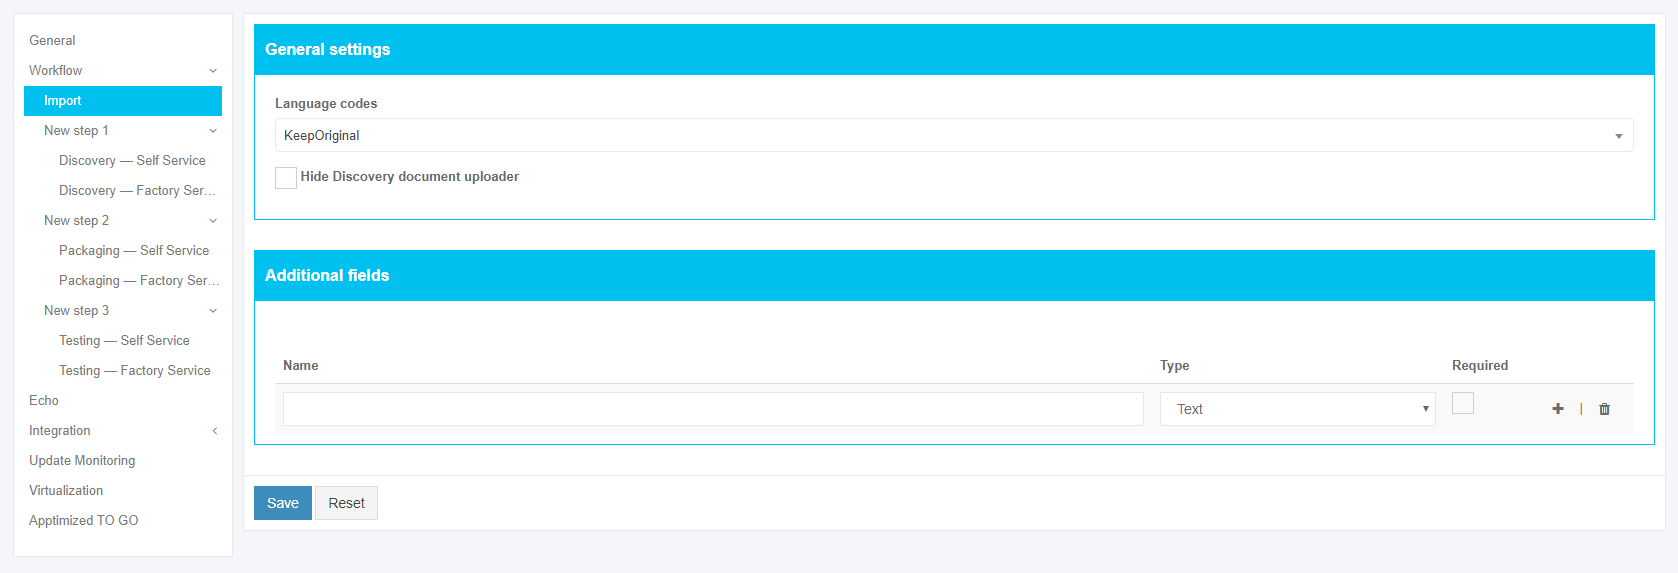
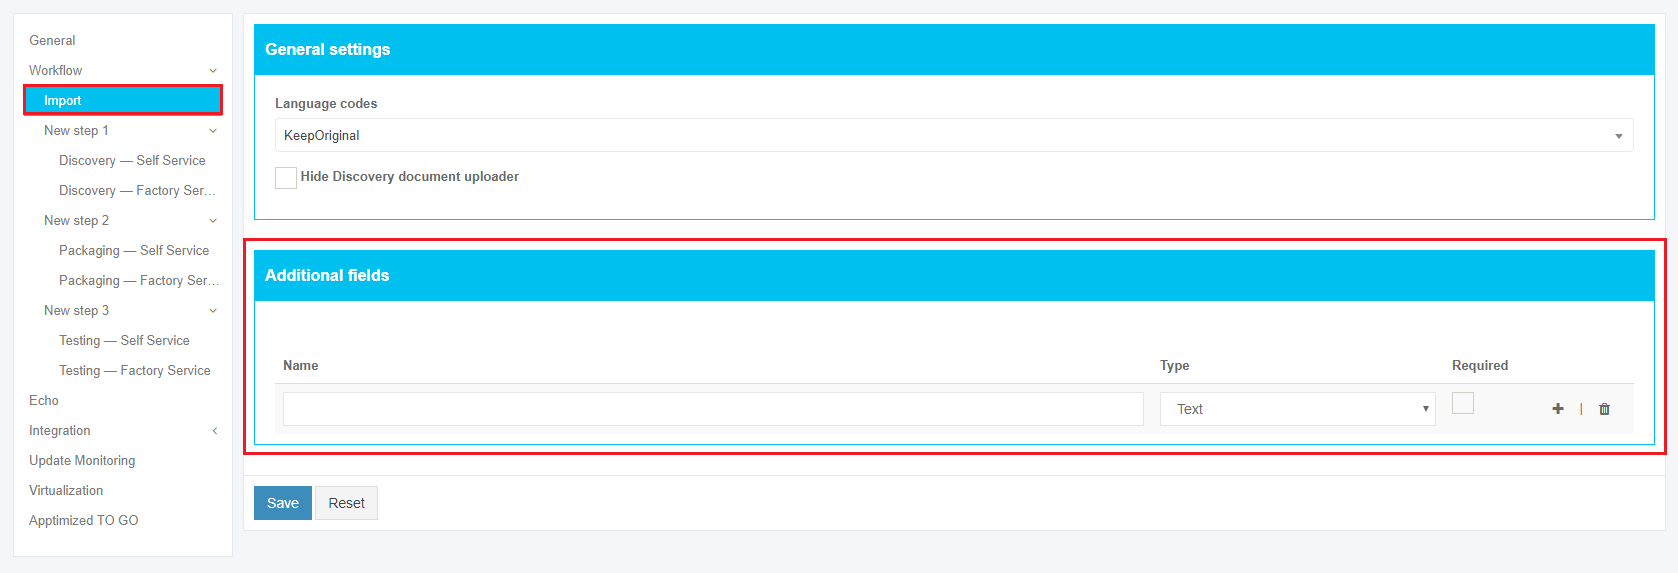
The screenshot below shows the default values of the project settings (Workflow > Import).
A user can set the language codes in the General settings block. The following language codes available:
| Language code | Description | Example |
| Keep original | Apptimized saves the language code value a user indicated on the Import step | English (US) |
| ISO 639-1 (Uppercase) | A two-character code set entered with uppercase letters | EN |
| ISO 639-1 (Capitalize case) | A two-character code set entered with the capitalized letter | En |
| ISO 639-2 (Uppercase) | A three-character code set. Begins with a capital letter | ENG |
| ISO 639-2 (Capitalize case) | A three-character code set. Begins with a capital letter | Eng |
The default value is Keep original.
A user can check the box in front of the Hide Discovery document uploader to disable discovery document uploader.
A user can set the additional fields that required at Import step. These settings are available under “Additional fields” block.
Additional fields are used for:
- providing additional information on each application to empower management within the project;
- creating custom dashboards;
- sorting / grouping / filtering data.
To add an additional field to the list, click on the plus symbol.
The relevant name and type of the additional filed are required.
The following options available to set an additional field type:
Table 1. Additional field types
|
Field type |
Details |
Relevant field name (example) |
|
Text |
Any type of information in a textual format. |
Department name Internal identifier Division |
|
Applications picker |
Allows to select an application from the project and to connect applications to each other. Using this field, the user gets the opportunity to refer to another application in the system. |
Application |
|
Users picker |
Allows to choose a specific person from the project and to designate a person to the application. |
Team leader Responsible person Tester QA engineer |
|
Date picker |
Allows setting a date for the application. A date may determine a release date, a date to test, to pack, or to start processing the application. |
Deployment date Due date Release date Date for testing Date for packaging |
|
Number |
Any type of information in a numerical format. Allows setting a numeric identifier, to set a priority, or to set the complexity of this application. |
Application ID Priority Complexity Precedence |
An additional field can be removed from the list by clicking on the bin symbol.
An additional field can be designated as required by ticking the checkbox Required.
To apply the settings, click the Save button. To revert the settings, click on the Reset button.
Apptimized shows the following notification when successful:
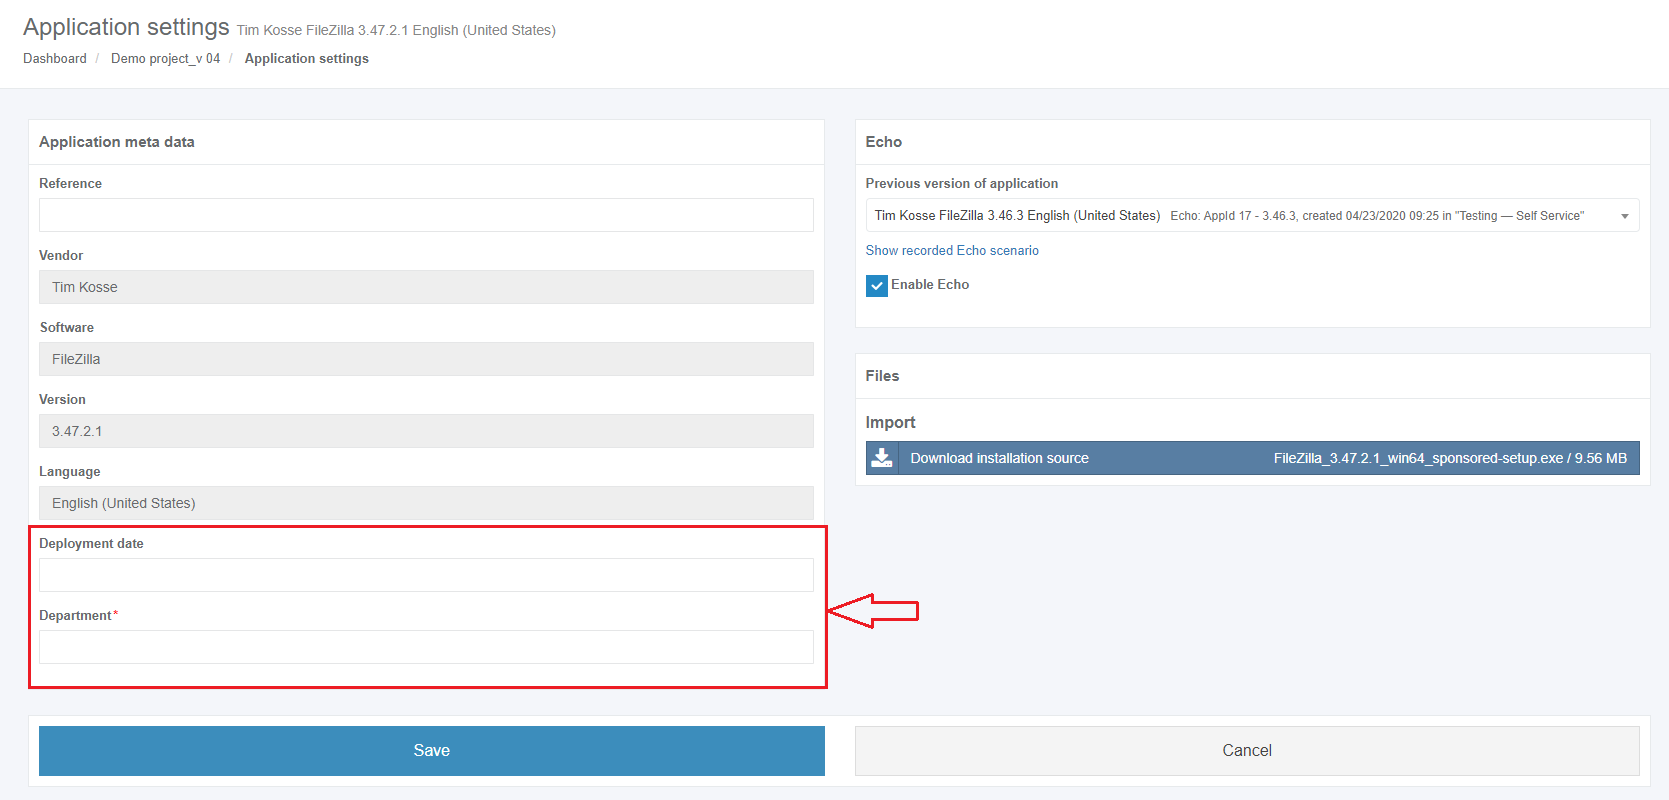
Note. When the additional field settings are applied they appear in the application metadata block (i.e., at the Import step, at the application settings screen). 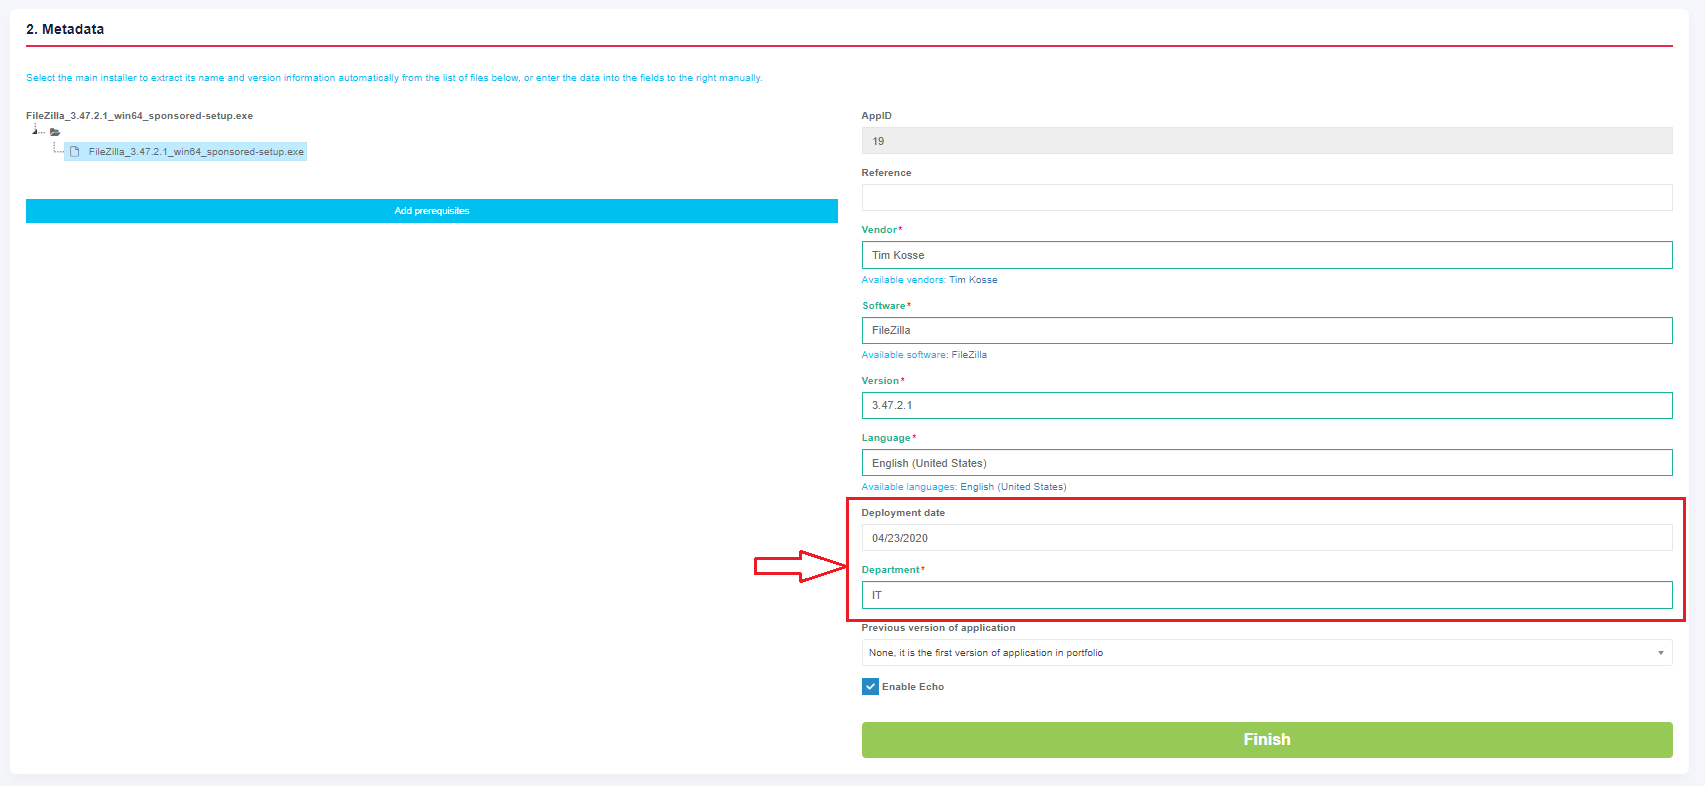
Steps settings
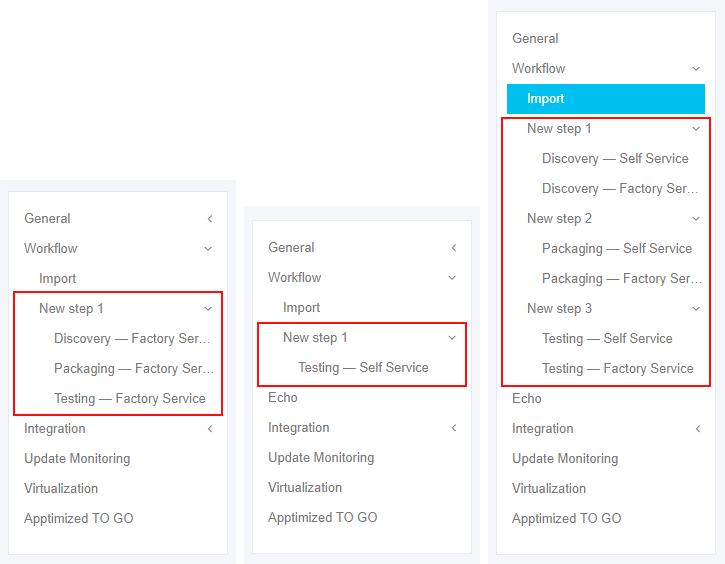
The set of workflow settings depends on workflow structure (i.e., the number of steps, the set of module types) that was configured during project creation.
The screenshot below shows the examples of possible workflow settings configurations.
Discovery – Self Service
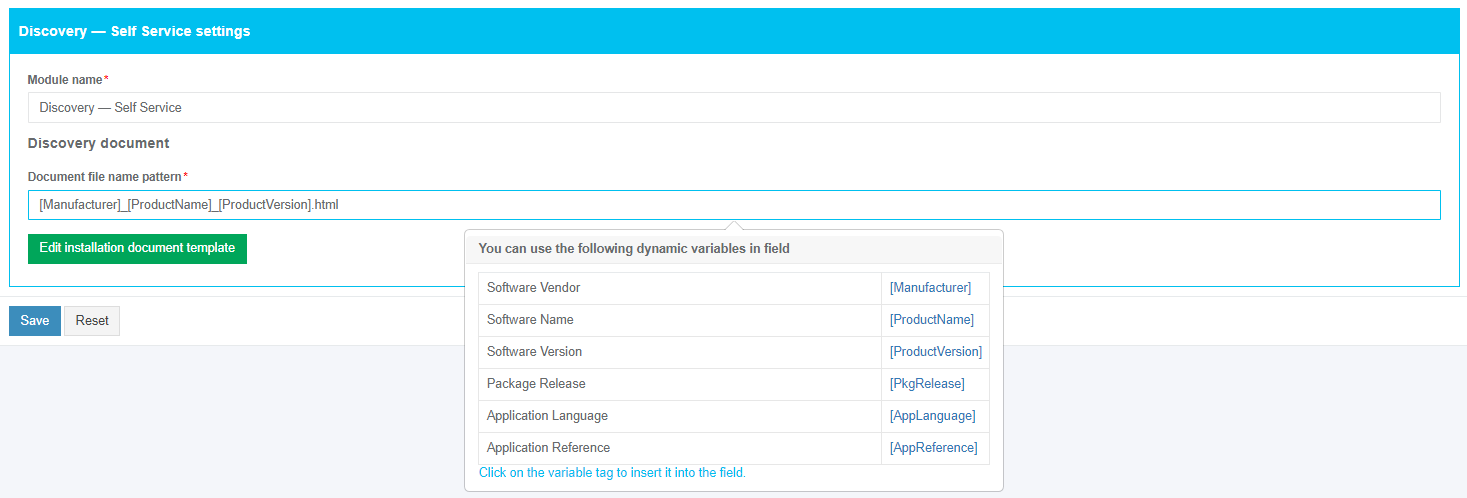
The screenshot below shows the default settings of the Discovery – Self Service module. All required fields are marked with an asterisk *.
The option to change a module name is available under the Module name field. The default module name is Discovery – Self Service.
The option to change a file name pattern is available under the Document file name pattern field. The default file name pattern is [Manufacturer]_[ProductName]_[ProductVersion].html.
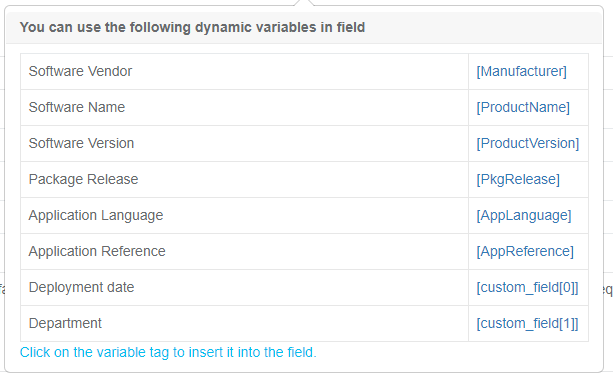
To insert the variable tag into the field, click the relevant variable tag from the dropdown list.
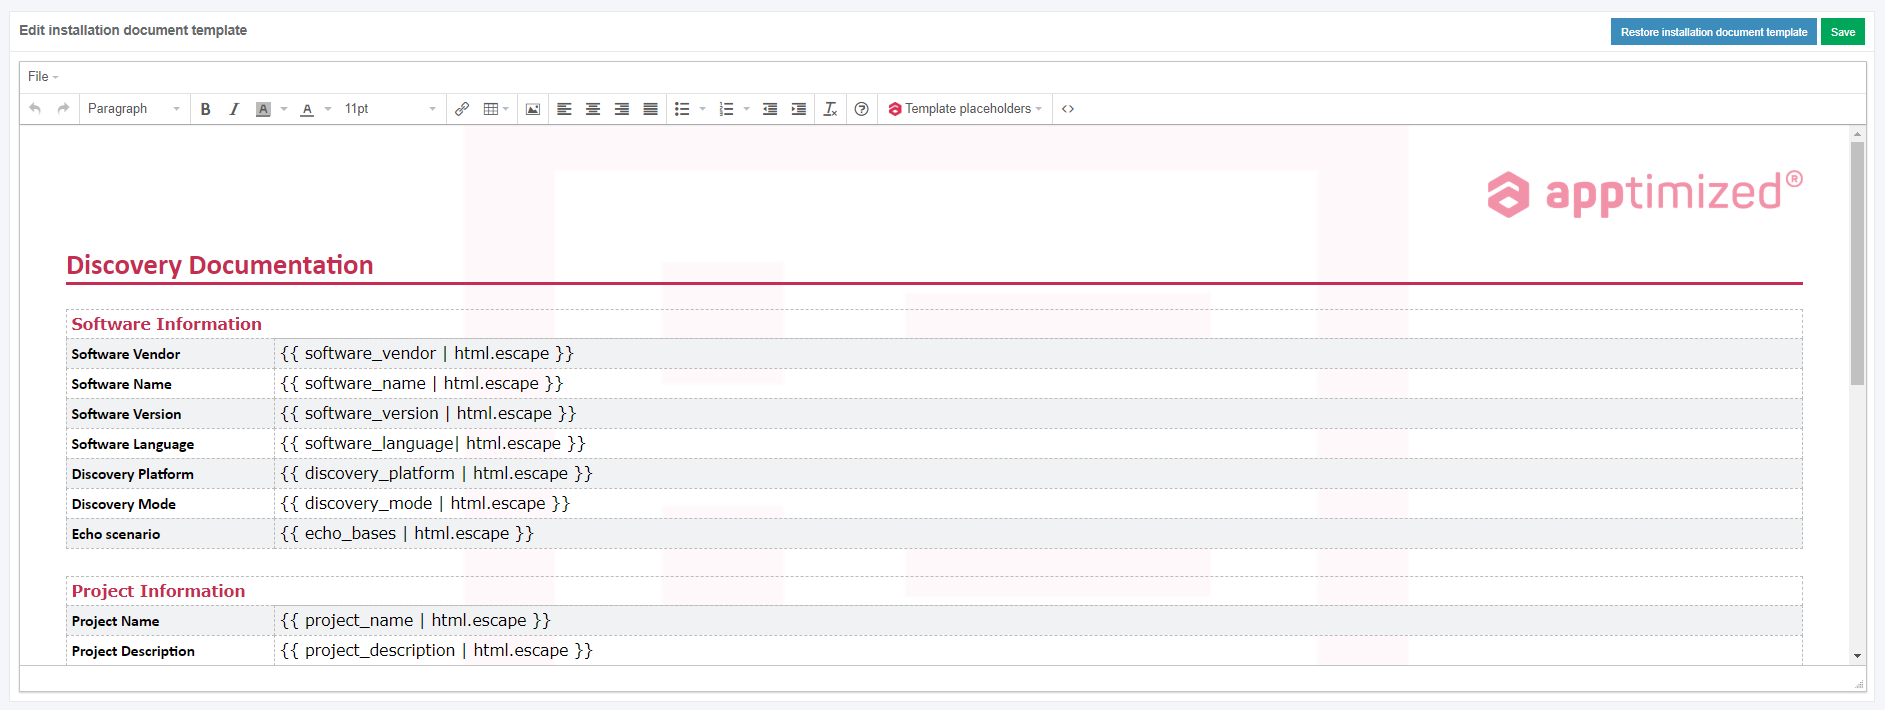
The option to edit a discovery case template is available under the Edit installation document template button.
Apptimized shows the following screen when successful:
To return the document to the default state, click the Restore installation document template button.
To apply edits in a discovery case template, click the Save button.
Settings are persisted on click to the Save button. To revert the settings, click on the Reset button.
Apptimized shows the following notification when successful:
Discovery – Factory Service
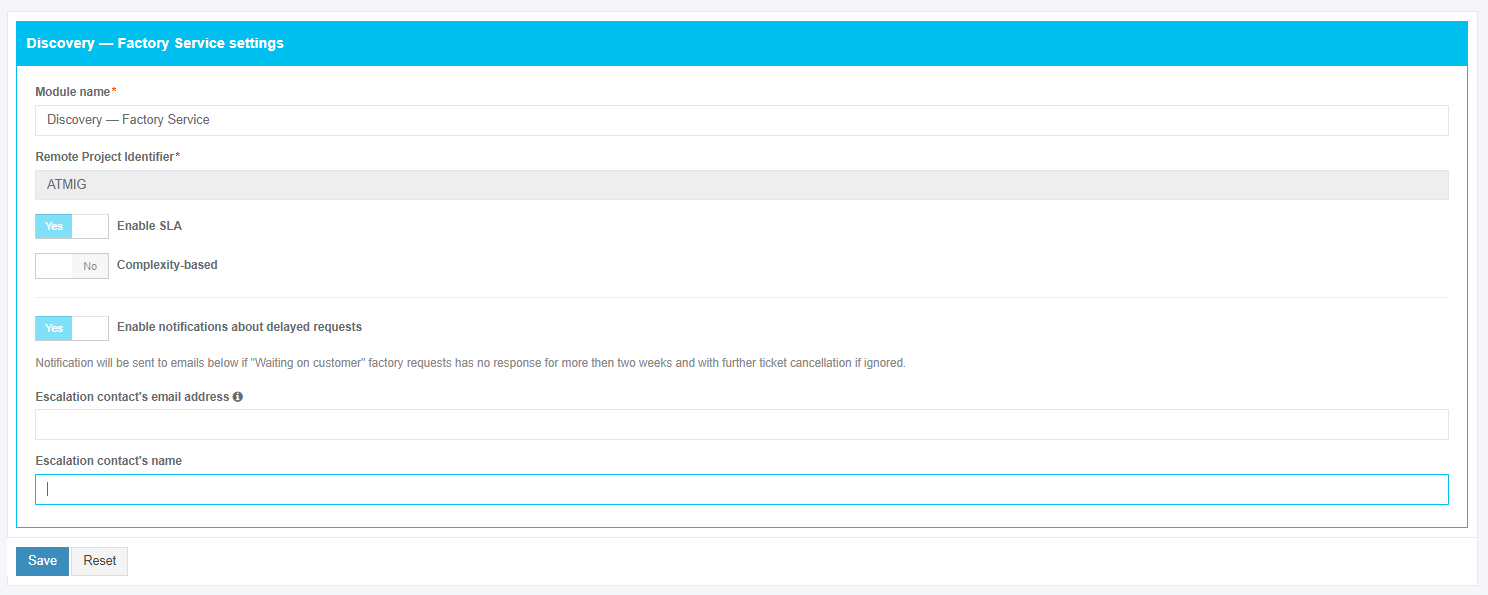
The screenshot below shows the default settings of the Discovery – Factory Service module. All required fields are marked with an asterisk *.
The option to change a module name is available under the Module name field. The default module name is Discovery – Factory Service.
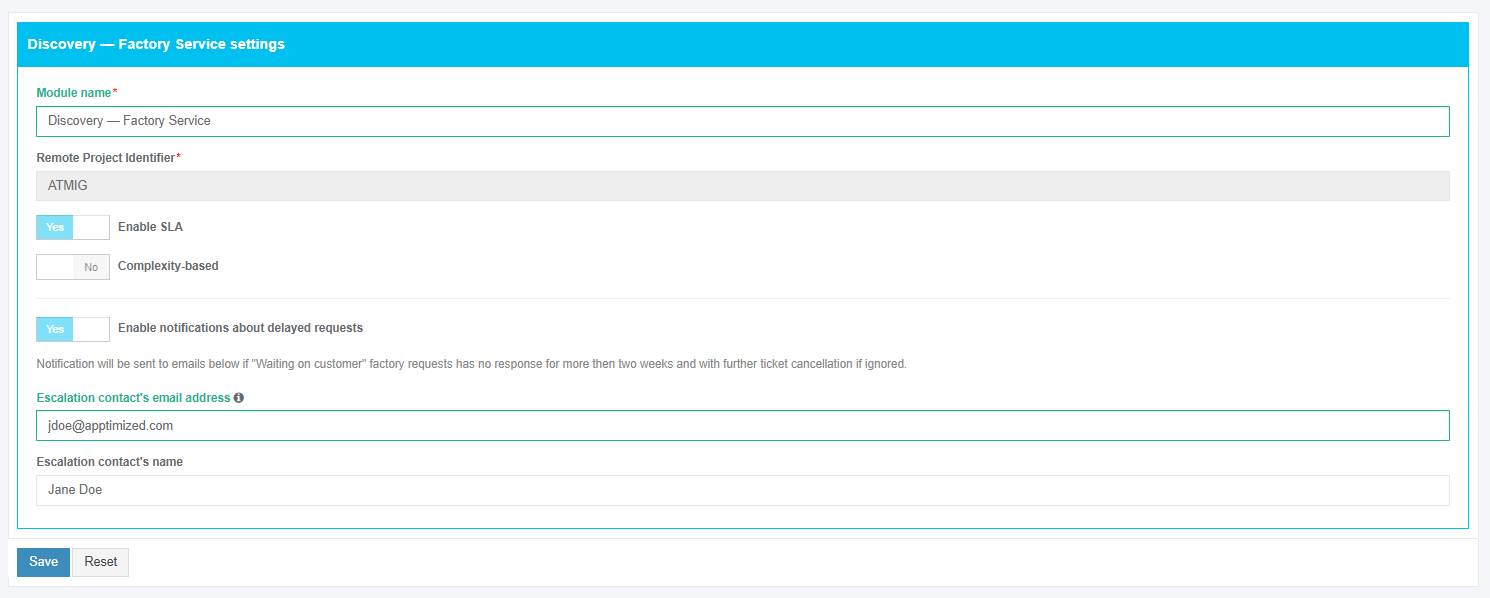
The option to set the person’s data who will receive notifications on factory requests in the project is available under “Escalation contact's email address” and “Escalation contact's name” fields.
Settings are persisted on click to the Save button.
Apptimized shows the following notification when successful:
Packaging – Self Service
General
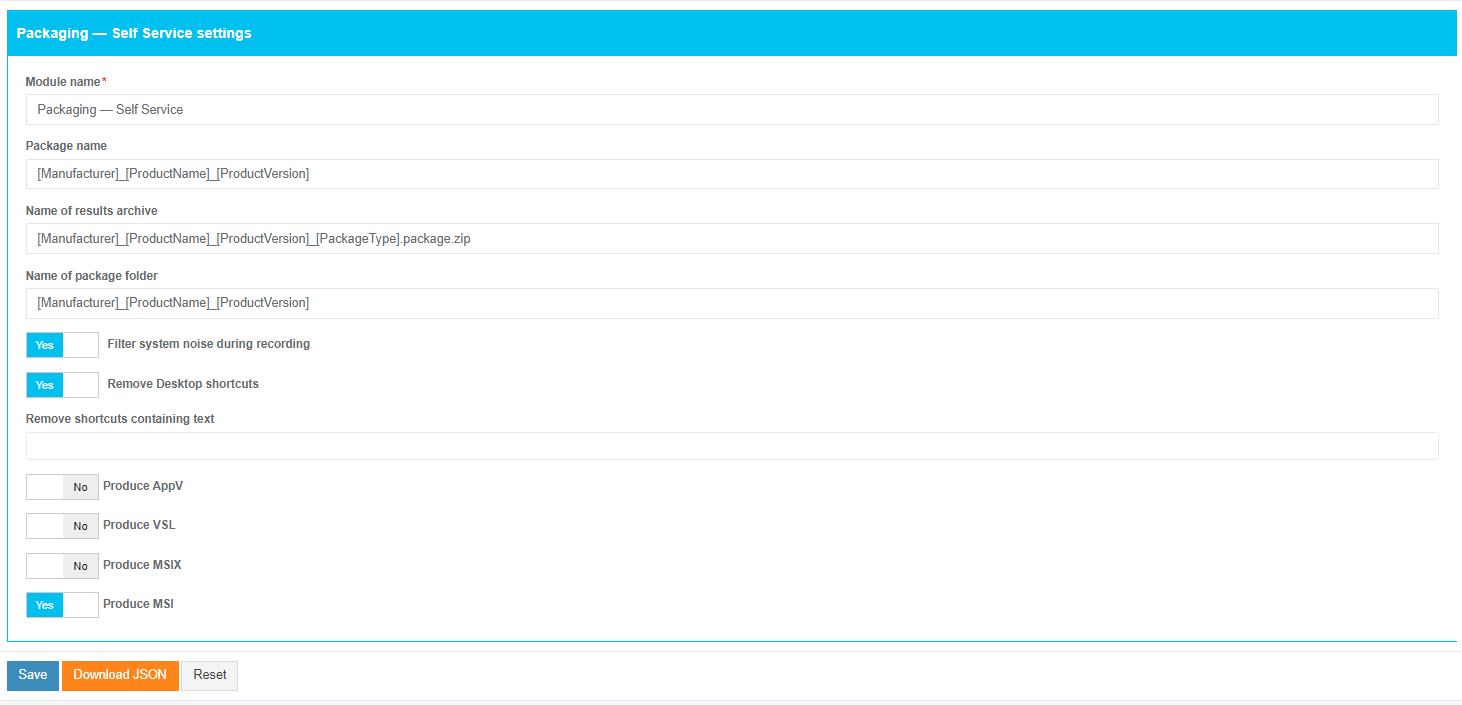
The screenshot below shows the default settings of the Packaging – Self Service module. All required fields are marked with an asterisk *.
The option to change a module name is available under the Module name field. The default module name is Packaging – Self Service.
The option to change a results archive name pattern is available under the Name of results archive field. The default archive name pattern is [Manufacturer]_[ProductName]_[ProductVersion]_[PackageType].package.zip.
The option to change a package folder name pattern is available under the Name of package folder field. The default package folder name pattern is [Manufacturer]_[ProductName]_[ProductVersion].
To insert the variable tag into the field, click the relevant variable tag from the dropdown list.
The following additional options can be enabled:
Table 2. Packaging – Self Service additional options
|
Option |
Details |
Default value |
|
Filter system noise during recording |
This option allows for applying a filter (exclusion list) to automatically remove the captured system and user activity (noise). Yes and No options available. Yes – the value of this option removes redundant files and registry keys that were created by the system while recording sessions and did not relate to installing software (i.e., telemetry or diagnostics data). No – the system noise which is captured by the application packaging tool will not be removed. |
Yes |
|
Remove Desktop shortcuts |
This setting indicates the option to remove all desktop shortcuts (Yes) from the package or to leave desktop shortcuts in the package (No). |
Yes |
|
Produce AppV |
This setting indicates the option to generate a file in App-V format. Yes and No options available. |
No |
|
Produce VSL |
This setting indicates the option to generate a file in VSL format. Yes and No options available. |
No |
|
Produce MSIX |
This setting indicates the option to repackage software to MSIX format. Yes and No options available. |
No |
|
Produce MSI |
This setting indicates the option to repackage software to MSI format. Yes and No options available. When No option is chosen, a legacy setup for software will be implemented if possible. |
Yes |
To turn on the option required in the project, enable the relevant switch in front of the option name.
The option to exclude shortcuts from the packaging results archive is available under the Remove shortcuts containing text field. The following options available:
- Readme (removing shortcuts on txt file);
- Release notes (removing shortcuts on the page with Release notes);
- Uninstall (removing shortcuts on exe file).
To exclude shortcuts from the packaging results archive, click the relevant option.
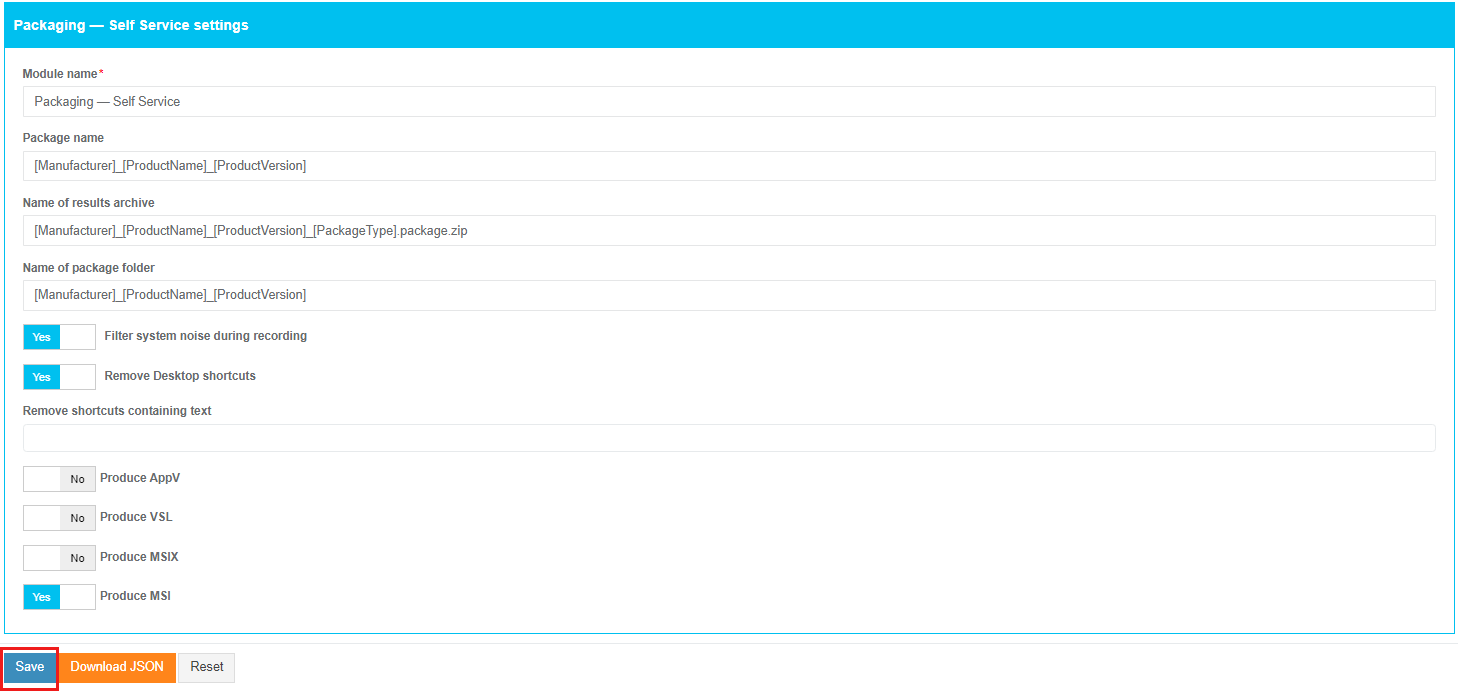
Settings are persisted on click to the Save button.
To download the Packaging Self-Service settings in JSON format, click on the Download JSON button. To revert the settings, click on the Reset button.
APPV
This option is disabled by default.
APPV option becomes active when switched on and once the required settings are completed.
The option to specify which version of App-V sequencer will be used is available under the Target App-V versions field. Every version of App-V sequencer has its own workflow and applies for different operating systems.
The following Target App-V versions available:
- 5.1;
- 5.0 SP3;
- 5.0 SP2 Hotfix 4+;
- 5.0 SP1/RTM;
- 5.0 SP2.
The default value is 5.1.
To start an application from App-V, a full load mode must be enabled. The option to enable a full load mode is available under the Require full load switch. Yes and No options available. The default value is Yes.
The option to enable interaction with ActiveX is available under the Allow named objects interaction switch. Yes and No options available. The default value is No.
The option to enable interaction with COM objects is available under the Allow COM interaction switch. Yes and No options available. The default value is No.
The option to write inside App-V is available under the Allow write to virtual FS switch. Yes and No options available. The default value is No.
VSL
VSL (Virtual Software Layer) is a combination of software components that implement the concept of FS layering.
Every software exists in its own container and can access files for write access only within this container unless the opposite is defined in a manifest file.
Real applications could have access to this container for reading and write access to the container content if the opposite is not prohibited in manifest and virtual files can be visible in Windows Explorer like ordinary files.
VSL consists of different layers applied on top of another in order to form the package based on the containment of the container.
By default, all VSL files are stored under the root directory C:\Program Files\VSL. This can be changed on a machine level, but the directory should be the same for all packages.
VSL format key features:
1. ZIP archive with extensions .VSL or .VSLX;
2. Every VSL file contains layers:
- OS layer;
- Service layer;
- Files layer;
- Registry layer;
- Manifest layer, etc.
3. Can be contained inside MSI files for compatibility with deployment systems;
4. Is self-contained. No additional software installation is required;
5. Back compatible and non-breaking updates.
This option is disabled by default.
VSL option becomes active when switched on and once the required settings are completed.
To insert the variable tag into the Description field, click the relevant variable tag from the dropdown list.
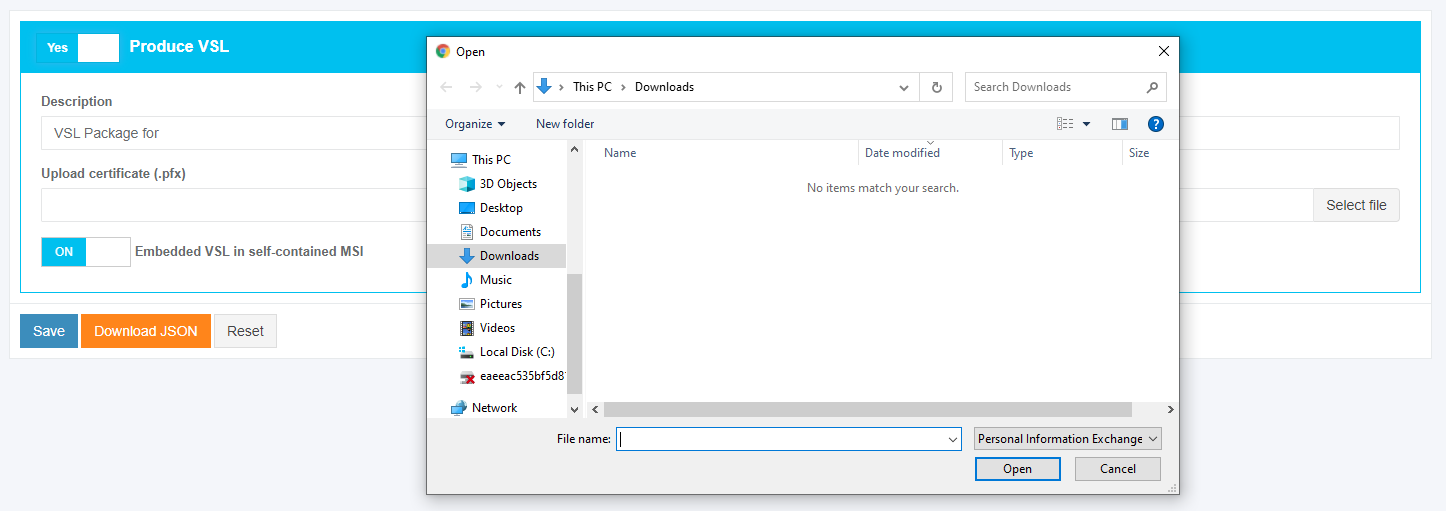
To upload a certificate in .PFX., the Upload certificate (.pfx) field can be used. Click the Open button when the relevant file is chosen.
The option to enable an embedded VSL is available under the Embedded VSL in self-contained MSI switch. On and Off options available. The default value is On.
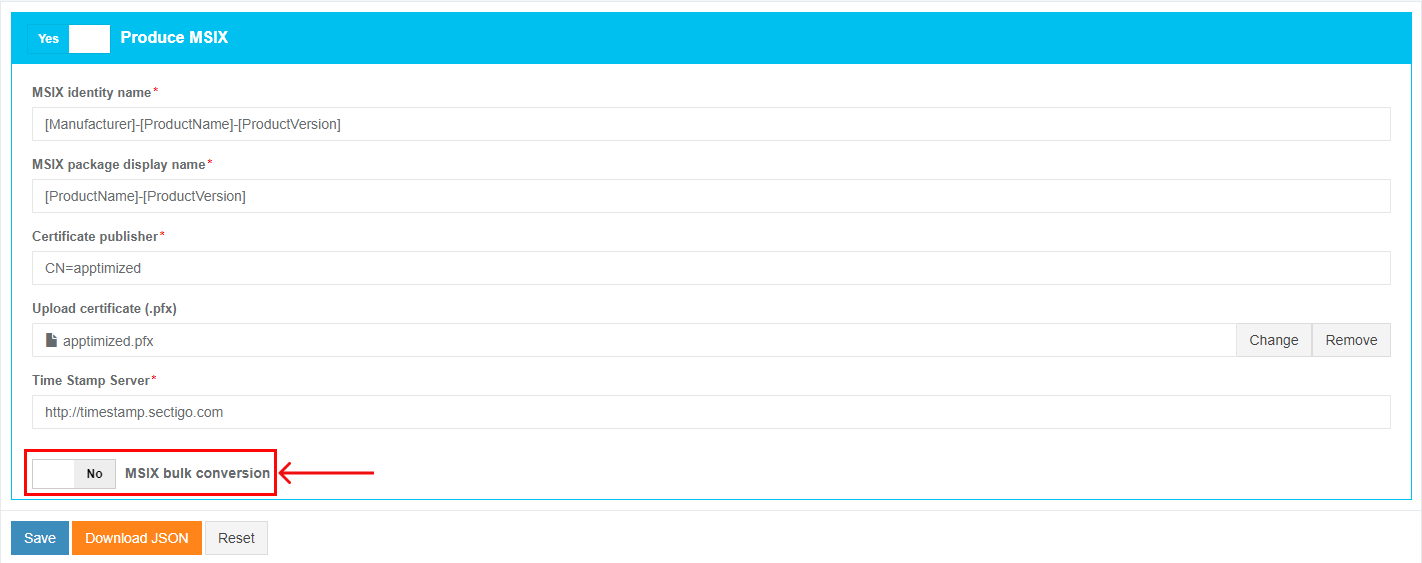
MSIX
MSIX is the Windows app package format that provides a packaging experience to all Windows apps. The MSIX package format preserves the functionality of existing app packages and/or install files in addition to enabling new packaging and deployment features to Win32, WPF, and WinForm apps.
This option is disabled by default.
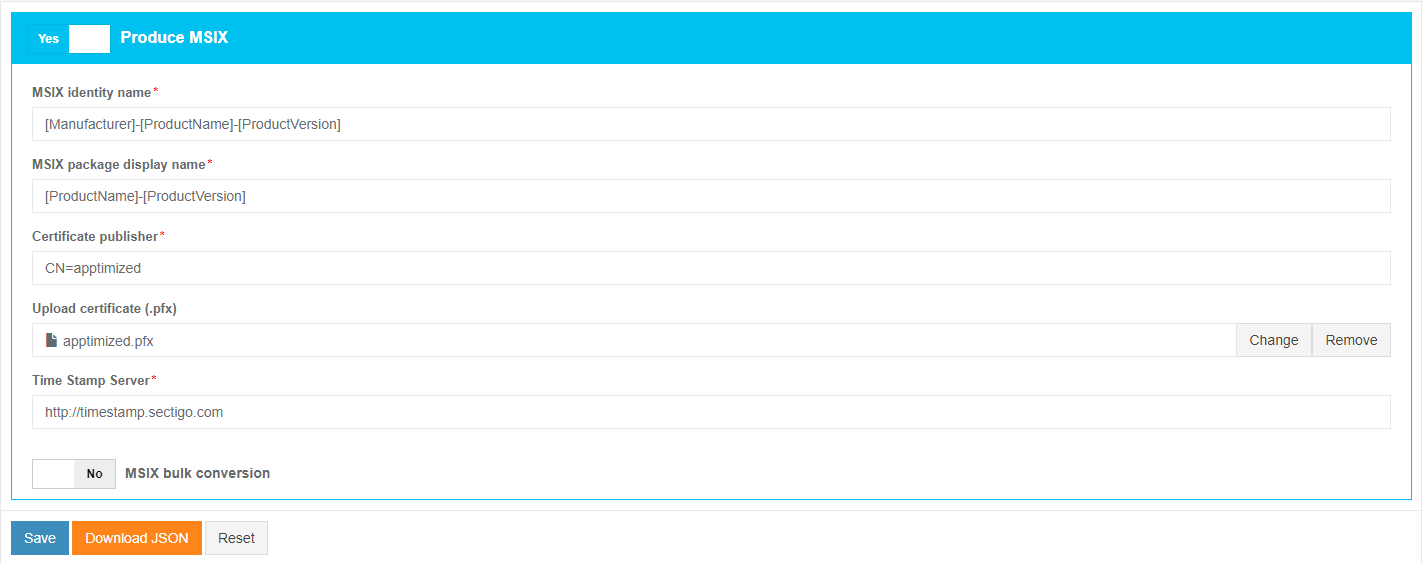
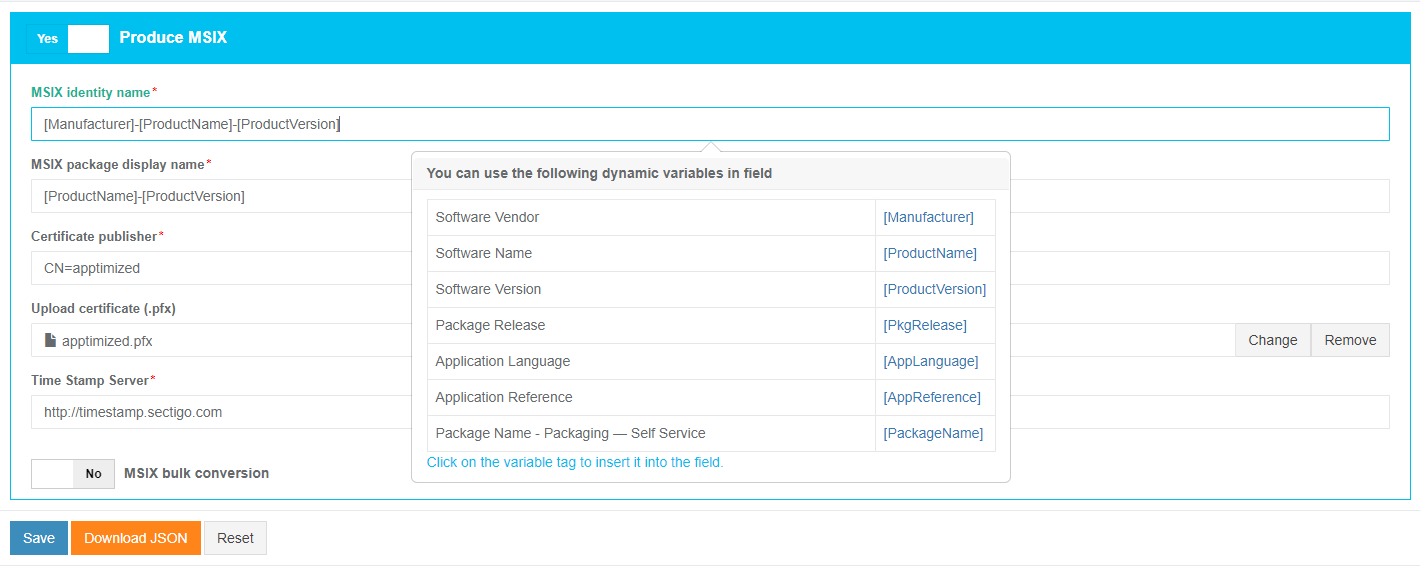
MSIX option becomes active when switched on and once the required settings are completed. All required fields are marked with an asterisk *.
To insert the variable tag into the MSIX identity name and MSIX package display name fields, click the relevant variable tag from the dropdown list.
The default MSIX identity name pattern is [Manufacturer]-[ProductName]-[ProductVersion].
The default MSIX package display name pattern is [ProductName]-[ProductVersion].
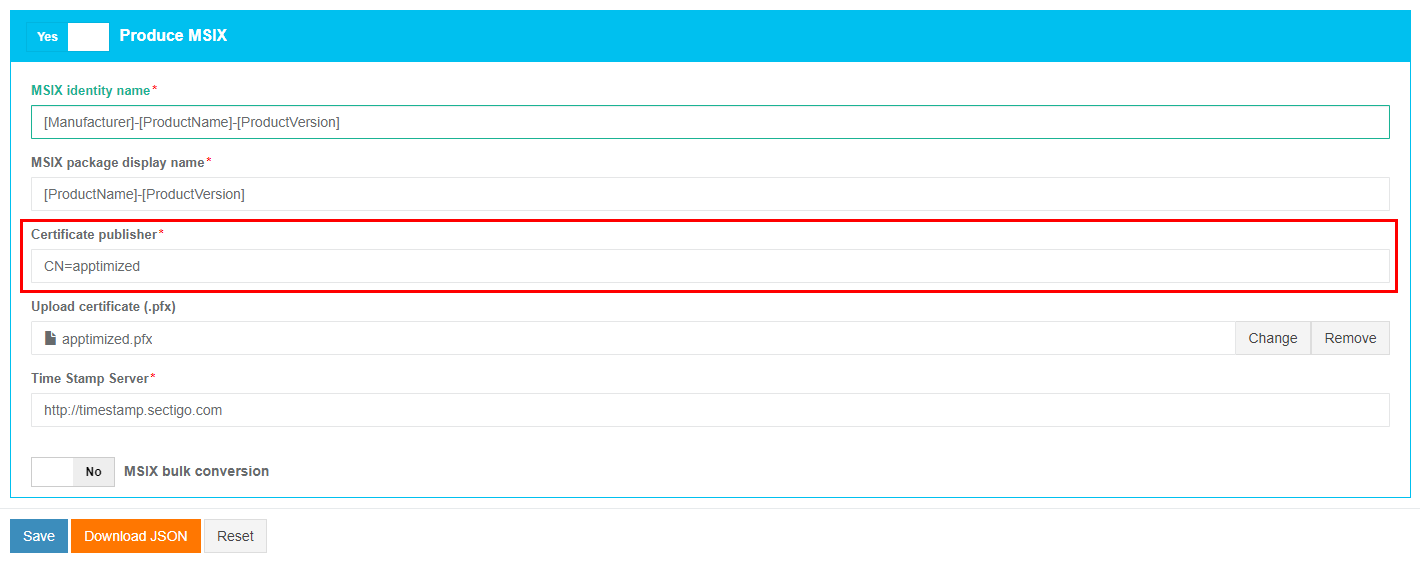
The option to set the certificate publisher's name is available under the Certificate publisher field. The certificate publisher's name should match the certificate subject name (If no, the package will not be signed).
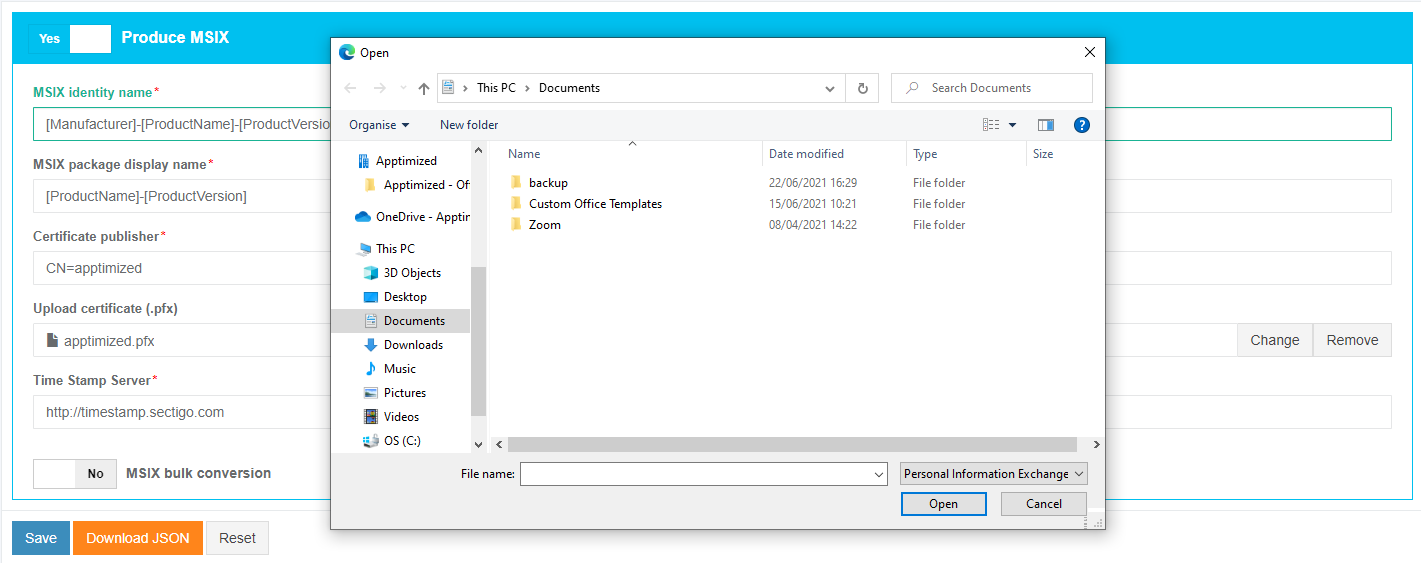
The certificate is used to sign the application and is uploaded for a user by default. An option to upload a .PFX certificate is available. To upload a certificate in .PFX the Upload certificate (.pfx) field can be used. Click the Open button when the relevant file is chosen.
A self-signed certificate is useful for testing the application before a user is ready to publish it to the store.
A user can upload a certificate with the ability to automatically and silently install a certificate for the MSIX package during the VM preparation (for all Self-Service steps: Packaging, Discovery, Testing). So that after the VM is ready, the user can run the MSIX package without additional actions related to installing the certificate.
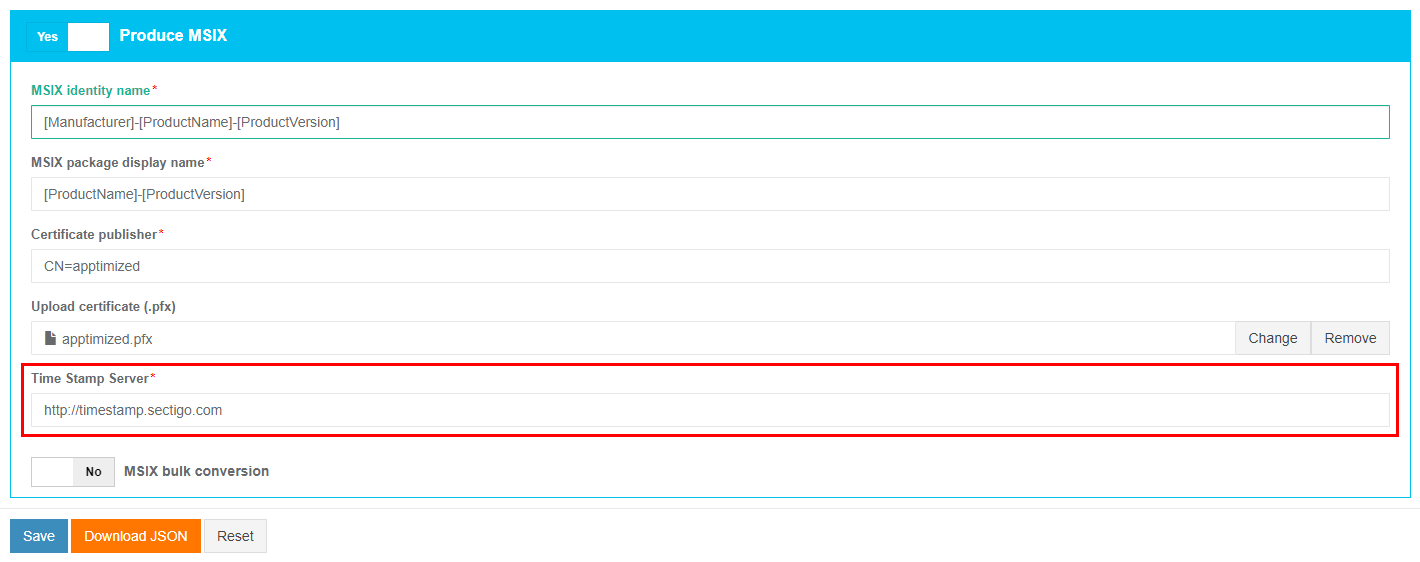
The option to set up Time Stamp Server is available under Time Stamp Server field. The default value is is http://timestamp.seectigo.sectigo.com
Time Stamp Server enables a user to sign the MSIX application package with a time-stamping protocol.
MSIX bulk conversion gives a user an ability to create MSIX application packages from an already existing one in silent mode. The option to enable a bulk conversion is available under the MSIX bulk conversation switch. Yes and No options available. The default value is No.
MSI
This option is enabled by default.
The screenshot below shows the default settings for MSI.
To insert the variable tag into the Name of MSI package and Name of MST transform fields, click the relevant variable tag from the dropdown list.
The default value for MSI package is [Manufacturer]_[ProductName]_[ProductVersion].msi.
The default value for MST transform is [Manufacturer]_[ProductName]_[ProductVersion].mst. This option applies if vendor MSI files were found.
The option to keep the original (vendor) name of the MSI file during the creation of a transform or to rename it according to the naming conventions for the MSI file is available under the Do not rename vendor MSI name switch. This option affects the vendor MSI files that were found during the installation of the application.
Yes (the vendor MSI name will not be changed) and No (the vendor MSI name will be changed according to the Packaging Guideline) options available. The default value is Yes.
Installation
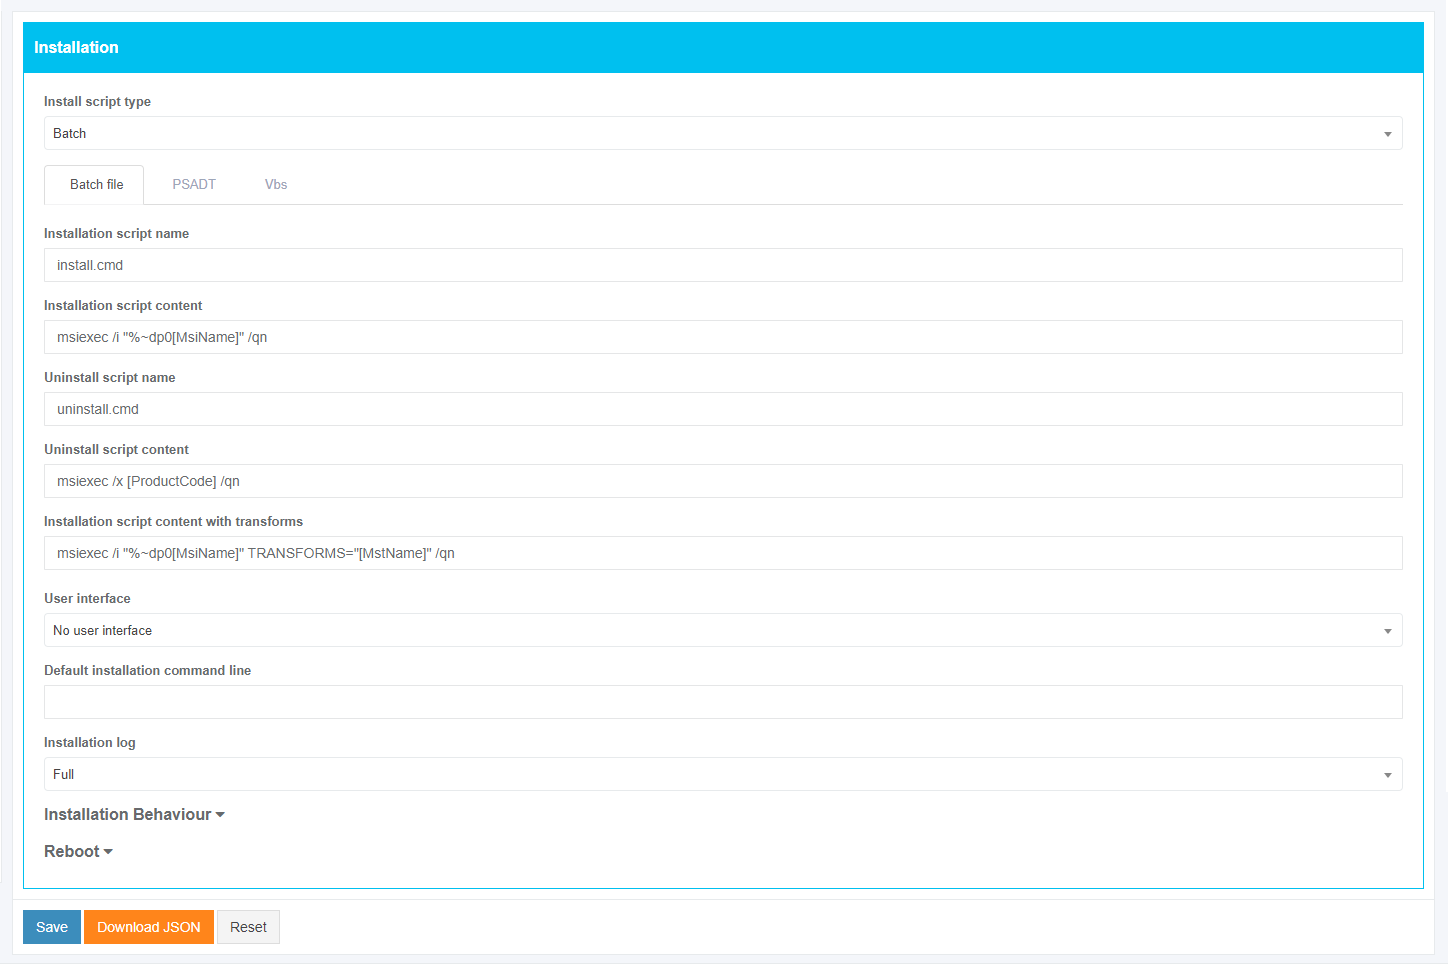
The screenshot below shows the default settings for the Batch file tab.
The option to choose the installation script type is available under the Install script type field. The following options available: Batch, PowerShell and Vbs. The default value is Batch.
Table 3. MSI installation settings (the Batch file tab)
|
Setting |
Details |
Default value |
|
Installation script name |
This setting indicates the file name of the generated installation command line (msiexec command line). This setting indicates a filename template for naming the .CMD file to install the package. |
install.cmd |
|
Installation script content |
This setting indicates the command line for installing the package. |
msiexec /i "%~dp0[MsiName]" /qn |
|
Uninstall script name |
This setting indicates the command line file name for the package uninstallation. |
uninstall.cmd |
|
Installation script content with transforms |
This setting indicates the command line for installing the package using the created Transform file. |
msiexec /x [ProductCode] /qn |
|
User interface |
This setting indicates which parameter will be added to the msiexec command line. The following options available:
|
No user interface |
|
Default installation command line |
This setting indicates the command line for the installation of the MSI with transform. |
- |
|
Installation log |
This setting indicates the installation log mode. The following options available:
|
Full |
Table 4. MSI installation settings (the PSADT tab)
|
Setting |
Details |
Default value |
|
Install command |
This setting indicates the command line for installing the package. |
Execute-MSI -Action 'Install' -Path "[MsiName]" -private:$PackageName |
|
Install with transform command |
This setting indicates the command line for installing the package using the created Transform file. |
Execute-MSI -Action 'Install' -Path "[MsiName]" -Transform "[MstName]" -private:$PackageName |
|
Uninstall command |
This setting indicates the command line for uninstalling the package. |
Execute-MSI -Action 'Uninstall' -Path '[ProductCode]' -private:$PackageName |
|
Reboot required |
This setting indicates the reboot mode. Yes and No options available. |
No |
|
User interface |
This setting indicates which parameter will be added to the msiexec command line. The following options available:
|
No user interface |
|
Default installation command line |
This setting indicates the command line for the installation of the MSI with transform. |
- |
|
Installation log |
This setting indicates the installation log mode. The following options available:
|
Full |
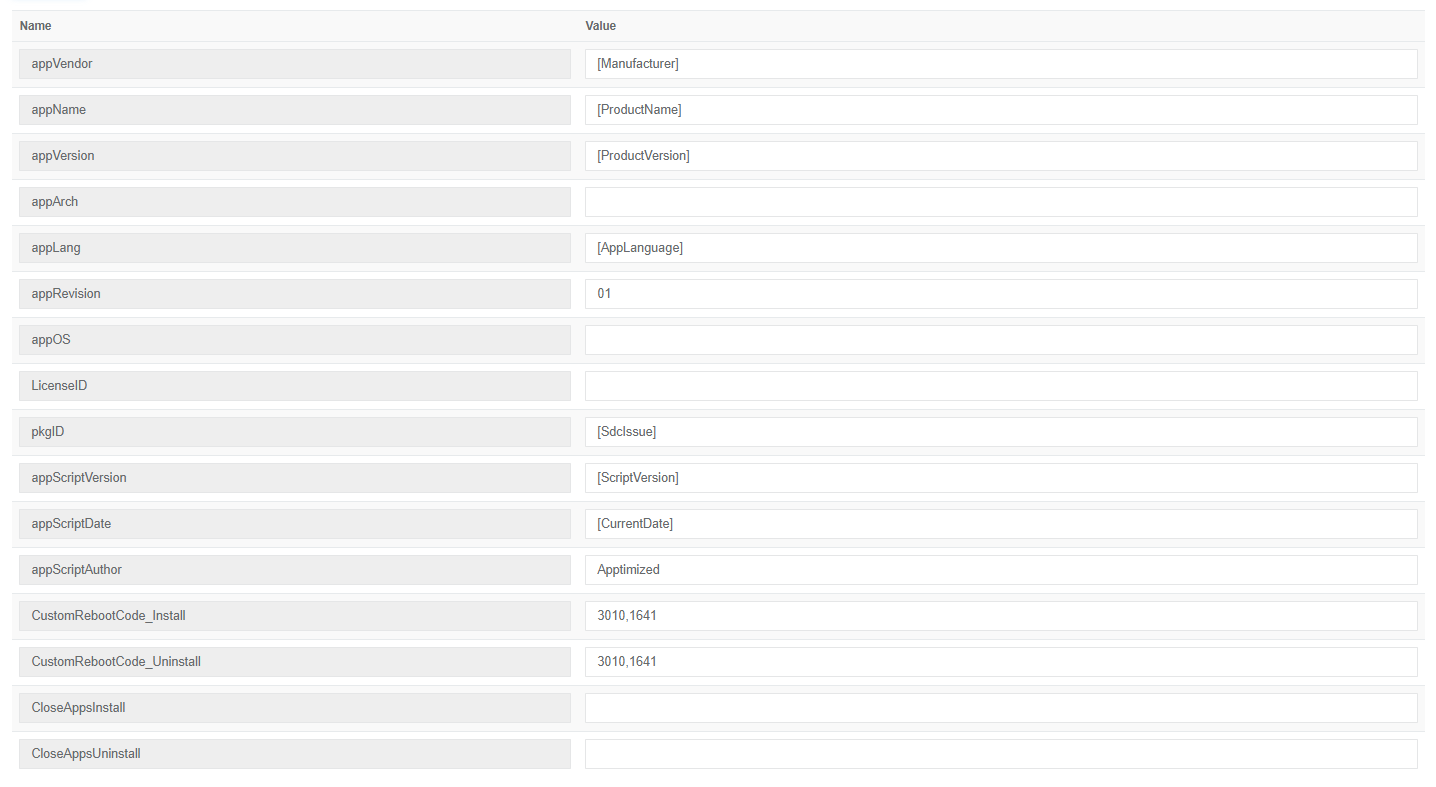
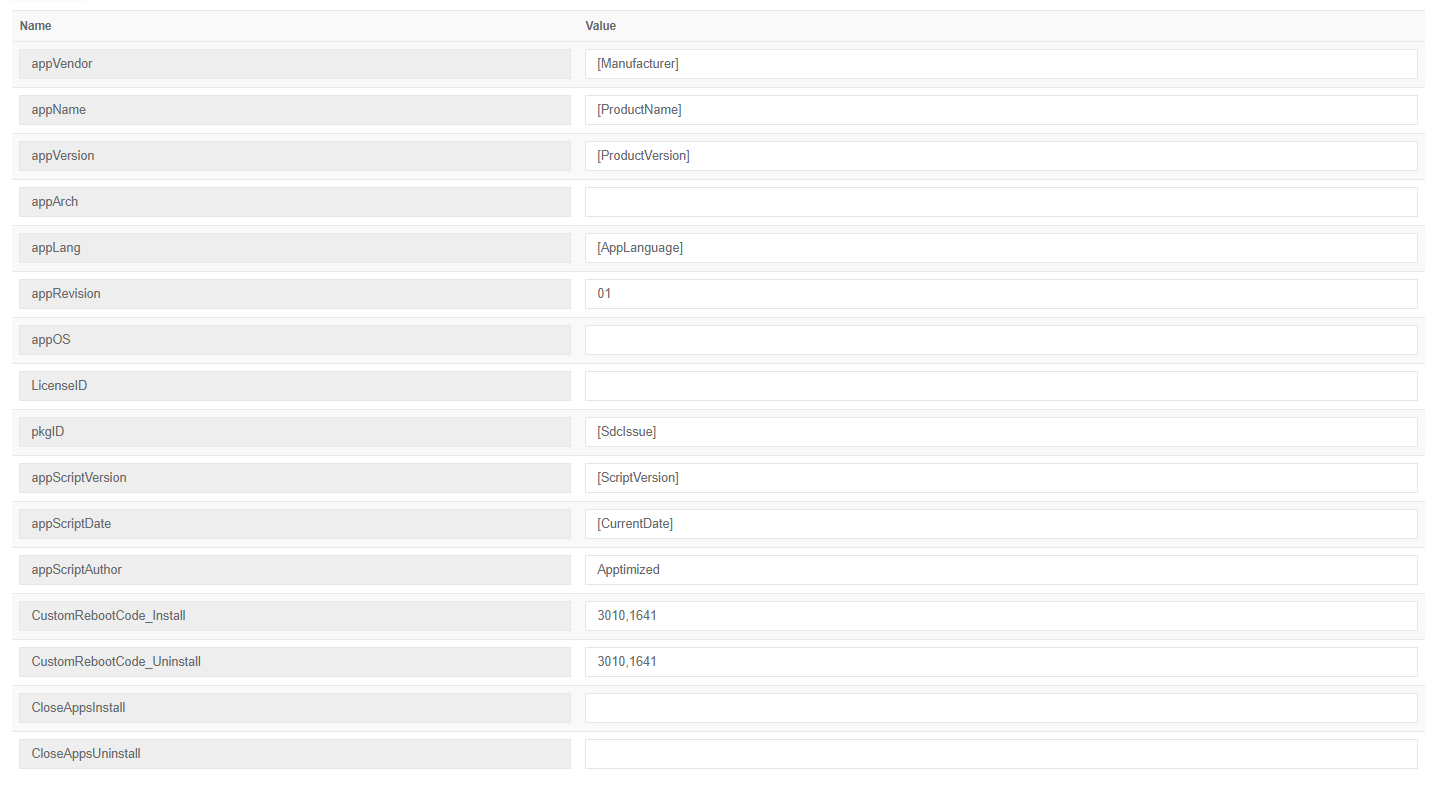
The option to set the package metadata is available under the module table. The following screenshot indicates the default settings for the module table. To set or change the value choose the relevant field in the module and type the value in square brackets.
Table 5. MSI installation settings (the Vbs tab)
|
Setting |
Details |
Default value |
|
Installation script name |
This setting indicates the file name of the generated installation command line (msiexec command line). This setting indicates a filename template for naming the .VBS file to install the package. |
install.vbs |
|
Installation script content |
This setting indicates the command line for installing package. |
set res = run("%windir%\system32\msiexec.exe /i " & chr(34) & "%~dp0[MsiName]" & chr(34) & " /qn", "0,3010", 0, true) wscript.quit(res.ReturnCode) |
|
Installation script content with transforms |
This setting indicates the command line for installing the package using the created Transform file. |
set res = run("%windir%\system32\msiexec.exe /i " & chr(34) & "%~dp0[MsiName]" & chr(34) & " TRANSFORMS=" & chr(34) & "%~dp0[MstName]" & chr(34) & " /qn", "0,3010", 0, true) wscript.quit(res.ReturnCode) |
|
Uninstall script name |
This setting indicates the file name of the generated uninstallation command line (msiexec command line). This setting indicates a filename template for naming the .VBS file to ninstall the package. |
uninstall.vbs |
|
Uninstall script content |
This setting indicates the command line for uninstalling package. |
set res = run("%windir%\system32\msiexec.exe /x [ProductCode] /qn", "0,3010", 0, true) wscript.quit(res.ReturnCode) |
|
User interface |
This setting indicates which parameter will be added to the msiexec command line. The following options available:
|
No user interface |
|
Default installation command line |
This setting indicates the command line for the installation of the MSI with transform. |
- |
|
Installation log |
This setting indicates the installation log mode. The following options available: · None (no logging available). · Basic (logging shows only errors appeared during installation/uninstallation). · Full (logging shows all informational, warning, error messages during installation/uninstallation). |
Full |
The tables 6 -7 show the settings that are common for all install script types.
Table 6. Installation behavior settings
|
Setting |
Details |
Default value |
|
Installation context |
This setting indicates the installation context mode. The following options available:
|
Per-machine |
|
Destination drive |
This setting indicates the drive where a package will be installed, set value for ROOTDRIVE property of MSI. The ROOTDRIVE property specifies the default drive for the destination directory of the installation. Learn more. The following options available:
|
C:\ |
Table 7. Reboot settings
|
Setting |
Details |
Default value |
|
Reboot after install |
This setting is based on the REBOOT property value. The REBOOT property suppresses certain prompts for a restart of the system. The following options available:
|
Never |
|
Shut down any files in use |
This setting is based on the MSIRMSHUTDOWN property value. When the default value (Yes) is set, all system services and files that were shut down to install the update will be restarted. The following options available:
|
Yes |
|
If files are in use |
This setting is based on MSIRESTARTMANAGERCONTROL property value. This setting enables setup authors to specify whether the package will use the Restart Manager or FileInUse Dialog to handle locked files. The following options available:
|
Use restart manager |
|
Display of reboot prompts |
This setting is based on REBOOTPROMPT property value. This property does not initiate a reboot if one is not needed, it only suppresses any prompts for reboots to the user. The following options available:
|
Suppress |
ARP & Properties
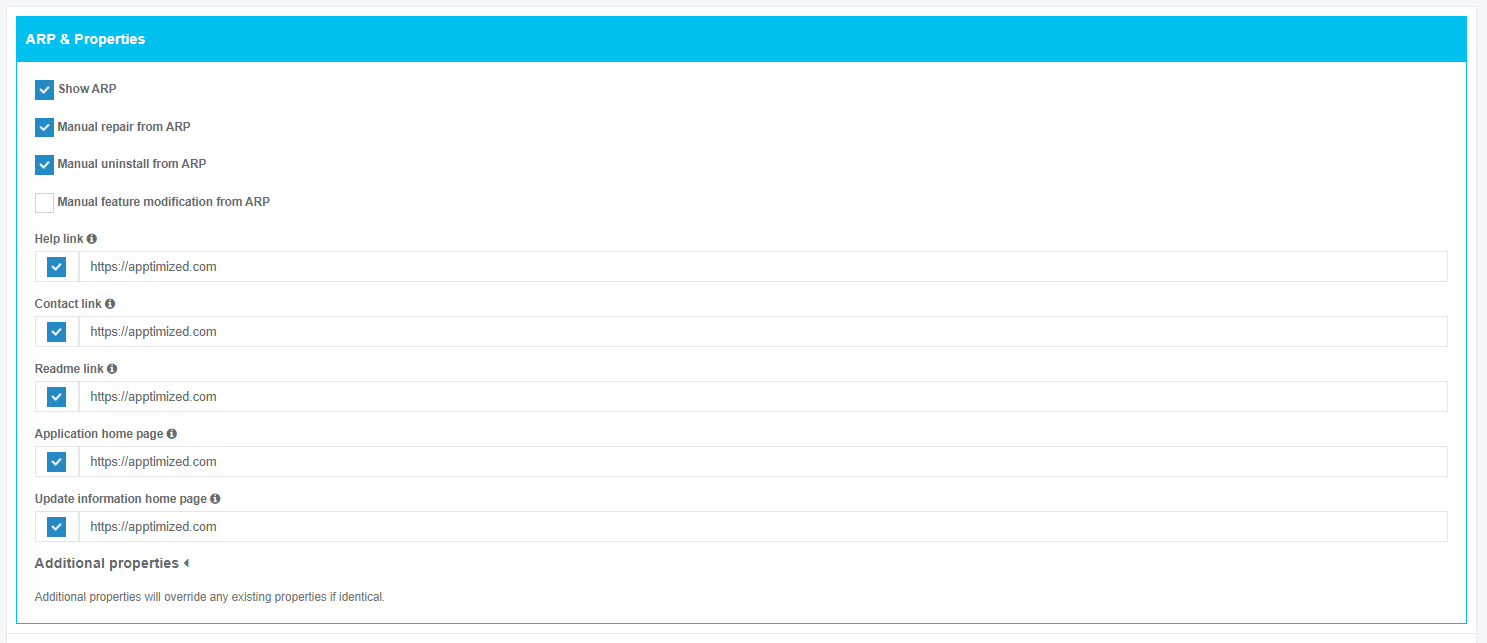
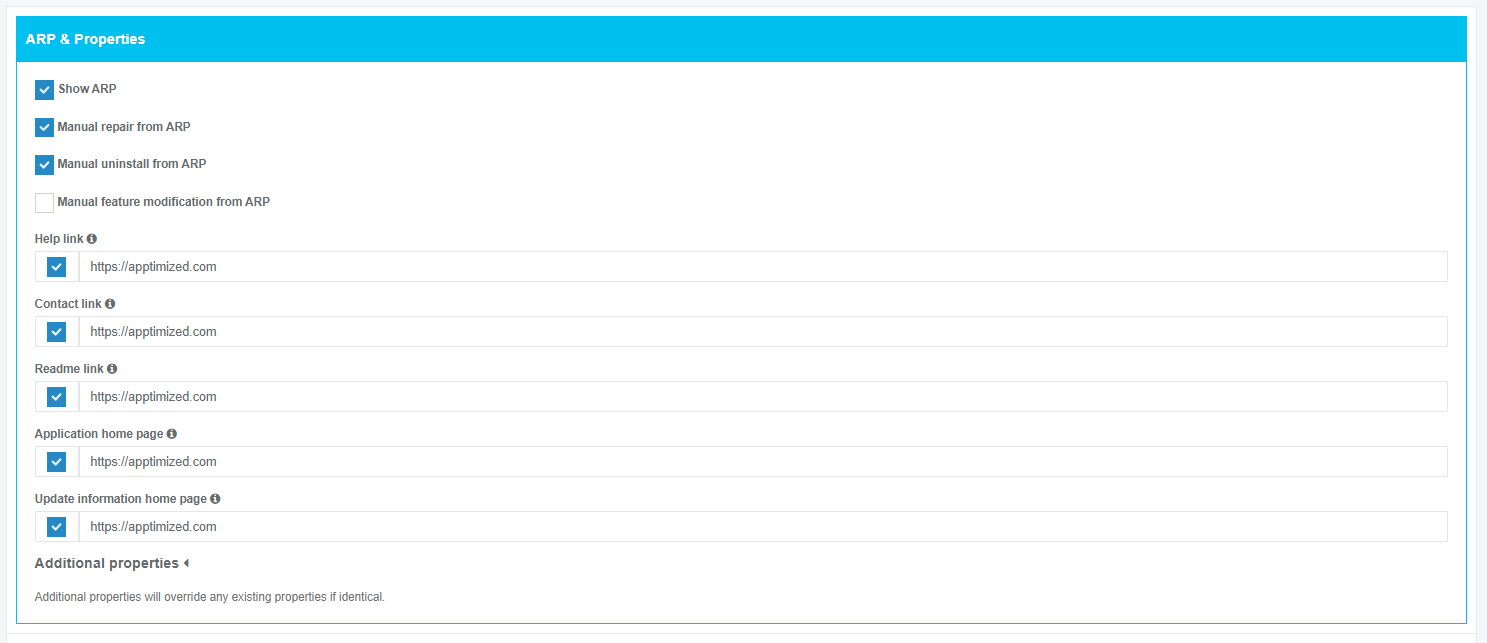
The screenshot below shows the default values of ARP & Properties settings.
To exclude the Show ARP, Manual repair from ARP, or Manual uninstall from ARP options, uncheck the box next to the option name not required in packaging settings.
To include the Manual feature modification from ARP option to packaging settings, check the box next to the option name.
Table 8. Add-Remove Program settings
|
Setting |
Details |
Default value |
|
Show ARP |
This option specifies the listing mode of the program in the ARP (Add-Remove Program) and is based on ARPSYSTEMCOMPONENT property value. When the option is enabled, the program will be listed in the Add-Remove Program. When the option is disabled, the program will be hidden in the Add-Remove Program list. |
Enabled |
|
Manual repair from ARP |
This option enables or disables the usage of the Repair button in the ARP for the package and is based on ARPNOREPAIR property value. When the option is enabled, the Repair button is added to the ARP for the package. When the option is disabled, the Repair button is removed from the ARP for the package. |
Enabled |
|
Manual uninstall from ARP |
This option enables or disables the usage of the Uninstall button in the ARP for the package and is based on ARPNOREMOVE property value. When the option is enabled, the Uninstall button is added to the ARP for the package. When the option is disabled, the Uninstall button is removed from the ARP for the package. |
Enabled |
|
Manual feature modification from ARP |
This option enables or disables the usage of the Modify button in the ARP for the package and is based on ARPNOMODIFY property value. When the option is enabled, the Modify button is added to the ARP for the package. When the option is disabled, the Modify button is removed from the ARP for the package. |
Disabled |
Additional properties
The option to set the nonstandard properties that should be included to package is available under the Additional properties dropdown menu. This option covers the properties that will be added to the generated MSI or Transform. For example:
- COMPANY, USERNAME – properties, which contain company name and user’s name. They are used by some software to initialize the user’s information;
- ACCEPT_EULA – properties, which mean that you agree with all license agreements.
The option to create the additional setting is available under the plus symbol in the Actions column: Add the setting name in the Setting field > Add the setting value in the Value field.
The option to delete the additional setting is available under the bin symbol in the Actions column.
The option to enable the self-healing process on application shortcuts run is available under the Advertised shortcuts switch. Yes and No options available. The default value is Yes.
Files & Registry
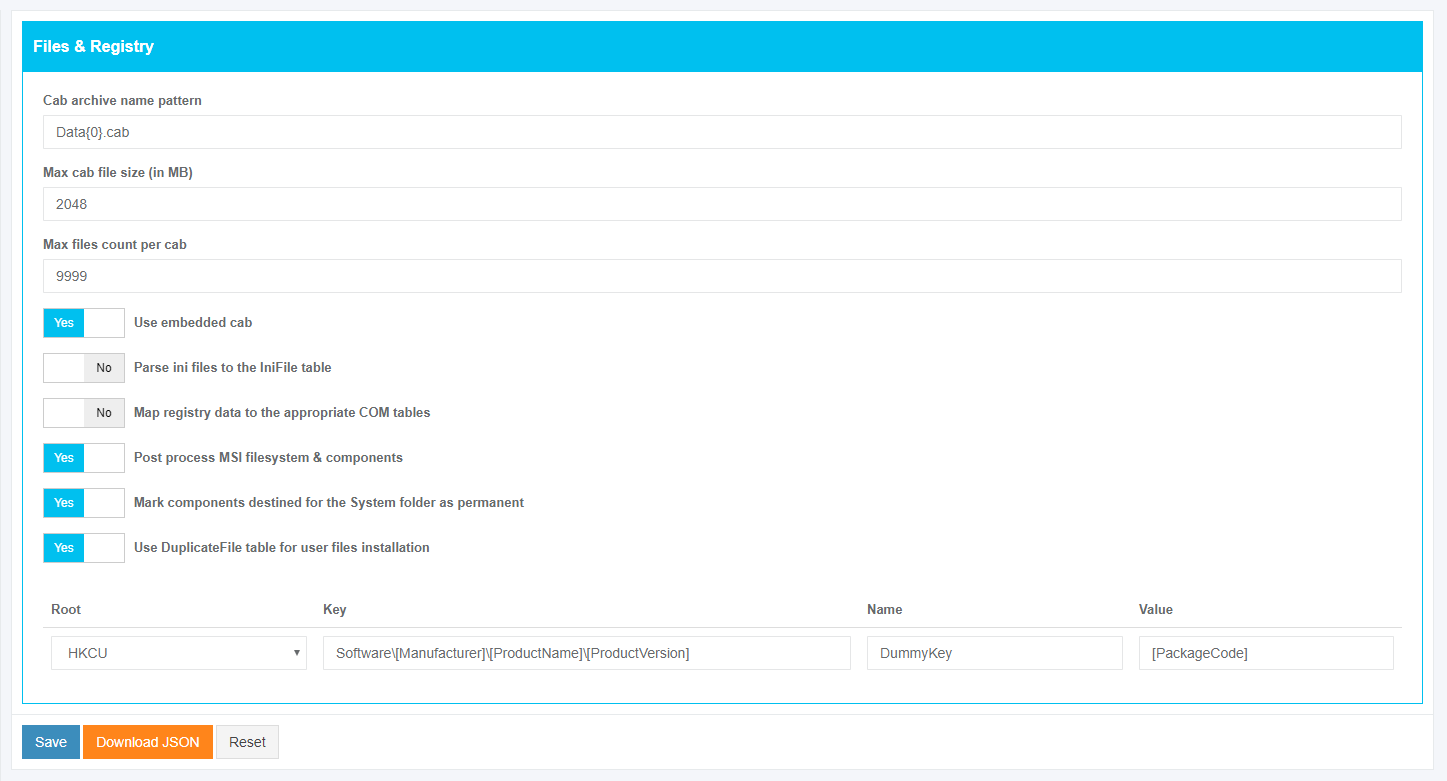
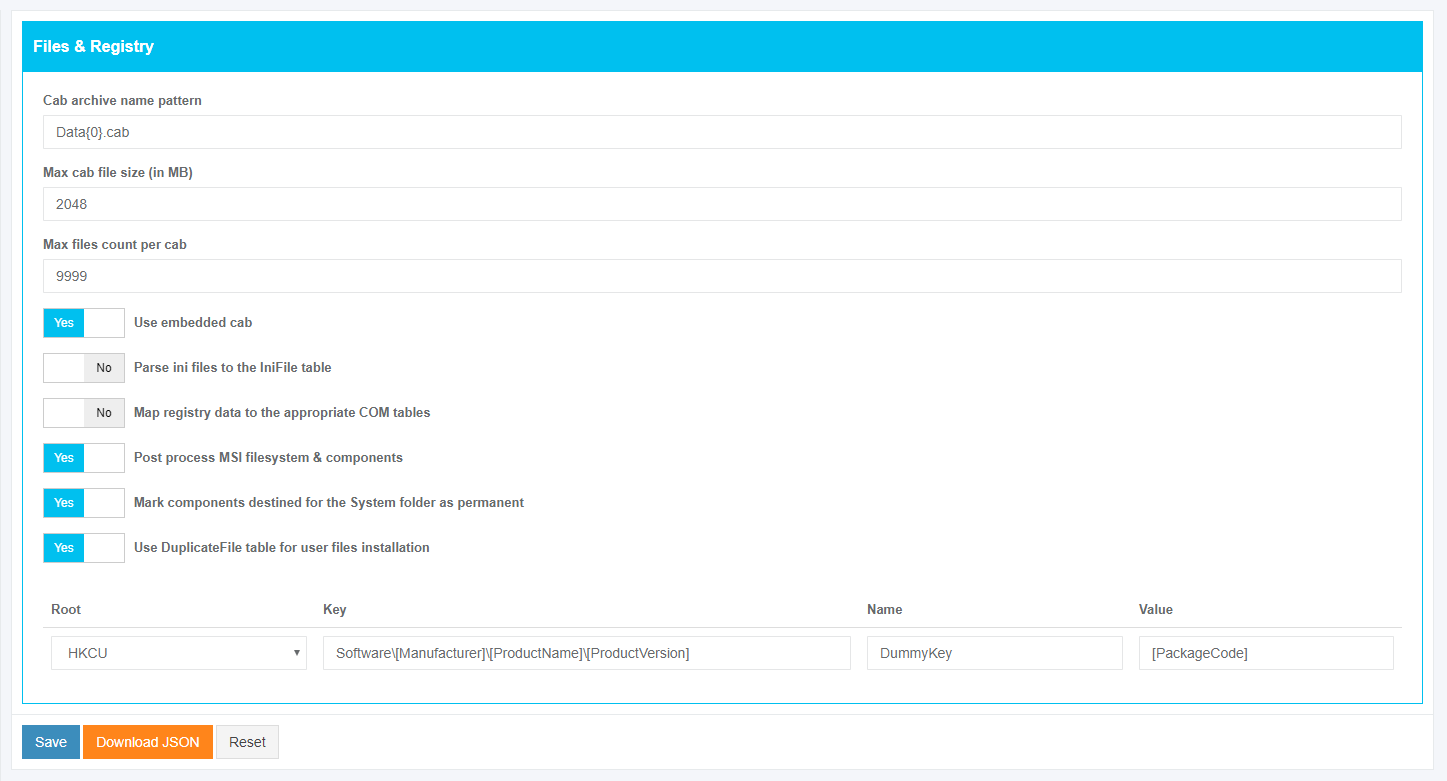
The screenshot below shows the default values of Files&Registry settings.
Table 9. Files & Registry settings
|
Setting |
Details |
Default value |
|
Cab archive name pattern |
This setting indicates the filename template for naming .CAB files. Cab files contain files that will be installed by MSI package. |
Data{0}.cab |
|
Max cab file size (in MB) |
These settings indicate the number of files that will be placed in a single cab file. If the size of one cab file is bigger than the provided value, it will be divided into several cab files. |
2048 |
|
Max files count per cab |
9999 |
|
|
Use embedded cab |
This setting sets the mode to use an embedded file. When the Use embedded cab switch is enabled a .CAB file will be implemented into .MSI. When the Use embedded cab switch is disabled a .CAB file will be outside the .MSI (external CAB). It is a compressed source (opposed to "Loose files" = uncompressed source). |
Yes |
|
Parse ini files to the IniFile table |
This option indicates the mode to parse ini files. When the Parse ini files to the IniFile table switch is enabled, the ini files will be added via an IniFile table. It is the best practice to add ini files via IniFile table because these files may contain hard-coded values, which in this case can be replaced with MSI properties. When the Parse ini files to the IniFile table switch is disabled, the ini files will be added via an File table. |
No |
|
Map registry data to the appropriate COM tables |
This setting allows identifying objects and to add them to the appropriate tables. When the Map registry data to the appropriate COM tables switch is enabled, all COM objects will be mapped to MSI via special tables designed for these objects (ProgID, Classes, etc.). It is a better way of COM objects registration according to Microsoft's best practices and helps easily navigate and manage these objects through MSI. When the Map registry data to the appropriate COM tables switch is disabled all COM objects will be added to MSI via Registry table and installed as regular registry keys. |
No |
|
Post process MSI filesystem & components |
This setting sets the File Table entries for the Language and Version fields. Learn more. |
Yes |
|
Mark components destined for the System folder as permanent |
A system folder is used by other programs. If the package contains some System folder files, they can be removed from the system during uninstallation. So, it will affect other programs that use these files. When the Mark components destined for the System folder as permanent switch is enabled, the files will be marked as permanent and won’t be removed after the package uninstalling. When the Mark components destined for the System folder as permanent switch is disabled, the files will be deleted after the package uninstalling. |
Yes |
|
Use Duplicate File table for user files installation |
Some files (.DLL, .OCX, etc.) that are installed in the Common Files folder is used by other programs. If the package contains some of these files they can be removed from the system during uninstallation. So, this affects other programs that use these files. When the Use Duplicate File table for user files installation switch is enabled, the files mark as shared. Every time when such files are installed in this folder, a counter is incremented. This counter shows how many programs use this file. When the package tries to remove this file, the counter is decremented. When this counter equals 0 this file removes from the system. |
Yes |
The option to create the кщще keys is available under the block below: Choose the root type > Fill in the Key field > Fill in the Name field > Fill in the Value field.
The default value for the Key field is Software\[Manufacturer]\[ProductName]\[ProductVersion].
The default value for the Name field is DummyKey.
The default value for the Value field is [PackageCode].
Per User Data
This section allows creating separate registry keys for Active Setup.
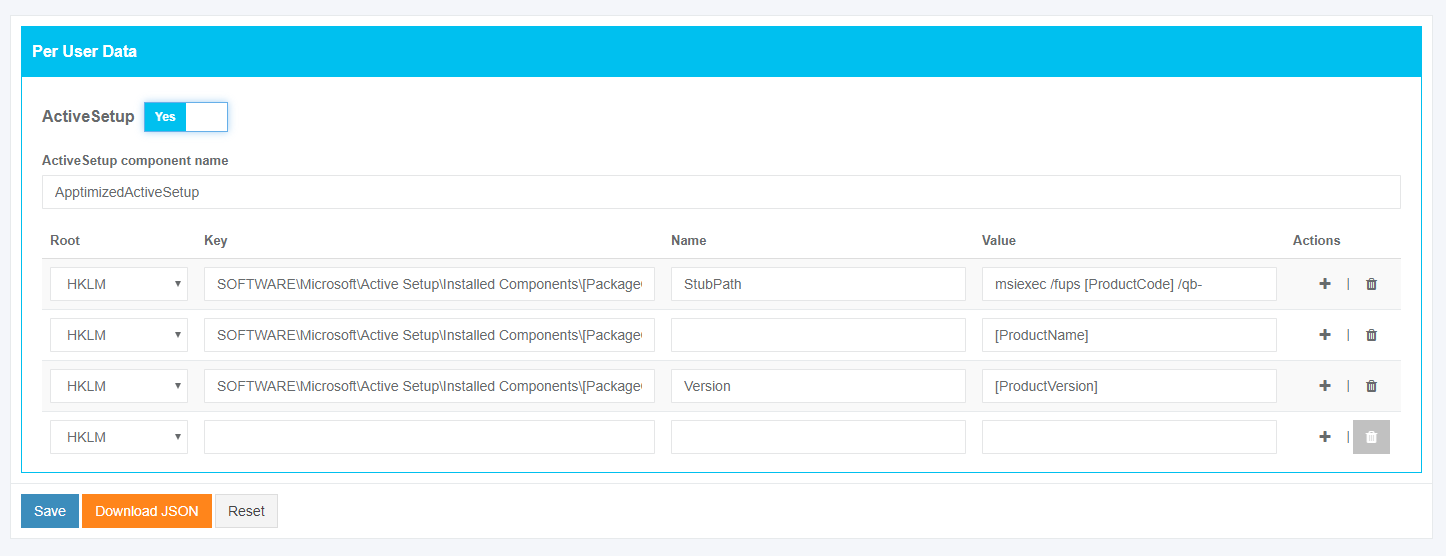
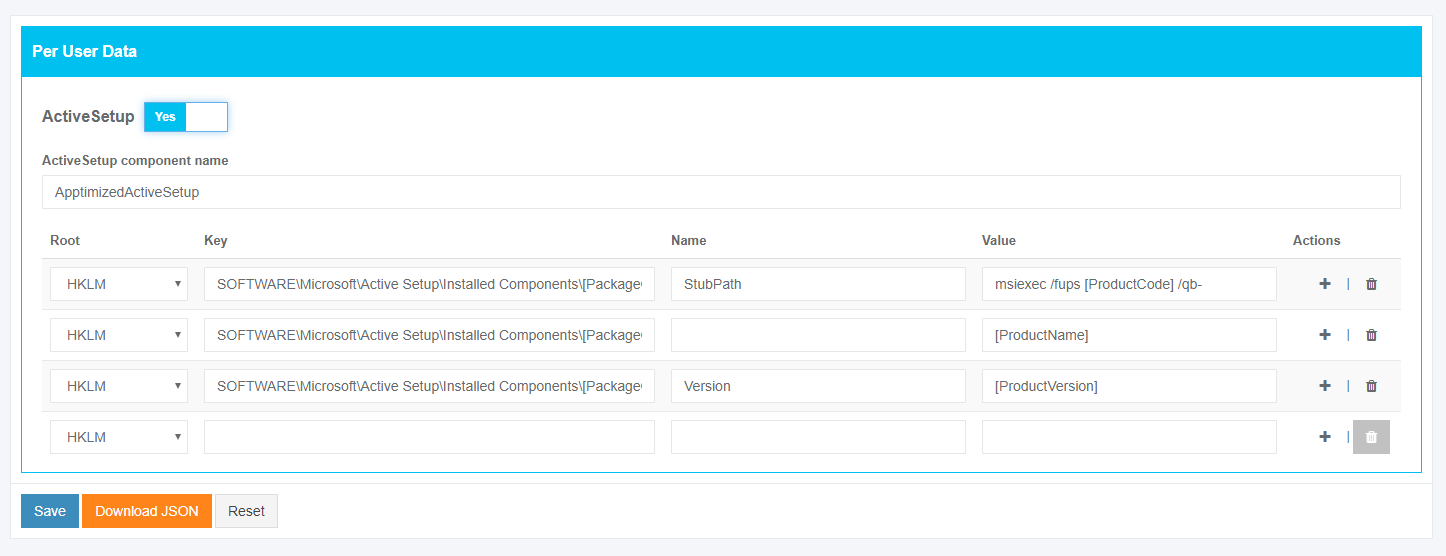
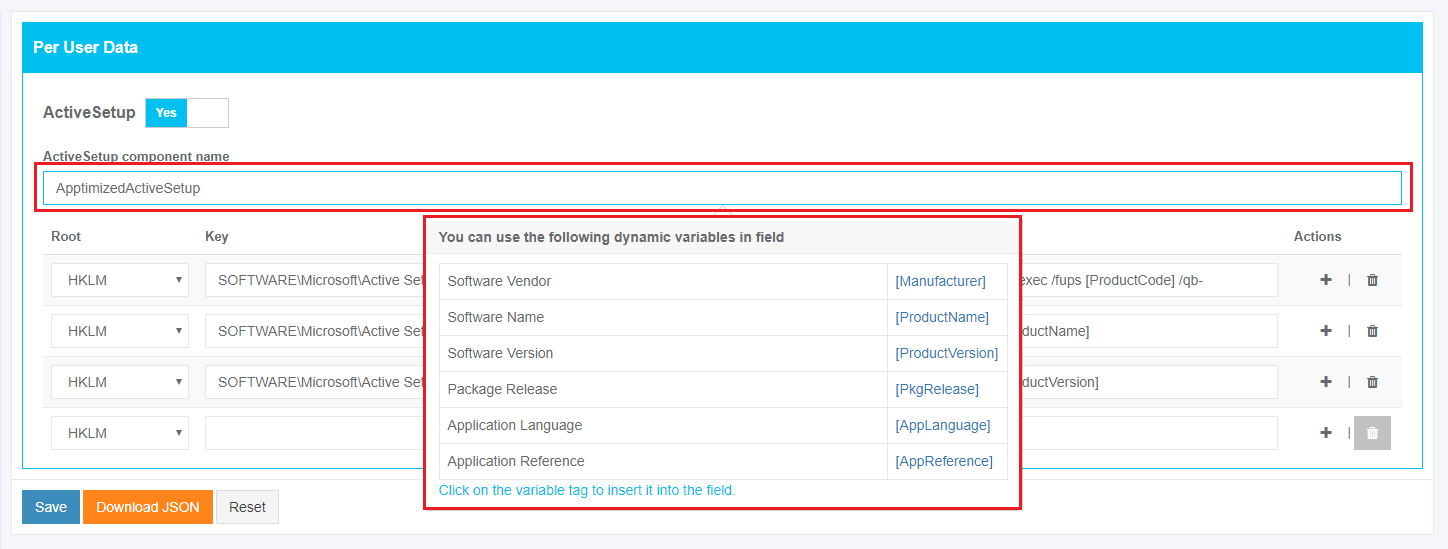
The screenshot below shows the default values of Per User Data settings.
The option to create the separate registry keys for Active Setup is available under the Active setup switch. Yes and No options available. The default value is Yes.
When the Active Setup switch is enabled, the self-healing process on the user’s logon will be implemented. This option is useful when the program has extensions or when the self-healing process on the advertised shortcut does not work.
When the Active Setup switch is disabled, the self-healing process on the user’s logon will not be implemented.
The options to specify the component name for active setup keys and registry keys are available in this section.
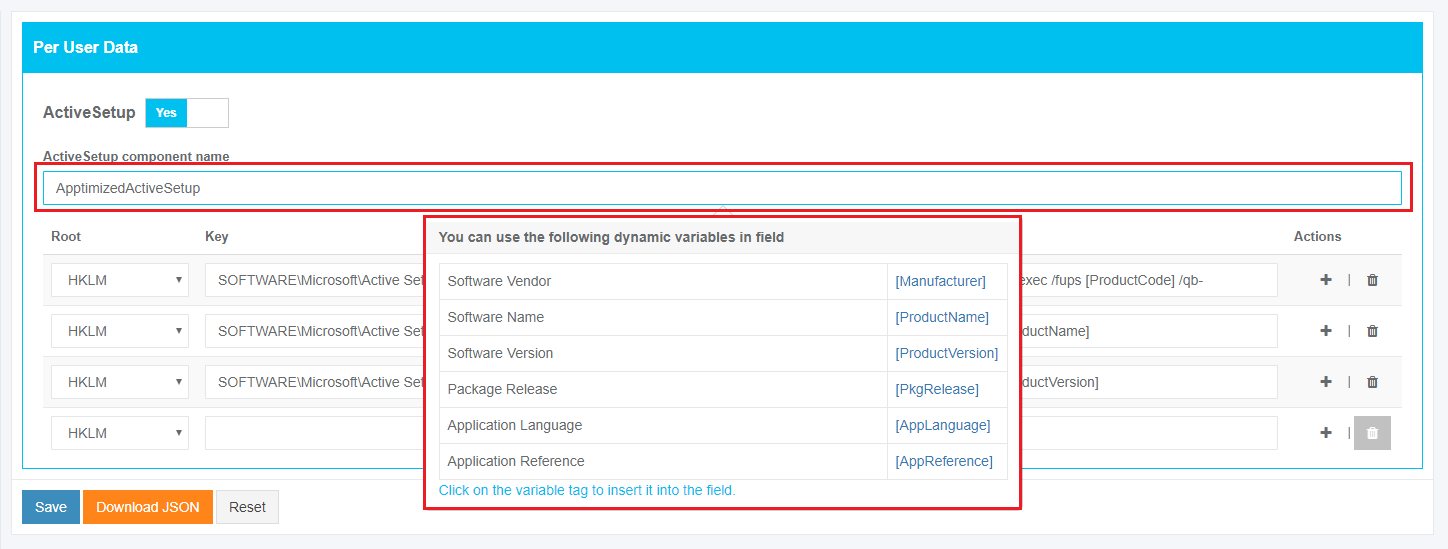
The default value for the ActiveSetup component name field is ApptimizedActiveSetup.
To insert the variable tag into the ActiveSetup component name field, click the relevant variable tag from the dropdown list.
The option to create the registry keys is available under the plus symbol in the Actions column: Choose the root type > Fill in the Key field > Fill in the Name field > Fill in the Value field.
The option to delete the registry key is available under the bin symbol in the Actions column.
Branding
This option enables a user to check all Apptimized packages installed on the user’s computer. If a user has installed applications to monitor, these branding keys assist a user.
These keys contain all information about packages (i.e., installed date, time, manufacturer, etc.).
This option is disabled by default.
When the Branding switch is enabled, the branding keys will be included to package. This option a user can use when the program has extensions or when the self-healing process on the advertised shortcut does not work.
When the Branding switch is disabled, the output package will not contain any branding keys even if they are specified in the settings above.
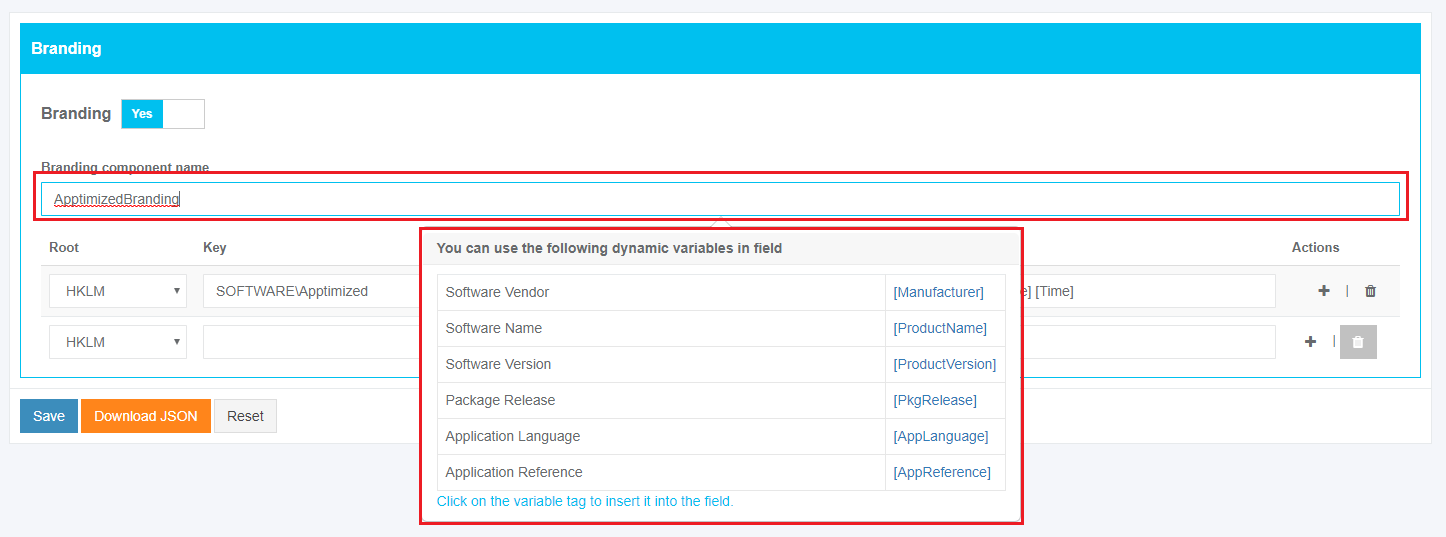
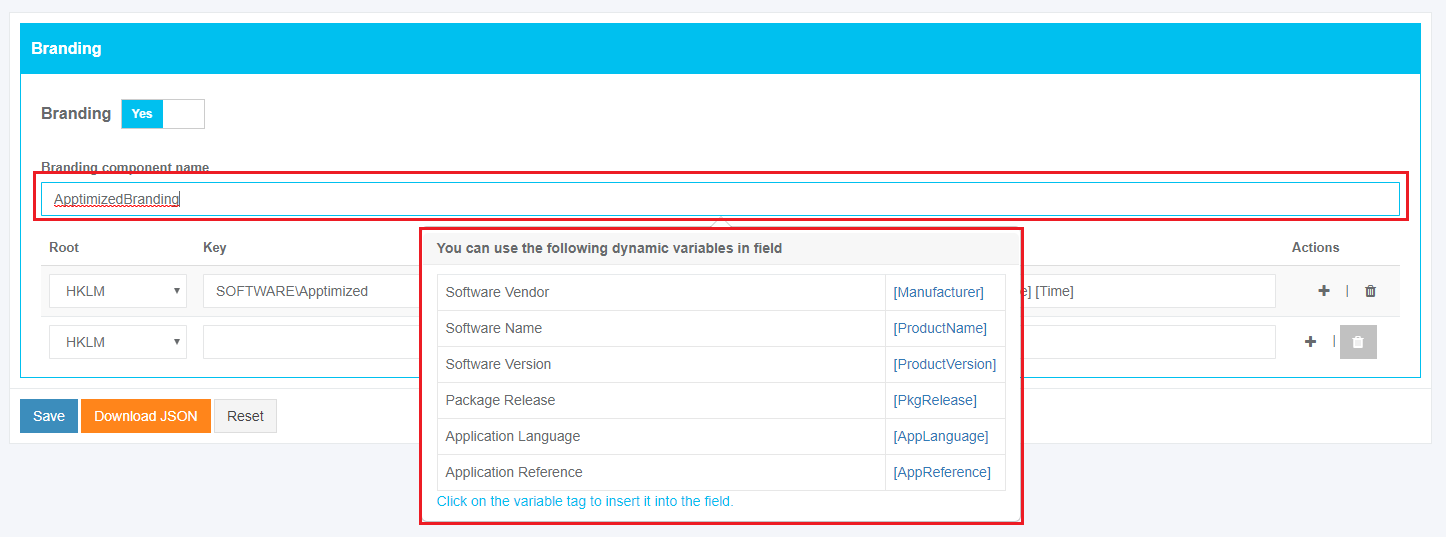
The screenshot below shows the default values of Branding settings.
The options to specify the component name for active setup keys and branding keys are available in this section.
The default value for the Branding component name field is ApptimizedBranding.
To insert the variable tag into the Branding component name field, click the relevant variable tag from the dropdown list.
The option to create the branding keys is available under the plus symbol in the Actions column: Choose the root type > Fill in the Key field > Fill in the Name field > Fill in the Value field.
The option to delete the branding key is available under the bin symbol in the Actions column.
Transformation
This option is disabled by default.
When the Skip installation during transformation switch is enabled, all changes which were implemented during installation will capture but the application will not be installed physically. Transformed will be provided based on the implemented changes.
When the Skip installation during transformation switch is disabled, all changes which were implemented during installation will capture the application will be installed physically on the system.
The option to download JavaScript Object Notation file is available under the Download JSON button.
Settings are persisted on click to the Save button.
Apptimized shows the following notification when successful:
Workspace Launcher
Apptimized Workspace Launcher is a Windows-based application that provides a user with a packaging toolset within Apptimized cloud environment.
The Workspace Launcher section enables a user to create customizable bundles with applications available in Apptimized Workspace Launcher and share them with all users inside a project.
The created bundle(s) will appear on the VM while Packaging Self-Service (see the Packaging).
The Workspace Launcher section is available under Project Settings > Workflow > Packaging – Self Service > Workspace Launcher. Apptimized shows the following screen when successful:
The option to create a new bundle is available under the Create new bundle button.
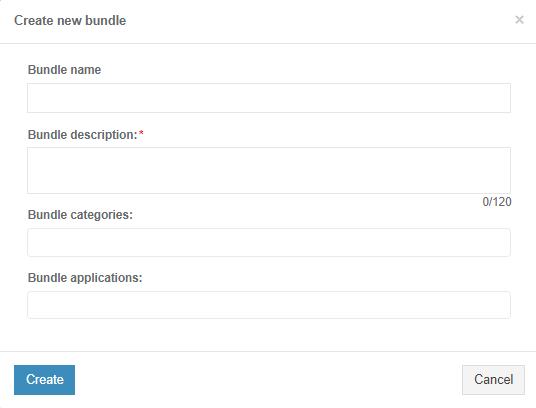
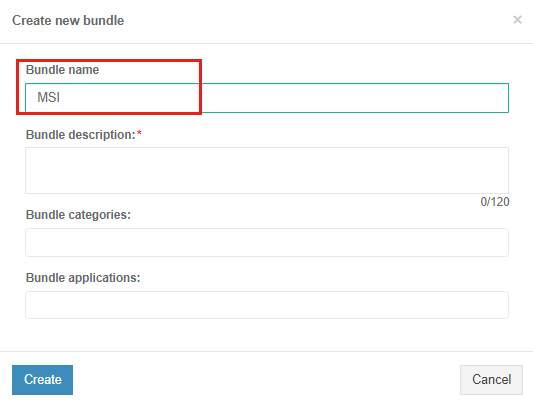
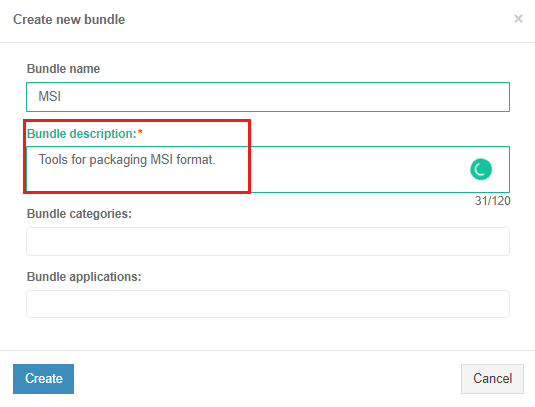
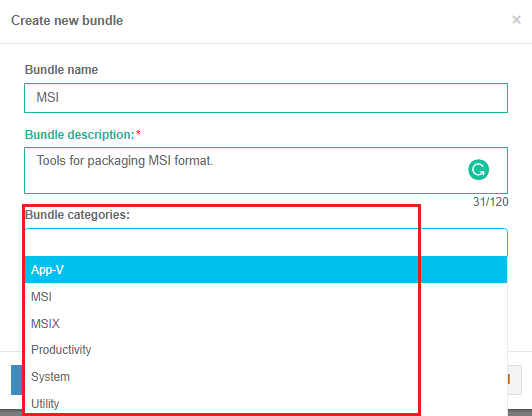
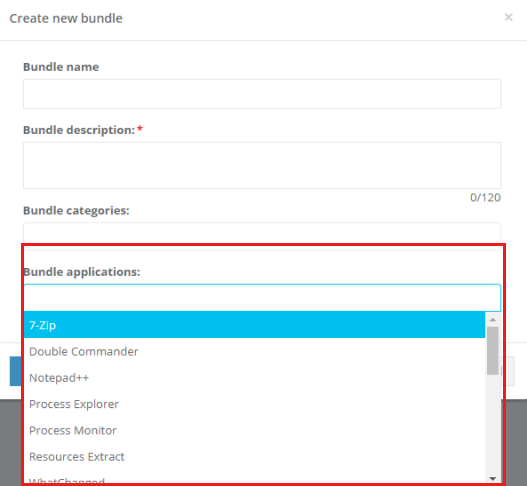
Apptimized shows the following modal window:
| Setting | Details |
| Bundle name |
The bundle name field allows defining the bundle name (e.g., MSI). There is no default value for this field. |
| Bundle description |
The bundle description field allows defining the bundle description (e.g., Tools for packaging MSI format). There is no default value for this field. |
| Select categories |
The select categories field allows defining the categories for a new bundle. The following options available:
There is no default value for this field. The option to choose multiple categories is available. |
| Select applications |
The select applications field allows defining the applications included in a new bundle. The following options available:
There is no default value for this field. The option to choose multiple applications is available. |
To apply the settings, click the Create bundle button. Cancel - reverts to the Workspace Launcher section.
Apptimized shows the following screen when successful:
A bundle can be removed from the list by clicking on the bin symbol (Actions column > 
A bundle can be edited by clicking on the pen symbol (Actions column > 
Packaging Wrappers
This section enables a user:
- to set the PSADT templates
- to manage the PSADT parameters (i.e., parameters, replace items, and ZIP templates).
The Packaging Wrappers section is available under Project Settings > Workflow > Packaging – Self Service > Packaging Wrappers. Apptimized shows the following screen when successful:
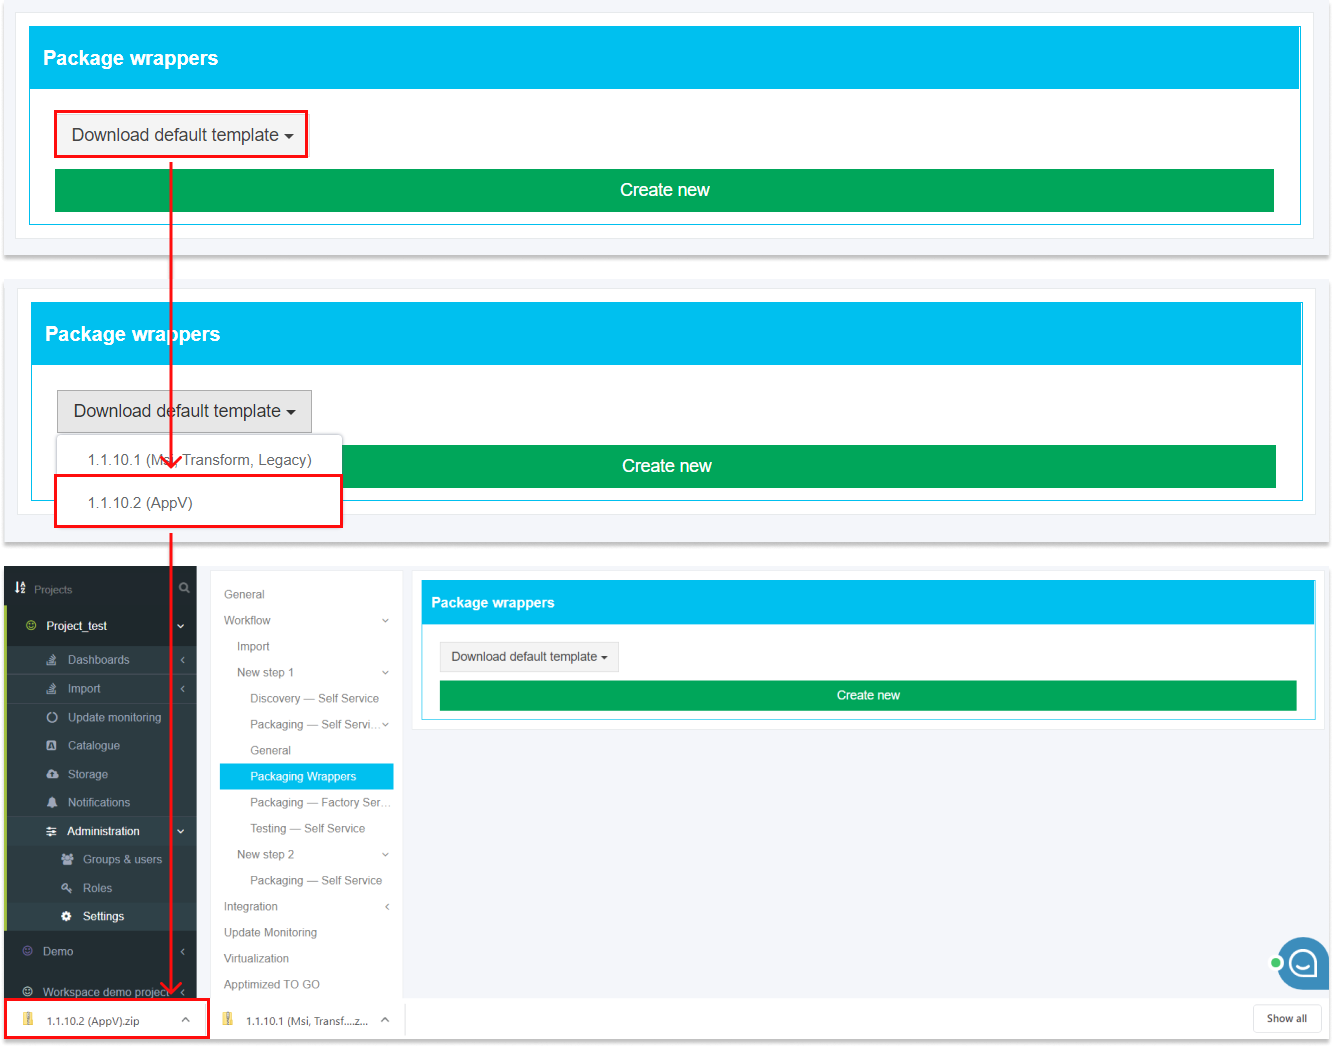
Download default template
The option to download the package wrappers default template is available under the Download default template button. The following default templates available: 1.1.10.1 (MSI, Transform, Legacy) and 1.1.10.2 (App-V).
Note. After a user downloaded an archive with the default templates (i.e., 1.1.10.2 (AppV).zip or 1.1.10.1 (MSI, Transform, Legacy).zip), it is recommended to examine the archive structure and files content. The list of placeholders to replace can be formed, or needed modifications to the archive can be provided as a result of the review.
Create a new package wrapper template
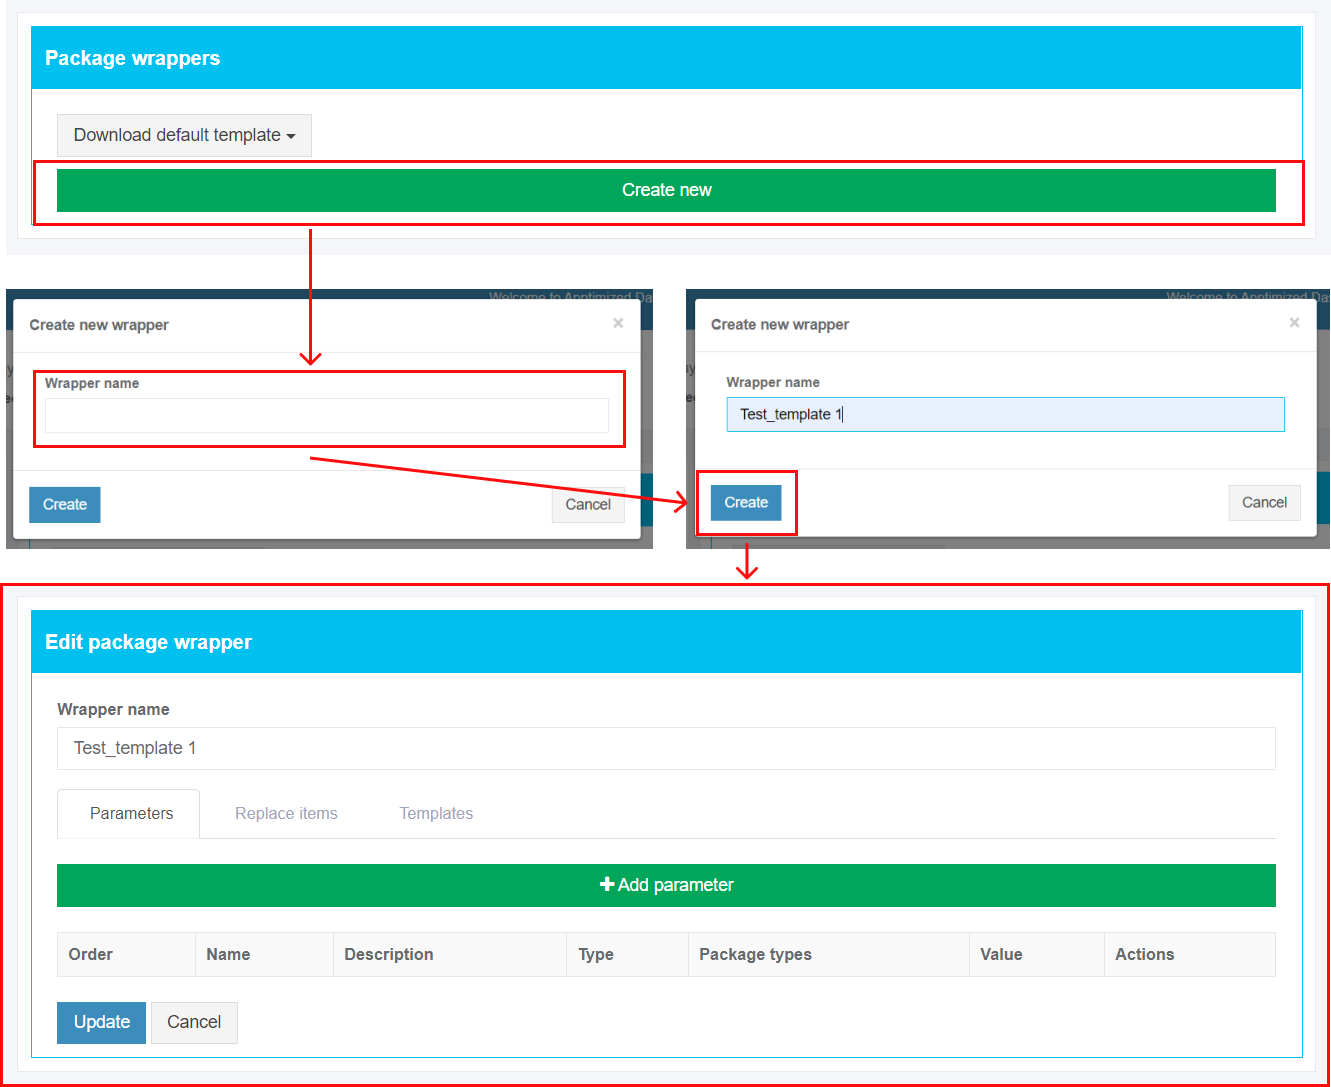
The option to create a new package wrapper template is available under the Create new button.
Note. When the new package template is created, it is recommended to implement the following sequence of actions:
1. Upload a ZIP archive with the wrapper template (see the Templates tab)
2. Create a list of parameters (see the Parameters tab)
3. Create a list of replaced items (see the Replace items tab)
Parameters tab
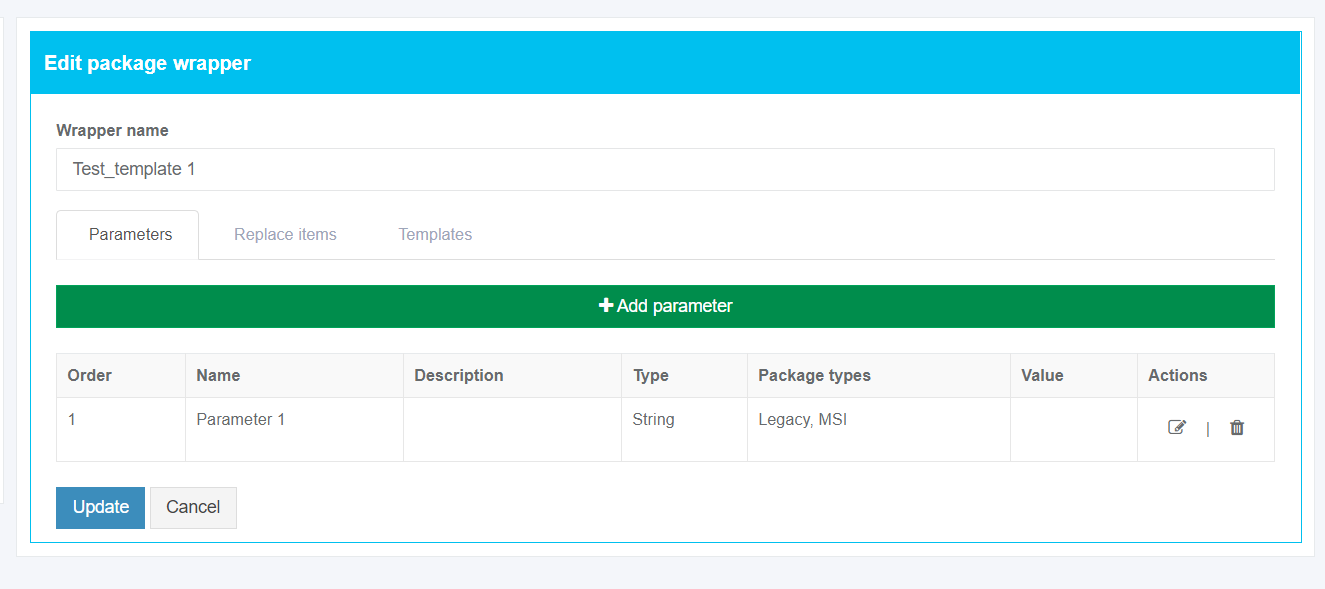
This tab enables a user to set the list of parameters to customize wrapper templates.
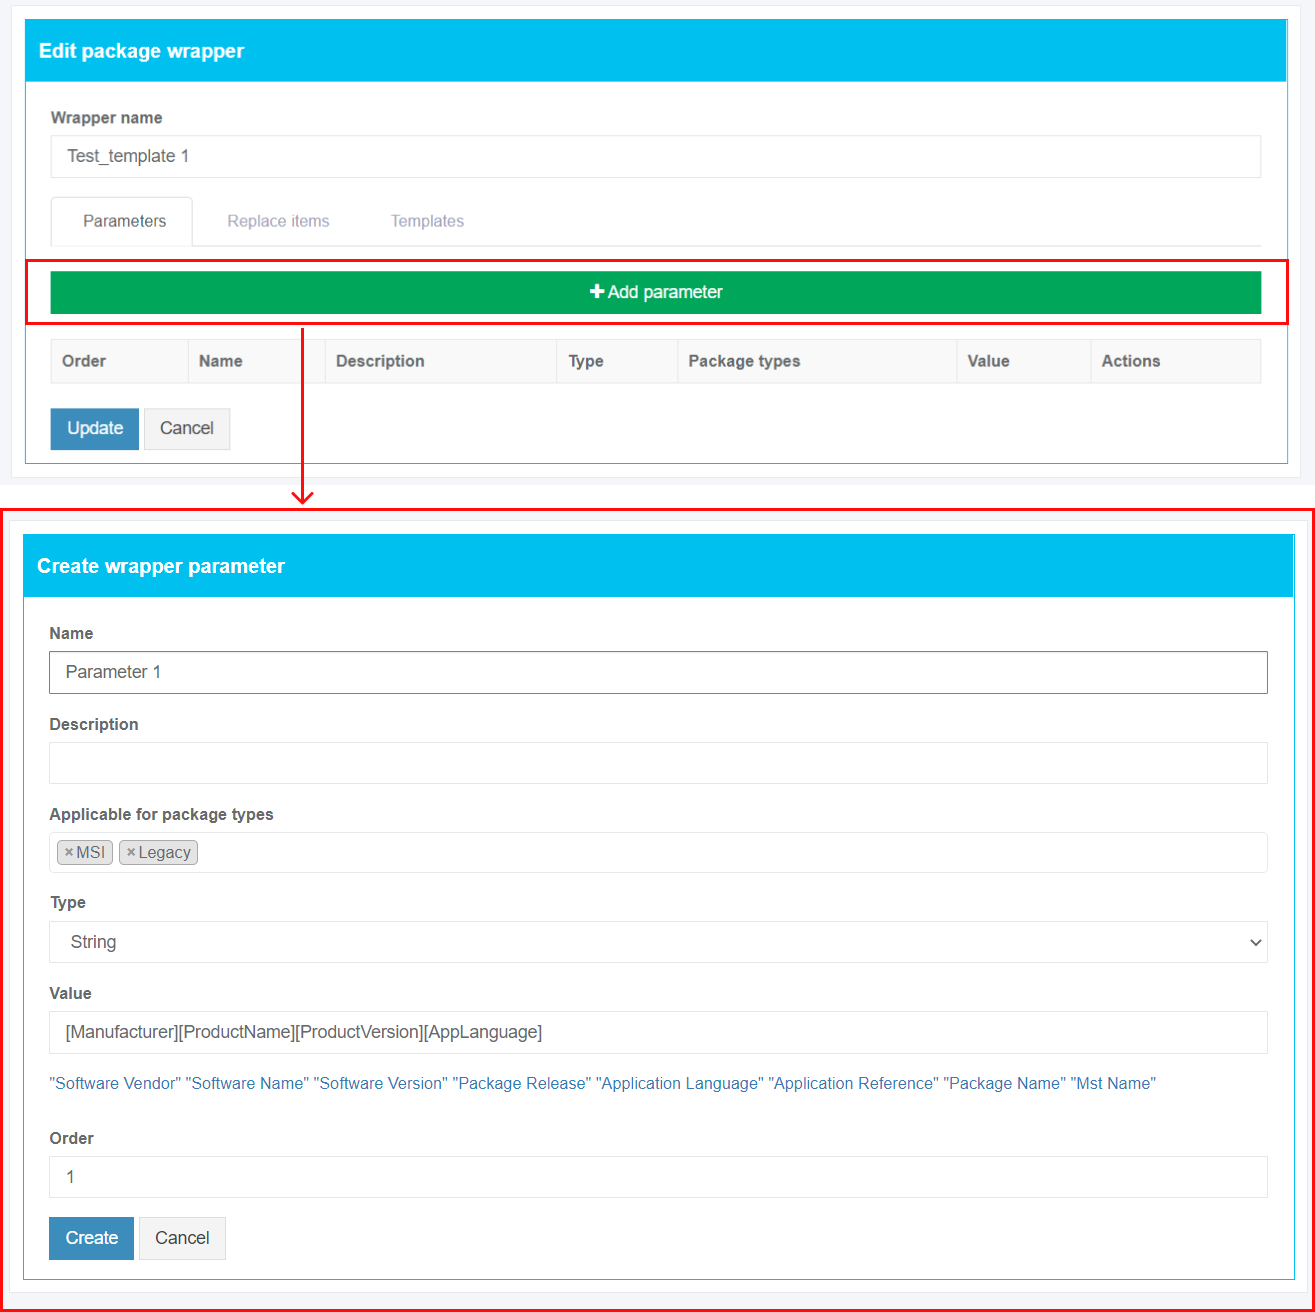
The option to create a new parameter is available under the Add parameter button.
|
Settings |
Details |
|
Name |
This field sets the name of the created parameter (e.g., Software name). Parameter naming is a user preference. This field is required. |
|
Description |
A user can provide here any meaningful description to simplify the parameter's identification. |
|
Applicable for the package type |
This setting indicates the list of package types for which this parameter will be applicable. The following options available:
The multiple-choice is available. |
|
Type |
This setting indicates the type of the created parameter. The following options available:
The default value is String. |
|
Value |
This field indicates the static or dynamic generated name which a user can apply within the settings for replaced items. The following actions available:
|
|
Values |
This field enables a user to create a predefined list of values (e.g., Windows 10 32 bit, Windows 10 64 bit, Language (Eng), Language (De), etc.). This field is disabled by default. The field becomes active when the Select list, Editable select list, or Multiple select list parameter’s type is selected. A user must provide at least one value. |
|
Order |
This field indicates the parameter’s position in the parameters list. This field is required. |
The parameter settings are applied when clicking the Create button. Apptimized shows the following notification when successful:
The option to revert to the package wrapper settings screen is available under the Cancel button.
Apptimized shows the following screen when successful:
A parameter can be removed from the list by clicking on the bin symbol (Actions column > 
A parameter can be edited by clicking on the pen symbol (Actions column > 
Replace items tab
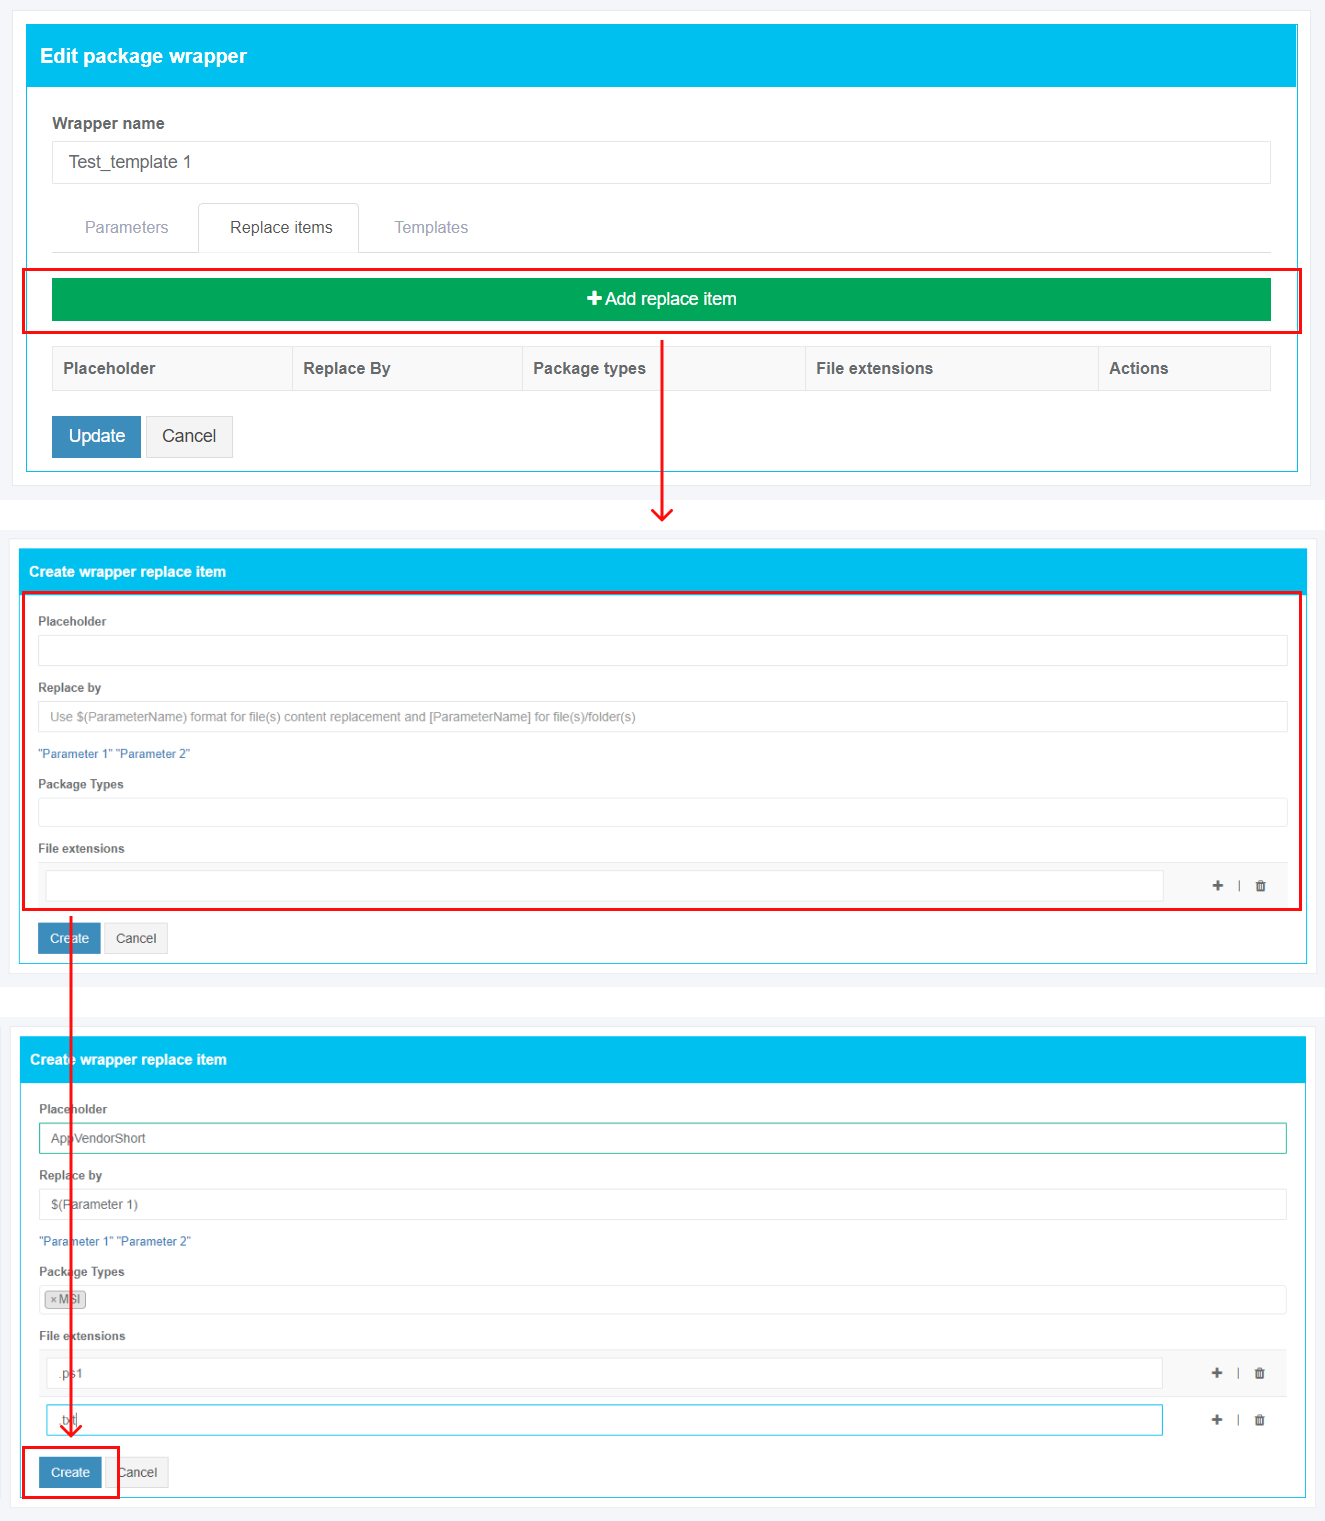
This tab enables a user to set the list of placeholders to replace in the provided file types or folder names a given parameter value.
The option to create a new replace element is available under the Add replace item button.
|
Settings |
Details |
|
Placeholder |
This setting indicates the variable to be replaced in template files or folders (e.g., AppVendorShort). This field is required. |
|
Replaced by |
This field indicates the static or dynamic generated name which a user can apply within the settings for replaced items. The following actions available:
|
|
Package types |
This setting indicates the list of package types for which this replacement item will be applicable. The following options available:
The multiple-choice is available. This field is required. |
|
File extensions |
This field indicates the extension of a file for which the replacement rules will be applied (e.g., .PS1 or .TXT). This field is required. The option to add a file extension is available under the plus symbol. The option to delete a file extension is available under the bin symbol. |
The replaced item’s settings are applied when clicking the Create button. Apptimized shows the following notification when successful:
The option to revert to the package wrapper settings screen is available under the Cancel button.
Apptimized shows the following screen when successful:
A replaced item can be removed from the list by clicking on the bin symbol (Actions column > 
A replaced item can be edited by clicking on the pen symbol (Actions column > 
Templates tab
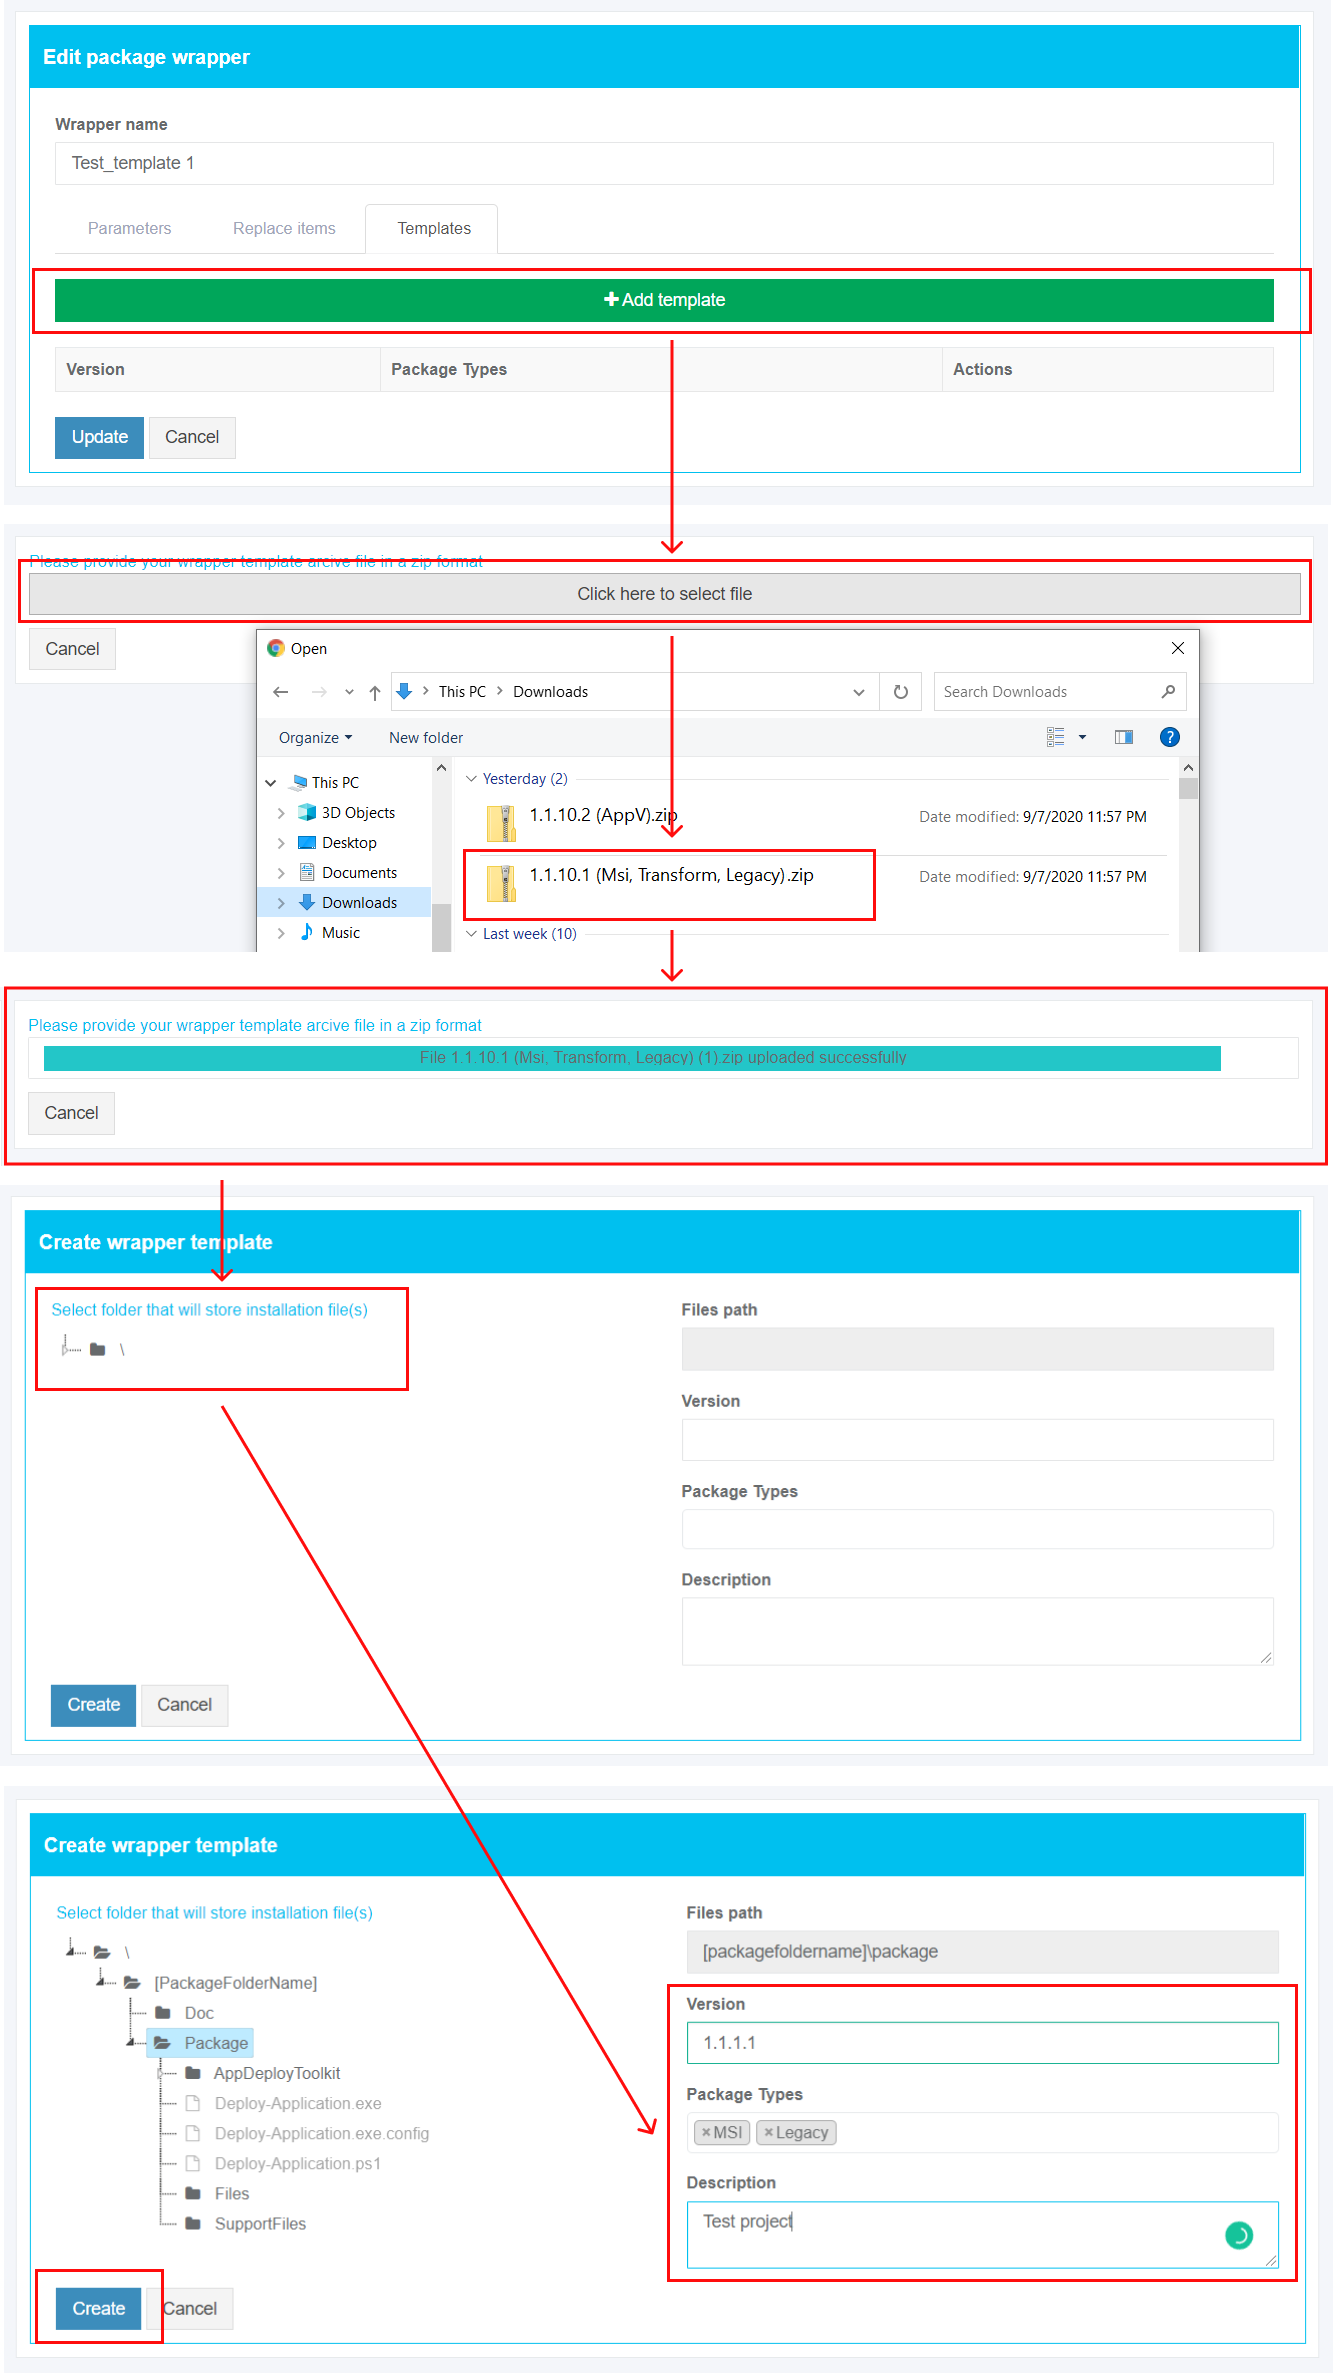
This tab enables a user to implement the default wrapping templates.
|
Settings |
Details |
|
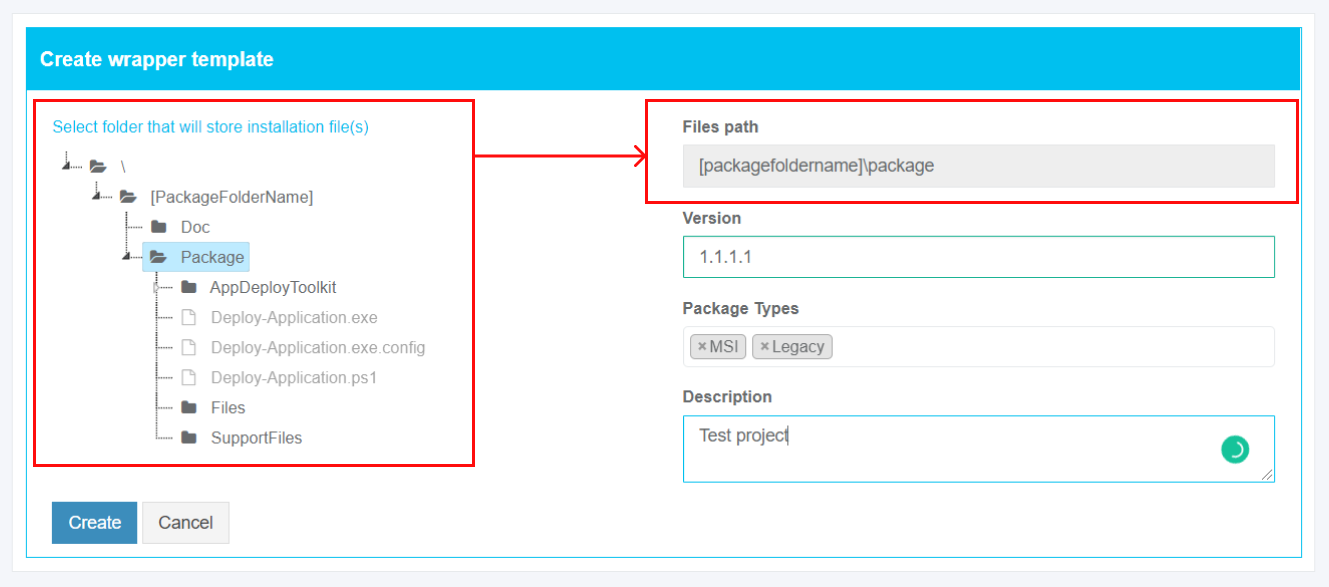
File path |
This field enables a user to define the destination of the installation file or several installation files (e.g., [packagefoldername]\package). To define the file (s) path, a user needs to select a folder that will store the installation file or several installation files from the hierarchical folder structure on the left-hand side of the settings window. This field is required. |
|
Version |
This field provides information about the wrapper’s version number (e.g., 1.1.1.1 or 1.1.05.1). The wrapper’s version number should be represented as a four-part string with the following format: <major version>.<minor version>.<build number>.<revision> This field is required. |
|
Package types |
This setting indicates the list of package types for which this template will be applicable. The following options available:
The multiple-choice is available. This field is required. |
|
Description |
A user can provide here any meaningful description to simplify the template's identification. |
The templates settings are applied when clicking the Create button.
The option to revert to the package wrapper settings screen is available under the Cancel button.
Apptimized shows the following notification when successful:
A template can be removed from the list by clicking on the bin symbol (Actions column > 
A template can be edited by clicking on the pen symbol (Actions column > 
Note. If required to modify the current wrapper template or implement any changes, a user doesn't need to create a new packaging wrapper entry. A user can upload a new wrapper revision (Template tab > Add template button).
A wrapper version number update is needed.
Apptimized Platform will automatically use the latest one when the wrapper template updated successfully.
Packaging – Factory Service
General
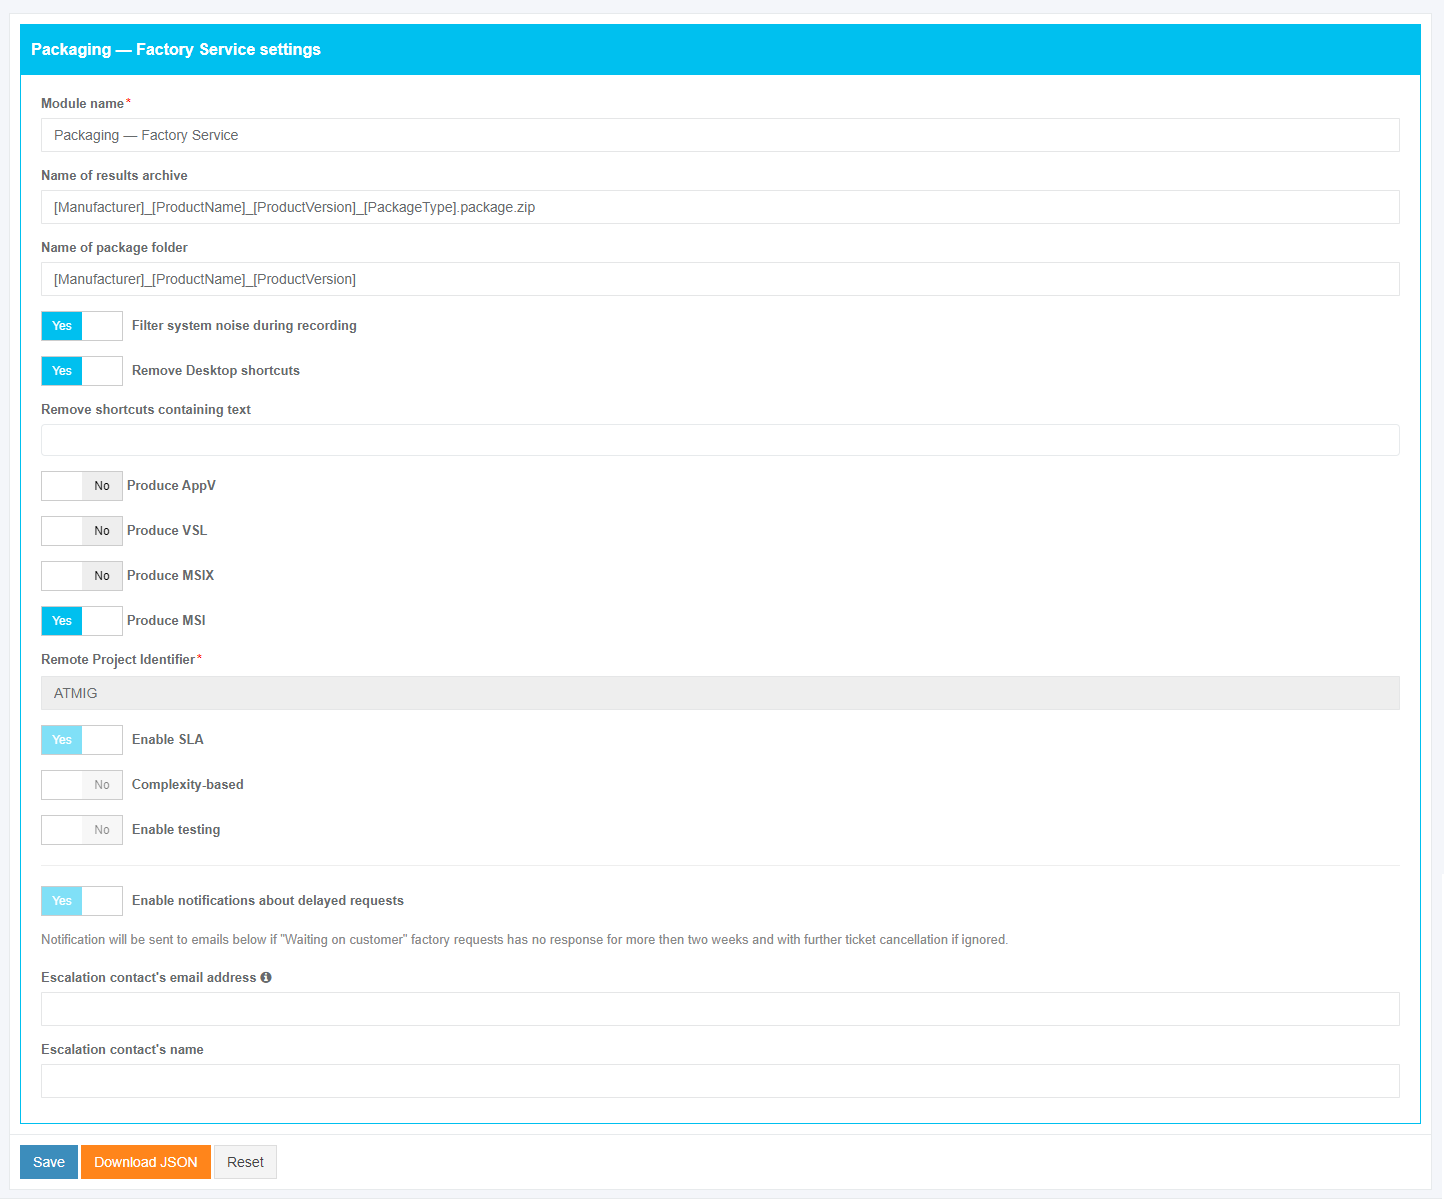
The screenshot below shows the default settings of the Packaging – Factory Service module. All required fields are marked with an asterisk *.
The option to change a module name is available under the Module name field. The default module name is Packaging – Factory Service.
The option to change a results archive name pattern is available under the Name of results archive field. The default archive name pattern is [Manufacturer]_[ProductName]_[ProductVersion]_[PackageType].package.zip.
The option to change a package folder name pattern is available under the Name of package folder field. The default package folder name pattern is [Manufacturer]_[ProductName]_[ProductVersion].
To insert the variable tag into the field, click the relevant variable tag from the dropdown list.
The following additional options can be enabled:
Table 10. Packaging – Factory Service additional options
|
Option |
Details |
Default value |
|
Filter system noise during recording |
This option allows for applying a filter (exclusion list) to automatically remove the captured system and user activity (noise). Yes and No options available. Yes – the value of this option removes redundant files and registry keys that were created by the system while recording sessions and did not relate to installing software (i.e., telemetry or diagnostics data). No – the system noise which is captured by the application packaging tool will not be removed. |
Yes |
|
Remove Desktop shortcuts |
This setting indicates the option to remove all desktop shortcuts (Yes) from the package or to leave desktop shortcuts in the package (No). |
Yes |
|
Produce AppV |
This setting indicates the option to generate a file in App-V format. Yes and No options available. |
No |
|
Produce VSL |
This setting indicates the option to generate a file in VSL format. Yes and No options available. |
No |
|
Produce MSIX |
This setting indicates the option to repackage software to MSIX format. Yes and No options available. |
No |
|
Produce MSI |
This setting indicates the option to repackage software to MSI format. Yes and No options available. When No option is chosen, a legacy setup for software will be implemented if possible. |
Yes |
To turn on the option required in the project, enable the relevant switch in front of the option name.
The option to exclude shortcuts from the packaging results archive is available under the Remove shortcuts containing text field. The following options available:
- Readme (removing shortcuts on txt file);
- Release notes (removing shortcuts on the page with Release notes);
- Uninstall (removing shortcuts on exe file).
To exclude shortcuts from the packaging results archive, click the relevant option.
The option to set the person’s data who will receive notifications on factory requests in the project is available under “Escalation contact's email address” and “Escalation contact's name” fields.
APPV
This option is disabled by default.
APPV option becomes active when switched on and once the required settings are completed.
The option to specify which version of App-V sequencer will be used is available under the Target App-V versions field. Every version of App-V sequencer has its own workflow and applies for different operating systems.
The following Target App-V versions available:
- 5.1;
- 5.0 SP3;
- 5.0 SP2 Hotfix 4+;
- 5.0 SP1/RTM;
- 5.0 SP2.
The default value is 5.1.
To start an application from App-V, a full load mode must be enabled. The option to enable a full load mode is available under the Require full load switch. Yes and No options available. The default value is Yes.
The option to enable interaction with ActiveX is available under the Allow named objects interaction switch. Yes and No options available. The default value is No.
The option to enable interaction with COM objects is available under the Allow COM interaction switch. Yes and No options available. The default value is No.
The option to write inside App-V is available under the Allow write to virtual FS switch. Yes and No options available. The default value is No.
VSL
VSL (Virtual Software Layer) is a combination of software components that implement the concept of FS layering.
Every software exists in its own container and can access files for write access only within this container unless the opposite is defined in a manifest file.
Real applications could have access to this container for reading and write access to the container content if the opposite is not prohibited in manifest and virtual files can be visible in Windows Explorer like ordinary files.
VSL consists of different layers applied on top of another in order to form the package based on the containment of the container.
By default, all VSL files are stored under the root directory C:\Program Files\VSL. This can be changed on a machine level, but the directory should be the same for all packages.
VSL format key features:
1. ZIP archive with extensions .VSL or .VSLX;
2. Every VSL file contains layers:
- OS layer;
- Service layer;
- Files layer;
- Registry layer;
- Manifest layer, etc.
3. Can be contained inside MSI files for compatibility with deployment systems;
4. Is self-contained. No additional software installation is required;
5. Back compatible and non-breaking updates.
This option is disabled by default.
VSL option becomes active when switched on and once the required settings are completed.
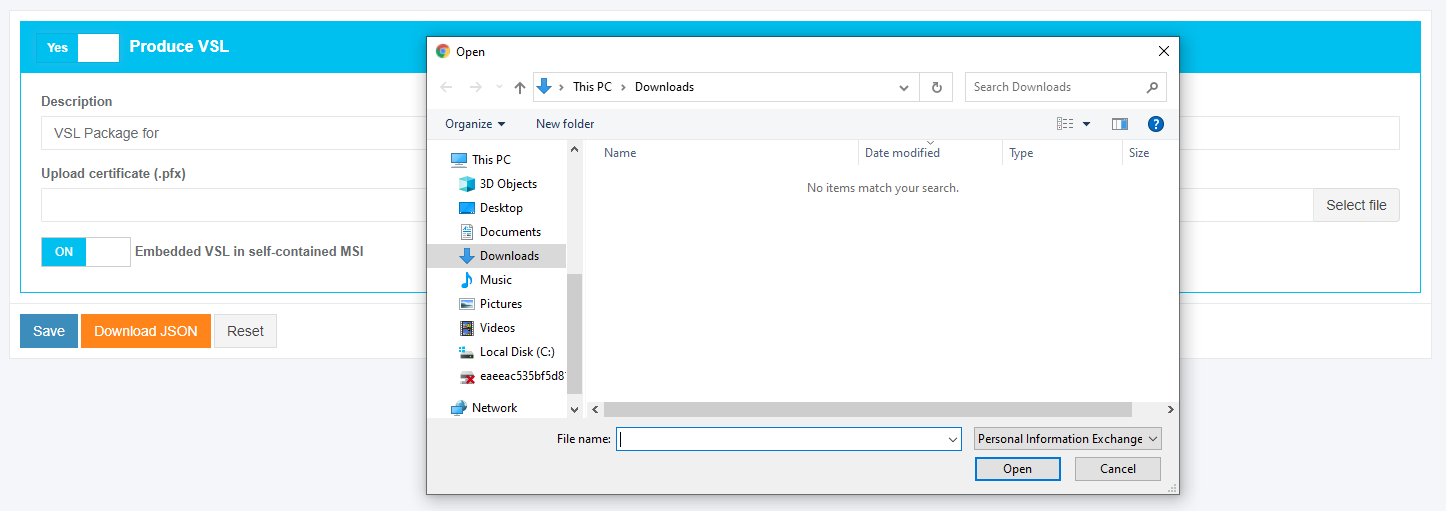
To insert the variable tag into the Description field, click the relevant variable tag from the dropdown list.
To upload a certificate in .PFX the Upload certificate (.pfx) field can be used. Click the Open button when the relevant file is chosen.
The option to enable an embedded VSL is available under the Embedded VSL in self-contained MSI switch. On and Off options available. The default value is On.
MSIX
MSIX is the Windows app package format that provides a packaging experience to all Windows apps. The MSIX package format preserves the functionality of existing app packages and/or install files in addition to enabling new packaging and deployment features to Win32, WPF, and WinForm apps.
This option is disabled by default.
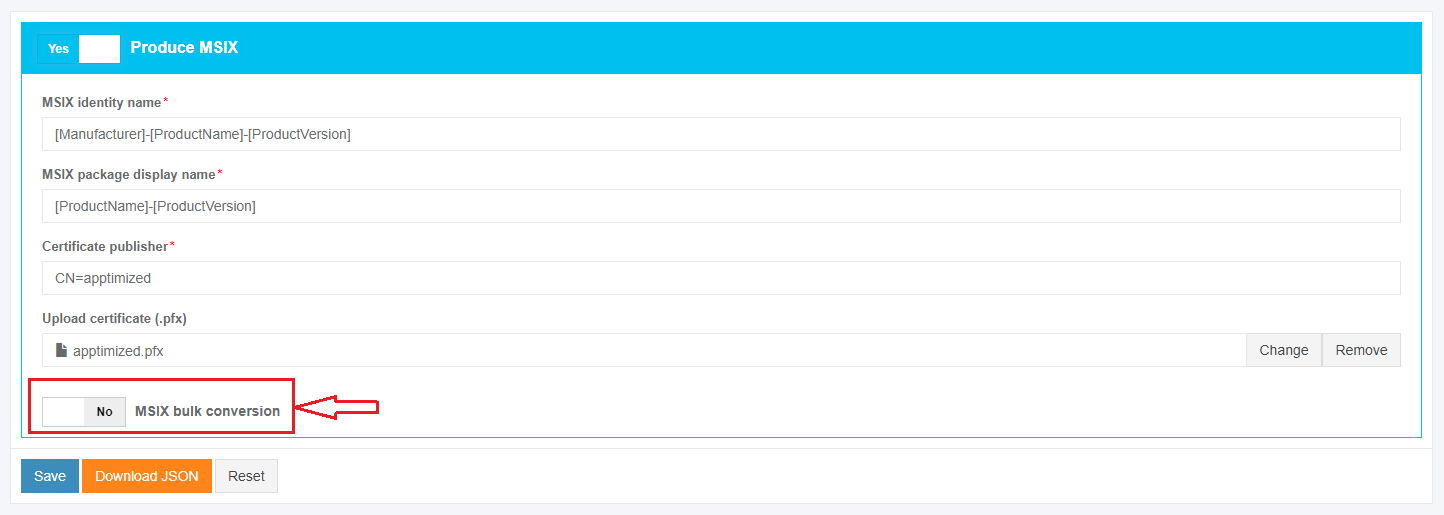
MSIX option becomes active when switched on and once the required settings are completed. All required fields are marked with an asterisk *.
To insert the variable tag into the MSIX identity name and MSIX package display name fields, click the relevant variable tag from the dropdown list.
The default MSIX identity name pattern is [Manufacturer]-[ProductName]-[ProductVersion].
The default MSIX package display name pattern is [ProductName]-[ProductVersion].
The option to set the certificate publisher's name is available under the Certificate publisher field. The certificate publisher's name should match the certificate subject name. If no the package will not be signed.
The certificate is used to sign the application and is uploaded for a user by default. An option to upload a .PFX certificate is available. To upload a certificate in .PFX the Upload certificate (.pfx) field can be used. Click the Open button when the relevant file is chosen.
A self-signed certificate is useful for testing the application before a user is ready to publish it to the store.
A user can upload a certificate with the ability to automatically and silently install a certificate for the MSIX package during the VM preparation (for all Self-Service steps: Packaging, Discovery, Testing). So that after the VM is ready, the user can run the MSIX package without additional actions related to installing the certificate.
The option to set up Time Stamp Server is available under Time Stamp Server field. The default value is http://timestamp.seectigo.sectigo.com
Time Stamp Server enables a user to sign the MSIX application package with a time-stamping protocol.
MSIX bulk conversion gives a user an ability to create MSIX application packages from an already existing one in silent mode. The option to enable a bulk conversion is available under the MSIX bulk conversation switch. Yes and No options available. The default value is No.
MSI
This option is enabled by default.
The screenshot below shows the default settings for MSI.
To insert the variable tag into the Name of MSI package and Name of MST transform fields, click the relevant variable tag from the dropdown list.
The default value for MSI package is [Manufacturer]_[ProductName]_[ProductVersion].msi.
The default value for MST transform is [Manufacturer]_[ProductName]_[ProductVersion].mst. This option applies if vendor MSI files were found.
The option to keep the original (vendor) name of the MSI file during the creation of a transform or to rename it according to the naming conventions for the MSI file is available under the Do not rename vendor MSI name switch. This option affects the vendor MSI files that were found during the installation of the application.
Yes (the vendor MSI name will not be changed) and No (the vendor MSI name will be changed according to the Packaging Guideline) options available. The default value is Yes.
Installation
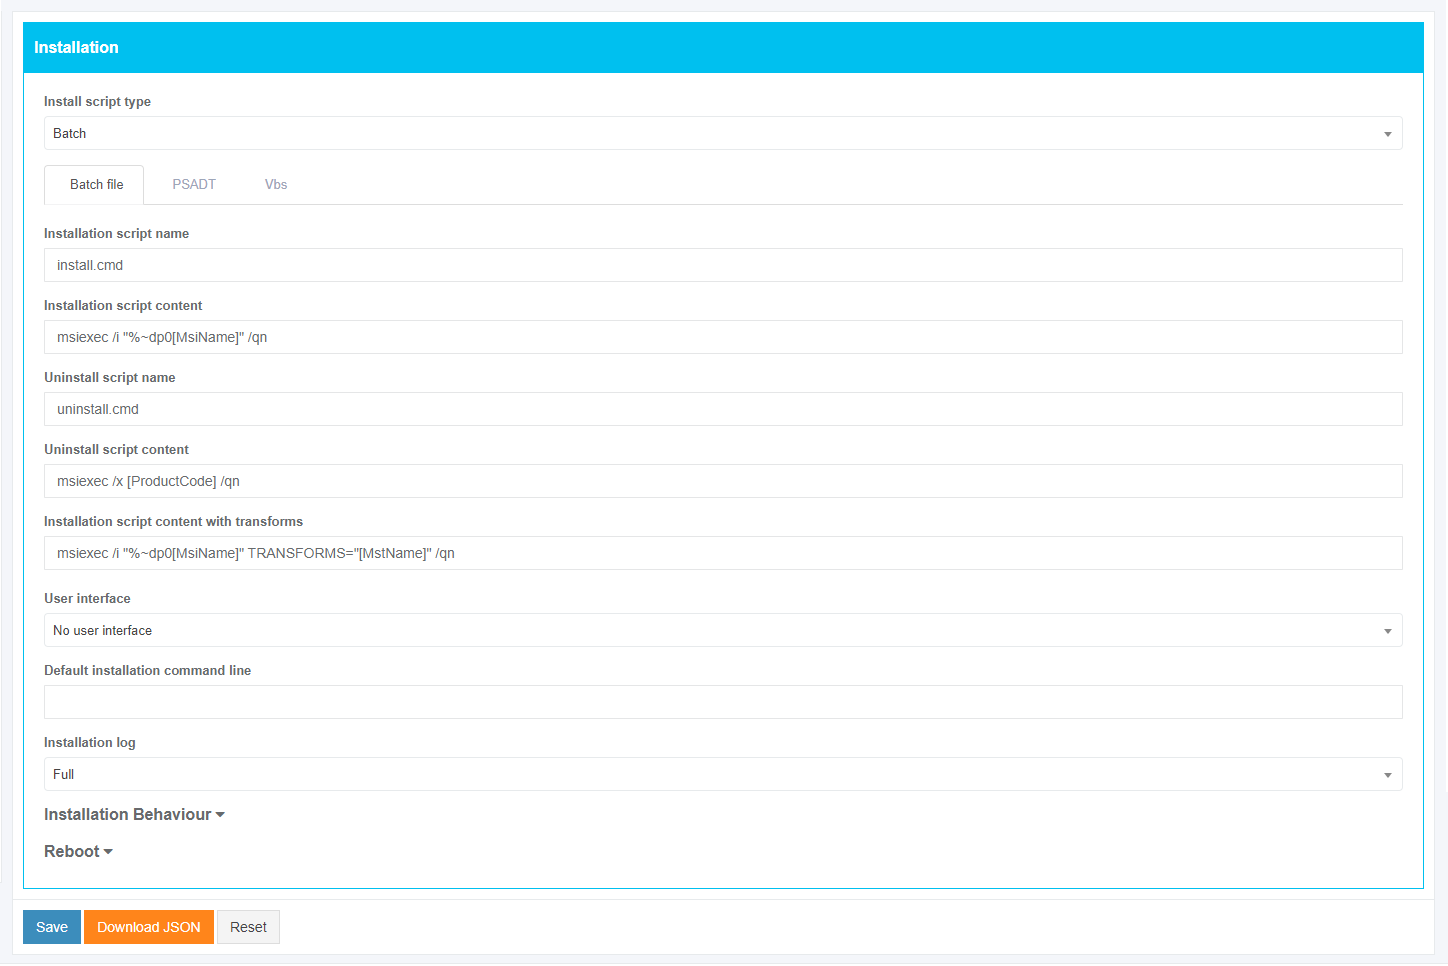
The screenshot below shows the default settings for the Batch file tab.
The option to choose the installation script type is available under the Install script type field. The following options available: Batch, PowerShell and Vbs. The default value is Batch.
Table 11. MSI installation settings (the Batch file tab)
|
Setting |
Details |
Default value |
|
Installation script name |
This setting indicates the file name of the generated installation command line (msiexec command line). This setting indicates a filename template for naming the .CMD file to install the package. |
install.cmd |
|
Installation script content |
This setting indicates the command line for installing the package. |
msiexec /i "%~dp0[MsiName]" /qn |
|
Uninstall script name |
This setting indicates the command line file name for the package uninstallation. |
uninstall.cmd |
|
Installation script content with transforms |
This setting indicates the command line for installing the package using the created Transform file. |
msiexec /x [ProductCode] /qn |
|
User interface |
This setting indicates which parameter will be added to the msiexec command line. The following options available:
|
No user interface |
|
Default installation command line |
This setting indicates the command line for the installation of the MSI with transform. |
- |
|
Installation log |
This setting indicates the installation log mode. The following options available:
|
Full |
Table 12. MSI installation settings (the PSADT tab)
|
Setting |
Details |
Default value |
|
Install command |
This setting indicates the command line for installing the package. |
Execute-MSI -Action 'Install' -Path "[MsiName]" -private:$PackageName |
|
Install with transform command |
This setting indicates the command line for installing the package using the created Transform file. |
Execute-MSI -Action 'Install' -Path "[MsiName]" -Transform "[MstName]" -private:$PackageName |
|
Uninstall command |
This setting indicates the command line for uninstalling the package. |
Execute-MSI -Action 'Uninstall' -Path '[ProductCode]' -private:$PackageName |
|
Reboot required |
This setting indicates the reboot mode. Yes and No options available. |
No |
|
User interface |
This setting indicates which parameter will be added to the msiexec command line. The following options available:
|
No user interface |
|
Default installation command line |
This setting indicates the command line for the installation of the MSI with transform. |
- |
|
Installation log |
This setting indicates the installation log mode. The following options available:
|
Full |
The option to set the package metadata is available under the module table. The following screenshot indicates the default settings for the module table. To set or change the value choose the relevant field in the module and type the value in square brackets.
Table 13. MSI installation settings (the Vbs tab)
|
Setting |
Details |
Default value |
|
Installation script name |
This setting indicates the file name of the generated installation command line (msiexec command line). This setting indicates a filename template for naming the .VBS file to install the package. |
install.vbs |
|
Installation script content |
This setting indicates the command line for installing package. |
set res = run("%windir%\system32\msiexec.exe /i " & chr(34) & "%~dp0[MsiName]" & chr(34) & " /qn", "0,3010", 0, true) wscript.quit(res.ReturnCode) |
|
Installation script content with transforms |
This setting indicates the command line for installing the package using the created Transform file. |
set res = run("%windir%\system32\msiexec.exe /i " & chr(34) & "%~dp0[MsiName]" & chr(34) & " TRANSFORMS=" & chr(34) & "%~dp0[MstName]" & chr(34) & " /qn", "0,3010", 0, true) wscript.quit(res.ReturnCode) |
|
Uninstall script name |
This setting indicates the file name of the generated uninstallation command line (msiexec command line). This setting indicates a filename template for naming the .VBS file to uninstall the package. |
uninstall.vbs |
|
Uninstall script content |
This setting indicates the command line for uninstalling package. |
set res = run("%windir%\system32\msiexec.exe /x [ProductCode] /qn", "0,3010", 0, true) wscript.quit(res.ReturnCode) |
|
User interface |
This setting indicates which parameter will be added to the msiexec command line. The following options available:
|
No user interface |
|
Default installation command line |
This setting indicates the command line for the installation of the MSI with transform. |
- |
|
Installation log |
This setting indicates the installation log mode. The following options available:
|
Full |
The tables 14 - 15 show the settings that are common for all install script types.
Table 14. Installation behavior settings
|
Setting |
Details |
Default value |
|
Installation context |
This setting indicates the installation context mode. The following options available:
|
Per-machine |
|
Destination drive |
This setting indicates the drive where a package will be installed, set value for ROOTDRIVE property of MSI. The ROOTDRIVE property specifies the default drive for the destination directory of the installation. Learn more. The following options available:
|
C:\ |
Table 15. Reboot settings
|
Setting |
Details |
Default value |
|
Reboot after install |
This setting is based on the REBOOT property value. The REBOOT property suppresses certain prompts for a restart of the system. The following options available:
|
Never |
|
Shut down any files in use |
This setting is based on the MSIRMSHUTDOWN property value. When the default value (Yes) is set, all system services and files that were shut down to install the update will be restarted. The following options available:
|
YesThis setting is |
|
If files are in use |
This setting is based on MSIRESTARTMANAGERCONTROL property value. This setting enables setup authors to specify whether the package will use the Restart Manager or FileInUse Dialog to handle locked files. The following options available:
|
Use restart manager |
|
Display of reboot prompts |
This setting is based on REBOOTPROMPT property value. This property does not initiate a reboot if one is not needed, it only suppresses any prompts for reboots to the user. The following options available:
|
Suppress |
ARP & Properties
The screenshot below shows the default values of ARP & Properties settings.
To exclude the Show ARP, Manual repair from ARP, or Manual uninstall from ARP options, uncheck the box next to the option name not required in packaging settings.
To include the Manual feature modification from ARP option to packaging settings, check the box next to the option name.
Table 16. Add-Remove Program settings
|
Setting |
Details |
Default value |
|
Show ARP |
This option specifies the listing mode of the program in the ARP (Add-Remove Program) and is based on ARPSYSTEMCOMPONENT property value. When the option is enabled, the program will be listed in the Add-Remove Program. When the option is disabled, the program will be hidden in the Add-Remove Program list. |
Enabled |
|
Manual repair from ARP |
This option enables or disables the usage of the Repair button in the ARP for the package and is based on ARPNOREPAIR property value. When the option is enabled, the Repair button is added to the ARP for the package. When the option is disabled, the Repair button is removed from the ARP for the package. |
Enabled |
|
Manual uninstall from ARP |
This option enables or disables the usage of the Uninstall button in the ARP for the package and is based on ARPNOREMOVE property value. When the option is enabled the Uninstall button, is added to the ARP for the package. When the option is disabled the Uninstall button, is removed from the ARP for the package. |
Enabled |
|
Manual feature modification from ARP |
This option enables or disables the usage of the Modify button in the ARP for the package and is based on ARPNOMODIFY property value. When the option is enabled, the Modify button is added to the ARP for the package. When the option is disabled, the Modify button is removed from the ARP for the package. |
Disabled |
Additional properties
The option to set the nonstandard properties that should be included to package is available under the Additional properties dropdown menu. This option covers the properties that will be added to the generated MSI or Transform. For example:
- COMPANY, USERNAME – properties, which contain company name and user’s name. They are used by some software to initialize the user’s information;
- ACCEPT_EULA – properties, which mean that you agree with all license agreements.
The option to create the additional setting is available under the plus symbol in the Actions column: Add the setting name in the Setting field > Add the setting value in the Value field.
The option to delete the additional setting is available under the bin symbol in the Actions column.
The option to enable the self-healing process on application shortcuts run is available under the Advertised shortcuts switch. Yes and No options available. The default value is Yes.
Files & Registry
The screenshot below shows the default values of Files&Registry settings.
Table 17. Files & Registry settings
|
Setting |
Details |
Default value |
|
Cab archive name pattern |
This setting indicates the filename template for naming .CAB files. Cab files contain files that will be installed by MSI package. |
Data{0}.cab |
|
Max cab file size (in MB) |
These settings indicate the number of files that will be placed in a single cab file. If the size of one cab file is bigger than the provided value, it will be divided to several cab files. |
2048 |
|
Max files count per cab |
9999 |
|
|
Use embedded cab |
This setting sets the mode to use an embedded file. When the Use embedded cab switch is enabled, a .CAB file will be implemented into .MSI. When the Use embedded cab switch is disabled, a .CAB file will be outside the .MSI (external CAB). It is a compressed source (opposed to "Loose files" = uncompressed source). |
Yes |
|
Parse ini files to the IniFile table |
This option indicates the mode to parse ini files. When the Parse ini files to the IniFile table switch is enabled, the ini files will be added via an IniFile table. It is the best practice to add ini files via IniFile table because these files may contain hard-coded values which in this case can be replaced with MSI properties. When the Parse ini files to the IniFile table switch is disabled, the ini files will be added via an File table. |
No |
|
Map registry data to the appropriate COM tables |
This setting allows to identify objects and to add them to the appropriate tables. When the Map registry data to the appropriate COM tables switch is enabled, all COM objects will be mapped to MSI via special tables designed for these objects (ProgID, Classes, etc.). It is a better way of COM objects registration according to Microsoft's best practices and helps easily navigate and manage these objects through MSI. When the Map registry data to the appropriate COM tables switch is disabled, all COM objects will be added to MSI via Registry table and installed as regular registry keys. |
No |
|
Post process MSI filesystem & components |
This setting sets the File Table entries for the Language and Version fields. Learn more. |
Yes |
|
Mark components destined for the System folder as permanent |
A system folder is used by other programs. If the package contains some System folder files, they can be removed from the system during uninstallation. So, it will affect other programs that use these files. When the Mark components destined for the System folder as permanent switch is enabled, the files will be marked as permanent and won’t be removed after the package uninstalling. When the Mark components destined for the System folder as permanent switch is disabled, the files will be deleted after the package uninstalling. |
Yes |
|
Use Duplicate File table for user files installation |
Some files (.DLL, .OCX, etc.) that are installed in the Common Files folder is used by other programs. If the package contains some of these files they can be removed from the system during uninstallation. So, this affects other programs that use these files. When the Use Duplicate File table for user files installation switch is enabled, the files mark as shared. Every time when such files are installed in this folder, a counter is incremented. This counter shows how many programs use this file. When the package tries to remove this file, the counter is decremented. When this counter equals 0 this file removes from the system. |
Yes |
The option to create the кщще keys is available under the block below: Choose the root type > Fill in the Key field > Fill in the Name field > Fill in the Value field.
The default value for the Key field is Software\[Manufacturer]\[ProductName]\[ProductVersion].
The default value for the Name field is DummyKey.
The default value for the Value field is [PackageCode].
Per User Data
This section allows creating separate registry keys for Active Setup.
The screenshot below shows the default values of Per User Data settings.
The option to create the separate registry keys for Active Setup is available under the Active setup switch. Yes and No options available. The default value is Yes.
When the Active Setup switch is enabled, the self-healing process on the user’s logon will be implemented. This option is useful when the program has extensions or when the self-healing process on the advertised shortcut does not work.
When the Active Setup switch is disabled, the self-healing process on the user’s logon will not be implemented.
The options to specify the component name for active setup keys and registry keys are available in this section.
The default value for the ActiveSetup component name field is ApptimizedActiveSetup.
To insert the variable tag into the ActiveSetup component name field, click the relevant variable tag from the dropdown list.
The option to create the registry keys is available under the plus symbol in the Actions column: Choose the root type > Fill in the Key field > Fill in the Name field > Fill in the Value field.
The option to delete the registry key is available under the bin symbol in the Actions column.
Branding
This option enables a user to check all Apptimized packages installed on the user’s computer. If a user has installed applications to monitor, these branding keys assist a user.
These keys contain all information about packages (i.e., installed date, time, manufacturer, etc.).
This option is disabled by default.
When the Branding switch is enabled, the branding keys will be included to package. This option a user can use when the program has extensions or when the self-healing process on the advertised shortcut does not work.
When the Branding switch is disabled, the output package will not contain any branding keys even if they are specified in the settings above.
The screenshot below shows the default values of Branding settings.
The options to specify the component name for active setup keys and branding keys are available in this section.
The default value for the Branding component name field is ApptimizedBranding.
To insert the variable tag into the Branding component name field, click the relevant variable tag from the dropdown list.
The option to create the branding keys is available under the plus symbol in the Actions column: Choose the root type > Fill in the Key field > Fill in the Name field > Fill in the Value field.
The option to delete the branding key is available under the bin symbol in the Actions column.
Transformation
This option is disabled by default.
When the Skip installation during transformation switch is enabled, all changes which were implemented during installation will capture but the application will not be installed physically. Transformed will be provided based on the implemented changes.
When the Skip installation during transformation switch is disabled, all changes which were implemented during installation will capture the application will be installed physically on the system.
The option to download JavaScript Object Notation file is available under the Download JSON button.
Settings are persisted on click to the Save button.
Apptimized shows the following notification when successful:
Testing – Self Service
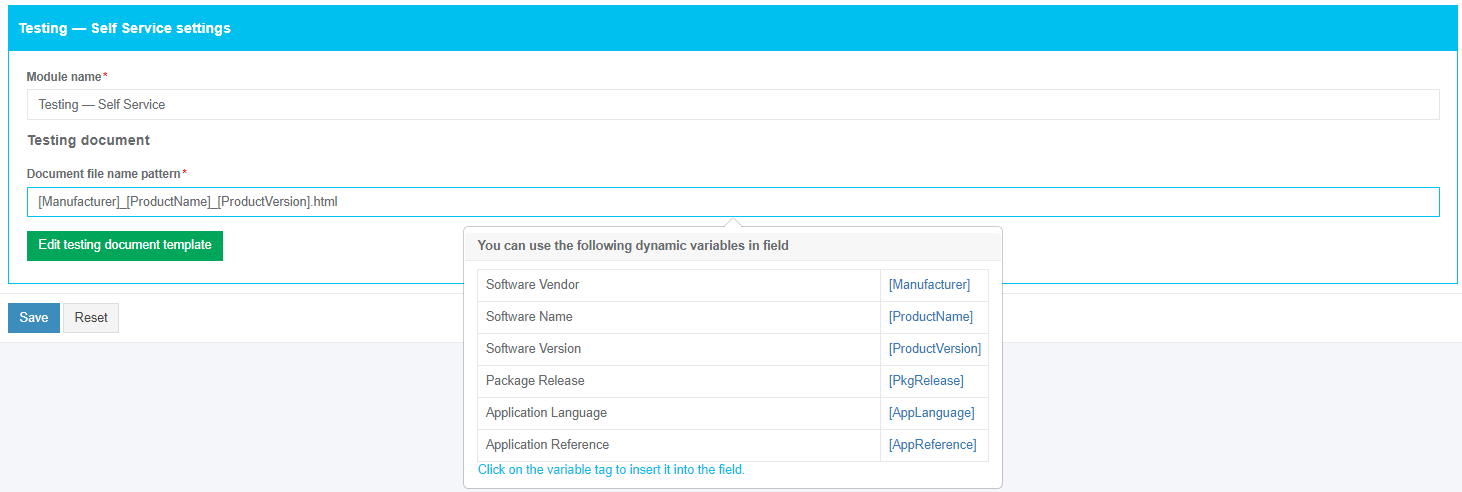
The screenshot below shows the default settings of the Testing – Self Service module. All required fields are marked with an asterisk *.
The option to change a module name is available under the Module name field. The default module name is Testing – Self Service.
The option to change a file name pattern is available under the Document file name pattern field. The default file name pattern is [Manufacturer]_[ProductName]_[ProductVersion].html.
To insert the variable tag into the field, click the relevant variable tag from the dropdown list.
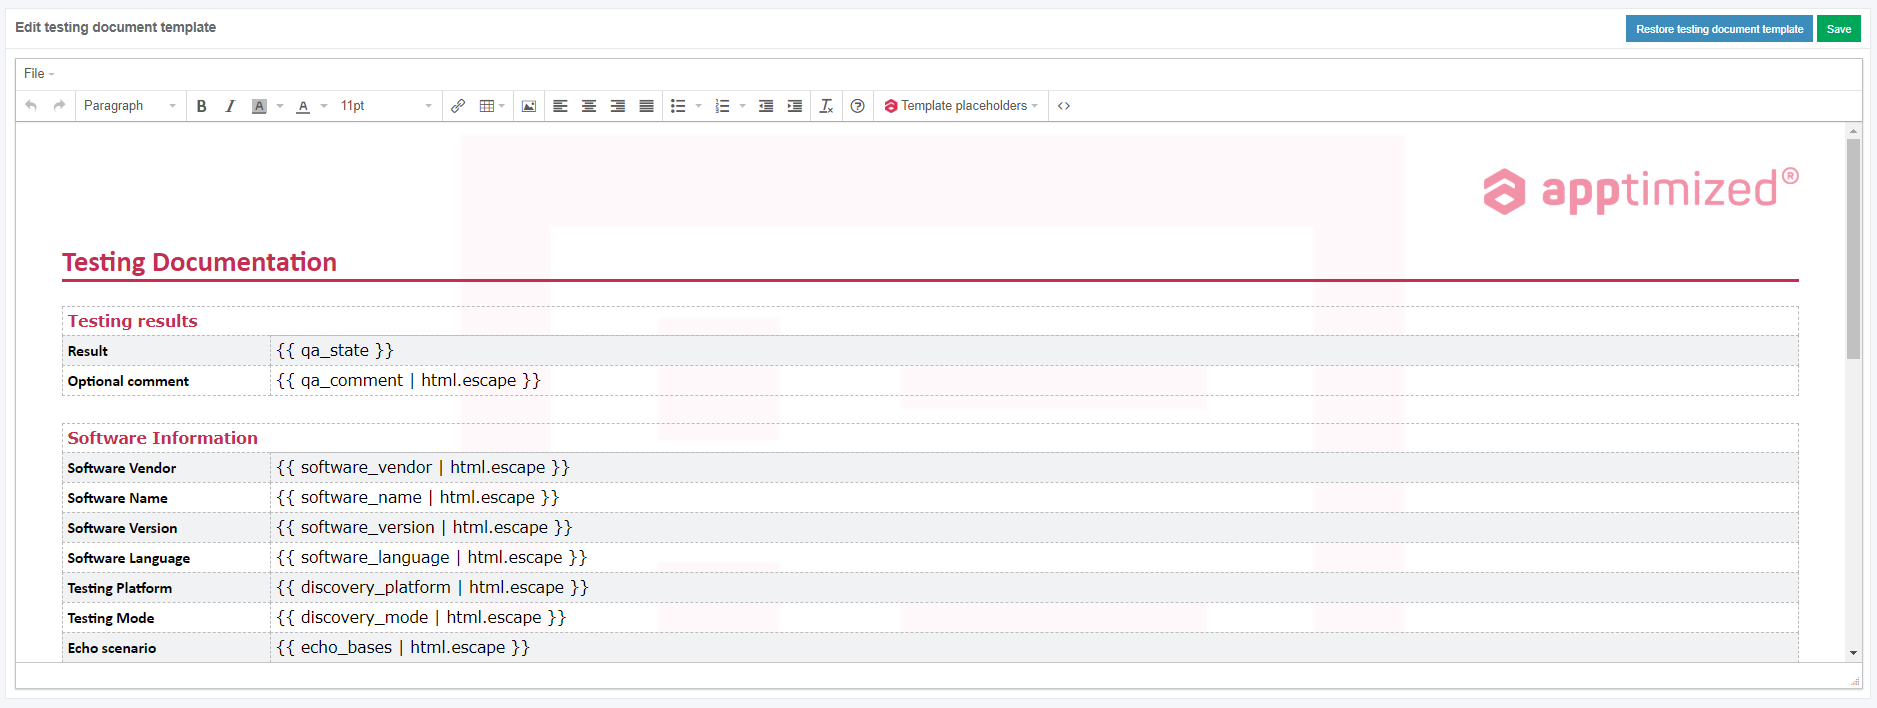
The option to edit a testing case template is available under the Edit testing document template button.
Apptimized shows the following screen when successful:
To return the document to the default state, click the Restore testing document template button.
To apply edits in a discovery case template, click the Save button.
Settings are persisted on click to the Save button. To revert the settings, click on the Reset button.
Apptimized shows the following notification when successful:
Testing – Factory Service
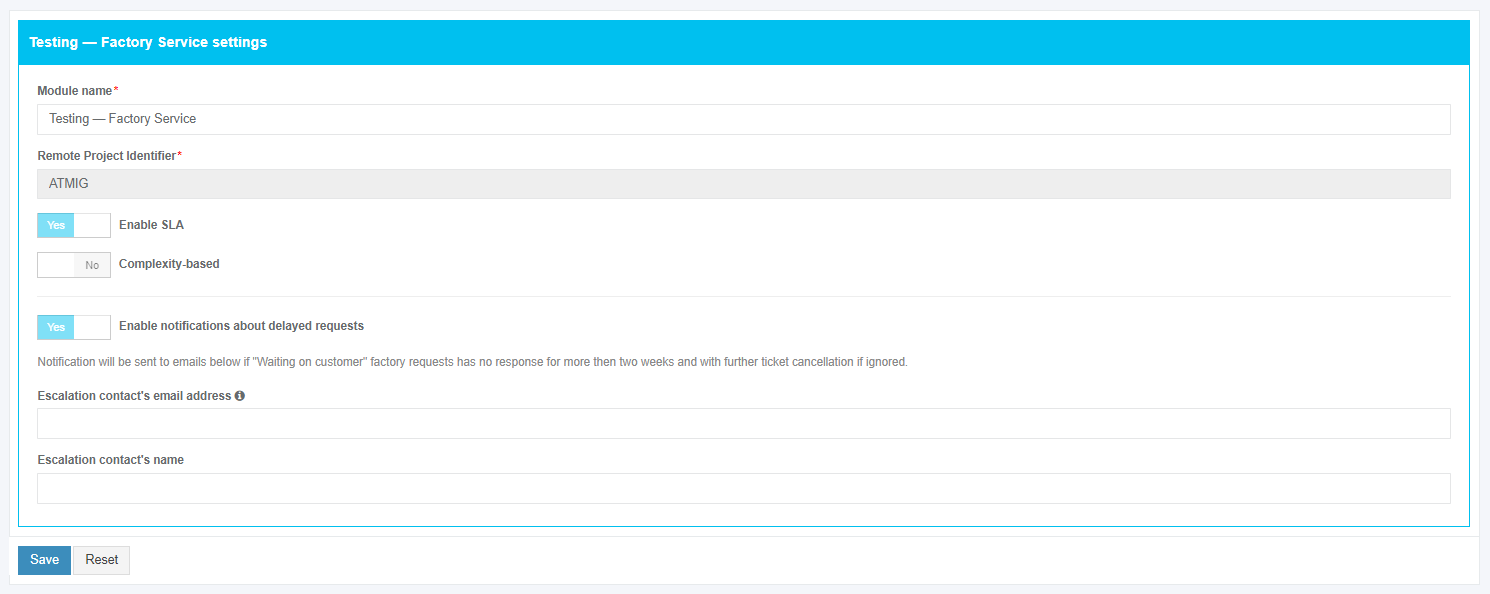
The screenshot below shows the default settings of the Testing – Factory Service module. All required fields are marked with an asterisk *.
The option to change a module name is available under the Module name field. The default module name is Testing – Factory Service.
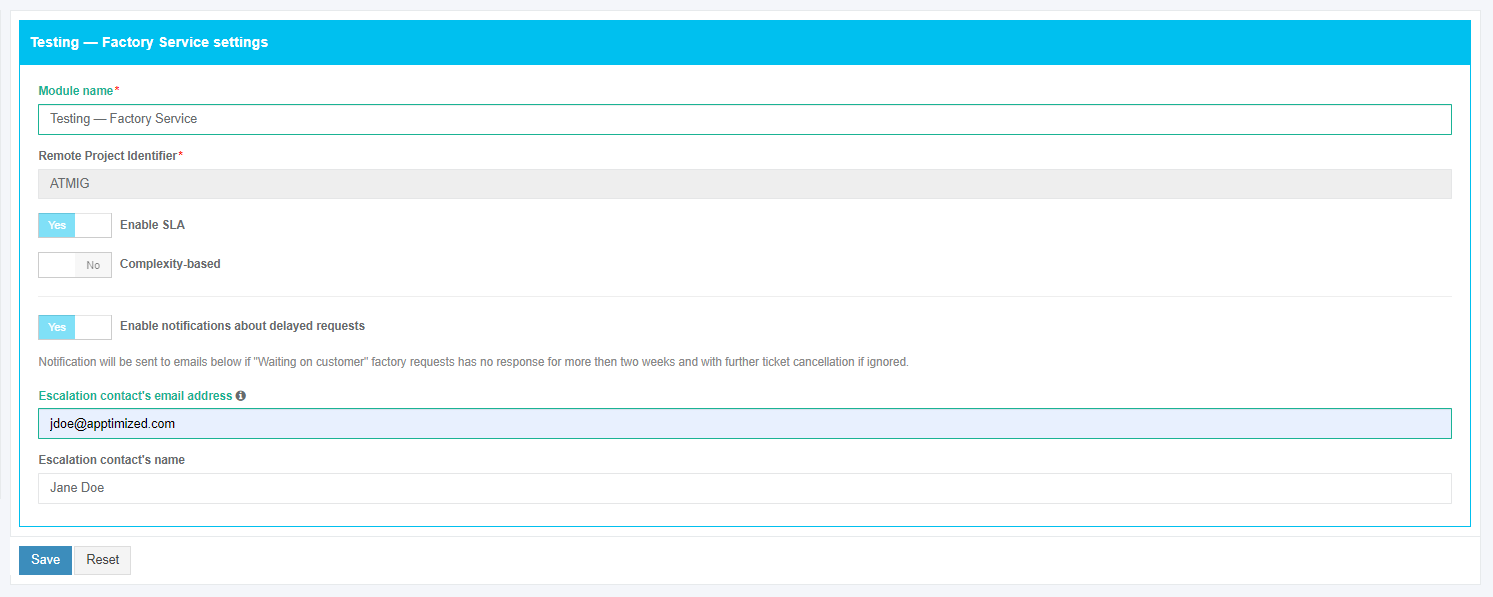
The option to set the person’s data who will receive notifications on factory requests in the project is available under “Escalation contact's email address” and “Escalation contact's name” fields.
Settings are persisted on click to the Save button.
Apptimized shows the following notification when successful:
Echo settings
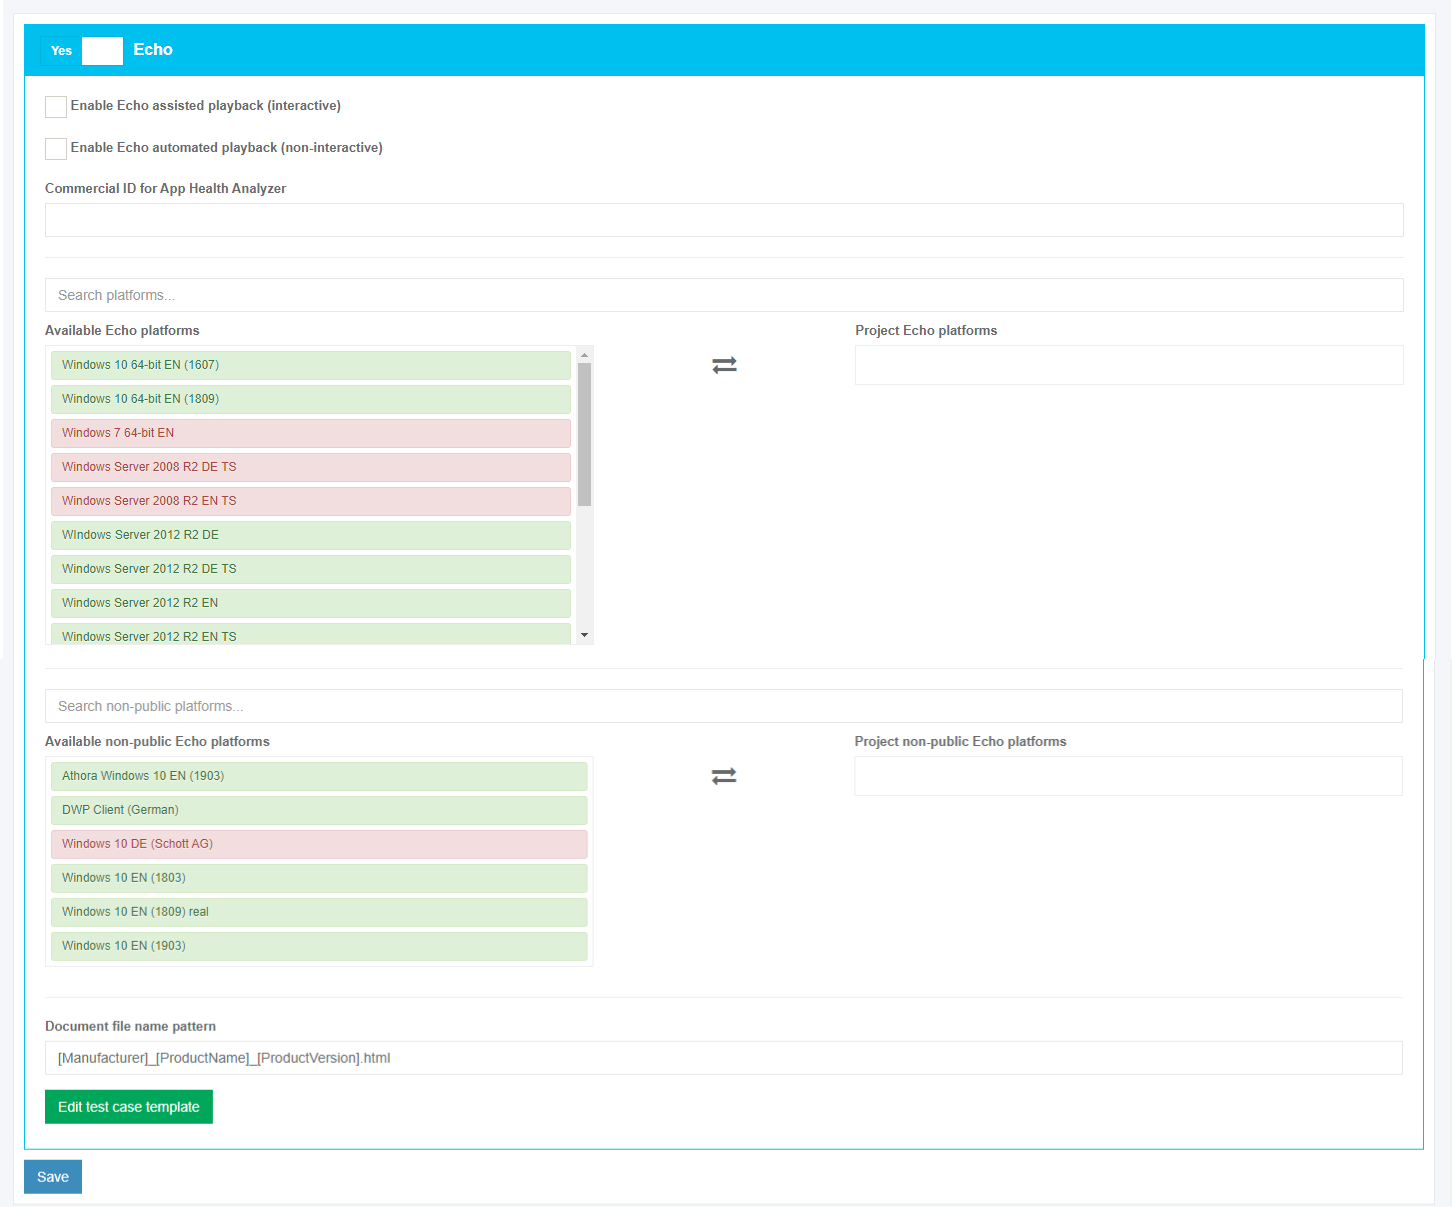
The option to enable Echo is available under the Echo switch. The default value is No.
Apptimized shows the following screen when Echo option is enabled:
The option to replay the recorded installation and configuration of the application from the initial version is available under the Enable Echo assisted playback (interactive) switch. The option is inactive by default.
The option to replay the record automatically against the selected Windows OS is available under the Enable Echo automated playback (non-interactive) switch. The option is inactive by default.
A playback mode enables a user to choose how to proceed with recorded test cases when the new platform (VM) is added. Three playback modes available:
- Automated – when a new platform (VM) is added, all possible test cases run;
- Opt-In – when a new platform (VM) is added, a user is notified by email to add it manually to the project;
- Opt-Out – when a new platform (VM) is added, a user is notified by email. A user has 48 hours to cancel prepared test cases or they run automatically.
The default value is Automated.
Keyword search mode available:
To choose an Echo platform, a user can drag and drop a suitable platform from the Available Echo platform / Available non-public Echo platforms container to the Project Echo platforms / Project non-public Echo platforms container.
The option to change a file name pattern is available under the Document file name pattern field. The default file name pattern is [Manufacturer]_[ProductName]_[ProductVersion].html.
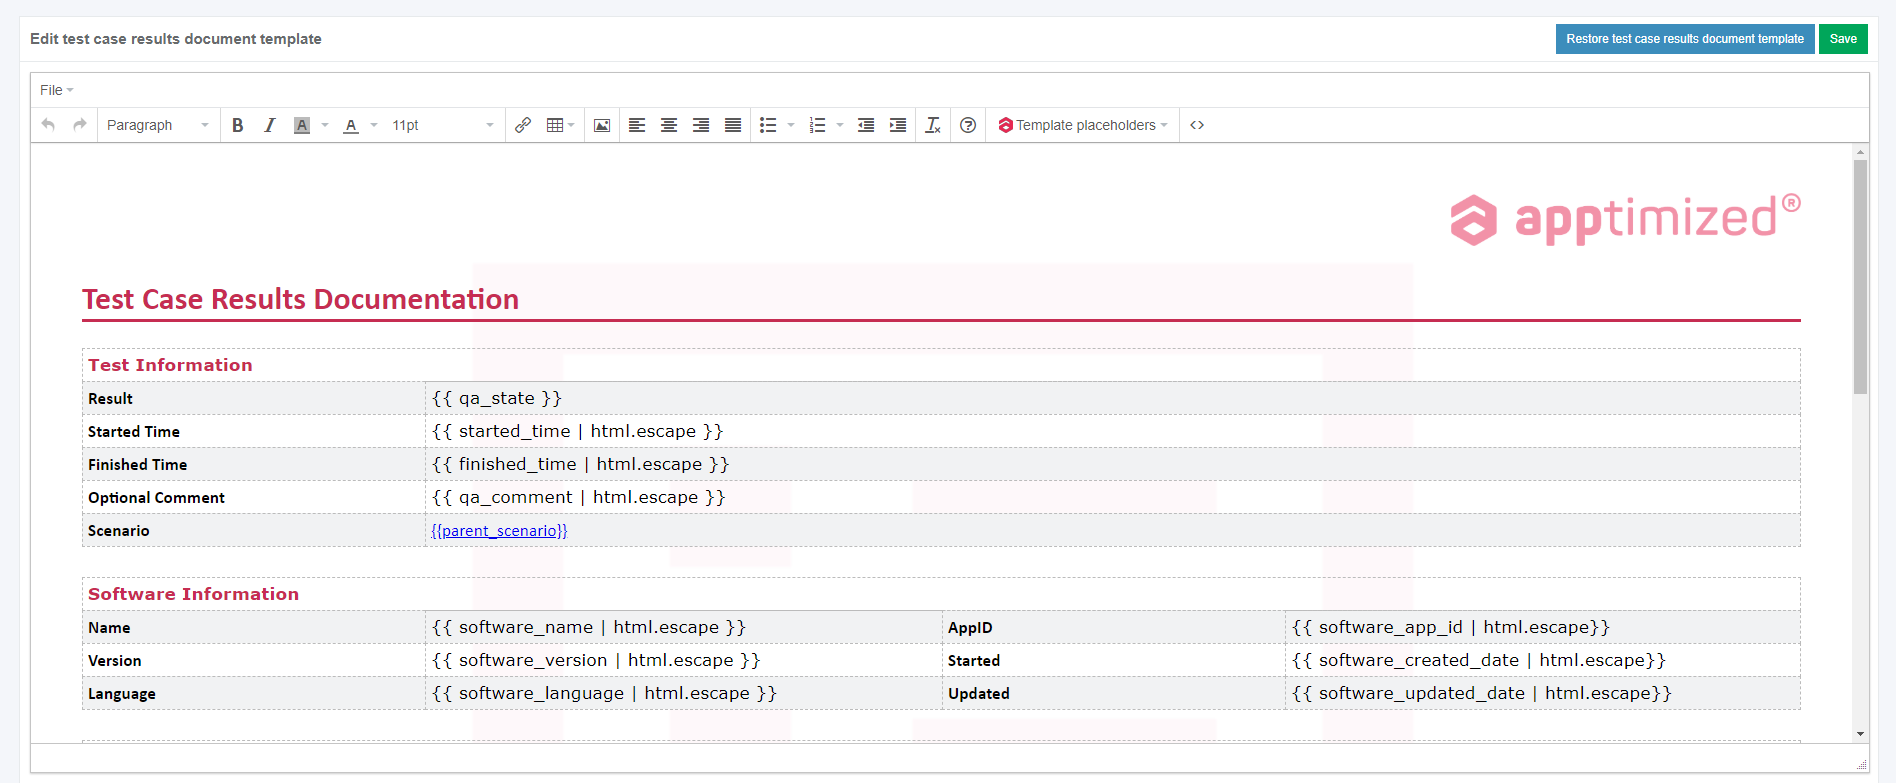
The option to edit a test case template is available under the Edit test case template button.
Apptimized shows the following screen when successful:
To apply edits in a test case template, click the Save button.
To apply the Echo settings, click the Save button.
Apptimized shows the following notification when successful:
Integration settings
Intune
The option is disabled by default.
Intune becomes active when switched on and once the required settings are completed. All required fields are marked with an asterisk *.
The option to set demo settings is available under the Set demo Intune settings button. Apptimized shows the following modal window:
Apptimized shows the following screen when the Intune demo settings confirmed:
Settings are persisted on click to the Save button.
Apptimized shows the following notification when successful:
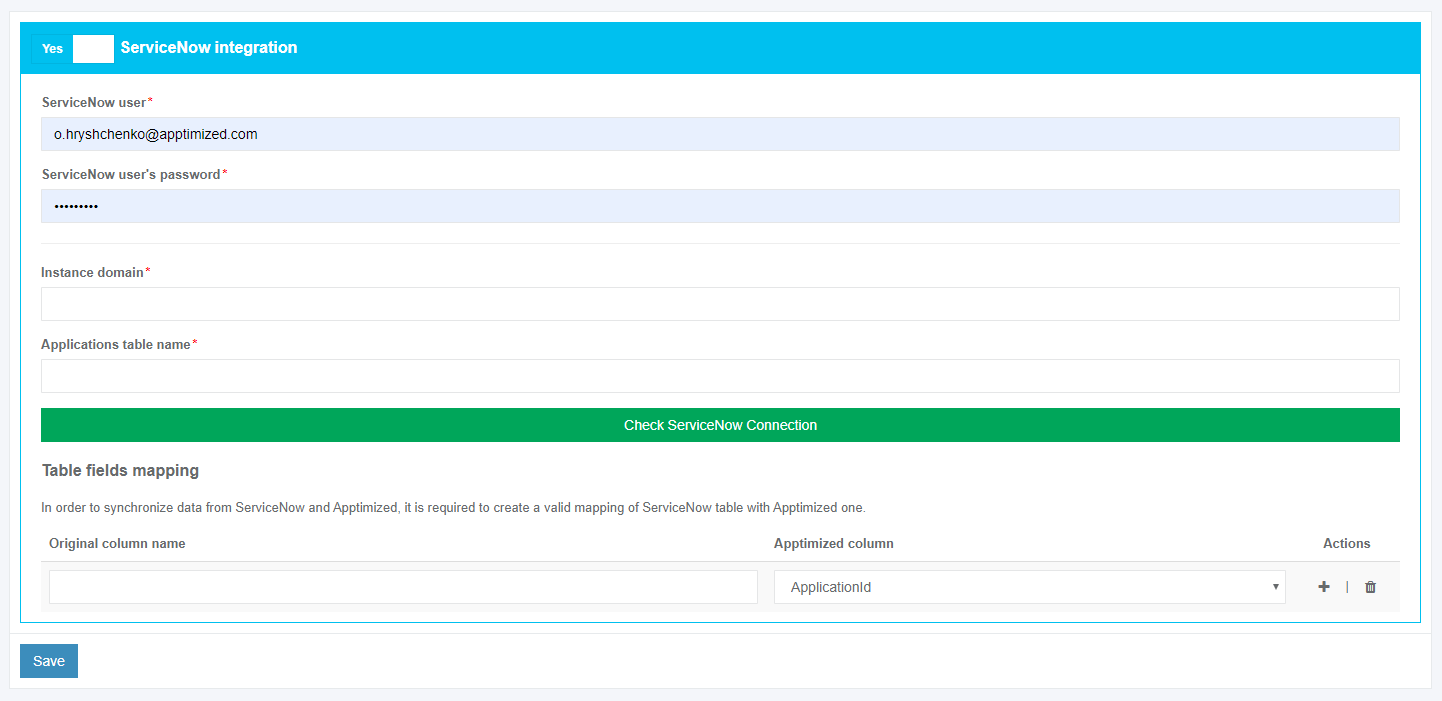
ServiceNow
The option is disabled by default.
ServiceNow becomes active when switched on and once the required settings are completed. All required fields are marked with an asterisk *.
The option to check the connection status with ServiceNow is available under the Check ServiceNow Connection button.
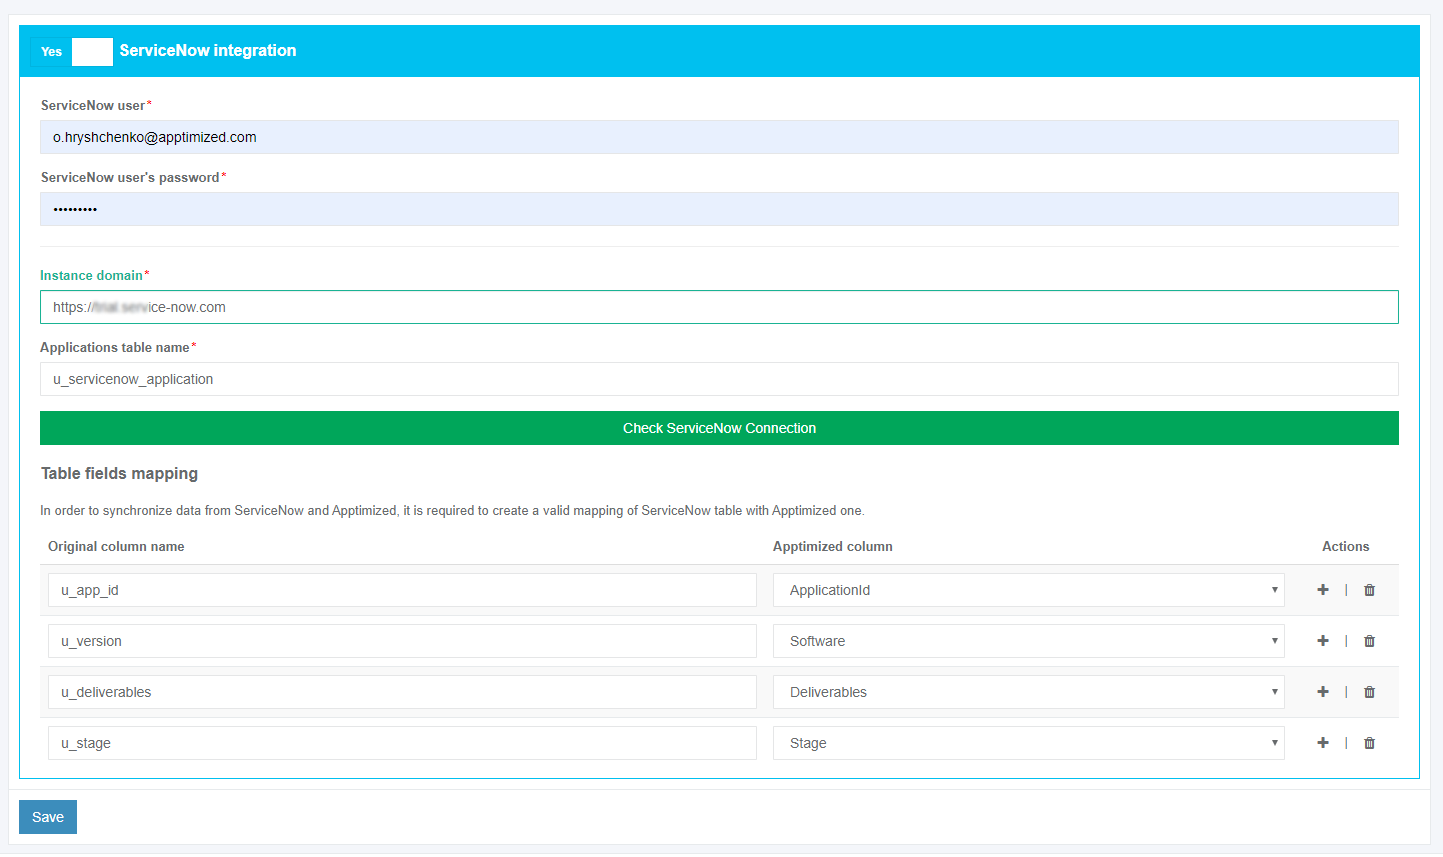
Apptimized shows the following notification when successful:
To synchronize ServiceNow data with Apptimized, a user must map ServiceNow table fields with Apptimized table fields.
To add additional fields to the list, click on the plus symbol. 
An additional field can be excluded from the list by clicking on the bin symbol.
The Original column names fields fill in with the ServiceNow system name of this value (i.e., u_app_id).
Settings are persisted on click to the Save button.
Apptimized shows the following notifications when successful:
SCCM
The option is disabled by default.
SCCM option becomes active when switched on and once the required settings are completed.
General settings
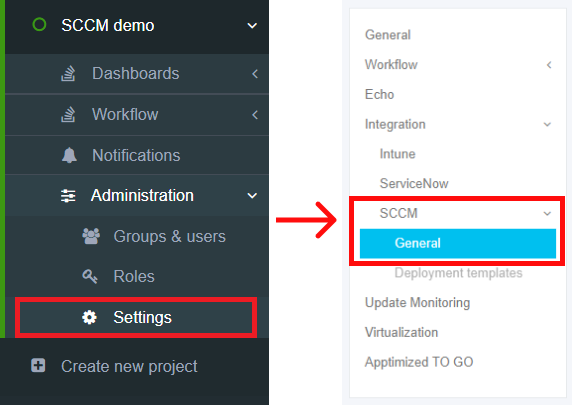
The one-time configuration is available for project administrators under Settings in the project menu > Integration section > SCCM > General.
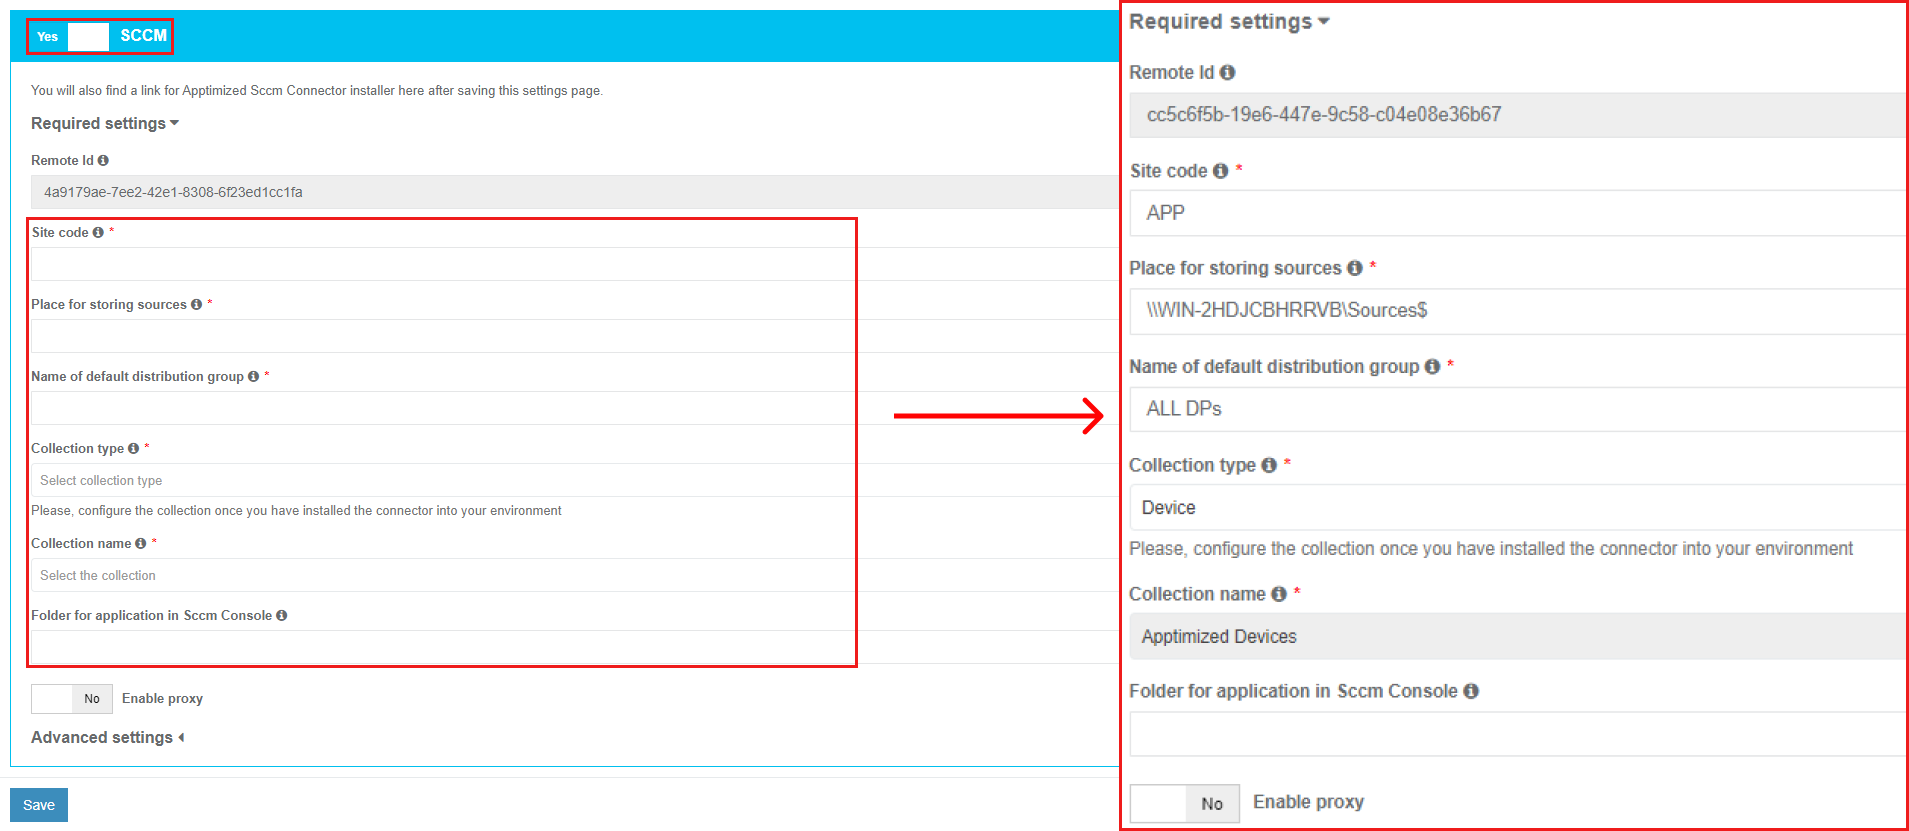
SCCM Connector becomes active when switched on and once the required settings are completed.
Table 18. General settings
|
Settings |
Details |
| Remote ID |
The remote ID is a unique identifier generated automatically for every project during its creation. Remote ID provides customer identification. |
| Site code |
Site codes and site names identify sites in a Configuration Manager hierarchy. Configuration Manager Setup prompts for a site code and site name for the central administration site, and each primary site and secondary site installation. Learn more. |
| The place for storing sources | Network share for SCCM package source media. |
| Name of the default distribution group |
Indicates the default group of users or devices where to Install applications. This setting corresponds to the term "Distribution point group" in the SCCM admin console. |
| Collection type |
Indicates the type of collection where apps should be installed. The following types are:
|
| Collection name |
Indicates the name of the collection where apps should be installed. |
| Device collection name |
Indicates the collection of devices where to install applications. This setting corresponds to the term "Device collection" in the SCCM admin console. |
| Folder for application in SCCM Console |
This field is optional and can stay blank. If provided, overrides the default “Application” folder in SCCM Administrator Console as a target path for created application records.
Example: Testfolder1\testFolder2 or Testfolder1\testfolder2\testfolder3. |
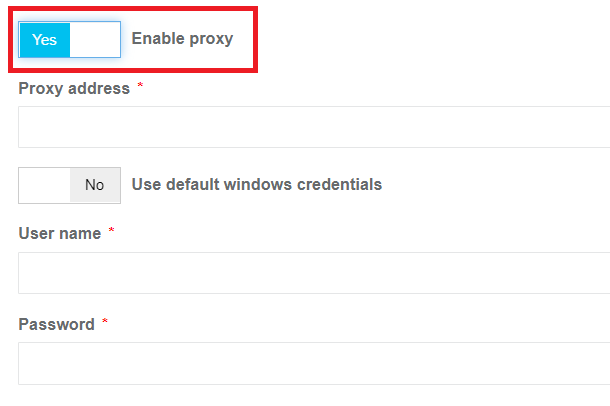
If the endpoint connects to the internet via the proxy server, configure the connection by turning on Enable proxy and selecting Use default windows credentials or providing credentials in Username and Password fields.
Note. SCCM connector isn't able to use Windows default proxy settings. A user enters manually the proxy settings (which are configured on a machine) into the Apptimized portal.
Advanced settings
Advanced settings are optional and provide granular configuration of the SCCM Connector.
The set of advanced settings depends on the chosen installer type. Table 2 shows settings suitable for all installer types.
Table 19. Advanced settings for all installer types
|
Settings |
Details |
|
Path to SCCM Console |
The field indicates a binary of the SCCM console on the disk. By default, the path is C:\Program Files (x86)\Microsoft Configuration Manager\AdminConsole\bin. |
| Auto-install in task sequence of SCCM Console |
This setting indicates whether a task sequence action in SCCM Console can install the application. Yes or No options are available. The default value is Yes. |
| Install or uninstall the application by default |
This option specifies the default action on the client's machine or device. Install or Uninstall options are available. The default value is Install. |
| Deploy the purpose of the installation by default |
This option specifies whether the application deployment can is mandatory or optional. Available or Required options are available. The default value is Available. |
| Deadline time |
This option indicates the deadline time of installation. The deadline is a current date for the moment of creation of an application on the SCCM server. The default value is 18:00. |
| Time zone of a deadline |
Local time or UTC options are available. The default value is Local time. |
Deployment types templates settings
This setting enables a user to implement multiple deployment types by creating multiple deployment templates within one project.
The option to enable SCCM deployment templates becomes active when all required fields in the SCCM general tab are filled in (Settings in the project menu > Integration > SCCM > Deployment templates).
The set of SCCM deployment template settings depends on the chosen installer type.
Table 20. Deployment types template settings
| Settings |
Description |
Availability of settings depending on the Installer type | |||
| MSI |
Script
|
AppV |
|||
|
Microsoft Application Virtualization 4 |
Microsoft Application Virtualization 5 |
||||
|
Deployment type template name |
The field indicates the template name to help a user to identify templates in Apptimized portal. The default value is Deployment type template name [number]. This field is required. |
+ | + | + | + |
| Deployment type name |
This field indicates the name of a deployment type. It is implemented during SCCM application deployment process and is sent to SCCM server. A user can set the Deployment type name manually or use the following dynamic variables: This field is required. |
+ | + | + | + |
| Installer type |
This setting indicates the type of installer to use. The following installer types are available: The default value is Script Installer. |
+ | + | + | + |
| Script type for the detection method |
This setting indicates the type of script content of the detection method. The following script types for detection method are available: The default value is Powershell. |
+ | |||
|
Detection script content template |
This field specifies the script template of the detection method. It is possible to provide a custom template with mandatory variables in square brackets, indicating them in any order and quantity. The Connector replaces these variables with specific values during the deployment to SCCM. The default value is Get-ItemProperty "HKLM:Software\[PackageName]\ |
+ | |||
|
Persist content in the client cache |
This setting indicates the necessity to upload the application or package source to the client's machine or device cache. Yes or No options are available. The default value is No. |
+ | |||
| Installation command with parameters |
This setting indicates the command to run during the package installation. The default value for the Script Installer is Deploy-Application.exe -DeploymentType Install The default value for the MSI Package is msiexec /i "\\atd-dist01\Public\CM\DTeam\FeatureData\OSD\Tbreck\Setup1.msi" or msiexec /i "\\atd-dist01\Public\CM\DTeam\FeatureData\OSD\Tbreck\Setup1.msi" /qn |
+ | + | ||
|
Uninstallation command with parameters |
This setting indicates the command to run during the package uninstallation. The default value is Deploy-Application.exe -DeploymentType Uninstall |
+ | |||
|
Installation context |
This option defines the context of the package installation. The following installation contexts are available:
The default value is Install for the system. This option corresponds to the term Installation behaviour in the SCCM admin console. |
+ | |||
|
Should the user be logged on or not |
This option defines the required user state when the installation starts. The following options are available:
The default value is Whether or not users are active in the system. This option corresponds to the term Logon requirement in the SCCM admin console. |
+ | |||
| Installation visibility for the user |
This option defines the installation process visibility. The following options are available:
The default value is Normal. This option corresponds to the term Installation program visibility in the SCCM admin console. |
+ | |||
| Requires user interaction |
This setting indicates if the user can be involved in the installation or uninstallation process. Yes or No options are available. The default value is No. |
+ | |||
| Identify deployment type information from a package file |
This setting indicates the option of a manual (Yes) or automatic (No) deployment type information identification. The default value is No. |
+ | + | + | |
| The file where to get information |
This field indicates the file with the deployment type information. The following options are available:
|
+ | + | + | |
| What to do on a slow network |
This option specifies actions with package sources in case of a slow network. Following options are available:
|
+ | + | + | + |
| Maximum installation time (minutes) |
This option indicates the maximum duration per installation in minutes. The default value is 120. |
+ | + | + | + |
| Estimated installation time by default (minutes) |
This option indicates the estimated duration per installation in minutes. The default value is 0. |
+ | + | + | + |
| Run installation program as a 32-bit process on 64-bit client |
This setting forces the installer to launch as a 32-bit process on the 64-bit client. Yes or No options are available. The default value is No. |
+ | + | ||
|
Administrator comment |
This optional field corresponds to the term Administrator comments in the SCCM admin console. |
+ | + | + | + |
The screenshot below shows the default values of the Deployment type template settings:
The option to add a new deployment type template is available under the plus symbol. Apptimized shows the following screen when successful:
The option to collapse the deployment type template is available under the 
The option to add a new deployment type template is available under the bin symbol.
Settings are persisted on click to Save button.
Apptimized shows the following notification when successful:
Update monitoring
To receive a notification when an update or upgrade has been released by the application vendor, a user enables the Enable Update Monitoring option.
To receive a notification by email when an application vulnerability is found, a user enables the Enable Vulnerability Notifications option.
Settings are persisted on click to the Save button.
Apptimized shows the following notification when successful:
Virtualization
General
The option to manage the Windows platforms within the Project is available under the Virtualization settings > General tab. Apptimized shows the following screen when successful:
The option to add a new platform is available under the Add new platform button > Add new platform modal window > Select the value from the drop-down list in the Select platforms field > Add button.
Note. The multiple-choice option is available in the Select platforms field. For each selected item, a separate category will be created.
The following Windows platforms available:
- Windows 7 DE
- Windows 7 64-bit EN
- Windows 10 64 bit EN (1809)
- Windows 10 64 bit EN (1607)
- Windows 10 64 bit DE (1607)
- Windows 10 (1809) DE
The option to delete the Windows platform from the list within the Project is available under the Delete button > Confirm delete platform modal window > Delete button.
To enable the Windows platform required in the self-service module, check the box in front of the platform name.
To apply the virtualization general settings, click the Save button.
Providers
Azure switch
The Azure virtualization provider activates when the Azure switch is enabled. All required fields are marked with an asterisk *. The option is disabled by default.
Table 21. Azure virtualization provider settings
|
Setting |
Details |
|
Azure subscription name |
This setting indicates the name of user’s Azure subscription (portal.azure.com > Subscription > Subscription name). |
|
Subscription Id |
This setting indicates the user’s subscription Id in Azure (portal.azure.com > Subscription > Subscription Id). |
|
Client Id |
This setting indicates the user (application) Id from Azure Active directory. |
|
Client Secret |
This setting indicates the client secret of the application from Azure Active directory. It is a secret string that an application uses to prove its identity when requesting a token. Also, it can be referred to as an application password. |
|
Tenant Id |
This setting indicates the directory (Tenant) Id of Application from Azure Active Directory. |
|
Resource group |
This setting indicates the resource group from portal.azure.com. It is a container that keeps related resources for an Azure solution. |
|
Region |
This setting indicates the region of a resource group at portal.azure.com. |
|
Network name |
This setting indicates the virtual network name from portal.azure.com. |
|
Subnet name |
This setting indicates the subnet name the virtual network from portal.azure.com. |
|
VM size |
This setting indicates a disk size of the VM. VM disk size depends on a user subscription type. The following types of sizes available:
Note. It is necessary to select the size of the VM's that supports Generation 1 and 2 if any will be used. |
|
OS disk type |
This setting indicates a disk type of the VM.
|
|
VMs limit |
This setting indicates a maximum number of currently running VMs. Yes or No options are available. The default value is No. When the VMs limit switch is activated, a user must enter a number in the Maximum number of currently running VMs field. |
The option to save settings is available under the Save button.
The option to add a new Azure image is available under the Create new image button.
Note. The option to add a new Azure image becomes available after the Azure switch settings were set up.
All required fields are marked with an asterisk *.
Table 22. Azure image settings
|
Setting |
Description |
|
Name |
This setting defines the name for a new Azure image. The naming is a user preference. |
|
Platform |
This setting defines the name of Windows platform (i.e., Windows 10). |
|
OS Build |
This setting defines the operating system build that will be used (i.e., 18363.753 – is an OS build for Windows 10, version 1909). OS build is a timeline of minor build releases in between the major version number releases. |
|
OS Version |
This setting defines the operation system version that will be used. The following options available:
The default value is Windows 10. |
|
OS Language |
This setting defines the operating system language mode. The following options available:
The default value is EN. |
|
OS type |
This setting defines the operating system type mode. The following options available:
The default value is Windows Server. |
|
Enabled |
This setting indicates that the current image is enabled for use. |
|
Disk generation |
This setting defines the Hyper-V virtual machine generation. The following options available:
|
|
Link to VHD / Snapshot name |
This setting indicates the link to VHD / Snapshot that is stored on portal.azure.com storage. |
|
Windows username |
This setting is automatically prefilling with the project creator data (i.e., test.account@apptimized.com). Setting a Windows username is a user preference and the automatically prefilling data can be changed. |
|
Password for log in |
This setting is automatically prefilling with the project creator data. Setting a login password is a user preference and the automatically prefilling data can be changed. |
The Azure image creates when clicking the Create button.
To Go switch
The To Go virtualization provider activates when the To Go switch is enabled. All required fields are marked with an asterisk *. The option is disabled by default.
This switch enables the TO GO hypervisor connector implementation within the project.
The option to specify within what workflow step the TO GO hypervisor connector will be implemented enables when the switch is activated in front of the step name.
The User name and Password fields come prefilled.
The Host field defines the IP address or DNS name of a resource that contains Virtual Machines (i.e., 10.159.11.2:1233 or somesite.hive.com).
When the value to the Host field is added, the Create new image button appears.
The option to create a custom operating system image is available under the Create new image button. Apptimized shows the following modal window (all required fields are marked with an asterisk *):
Table 23. Image settings
|
Setting |
Description |
|
Name |
This setting defines the name for a new Azure image. The naming is a user preference. This field is required. |
|
Platform |
This setting defines the name of the Windows platform (i.e., Windows 10). |
|
OS Build |
This setting defines the operating system build that will be used (i.e., 18363.753 – is an OS build for Windows 10, version 1909). OS build is a timeline of minor build releases in between the major version number releases. |
|
OS Version |
This setting defines the operation system version that will be used. The following options available:
The default value is Windows 10. |
|
OS Language |
This setting defines the operating system language mode. The following options available:
The default value is EN. |
|
OS type |
This setting defines the operating system type mode. The following options available:
The default value is Windows. Server. |
|
Enabled |
This setting indicates that the current image is enabled for use. |
| Base snapshot |
This setting defines the name of the snapshot (a captured state of a system in a particular time point). It is usually used as a back-up copy or as a basis to troubleshoot issues. This field is required. |
| Base image |
This setting defines the name of the existed operating system image which can be used as a basis for this image. This field is required. |
The custom operating system image settings apply when clicking on the Create button. Apptimized shows the following screen when successful:
The option to modify the custom operating system image settings is available under the Edit image button.
Upload to VM switch
The option to allow uploading files to the running VM activates when the Upload to VM switch is enabled. All required fields are marked with an asterisk *. The following screenshot shows the default settings:
The Upload limit field indicates the number of total items that can be uploaded to VM per application.
The Max file size field indicates the file size that can be downloaded to VM. The default value is 250 Mb.
Settings of the Virtualization providers block are persisted on click to the Save button.
Apptimized shows the following notification when successful:
Apptimized TO GO settings
The option is disabled by default.
Apptimized - TO GO becomes active when switched on.
Settings are persisted on click to Save button.
Apptimized shows the following screen when successful:
The option Enable proxy is disabled by default.
If the endpoint connects to the internet via the proxy server, configure the connection by turning on Enable proxy and selecting Use default windows credentials or providing credentials in Username and Password fields.
Settings are persisted on click to Save button.
In case of success, Apptimized shows the following notification:

