Dashboards

Default configurations

By default, a new project is created with two predefined components in the project dashboard: Portfolio and Overview.

dashboards_default_02.png

Overview dashboard

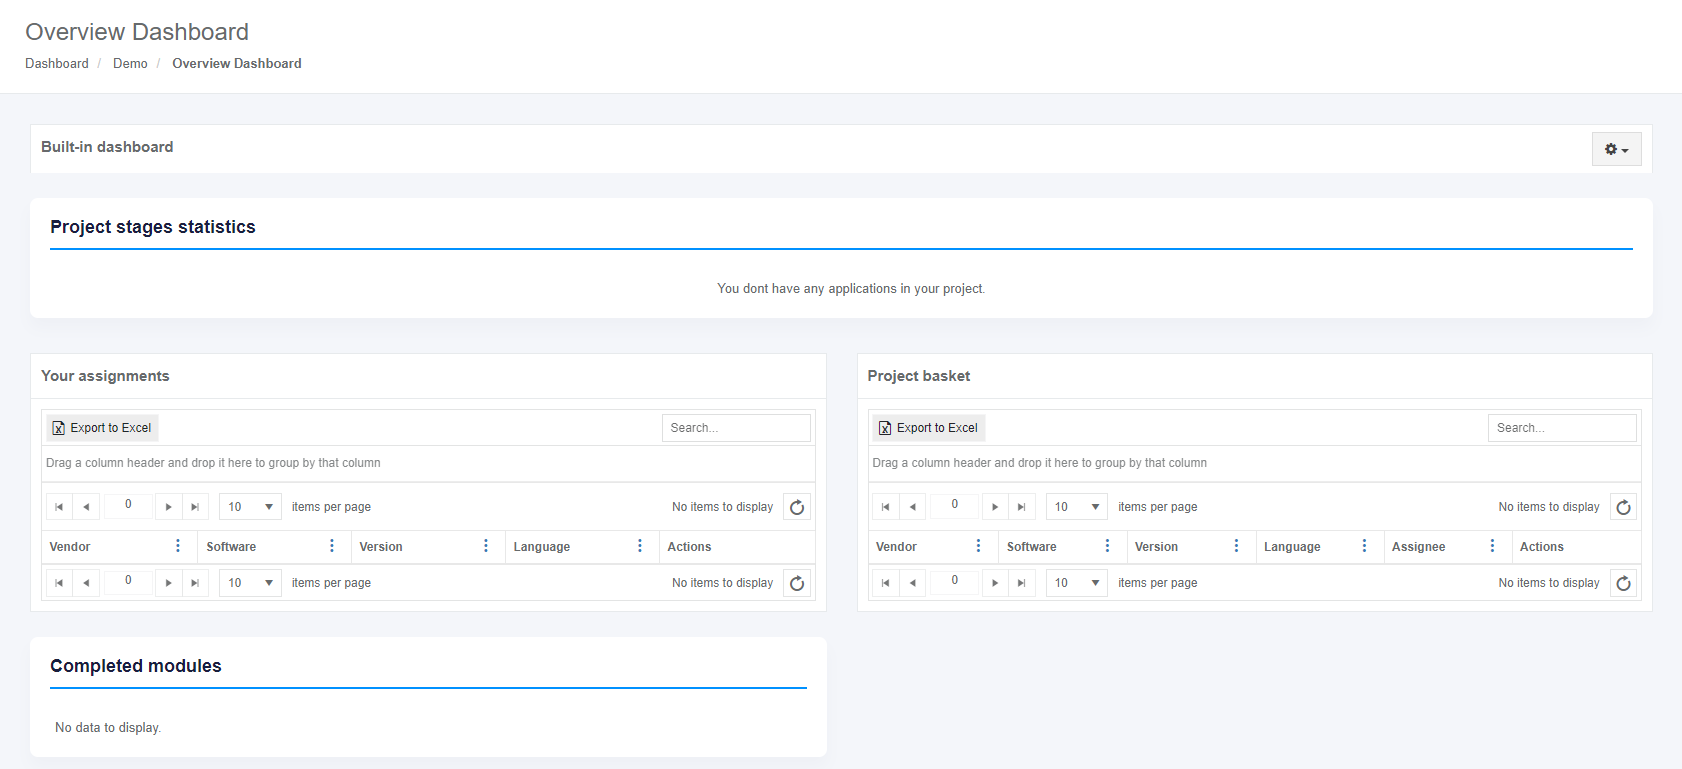
Apptimized shows the following screen upon the project creation:
dashboards_overview_01.PNG

The overview dashboard contains the following blocks:

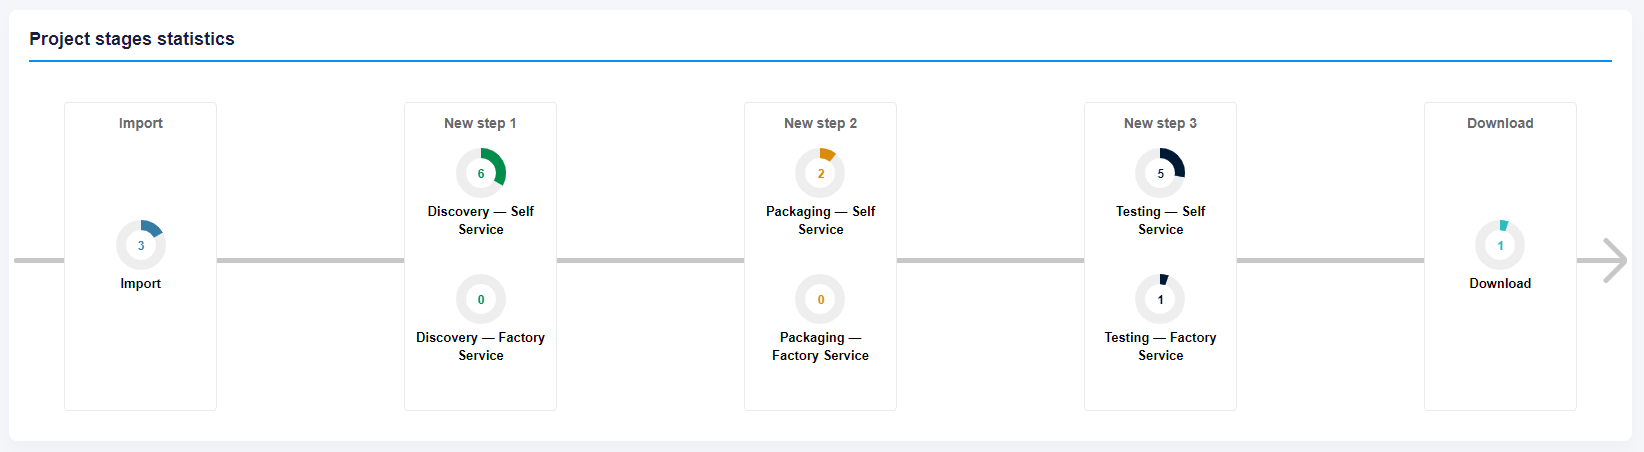
  1. Project stages statistics
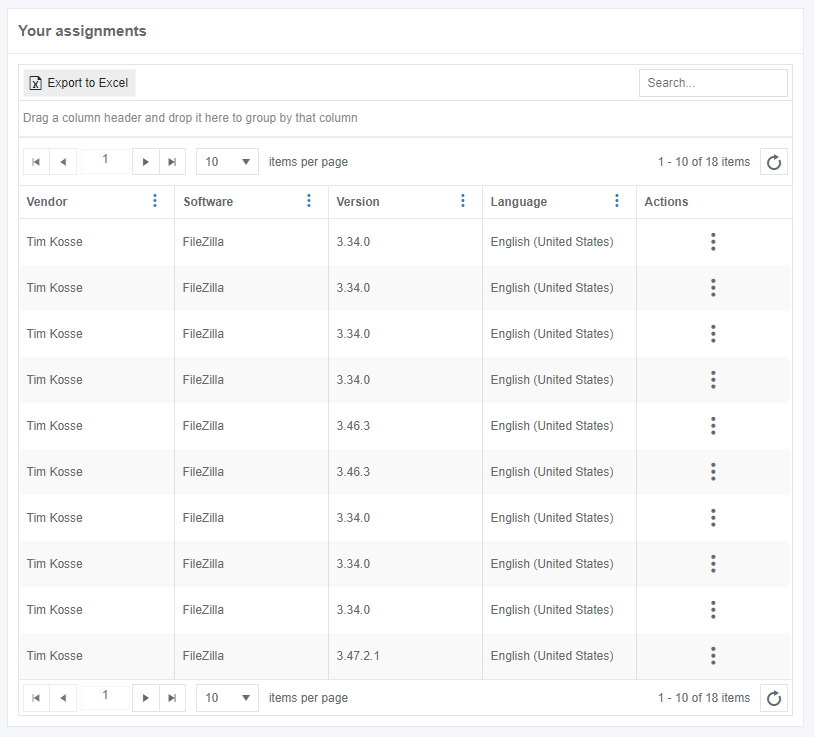
  2. Your assignments
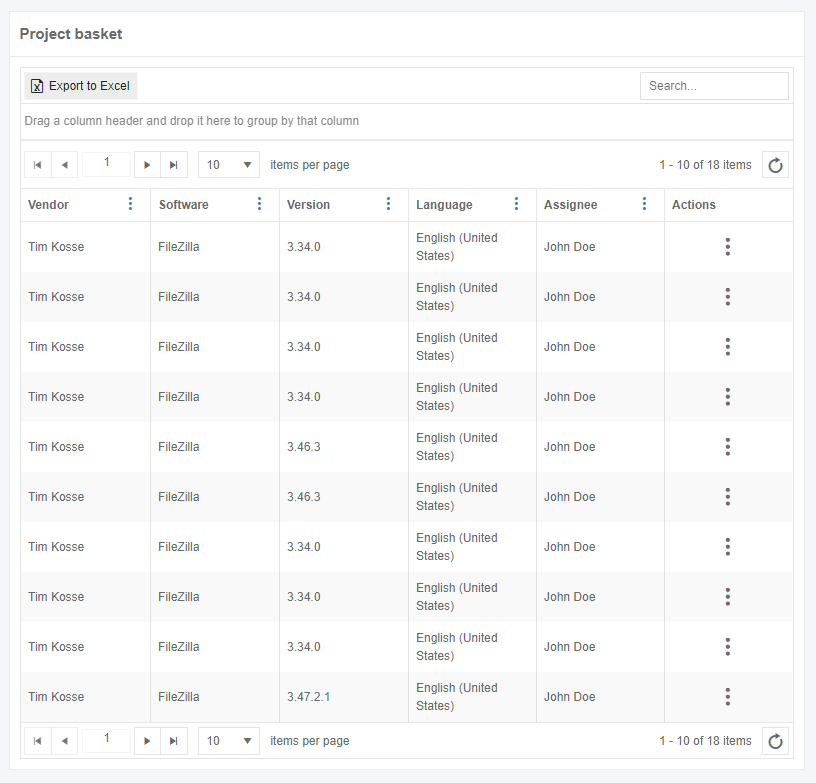
  3. Project basket
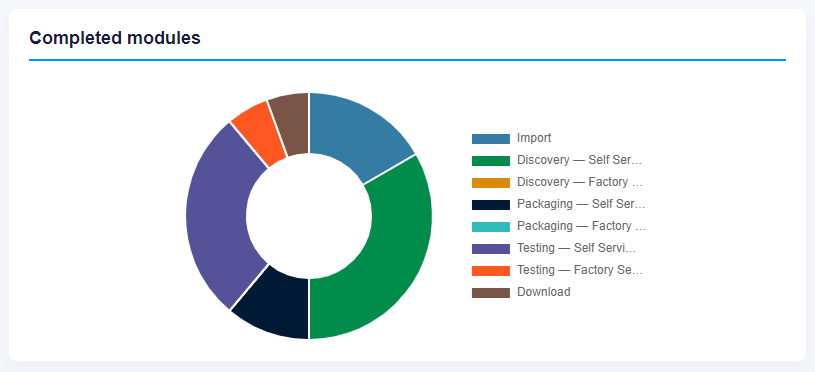
  4. Completed modules

The overview dashboard is filled with data as the project is implemented. The project progress data (i.e., multiple dashboard widgets, depending on enabled modules; a list of assignments; a list of applications) will be displayed in the relevant dashboard blocks.

Block name Description

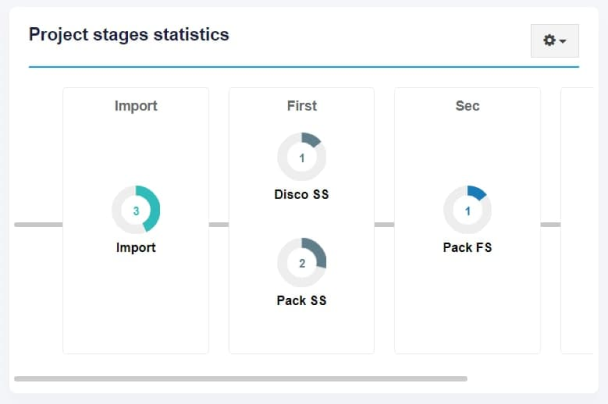
Project stages statistics

This block shows the Project workflow steps statistics and status. 

Project steps statistics is provided in the form of the number of applications used in a particular step (module).

Apptimized shows the following screen when the project gets some progress:


dashboards_overview_02.PNG

Your assignments

This block shows a list of applications that are assigned to a user currently logged in.

This block is configured as a table. Assignments data is grouped into the following categories:

  • Vendor
  • Software
  • Version
  • Language
  • Actions

dashboards_overview_03.PNG

Project basket

This block contains information about all applications that are used in this particular project.

This block is configured as a table. Project basket data is grouped into the following categories:

  • Vendor
  • Software
  • Version
  • Language
  • Assignee
  • Actions

dashboards_overview_04.PNG

Completed modules

This block shows the statistics of completed steps (modules) within the project.

This block is configured as a chart. Each chart sector shows the number of applications completed a particular step (module).


dashboards_overview_05.PNG


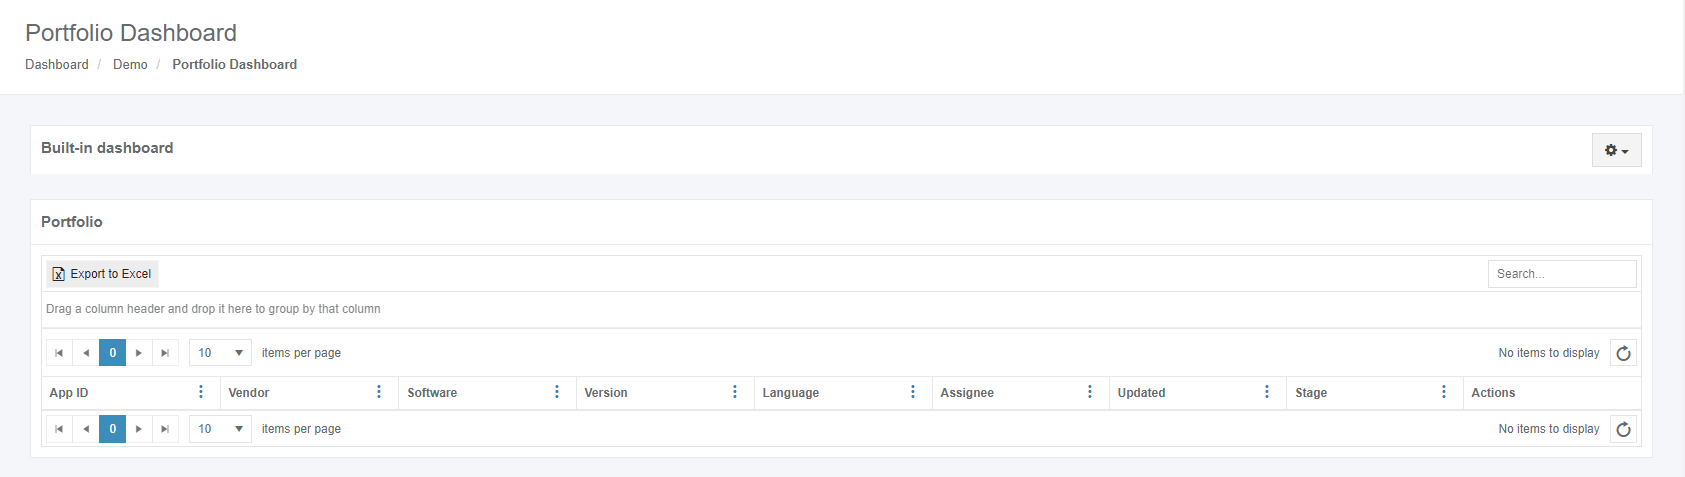
Portfolio dashboard

dashboards_portfolio_01.PNG

This dashboard shows more detailed information regarding the Project’s applications, and also can display applications from another shared project of the same tenant if enabled.  See more.

Create a custom dashboard

The option to create a custom dashboard provides a user with page that represents application data structured according to the user’s settings applied while dashboard creation.  

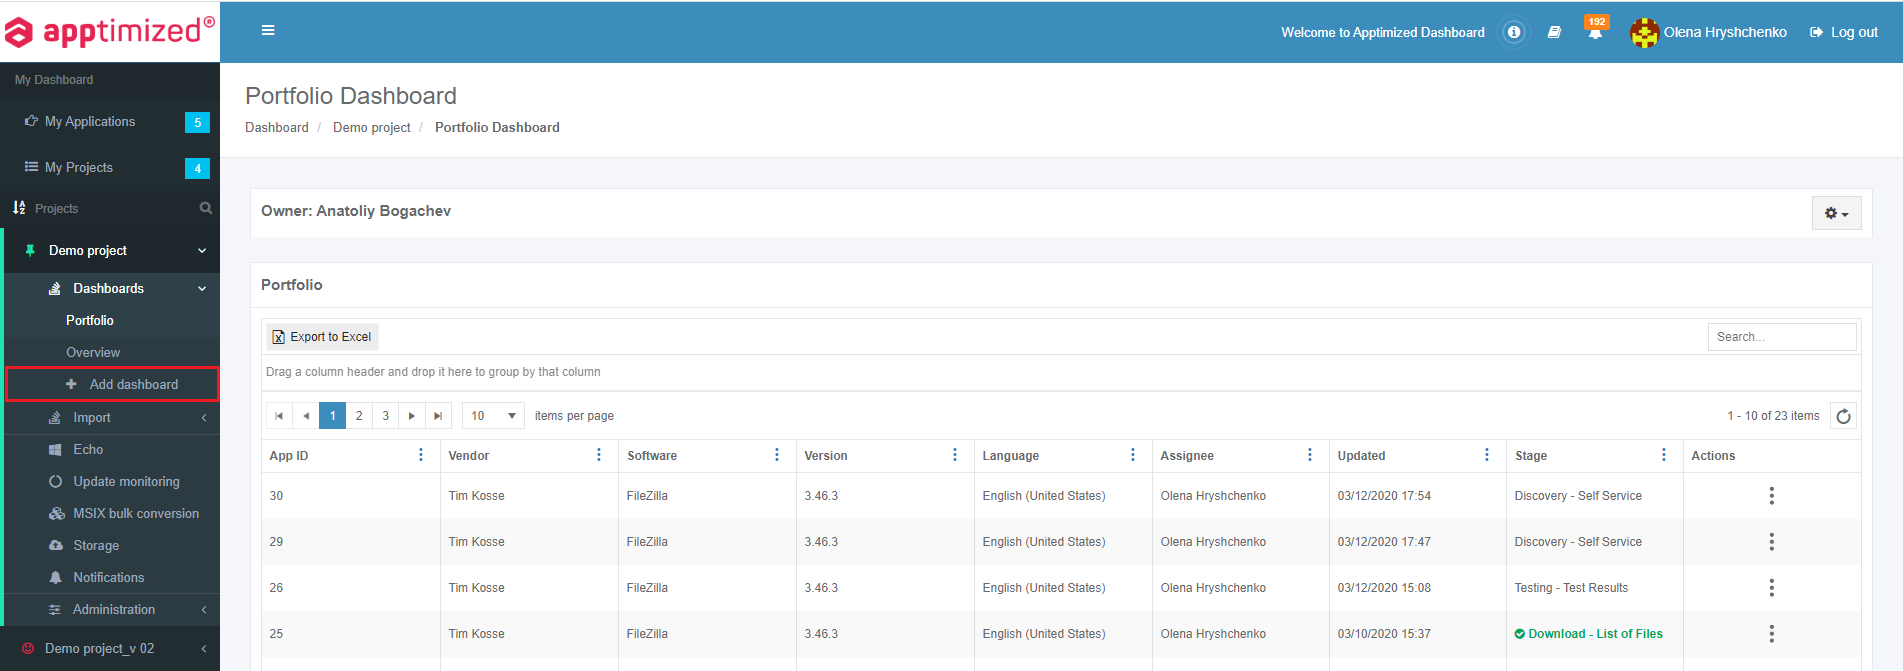
To create a new dashboard in a project, click Add dashboard in the Dashboards submenu. 
dashboard_01.png

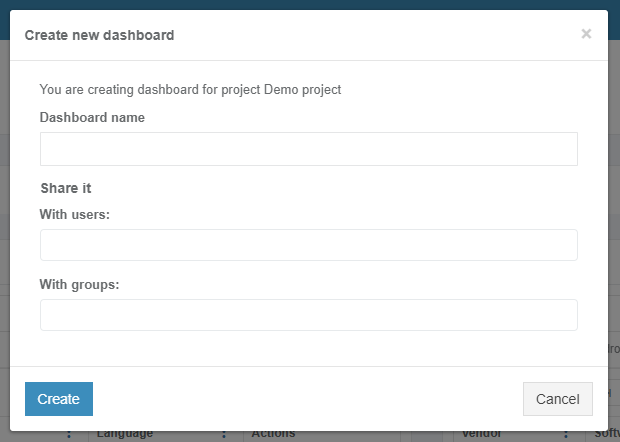
Apptimized shows the following modal window:
dashboard_03.PNG

Settings 

Details 

Dashboard name 

Dashboard name field allows users to set the dashboard name (e.g., “Demo dashboard”). 


There is no default value in this field. 


dashboard_01.png

Share it 

Share it option. Apptimized provides two options to share the dashboard: 

  • Sharing with users   
  • Sharing with groups (e.g., with “Project Administrators”) 

 There is no default value in this field. 

dashboard_02.png


To apply the settings, click the Create button. To revert the settings, click on the Cancel button.

Layout

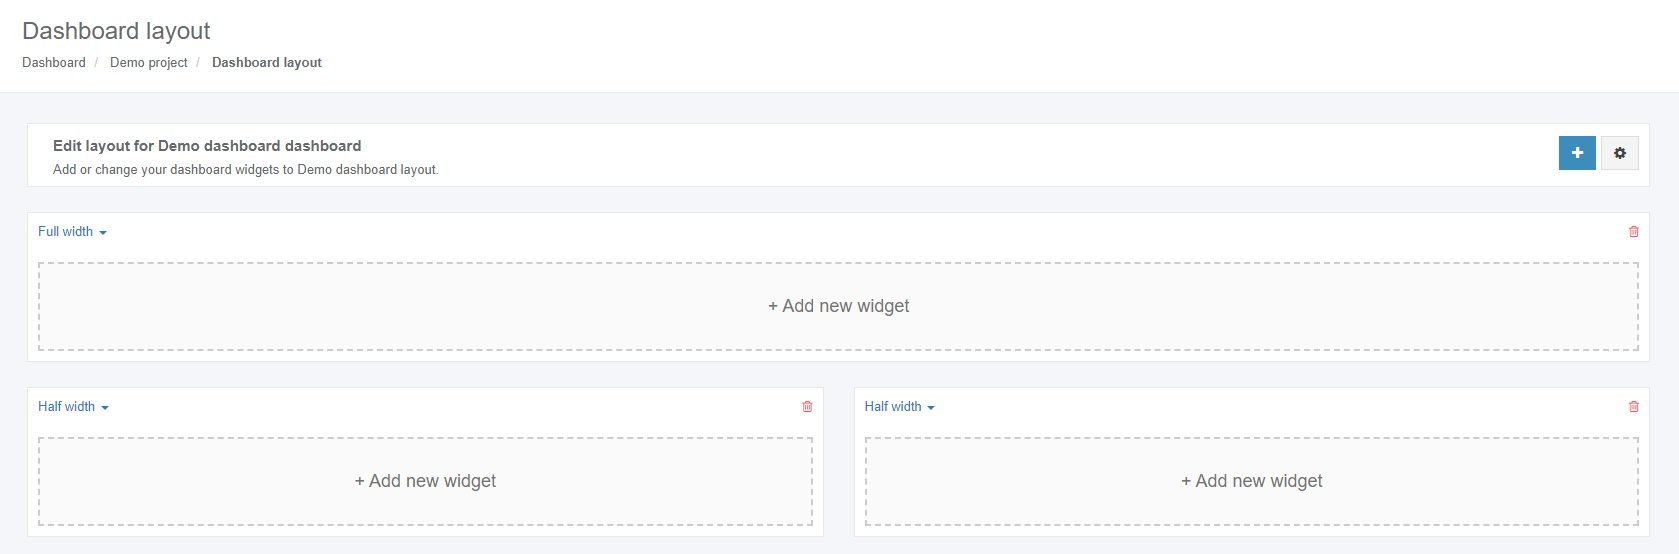
The dashboard creation process may take a few moments. Apptimized shows the following notification when successful:
dashboard_04.PNG

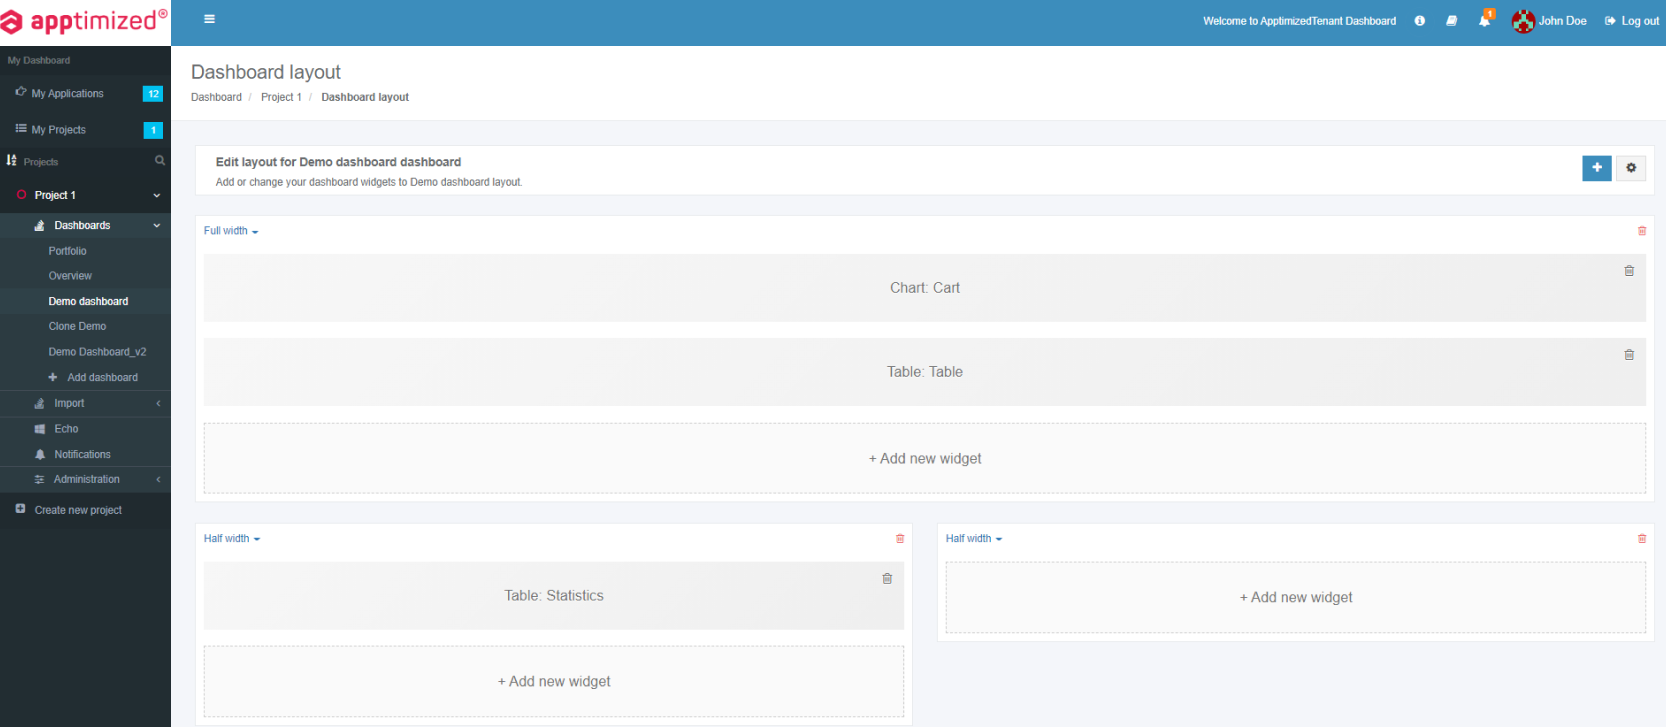
The blocks on the screenshot above are containers in which tables or charts are placed. 
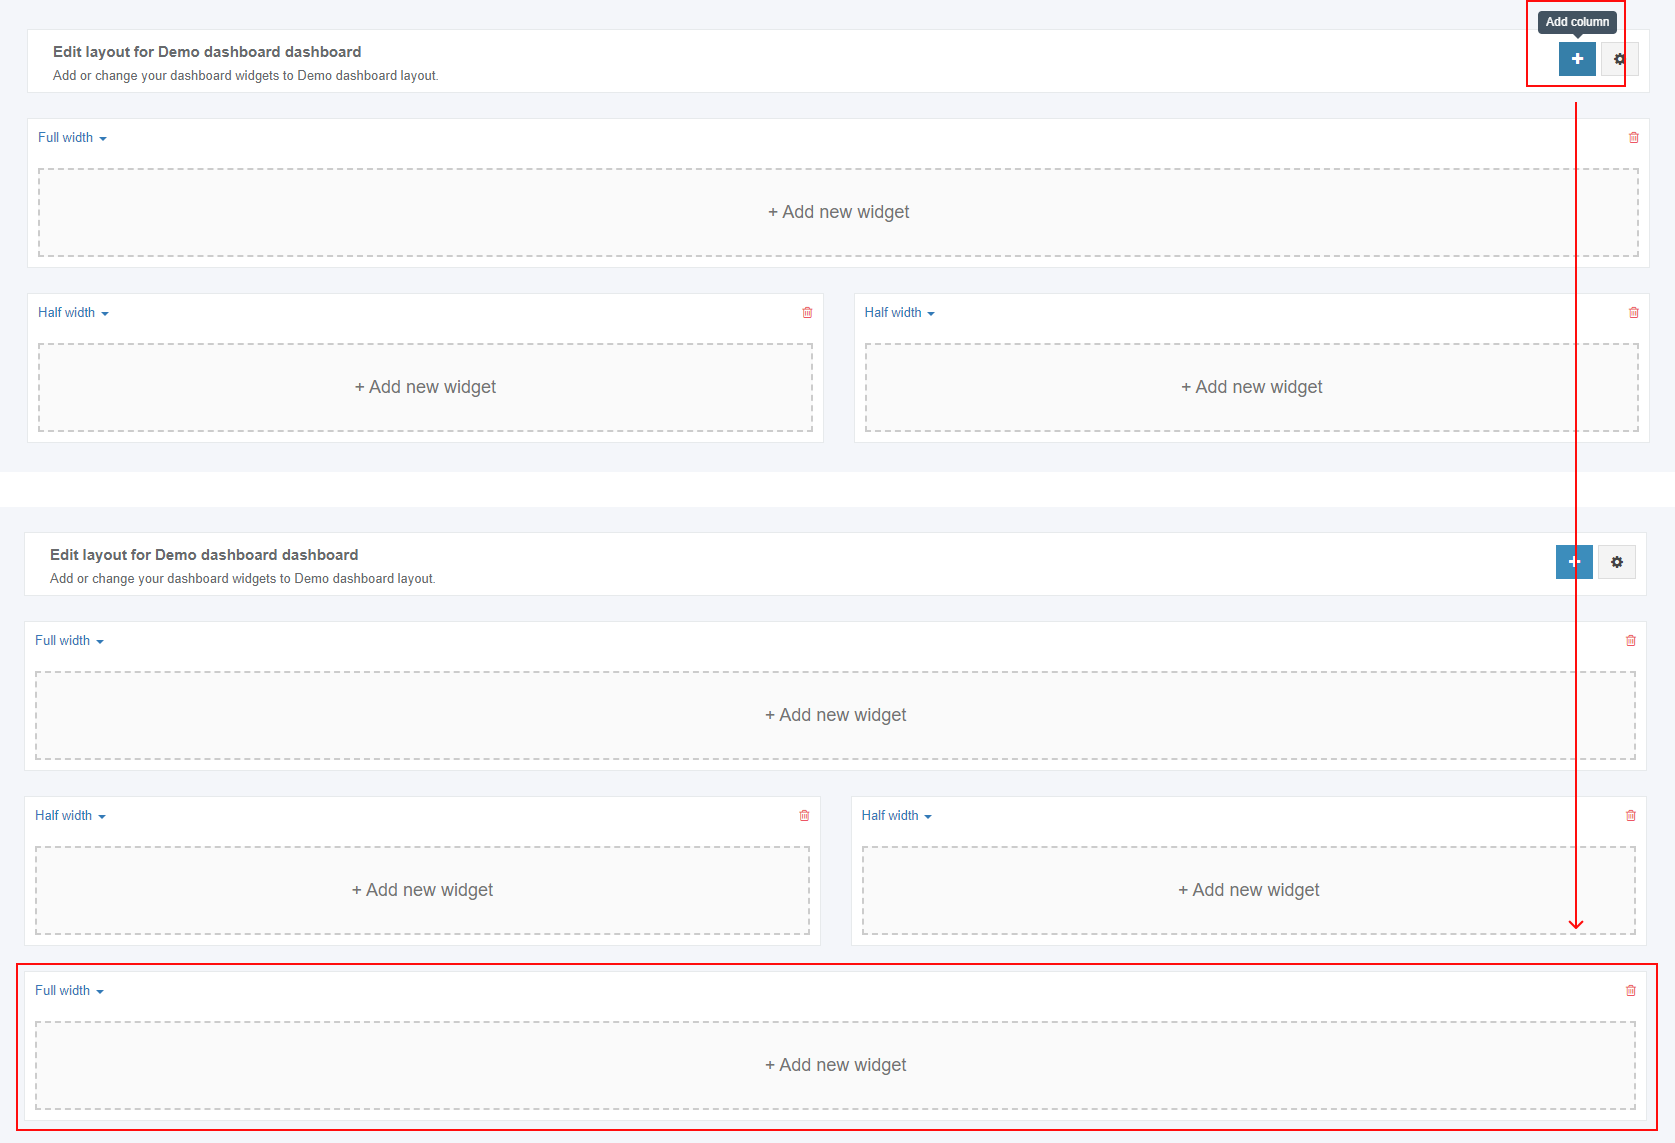
The option to add a new block to the dashboard is available under the plus symbol. 
dashboard_05.png

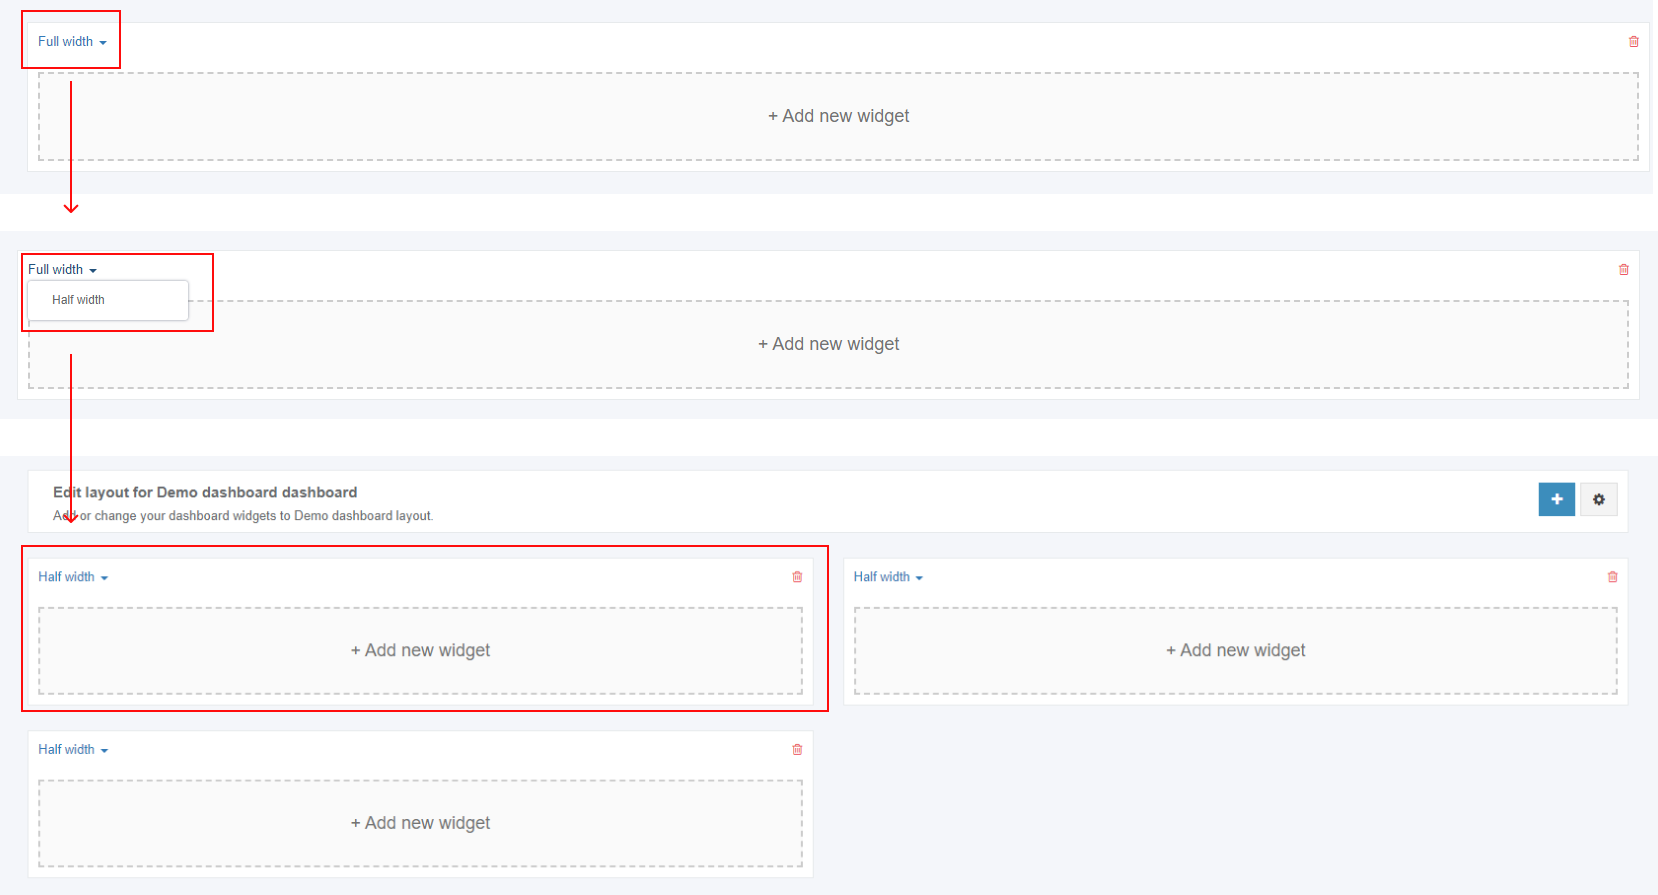
A new block appears in full-width mode by default. To change a width mode, click the drop-down menu.
dashboard_06.png

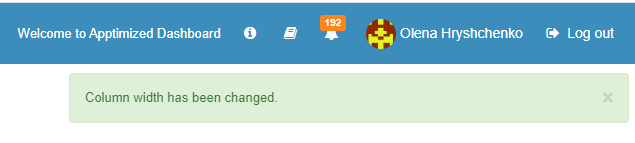
Apptimized shows the following notification when successful:
dashboard_07.png

Blocks on the dashboard appear as empty containers by default. The block naming and filling in is a user preference.  

Widget management and configuration 

Apptimized provides the option to create and manage widgets based on user’s settings preconfigured by a user or by default. The Widget provides a user with quick access to application data. 

Every Widget requires conditions and appearance configurations that can be set during its creation. Configurations and appearance vary depending on the widget type (see the Widget configuration). 

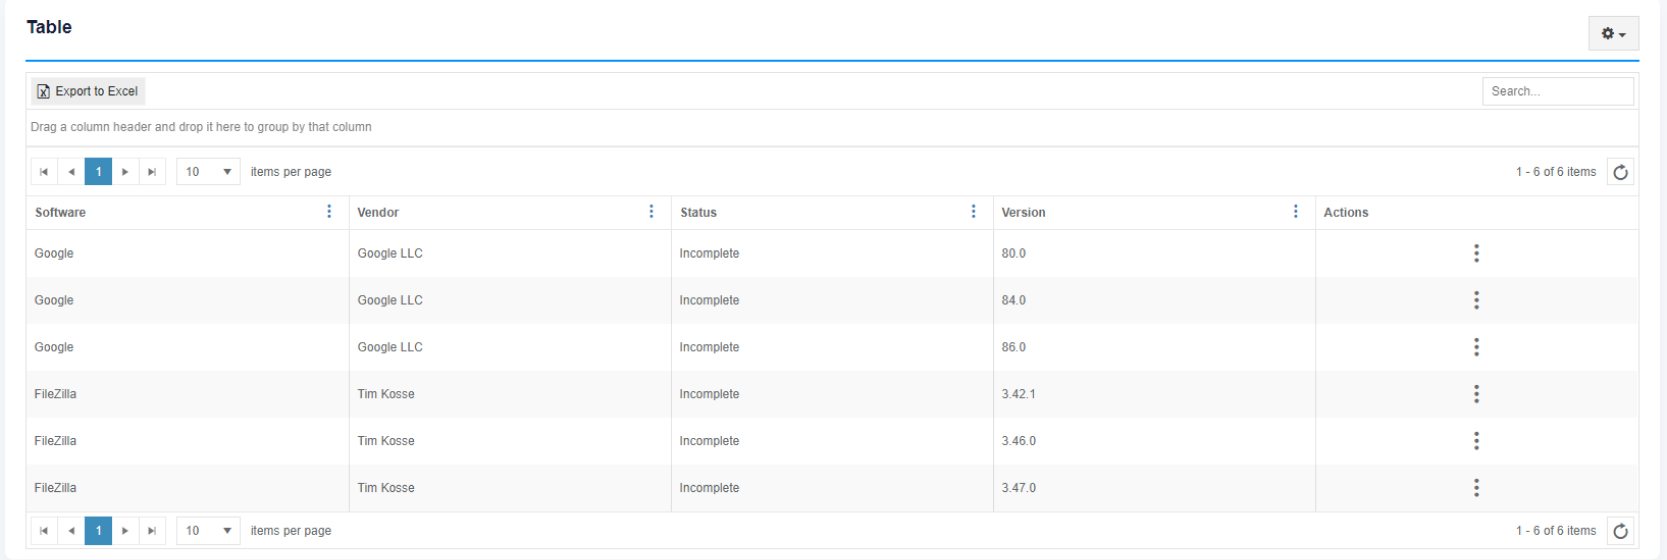
The screenshot below shows a result for the creation of Table widget. 

dashboard_05.png

The screenshot below shows a result for the creation of Chart widget. 

dashboard_06.png

Add Widget

When clicking on “Add new widget” Apptimized shows the modal window below.

The following widget types available: 

  • Table  
  • Chart
  • Echo consumption

dashboard_08.png

NoteIf a user chooses Chart widget type, the field Based on preset appears in the modal window (see the Widget presets). 

dashboard_07.png

The widget settings become active when clicking on the Create button. Apptimized shows the Widget when successful. 
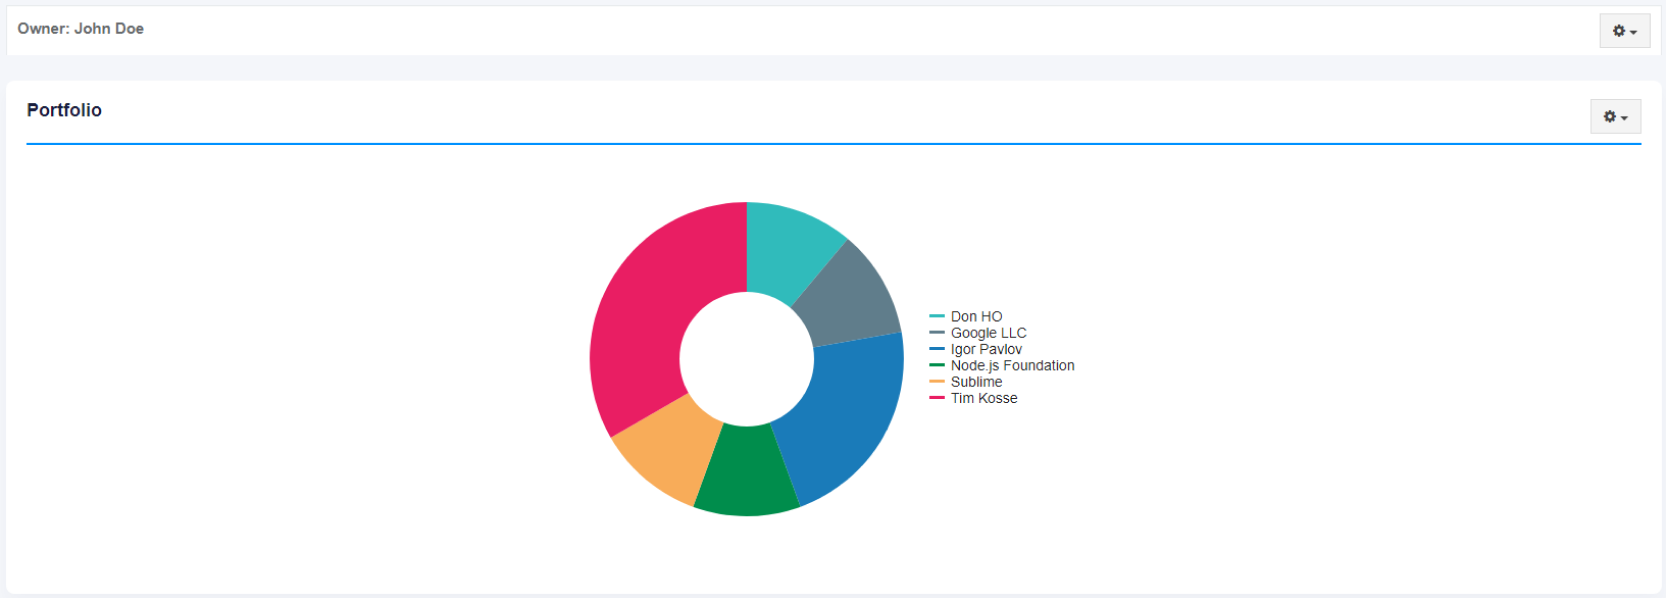
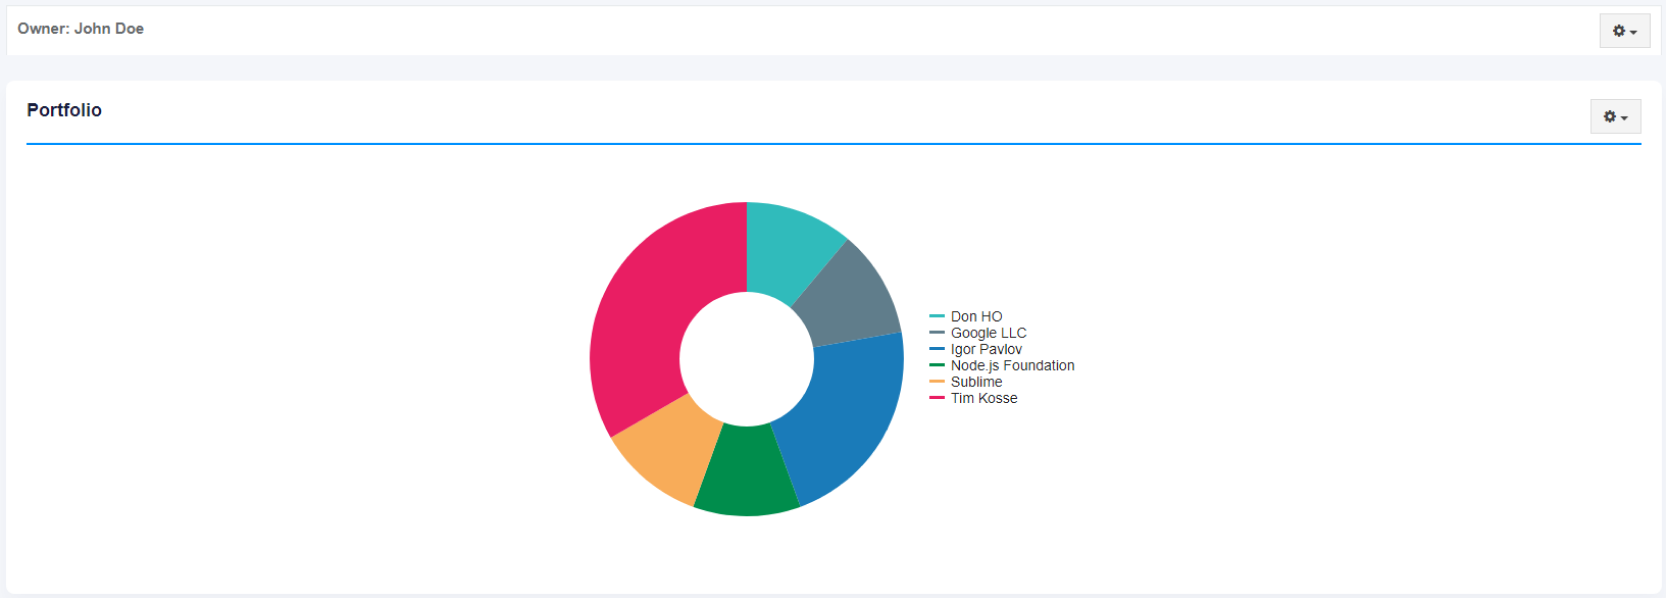
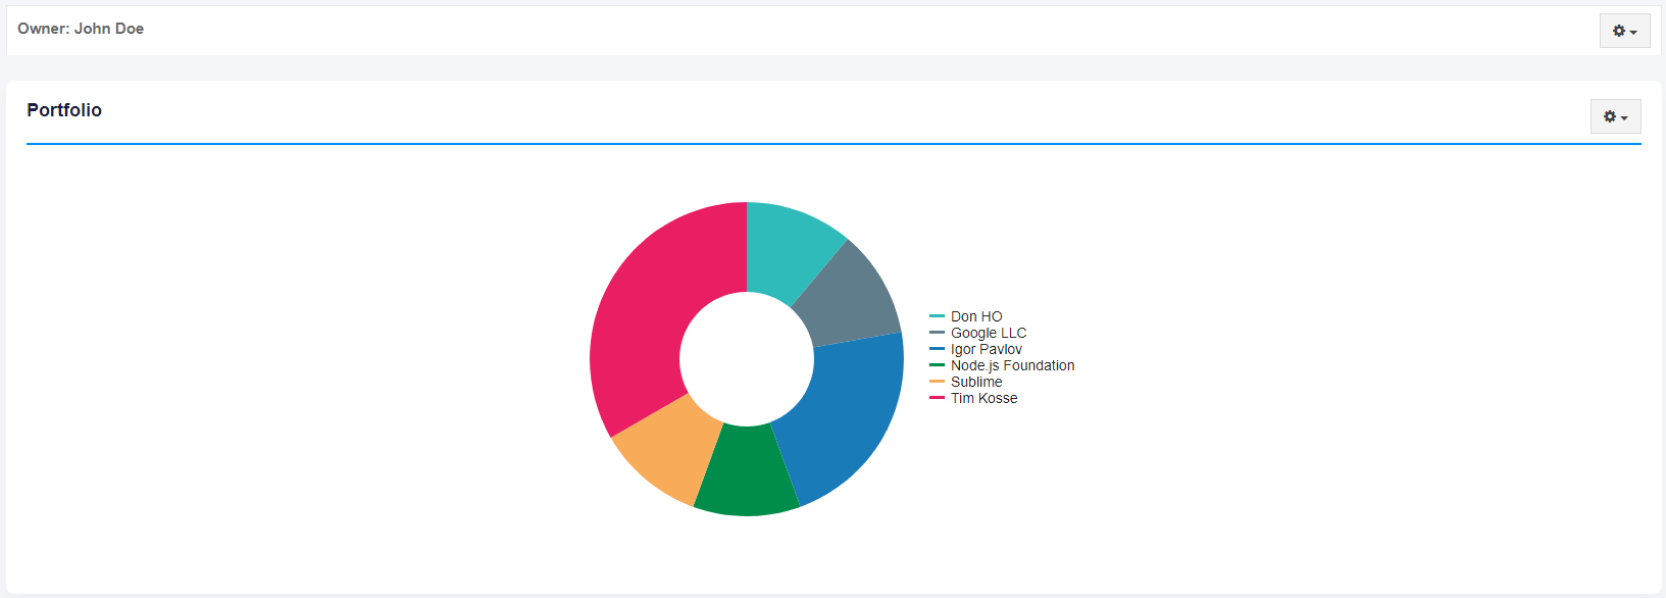
The screenshot below shows a result for the creation of a Chart widget named “Portfolio”. 
dashboard_06.png

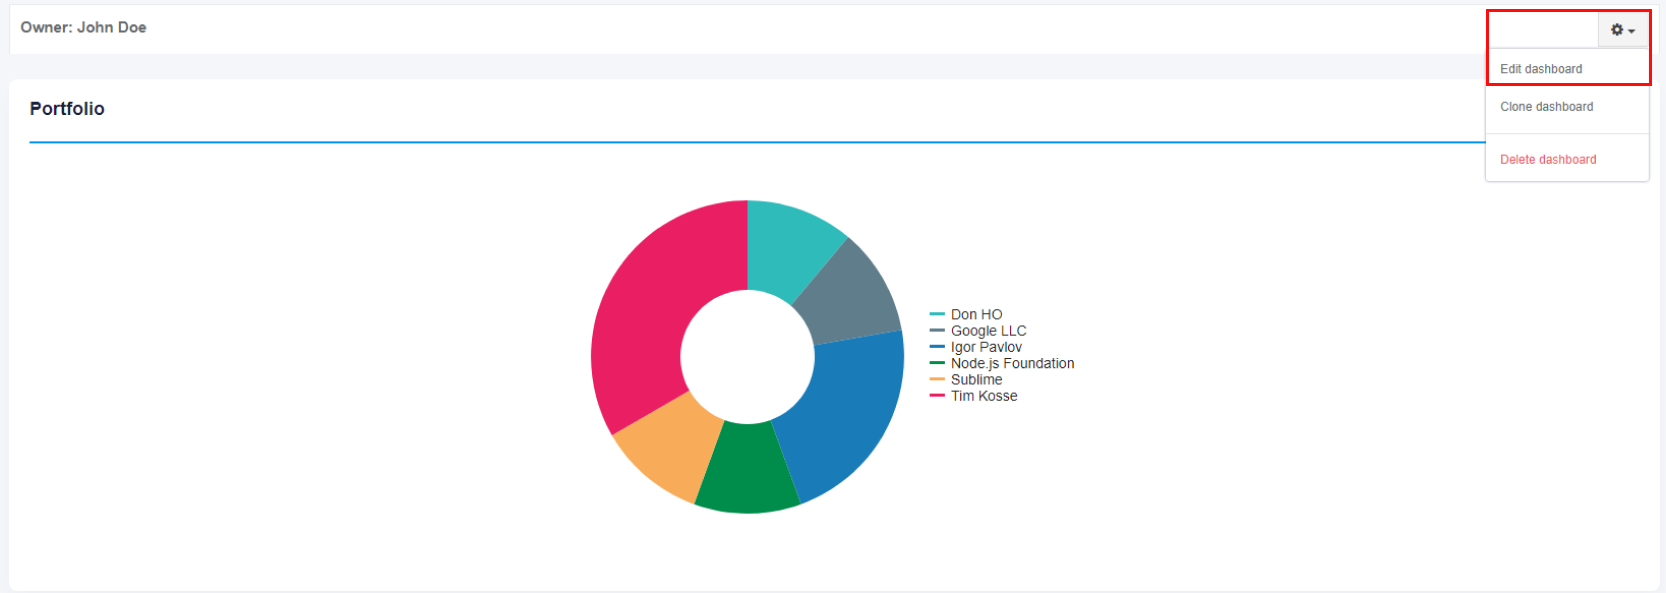
The option to edit the layout for the dashboard is available under Settings > Edit dashboard. 
dashboard_09.png


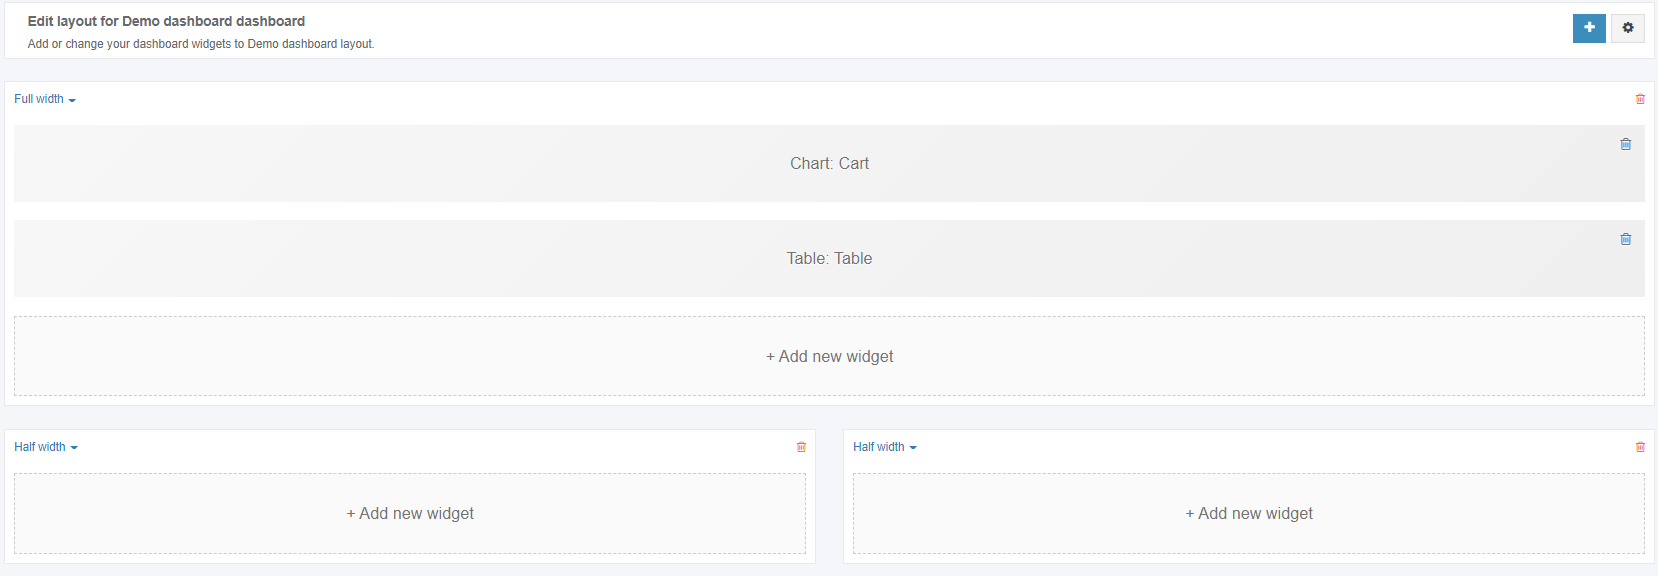
Apptimized shows the following screen when successful:
dashboard_10.png

The option to delete a block or a widget from a dashboard is available under bin symbol.

dashboard_11.png

Widget presets 

Widget presets are pre-configured and automatically generated presets available for Chart widget type. Every preset is based on the information in the project Portfolio (see the Portfolio). 

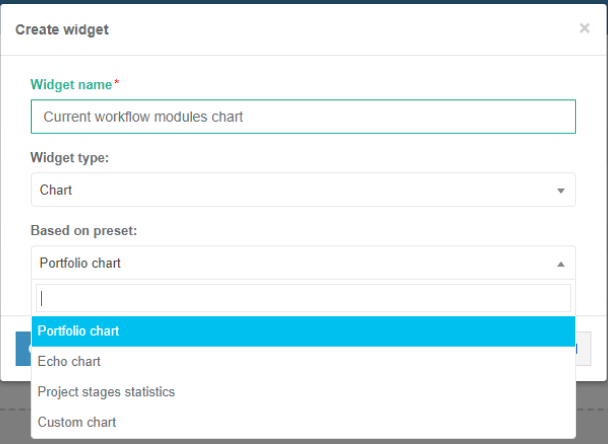
The option to choose a widget preset is available under Based on preset while widget creation (see the Add Widget). 
dashboard_12.png

The following Based on preset settings available: 

Setting

Details 

Portfolio chart 

Portfolio chart is a setting indicating the option to create a Chart widget based on the application number in each workflow module (see the Overview dashboard).


The default value is the Portfolio chart


The screenshot below shows a result for the creation of a widget based on the Portfolio chart: 


dashboard_13.png


The option to change Widget is available after creation (see Widget configuration).

Echo chart 

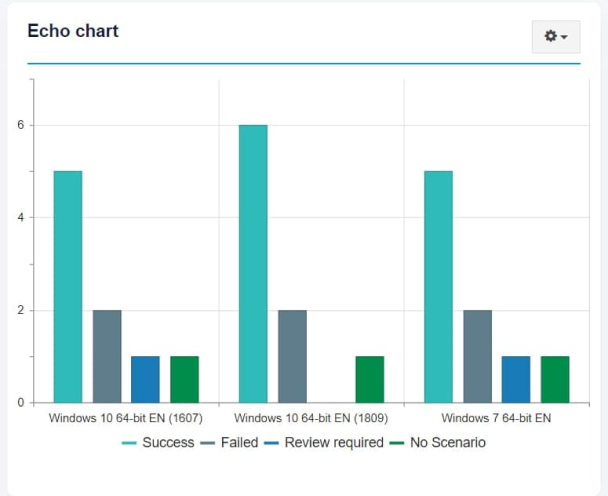
Echo chart is a setting indicating the option to create a Chart widget based on a user’s Echo test cases status. 


The screenshot below shows a result for the creation of a widget based on the Echo chart:  


dashboard_14.png

The option to change Widget is available after creation (see Widget configuration).

Project stages statistics 

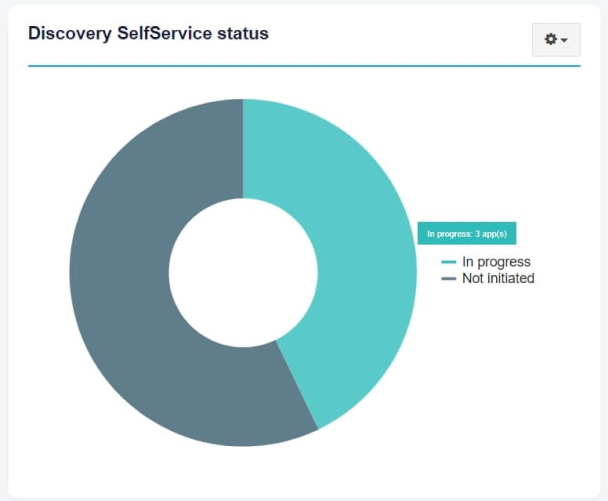
Project stages statistics is a setting indicating the option to create a Chart widget based on a user’s current project workflow steps statistics and status (see the Overview dashboard). 


The screenshot below shows a result for the creation of a widget based on Project stages statistics: 


dashboard_15.png


The option to change Widget is not available after creation.

Custom chart 

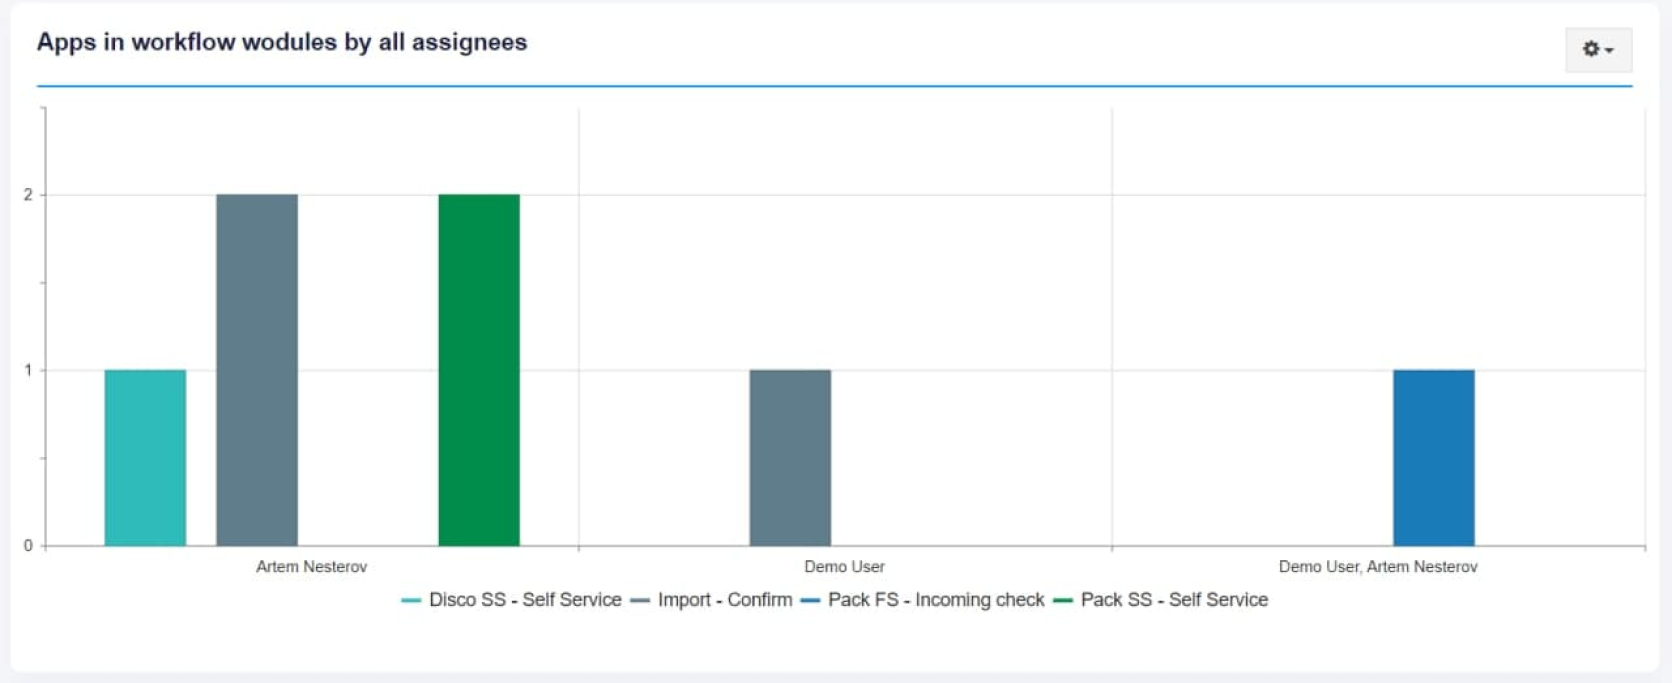
Custom chart is a setting indicating the option to create a Chart widget based on a user’s configurations and conditions (see the Widget configuration and Widget conditions configuration).  


The screenshot below shows a few results for the creation of a widget based on the Custom chart:  


dashboard_16.png


dashboard_17.png


The widget view varies depending on the conditions configuration set by a user.  

The option to change Widget is available after creation (see Widget configuration).

Widget configuration 

The option to configure Widget is available under Settings > Edit Chart or Edit Table. 

dashboard_18.png


dashboard_19.png

To configure widgets, a user is redirected to the constructor page. 

dashboard_20_2-(1).png

Constructor page allows configuring widget conditions and widget appearance.  

The widget configuration process includes the following steps: 

  • Step 1: Widget conditions 
  • Step 2: Widget appearance 

NoteStep 1: The widget conditions block is the same for all widget types.
Step 2: Widget appearance varies depending on widget type (see the Table widget appearance configuration and Chart widget appearance configuration). 

Widget conditions configuration 

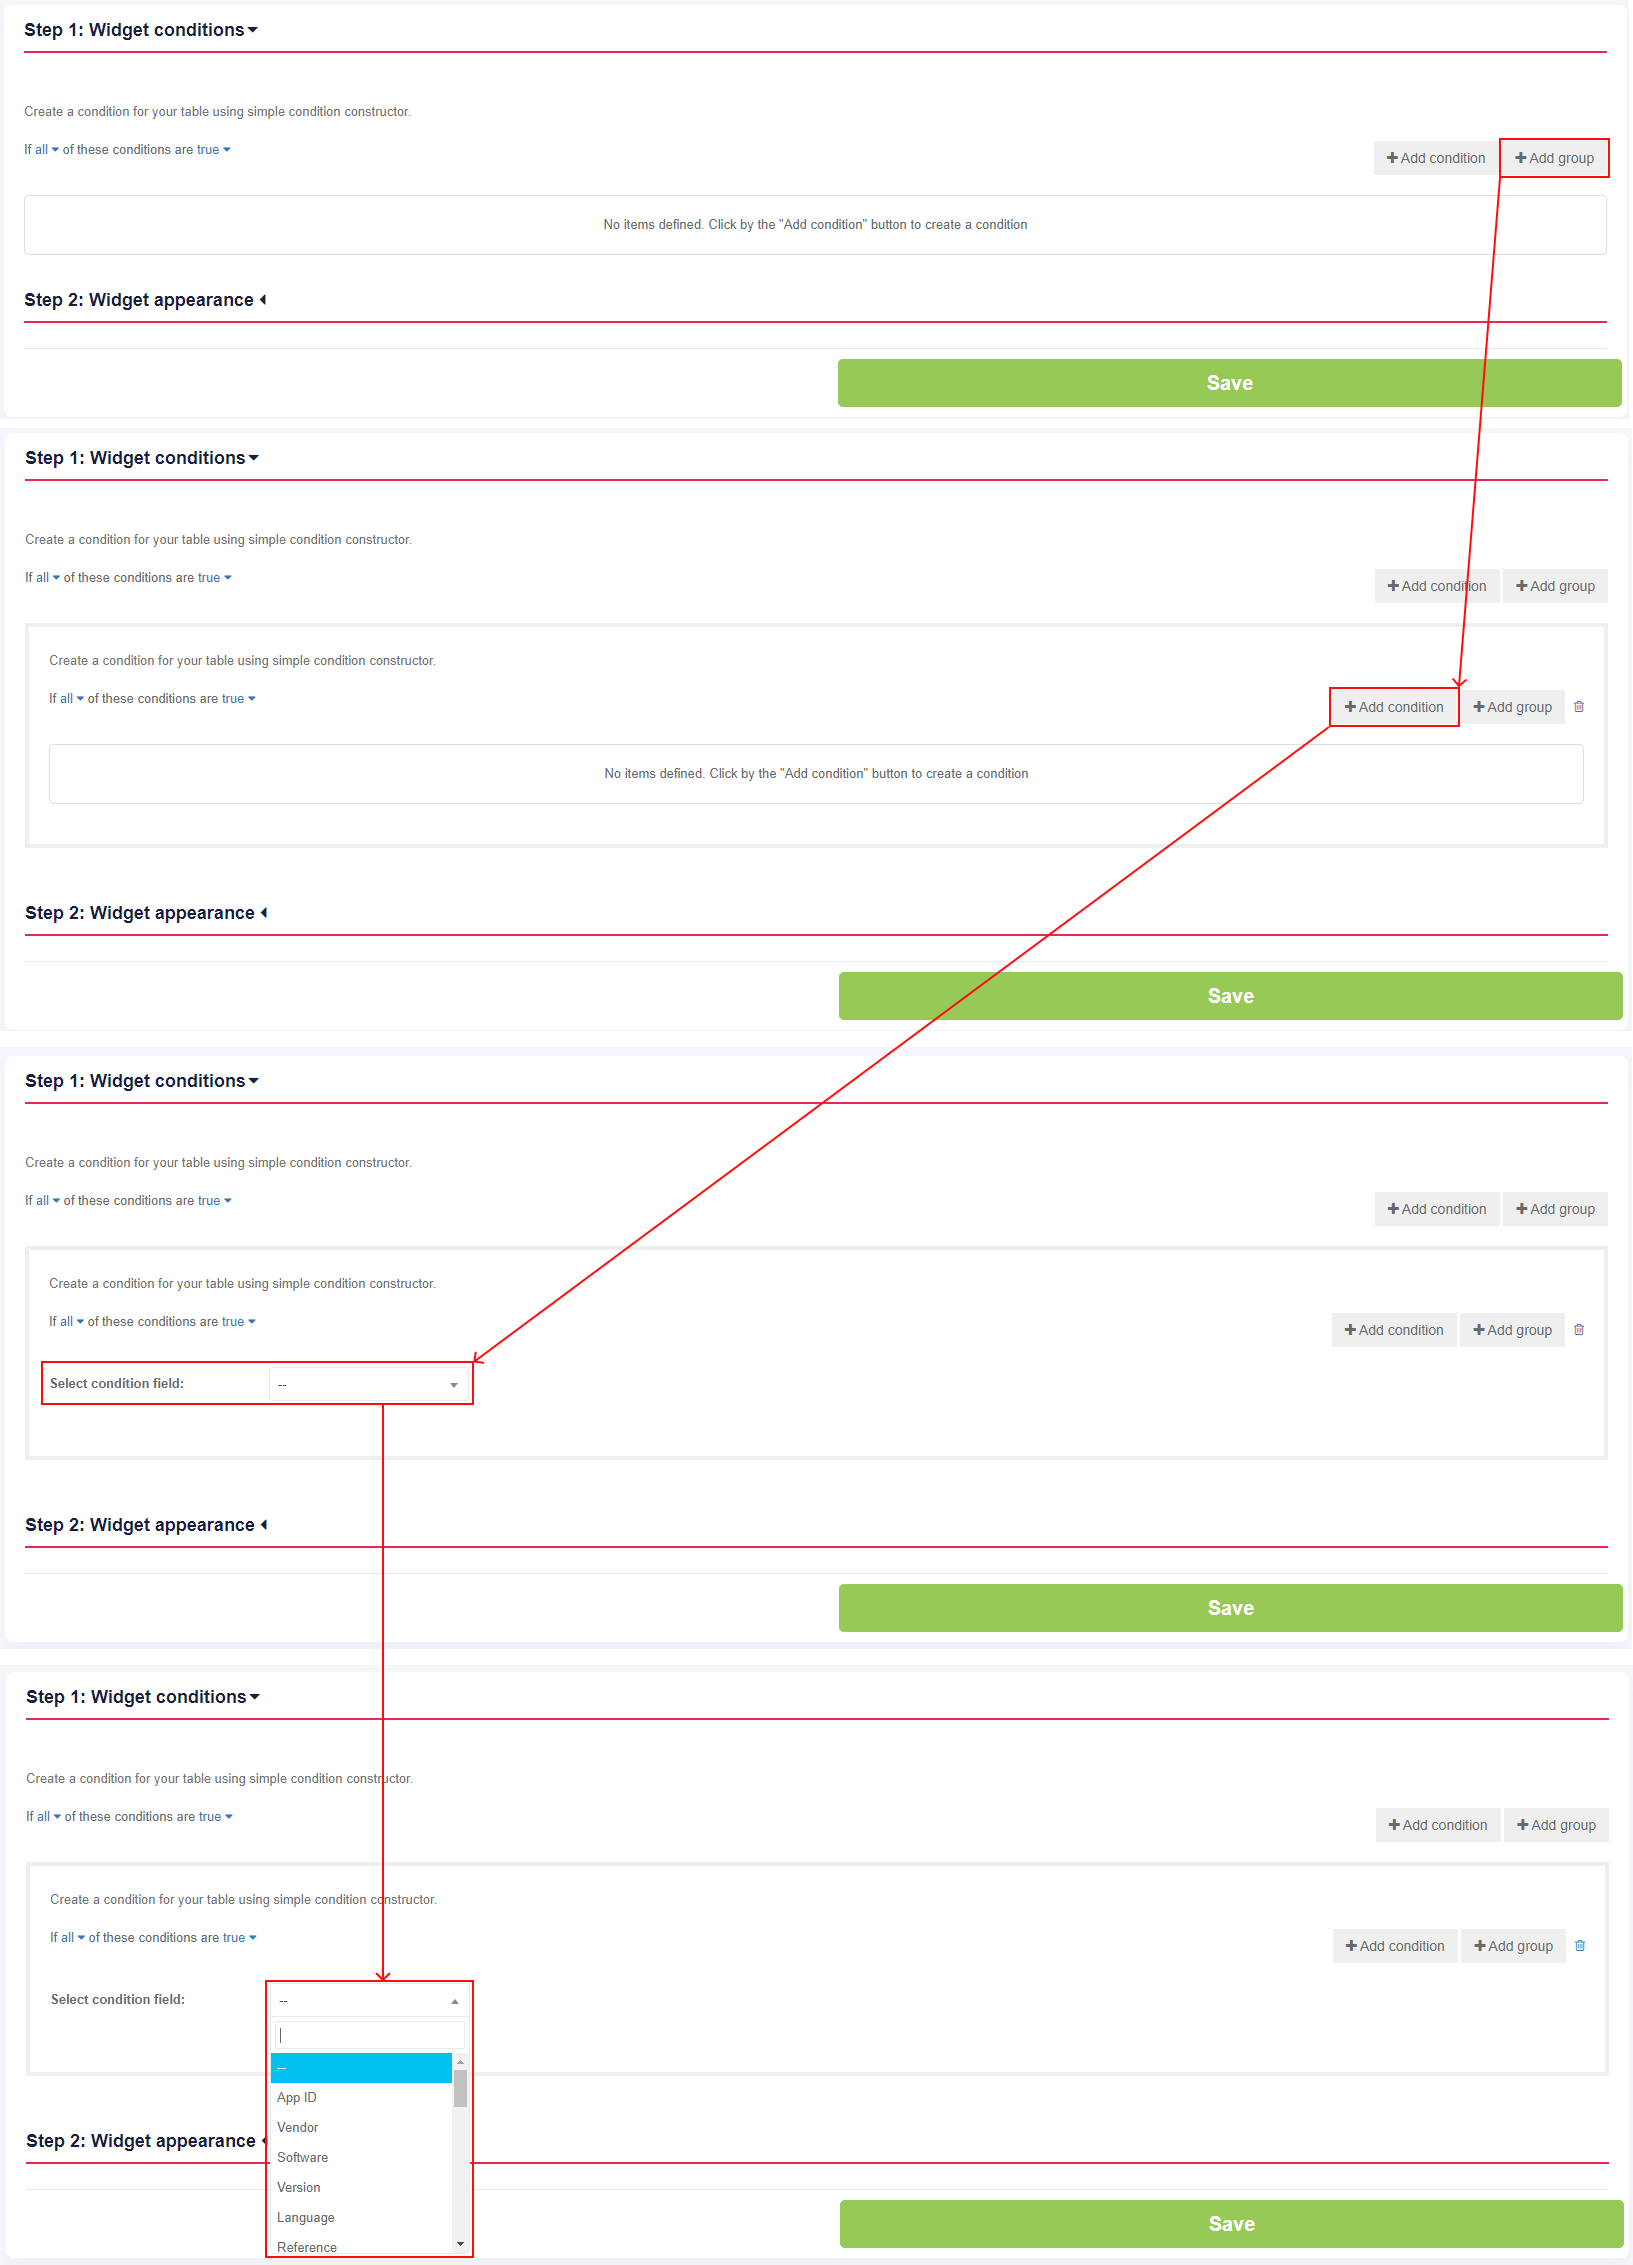
The Widget conditions block sets the rules by which to apply applications search.  

This block consists of the condition groups list. 

Group consists of logical operators that should be applied to conditions below: 
• If all/any of these conditions are true/false; 
• Inner group conditions. 

The options to add a condition or a group of conditions are available under the Add condition and Add group buttons. 

dashboard_21_2-(1).png


dashboard_22_2.png
The following table contains all widget condition settings, options, parameters and values:

Condition setting Condition setting options Condition setting parameter Condition setting value

App ID 

    Is less than Is greater than 

    - 

    Number 


    Vendor 
    Software 
    Language 
    Reference 

      Is  Is not  Starts with  Ends with  Contains  Is null or empty 

      - 

      Integer 

      Version 

        Is less than  Is  Is not  Is greater than 

        - 

        Integer 

        Echo 

          Contains  Not in 
            Pending  In progress  Success  Failed  Review required  Action required  No Scenario  Disabled  All 

            - 

            Updated 

            Push To Sccm 


              Is less than  Is  Is not  Is greater than 
                Date  Current Date  Days Offset  Weeks Offset  Start of week  Start of month  Start of year  End of week  End of month  End of year 

                Date 

                Application’s prerequisites 

                  Contains  Not in 

                  - 

                  Applications uploaded to the project & packages 

                  Origin 

                    Contains  Not in 
                      CSV import  Classic import  Intune Import  SCCM Import  Catalogue & UM Import 

                      - 

                      Stage 

                        Starts with  Ends with  Contains 

                        - 

                        Integer 

                        Application’s parent 

                          Contains  Not in 

                          - 

                          Applications uploaded to the project & packages 

                          Factory request type 
                          Factory Request platfom 
                          Factory request start date 
                          Factory request SLA On Time/Overdue 

                          Factory request status 
                          Factory request delivery date 
                          Factory request invoiced 

                          Factory  request date of invoicing 

                            Packaging – Factory Service 

                            - 

                            - 

                            Assignee 

                              All  Current  Discovery – Self Service  Packaging – Self Service  Testing – Self Service  Discovery – Factory Service  Packaging – Factory Service  Testing - Factory Service 

                              - 

                              Users assigned to a specific step. 

                              Status 

                                Global  Discovery – Self Service  Packaging – Self Service  Testing – Self Service  Discovery – Factory Service  Packaging – Factory Service  Testing – Factory Service 
                                  Is  Is not 
                                    Incomplete  Complete 

                                    Start Module Time 
                                    Finish Module Time 

                                      Discovery – Self Service  Packaging – Self Service  Testing – Self Service  Discovery – Factory Service  Packaging – Factory Service  Testing – Factory Service 
                                        Is less than  Is   Is not  Is greater than 
                                          Date   Current Date   Days Offset  Weeks Offset  Start of week  Start of month  Start of year  End of week  End of month  End of year 

                                          Deliverable 

                                            Import  Discovery – Self Service  Packaging – Self Service  Testing – Self Serivce  Discovery – Factory Service  Packaging – Factory Service  Testing – Factory Service 
                                              Is 
                                                Not available  Available 

                                                Test status 

                                                  Testing – Self Service  Testing – Factory Service 
                                                    Contains  Not in 
                                                      Untested  Success  Failed  Fixed 
                                                      Widget appearance configuration 

                                                      Widget appearance block defines widget view for the dashboard (i.e., widget name, set of columns, chart type, grouping, ordering, aggregates). 

                                                      Table widget appearance configuration

                                                      The screenshot below shows settings a user can apply to configure table widget appearance. 
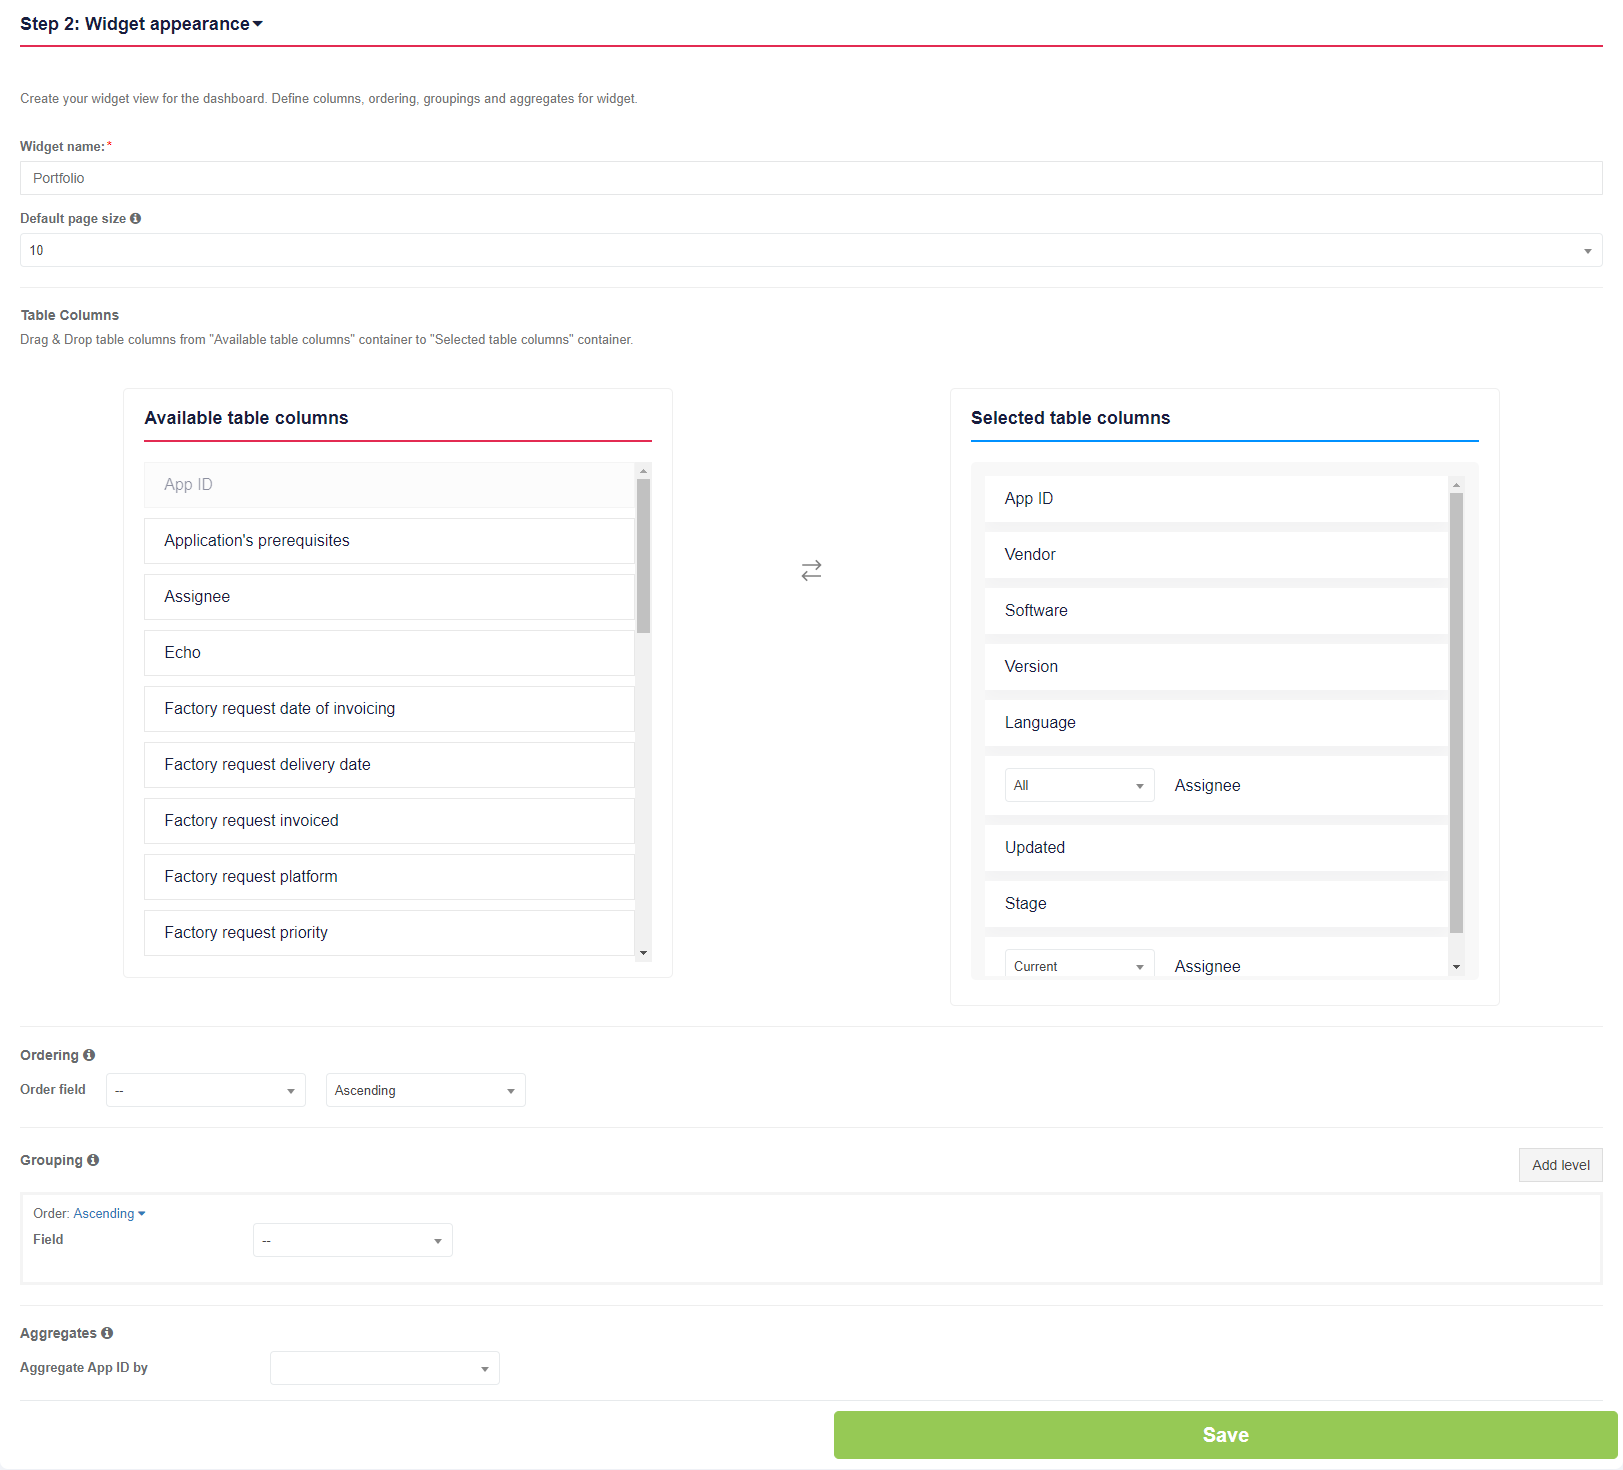
                                                      dashboard_23_2.png

                                                      Note. If the project Portfolio is shared with other projects within organization, the Projects to include field appears in the Step 2: Widget appearance block (see the Project settings).

                                                      The Project to include field allows a user to include applications from other organization's projects to the Widget.

                                                      The
                                                      re is no default value for this field. 

                                                      dashboard_35.png

                                                      Setting Description
                                                      Widget name The widget name field allows defining the widget name (e.g., Portfolio).
                                                      Default page size This field allows defining number of items per table page.
                                                      Table Columns This section allows setting up table columns container.
                                                      Ordering This field allows arranging items in a sequence.

                                                      The following criteria available: 

                                                      • Ascending; 
                                                      • Descending. 

                                                      The following items available: 

                                                      • App ID; 
                                                      • Vendor; 
                                                      • Software; 
                                                      • Version; 
                                                      • Language; 
                                                      • Assignee: All; 
                                                      • Updated; 
                                                      • Stage; 
                                                      • Assignee: Current. 
                                                      Grouping

                                                      This field allows combining data into groups that have the same value in selected columns. 

                                                      The following items available: 

                                                      • App ID; 
                                                      • Vendor; 
                                                      • Software; 
                                                      • Version; 
                                                      • Language; 
                                                      • Assignee: All; 
                                                      • Updated; 
                                                      • Stage; 
                                                      • Assignee: Current. 

                                                      The following order settings available: 

                                                      • Ascending; 
                                                      • Descending. 
                                                      Aggregates

                                                      This field allows defining high-level data composed from other more individual data by selected measurement for the column.

                                                      The following aggregate options available: 

                                                      • Count; 
                                                      • Sum; 
                                                      • Average; 
                                                      • Min; 
                                                      • Max. 


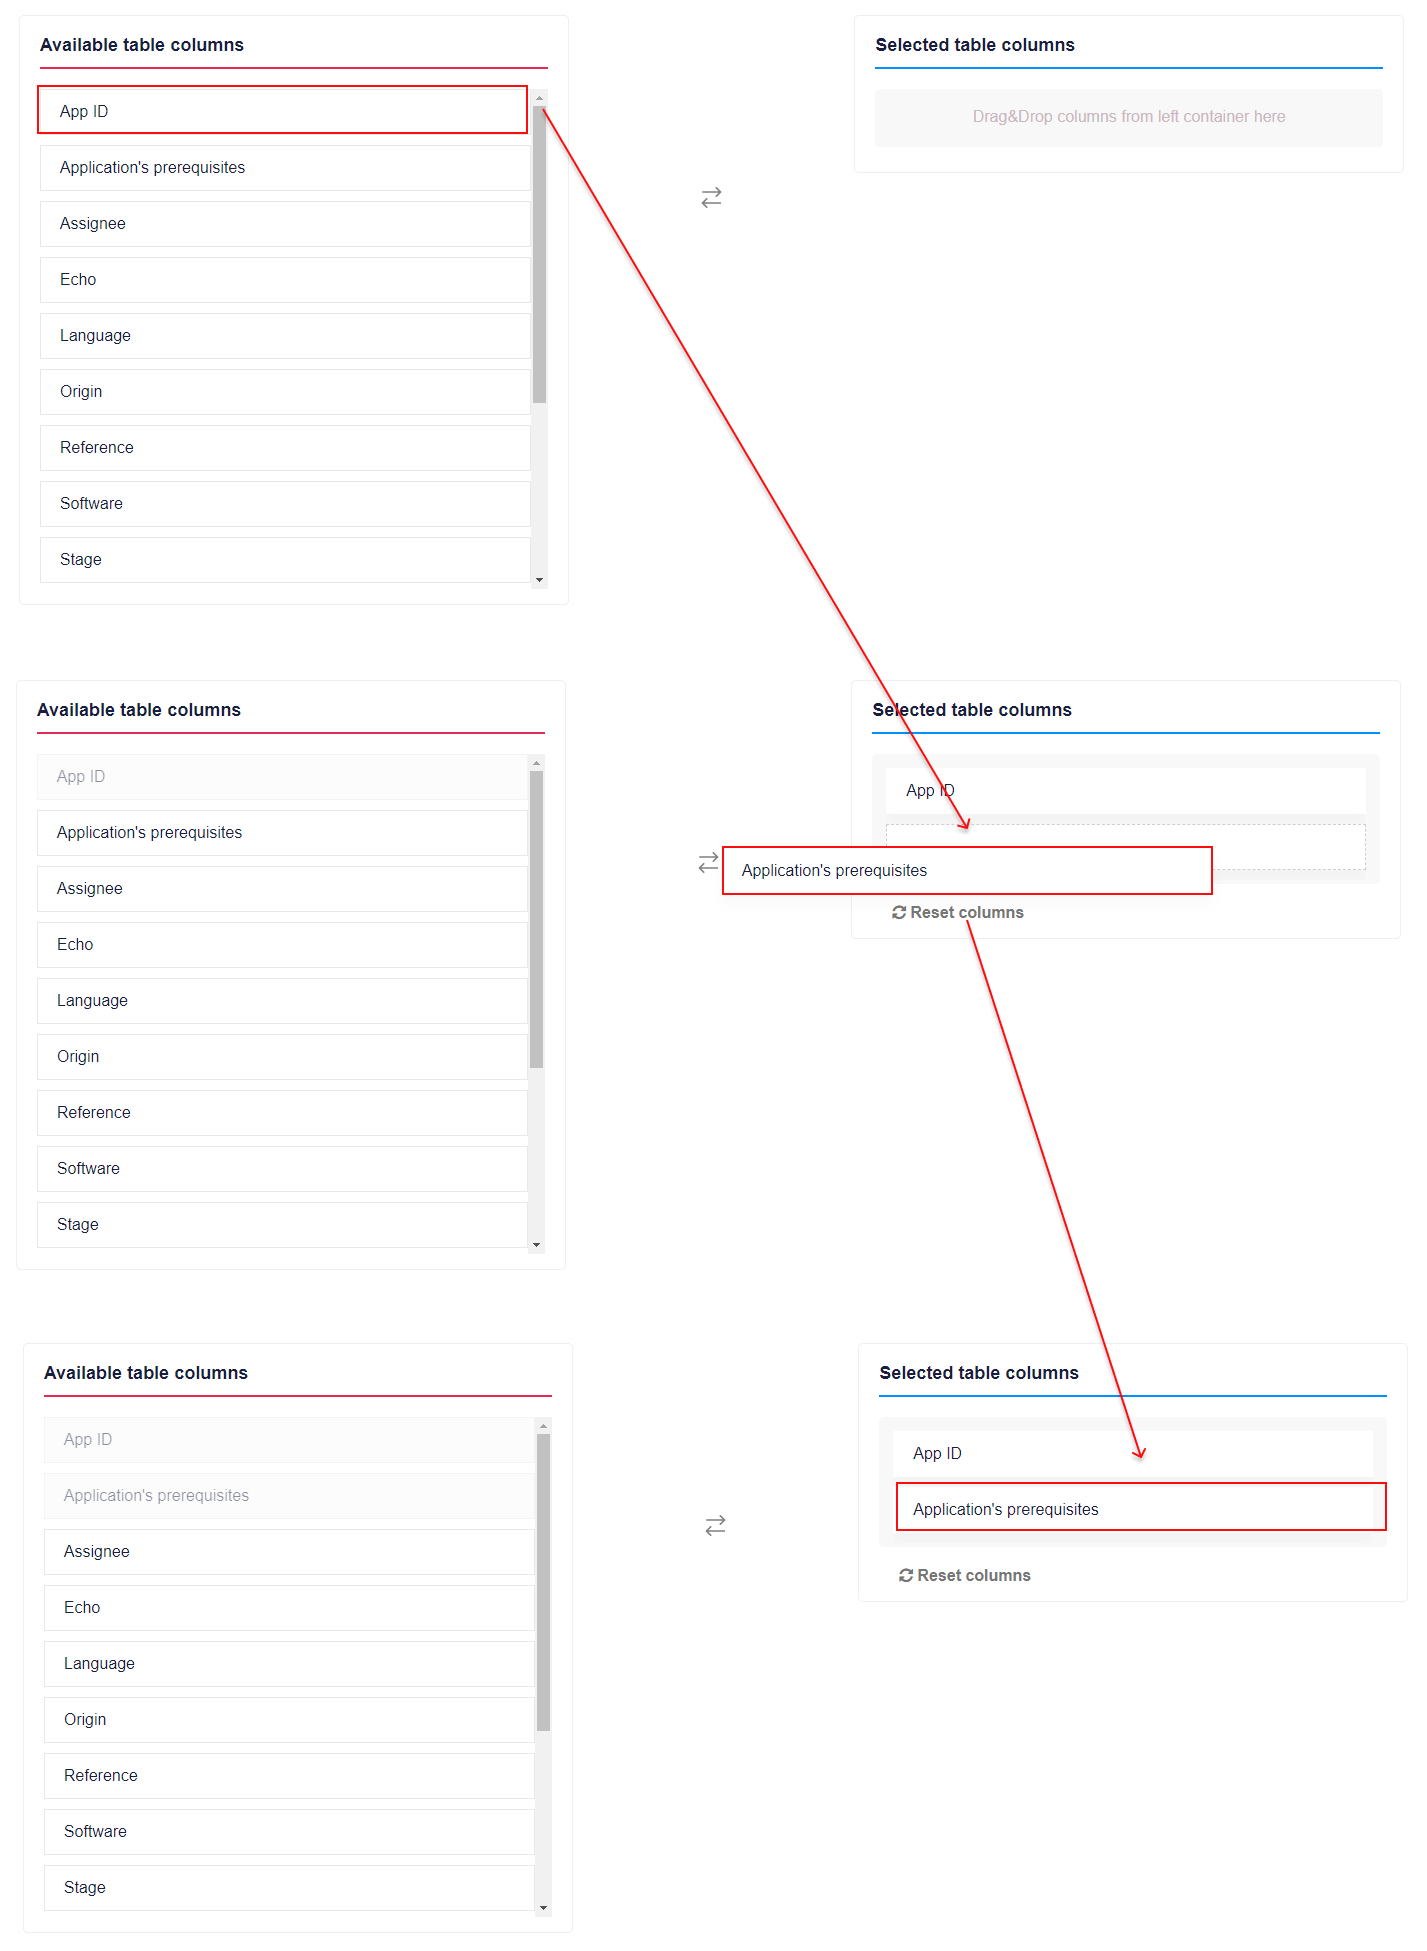
                                                      The table columns are set when dragged and dropped from the "Available table columns" to the "Selected table columns" container. 

                                                      dashboard_14.png

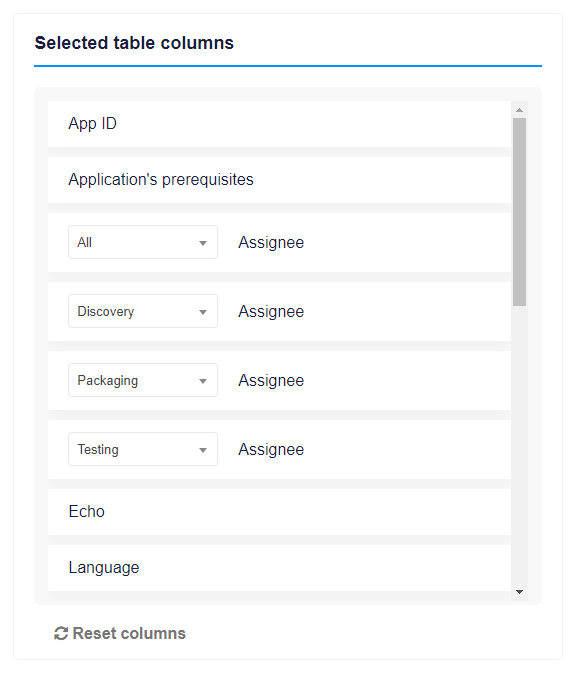
                                                      For columns used on a per-module basis (namely, Assignee, Status, Test status), an option to select which module this column should be applied to is available: 

                                                      dashboard_15.png

                                                      “Reset columns” button allows to revert actions for columns to initial state.
                                                      An option to arrange the ordering mode is available under the Ordering block. Ascending and Descending modes are available.

                                                      dashboard_16.png

                                                      Combining data into groups with the same value in columns is available under the Grouping block.

                                                      Ascending and Descending order modes are available. 

                                                      dashboard_17.png

                                                      A user sets the fields to include in a group.

                                                      dashboard_18.png

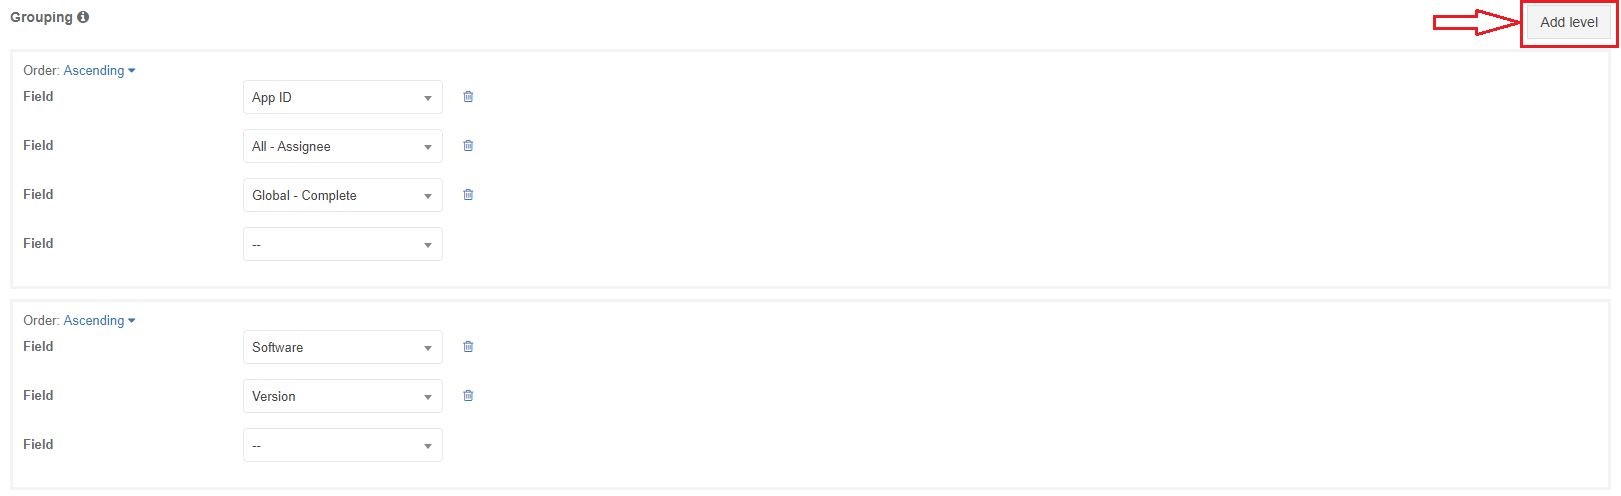
                                                      The “Add level” button creates a new group.

                                                      dashboard_19.png

                                                      Suppose the selected set of columns includes columns aggregated by Numeric field, Echo field, or Test status field. In that case, the ability to set the aggregation rules is available: 

                                                      dashboard_20.png

                                                      The settings are applied when clicking the Save button. A table widget appears on the project dashboard. 

                                                      dashboard_25.png

                                                      Chart widget appearance configuration

                                                      The screenshot below shows settings a user can apply to configure chart widget appearance. 

                                                      dashboard_27_2-(1).png

                                                      Settings 

                                                      Details 

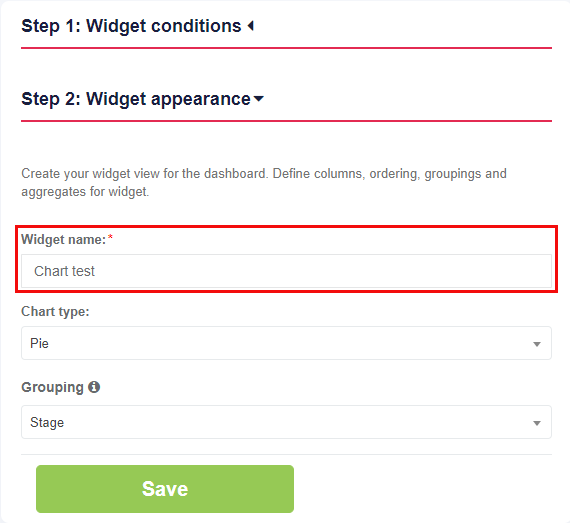
                                                      Widget name 

                                                      The widget name field allows defining the widget name (e.g., Portfolio). 

                                                      There is no default value for this field. 


                                                      dashboard_28_2.png

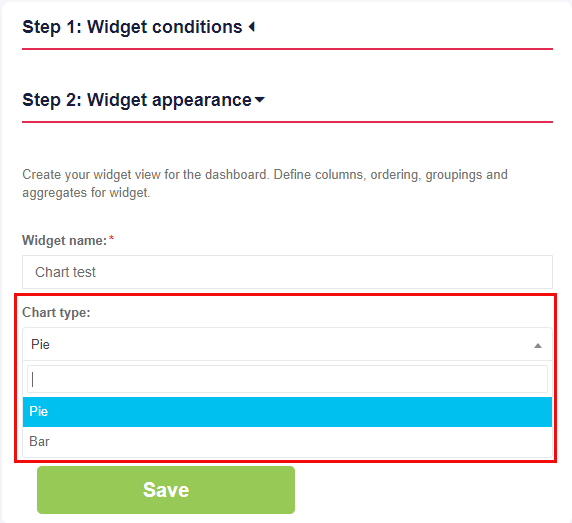
                                                      Chart type 

                                                      Chart type field allows choosing a type for the chart. 

                                                      The following options available: 

                                                      • Pie 
                                                      • Bar 

                                                      The default value is Pie. 


                                                      dashboard_29_2.png

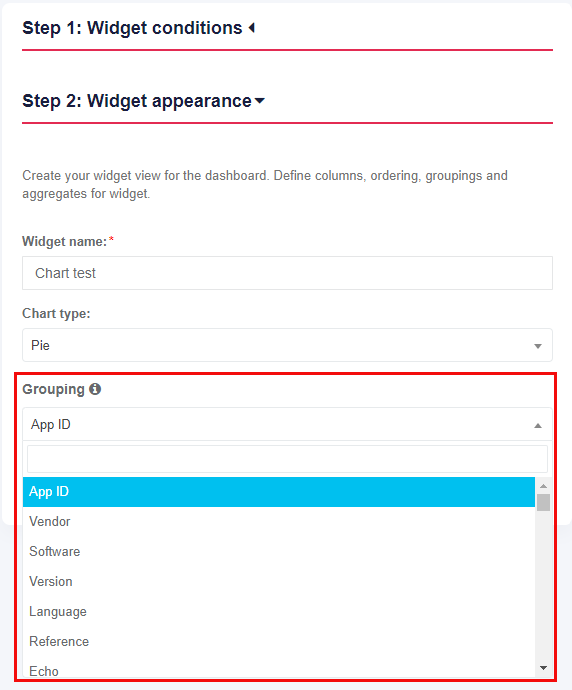
                                                      Grouping 

                                                      The grouping field allows combining data into groups. 

                                                      The following options available: 

                                                      • App ID
                                                      • Vendor 
                                                      • Software  
                                                      • Version 
                                                      • Language 
                                                      • Reference 
                                                      • Echo 
                                                      • Updated 
                                                      • Application’s prerequisites  
                                                      • Origin 
                                                      • Stage 
                                                      • Application’s parent 
                                                      • Testcase status 
                                                      • Echo platform 
                                                      • Assignee 
                                                      • Status 
                                                      • Start module time 
                                                      • Finish module time 
                                                      • Deliverable 
                                                      • Test status 

                                                       The default value is App ID. 


                                                      dashboard_30_2.png

                                                      Note. The options Assignee, Status, Start module time, Finish module time, Deliverable, and Test status varies depending on the project configuration (see the Create project). 


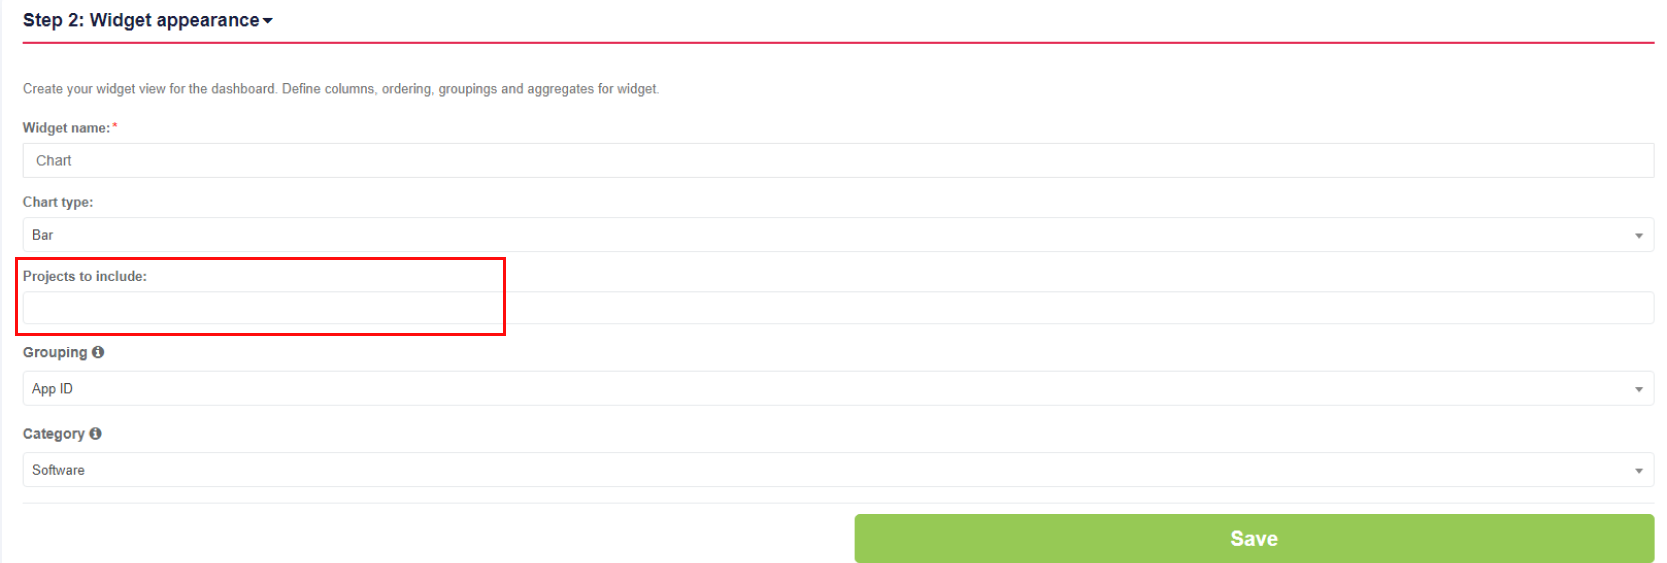
                                                      Note. If the project Portfolio is shared with other projects within organization, the Projects to include field appears in the Step 2: Project appearance block (see the Project settings).

                                                      The Project to include field allows a user to include applications from other organization's projects to the Widget.

                                                      There is no default value for this field. 

                                                      dashboard_36_2.png

                                                      The settings are applied when clicking the Save button. A chart widget appears on the project dashboard. 
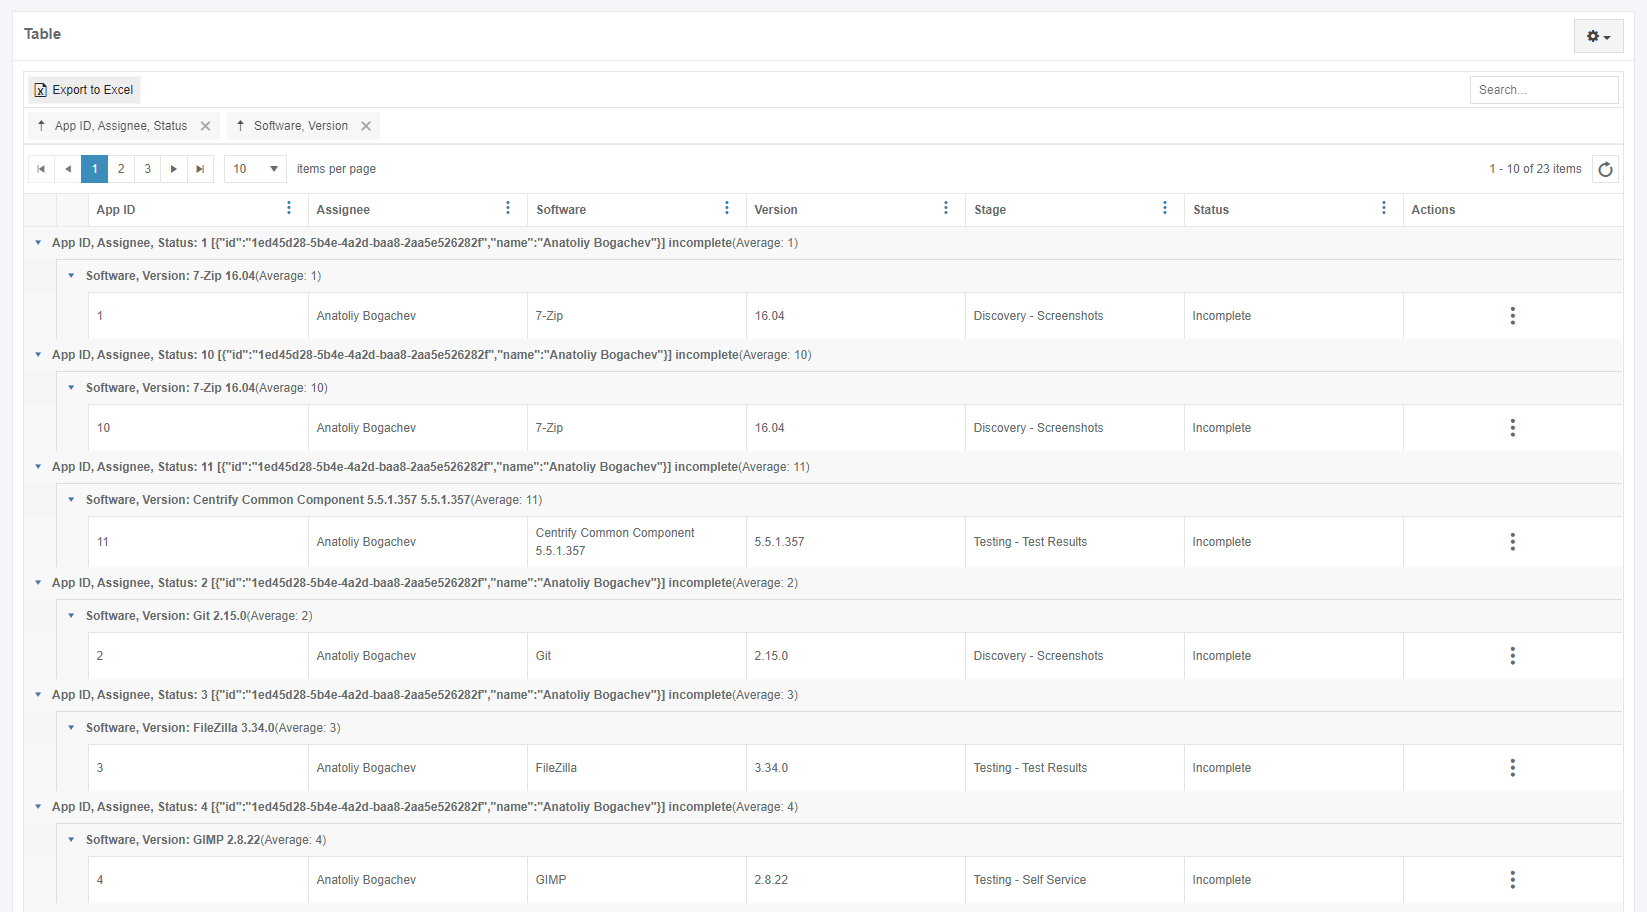
                                                      dashboard_08.png

                                                      Apptimized shows the following screen when successful: 
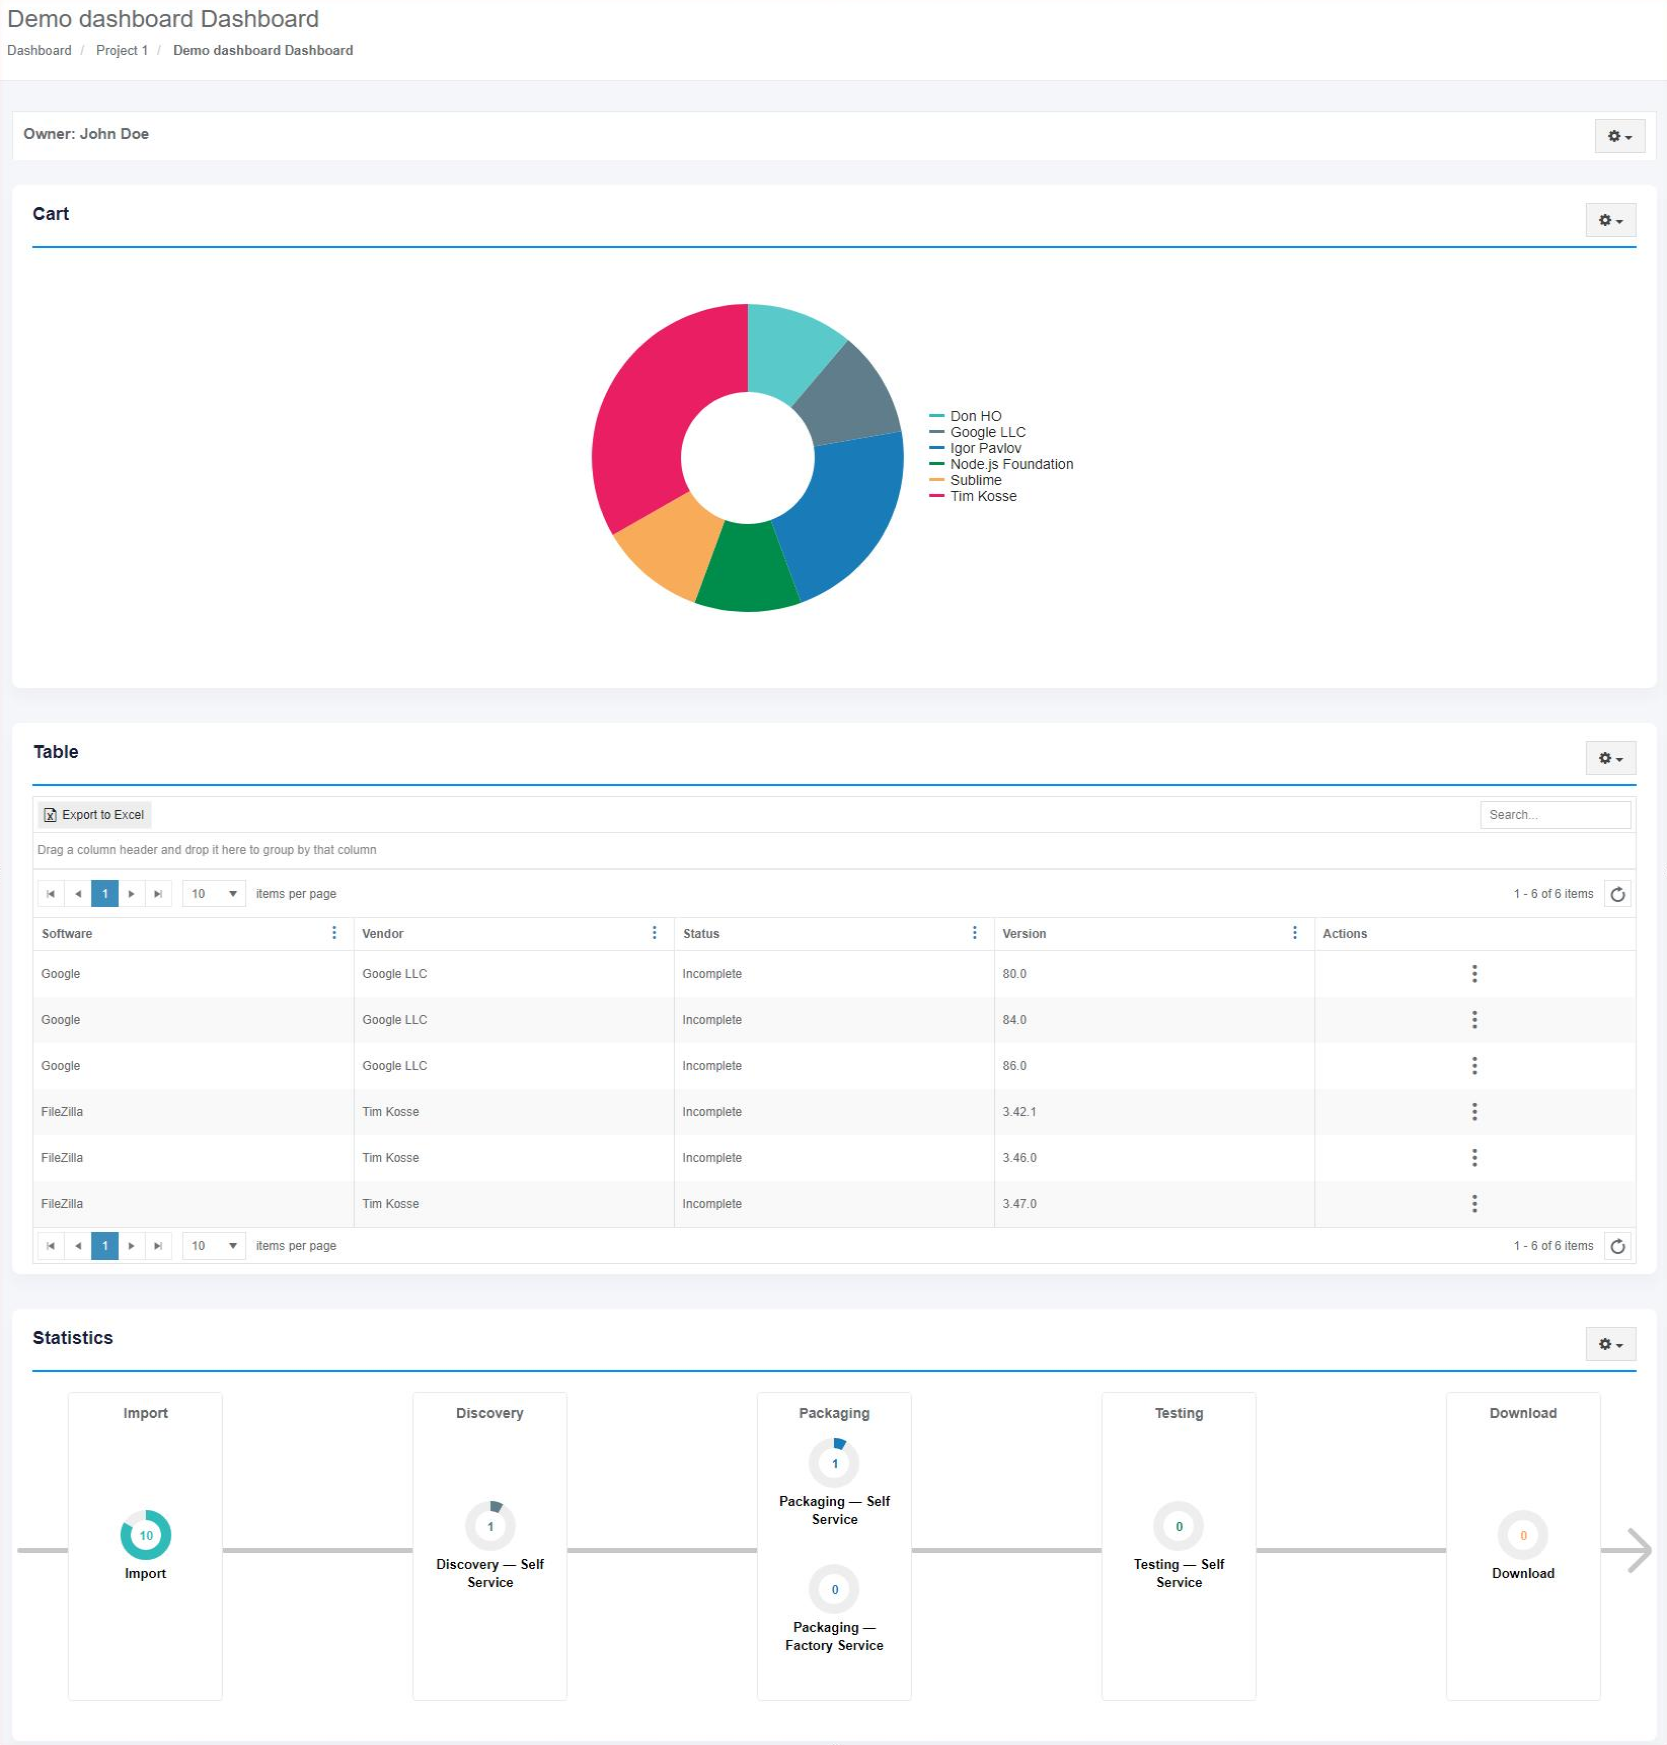
                                                      dashboard_31_1.png

                                                      Echo consumption widget appearance configuration

                                                      The screenshot below shows settings a user can apply to configure echo consuption widget appearance. 
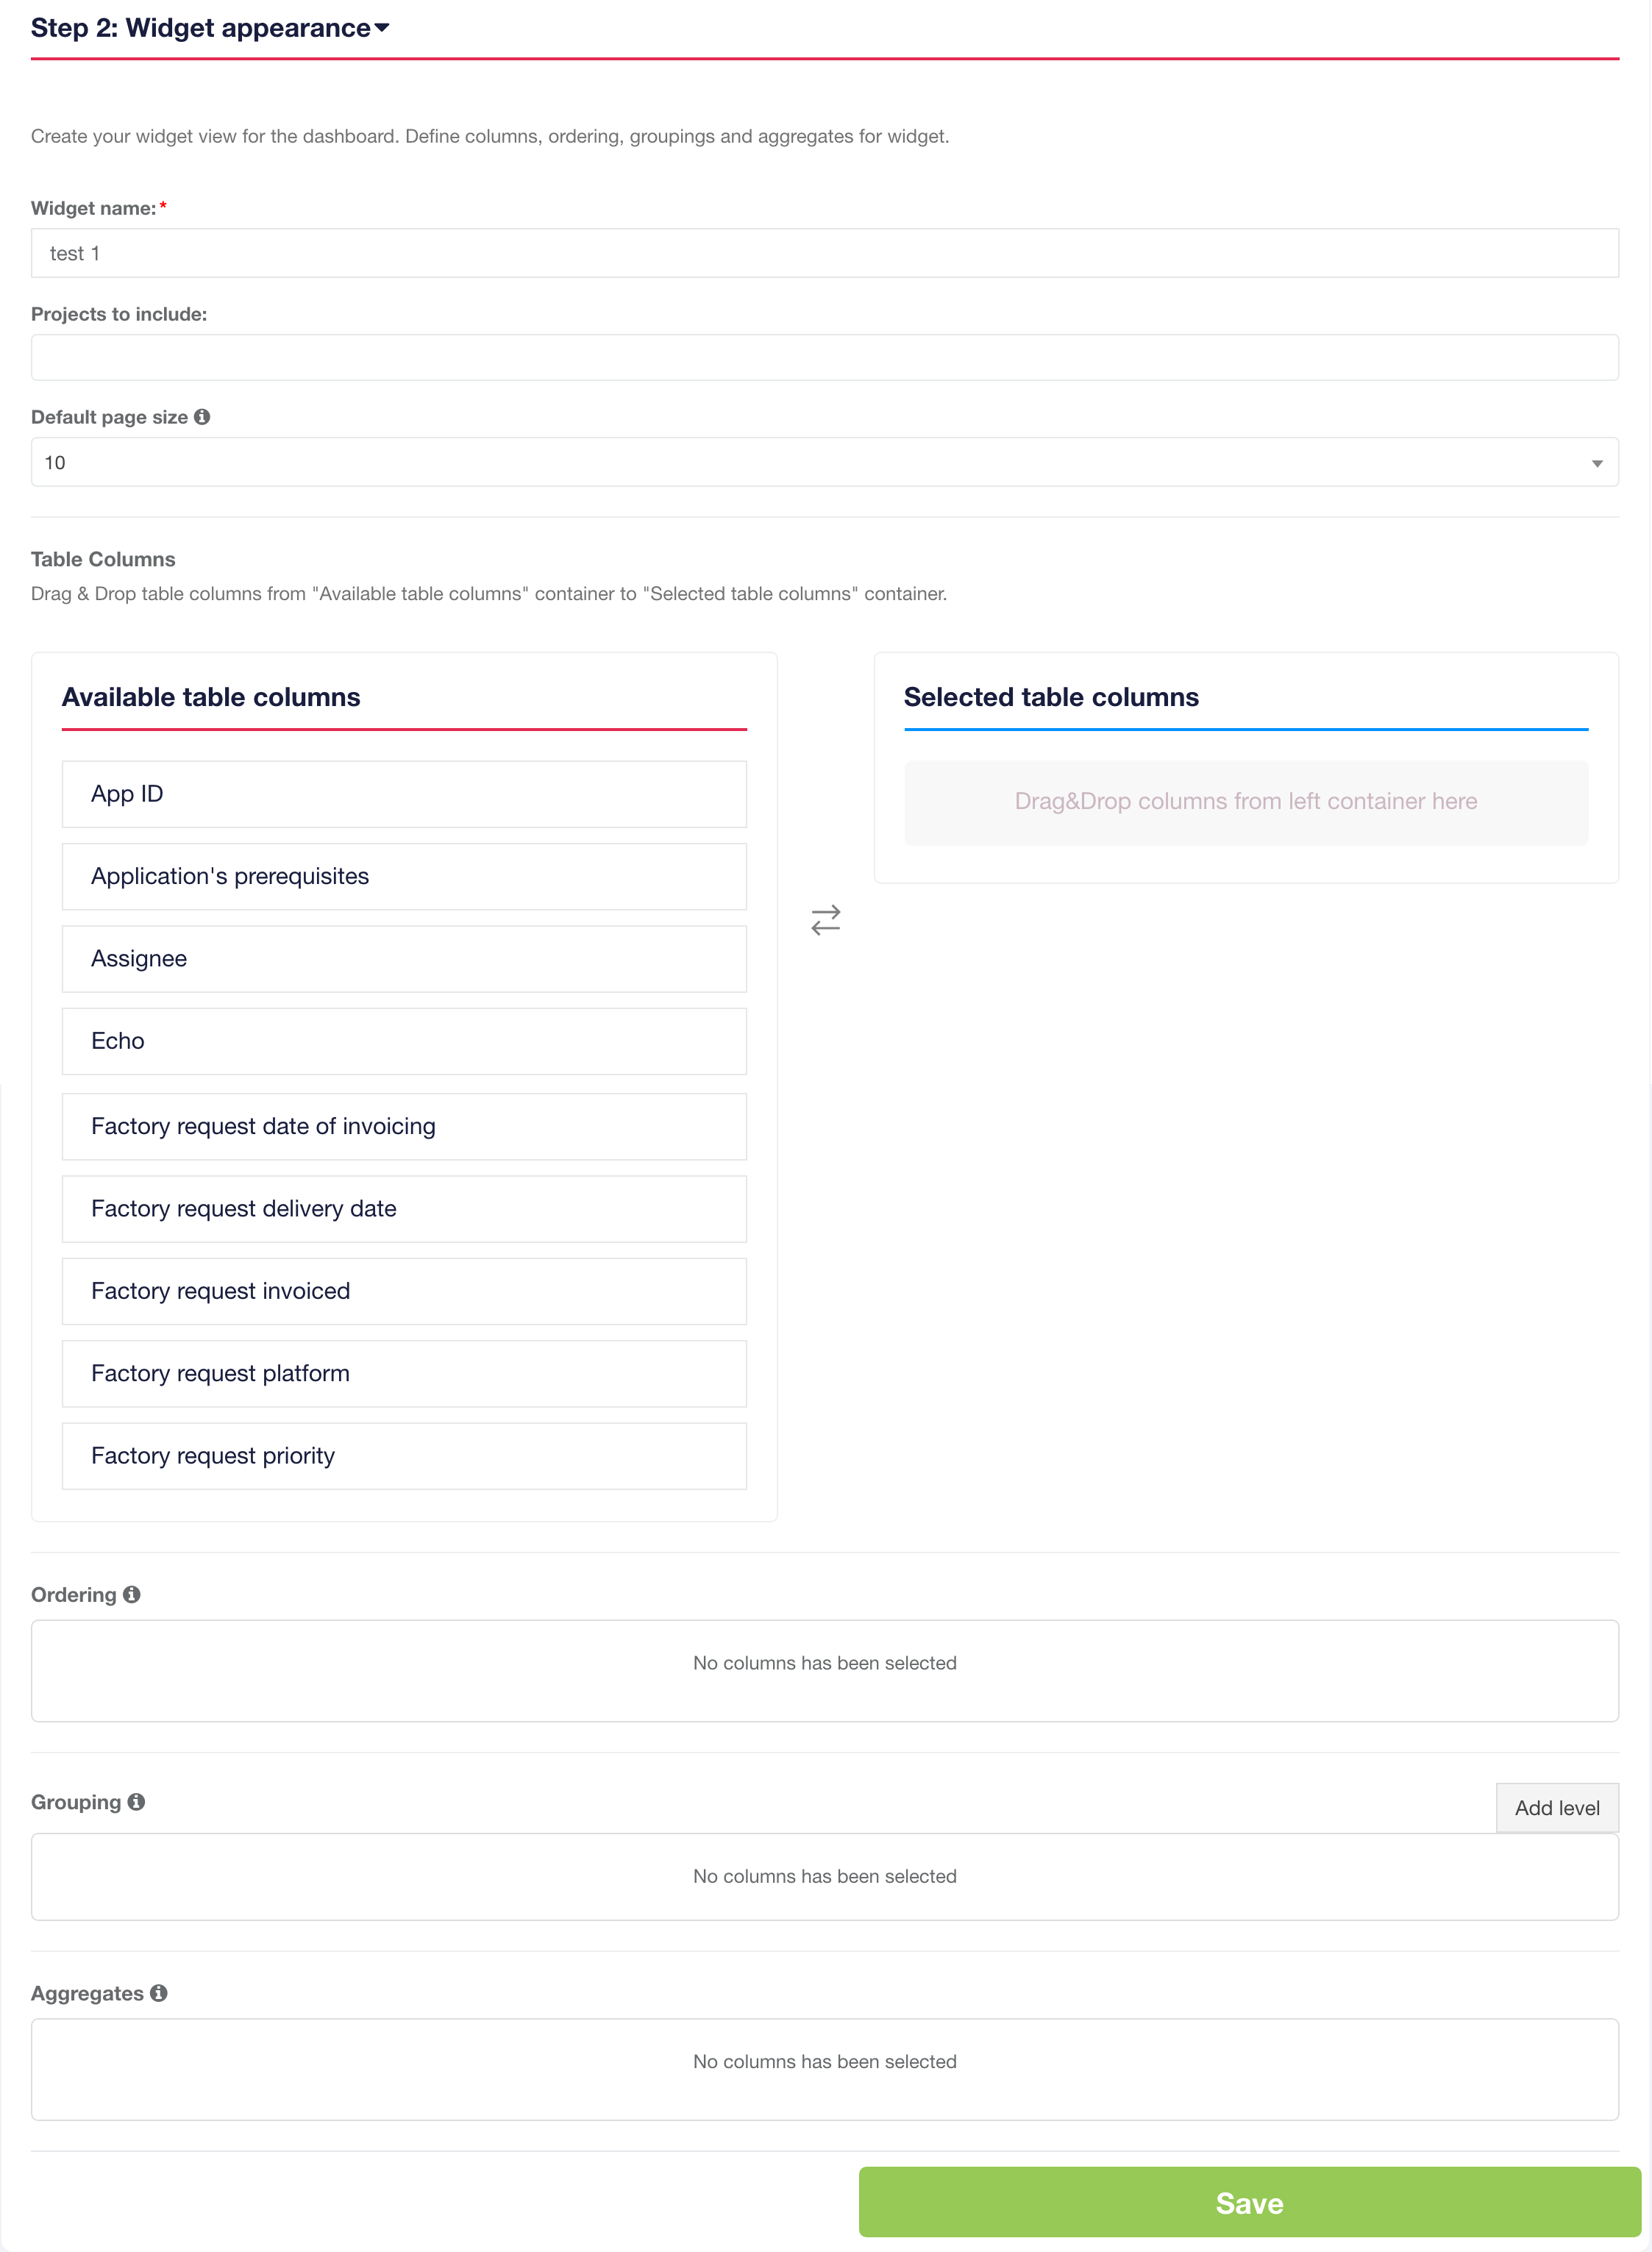
                                                      dashboards_30_x.png

                                                      Note. If the project Portfolio is shared with other projects within organization, the Projects to include field appears in the Step 2: Widget appearance block (see the Project settings).

                                                      The Project to include field allows a user to include applications from other organization's projects to the Widget.

                                                      The
                                                      re is no default value for this field. 

                                                      dashboard_35.png

                                                      Setting Description
                                                      Widget name The widget name field allows defining the widget name (e.g., Portfolio).
                                                      Default page size This field allows defining number of items per table page.
                                                      Table Columns This section allows setting up table columns container.
                                                      Ordering This field allows arranging items in a sequence.
                                                      Grouping This field allows combining data into groups that have the same value in selected columns.
                                                      Aggregates This field allows defining high-level data composed from other more individual data by selected measurement for the column.


                                                      Clone dashboard 

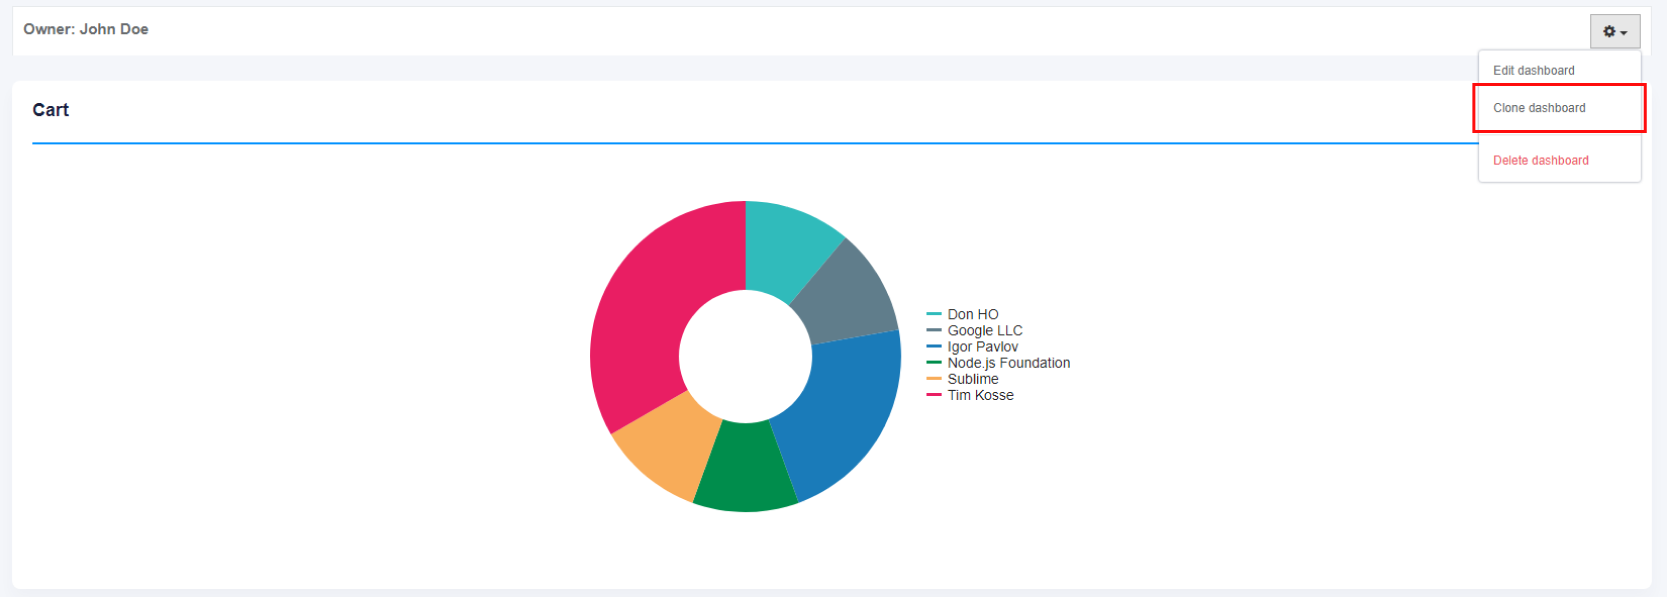
                                                      The option to clone the dashboard is available under Settings > Clone dashboard. 

                                                      Apptimized shows the following modal window: 
                                                      dashboard_32.png


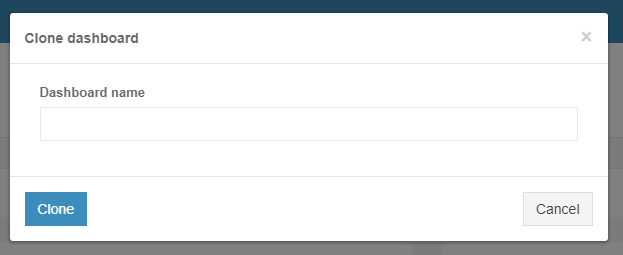
                                                      Apptimized shows the following modal window:
                                                      dashboard_28.png

                                                      The cloning step is finalized by clicking on the Clone button. 
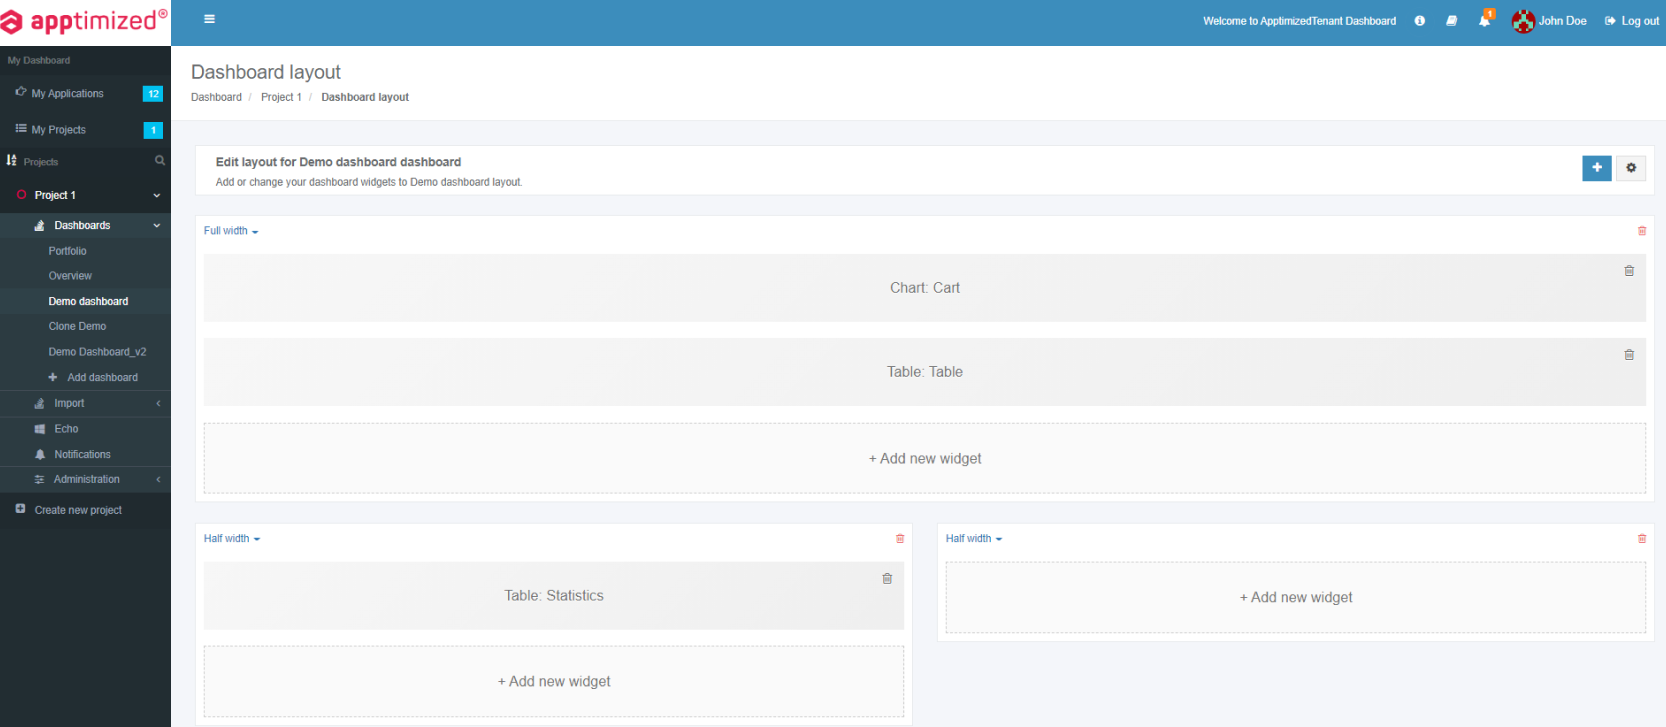
                                                      The cloned dashboard appears in the project menu. Apptimized shows the Dashboard layout page for the cloned dashboard. 
                                                      dashboard_33.png

                                                      Delete dashboard 

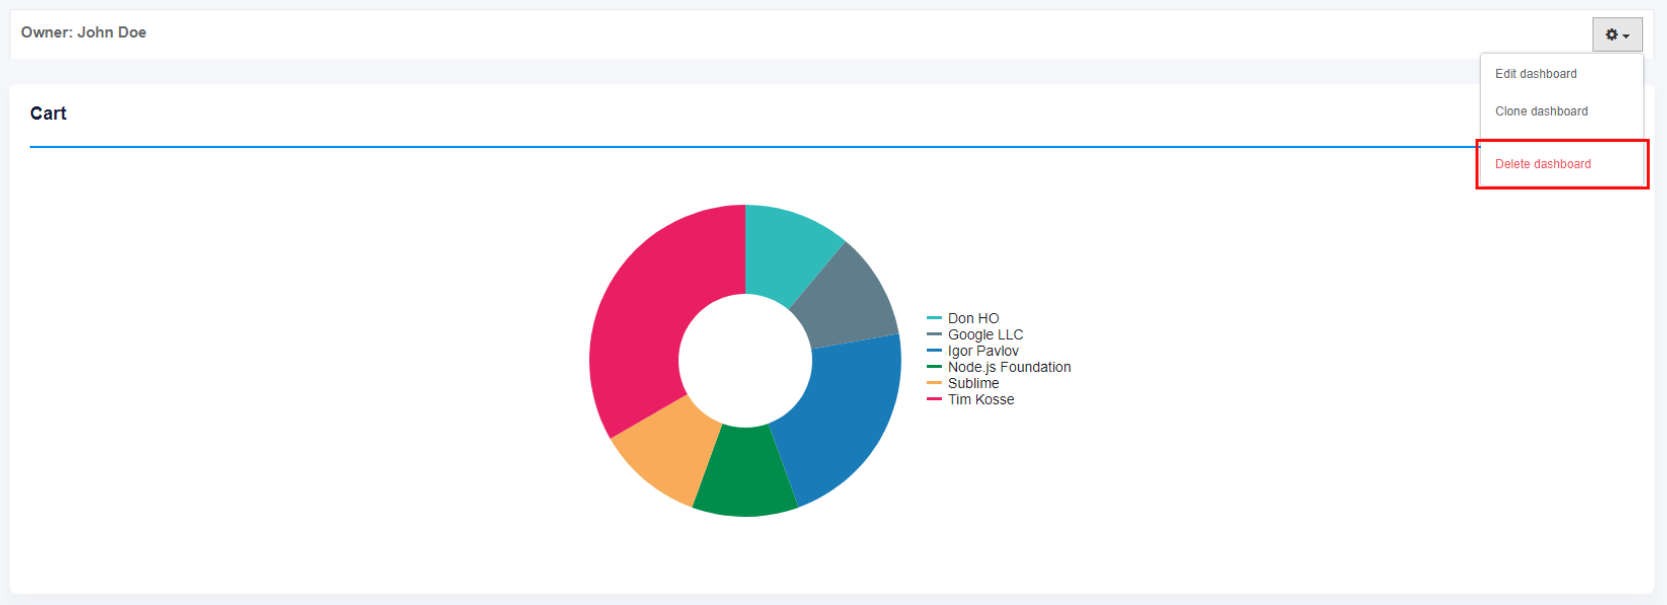
                                                      The option to delete the dashboard is available under Settings > Delete dashboard. 
                                                      dashboard_34.png

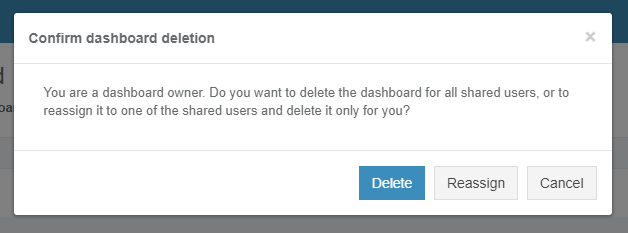
                                                      Apptimized shows the following modal window:
                                                      dashboard_31.png

                                                      Three options available:

                                                      1. Delete:

                                                      • Permanently delete;
                                                      • Apptimized reverts to the project dashboard.

                                                      2. Reassign to another owner - a new owner can be assigned^

                                                      dashboard_32_2.png

                                                      3. Cancel - reverts to the dashboard.