Integration
Application registrations
The application registration is carried out in the Microsoft Azure portal via administrative credentials. A user can choose one of the following types of accounts:
A tenant admin account;
- A tenant user account (with the enabled “Users can register applications” setting).
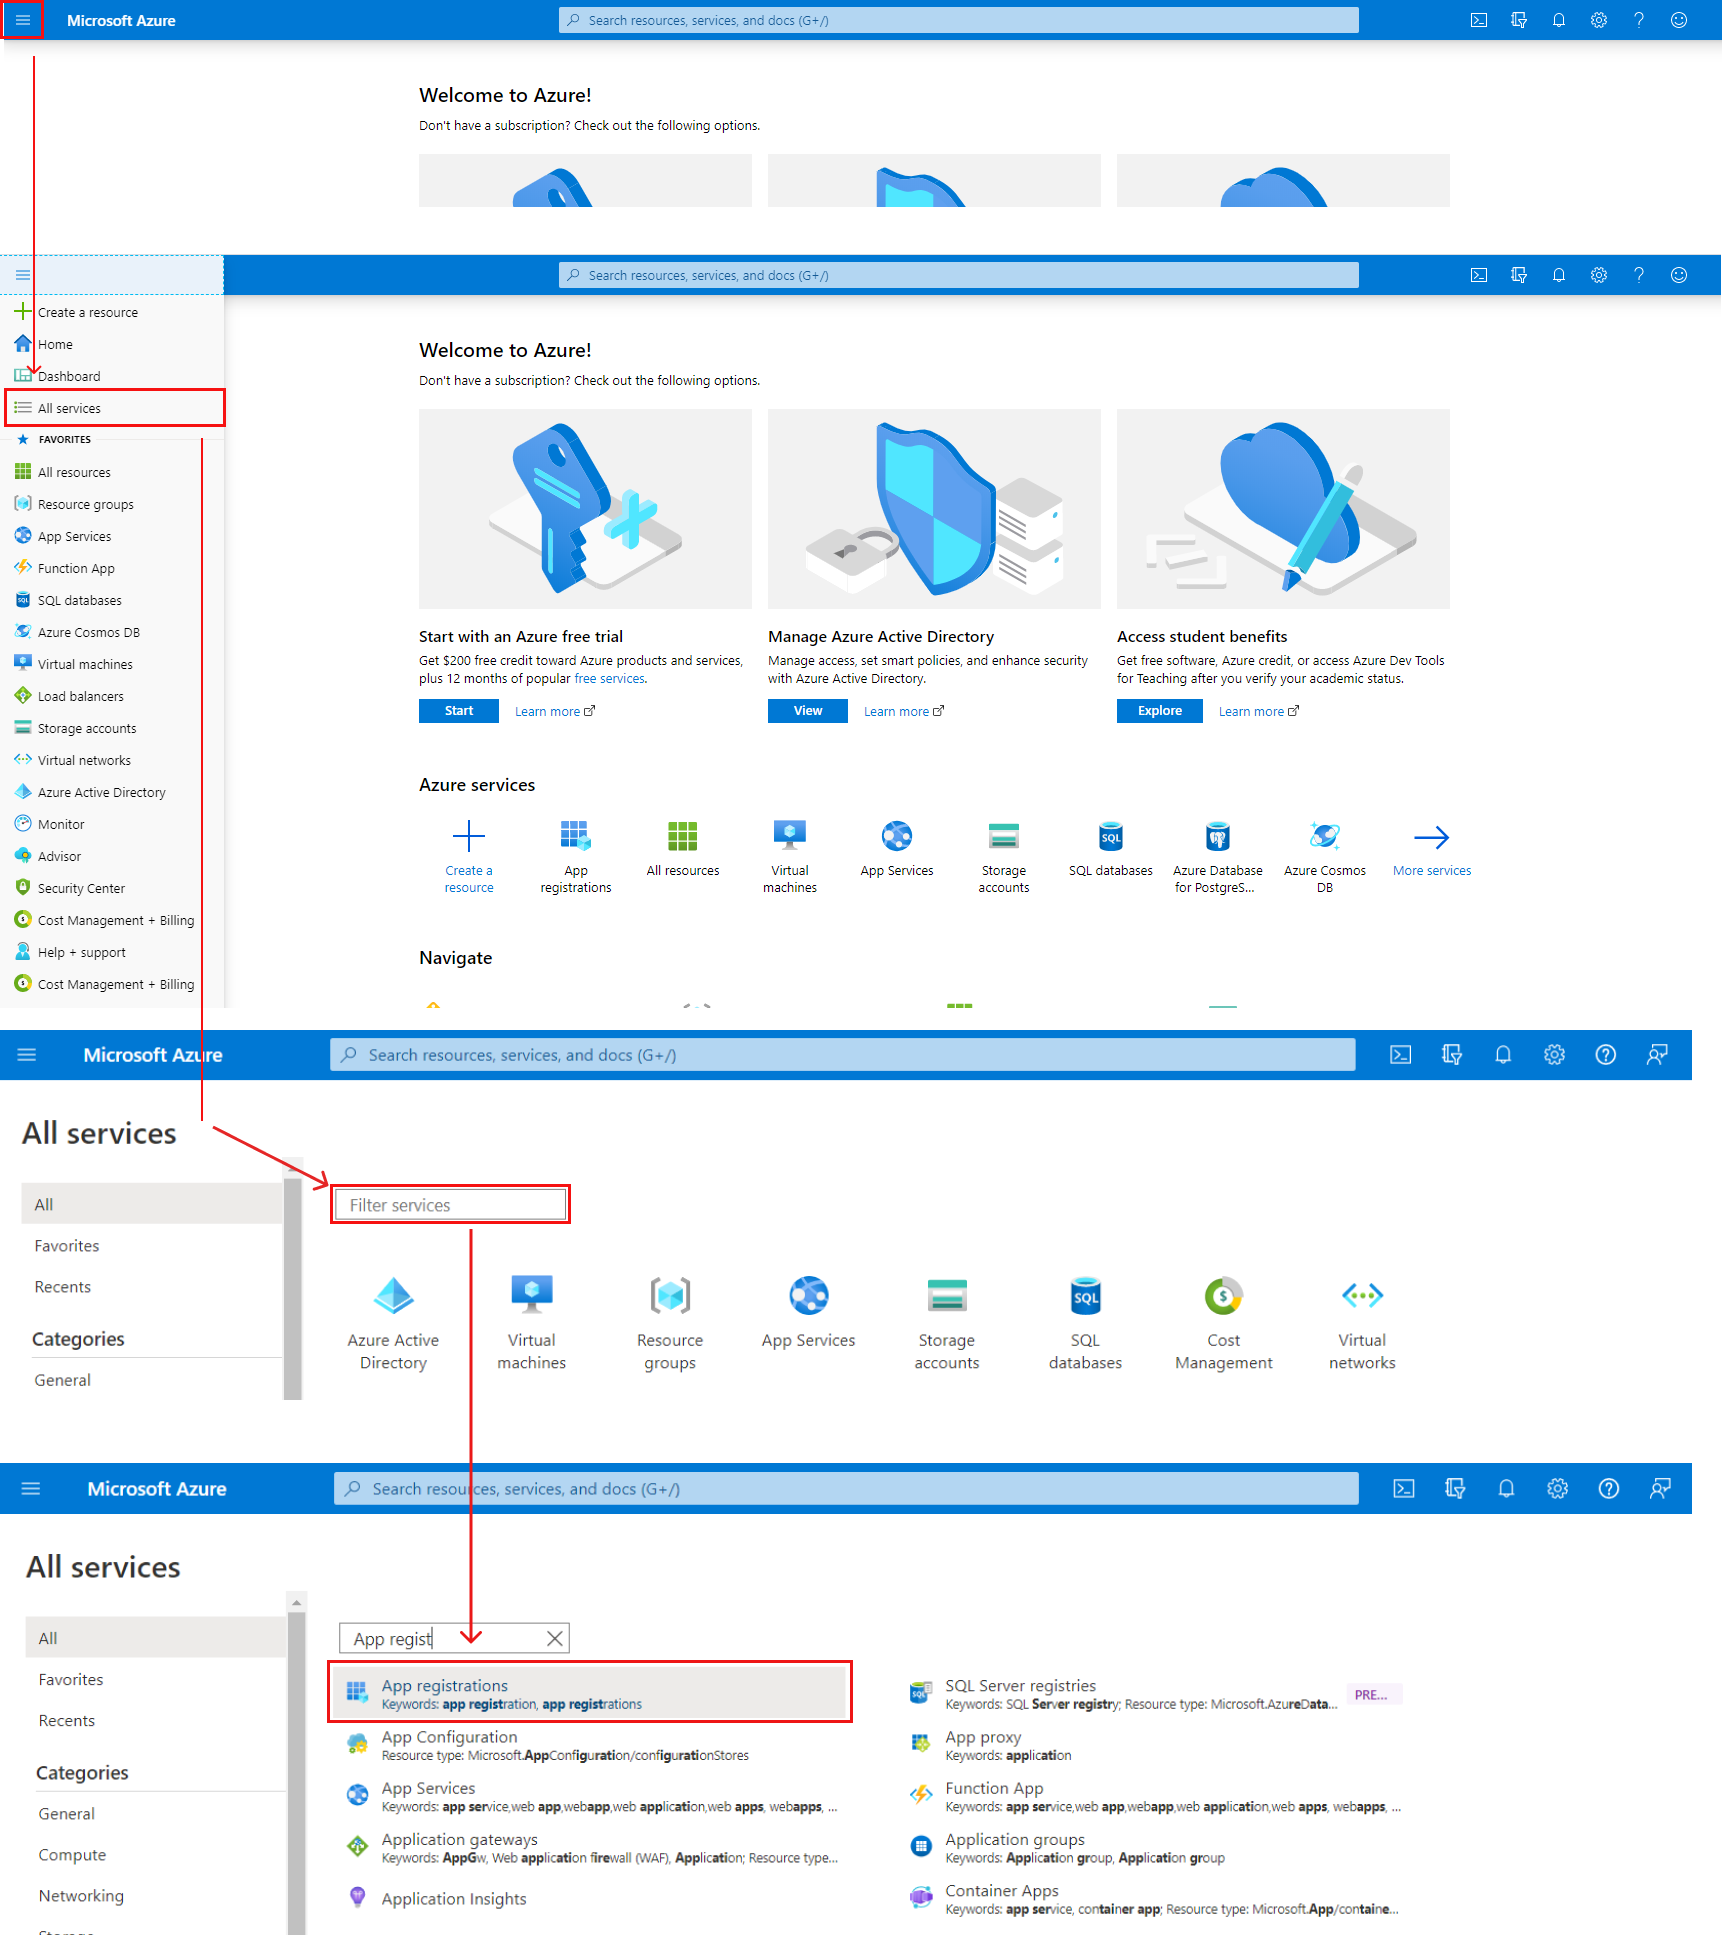
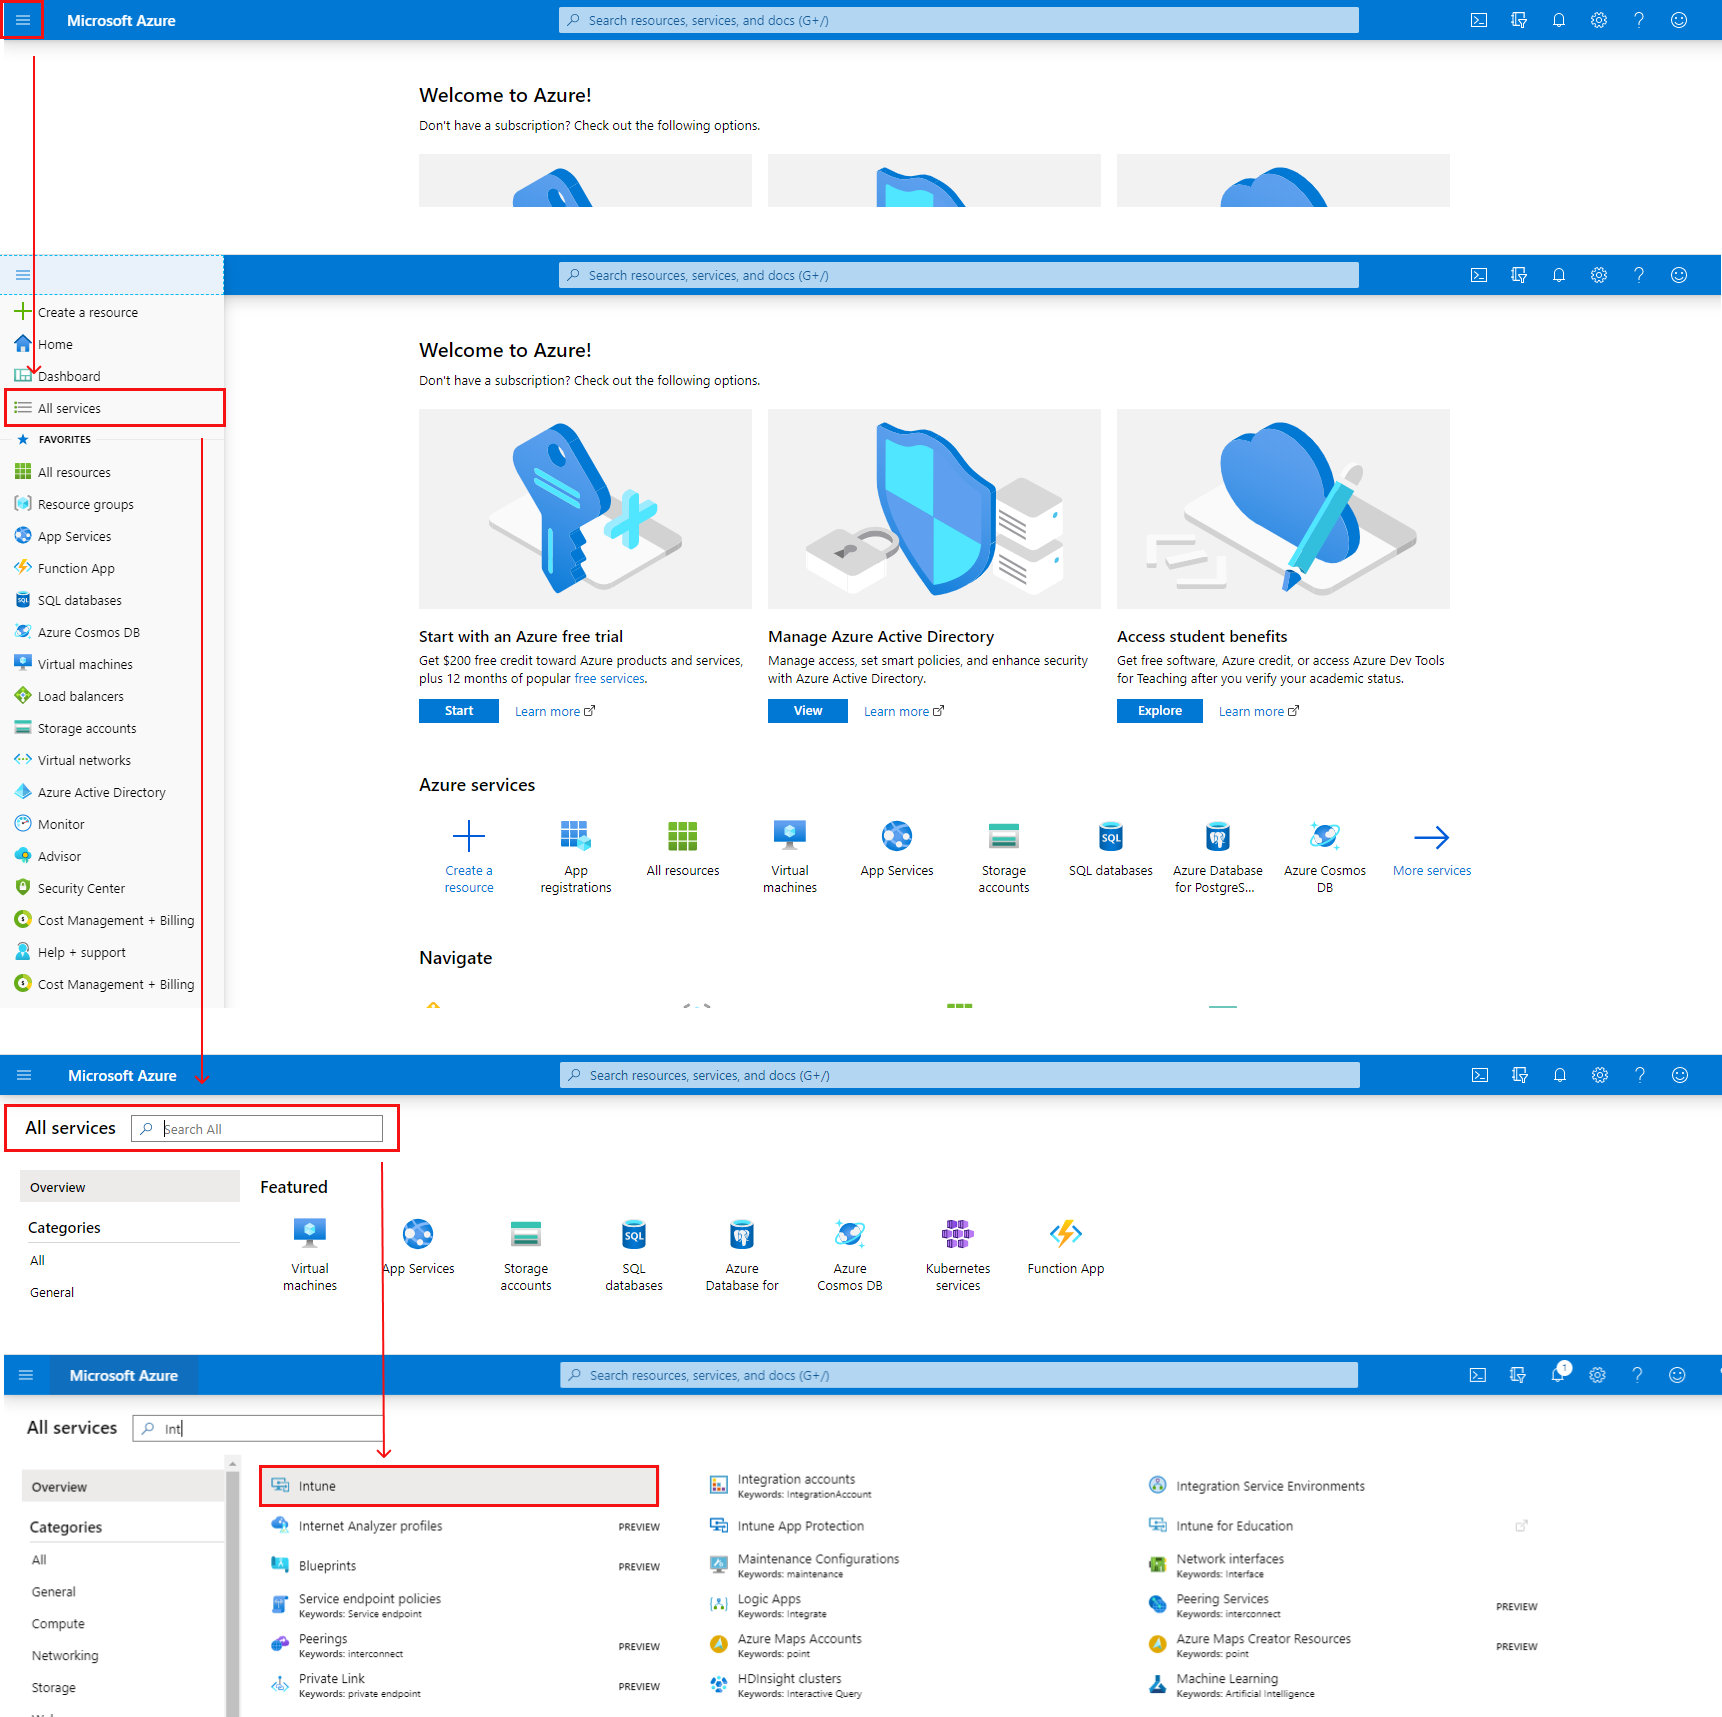
- Microsoft Azure portal > Azure services > App registrations;
- Microsoft Azure portal > Search > Enter a search request (i.e., “App registrations”) > Select the service in the list > App registrations;
- Microsoft Azure portal > Menu > All services > Enter a search request (i.e., “App registrations”) > Select the service in the list > App registrations.
- Accounts in this organizational directory only;
- Accounts in any organizational directory;
- Accounts in any organizational directory and personal Microsoft accounts;
- Personal Microsoft account only.
- To add a redirect URIs;
- To add new client secret string;
- To grant permissions to the application to call API.
- Microsoft Azure portal > Search > Enter a search request (i.e., “Intune”) > Select the service in the list > Intune;
- Microsoft Azure portal > Menu > All services > Enter a search request (i.e., “Intune”) > Select the service in the list > Intune.
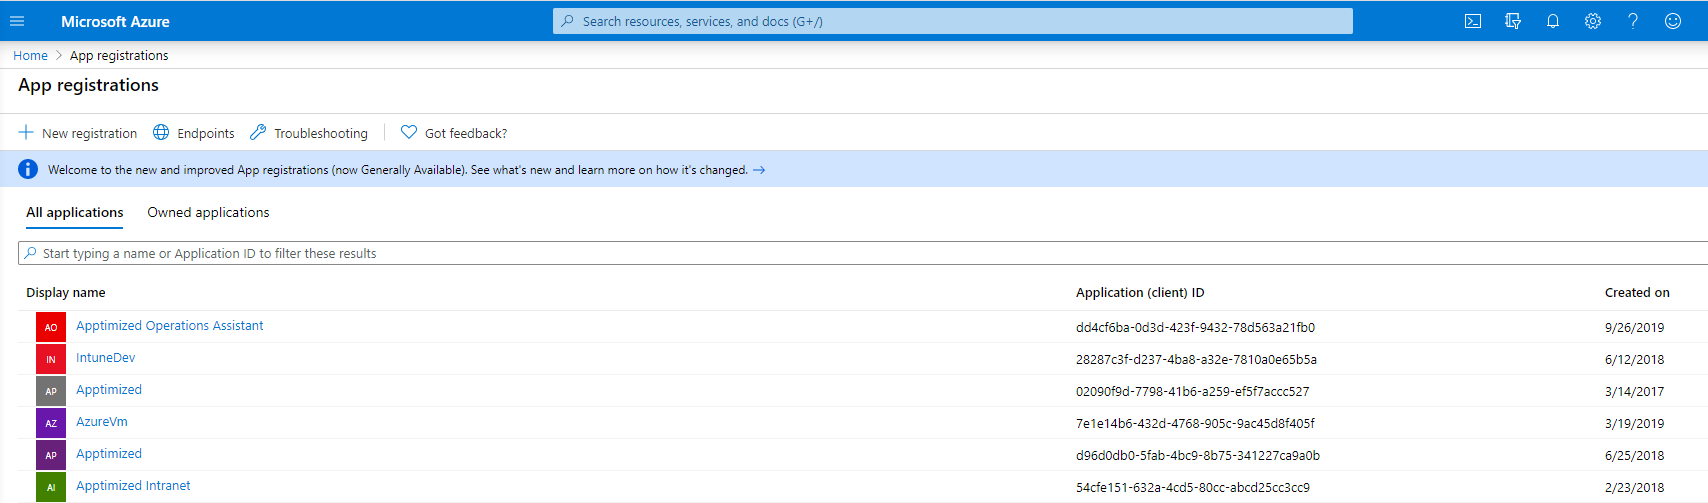
The option to open an application registration page is available under:


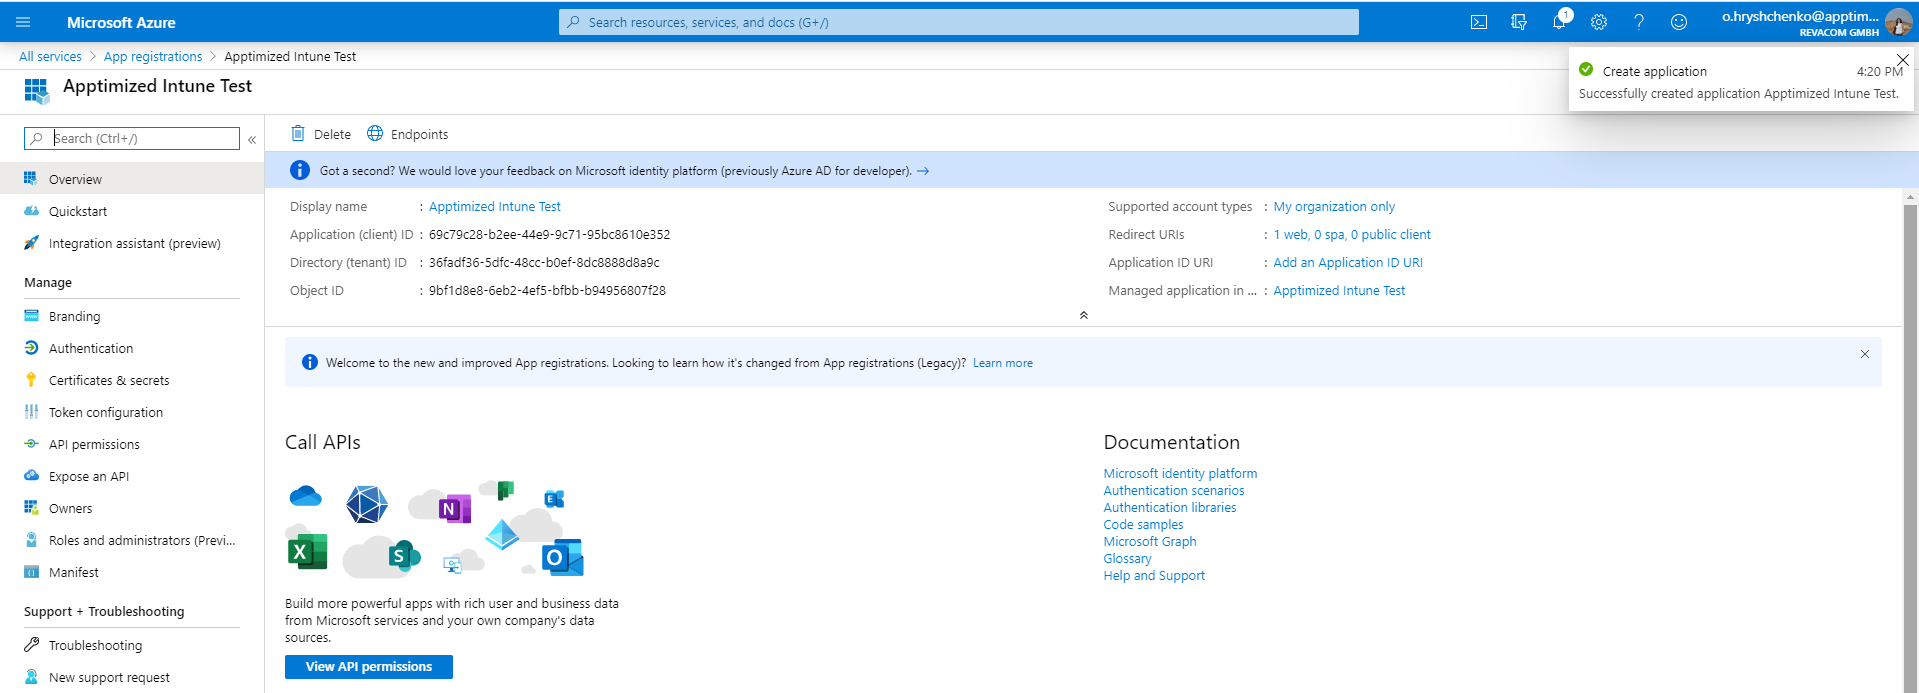
Microsoft Azure portal shows the screen when successful:
The option to create a new application registration is available under the New registration option.

Microsoft Azure portal shows the Create window when successful:
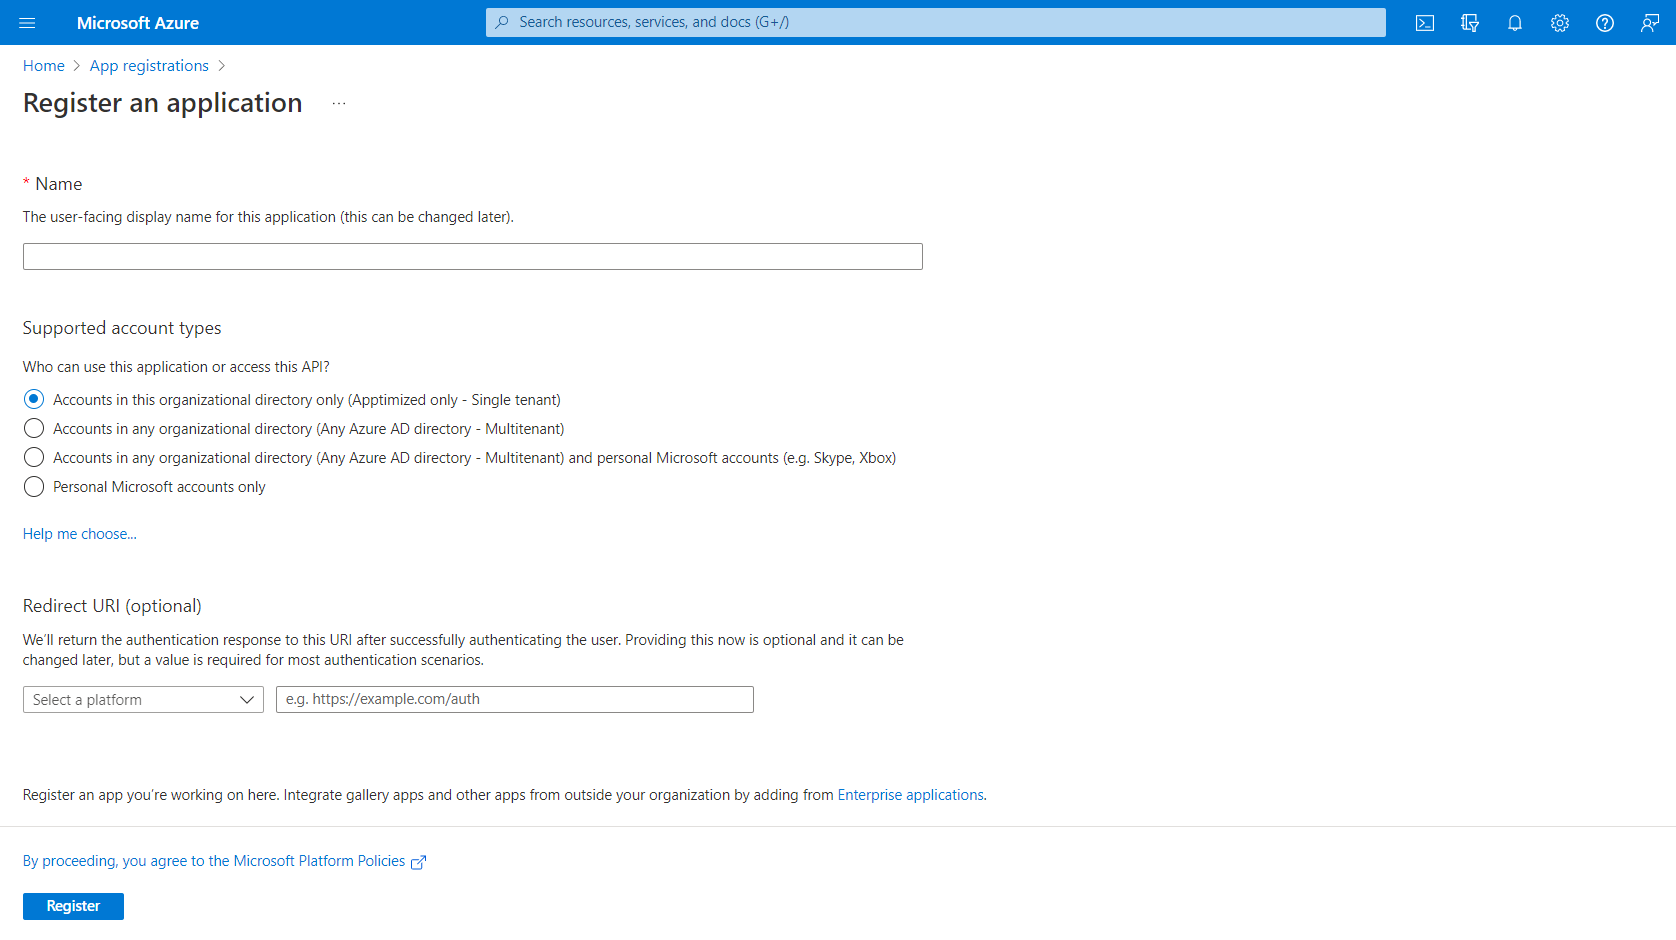
To create a new application registration, a user fills in the fields in the form (see Table 1 and the Microsoft Azure manual).
Table 1. A new application registration
| Field name | Details |
| Name | This field sets a meaningful application name to display to users (i.e., Apptimized Intune Test) |
| Supported accounts |
This option identifies types of accounts that can use the application. |
| Redirect URI |
This setting is optional, and the values can be provided later.
|
When clicking on the Register button, Microsoft Azure portal shows the following screen:
When the application is successfully registered, a user needs to make a series of settings steps, namely:
Next, each setting block is shown in more detail.
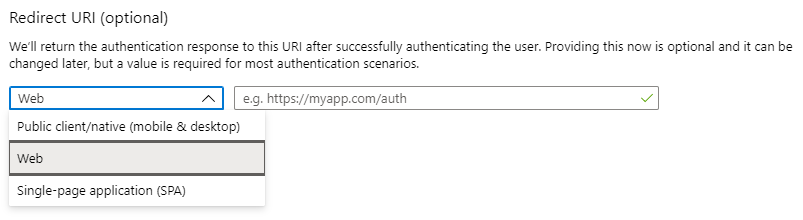
The option to add redirect URIs to the application is available under the All services > App registrations > Select the application in the list > Manage menu > Authentication > Platform configurations > Add a platform> Web > Redirect URLs > Fill in new URI > Configure button.
The following URL is required to be added: https://app.apptimized.com/Account/AuthCode
.png)
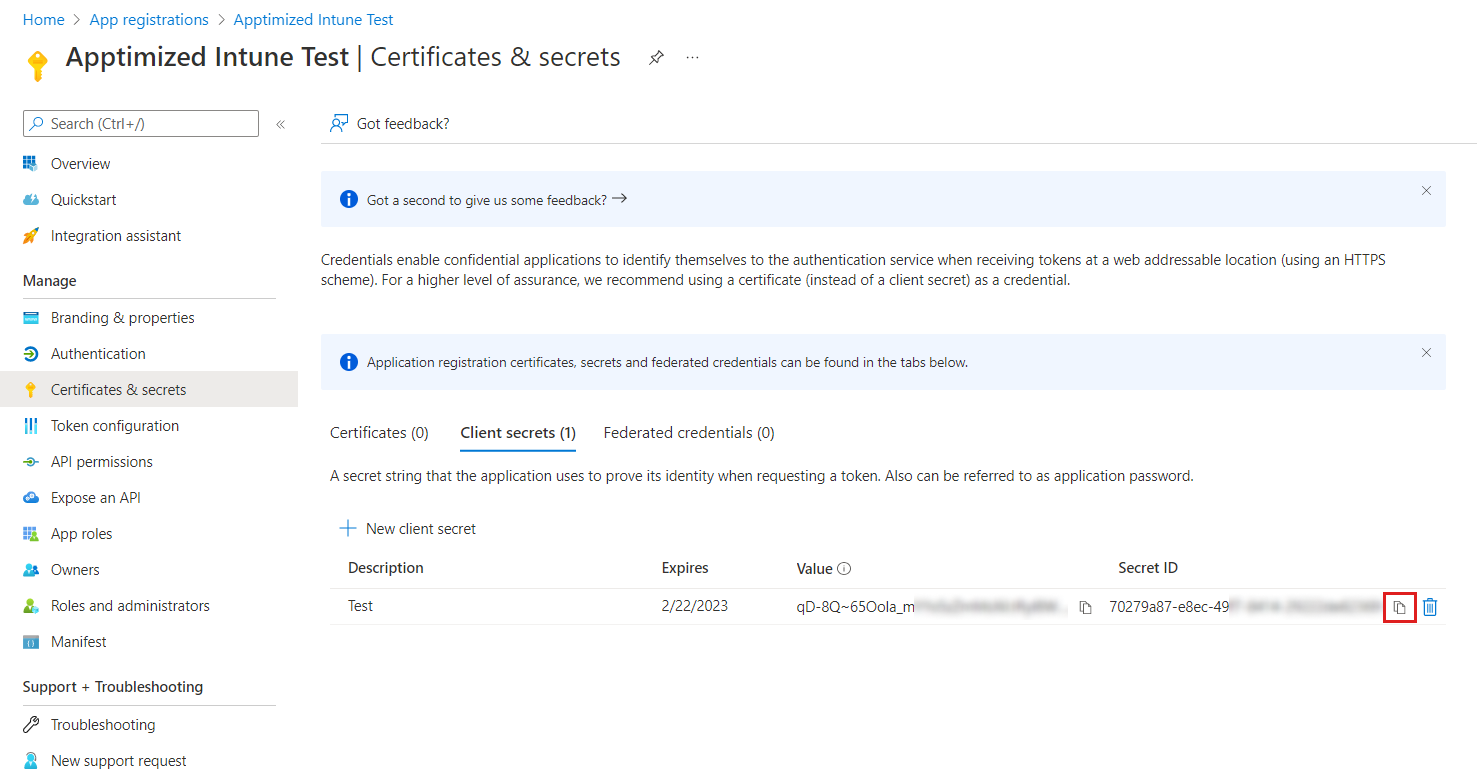
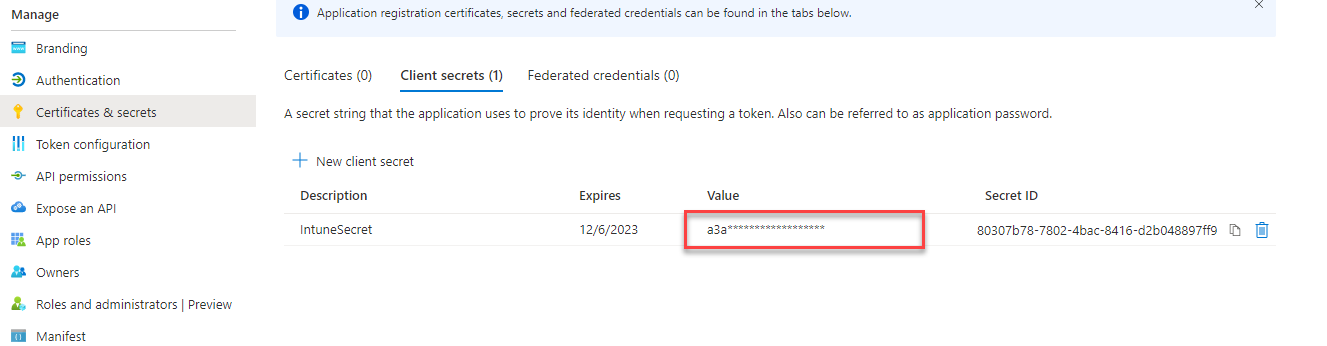
The option to add new client secret string is available under the All services > App registrations > Select the application in the list > Manage menu > Certificates & secrets > Client secrets > New client secret button > Fill in the description > Set the expiry mode > Add button.
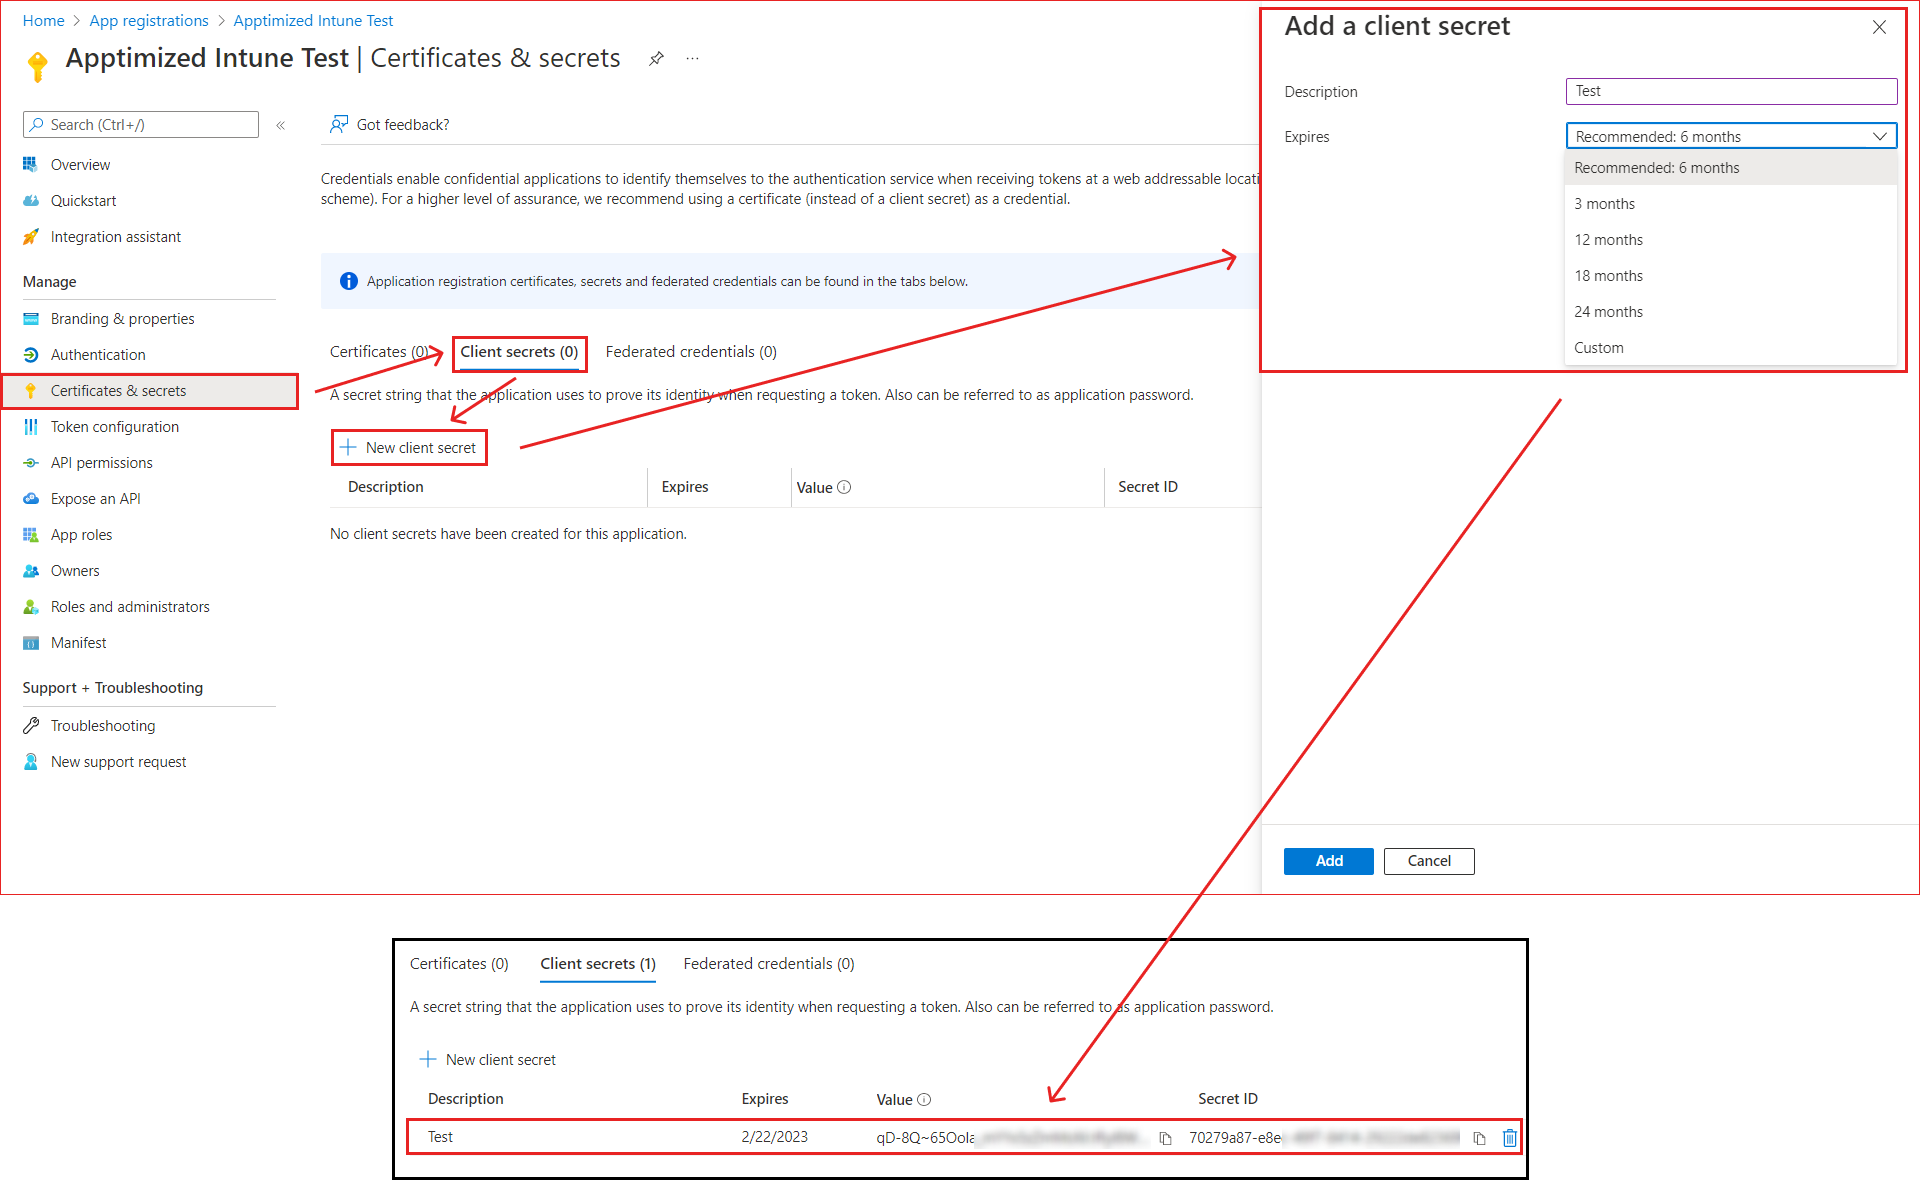
Note. When clicking on the Add button, the client secret value appears (i.e., ~_fd-Y49~haNZ~g8RbDz9yQCF4KQ__1j49). A user must copy the value to the clipboard to use it in the client’s application code. It becomes inaccessible once a user leaves this page. The Client secret value correlates with the Client secret field when integrating Intune into the Apptimized portal.
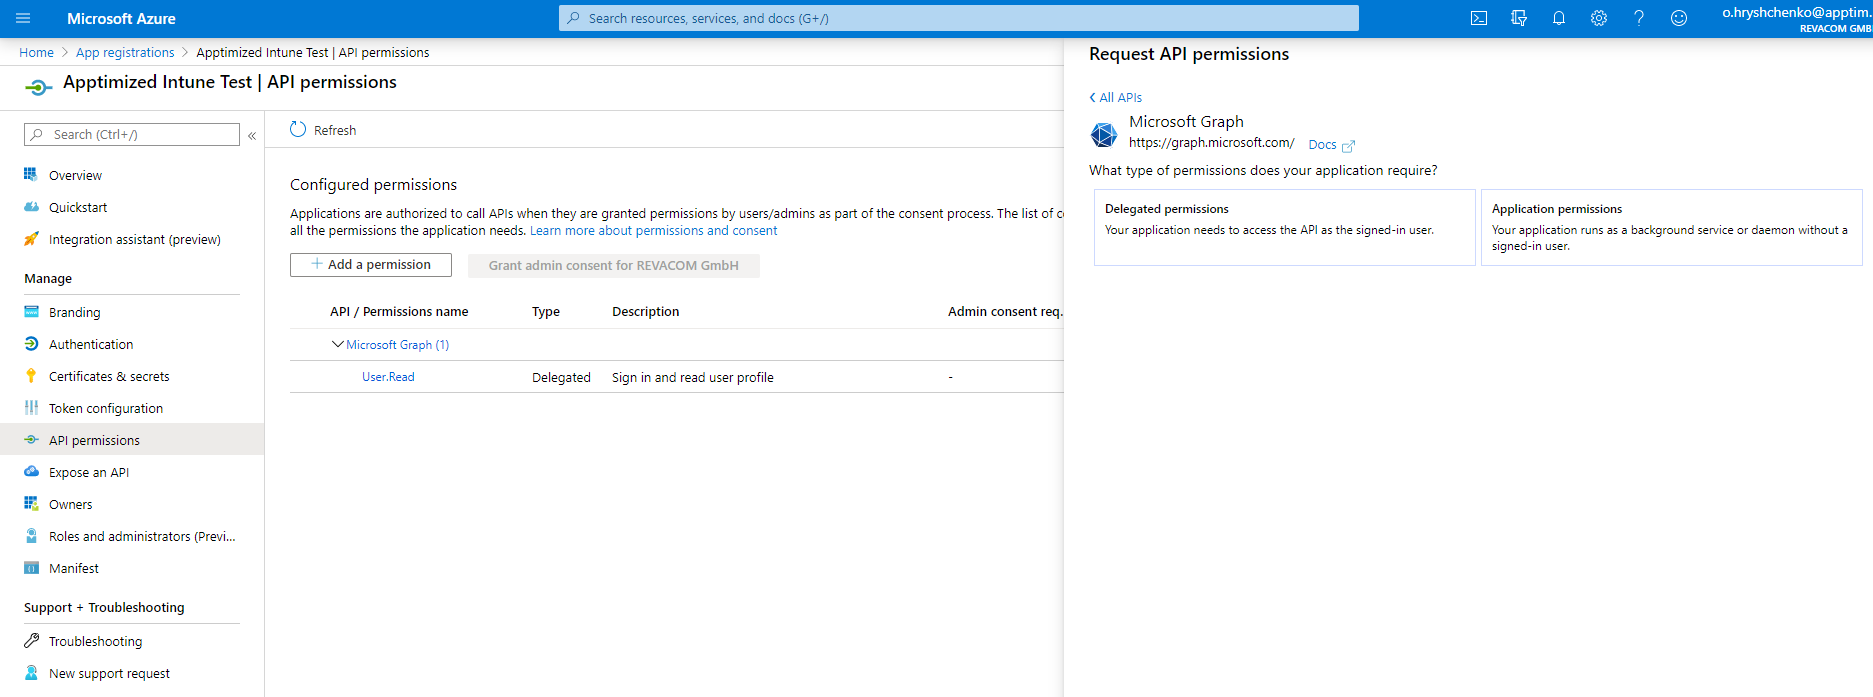
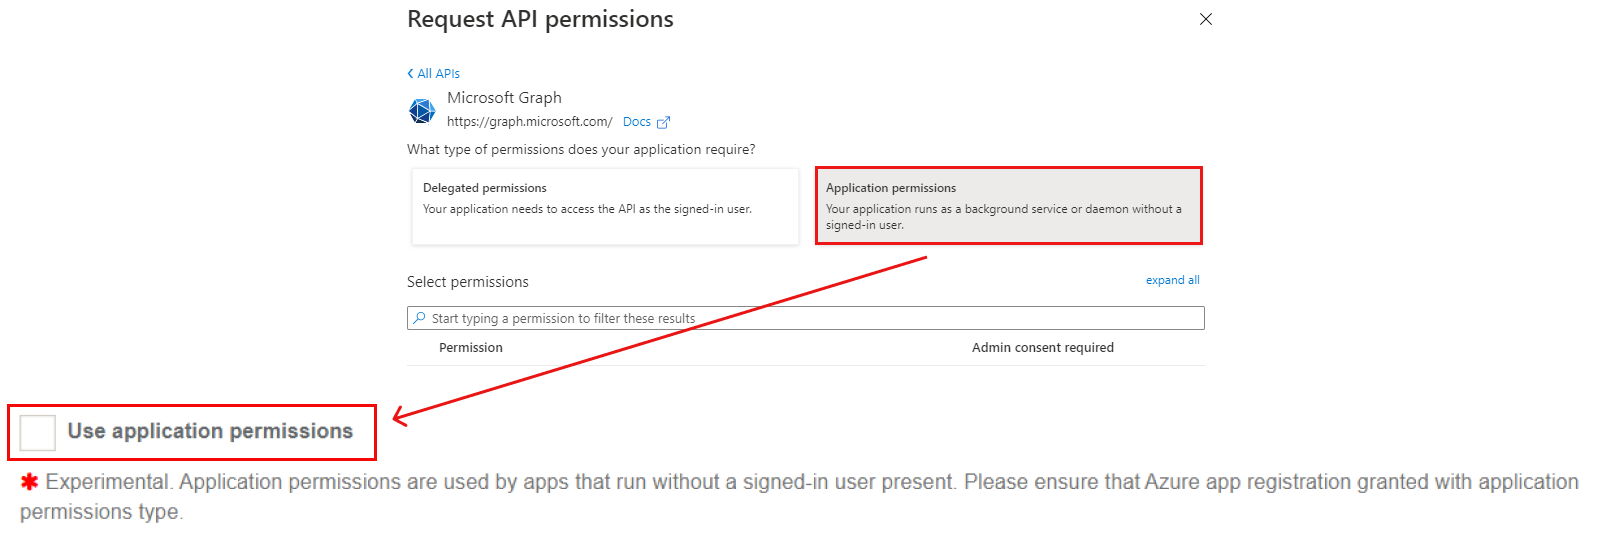
The option to configure permissions to the application to call API is available under All services > App registrations > Select the application in the list > Manage menu > API permissions > Add a permission > Microsoft Graph.

Microsoft Azure portal shows the following screen when successful:
The option to set the types of permissions to the application is available under the Delegated permissions button > Select the permissions from the list > Add permissions button. The screenshot below shows the list of enabled permissions:
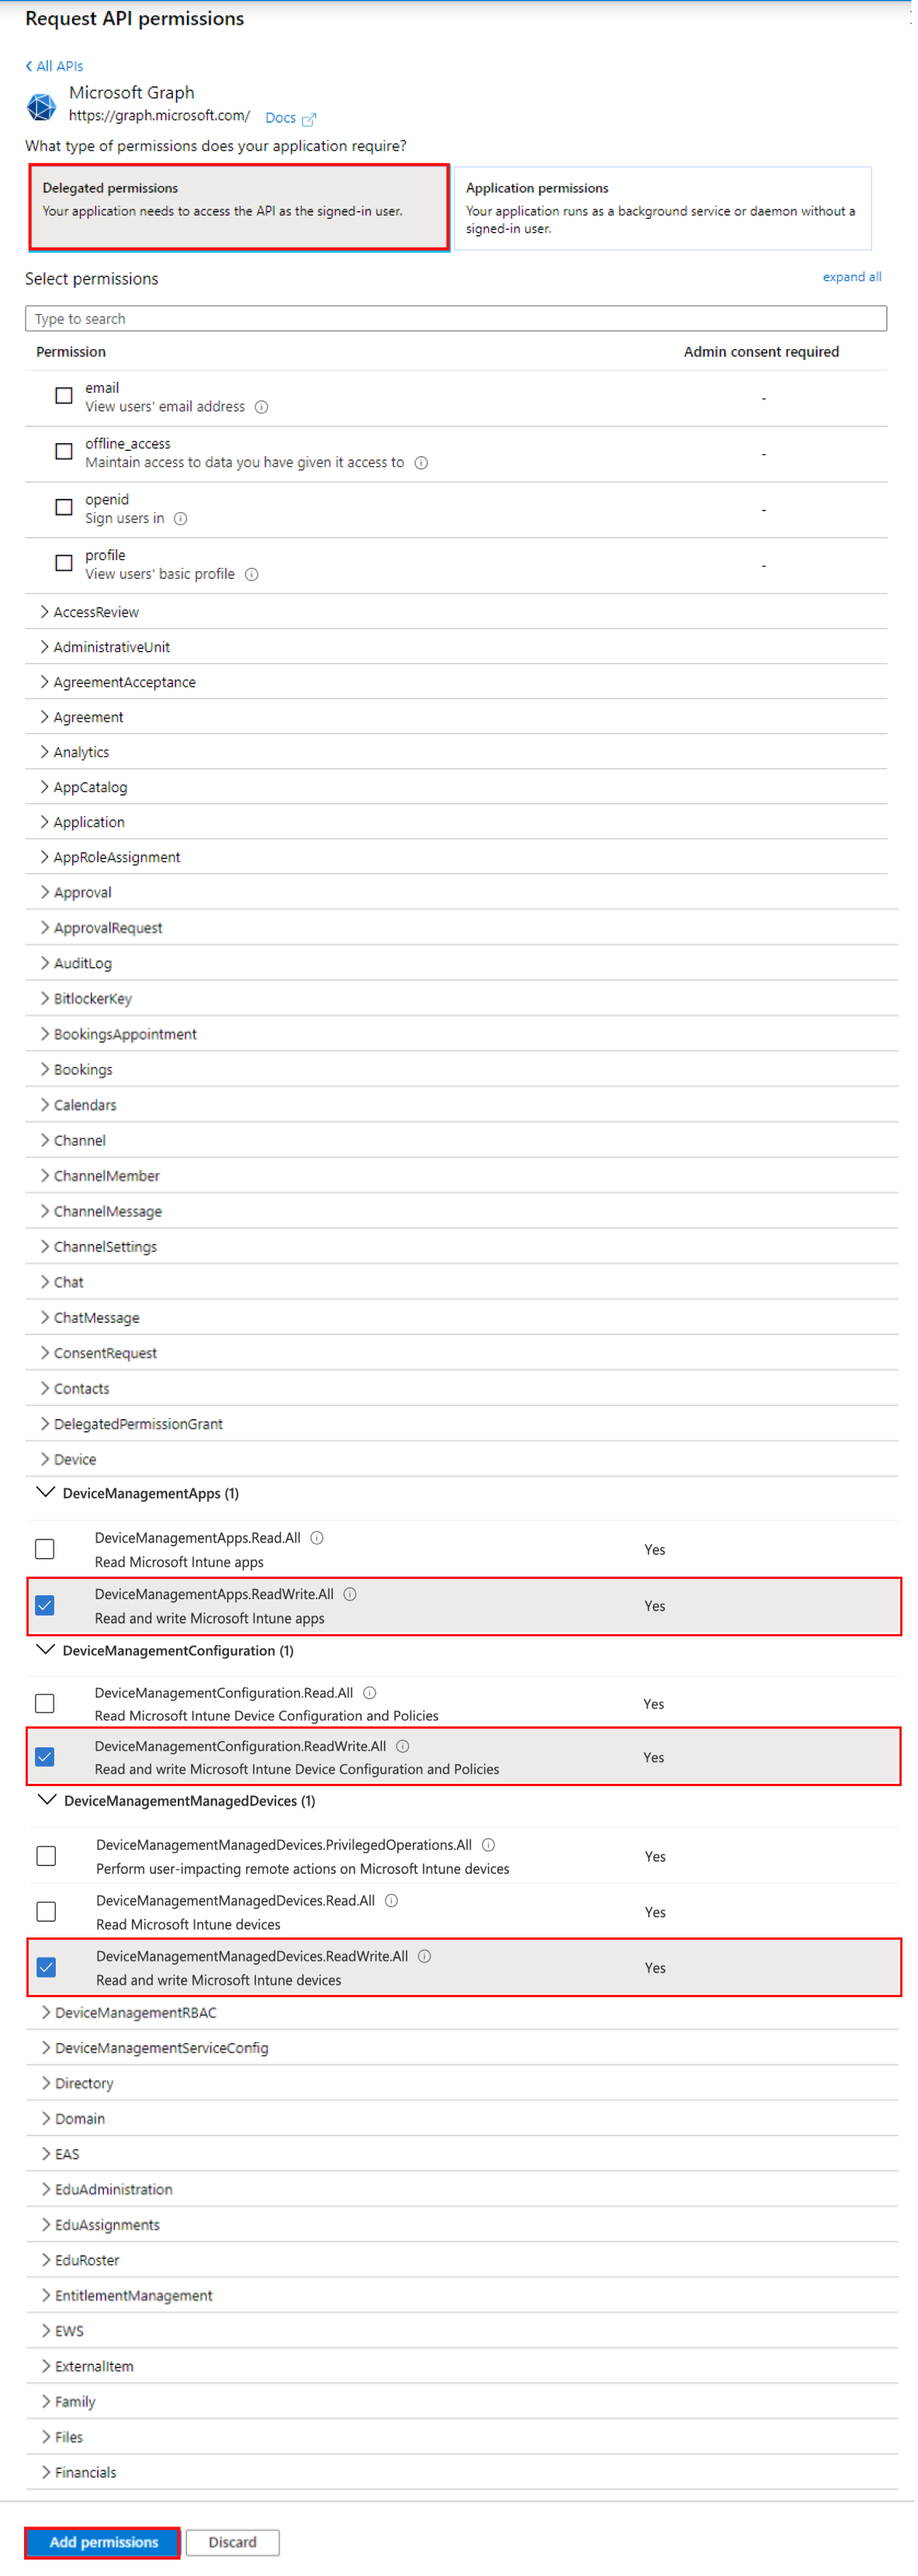
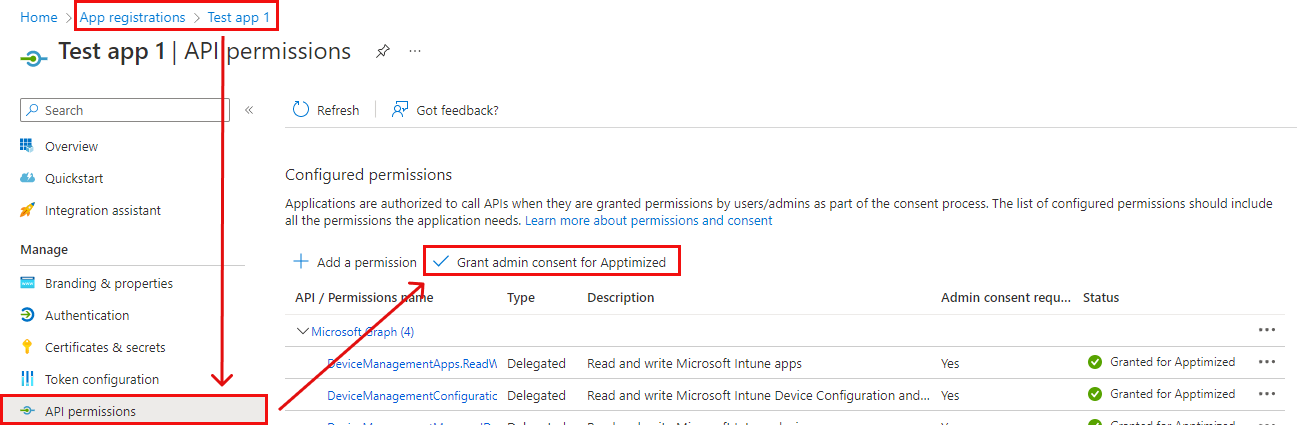
Some delegated permissions can be consented by non-administrative users, but some higher-privileged permissions require administrator consent. The option to grant permissions is available under the Grant admin consent for [company name] button.
Note. If the application runs as a background service or daemon without a signed-in user, the required option is is Application permissions. The The Applications permissions are the permissions that are used by applications that run without a signed-in user present. Using Application permissions enables Apptimized users to push packages to Intune without requiring an own Intune access or even an AAD account in the target Azure directory. By configuring the use of application permissions, the API will be authorized to push packages to Intune without requiring an authenticated AAD Intune user with adequate permissions to provide this authorization.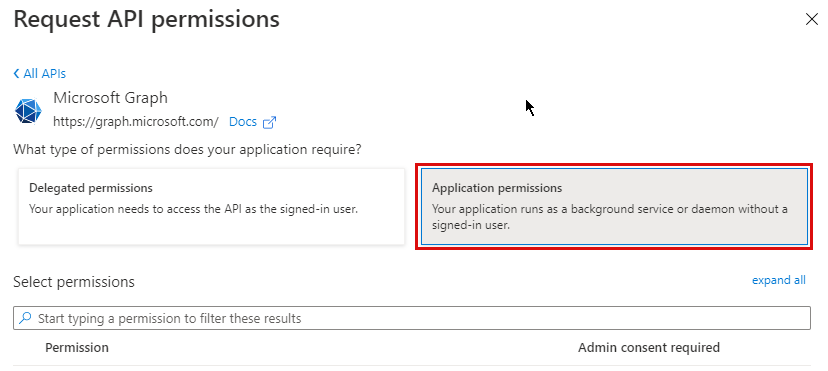
The DeviceManagementApps DeviceManagementApps permissions in in Applications Applications permissions permissions are identical to to Delegated permissions permissions group.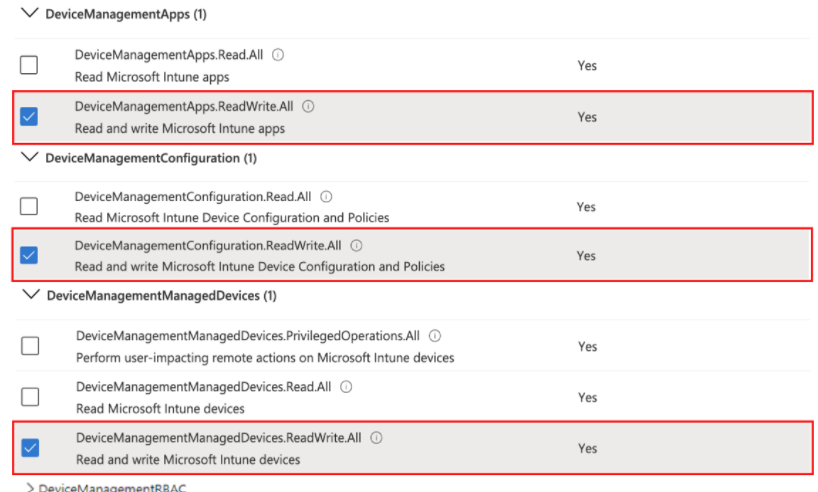
Integration of the application from the Microsoft Azure portal into the Apptimized portal
The one-time configuration is available for project administrators under the Project menu > Administration > Settings > Integration section > Intune.
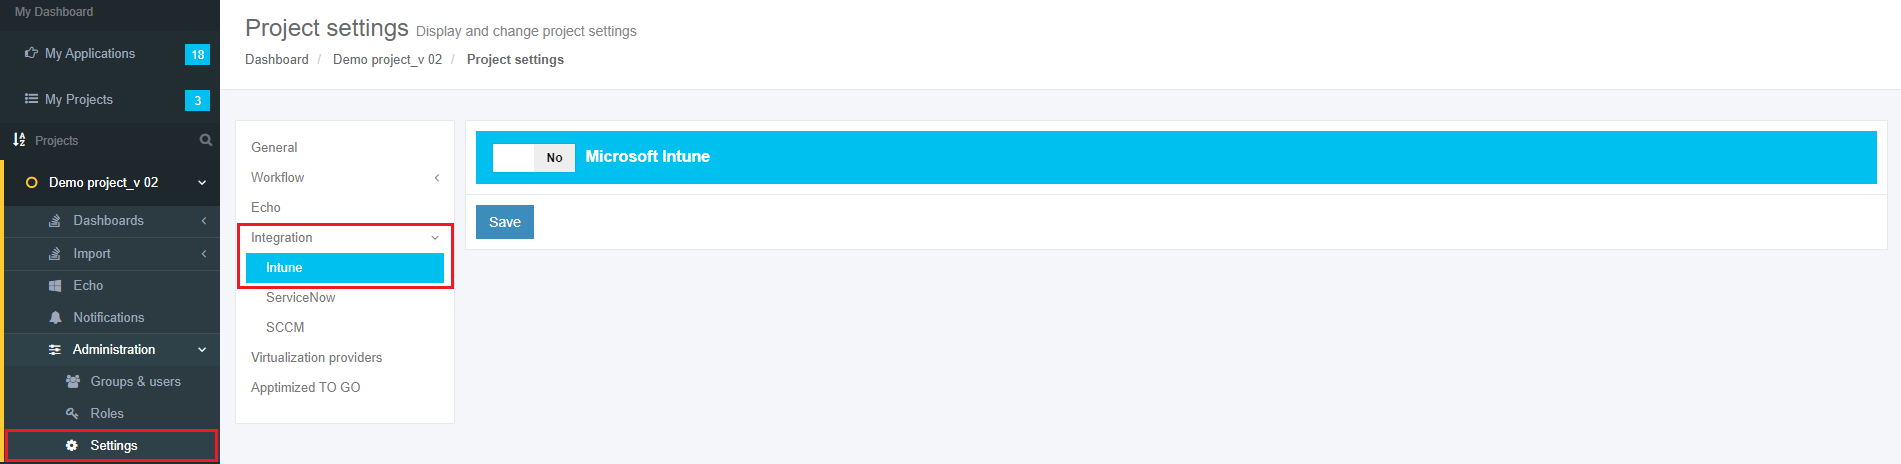
Intune becomes active when switched on and once the required settings are completed. All required fields are marked with an asterisk *.
Table 2. Basic settings
|
Settings |
Details |
|
Tenant Identifier |
The Tenant Identifier corresponds to the term Directory (tenant) ID in the Microsoft Azure portal. The Directory (tenant) ID is a unique identifier generated automatically by the Microsoft Azure portal for every application during its creation.
|
|
Client Identifier |
The Client Identifier corresponds to the term Application (client) ID in the Microsoft Azure portal. The Application (client) ID is a unique identifier generated automatically by the Microsoft Azure portal for every application during its creation.
|
|
Client Secret |
The Client Secret corresponds to the term Value of secret The Client Secret is a unique identifier generated automatically by the Microsoft Azure portal for every application during its creation.
|
|
Use applications permissions |
|


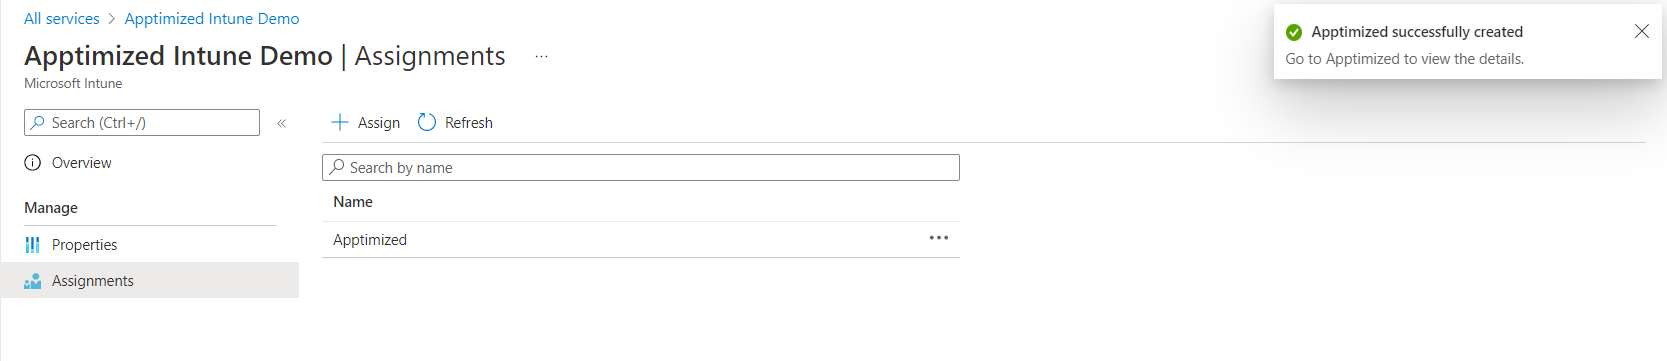
Apptimized shows the following notification when successful:

The option to Create environments is available under the Settings > Integration section > Intune > Environments > Create environment.
Apptimized shows the following notification when successful:
Creating Assignment Templates is available under the Create assignment template button.
The option to Set demo settings is available under the Set demo Intune settings button. Apptimized shows the following modal window:
After pressing the button, the following page is shown:
Apptimized shows the following notification when successful:
If the environment's details are set into the environment settings and a user without certain permissions wants to create the assignment - a no permission notification will be shown.
When customer chooses a group that was not selected before, By Default, the Included parameter will be set.
If this group is present in another Deployment Type, it can be assigned but used as Excluded.
The option to Create templates is available under the Settings > Integration section > Intune > Templates > Create template.
The following field will be shown:
Apptimized shows the following notification when created successfully:
Manage project roles
Intune requires the assignment of the project user to the role with the required permission. Assigning needed permissions is available under the Project menu > Administration > Roles.
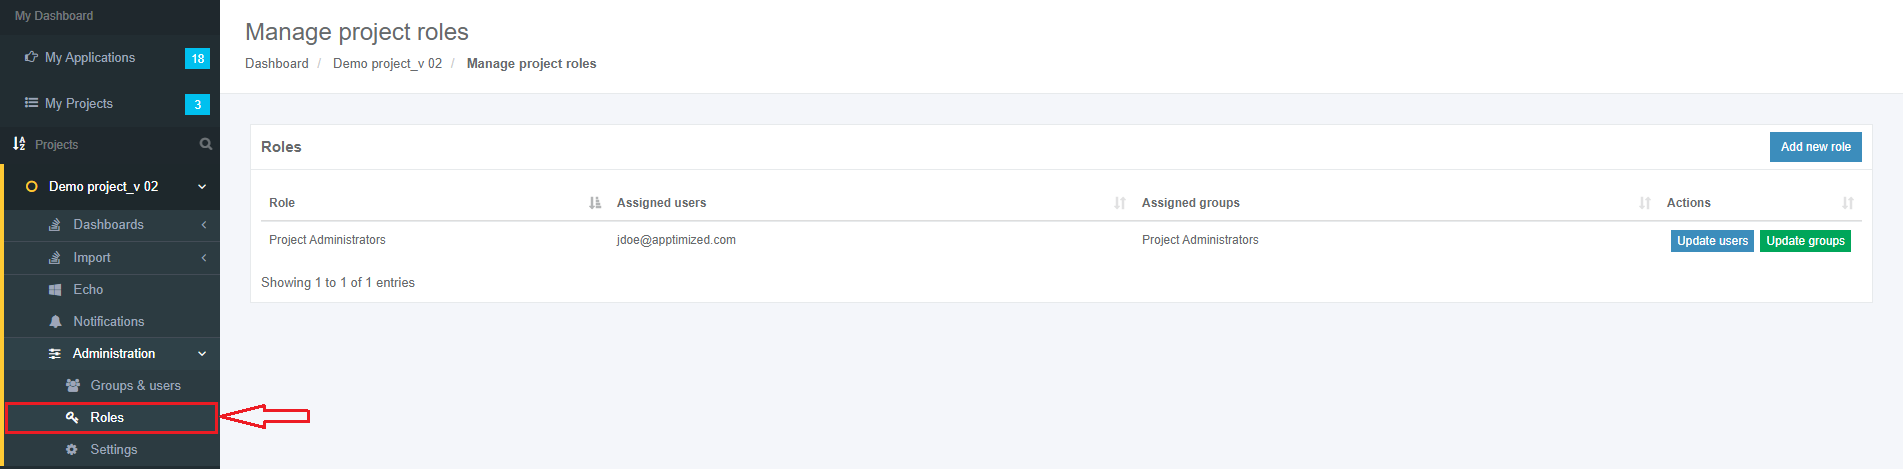
It is possible to add permission to the existing group or to create a new one by clicking the Add new role button, as shown on the screenshots below.

The new role requires its meaningful name and Intune project permission.

Apptimized shows the following screen and notification when successful:

For a user to be able to perform any activities related to the Intune, he must be assigned a role with the Intune project permission. The option to assign the role to a user (or a group) is available under the Update users or Update groups buttons respectively.
Instructions on how to edit or manage roles within the project are available in the Apptimized Portal user manual > Project role section.
Intune apps list
The The Intune apps list provides a user the information on the full list of applications from the the Microsoft Intune portal available in the the Apptimized portal.
The The Intune apps list enables a user to manage applications from the the Microsoft Intune portal without leaving the the Apptimized portal.
The option to access Intune applications list is available under Project menu > Intune apps.

Assigning permissions to a user to work with Microsoft Intune from Microsoft Azure
The option to open an application registration page is available under:

Microsoft Azure portal shows the following screen when successful:
The option to add new Intune role is available under the All services > Tenant administration > Roles > All roles > Create button.

Microsoft Azure portal shows the screen when successful:
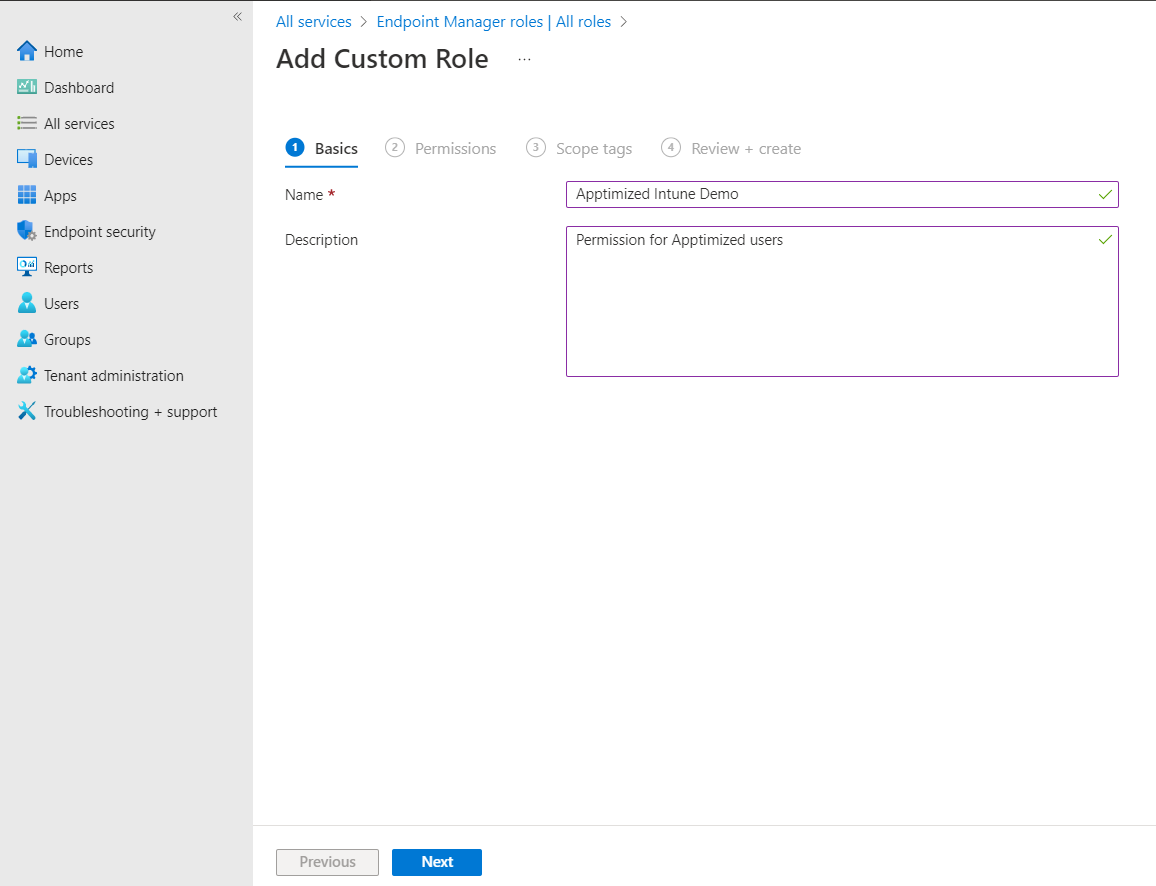
The screenshot below shows the procedure for creating a new custom role (Create button > Enter role name > Enter role description > Select scope tags > Create button):

Microsoft Azure portal shows the following screen when successful:
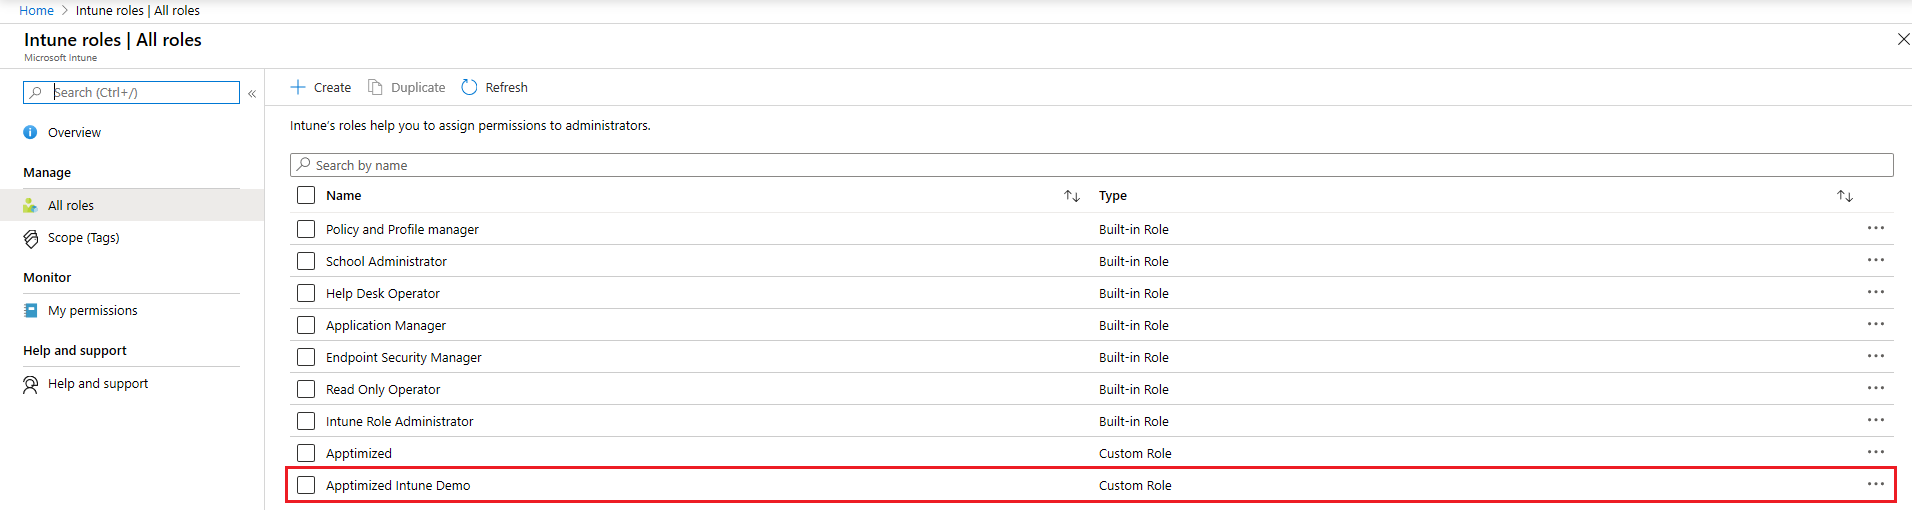
When the new custom role appears in the list, the assignments must be provided. Microsoft Azure portal shows the following screen when clicking the new custom role name:

The option to provide assignments is available under the the Roles Roles > Select and click on role role > Assignments > Assign button.
The screenshot below shows the procedure for role assignments (Assign button > Enter role assignment name > Enter role assignment description > Select admin groups > Select scope groups > Select scope tags > Create button):
.png)
Microsoft Azure portal shows the following screen when successful: