Single Sign-On
About Single Sign-On
Apptimized Single Sign-On (SSO) is an authentication technology that enables an Apptimized user to secure log in with single credentials to any of Apptimized solutions or services he has a subscription.
Before starting the Apptimized SSO application, it is recommended to check the list of prerequisites and firewall rules.
The Apptimized SSO application is available under the https://auth.apptimized.com/
User sign-on experience
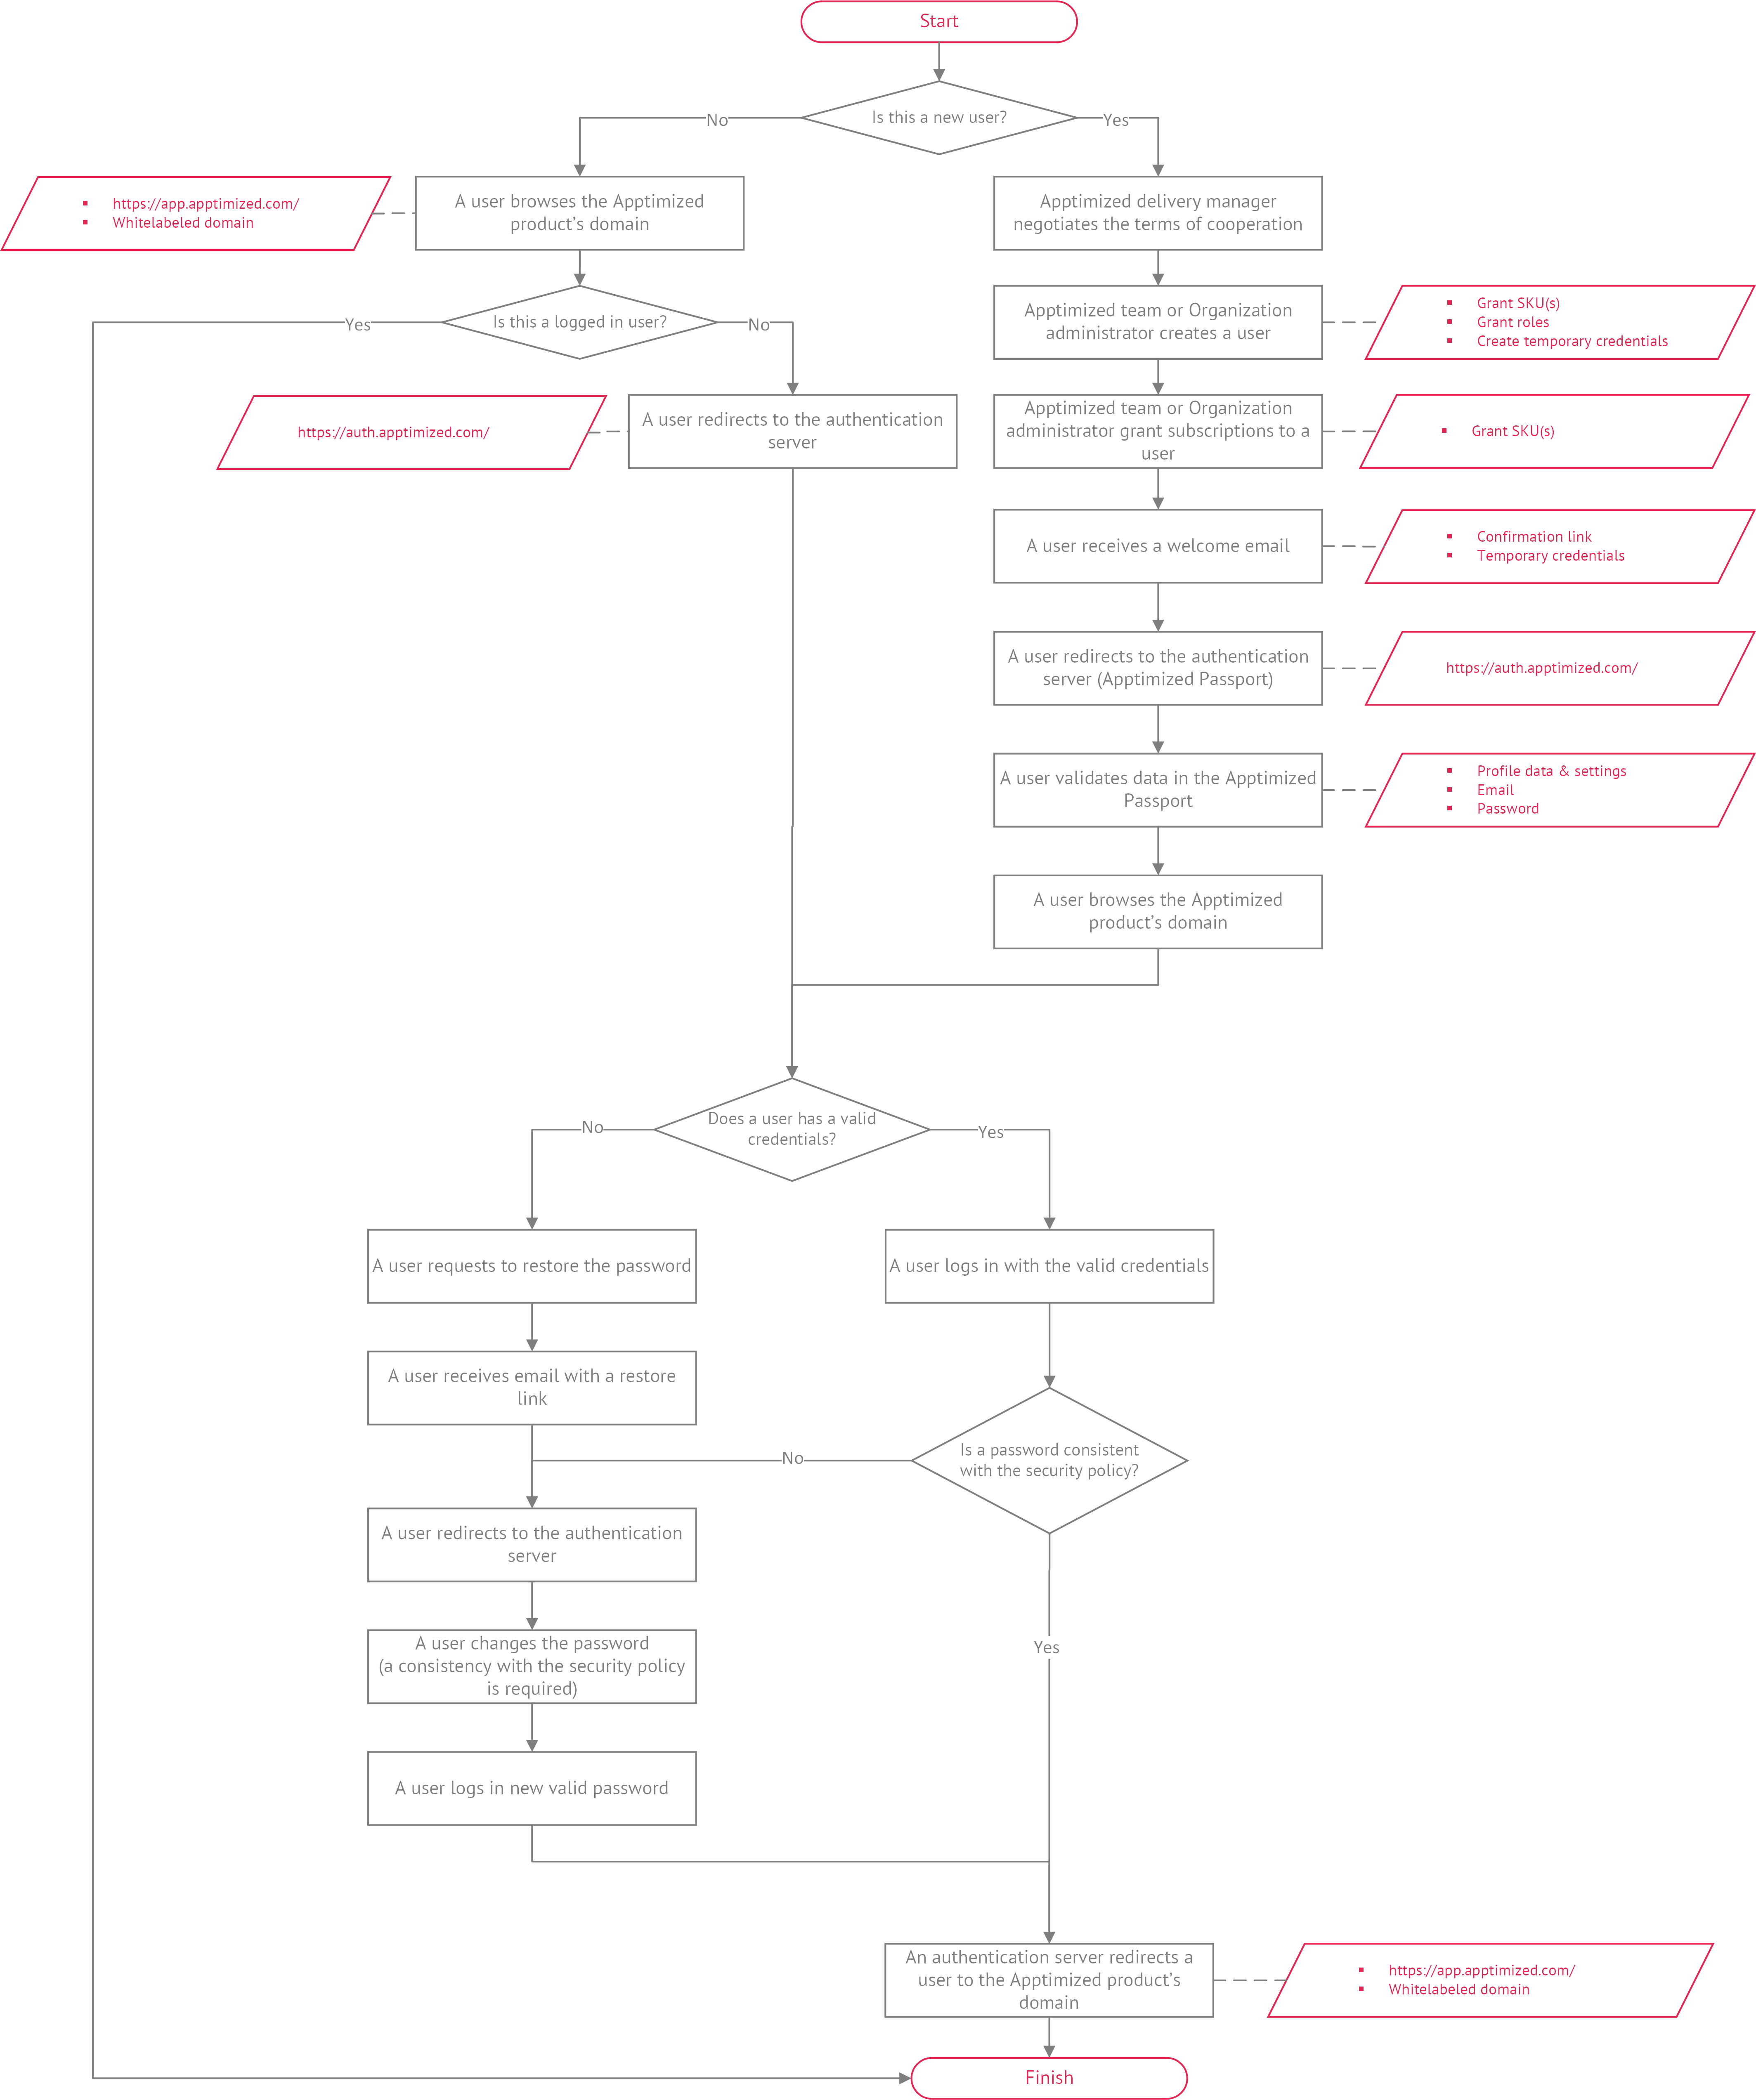
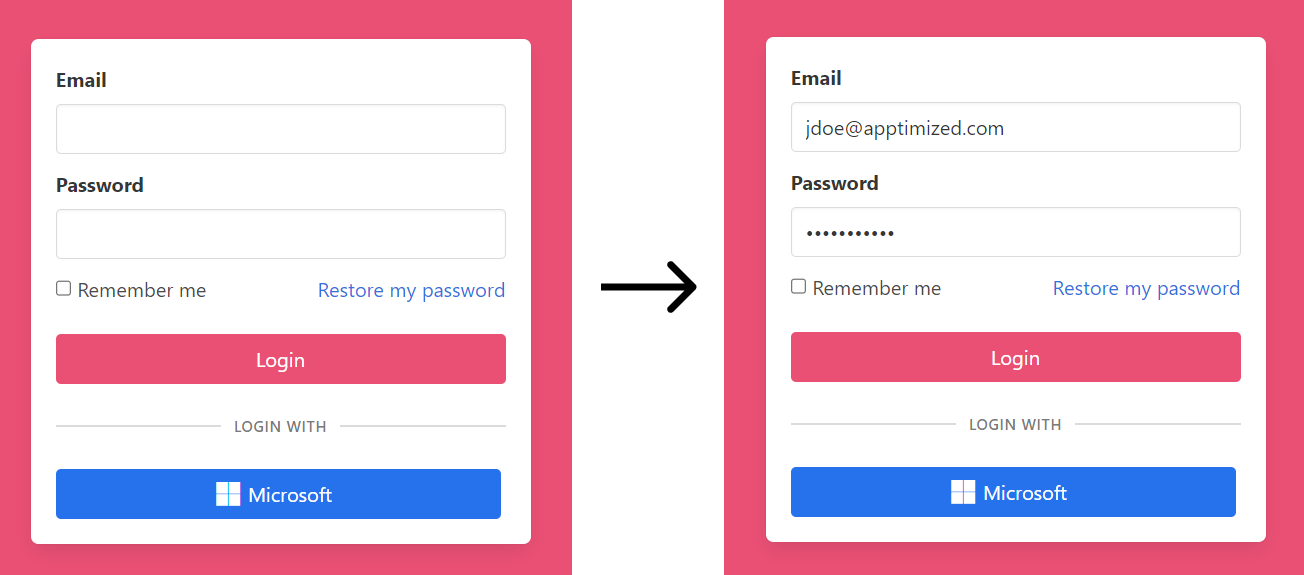
The following scheme shows a user login experience (both for the existing and new Apptimized user):
No need to reconfigure accounts for the existing Apptimized users. Therefore, existing credentials will continue to work.
In the case a password is not consistent with the organization's security policy settings or is expired, a password update is required.
Register to Apptimized Passport
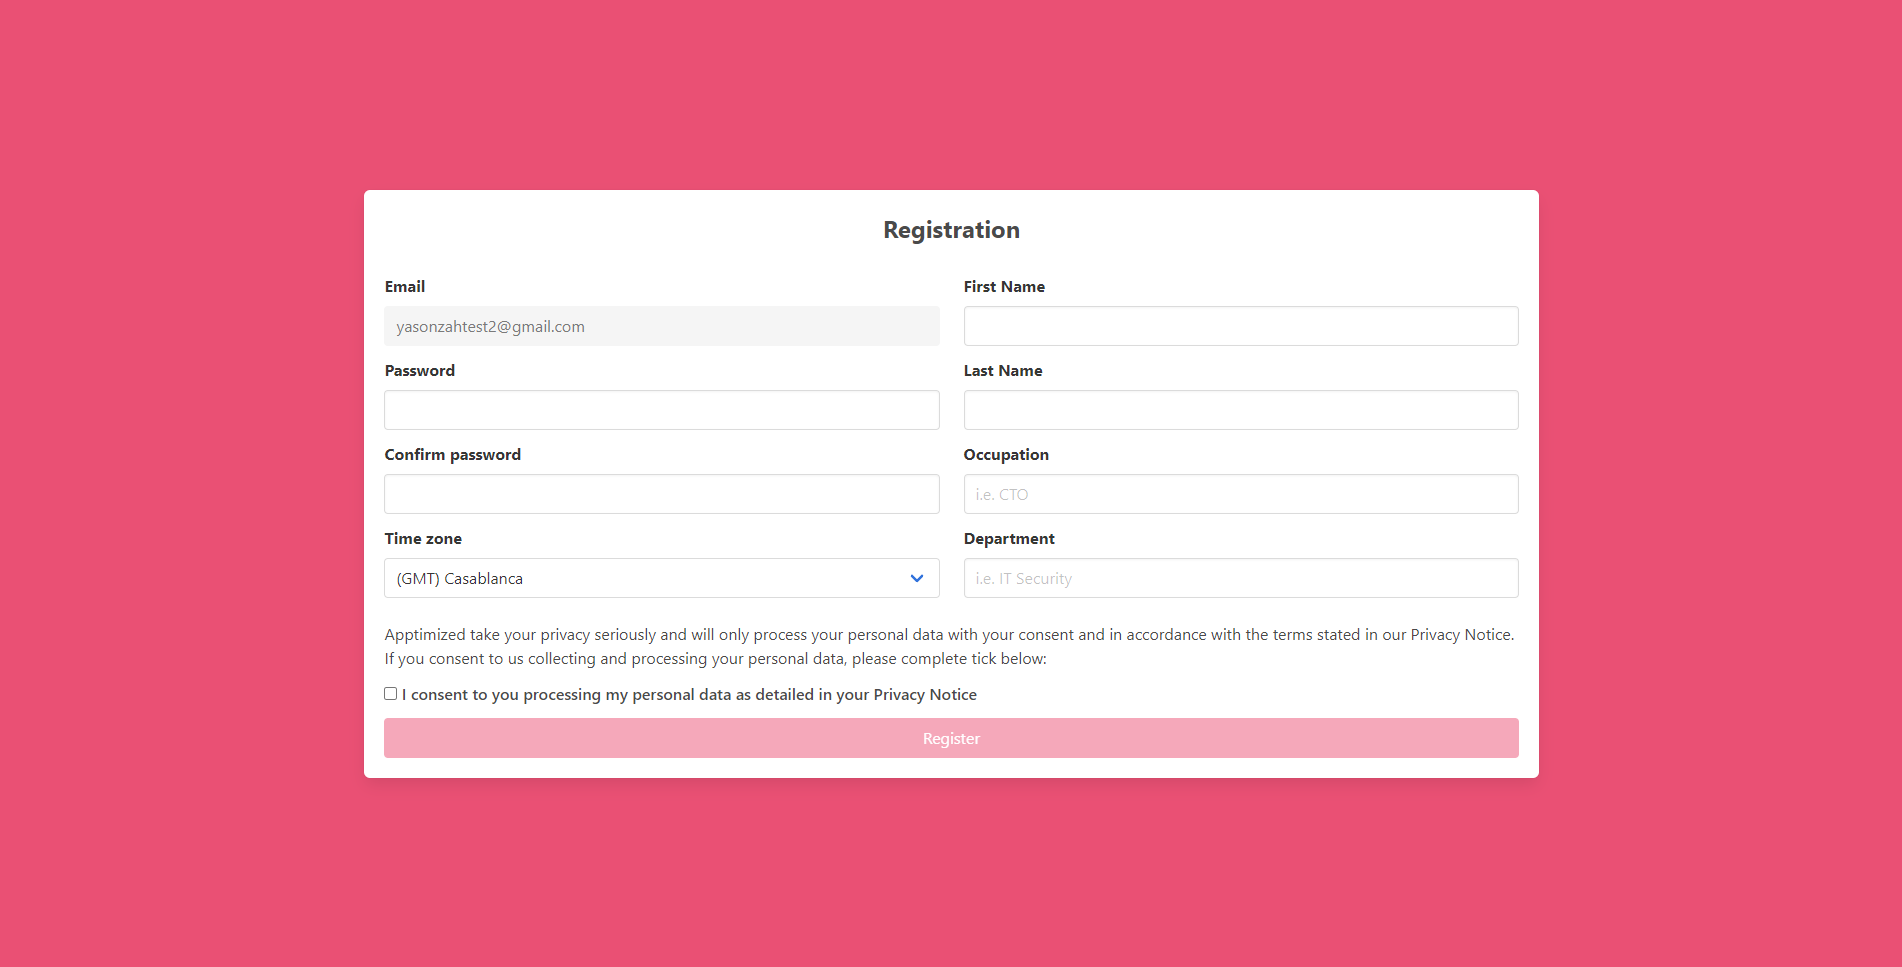
The registration screen is shown by Apptimized after user clicks on an invitation link in email (see Invite via email).
| Setting | Description |
|
This field indicates user's email being used during the registration process. This field can't be changed. |
|
| Password |
This field indicates user's password that will be used during the log in process. Password requirements:
This field is required. |
| Confirm password |
This field duplicates the Password field and must be filled in identically. This field is required. |
| Time zone |
This field indicates the user's Time zone. The default value is: (GMT) Casablanca. This field is required. |
| First Name |
This field indicates the user's First name (i.e., John). This field is required. |
| Last Name |
This field indicates the user's Last name (i.e., Doe). This field is required. |
| Occupation |
This field indicates the user's occupation (i.e., CTO). This is an optional field. |
| Department |
This field indicates the user's department (i.e., IT Security). This is an optional field. |
The option to Register becomes available after filling in required fields and marking I consent to you processing my personal data as detailed in your Privacy Notice checkbox.
The Privacy Notice is available by clicking the checkbox.
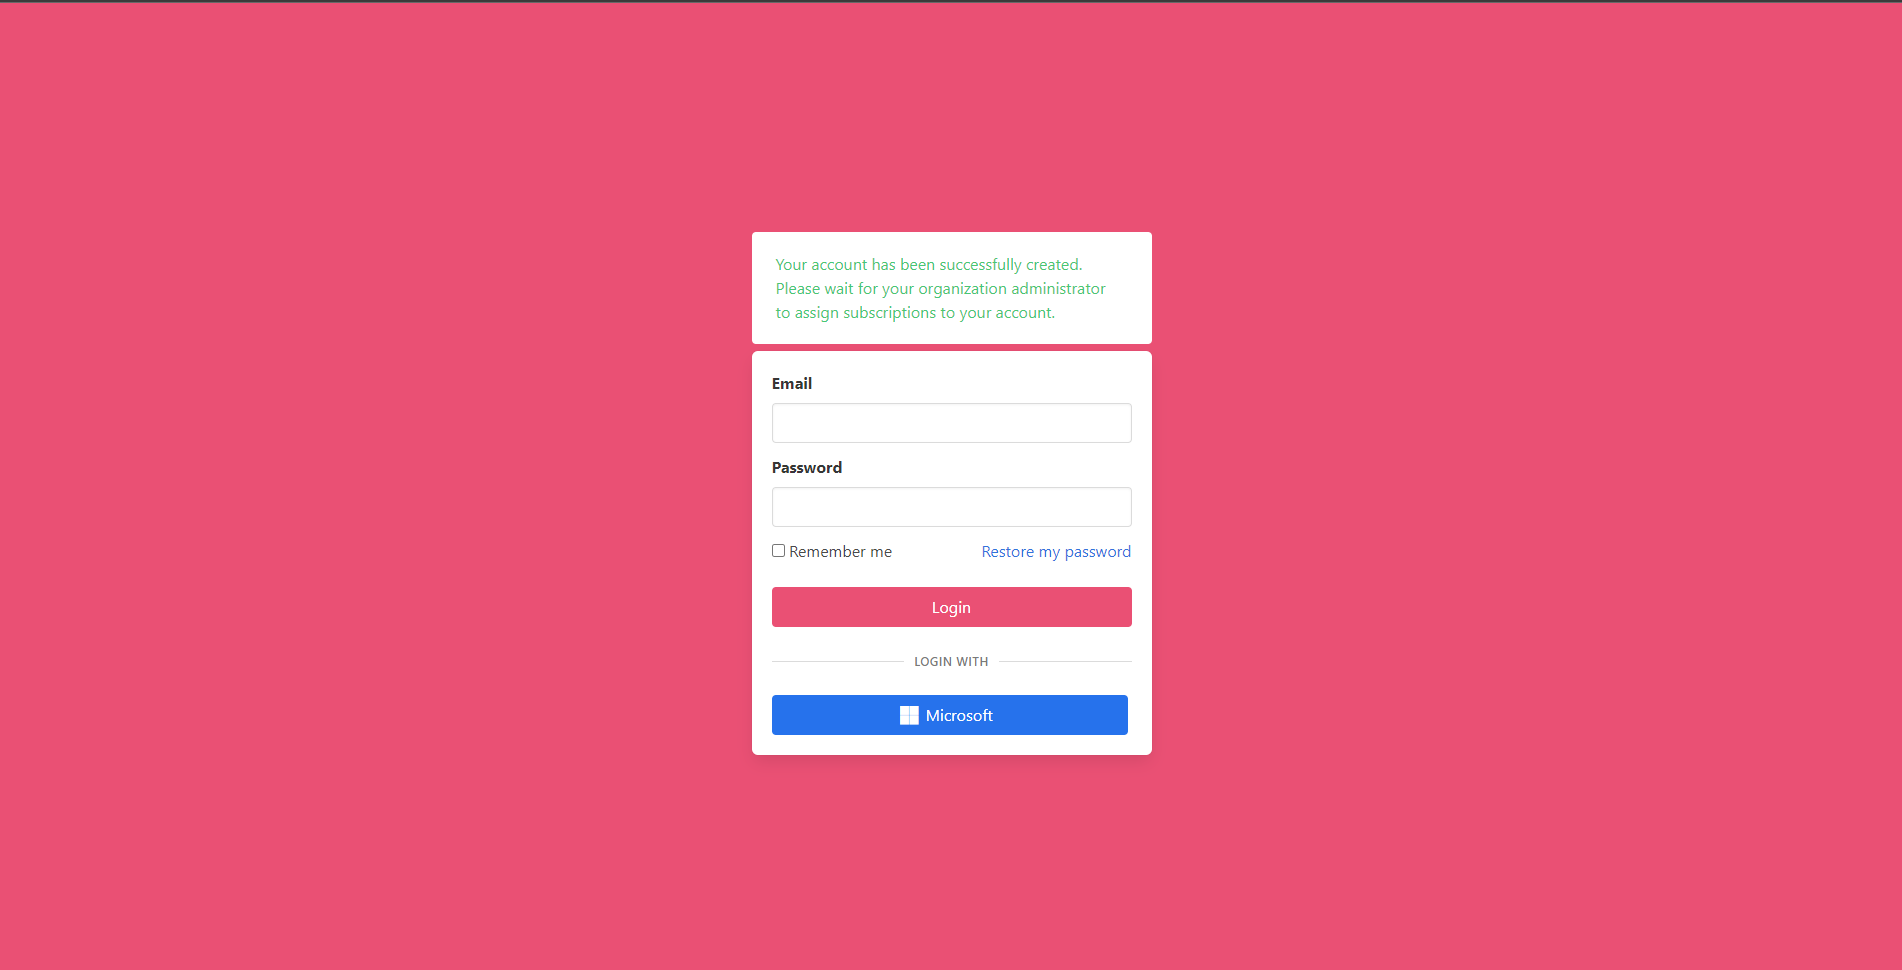
Apptimized shows the following screen when successful registration.
After registration, the user must contact the organization administrator to assign subscriptions.
Log in to Apptimized Passport
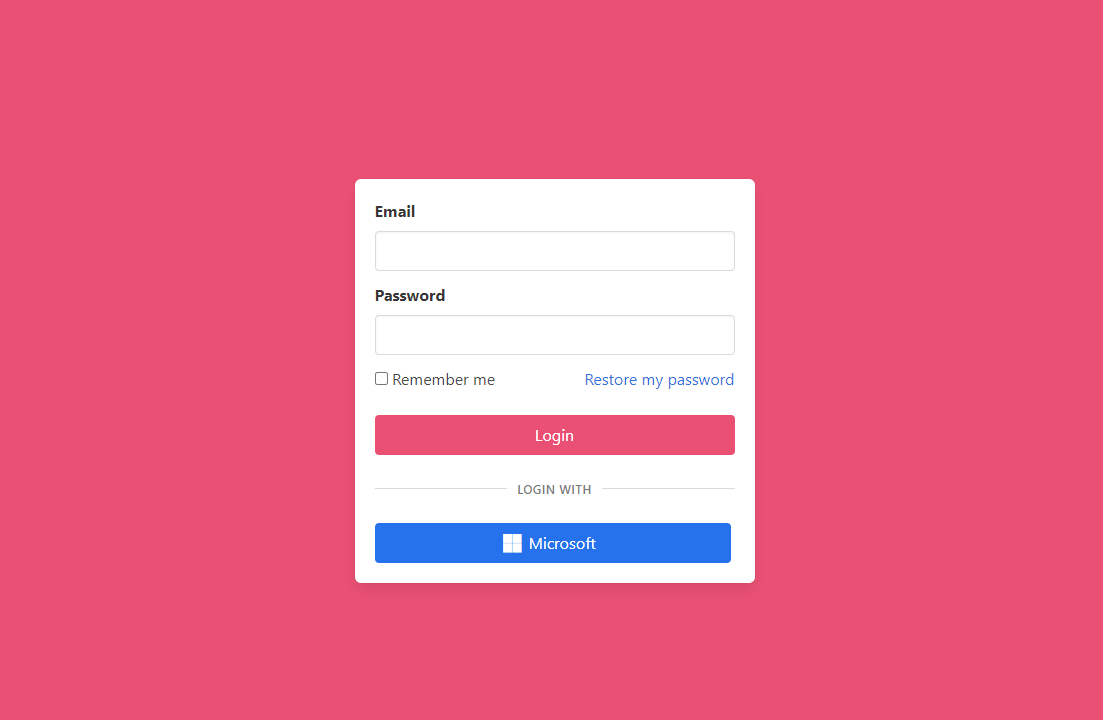
The following screenshot shows the login screen to Apptimized Passport:
The login to the Apptimized Passport is available under the following scenarios:
- Email field > Password field > Login button;
- Use Microsoft button;
- Use LinkedIn button.
Apptimized produces a secured cookie with an encrypted session ID to automatically login on the next visit. The automatic login option is available under the Remember my login checkbox.
Note. In instances of two-factor authentication is enabled for the account, the log in procedure will be as follows:
Apptimized shows the following screen when successful:
Ten attempts to provide credentials available by default. The number of attempts can be changed by an Organization administrator. The account locks when attempts are deplete. Assistance on this issue is available under the Apptimized support team email (support@apptimized.com) or via https://www.apptimized.com/contact-us/ .
When a user is logged into the Apptimized SSO application, organization settings can be performed in the Organization Management application.
Restore a password
The option to recover a password is available under the Restore my password link:
Profile tab
This tab enables a user:
- To make changes to the user’s profile data (i.e., first name, last name, occupation, department, avatar).
- To export personal data.
- To delete an account.
Account avatar
By default, the system assigns a user a random image.
The option to change the avatar is available under the Update button:
Note. The file upload must be less than 5 Mb and PNG / JPEG only.
Apptimized shows the following screen when successful:
The option to remove the avatar is available under the Remove button. Apptimized shows the following screen when successful:
Profile data
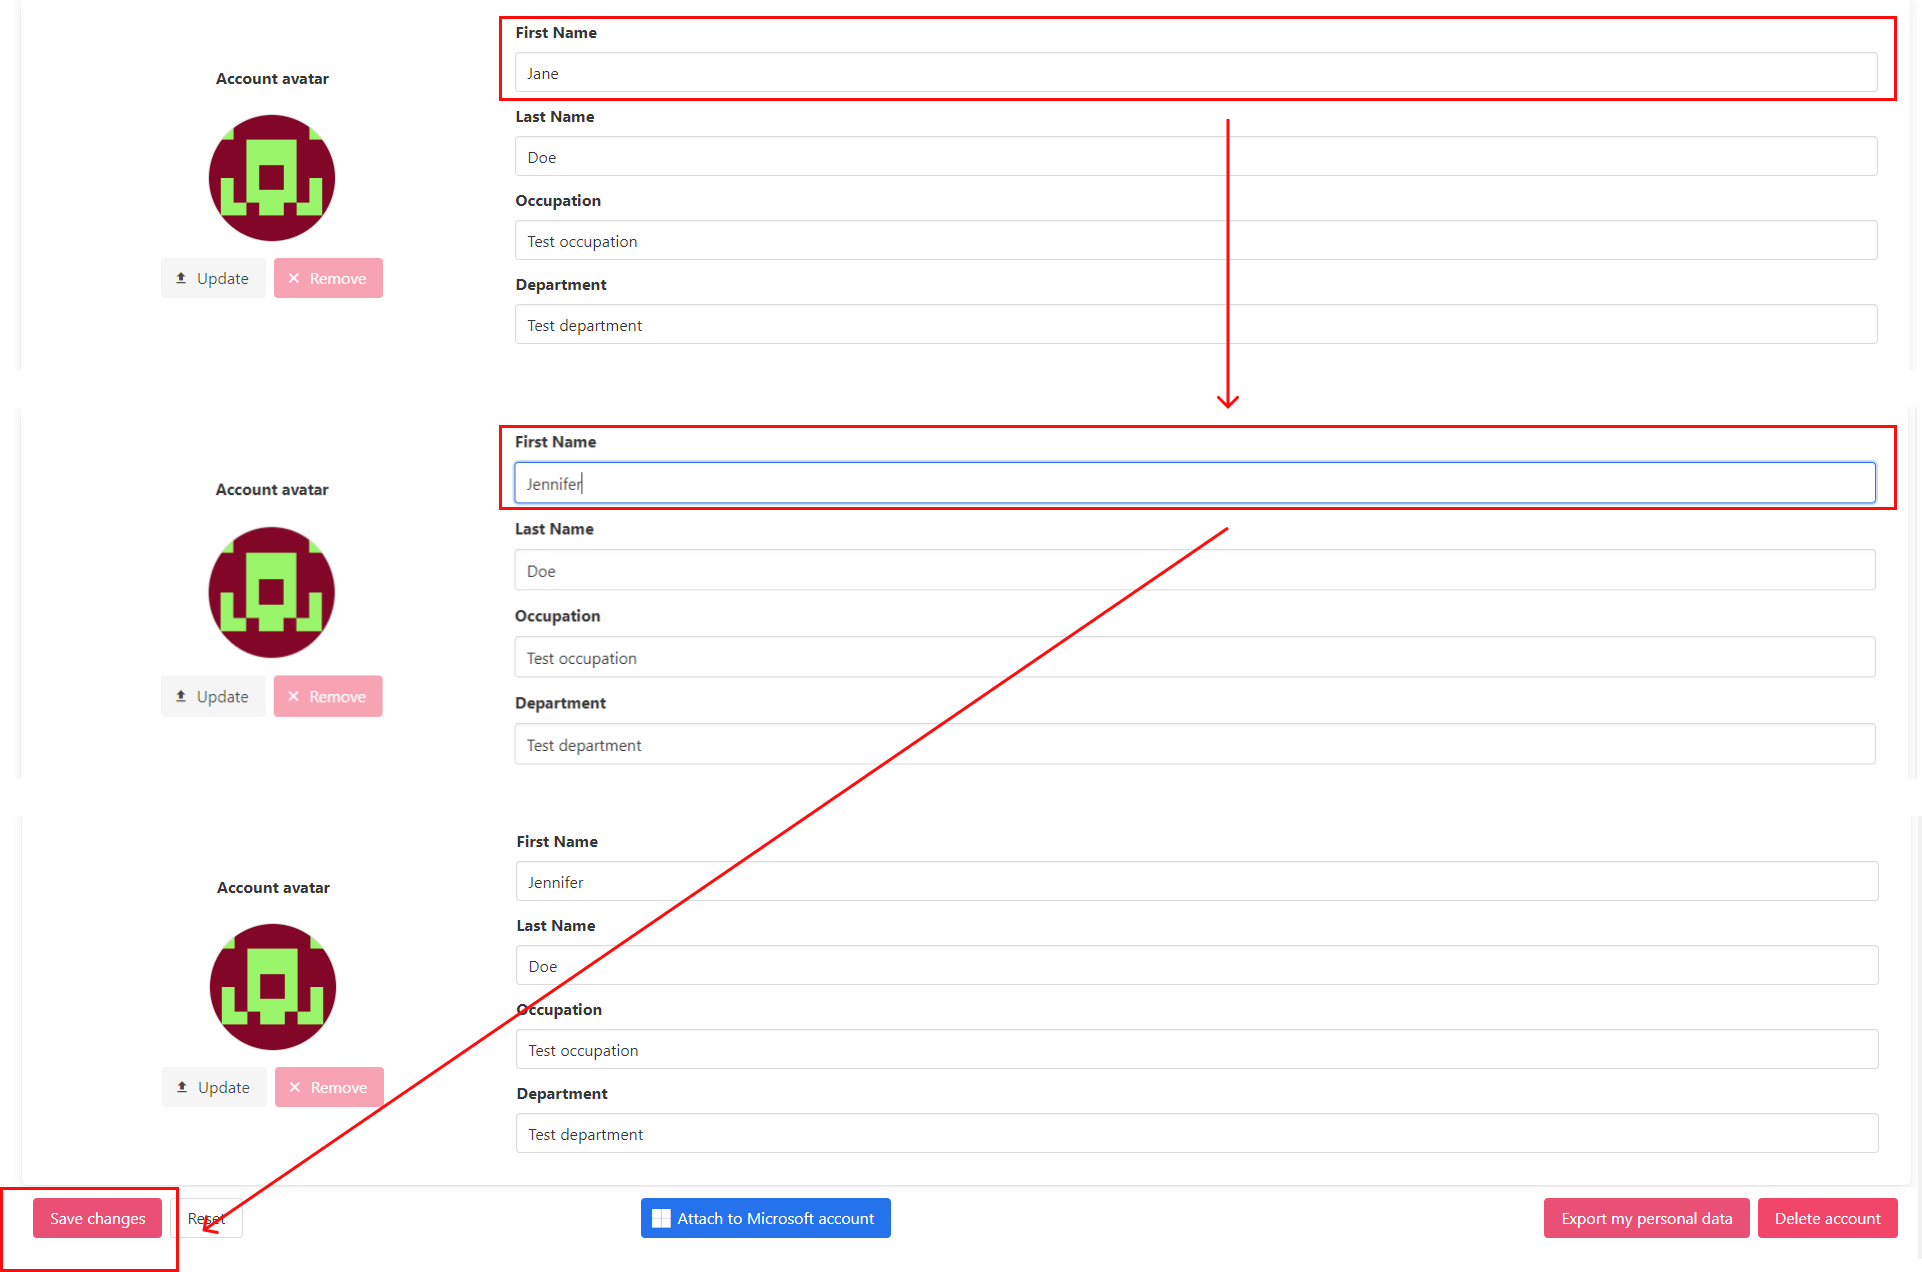
To make changes to the profile data (i.e., first name, last name, occupation, department), a user enters the valid data into the relevant field.
The option to revert the changes before they were applied is available under the Reset button.
The changes in the profile data apply when clicking the Save changes button.
Apptimized shows the following screen when successful:
Export profile data
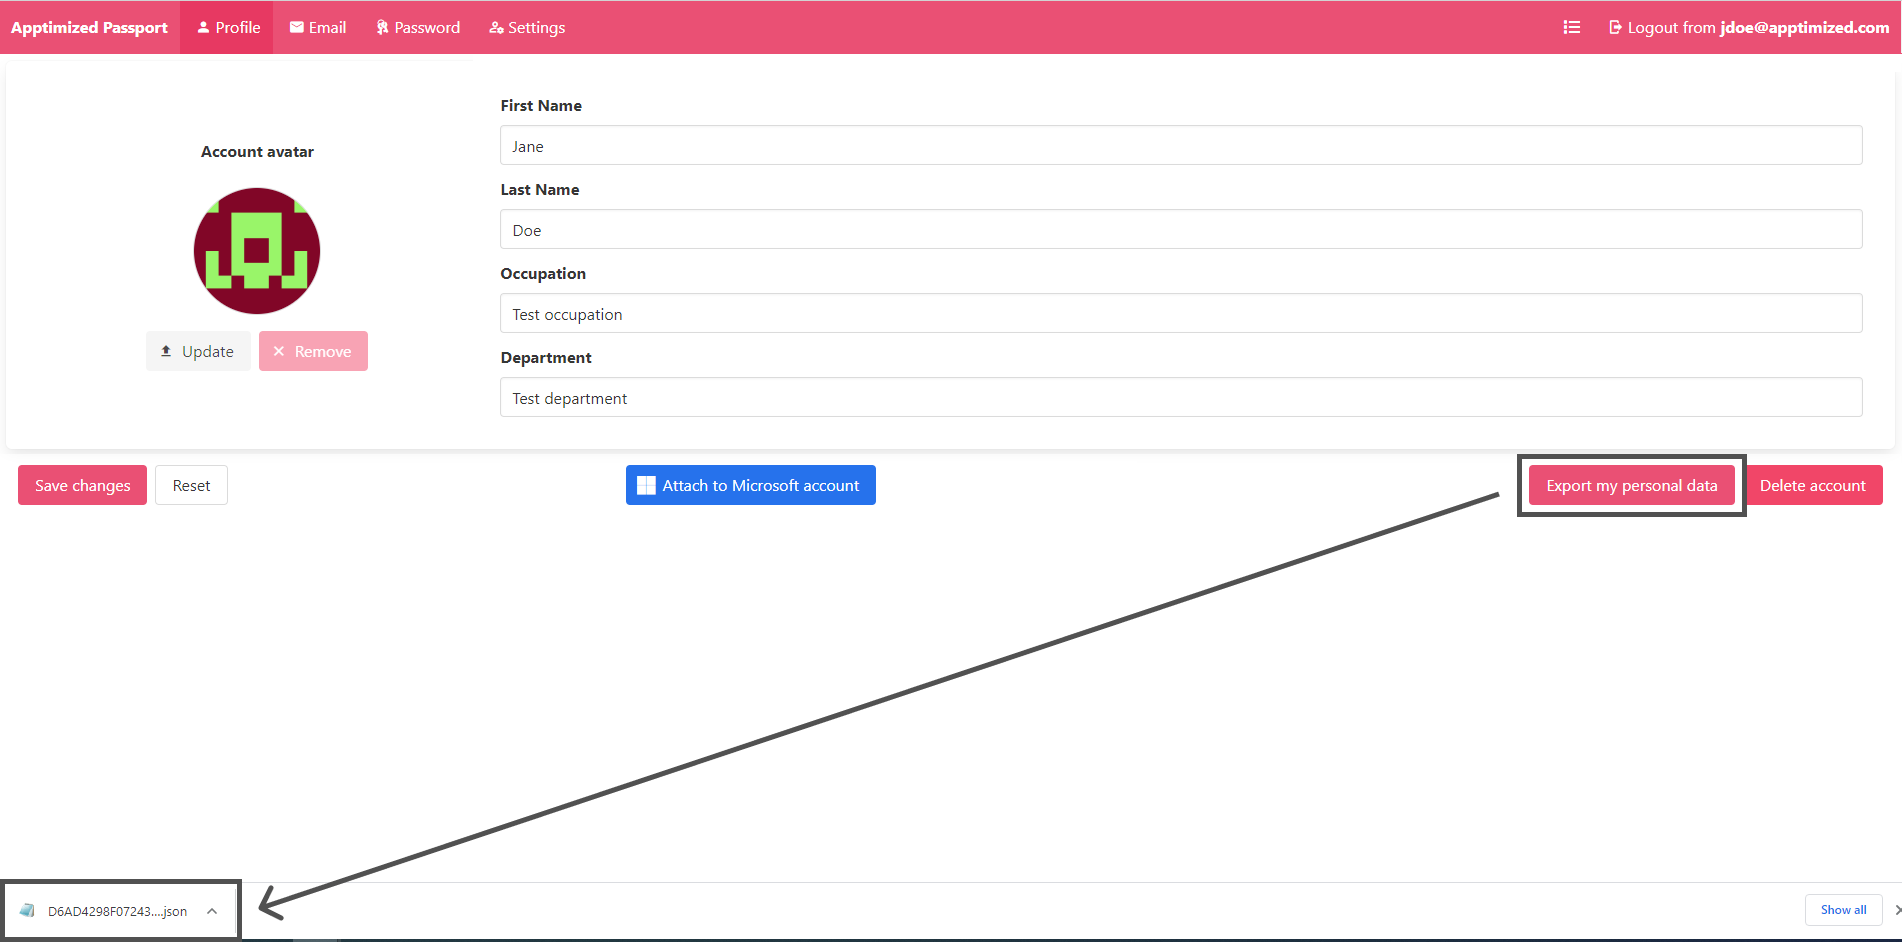
Profile data can be downloaded as a JSON file by clicking the Export my personal data button.
Attach Microsoft account
The option to connect user's Microsoft account to Apptimized account is available under the Attach to Microsoft account button:
Apptimized shows the following screen when successful:
Note. To proceed with the connection to Microsoft, logging in Microsoft account and Granting Sign in and read user profile permission is required.
The option to grant permission is available under Microsoft Azure Portal > Enterprise applications > Apptimized Portal > Permissions > Grant admin consent for Apptimized button.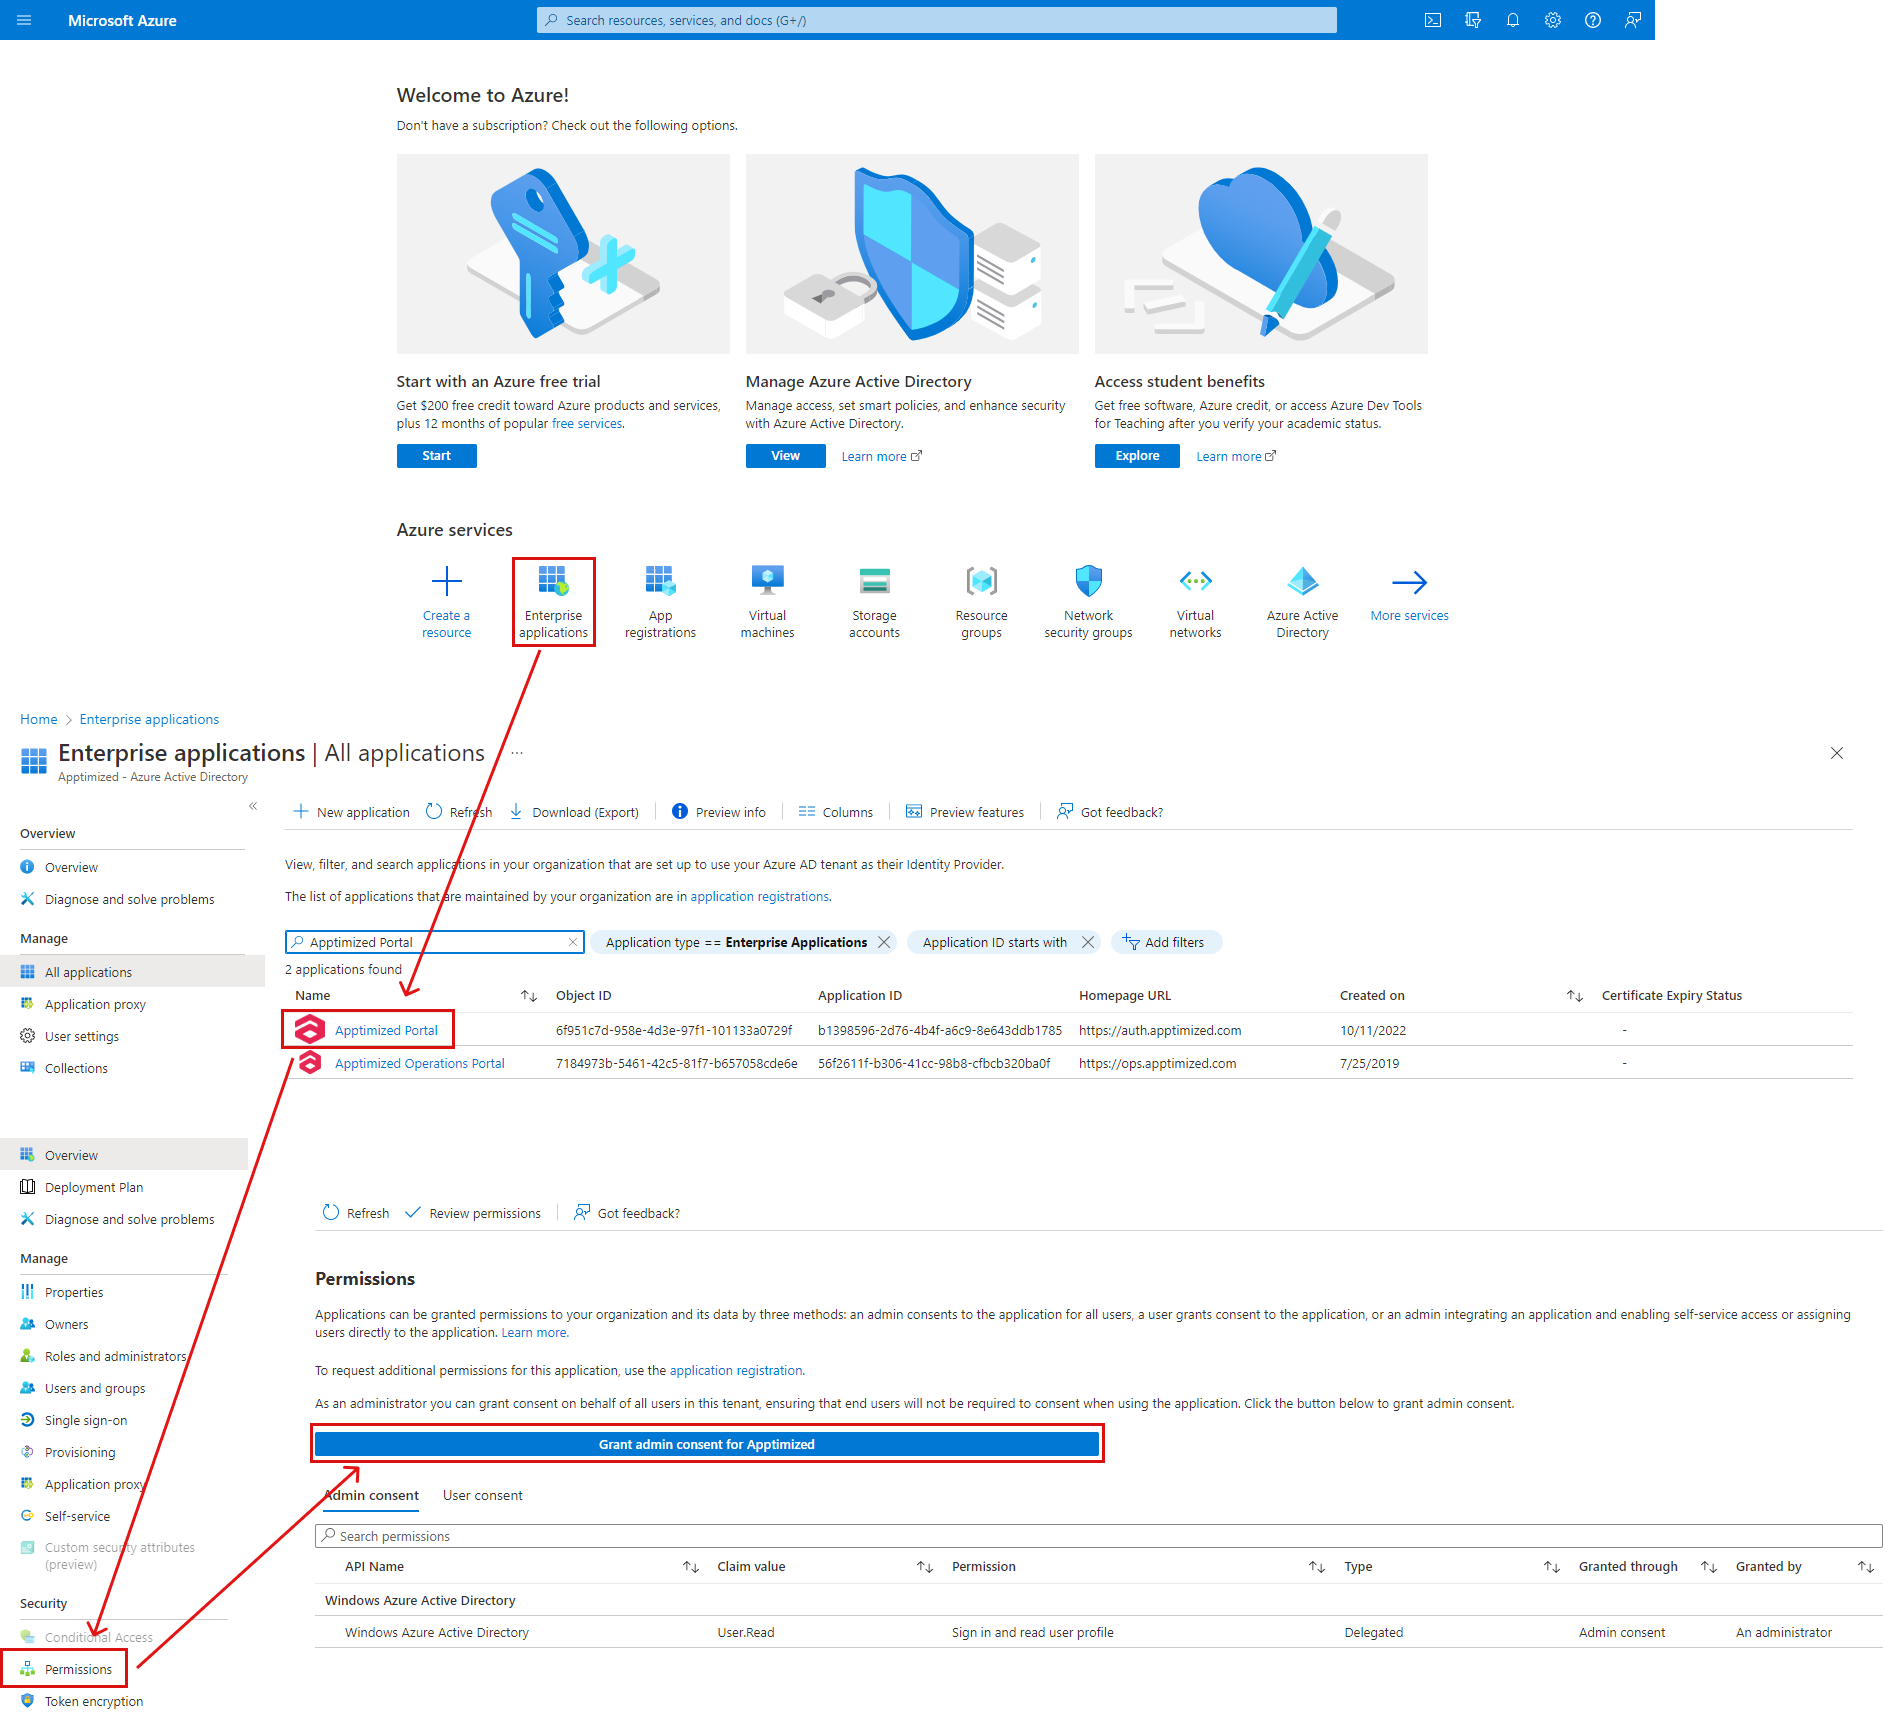
The next time a user signs in to the Apptimized, those credentials will apply.
The option to detach the account when needed is available by contacting the Apptimized team through the support chat or via delivery managers.
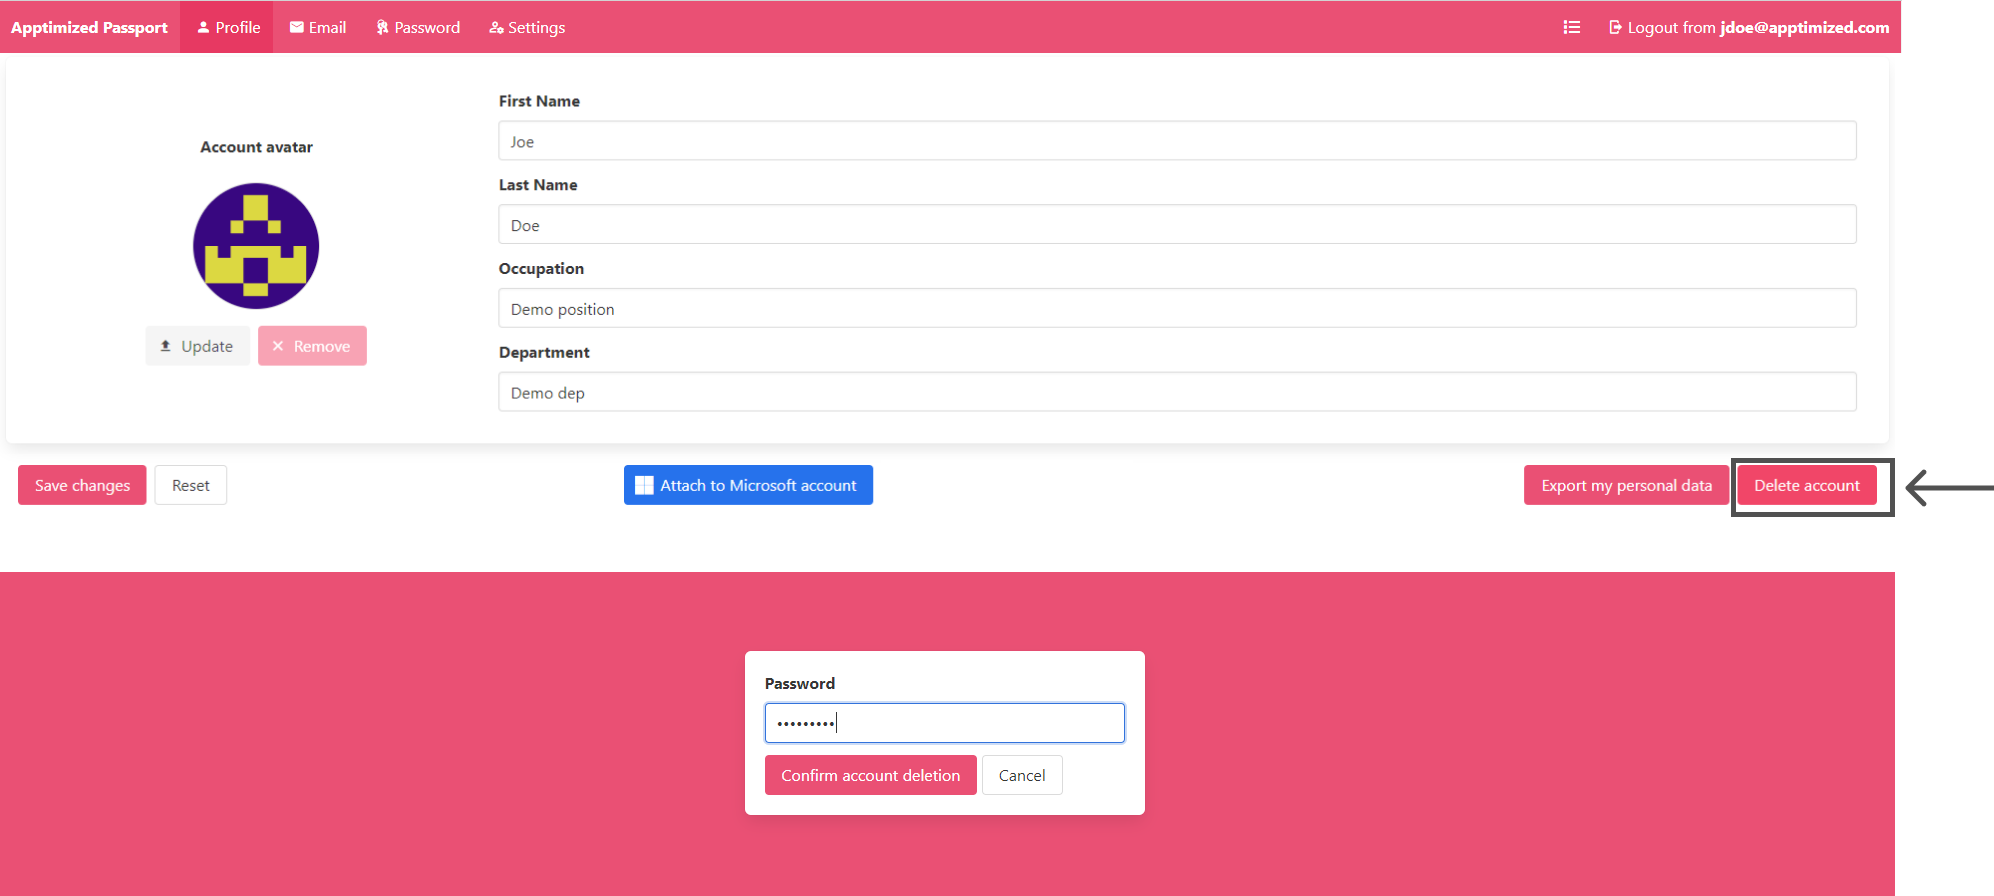
Delete an account
The option to delete an account is available under the Delete account button > Enter the valid password > Confirm account deletion button.
Apptimized shows the following screen when successful:
Email tab
This tab enables a user to change the email address in the profile.
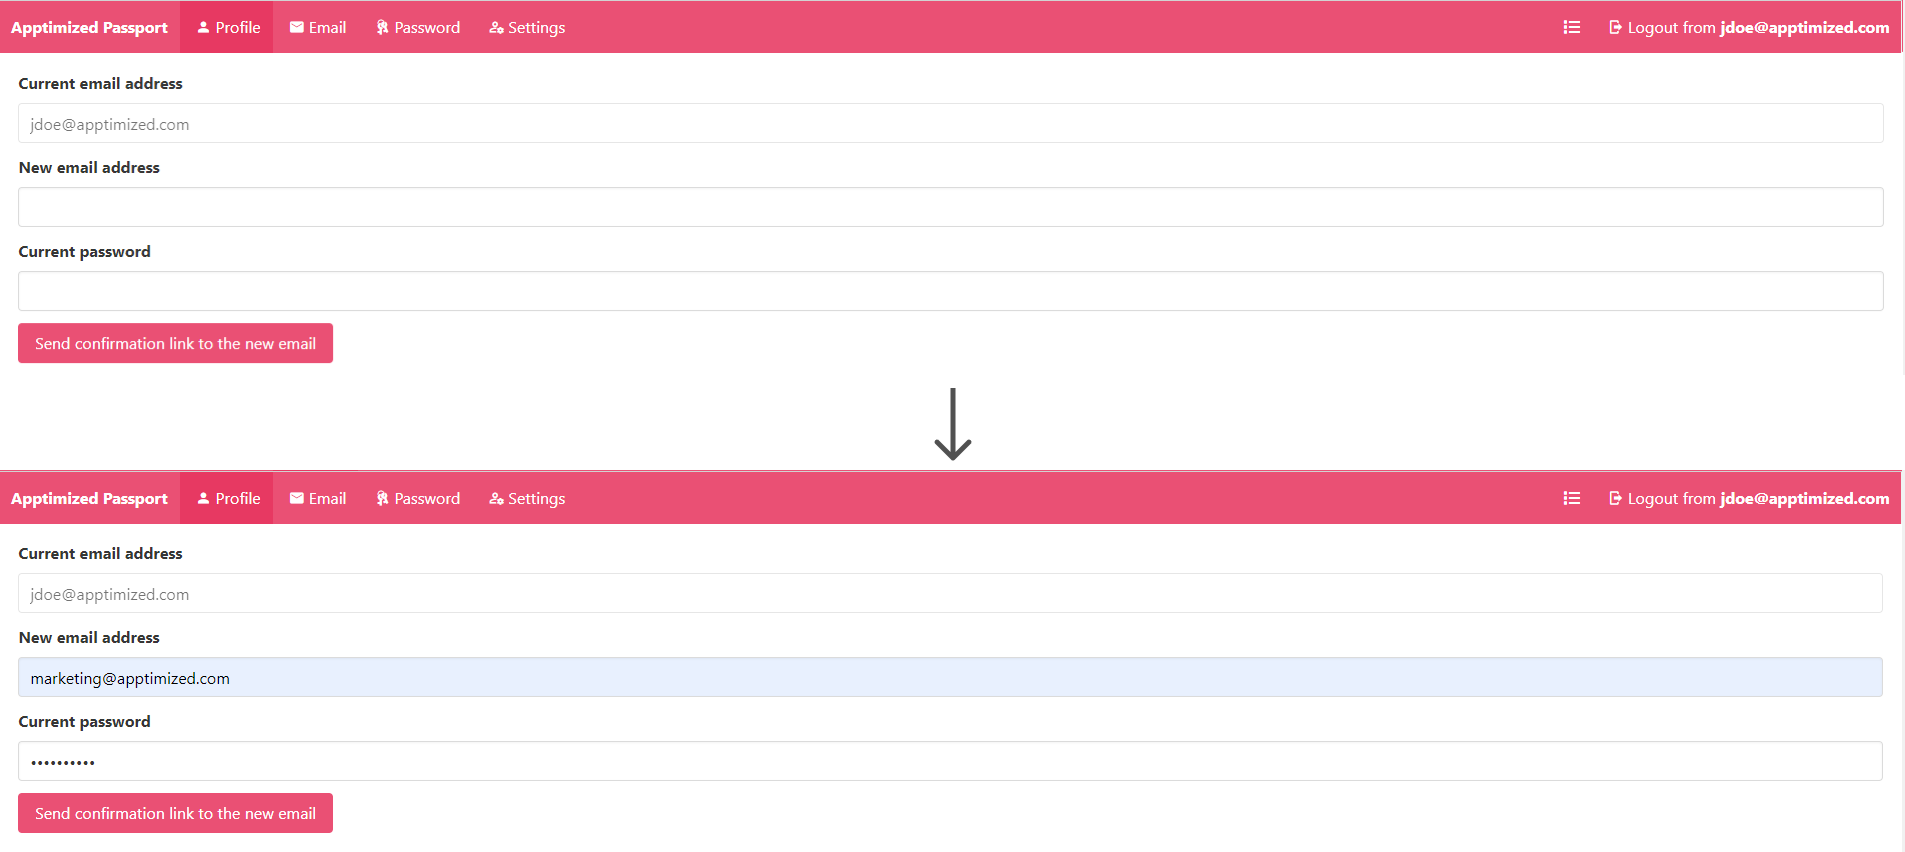
To change the email address a user needs to perform the following actions: Click the Email tab > Select the New email address field > Enter new email > Select the Current password field > Enter the valid password > Send confirmation link to the new email button.
Apptimized shows the following screen when successful:
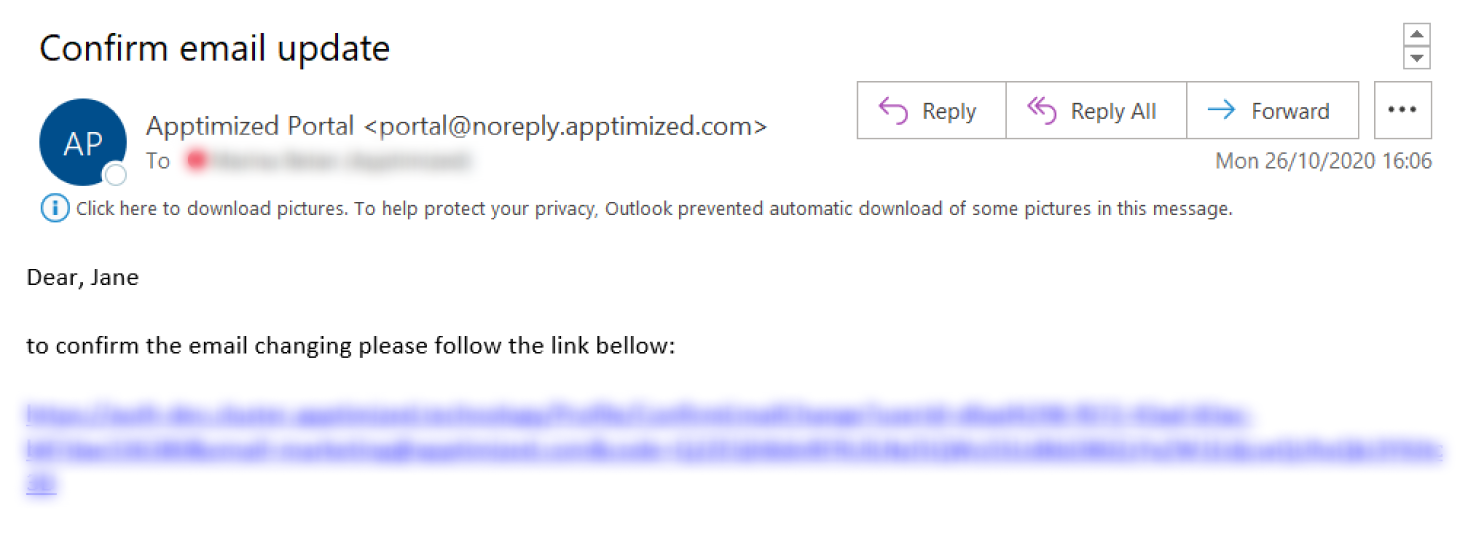
The following screenshot shows the notification email when a user makes an email change request:
When a user clicks a link from the confirmation email Apptimized shows the following screen:
Password tab
This tab allows a user:
- To change the password.
- To enable two-factor authentication.
Password change request
The option to change password is available under the Password tab > Current password field > Enter the current password > Select the New password field > Enter new valid password > Select the New password (repeat) field > Repeat new valid password > Save changes button.
Apptimized shows the following screen when successful:
Two-factor authentication
The two-factor authentication is disabled by default.
The option to enable two-factor authentication is available under the Enable two-factor authentication using the authentication app button.
Apptimized shows the following screen when successful:
To proceed with the two-factor authentication set up, uploading one of the following applications is required:
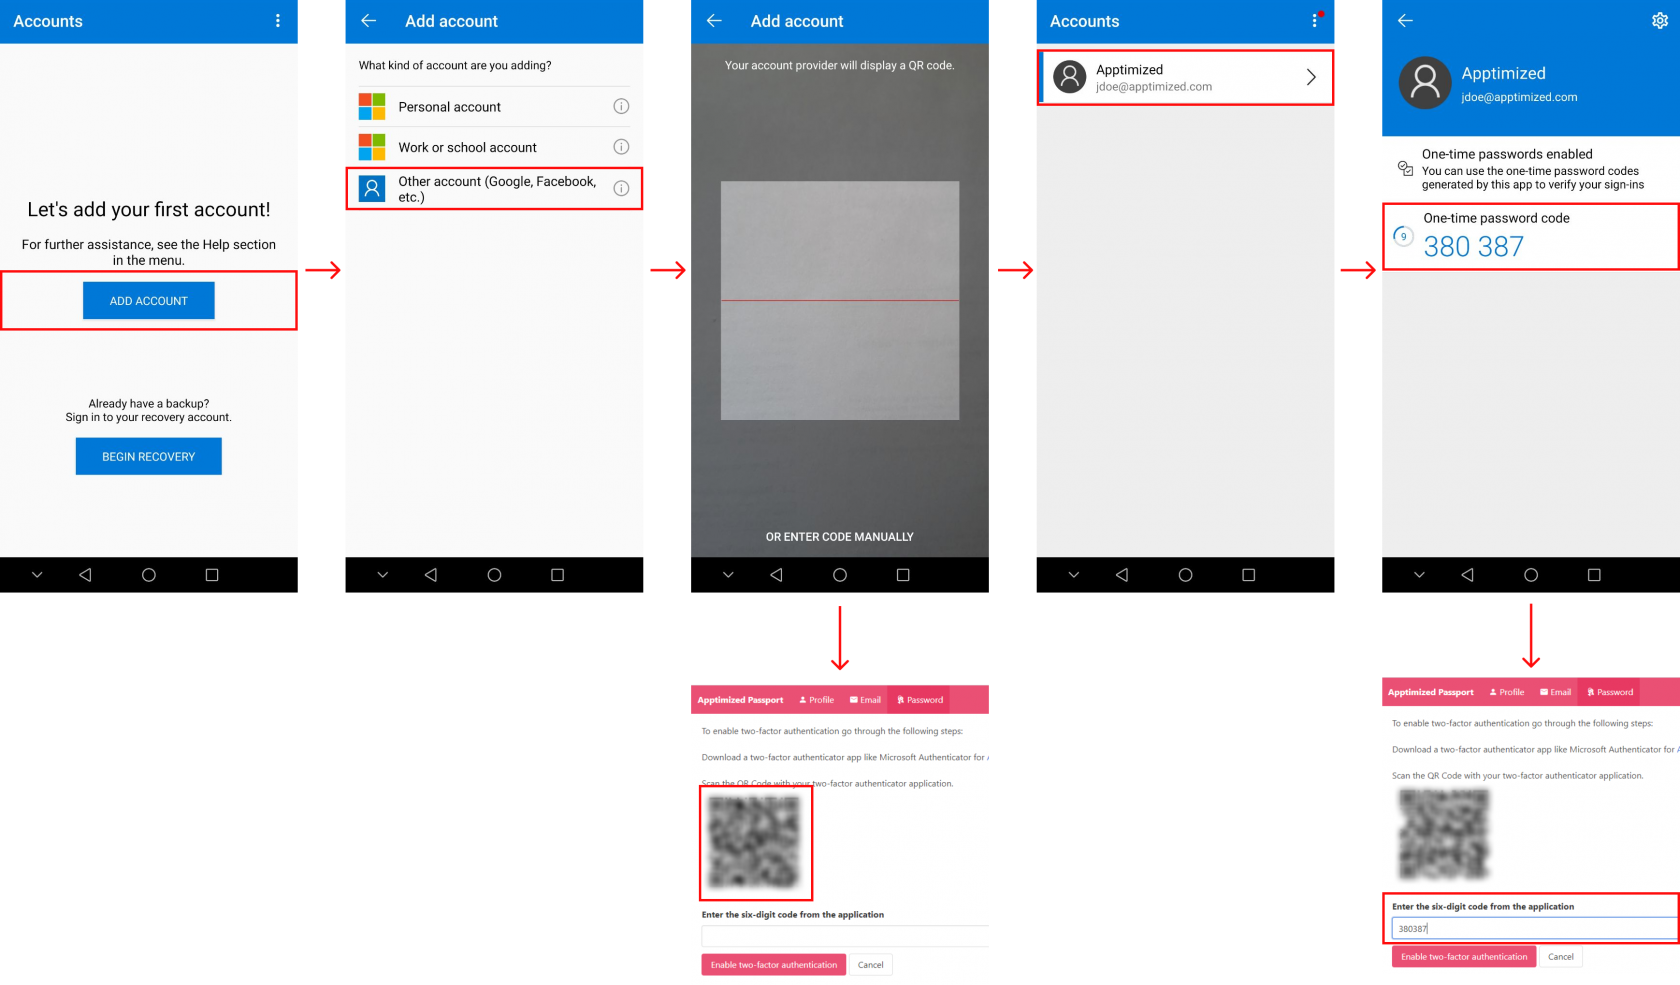
The example below shows the procedure to enable two-factor authentication via Microsoft Authenticator for Android (the installation of the application to the mobile phone or a tablet is required): Open Microsoft Authenticator > Add account button > Other account (Google, Facebook, etc.) option > Scan a QR code in Apptimized SSO > Select an account from the list > Enter a one-time password in Apptimized SSO > Enable two-factor authentication button in Apptimized SSO:
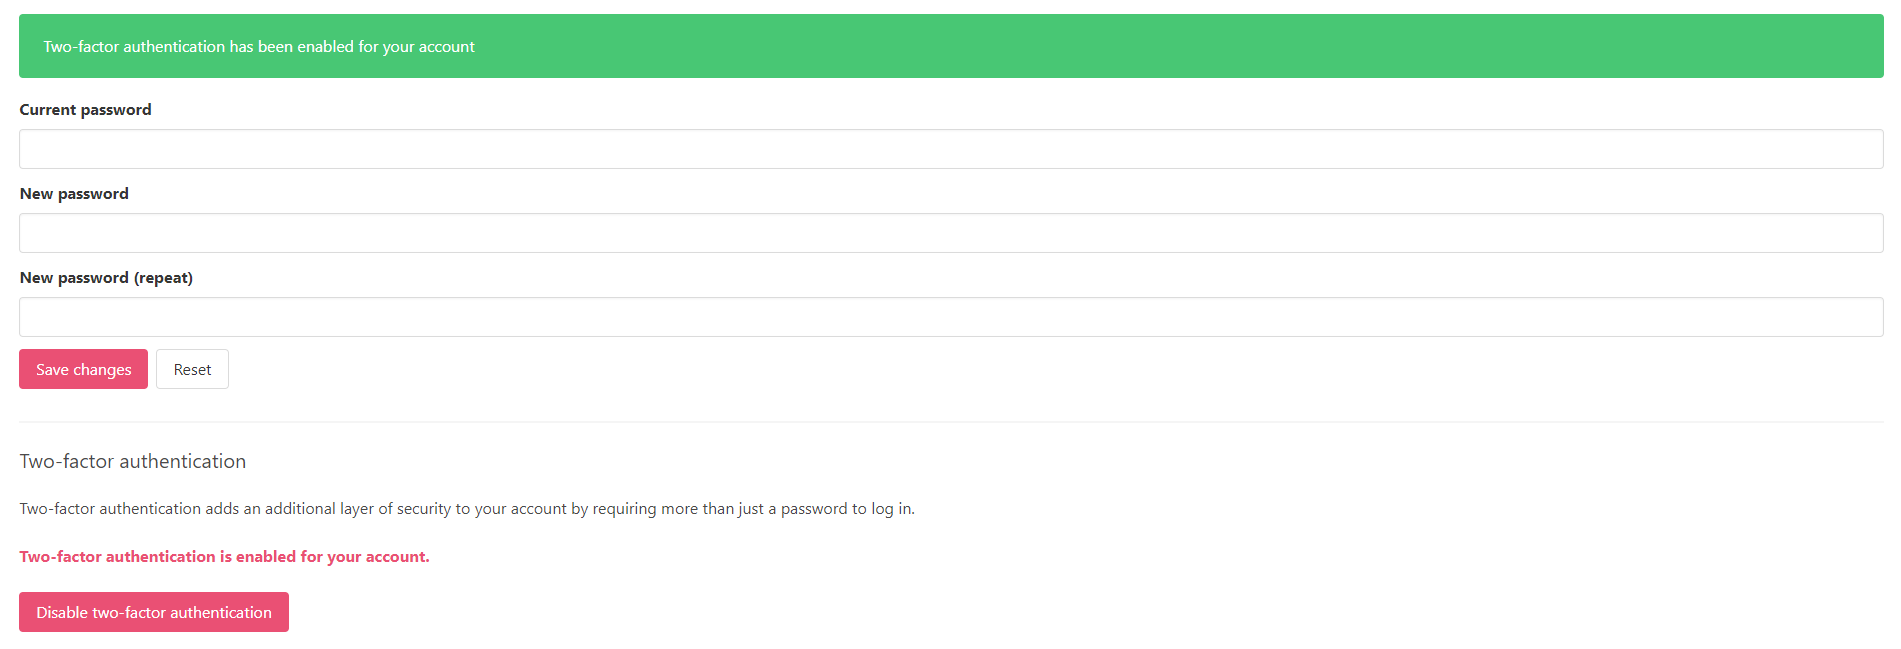
Apptimized shows the following screen when successful:
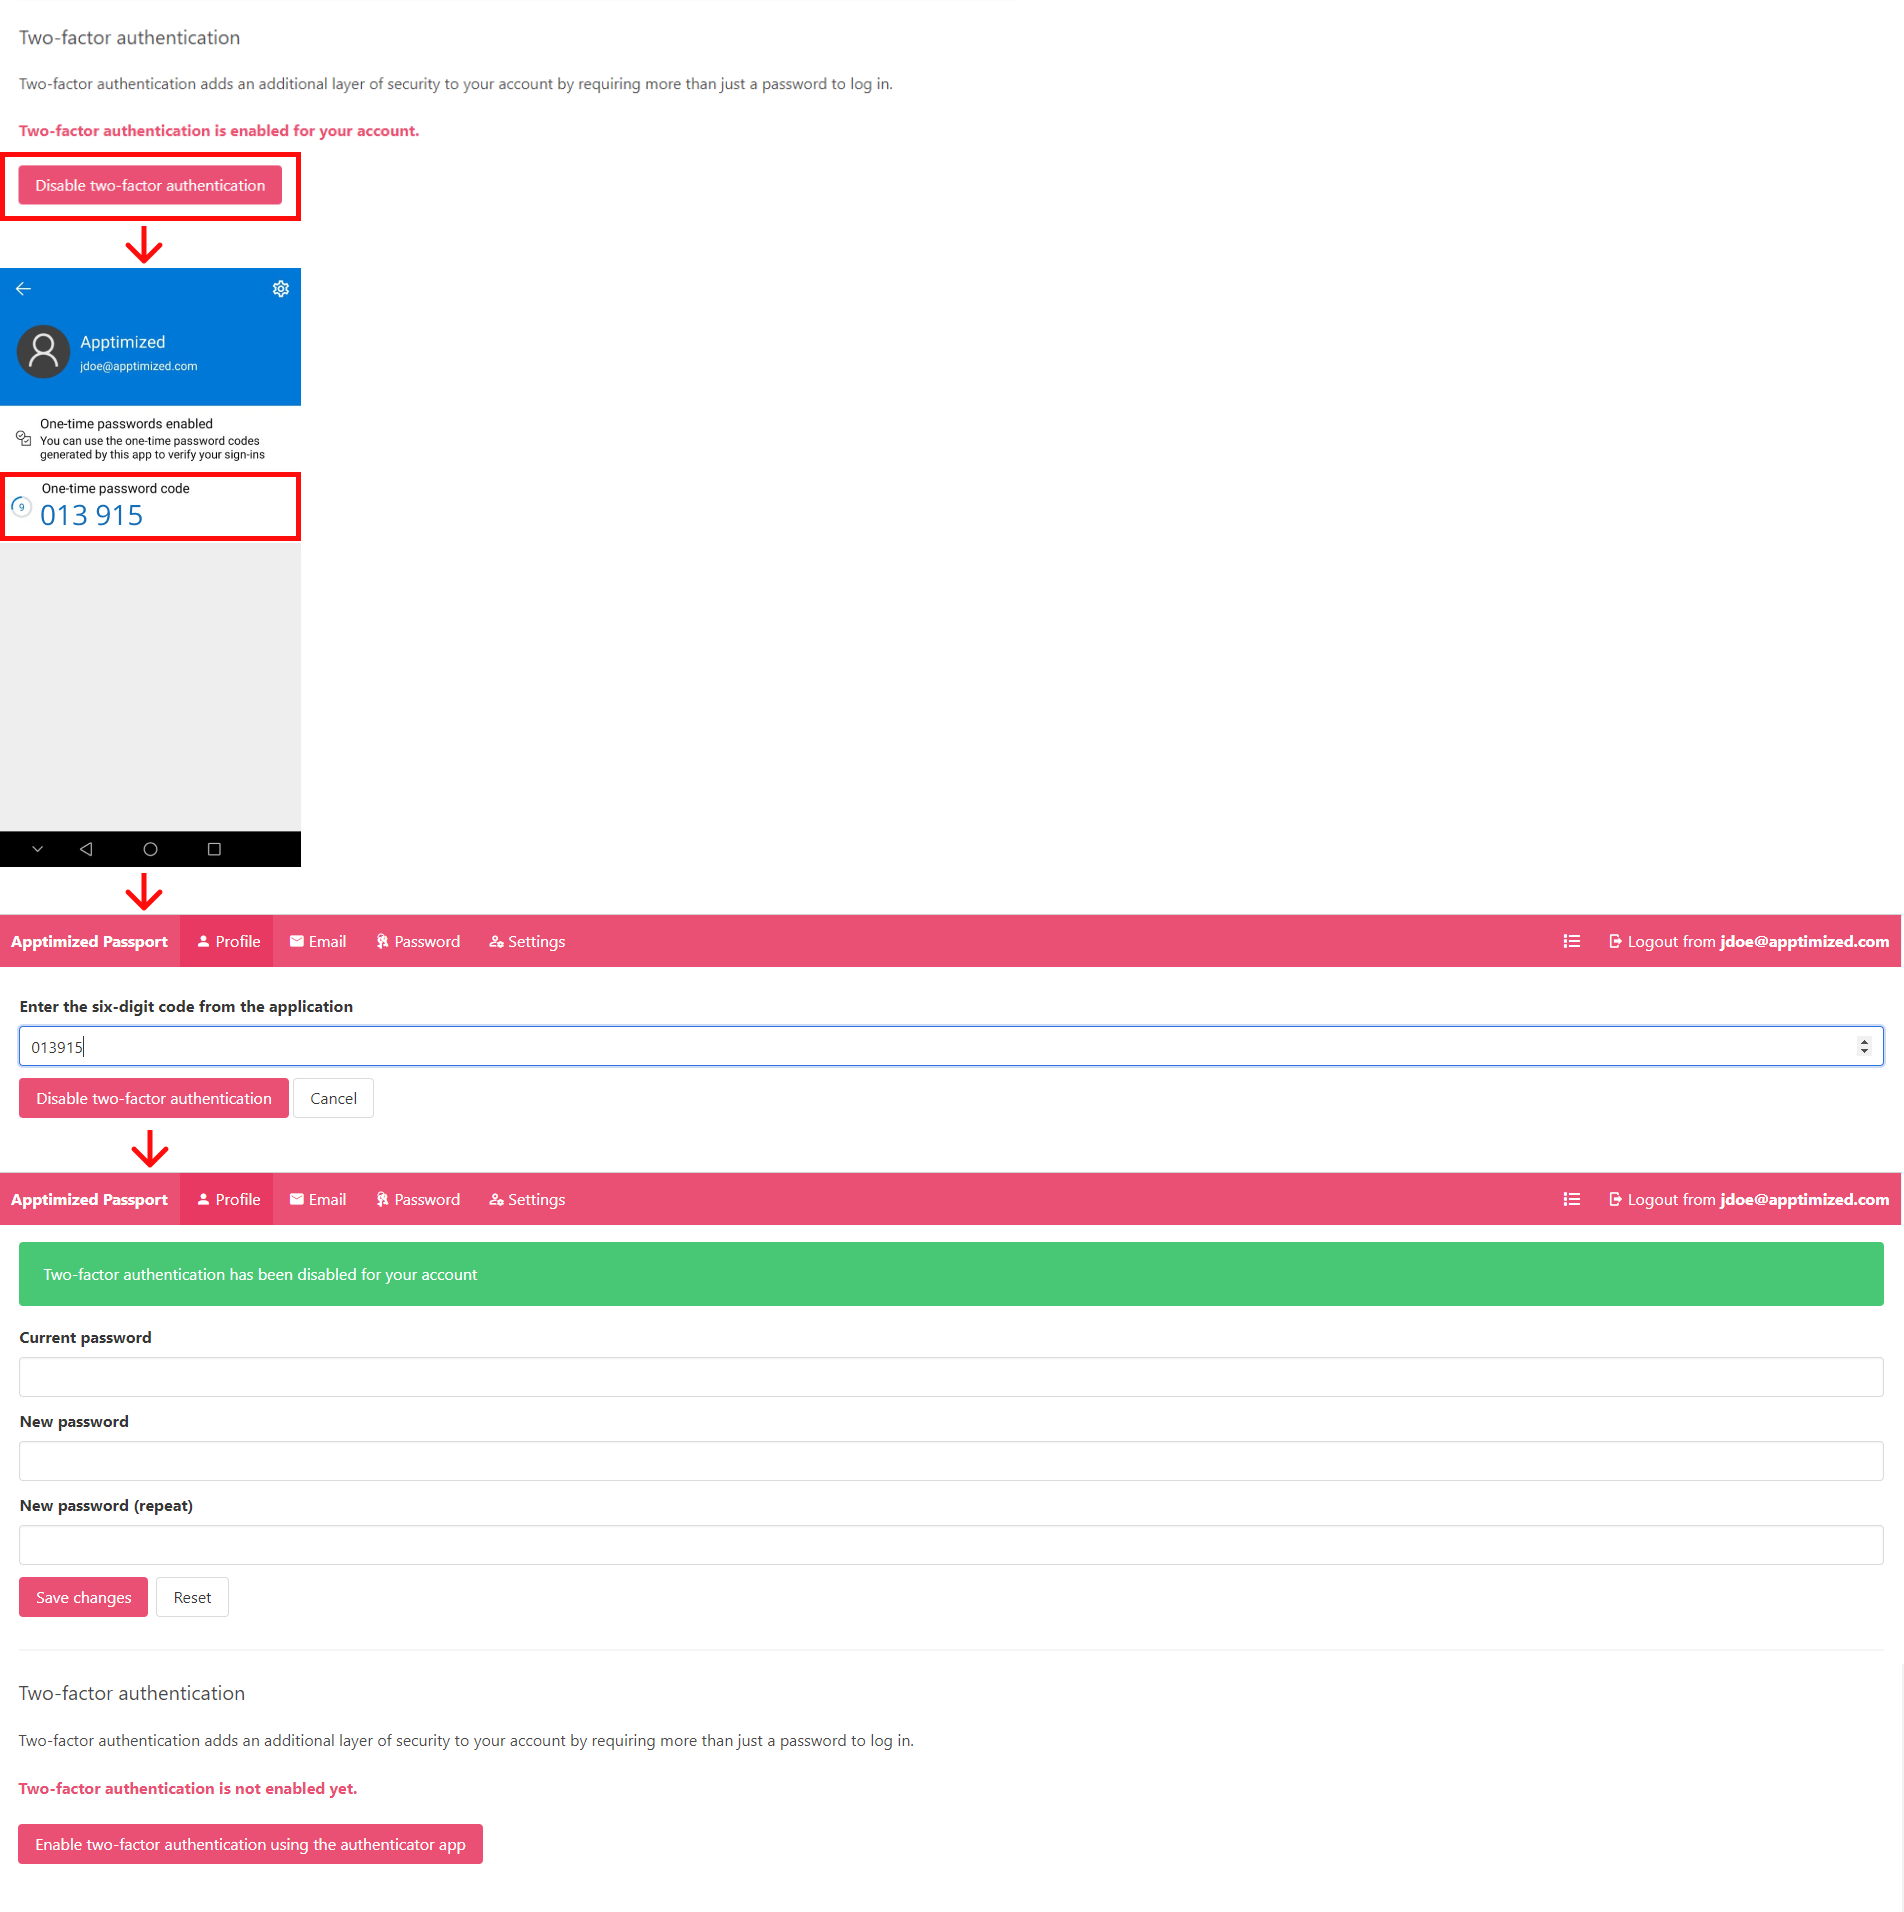
The option to deactivate the two-factor authentication is available under the Disable two-factor authentication button:
Note. In case of two-factor authentication option is enabled in Apptimized Administration for the organization, a user is not provided with the ability to deactivate the two-factor authentication option in Apptimized SSO.
Settings tab
This tab enables a user to configure settings within a specific user's account (i.e., to set up a time zone, date format, and time format by using a drop-down list):
Account logout
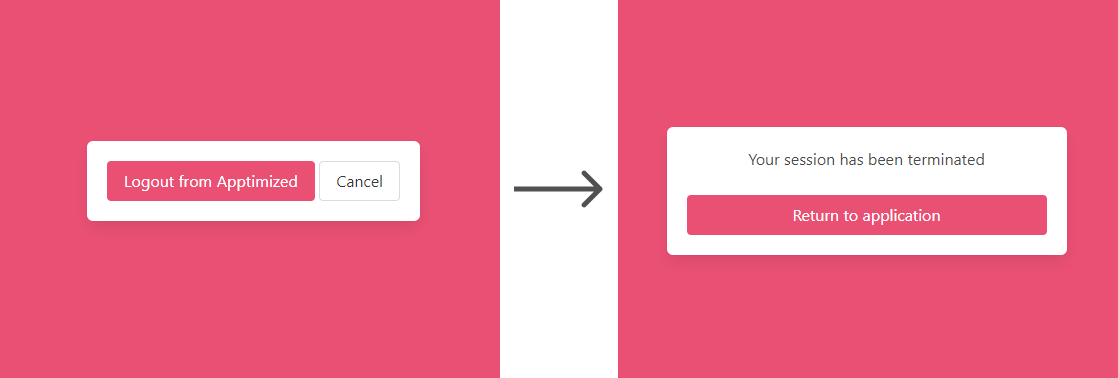
The option to terminate the session within the account is available under the Logout button > Logout from Apptimized button > Return to application button:
Apptimized shows the following screen when successful:

.png)
.png)
.png)
.png)

.png)





.png)




No comments to display
No comments to display