| 1. General settings: - Project settings; - Characters substitutions. 2. Workflow: - Import; - Step settings. 3. Echo; 4. Integration: - Intune; - ServiceNow; - SCCM. 5. Update Monitoring; 6. Storage 6. Virtualization - General; - Providers. 7. Apptimized TO GO. | [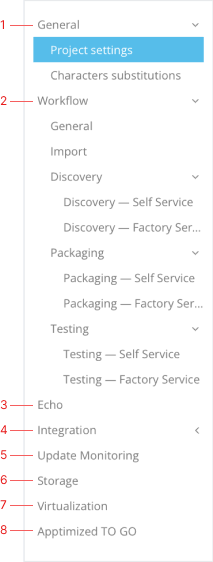](https://docs.apptimized.com/uploads/images/gallery/2023-03/6Hzg9Sr7mVxgmA03-project_settings_02_new-1.png) |
| **Setting** | **Description** |
| Follow workflow rules | Enforces the provision of a source and documentation. |
| Can skip steps | Allows moving forward in the workflow without satisfying process requirements such as providing a source, documentation, or completing the current step. |
| Revert to Import step | Allows moving backward to the start of workflow in order to replace the application source. |
| Revert back completed apps | Allows moving backward from the final workflow step to change applications that are already marked as completed. |
| **Setting** | **Description** |
| Installation source | This setting enables a field for source file uploading if switched on. |
| Documentations/Instructions | This settings enables a user to add the **Discovery document** field to upload the discovery document under it. |
| Mandatory | This setting enables a user to make the **Discovery document** setting as mandatory. This setting displays only if **Discovery document** setting switched on. |
| Application icon for Intune | This setting enables a user to add the Application icon for Intune field to upload the Icon for the application and made it available during the Intune push (see https://docs.apptimized.com/books/apptimized-platform-admin-manual/page/upload-package-to-the-microsoft-intune-from-the-apptimized-portal) |
| Mandatory | This setting enables a user to make the **Application icon for Intune** setting as mandatory. This setting displays only if **Application icon for Intune** setting switched on. |
| Application owner | This setting enables Application owner field under application metadata, and enables [additional project permissions](https://docs.apptimized.com/link/243#bkmrk-attribute-descriptio) under role permissions list |
| Mandatory | This setting enables a user to make the Application owner as mandatory. This setting displays only if Application owner setting switched on. |
| Architecture | This setting enables the **Architecture** field under application metadata and allows defining the application architecture. |
| **Language code** | **Description** | **Example** |
| Keep original | Apptimized saves the language code value a user indicated on the Import step | English (US) |
| ISO 639-1 (Uppercase) | A two-character code set entered with uppercase letters | EN |
| ISO 639-1 (Capitalize case) | A two-character code set entered with the capitalized letter | En |
| ISO 639-2 (Uppercase) | A three-character code set. Begins with a capital letter | ENG |
| ISO 639-2 (Capitalize case) | A three-character code set. Begins with a capital letter | Eng |
| **Category** | **Description** |
| Name | Indicates the name of the Custom field |
| Type | Indicates the type of Custom field. The following types are available: - Input - Select - Multiple select |
| Data type | Indicates the data type of Custom field. The following types are available:
- Integer
- Text
- DateTime
- Boolean
- Html
**Note.** **Data type **is available only if the **Input **type was selected. |
| Source type | Indicates the source type of Custom field. The following types are available:
- Custom
- Applications
- Users
**Note.** **Source type **is available only if the **Select** & **Multiple select **types were selected. |
| Required | Indicates the status of the custom field. The following statuses are available: - Yes - No |
**Note.** **Custom field options **section becomes available only if **Select **option was selected under the **Field type **dropdown list & **Custom **option was selected under the **Source type **dropdown list. [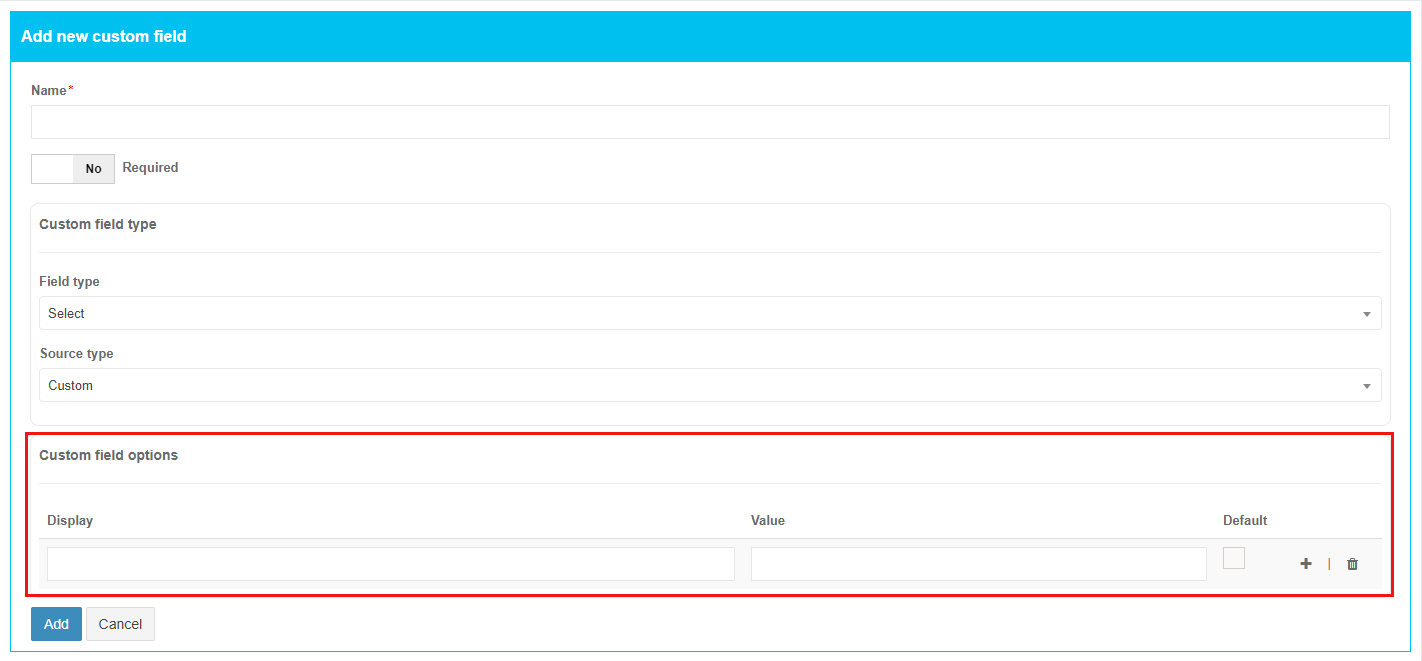](https://docs.apptimized.com/uploads/images/gallery/2021-08/ptfyMMU5S2VIPirZ-settings_custmfield_17_2.png) The option to add **Customfieldoptions** parameter is available after setting **Display & Value** fields. The custom field can be designated as required under the **Default** checkbox. The option to add a new entry is available under **plus** button. [](https://docs.apptimized.com/uploads/images/gallery/2021-08/yc9FXcieOv2MWG0q-settings_custmfield_18.png) The option to delete entry is available under **bin** symbol. [](https://docs.apptimized.com/uploads/images/gallery/2021-08/3qxpbkMAU87qDFZk-settings_custmfield_20.png)
Apptimized shows the following notification when successful: [.png)](https://docs.apptimized.com/uploads/images/gallery/2022-02/U408cg8B9mMTEx09-settings_custmfield_09-(2).png) The option to edit **Custom field **name & **Required **switch is available under **Actions **block > **Edit**. [.png)](https://docs.apptimized.com/uploads/images/gallery/2021-08/SLHLyIxNjoYD4ea8-settings_custmfield_10-(1).png) [.png)](https://docs.apptimized.com/uploads/images/gallery/2021-08/oY8wpx6MAskL1hAt-settings_custmfield_12-(1).png) The option to remove Custom field is available under the **Actions **block > **Remove**. [.png)](https://docs.apptimized.com/uploads/images/gallery/2021-08/gGrUAPs9fukAaK2w-settings_custmfield_11-(2).png) Apptimized shows the following modal window when successful: [.png)](https://docs.apptimized.com/uploads/images/gallery/2021-08/X5gHU9vZnBeDQ1eG-settings_custmfield_13-(1).png) To apply the settings, click the **Save **button. To revert the settings, click on the **Reset** button. Apptimized shows the following notification when successful: [](https://docs.apptimized.com/uploads/images/gallery/2021-08/KlE2PVQaDNJOgceA-image-32.png)**Note.** When the additional field settings are applied they appear in the application metadata block (i.e., at the Import step, at the application settings screen). [.png)](https://docs.apptimized.com/uploads/images/gallery/2021-08/K9Yx39s0ZGcEnfi2-settings_custmfield_15-(1).png) [.png)](https://docs.apptimized.com/uploads/images/gallery/2021-08/vwVxauGtQaBvinaq-settings_custmfield_16-(1).png)
#### **Steps settings** The set of workflow settings depends on workflow structure (i.e., the number of steps, the set of module types) that was configured during project creation. The screenshot below shows the examples of possible workflow settings configurations. [](https://docs.apptimized.com/uploads/images/gallery/2020-08/7lVUj5VgohEdbcHm-steps_settings_01_new.png) #### **Discovery – Self Service** The screenshot below shows the default settings of the **Discovery – Self Service** module. All required fields are marked with an asterisk \*. [](https://docs.apptimized.com/uploads/images/gallery/2020-12/pjZ5gbA3z4GEwJYz-discovery_selfservice_1.png) The option to change a module name is available under the **Module name** field. The default module name is **Discovery – Self Service.** The option to change a file name pattern is available under the **Document file name pattern** field. The default file name pattern is **\[Manufacturer\]\_\[ProductName\]\_\[ProductVersion\].html.** To insert the variable tag into the field, click the relevant variable tag from the dropdown list. [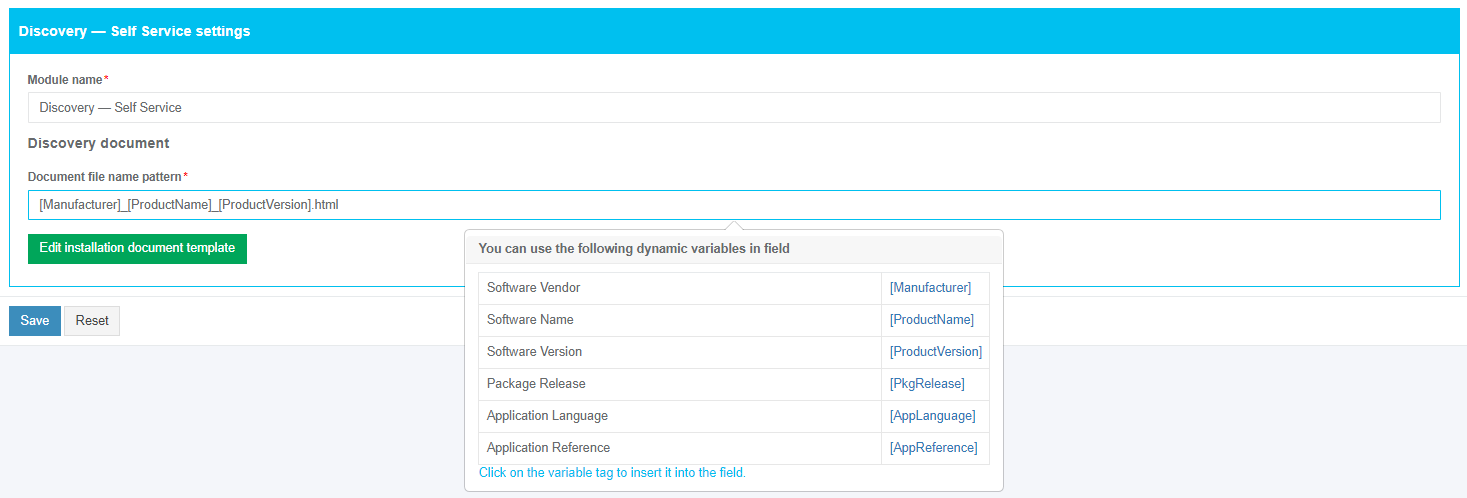](https://docs.apptimized.com/uploads/images/gallery/2020-12/YHDcNfqcjYWyqgs1-discovery_selfservice_2.png) The option to edit a discovery case template is available under the **Edit installation document template** button. [](https://docs.apptimized.com/uploads/images/gallery/2020-04/D98wJDlaN78sB0sL-steps_settings_03.png) Apptimized shows the following screen: [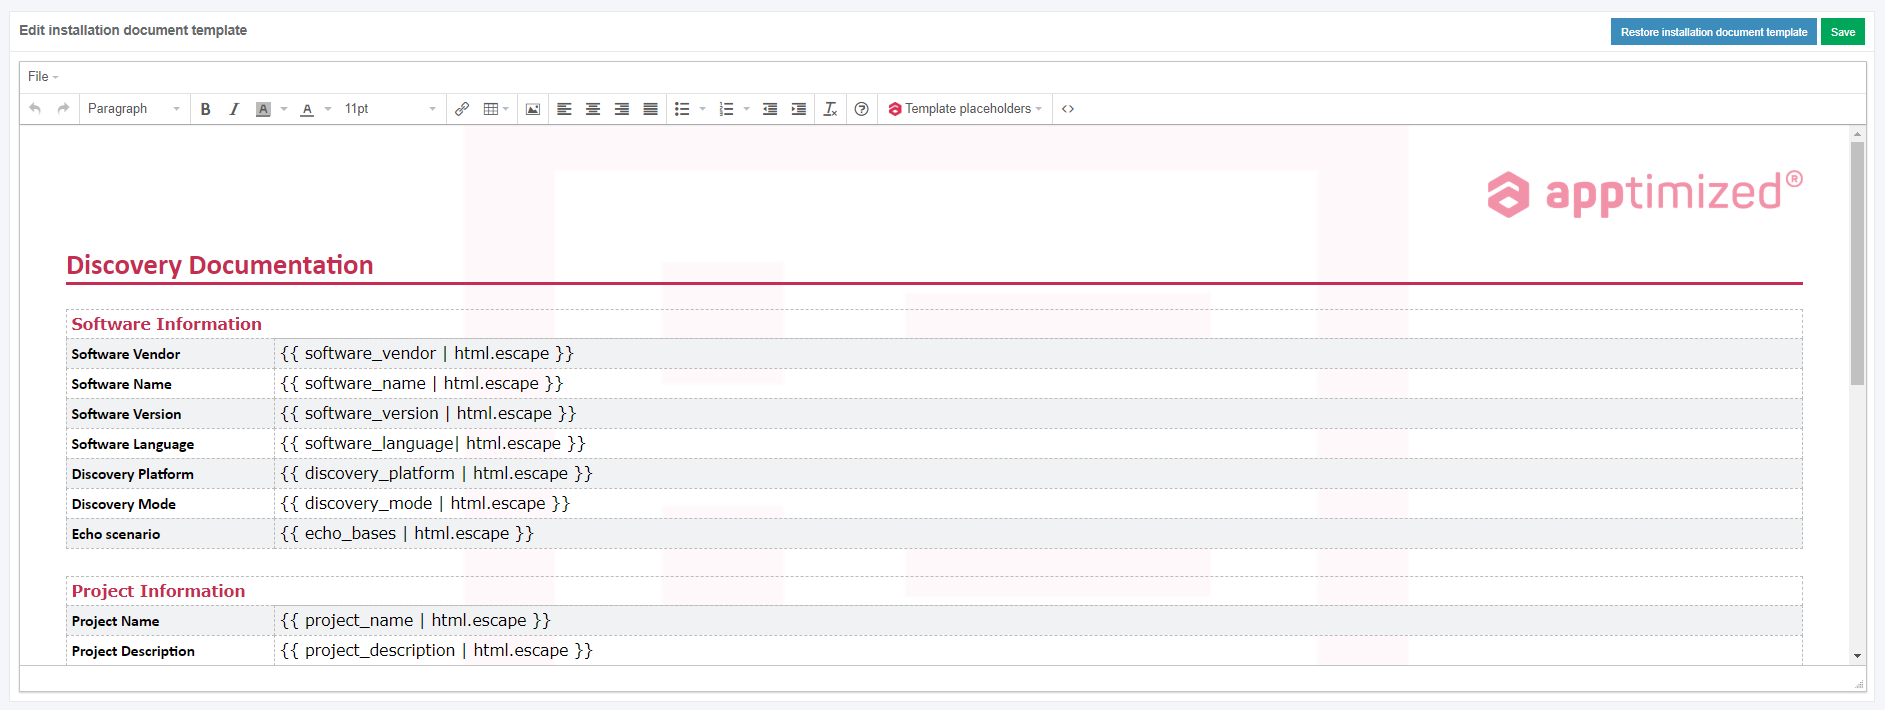](https://docs.apptimized.com/uploads/images/gallery/2020-04/A1zLkT22t1Vh3bpe-steps_settings_04.png)| **Option** | **Details** | **Default value** |
| Filter system noise during recording | This option allows for applying a filter (exclusion list) to automatically remove the captured system and user activity (noise). **Yes** and **No** options available. **Yes** – the value of this option removes redundant files and registry keys that were created by the system while recording sessions and did not relate to installing software (i.e., telemetry or diagnostics data). **No** – the system noise which is captured by the application packaging tool will not be removed. | Yes |
| Remove Desktop shortcuts | This setting indicates the option to remove all desktop shortcuts (**Yes**) from the package or to leave desktop shortcuts in the package (**No**). | Yes |
| Produce AppV | This setting indicates the option to generate a file in App-V format. **Yes** and **No** options available. | No |
| Produce VSL | This setting indicates the option to generate a file in VSL format. **Yes** and **No** options available. | No |
| Produce MSIX | This setting indicates the option to repackage software to MSIX format. **Yes** and **No** options available. | No |
| Produce MSI | This setting indicates the option to repackage software to MSI format. **Yes** and **No** options available. When **No** option is chosen, a legacy setup for software will be implemented if possible. | Yes |
| **Setting** | **Details** | **Default value** |
| Installation script name | This setting indicates the file name of the generated installation command line (msiexec command line). This setting indicates a filename template for naming the .CMD file to install the package. | install.cmd |
| Installation script content | This setting indicates the command line for installing the package. | msiexec /i "%~dp0\[MsiName\]" /qn |
| Uninstall script name | This setting indicates the command line file name for the package uninstallation. | uninstall.cmd |
| Installation script content with transforms | This setting indicates the command line for installing the package using the created **Transform** file. | msiexec /x \[ProductCode\] /qn |
| User interface | This setting indicates which parameter will be added to the msiexec command line. The following options available: - **No user interface** – the user interface does not show any wizard dialogue. - **Basic user interface** – only a progress bar will be shown during the installation, with the possibility to cancel this process by the Cancel button. - **Basic user interface with hidden “Cancel” button** – shows only progress bar without the ability to cancel the installation process. | No user interface |
| Default installation command line | This setting indicates the command line for the installation of the MSI with transform. | - |
| Installation log | This setting indicates the installation log mode. The following options available: - **None** (no logging available). - **Basic** (logging shows only errors appeared during installation/uninstallation). - **Full** (logging shows all informational, warning, error messages during installation/uninstallation). | Full |
| **Setting** | **Details** | **Default value** |
| Install command | This setting indicates the command line for installing the package. | Execute-MSI -Action 'Install' -Path "\[MsiName\]" -private:$PackageName |
| Install with transform command | This setting indicates the command line for installing the package using the created **Transform** file. | Execute-MSI -Action 'Install' -Path "\[MsiName\]" -Transform "\[MstName\]" -private:$PackageName |
| Uninstall command | This setting indicates the command line for uninstalling the package. | Execute-MSI -Action 'Uninstall' -Path '\[ProductCode\]' -private:$PackageName |
| Reboot required | This setting indicates the reboot mode. **Yes** and **No** options available. | No |
| User interface | This setting indicates which parameter will be added to the msiexec command line. The following options available: - **No user interface** – the user interface does not show any wizard dialogue. - **Basic user interface** – only a progress bar will be shown during the installation, with the possibility to cancel this process by the Cancel button. - **Basic user interface with hidden “Cancel” button** – shows only progress bar without the ability to cancel the installation process. | No user interface |
| Default installation command line | This setting indicates the command line for the installation of the MSI with transform. | - |
| Installation log | This setting indicates the installation log mode. The following options available: - **None** (no logging available). - **Basic** (logging shows only errors appeared during installation/uninstallation). - **Full** (logging shows all informational, warning, error messages during installation/uninstallation). | Full |
| **Setting** | **Details** | **Default value** |
| Installation script name | This setting indicates the file name of the generated installation command line (msiexec command line). This setting indicates a filename template for naming the .VBS file to install the package. | install.vbs |
| Installation script content | This setting indicates the command line for installing package. | set res = run("%windir%\\system32\\msiexec.exe /i " & chr(34) & "%~dp0\[MsiName\]" & chr(34) & " /qn", "0,3010", 0, true) wscript.quit(res.ReturnCode) |
| Installation script content with transforms | This setting indicates the command line for installing the package using the created **Transform** file. | set res = run("%windir%\\system32\\msiexec.exe /i " & chr(34) & "%~dp0\[MsiName\]" & chr(34) & " TRANSFORMS=" & chr(34) & "%~dp0\[MstName\]" & chr(34) & " /qn", "0,3010", 0, true) wscript.quit(res.ReturnCode) |
| Uninstall script name | This setting indicates the file name of the generated uninstallation command line (msiexec command line). This setting indicates a filename template for naming the .VBS file to ninstall the package. | uninstall.vbs |
| Uninstall script content | This setting indicates the command line for uninstalling package. | set res = run("%windir%\\system32\\msiexec.exe /x \[ProductCode\] /qn", "0,3010", 0, true) wscript.quit(res.ReturnCode) |
| User interface | This setting indicates which parameter will be added to the msiexec command line. The following options available: - **No user interface** – the user interface does not show any wizard dialogue. - **Basic user interface** – only a progress bar will be shown during the installation, with the possibility to cancel this process by the Cancel button. - **Basic user interface with hidden “Cancel” button** – shows only progress bar without the ability to cancel the installation process. | No user interface |
| Default installation command line | This setting indicates the command line for the installation of the MSI with transform. | - |
| Installation log | This setting indicates the installation log mode. The following options available: · **None** (no logging available). · **Basic** (logging shows only errors appeared during installation/uninstallation). · **Full** (logging shows all informational, warning, error messages during installation/uninstallation). | Full |
| **Setting** | **Details** | **Default value** |
| Installation context | This setting indicates the installation context mode. The following options available: - **Per-user** (access to a program is granted only to a user from which a program was installed); - **Per-machine** (the package installation is required to enable all computer users to access and use the application. A per-machine installation is based on ALLUSERS property value. The per-machine installation provides changes to the system that affects all users. Standard users with limited privileges will be restricted to install a package in the per-machine context. First, obtaining permission is needed. - **Per-user or per-machine** (If this is a per-user installation, the registry value is **HKEY\_CURRENT\_USER**; if this is a per-machine installation, the registry value is **HKEY\_LOCAL\_MACHINE**. A per-machine installation is based on ALLUSERS property value. | Per-machine |
| Destination drive | This setting indicates the drive where a package will be installed, set value for ROOTDRIVE property of MSI. The ROOTDRIVE property specifies the default drive for the destination directory of the installation. [Learn more](https://msdn.microsoft.com/en-us/library/windows/desktop/aa371372(v=vs.85).aspx). The following options available: - C:\\ - D:\\ | C:\\ |
| **Setting** | **Details** | **Default value** |
| Reboot after install | This setting is based on the REBOOT property value. The REBOOT property suppresses certain prompts for a restart of the system. The following options available: - Never; - Always; - At the end of a chain. | Never |
| Shut down any files in use | This setting is based on the MSIRMSHUTDOWN property value. When the default value (**Yes**) is set, all system services and files that were shut down to install the update will be restarted. The following options available: - Yes; - If they are registered for a restart; - Only if they have all been registered. | Yes |
| If files are in use | This setting is based on MSIRESTARTMANAGERCONTROL property value. This setting enables setup authors to specify whether the package will use the Restart Manager or FileInUse Dialog to handle locked files. The following options available: - Use Restart Manager; - Use FilesInUse Dialog; - Disable Shutdown. | Use restart manager |
| Display of reboot prompts | This setting is based on REBOOTPROMPT property value. This property does not initiate a reboot if one is not needed, it only suppresses any prompts for reboots to the user. The following options available: - Suppress; - Do not set / Remove. | Suppress |
| **Setting** | **Details** | **Default value** |
| Show in ARP | This option specifies the listing mode of the program in the ARP (Add-Remove Program) and is based on ARPSYSTEMCOMPONENT property value. When the option is enabled, the program will be listed in the Add-Remove Program. When the option is disabled, the program will be hidden in the Add-Remove Program list. | Enabled |
| Manual repair from ARP | This option enables or disables the usage of the **Repair** button in the ARP for the package and is based on ARPNOREPAIR property value. When the option is enabled, the **Repair** button is added to the ARP for the package. When the option is disabled, the **Repair** button is removed from the ARP for the package. | Enabled |
| Manual uninstall from ARP | This option enables or disables the usage of the **Uninstall** button in the ARP for the package and is based on ARPNOREMOVE property value. When the option is enabled, the **Uninstall** button is added to the ARP for the package. When the option is disabled, the **Uninstall** button is removed from the ARP for the package. | Enabled |
| Manual feature modification from ARP | This option enables or disables the usage of the **Modify** button in the ARP for the package and is based on ARPNOMODIFY property value. When the option is enabled, the **Modify** button is added to the ARP for the package. When the option is disabled, the **Modify** button is removed from the ARP for the package. | Disabled |
| **Setting** | **Details** | **Default value** |
| Cab archive name pattern | This setting indicates the filename template for naming **.CAB** files. Cab files contain files that will be installed by MSI package. | Data{0}.cab |
| Max cab file size (in MB) | These settings indicate the number of files that will be placed in a single cab file. If the size of one cab file is bigger than the provided value, it will be divided into several cab files. | 2048 |
| Max files count per cab | 9999 | |
| Use embedded cab | This setting sets the mode to use an embedded file. When the **Use embedded cab** switch is enabled a **.CAB** file will be implemented into **.MSI**. When the **Use embedded cab** switch is disabled a **.CAB** file will be outside the **.MSI** (external CAB). It is a compressed source (opposed to "Loose files" = uncompressed source). | Yes |
| Parse ini files to the IniFile table | This option indicates the mode to parse ini files. When the **Parse ini files to the IniFile table** switch is enabled, the ini files will be added via an IniFile table. It is the best practice to add ini files via IniFile table because these files may contain hard-coded values, which in this case can be replaced with MSI properties. When the **Parse ini files to the IniFile table** switch is disabled, the ini files will be added via an File table. | No |
| Map registry data to the appropriate COM tables | This setting allows identifying objects and to add them to the appropriate tables. When the **Map registry data to the appropriate COM tables** switch is enabled, all COM objects will be mapped to MSI via special tables designed for these objects (ProgID, Classes, etc.). It is a better way of COM objects registration according to Microsoft's best practices and helps easily navigate and manage these objects through MSI. When the **Map registry data to the appropriate COM tables** switch is disabled all COM objects will be added to MSI via Registry table and installed as regular registry keys. | No |
| Post process MSI filesystem & components | This setting sets the File Table entries for the Language and Version fields. [Learn more](https://docs.microsoft.com/en-us/windows/win32/msi/file-versioning-rules?redirectedfrom=MSDN). | Yes |
| Mark components destined for the System folder as permanent | A system folder is used by other programs. If the package contains some System folder files, they can be removed from the system during uninstallation. So, it will affect other programs that use these files. When the **Mark components destined for the System folder as permanent** switch is enabled, the files will be marked as permanent and won’t be removed after the package uninstalling. When the **Mark components destined for the System folder as permanent** switch is disabled, the files will be deleted after the package uninstalling. | Yes |
| Use Duplicate File table for user files installation | Some files (.DLL, .OCX, etc.) that are installed in the Common Files folder is used by other programs. If the package contains some of these files they can be removed from the system during uninstallation. So, this affects other programs that use these files. When the **Use Duplicate File table for user files installation** switch is enabled, the files mark as shared. Every time when such files are installed in this folder, a counter is incremented. This counter shows how many programs use this file. When the package tries to remove this file, the counter is decremented. When this counter equals 0 this file removes from the system. | Yes |
The created bundle(s) will appear on the VM while Packaging Self-Service (see the **[Packaging](https://docs.apptimized.com/books/apptimized-platform-user-manual/page/packaging "Packaging")**).
The Workspace Launcher section is available under **Project Settings** > **Workflow** > **Packaging – Self Service** > **Workspace Launcher**. Apptimized shows the following screen when successful: [](https://docs.apptimized.com/uploads/images/gallery/2020-12/dcijzvI3QNZ3rGtD-launcher_selfservice_1.png) The option to create a new bundle is available under the **Create new bundle** button. Apptimized shows the following modal window: [](https://docs.apptimized.com/uploads/images/gallery/2020-12/hYjS3KjKtqER6jea-launcher_selfservice_2.png)| **Setting** | **Details** |
| Bundle name | **The bundle name **field allows defining the bundle name (e.g., MSI). There is no default value for this field. [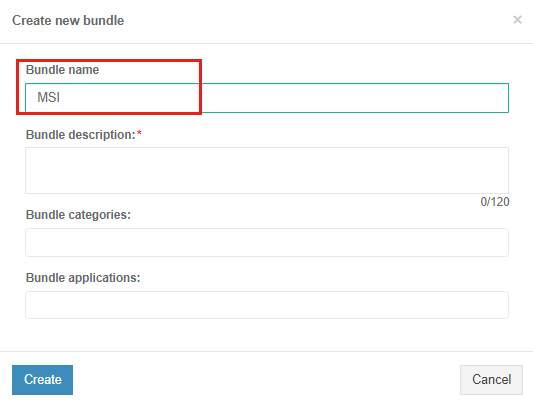](https://docs.apptimized.com/uploads/images/gallery/2020-12/yUnMl5t3iTx2QXMv-launcher_selfservice_3.png) |
| Bundle description | **The bundle description **field allows defining the bundle description (e.g., Tools for packaging MSI format). There is no default value for this field. [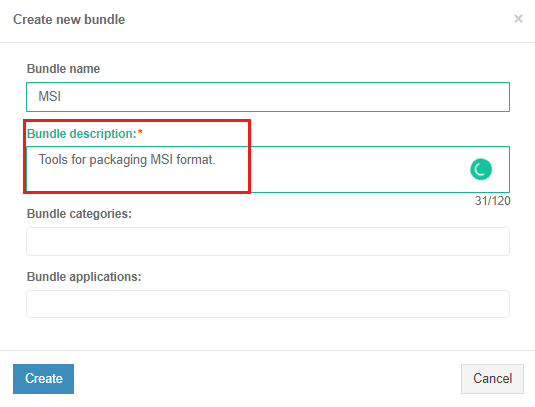](https://docs.apptimized.com/uploads/images/gallery/2020-12/I7C13HBnBWsQibmB-launcher_selfservice_4.png) |
| Select categories | **The select categories **field allows defining the categories for a new bundle. The following options available: - App-V - MSI - MSIX - Productivity - System - Utility There is no default value for this field. [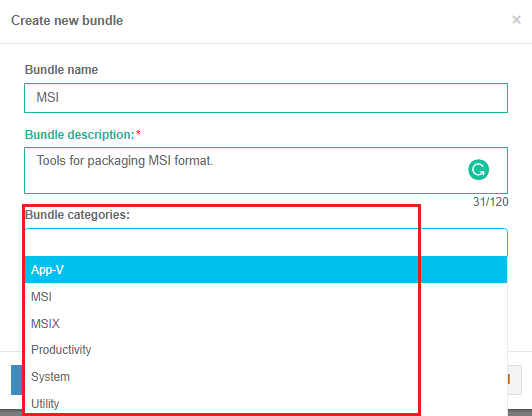](https://docs.apptimized.com/uploads/images/gallery/2020-12/30Vma9OsUDSnlA71-launcher_selfservice_5.png) The option to choose multiple categories is available. |
| Select applications | **The select applications **field allows defining the applications included in a new bundle. The following options available: - 7-Zip - Adobe Creative Cloud Cleaner Tool - Adobe Customization Wizard - App-V 5 Configuration Editor - App-V Manage - Apptimized MSI Editor - Apptimized Packaging Engine - AppV 5.1 Sequencer - Double Commander - InstEd - LockHunter - MSIX Packaging Tool - Notepad++ - Process Explorer - Process Monitor - PsExec - Resources Extract - WhatChanged - Orca - InstallWatch There is no default value for this field. [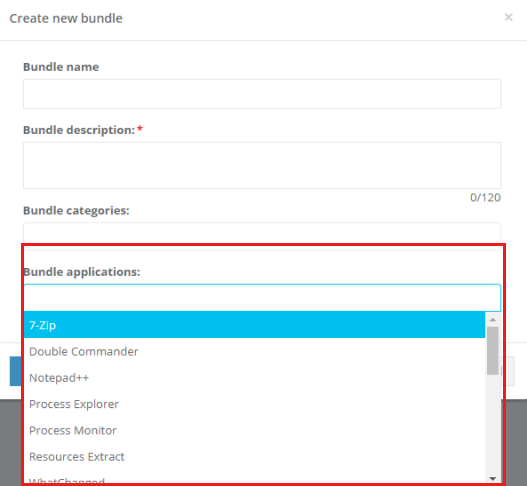](https://docs.apptimized.com/uploads/images/gallery/2020-12/1KNgSjO04wm1AGdB-launcher_selfservice_6.png) The option to choose multiple applications is available. |
| **Setting** | **Description** |
| Action | This field allows defining the name of Custom Action. |
| Type | This field allows defining the type of Custom Action. The following types available: VBS Script: - 38 – Scheduling: Always; - 3110 – Execution Context: Deffered, No Impersonate; - 3174 – Return Processing: ContinueOnReturn, Execution Context: Deffered, No Impersonate; Property: - 51 – Set Property, Scheduling: Always. |
| Source | This field allows defining the source property of the MSI package (i.e., ProductName). |
| Target | This field allows defining the execution parameter that depends on the basic type of custom action (i.e., Entry point).
**Note.** If Target is **Null**, Custom Action must contain script code. |
| Condition | This field allows defining the condition under which the Custom Action will be executed (e.g., Not installed). |
| Sequence | This field allows defining the order in which the Custom Action will be performed. The sequence value must be more than 1500 and less than 6600. |
**Note.** There is no option to delete the initial Custom Action field.
The option to apply settings is available under the **Save** button. Apptimized shows the following notification when successful: [](https://docs.apptimized.com/uploads/images/gallery/2021-08/Jq9HXWrAtjcZGJAs-cust_actions_new_6.png) The option to download JavaScript Object Notation file is available under **Download JSON** button: [](https://docs.apptimized.com/uploads/images/gallery/2021-08/viYThuU0FC3D5RMQ-cust_actions_new_7.png) The option to reset settings is available under **Reset** button. #### **Packaging Wrappers** ##### **Wrapper templates** This section enables a user: - to set the PSADT templates - to manage the PSADT parameters (i.e., parameters, replace items, and ZIP templates). The Packaging Wrappers section is available under **Project Settings** > **Workflow** > **Packaging – Self Service** > **Packaging Wrappers > Wrapper templates**. Apptimized shows the following screen when successful: [](https://docs.apptimized.com/uploads/images/gallery/2020-09/cPnwX7iNE6GVbb2h-wrap_sett_01.PNG) ##### Download default template The option to download the package wrappers default template is available under the **Download default template** button. The following default templates available: **1.1.10.1 (MSI, Transform, Legacy)**, **1.1.10.2 (App-V)**, **1.1.11.1 (MSI, Transform, Legacy)**, **1.1.12.1 (MSI, Transform, Legacy)**, **1.1.12.2 (App-V)**, **1.1.13.1 (MSI, Transform, Legacy)**, **1.1.13.2 (App-V)**. **[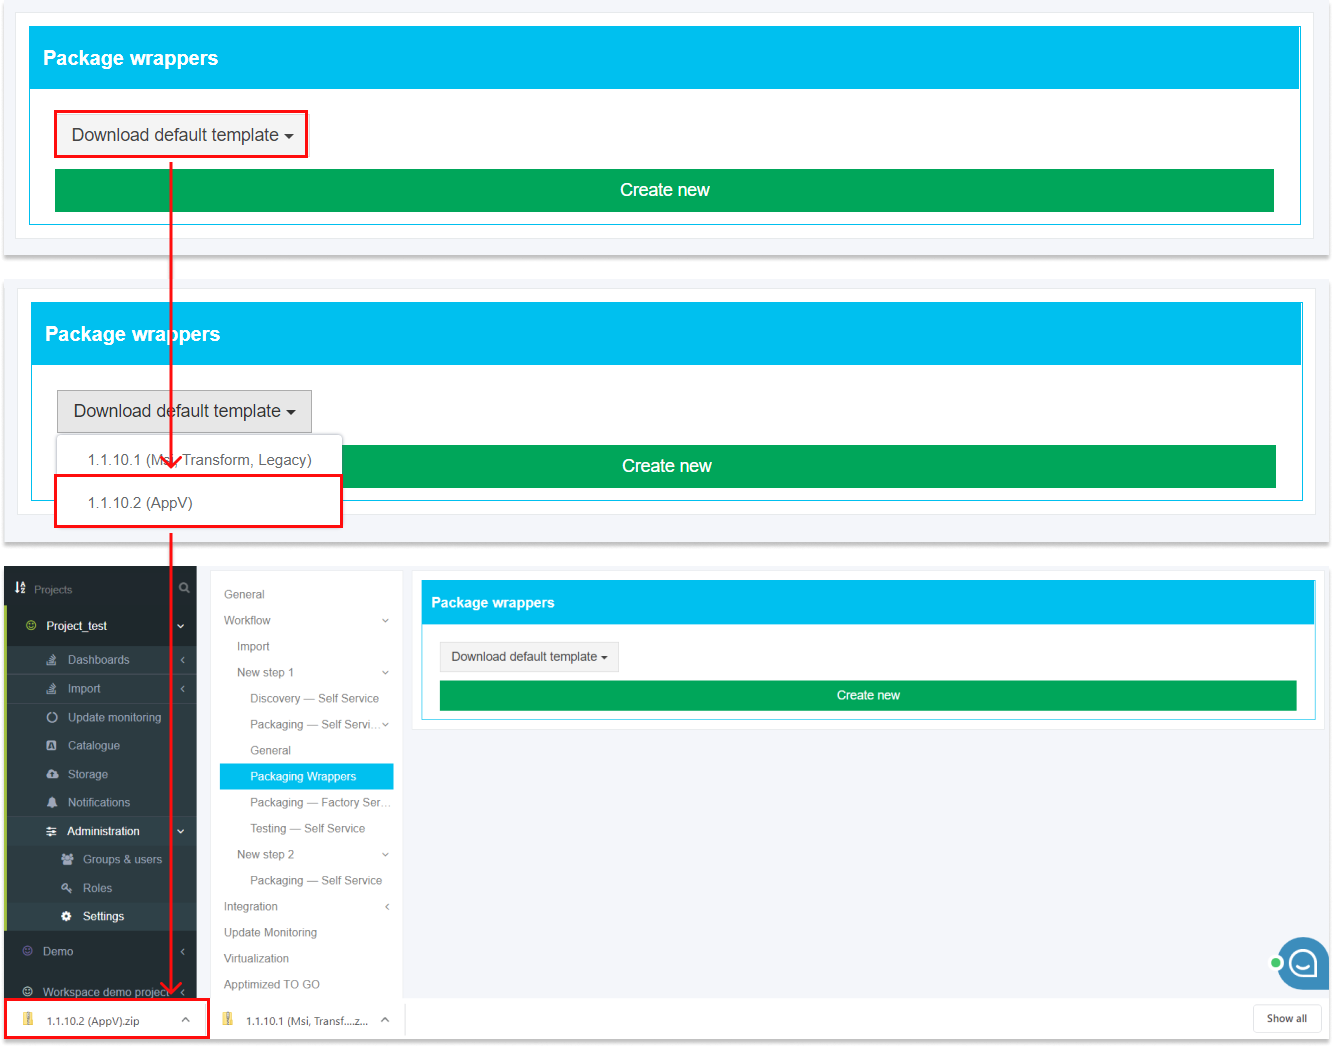](https://docs.apptimized.com/uploads/images/gallery/2020-09/woEIGdc3ye8buONZ-wrapp_sett_02.png)****Note.** After a user downloaded an archive with the default templates, it is recommended to examine the archive structure and files content. The list of placeholders to replace can be formed, or needed modifications to the archive can be provided as a result of the review.
##### Create a new package wrapper template The option to create a new package wrapper template is available under the **Create new** button. [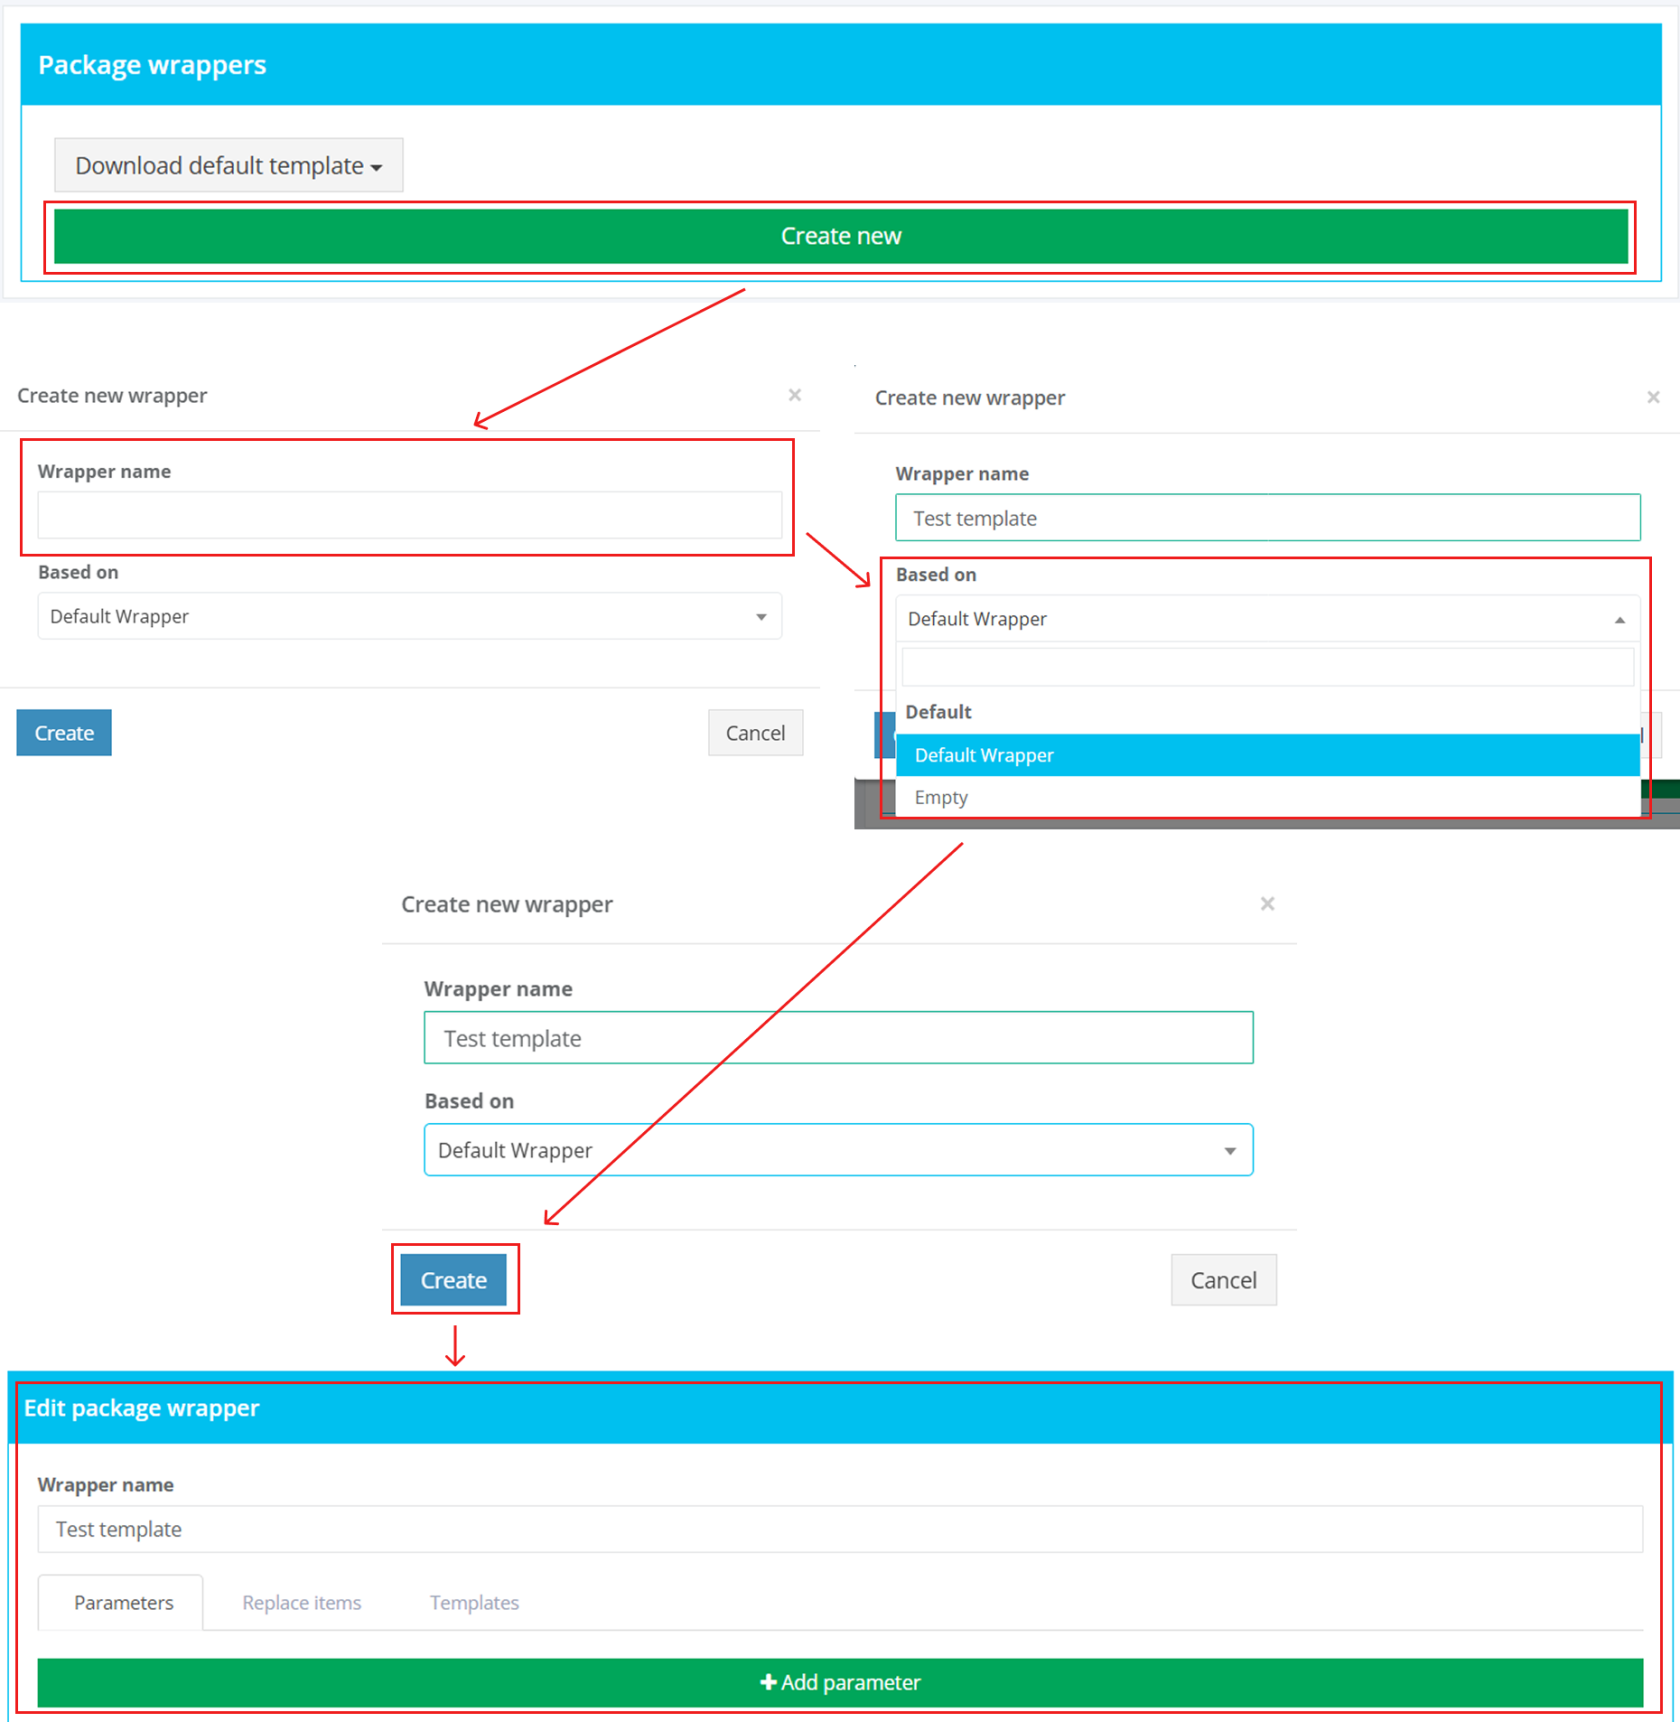](https://docs.apptimized.com/uploads/images/gallery/2025-12/wrapper.png)**Note. Based on** field indicates the state of the wrapper created. The **Empty** option creates wrapper without any predefined settings. The **Default Wrapper** option contains predefined parameters, replace items, and templates. The options under the **Project** **Wrappers** allow duplicating wrappers created previously on the project.
**Note.** When the new package template is created, it is recommended to implement the following sequence of actions: 1. Upload a ZIP archive with the wrapper template (see the [**Templates** **tab**](#bkmrk-templates-tab)) 2. Create a list of parameters (see the [**Parameters tab**](#h_48102001851599766225691)) 3. Create a list of replaced items (see the [**Replace items tab**](#bkmrk-replace-items-tab))
##### Parameters tab This tab enables a user to set the list of parameters to customize wrapper templates. The option to create a new parameter is available under the **Add parameter** button. [](https://docs.apptimized.com/uploads/images/gallery/2021-08/QKNF9YaLr4Xeunhe-wrap_sett_04_2.png)| **Settings** | **Details** |
| Name | This field sets the name of the created parameter (e.g., **Software name**). Parameter naming is a user preference. This field is required. |
| Required | This switch allows a user to specify the parameter as required. |
| Description | A user can provide here any meaningful description to simplify the parameter's identification. |
| Applicable for the package type | This setting indicates the list of package types for which this parameter will be applicable. The following options available: - MSI - Transform - App-V - MSIX - VSL The multiple-choice is available. |
| Type | This setting indicates the type of the created parameter. The following options available: - String - Select list - Editable select list - Multiple select list - Boolean - Date time - MSI property - TrimmedString The default value is **String**. |
| Value | This field indicates the static or dynamic generated name which a user can apply within the settings for replaced items. The following actions available: - The field can stay empty (Apptimized will apply the default value) - A user can hardcode the value (e.g., **File Zilla 3.46 Eng**) - A user can use the variables from the list below (e.g., **\[Manufacturer\]\[ProductName\]\[ProductVersion\]\[AppLanguage\]**). |
| Values | This field enables a user to create a predefined list of values (e.g., **Windows 10 32 bit**, **Windows 10 64 bit**, **Language (Eng)**, **Language (De)**, etc.). This field is disabled by default. The field becomes active when the **Select list**, **Editable select list**, or **Multiple select list** parameter’s type is selected. A user must provide at least one value. |
| Order | This field indicates the parameter’s position in the parameters list. This field is required. |
| **Settings** | **Details** |
| Placeholder | This setting indicates the variable to be replaced in template files or folders (e.g., **AppVendorShort**). This field is required. |
| Replaced by | This field indicates the static or dynamic generated name which a user can apply within the settings for replaced items. The following actions available: - A user can enter the value manually. The following templates must be implemented: for files - **$(ParameterName)**, and for folders **\[ParameterName\]** - A user can use the variables from the list below the field. |
| Package types | This setting indicates the list of package types for which this replacement item will be applicable. The following options available: - MSI - Transform - Legacy - App-V - MSIX - VSL The multiple-choice is available. This field is required. |
| File extensions | This field indicates the extension of a file for which the replacement rules will be applied (e.g., **.PS1** or **.TXT**). This field is required. The option to add a file extension is available under the **plus** symbol. The option to delete a file extension is available under the **bin** symbol. |
| **Settings** | **Details** |
| File path | This field enables a user to define the destination of the installation file or several installation files (e.g., **\[packagefoldername\]\\package**). To define the file (s) path, a user needs to select a folder that will store the installation file or several installation files from the hierarchical folder structure on the left-hand side of the settings window. [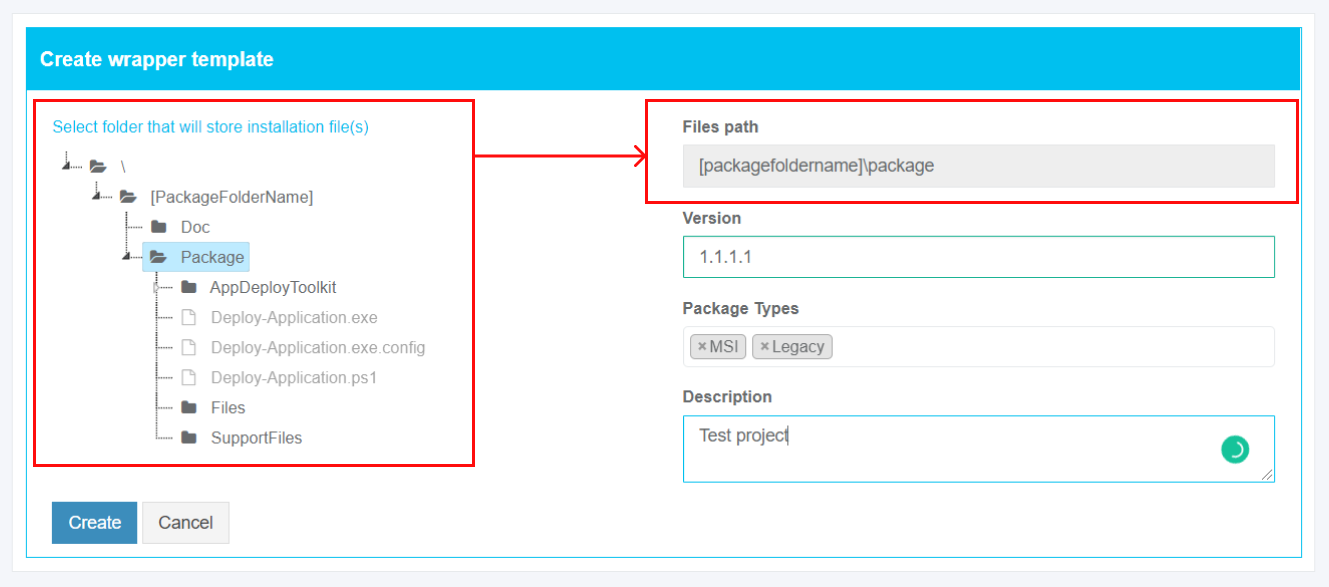](https://docs.apptimized.com/uploads/images/gallery/2020-09/317anF1r6L5hMfGN-wrap_sett_07_path.png) This field is required. |
| Version | This field provides information about the wrapper’s version number (e.g., **1.1.1.1** or **1.1.05.1**). The wrapper’s version number should be represented as a four-part string with the following format: **<major version>.<minor version>.<build number>.<revision>** This field is required. |
| Package types | This setting indicates the list of package types for which this template will be applicable. The following options available: - MSI - Transform - Legacy - App-V - MSIX - VSL The multiple-choice is available. This field is required. |
| Description | A user can provide here any meaningful description to simplify the template's identification. |
**Note.** If required to modify the current wrapper template or implement any changes, a user doesn't need to create a new packaging wrapper entry. A user can upload a new wrapper revision (**Template tab** > **Add template** button). A wrapper version number update is needed. Apptimized Platform will automatically use the latest one when the wrapper template updated successfully.
##### **Intunewin** This section enables a user to operate with Interactive mode during Intunewin wrapping. [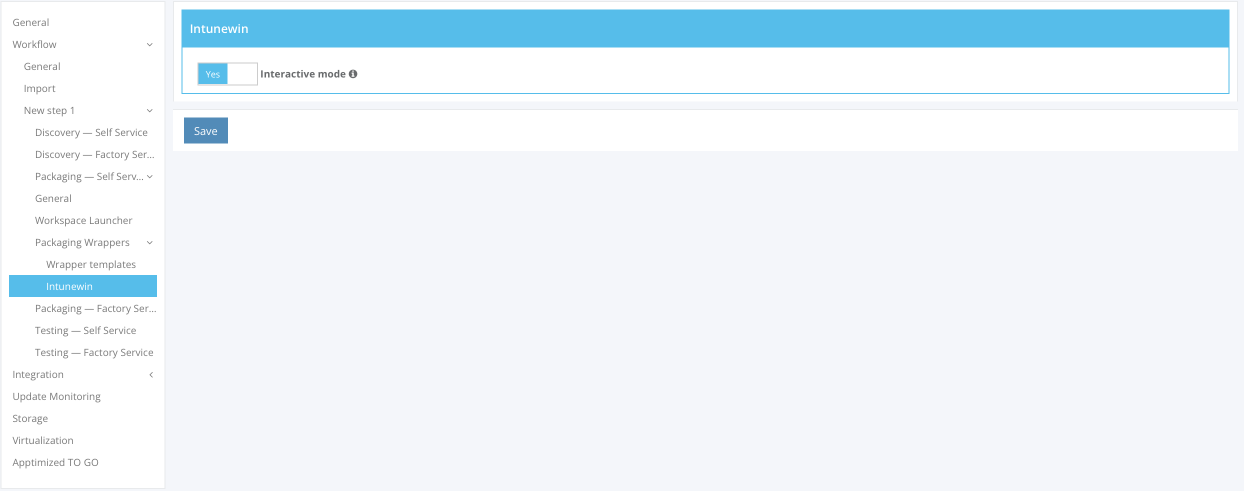](https://docs.apptimized.com/uploads/images/gallery/2023-03/Pn9f3V6IXVEH9TBX-intunewin_1.png) Interactive mode allows a user to show windows for the user during installation.**Note.** MSI package can't be interactive due to Intune restrictions.
The option to enable Interactive mode is available via the Interactive mode switch. The option is enabled by default. [](https://docs.apptimized.com/uploads/images/gallery/2023-03/H1l9cFInt2WTRDj3-intunewin_2.png) #### **Packaging – Factory Service** ##### **General** The screenshot below shows the default settings of the **Packaging – Factory Service** module. All required fields are marked with an asterisk \*. [.png)](https://docs.apptimized.com/uploads/images/gallery/2021-07/mOEeeta75UiTC7cR-step_settings_72_2-(2).png) The option to change a module name is available under the **Module name** field. The default module name is **Packaging – Factory Service.** The option to change a results archive name pattern is available under the **Name of results archive** field. The default archive name pattern is **\[Manufacturer\]\_\[ProductName\]\_\[ProductVersion\]\_\[PackageType\].package.zip.** The option to change a package folder name pattern is available under the **Name of package folder** field. The default package folder name pattern is **\[Manufacturer\]\_\[ProductName\]\_\[ProductVersion\].** To insert the variable tag into the field, click the relevant variable tag from the dropdown list. [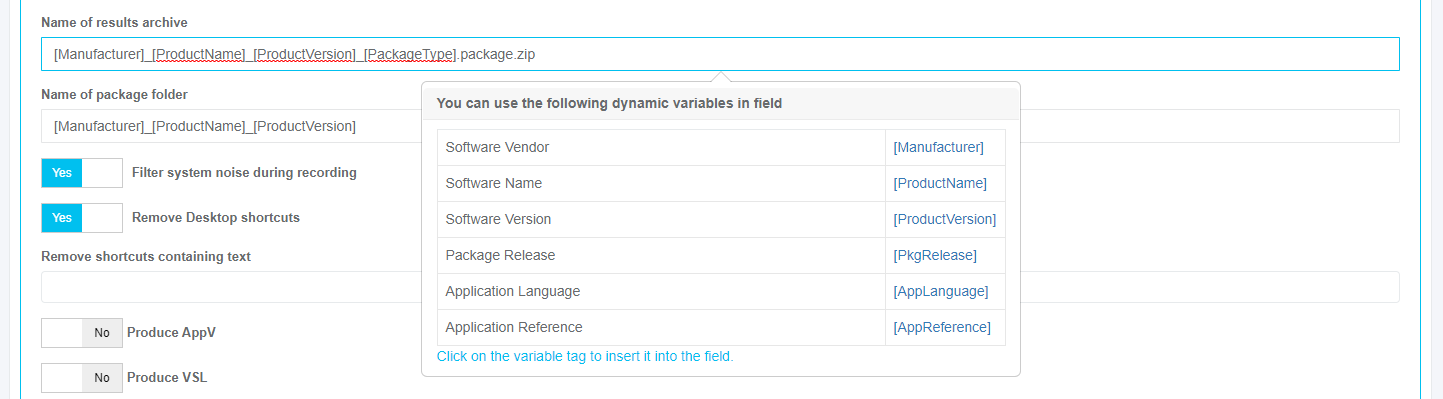](https://docs.apptimized.com/uploads/images/gallery/2020-04/vTdBqK9qJIOUizVJ-steps_settings_73.png) The following additional options can be enabled: Table 10. Packaging – Factory Service additional options| **Option** | **Details** | **Default value** |
| Filter system noise during recording | This option allows for applying a filter (exclusion list) to automatically remove the captured system and user activity (noise). **Yes** and **No** options available. **Yes** – the value of this option removes redundant files and registry keys that were created by the system while recording sessions and did not relate to installing software (i.e., telemetry or diagnostics data). **No** – the system noise which is captured by the application packaging tool will not be removed. | Yes |
| Remove Desktop shortcuts | This setting indicates the option to remove all desktop shortcuts (**Yes**) from the package or to leave desktop shortcuts in the package (**No**). | Yes |
| Produce AppV | This setting indicates the option to generate a file in App-V format. **Yes** and **No** options available. | No |
| Produce VSL | This setting indicates the option to generate a file in VSL format. **Yes** and **No** options available. | No |
| Produce MSIX | This setting indicates the option to repackage software to MSIX format. **Yes** and **No** options available. | No |
| Produce MSI | This setting indicates the option to repackage software to MSI format. **Yes** and **No** options available. When **No** option is chosen, a legacy setup for software will be implemented if possible. | Yes |
| **Setting** | **Details** | **Default value** |
| Installation script name | This setting indicates the file name of the generated installation command line (msiexec command line). This setting indicates a filename template for naming the .CMD file to install the package. | install.cmd |
| Installation script content | This setting indicates the command line for installing the package. | msiexec /i "%~dp0\[MsiName\]" /qn |
| Uninstall script name | This setting indicates the command line file name for the package uninstallation. | uninstall.cmd |
| Installation script content with transforms | This setting indicates the command line for installing the package using the created **Transform** file. | msiexec /x \[ProductCode\] /qn |
| User interface | This setting indicates which parameter will be added to the msiexec command line. The following options available: - **No user interface** – the user interface does not show any wizard dialogue. - **Basic user interface** – only a progress bar will be shown during the installation, with the possibility to cancel this process by the Cancel button. - **Basic user interface with hidden “Cancel” button** – shows only progress bar without the ability to cancel the installation process. | No user interface |
| Default installation command line | This setting indicates the command line for the installation of the MSI with transform. | - |
| Installation log | This setting indicates the installation log mode. The following options available: - **None** (no logging available). - **Basic** (logging shows only errors appeared during installation/uninstallation). - **Full** (logging shows all informational, warning, error messages during installation/uninstallation). | Full |
| **Setting** | **Details** | **Default value** |
| Install command | This setting indicates the command line for installing the package. | Execute-MSI -Action 'Install' -Path "\[MsiName\]" -private:$PackageName |
| Install with transform command | This setting indicates the command line for installing the package using the created **Transform** file. | Execute-MSI -Action 'Install' -Path "\[MsiName\]" -Transform "\[MstName\]" -private:$PackageName |
| Uninstall command | This setting indicates the command line for uninstalling the package. | Execute-MSI -Action 'Uninstall' -Path '\[ProductCode\]' -private:$PackageName |
| Reboot required | This setting indicates the reboot mode. **Yes** and **No** options available. | No |
| User interface | This setting indicates which parameter will be added to the msiexec command line. The following options available: - **No user interface** – the user interface does not show any wizard dialogue. - **Basic user interface** – only a progress bar will be shown during the installation, with the possibility to cancel this process by the Cancel button. - **Basic user interface with hidden “Cancel” button** – shows only progress bar without the ability to cancel the installation process. | No user interface |
| Default installation command line | This setting indicates the command line for the installation of the MSI with transform. | - |
| Installation log | This setting indicates the installation log mode. The following options available: - **None** (no logging available). - **Basic** (logging shows only errors appeared during installation/uninstallation). - **Full** (logging shows all informational, warning, error messages during installation/uninstallation). | Full |
| **Setting** | **Details** | **Default value** |
| Installation script name | This setting indicates the file name of the generated installation command line (msiexec command line). This setting indicates a filename template for naming the .VBS file to install the package. | install.vbs |
| Installation script content | This setting indicates the command line for installing package. | set res = run("%windir%\\system32\\msiexec.exe /i " & chr(34) & "%~dp0\[MsiName\]" & chr(34) & " /qn", "0,3010", 0, true) wscript.quit(res.ReturnCode) |
| Installation script content with transforms | This setting indicates the command line for installing the package using the created **Transform** file. | set res = run("%windir%\\system32\\msiexec.exe /i " & chr(34) & "%~dp0\[MsiName\]" & chr(34) & " TRANSFORMS=" & chr(34) & "%~dp0\[MstName\]" & chr(34) & " /qn", "0,3010", 0, true) wscript.quit(res.ReturnCode) |
| Uninstall script name | This setting indicates the file name of the generated uninstallation command line (msiexec command line). This setting indicates a filename template for naming the .VBS file to uninstall the package. | uninstall.vbs |
| Uninstall script content | This setting indicates the command line for uninstalling package. | set res = run("%windir%\\system32\\msiexec.exe /x \[ProductCode\] /qn", "0,3010", 0, true) wscript.quit(res.ReturnCode) |
| User interface | This setting indicates which parameter will be added to the msiexec command line. The following options available: - **No user interface** – the user interface does not show any wizard dialogue. - **Basic user interface** – only a progress bar will be shown during the installation, with the possibility to cancel this process by the Cancel button. - **Basic user interface with hidden “Cancel” button** – shows only progress bar without the ability to cancel the installation process. | No user interface |
| Default installation command line | This setting indicates the command line for the installation of the MSI with transform. | - |
| Installation log | This setting indicates the installation log mode. The following options available: - **None** (no logging available). - **Basic** (logging shows only errors appeared during installation/uninstallation). - **Full** (logging shows all informational, warning, error messages during installation/uninstallation). | Full |
| **Setting** | **Details** | **Default value** |
| Installation context | This setting indicates the installation context mode. The following options available: - **Per-user** (an access to a program is granted only to a user from which a program was installed); - **Per-machine** (the package installation is required to enable all computer users to access and use the application. A per-machine installation is based on ALLUSERS property value. The per-machine installation provides changes to the system that affects all users. Standard users with limited privileges will be restricted to install a package in the per-machine context. First obtaining permission is needed. - **Per-user or per-machine** (If this is a per-user installation, the registry value is **HKEY\_CURRENT\_USER**; if this is a per-machine installation, the registry value is **HKEY\_LOCAL\_MACHINE**. A per-machine installation is based on ALLUSERS property value. | Per-machine |
| Destination drive | This setting indicates the drive where a package will be installed, set value for ROOTDRIVE property of MSI. The ROOTDRIVE property specifies the default drive for the destination directory of the installation. [Learn more](https://msdn.microsoft.com/en-us/library/windows/desktop/aa371372(v=vs.85).aspx). The following options available: - C:\\ - D:\\ | C:\\ |
| **Setting** | **Details** | **Default value** |
| Reboot after install | This setting is based on the REBOOT property value. The REBOOT property suppresses certain prompts for a restart of the system. The following options available: - Never; - Always; - At the end of a chain. | Never |
| Shut down any files in use | This setting is based on the MSIRMSHUTDOWN property value. When the default value (**Yes**) is set, all system services and files that were shut down to install the update will be restarted. The following options available: - Yes; - If they are registered for a restart; - Only if they have all been registered. | YesThis setting is |
| If files are in use | This setting is based on MSIRESTARTMANAGERCONTROL property value. This setting enables setup authors to specify whether the package will use the Restart Manager or FileInUse Dialog to handle locked files. The following options available: - Use Restart Manager; - Use FilesInUse Dialog; - Disable Shutdown. | Use restart manager |
| Display of reboot prompts | This setting is based on REBOOTPROMPT property value. This property does not initiate a reboot if one is not needed, it only suppresses any prompts for reboots to the user. The following options available: - Suppress; - Do not set / Remove. | Suppress |
| **Setting** | **Details** | **Default value** |
| Show ARP | This option specifies the listing mode of the program in the ARP (Add-Remove Program) and is based on ARPSYSTEMCOMPONENT property value. When the option is enabled, the program will be listed in the Add-Remove Program. When the option is disabled, the program will be hidden in the Add-Remove Program list. | Enabled |
| Manual repair from ARP | This option enables or disables the usage of the **Repair** button in the ARP for the package and is based on ARPNOREPAIR property value. When the option is enabled, the **Repair** button is added to the ARP for the package. When the option is disabled, the **Repair** button is removed from the ARP for the package. | Enabled |
| Manual uninstall from ARP | This option enables or disables the usage of the **Uninstall** button in the ARP for the package and is based on ARPNOREMOVE property value. When the option is enabled the **Uninstall** button, is added to the ARP for the package. When the option is disabled the **Uninstall** button, is removed from the ARP for the package. | Enabled |
| Manual feature modification from ARP | This option enables or disables the usage of the **Modify** button in the ARP for the package and is based on ARPNOMODIFY property value. When the option is enabled, the **Modify** button is added to the ARP for the package. When the option is disabled, the **Modify** button is removed from the ARP for the package. | Disabled |
| **Setting** | **Details** | **Default value** |
| Cab archive name pattern | This setting indicates the filename template for naming **.CAB** files. Cab files contain files that will be installed by MSI package. | Data{0}.cab |
| Max cab file size (in MB) | These settings indicate the number of files that will be placed in a single cab file. If the size of one cab file is bigger than the provided value, it will be divided to several cab files. | 2048 |
| Max files count per cab | 9999 | |
| Use embedded cab | This setting sets the mode to use an embedded file. When the **Use embedded cab** switch is enabled, a **.CAB** file will be implemented into **.MSI**. When the **Use embedded cab** switch is disabled, a **.CAB** file will be outside the **.MSI** (external CAB). It is a compressed source (opposed to "Loose files" = uncompressed source). | Yes |
| Parse ini files to the IniFile table | This option indicates the mode to parse ini files. When the **Parse ini files to the IniFile table** switch is enabled, the ini files will be added via an IniFile table. It is the best practice to add ini files via IniFile table because these files may contain hard-coded values which in this case can be replaced with MSI properties. When the **Parse ini files to the IniFile table** switch is disabled, the ini files will be added via an File table. | No |
| Map registry data to the appropriate COM tables | This setting allows to identify objects and to add them to the appropriate tables. When the **Map registry data to the appropriate COM tables** switch is enabled, all COM objects will be mapped to MSI via special tables designed for these objects (ProgID, Classes, etc.). It is a better way of COM objects registration according to Microsoft's best practices and helps easily navigate and manage these objects through MSI. When the **Map registry data to the appropriate COM tables** switch is disabled, all COM objects will be added to MSI via Registry table and installed as regular registry keys. | No |
| Post process MSI filesystem & components | This setting sets the File Table entries for the Language and Version fields. [Learn more](https://docs.microsoft.com/en-us/windows/win32/msi/file-versioning-rules?redirectedfrom=MSDN). | Yes |
| Mark components destined for the System folder as permanent | A system folder is used by other programs. If the package contains some System folder files, they can be removed from the system during uninstallation. So, it will affect other programs that use these files. When the **Mark components destined for the System folder as permanent** switch is enabled, the files will be marked as permanent and won’t be removed after the package uninstalling. When the **Mark components destined for the System folder as permanent** switch is disabled, the files will be deleted after the package uninstalling. | Yes |
| Use Duplicate File table for user files installation | Some files (.DLL, .OCX, etc.) that are installed in the Common Files folder is used by other programs. If the package contains some of these files they can be removed from the system during uninstallation. So, this affects other programs that use these files. When the **Use Duplicate File table for user files installation** switch is enabled, the files mark as shared. Every time when such files are installed in this folder, a counter is incremented. This counter shows how many programs use this file. When the package tries to remove this file, the counter is decremented. When this counter equals 0 this file removes from the system. | Yes |
| **Setting** | **Description** |
| Action | This field allows defining the name of Custom Action. |
| Type | This field allows defining the type of Custom Action. The following types available: VBS Script: - 38 – Scheduling: Always; - 3110 – Execution Context: Deffered, No Impersonate; - 3174 – Return Processing: ContinueOnReturn, Execution Context: Deffered, No Impersonate; Property: - 51 – Set Property, Scheduling: Always. |
| Source | This field allows defining the source property of the MSI package (i.e., ProductName). |
| Target | This field allows defining the execution parameter that depends on the basic type of custom action (i.e., Entry point).
**Note.** If Target is **Null**, Custom Action must contain script code. |
| Condition | This field allows defining the condition under which the Custom Action will be executed (e.g., Not installed). |
| Sequence | This field allows defining the order in which the Custom Action will be performed. The sequence value must be more than 1500 and less than 6600. |
**Note.** There is no option to delete the initial Custom Action field.
The option to apply settings is available under the **Save** button. Apptimized shows the following notification when successful: [](https://docs.apptimized.com/uploads/images/gallery/2021-08/Jq9HXWrAtjcZGJAs-cust_actions_new_6.png) The option to download JavaScript Object Notation file is available under **Download JSON** button: [](https://docs.apptimized.com/uploads/images/gallery/2021-08/viYThuU0FC3D5RMQ-cust_actions_new_7.png) THe option to reset settings is available under **Reset** button. ##### **Packaging Wrappers** This section enables a user: - to set the PSADT templates - to manage the PSADT parameters (i.e., parameters, replace items, and ZIP templates). The Packaging Wrappers section is available under **Project Settings** > **Workflow** > **Packaging – Self Service** > **Packaging Wrappers**. Apptimized shows the following screen when successful: [](https://docs.apptimized.com/uploads/images/gallery/2020-09/cPnwX7iNE6GVbb2h-wrap_sett_01.PNG) ##### Download default template The option to download the package wrappers default template is available under the **Download default template** button. The following default templates available: **1.1.10.1 (MSI, Transform, Legacy)**, **1.1.10.2 (App-V)**, **1.1.11.1 (MSI, Transform, Legacy)**, **1.1.12.1 (MSI, Transform, Legacy)**, **1.1.12.2 (App-V)**, **1.1.13.1 (MSI, Transform, Legacy)**, **1.1.13.2 (App-V)**. **[](https://docs.apptimized.com/uploads/images/gallery/2020-09/woEIGdc3ye8buONZ-wrapp_sett_02.png)****Note.** After a user downloaded an archive with the default templates, it is recommended to examine the archive structure and files content. The list of placeholders to replace can be formed, or needed modifications to the archive can be provided as a result of the review.
##### Create a new package wrapper template The option to create a new package wrapper template is available under the **Create new** button. **[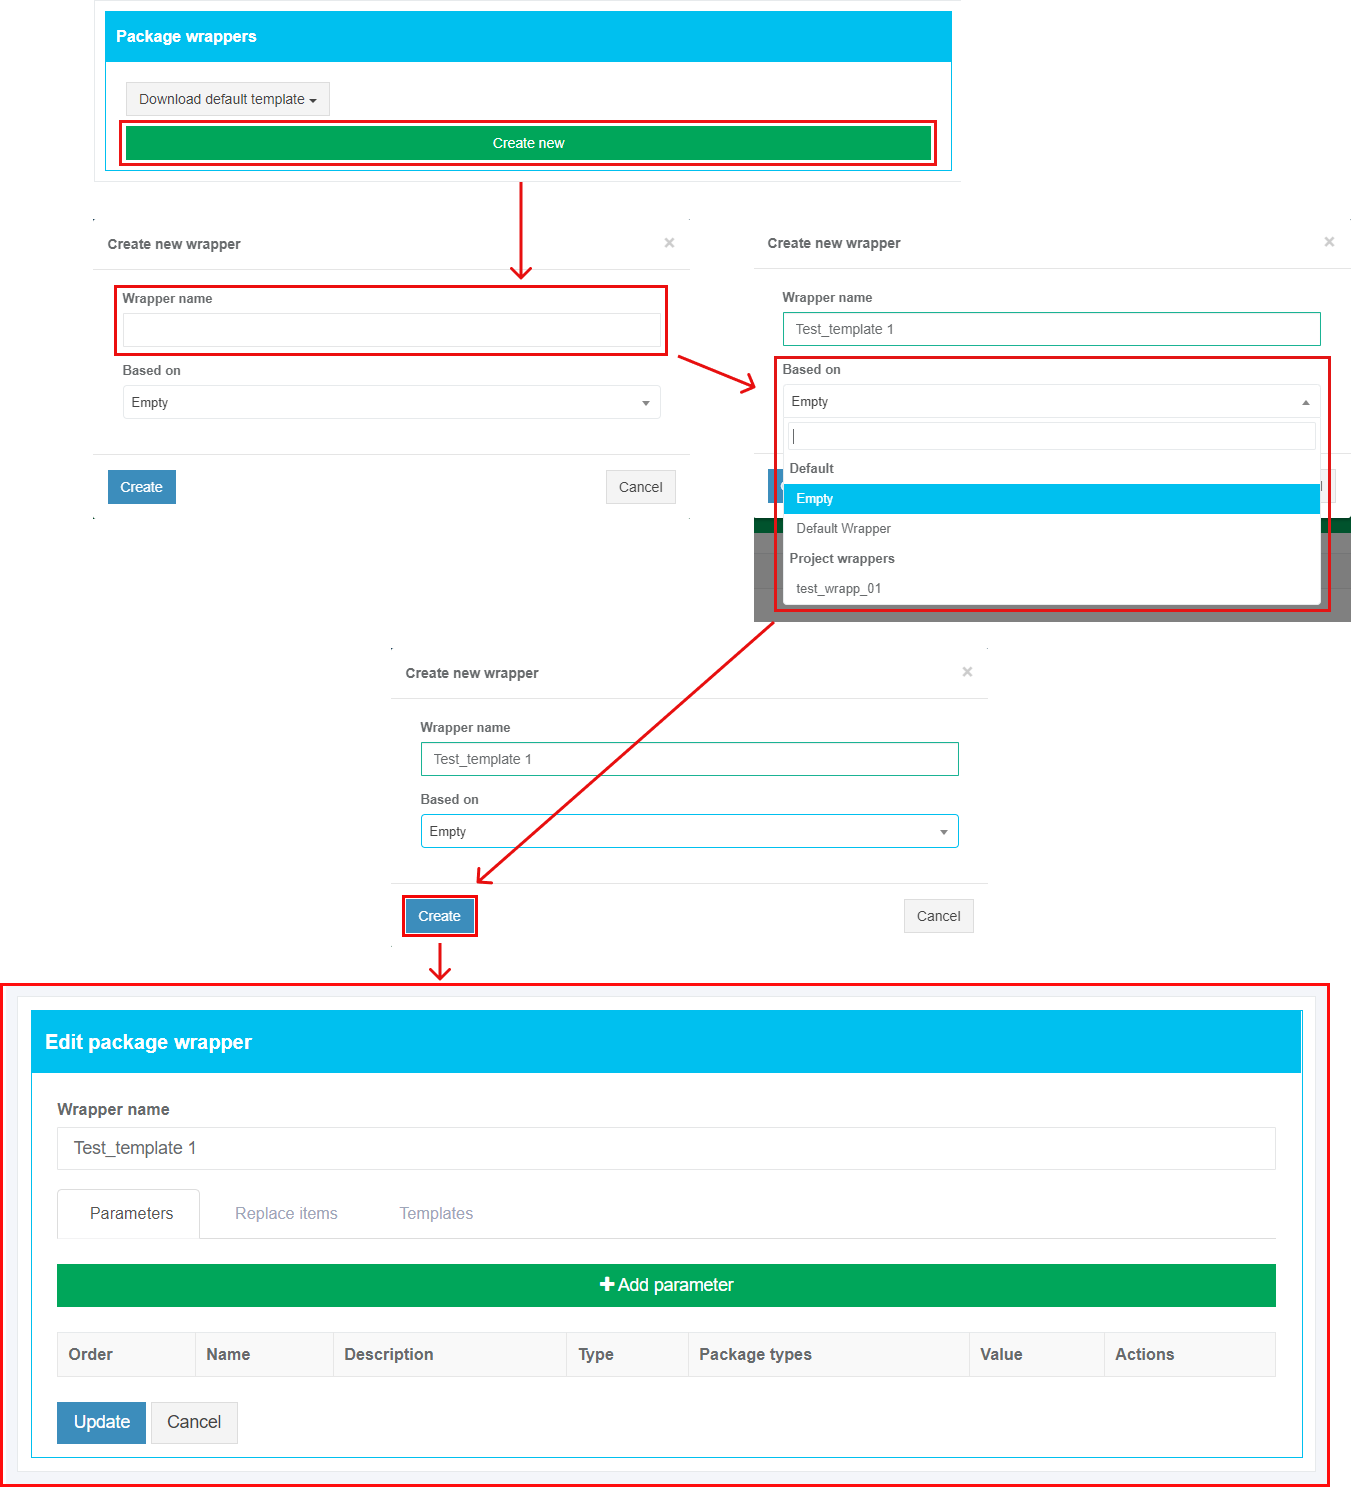](https://docs.apptimized.com/uploads/images/gallery/2021-07/3R4BCVOpUMjMXSK4-wrapp_sett_03_2.png)****Note. Based on** field indicates the state of the wrapper created. The **Empty** option creates wrapper without any predefined settings. The **Default Wrapper** option contains predefined parameters, replace items, and templates. The options under the **Project** **Wrappers** allow duplicating wrappers created previously on the project.
**Note.** When the new package template is created, it is recommended to implement the following sequence of actions: 1. Upload a ZIP archive with the wrapper template (see the [**Templates** **tab**](#bkmrk-templates-tab)) 2. Create a list of parameters (see the [**Parameters tab**](#h_48102001851599766225691)) 3. Create a list of replaced items (see the [**Replace items tab**](#bkmrk-replace-items-tab))
##### Parameters tab This tab enables a user to set the list of parameters to customize wrapper templates. The option to create a new parameter is available under the **Add parameter** button. [](https://docs.apptimized.com/uploads/images/gallery/2021-08/QKNF9YaLr4Xeunhe-wrap_sett_04_2.png)| **Settings** | **Details** |
| Name | This field sets the name of the created parameter (e.g., **Software name**). Parameter naming is a user preference. This field is required. |
| Required | This field allows a user to specify the parameter as required. |
| Description | A user can provide here any meaningful description to simplify the parameter's identification. |
| Applicable for the package type | This setting indicates the list of package types for which this parameter will be applicable. The following options available: - MSI - Transform - App-V - MSIX - VSL The multiple-choice is available. |
| Type | This setting indicates the type of the created parameter. The following options available: - String - Select list - Editable select list - Multiple select list - Boolean - Date time - MSI property - TrimmedString The default value is **String**. |
| Value | This field indicates the static or dynamic generated name which a user can apply within the settings for replaced items. The following actions available: - The field can stay empty (Apptimized will apply the default value) - A user can hardcode the value (e.g., **File Zilla 3.46 Eng**) - A user can use the variables from the list below (e.g., **\[Manufacturer\]\[ProductName\]\[ProductVersion\]\[AppLanguage\]**). |
| Values | This field enables a user to create a predefined list of values (e.g., **Windows 10 32 bit**, **Windows 10 64 bit**, **Language (Eng)**, **Language (De)**, etc.). This field is disabled by default. The field becomes active when the **Select list**, **Editable select list**, or **Multiple select list** parameter’s type is selected. A user must provide at least one value. |
| Order | This field indicates the parameter’s position in the parameters list. This field is required. |
| **Settings** | **Details** |
| Placeholder | This setting indicates the variable to be replaced in template files or folders (e.g., **AppVendorShort**). This field is required. |
| Replaced by | This field indicates the static or dynamic generated name which a user can apply within the settings for replaced items. The following actions available: - A user can enter the value manually. The following templates must be implemented: for files - **$(ParameterName)**, and for folders **\[ParameterName\]** - A user can use the variables from the list below the field. |
| Package types | This setting indicates the list of package types for which this replacement item will be applicable. The following options available: - MSI - Transform - Legacy - App-V - MSIX - VSL The multiple-choice is available. This field is required. |
| File extensions | This field indicates the extension of a file for which the replacement rules will be applied (e.g., **.PS1** or **.TXT**). This field is required. The option to add a file extension is available under the **plus** symbol. The option to delete a file extension is available under the **bin** symbol. |
| **Settings** | **Details** |
| File path | This field enables a user to define the destination of the installation file or several installation files (e.g., **\[packagefoldername\]\\package**). To define the file (s) path, a user needs to select a folder that will store the installation file or several installation files from the hierarchical folder structure on the left-hand side of the settings window. [](https://docs.apptimized.com/uploads/images/gallery/2020-09/317anF1r6L5hMfGN-wrap_sett_07_path.png) This field is required. |
| Version | This field provides information about the wrapper’s version number (e.g., **1.1.1.1** or **1.1.05.1**). The wrapper’s version number should be represented as a four-part string with the following format: **<major version>.<minor version>.<build number>.<revision>** This field is required. |
| Package types | This setting indicates the list of package types for which this template will be applicable. The following options available: - MSI - Transform - Legacy - App-V - MSIX - VSL The multiple-choice is available. This field is required. |
| Description | A user can provide here any meaningful description to simplify the template's identification. |
**Note.** If required to modify the current wrapper template or implement any changes, a user doesn't need to create a new packaging wrapper entry. A user can upload a new wrapper revision (**Template tab** > **Add template** button). A wrapper version number update is needed. Apptimized Platform will automatically use the latest one when the wrapper template updated successfully.
#### **Testing – Self Service** The screenshot below shows the default settings of the **Testing – Self Service** module. All required fields are marked with an asterisk \*. [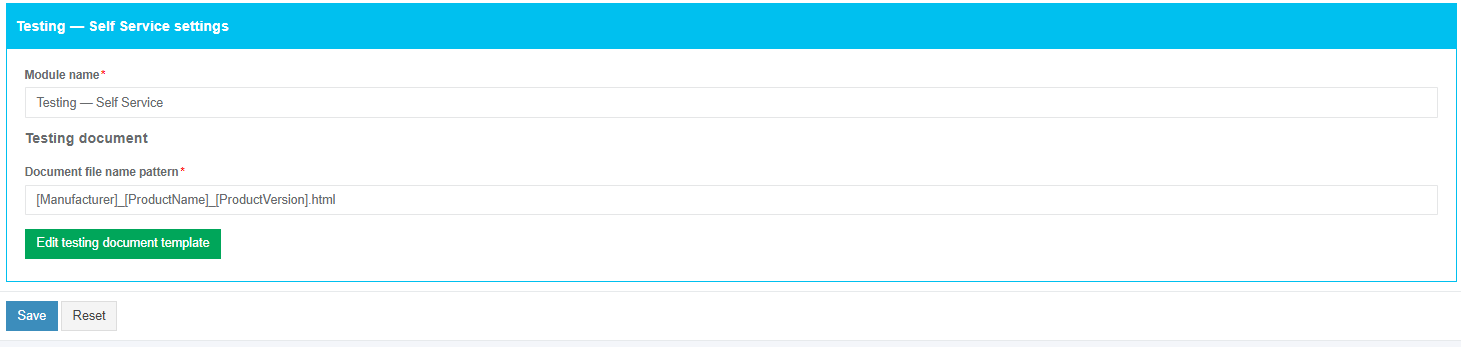](https://docs.apptimized.com/uploads/images/gallery/2020-12/DyK7zms6zeHWDB12-testing_selfservice_1.png) The option to change a module name is available under the **Module name** field. The default module name is **Testing – Self Service.** The option to change a file name pattern is available under the **Document file name pattern** field. The default file name pattern is **\[Manufacturer\]\_\[ProductName\]\_\[ProductVersion\].html.** To insert the variable tag into the field, click the relevant variable tag from the dropdown list. [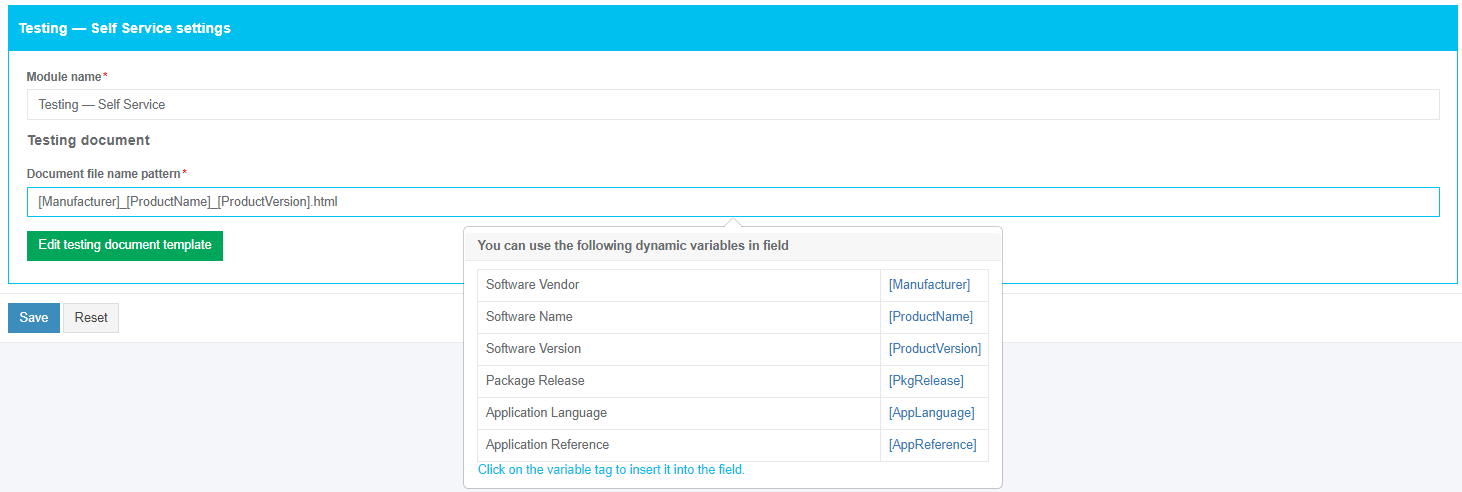](https://docs.apptimized.com/uploads/images/gallery/2020-12/NOdvKb0QSMy8XVzl-testing_selfservice_2.png) The option to edit a testing case template is available under the **Edit testing document template** button. [](https://docs.apptimized.com/uploads/images/gallery/2020-04/JFLKtjz842DwdvjS-steps_settings_15.png) Apptimized shows the following screen when successful: [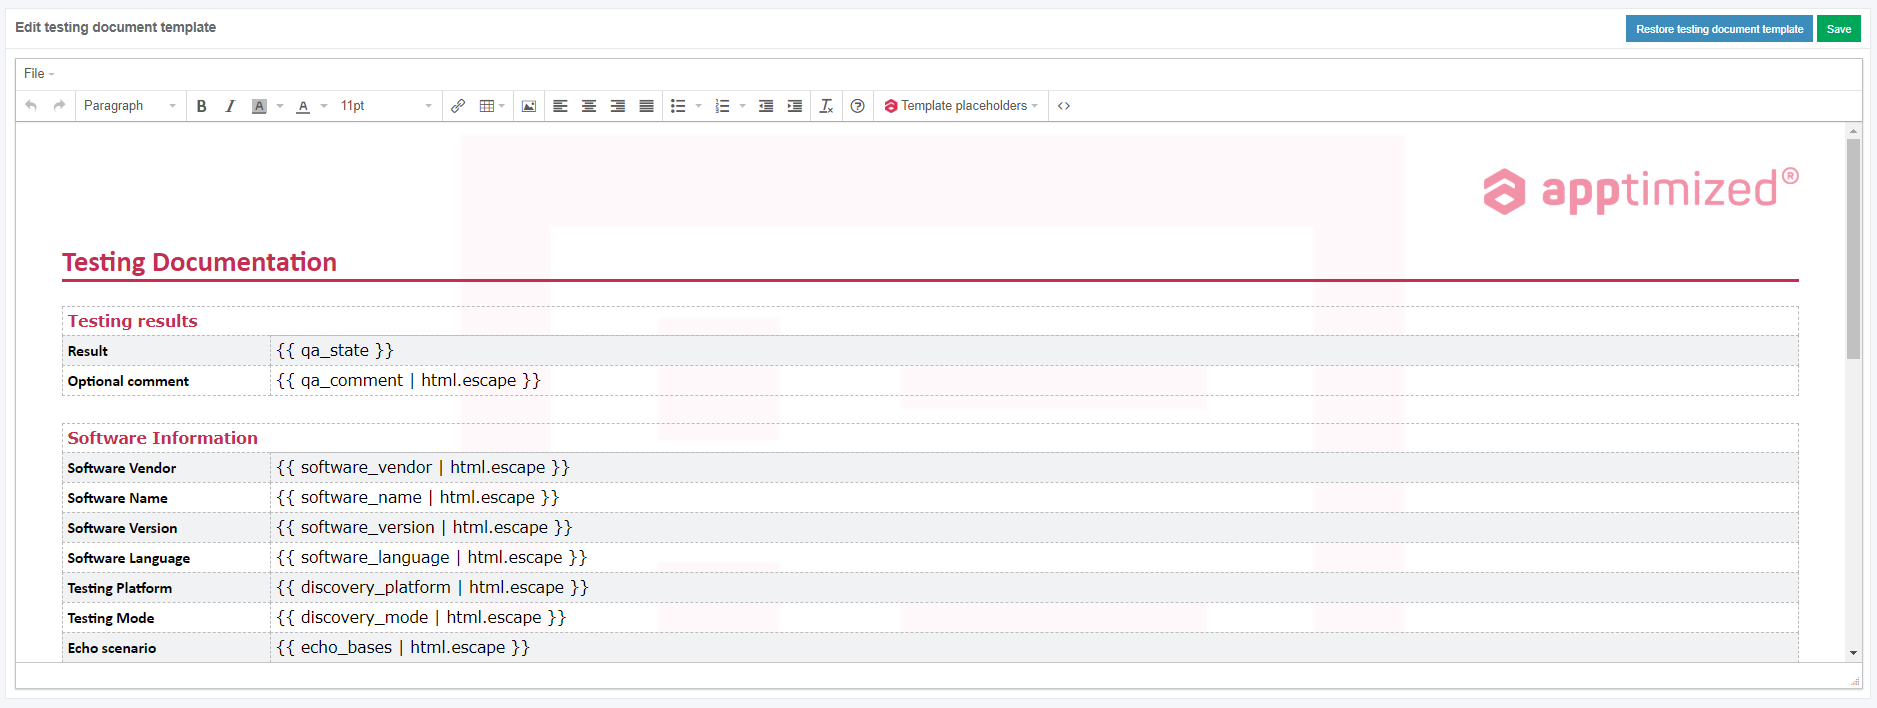](https://docs.apptimized.com/uploads/images/gallery/2020-04/hNt1o8PrKHenZiDd-steps_settings_16.png) To return the document to the default state, click the **Restore testing document template** button. To apply edits in a discovery case template, click the **Save** button. Settings are persisted on click to the **Save** button. To revert the settings, click on the **Reset** button. [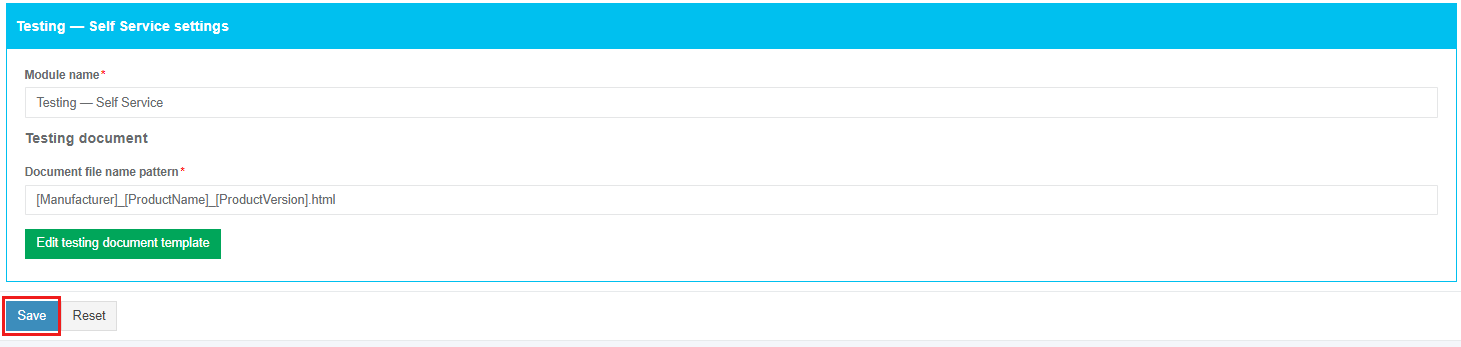](https://docs.apptimized.com/uploads/images/gallery/2020-12/JKaghggTWkNdQMBw-testing_selfservice_3.png) Apptimized shows the following notification when successful: [](https://docs.apptimized.com/uploads/images/gallery/2020-04/jbdVHUv8yipb6c24-steps_settings_22.png) #### **Testing – Factory Service** The screenshot below shows the default settings of the **Testing – Factory Service** module. All required fields are marked with an asterisk \*. [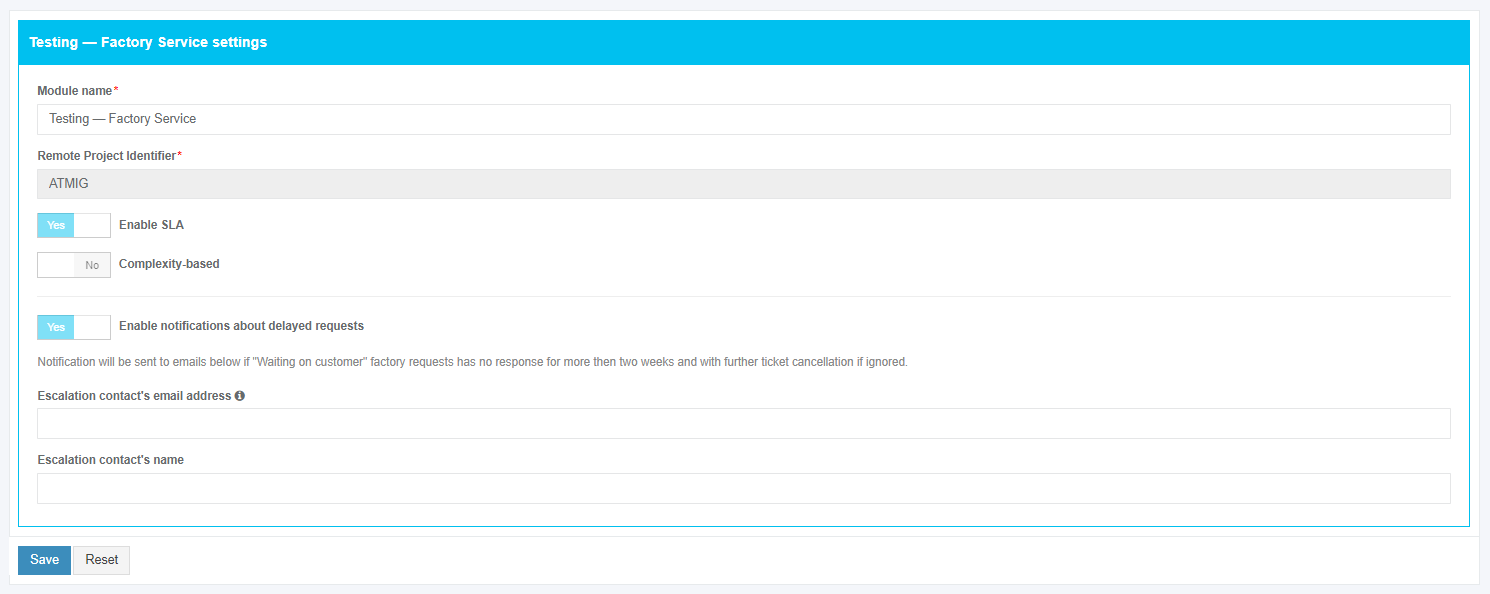](https://docs.apptimized.com/uploads/images/gallery/2020-04/ZPdms1twgcmCk5SJ-steps_settings_23.png) The option to change a module name is available under the **Module name** field. The default module name is **Testing – Factory Service.** The option to set the person’s data who will receive notifications on factory requests in the project is available under “**Escalation contact's email address”** and **“Escalation contact's name”** fields. [](https://docs.apptimized.com/uploads/images/gallery/2020-04/e2EAH7WQBg0uIKvM-steps_settings_24.png) Settings are persisted on click to the **Save** button. Apptimized shows the following notification when successful: [](https://docs.apptimized.com/uploads/images/gallery/2020-04/xGnczHxKWkjU0TST-steps_settings_25.png) ### **Echo settings** The option to enable [Echo](https://www.youtube.com/watch?v=EaVj5lDKufM) is available under the **Echo** switch. The default value is **No**. [](https://docs.apptimized.com/uploads/images/gallery/2020-04/6j9NZCPDtEnkQtFu-project_settings_09.png) Apptimized shows the following screen when Echo option is enabled: [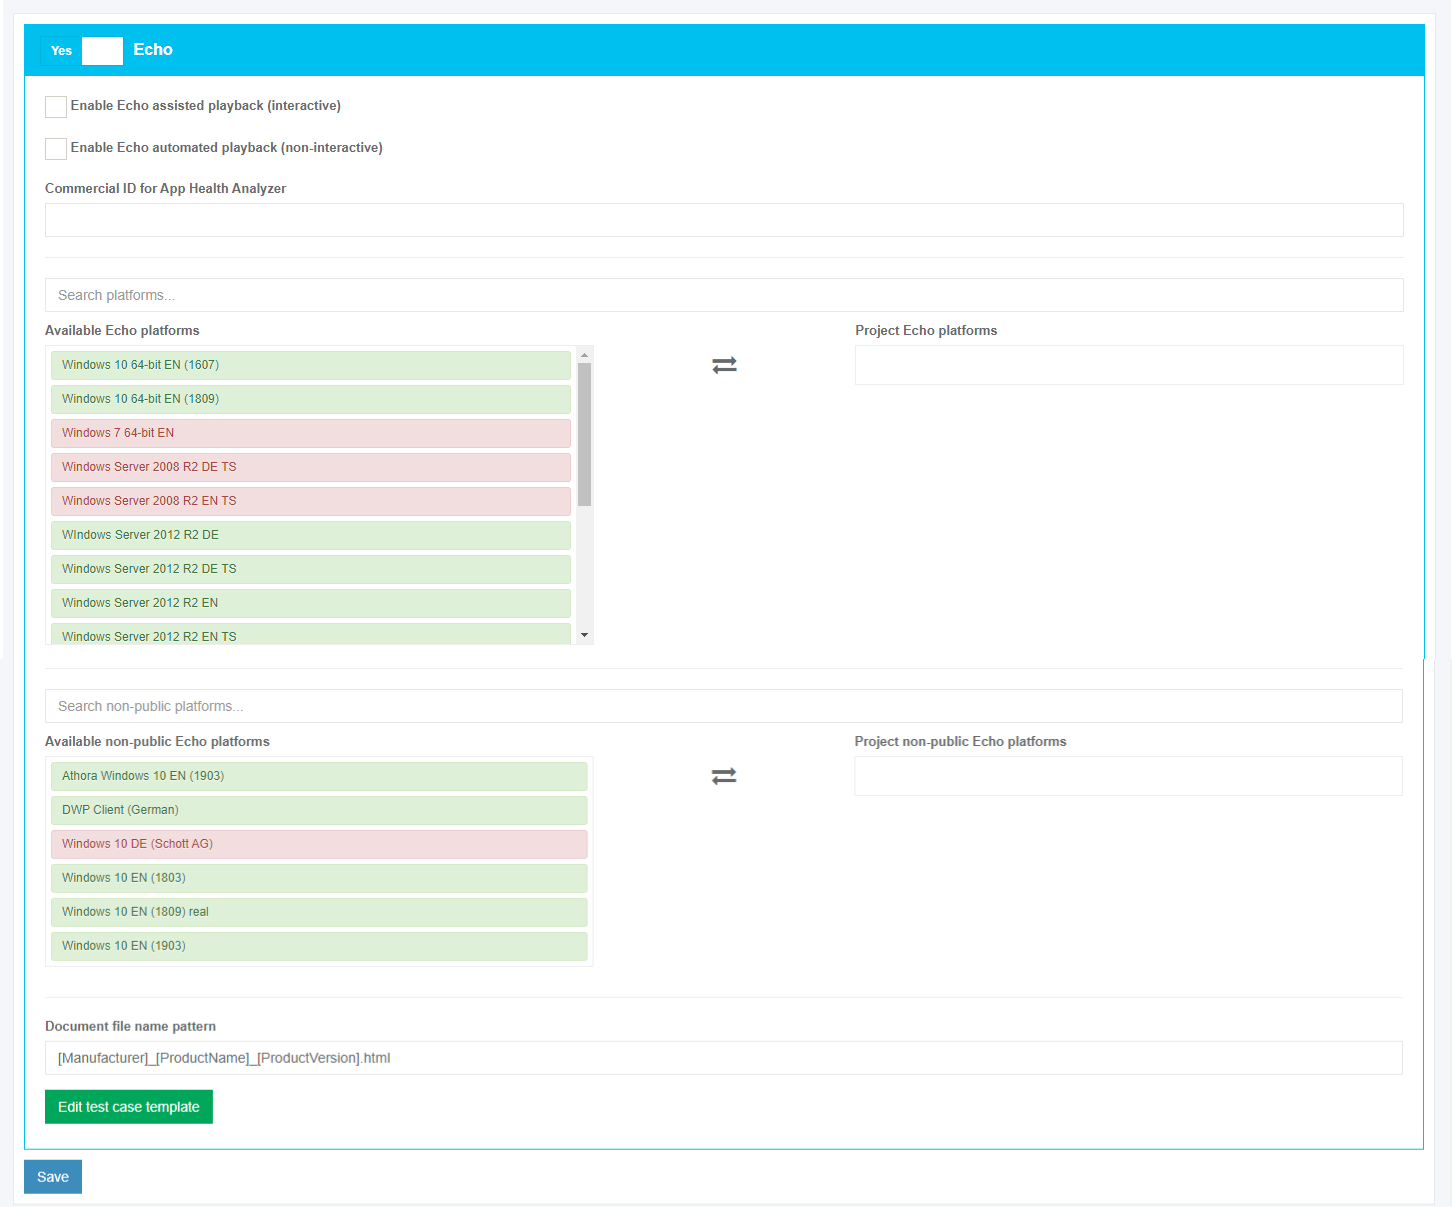](https://docs.apptimized.com/uploads/images/gallery/2020-04/iUVkbf4WQxnMvZHV-project_settings_10.png) The option to replay the recorded installation and configuration of the application from the initial version is available under the **Enable Echo assisted playback (interactive)** switch. The option is inactive by default. The option to replay the record automatically against the selected Windows OS is available under the **Enable Echo automated playback (non-interactive)** switch. The option is inactive by default. [](https://docs.apptimized.com/uploads/images/gallery/2020-04/HSbM5shBdPE2CLzE-project_settings_11.png) A playback mode enables a user to choose how to proceed with recorded test cases when the new platform (VM) is added. Three playback modes available: - **Automated** – when a new platform (VM) is added, all possible test cases run; - **Opt-In** – when a new platform (VM) is added, a user is notified by email to add it manually to the project; - **Opt-Out** – when a new platform (VM) is added, a user is notified by email. A user has 48 hours to cancel prepared test cases or they run automatically. The default value is **Automated**.**Note.** The **Playback Echo scenario from** field is required. Apptimized Portal shows the following error screen: [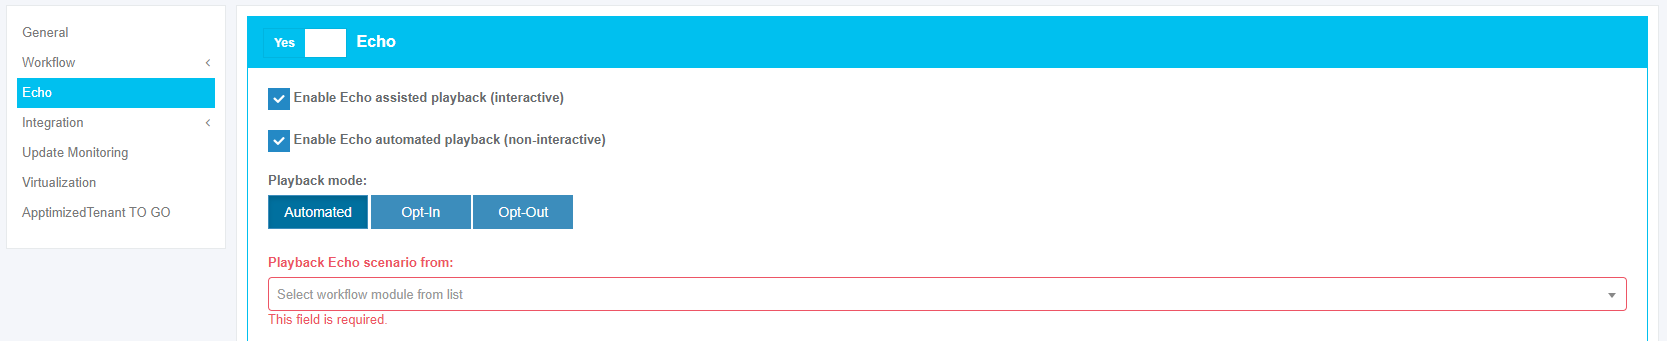](https://docs.apptimized.com/uploads/images/gallery/2021-07/VgCSsluSP0L9J8Oc-echo_error_message.png)
Keyword search mode available: [](https://docs.apptimized.com/uploads/images/gallery/2020-04/9nX93ApZ5LdcPnvb-project_settings_12.png) To choose an Echo platform, a user can drag and drop a suitable platform from the **Available Echo platform / Available non-public Echo platforms** container to the **Project Echo platforms / Project non-public Echo platforms** container. [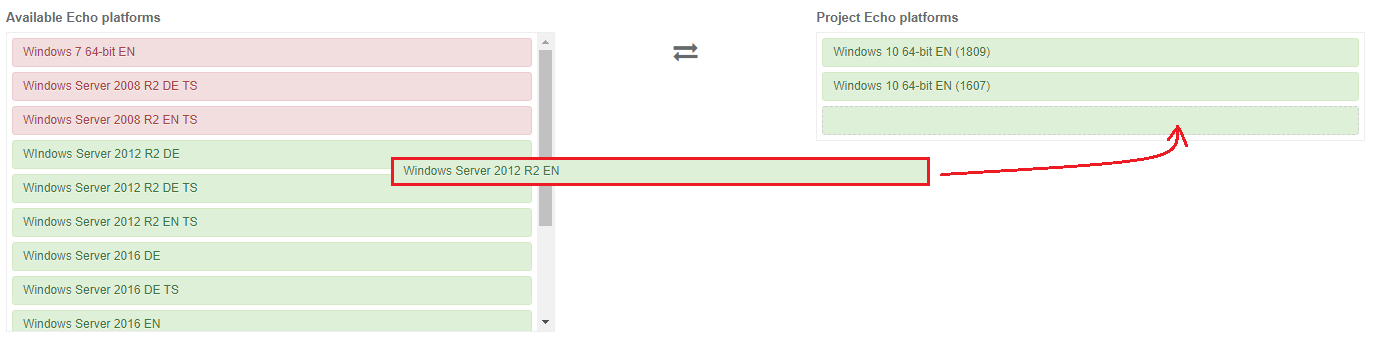](https://docs.apptimized.com/uploads/images/gallery/2020-04/mN3yLQwEoQP0JGr4-project_settings_13.png) The option to change a file name pattern is available under the **Document file name pattern** field. The default file name pattern is **\[Manufacturer\]\_\[ProductName\]\_\[ProductVersion\].html.** **[](https://docs.apptimized.com/uploads/images/gallery/2020-04/DSPd5Mt2vs8BygKy-project_settings_14.png)** The option to edit a test case template is available under the **Edit test case template** button. [](https://docs.apptimized.com/uploads/images/gallery/2020-04/VjP7EYWnixHDYRqm-project_settings_15.png) Apptimized shows the following screen when successful: [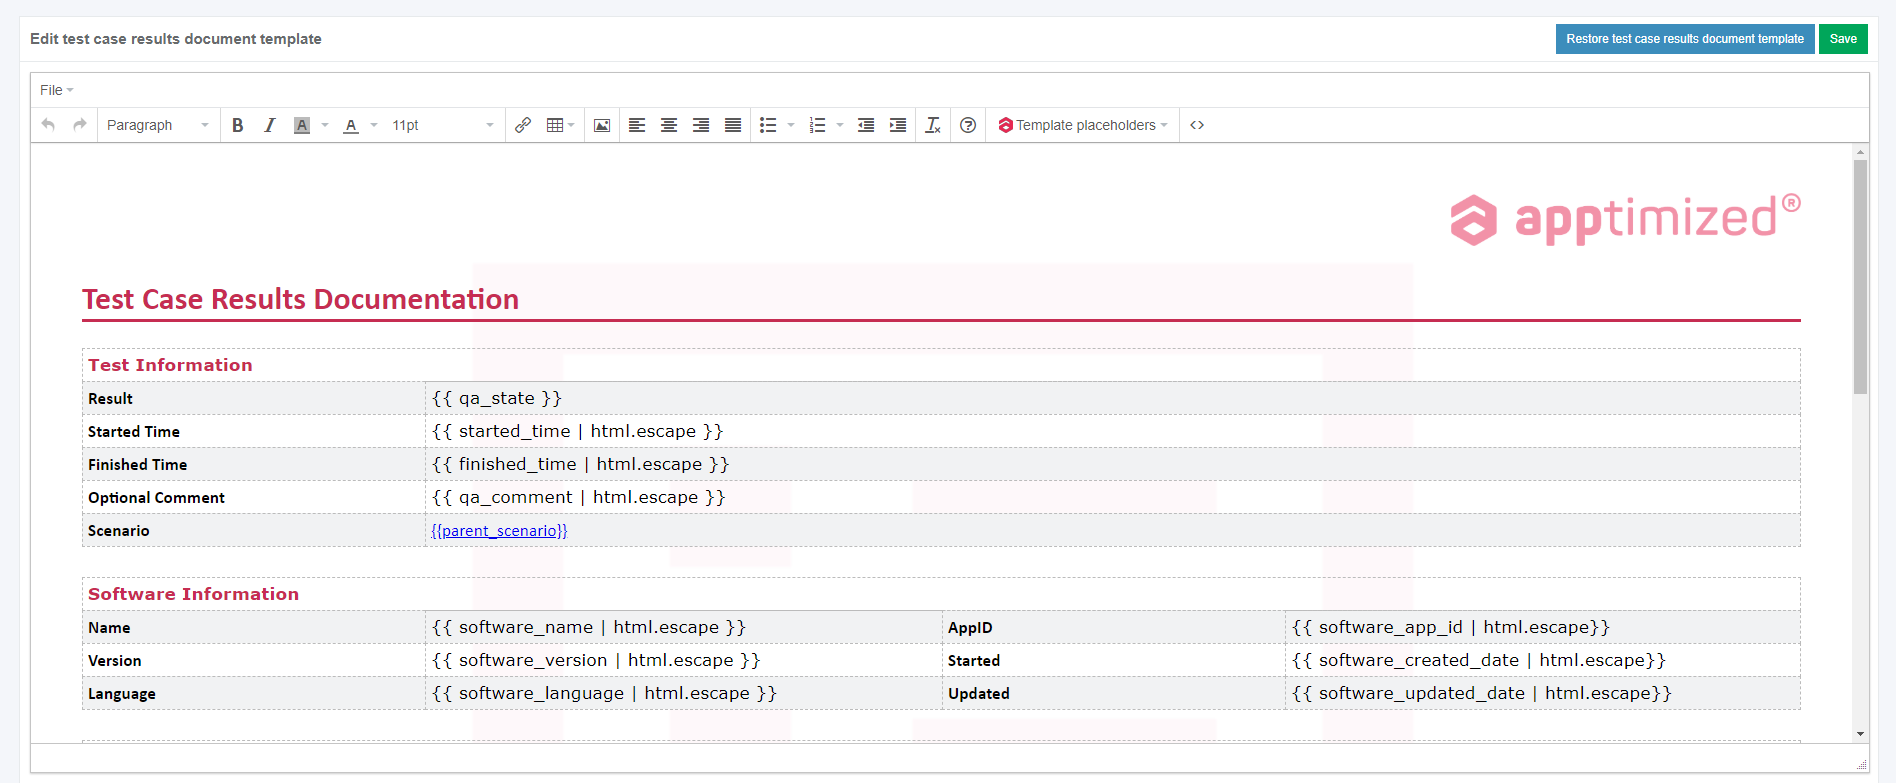](https://docs.apptimized.com/uploads/images/gallery/2020-04/9RgS7wSK9viYNY19-project_settings_16.png) To apply edits in a test case template, click the **Save** button. To apply the Echo settings, click the **Save** button. Apptimized shows the following notification when successful: [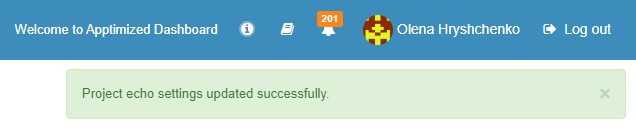](https://docs.apptimized.com/uploads/images/gallery/2020-04/RFPFWqbOk24V3ivc-project_settings_16_1.png) ### **Integration settings** #### **Intune** ##### **Create environment** **Your Project → Administration → Settings → Integration → Intune → Environments → Create environment**  Put a name for your environment on the Apptimized Portal and press "**Create**". 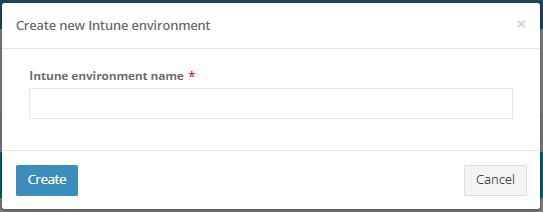**Then you will faced massage about that your environment was created. **
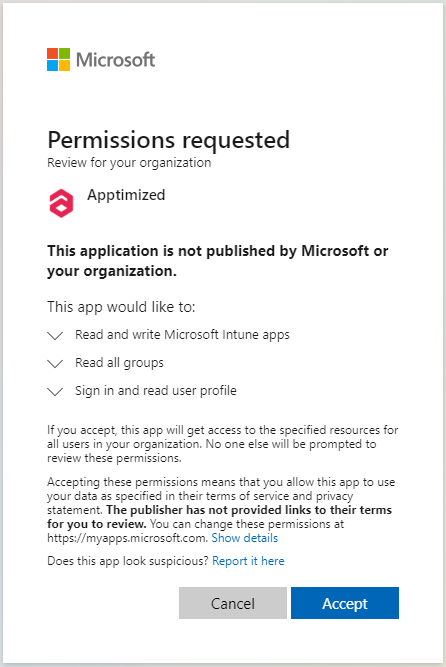
 [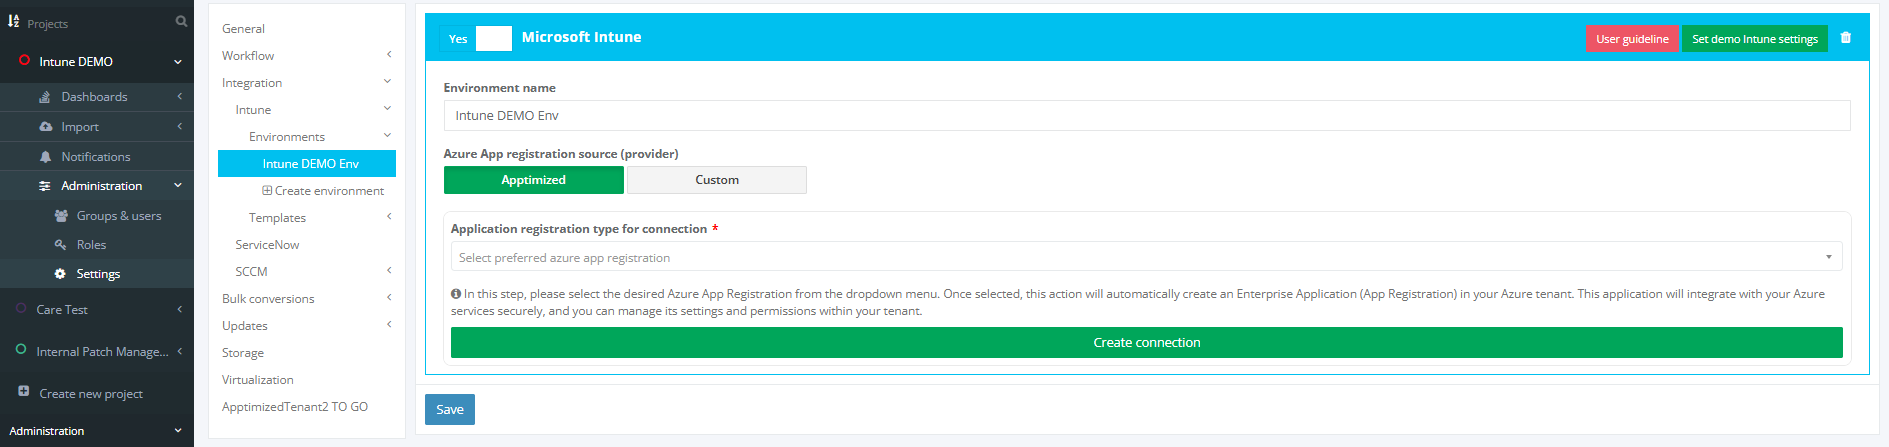](https://docs.apptimized.com/uploads/images/gallery/2025-03/main.PNG) ##### **Connect environment** After creating your project on the Apptimized Portal you have two options for integrating your Intune environment. - **Apptimized** – use Apptimized provided App Registration - **Custom** – use own App Registration connection  ##### **Apptimized connection** In the “**Application registration type for connection**” you can choose: - Connection with Application permissions - Connection only with Delegated permissions In this step, please select the desired Azure App Registration from the dropdown menu. Once selected, this action will automatically create an Enterprise Application (App Registration) in your Azure tenant. This application will integrate with your Azure services securely, and you can manage its settings and permissions within your tenant. [](https://docs.apptimized.com/uploads/images/gallery/2025-03/two.PNG) Then press “**Create connection**” button: [](https://docs.apptimized.com/uploads/images/gallery/2025-03/connection-button.PNG)In case if you have enough permissions for this operation (Global Admin role) you will faced the next window:
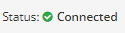
After pressing “Accept” connection with your environment will be created and it will back you to the your created 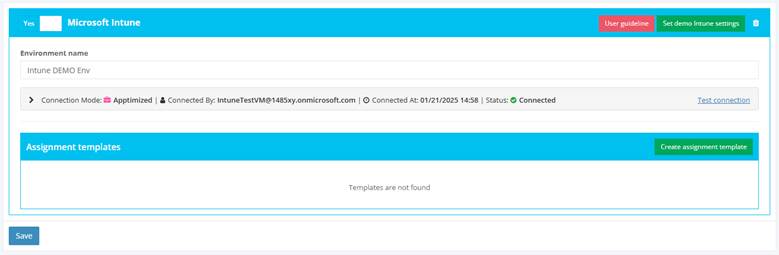If all went well you would face the status - “**Connected**”
And if something went wrong – “**Error**”
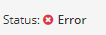
In this case please press: **“Test connection”** button: It will update information aboud status of your Intune connection**If status don’t change, please contact support.**
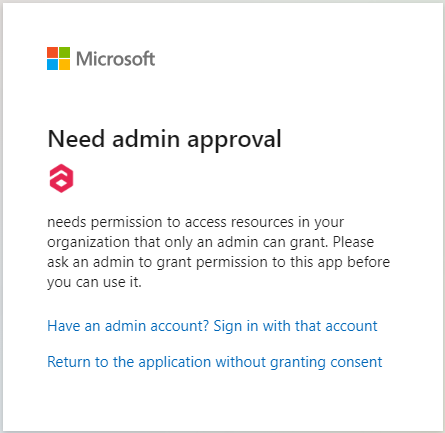
Also here you can see: - **Connection Mode**: Apptimized or Custom - **Connected By**: User who made autorization - **Connected At**: Time when authorization was doneIn case if you do not have enough permissions, but your Enterprise application settings allow you request it, you will face the next window.
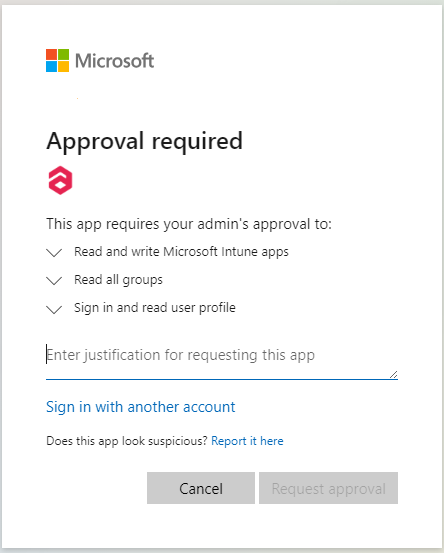
After pressing “**Request approval**” email will be sent to your Admin and you will see next window.
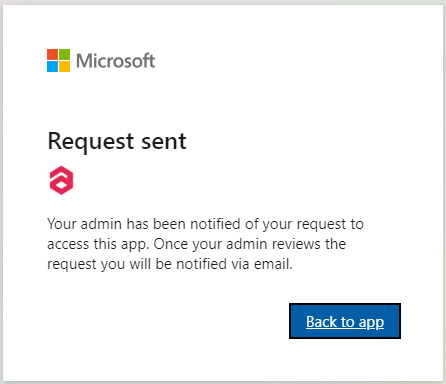
After pressing "**Back to app**” you will back to the Intune Environment page. [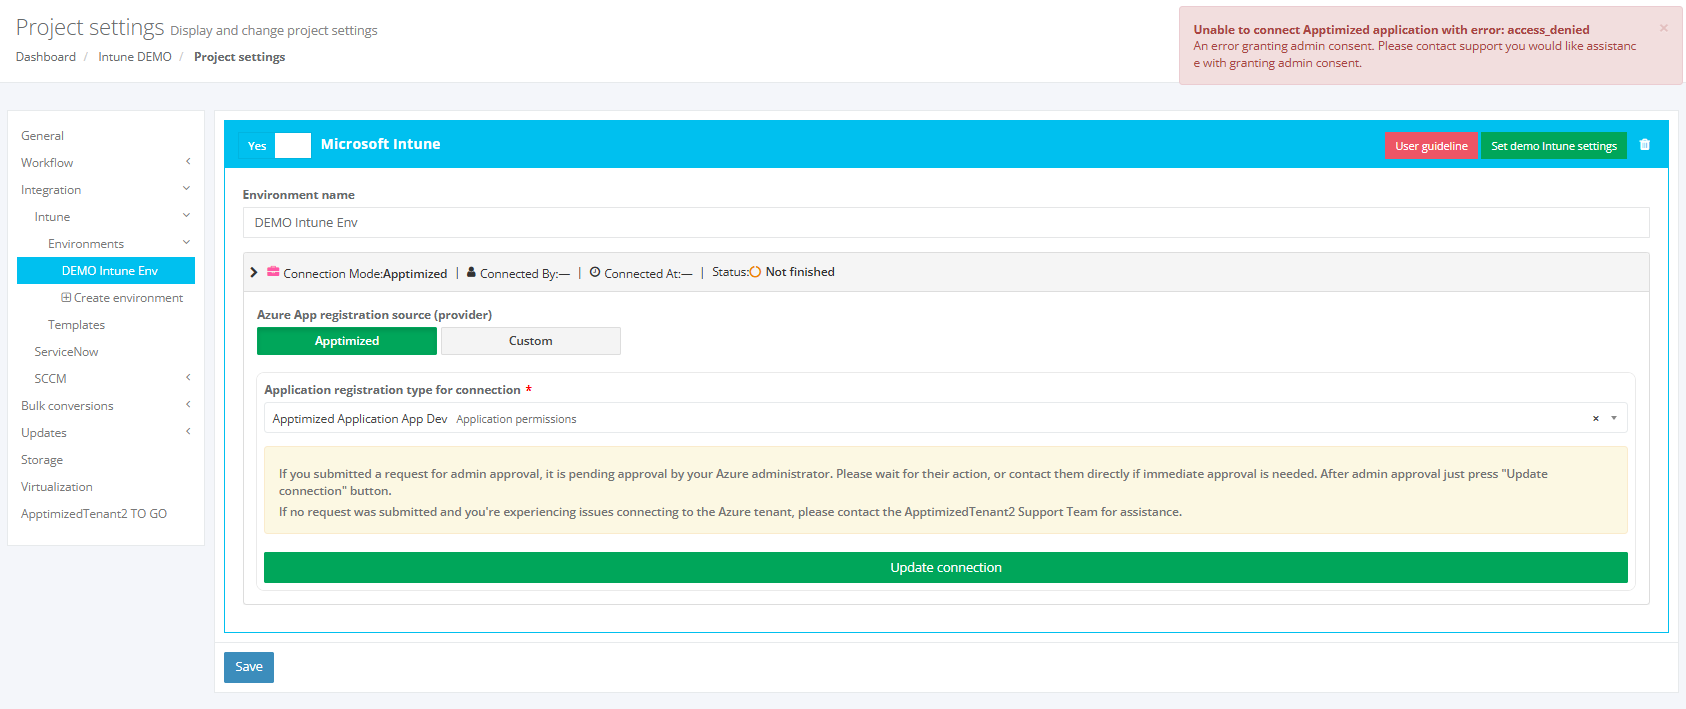](https://docs.apptimized.com/uploads/images/gallery/2025-09/VeEintune-environment-page.PNG) In this case, the status will be “Not finished”. [](https://docs.apptimized.com/uploads/images/gallery/2025-09/image.png) Also, you will face the next warning (it's ok). [](https://docs.apptimized.com/uploads/images/gallery/2025-09/g5wimage.png) And now you need to wait approval from your Admin by Email message.
> Email Example: > > [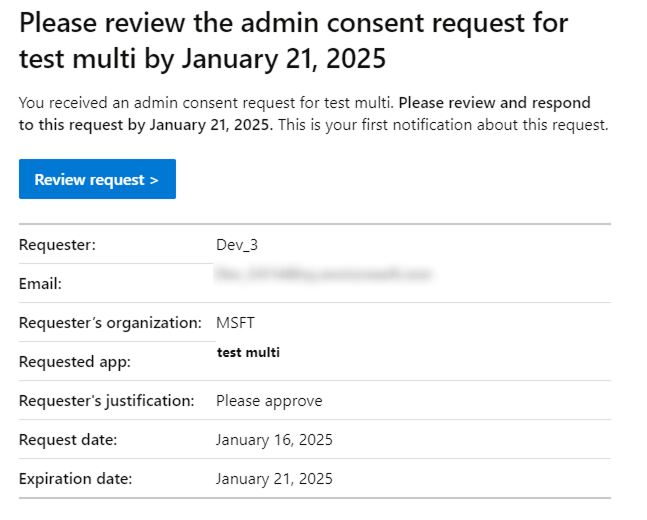](https://docs.apptimized.com/uploads/images/gallery/2025-08/group-1.png) > > > After Admin approval you will get the next message on your Email. > Example: > > 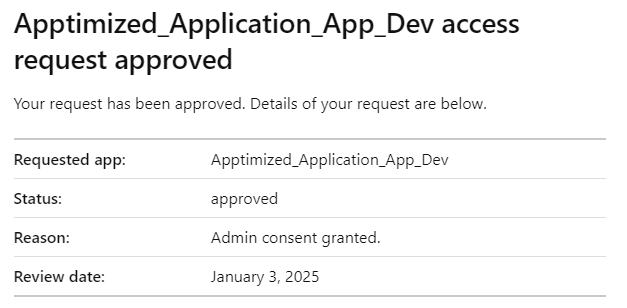 After that you need to go to the Intune Environment setting page of your created environment and press “**Update connection**” button. [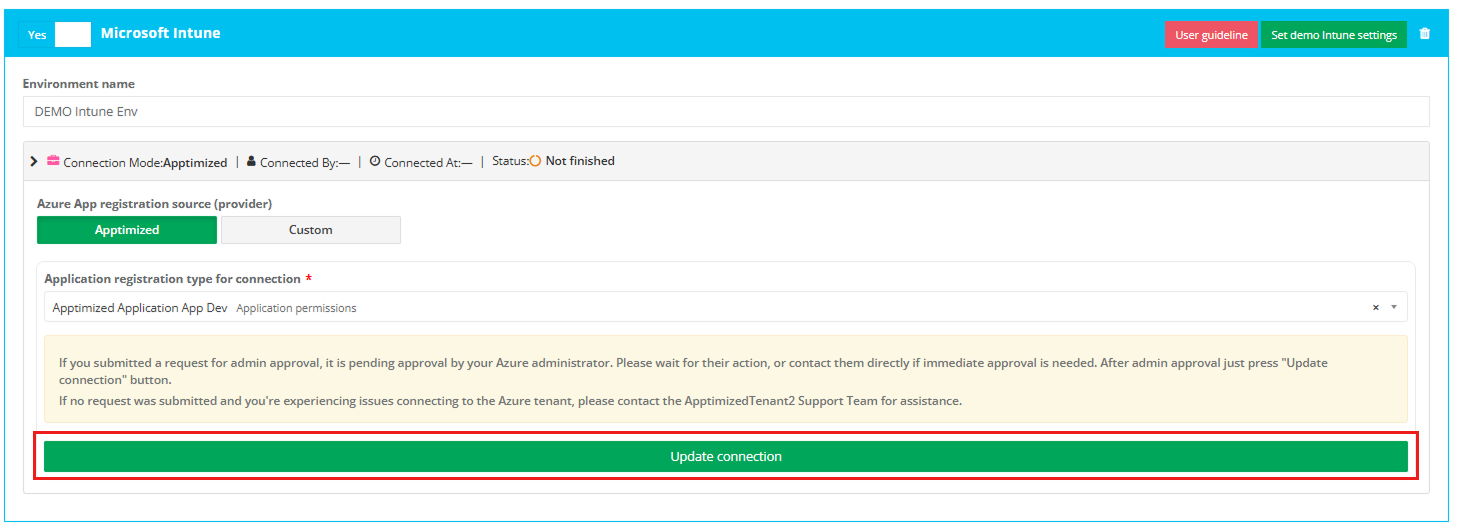](https://docs.apptimized.com/uploads/images/gallery/2025-09/group-8.png) If the request is approved, the status will change to “Connected”, and the environment will be ready for work. [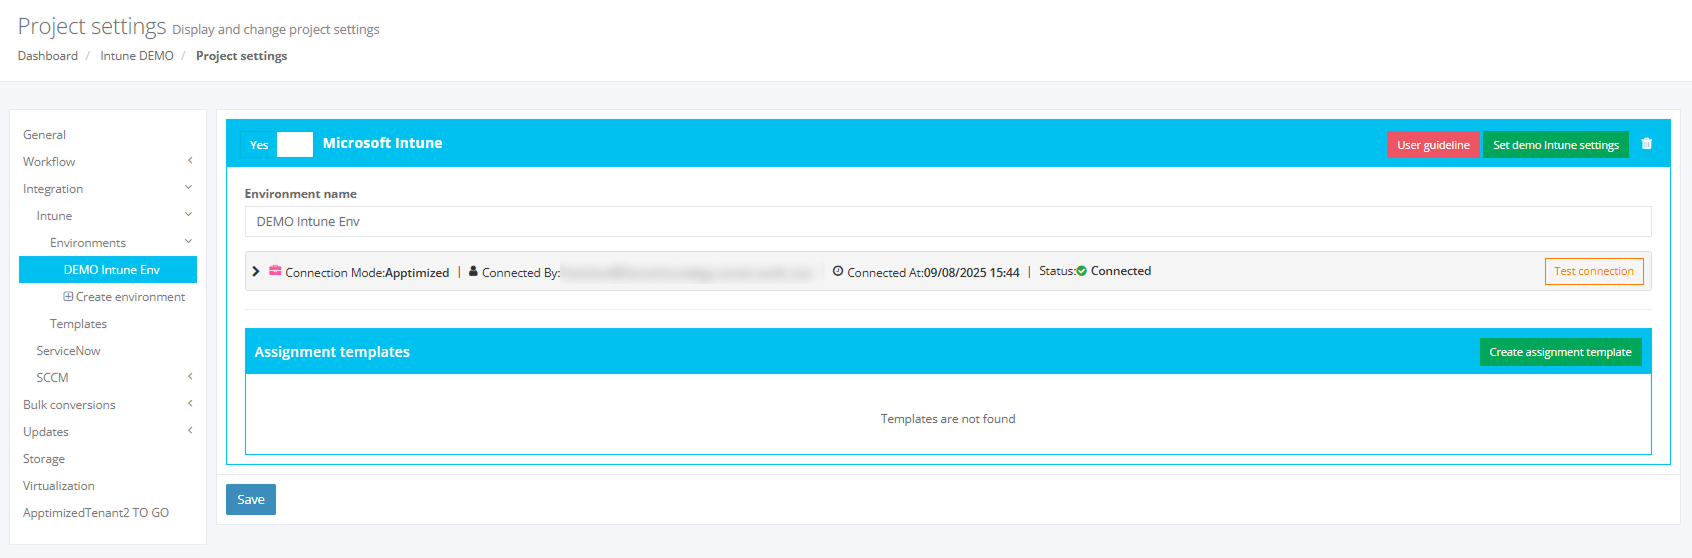](https://docs.apptimized.com/uploads/images/gallery/2025-09/group-9.png) If you get the window with the approval request, it means that your request has not been approved yet or denied.In case if you do not have enough permissions and can not request it you will faced the next window:
In this case you can create this type of connection only with Global Administrator permission.   **Setting that allow you to request Admin consent:**  --- ##### **Custom connection** The application registration is carried out in the Microsoft Azure portal via administrative credentials. A user can choose one of the following types of accounts: A tenant admin account; - A tenant user account (with the enabled **“Users can register applications”** setting). The option to open an application registration page is available under: - **Microsoft Azure** portal > **Azure services** > **App registrations**; [](https://docs.apptimized.com/uploads/images/gallery/2020-05/ql2t7GeHU7oa1KFn-intune_01.png) - **Microsoft Azure** portal > Search > Enter a search request (i.e., “App registrations”) > Select the service in the list > **App registrations**; [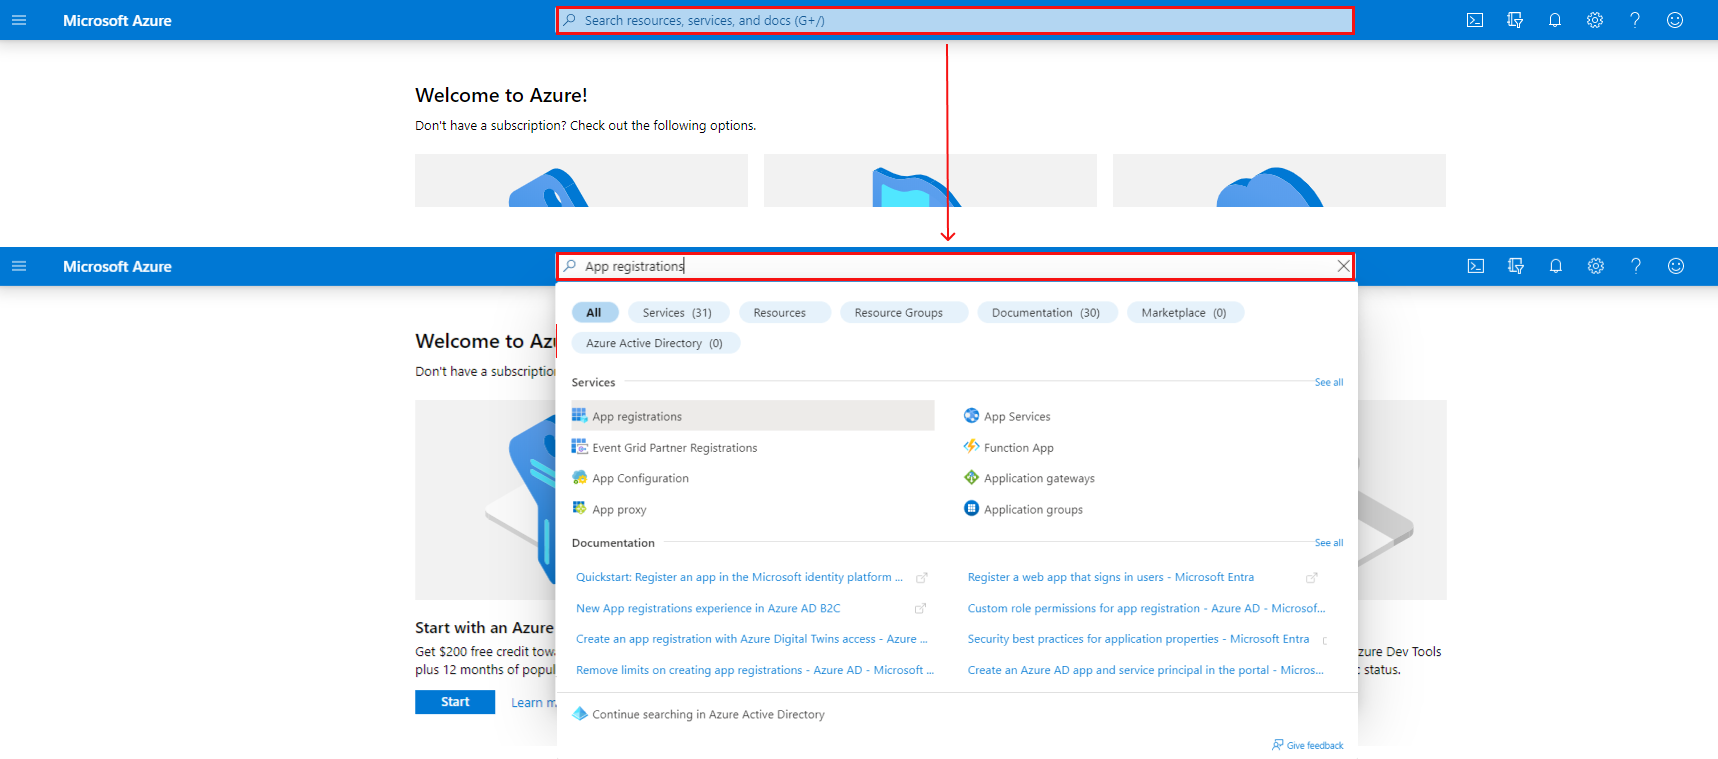](https://docs.apptimized.com/uploads/images/gallery/2022-08/q7ncDCyqN1eH0oih-intune_02_02.png) - **Microsoft Azure** portal > Menu > All services > Enter a search request (i.e., “App registrations”) > Select the service in the list > **App registrations**. [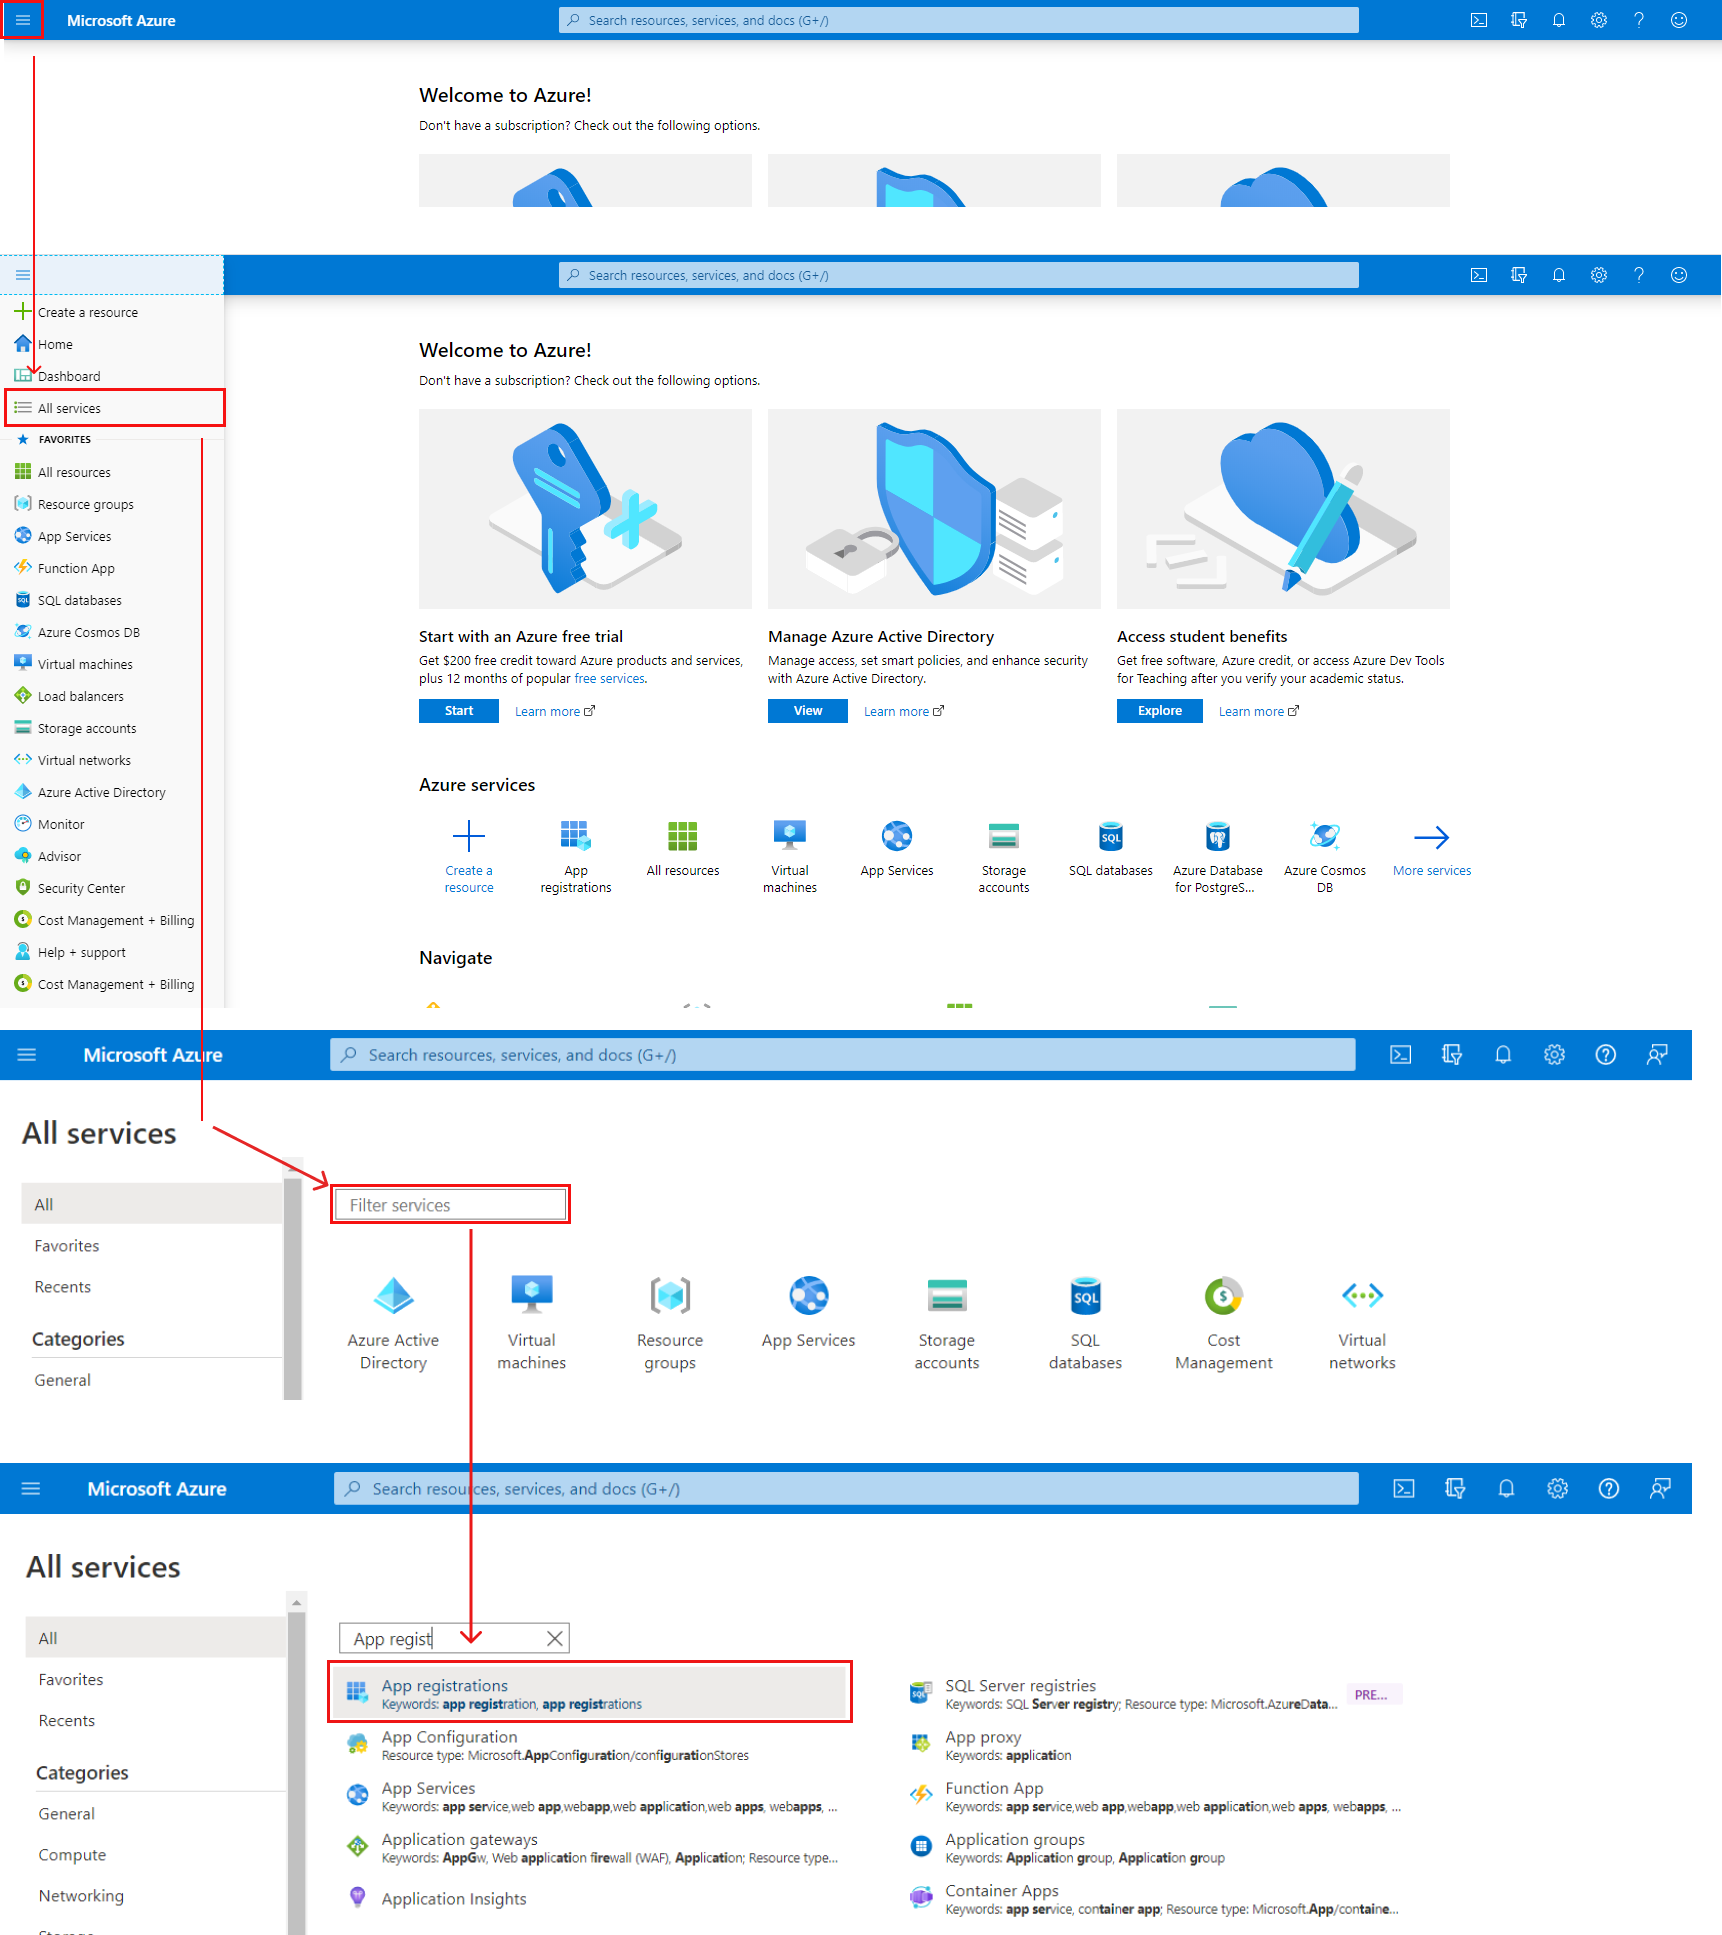](https://docs.apptimized.com/uploads/images/gallery/2022-08/yC2QnvLLANcWCJZq-intune_03_03.png) **Microsoft Azure** portal shows the screen when successful: [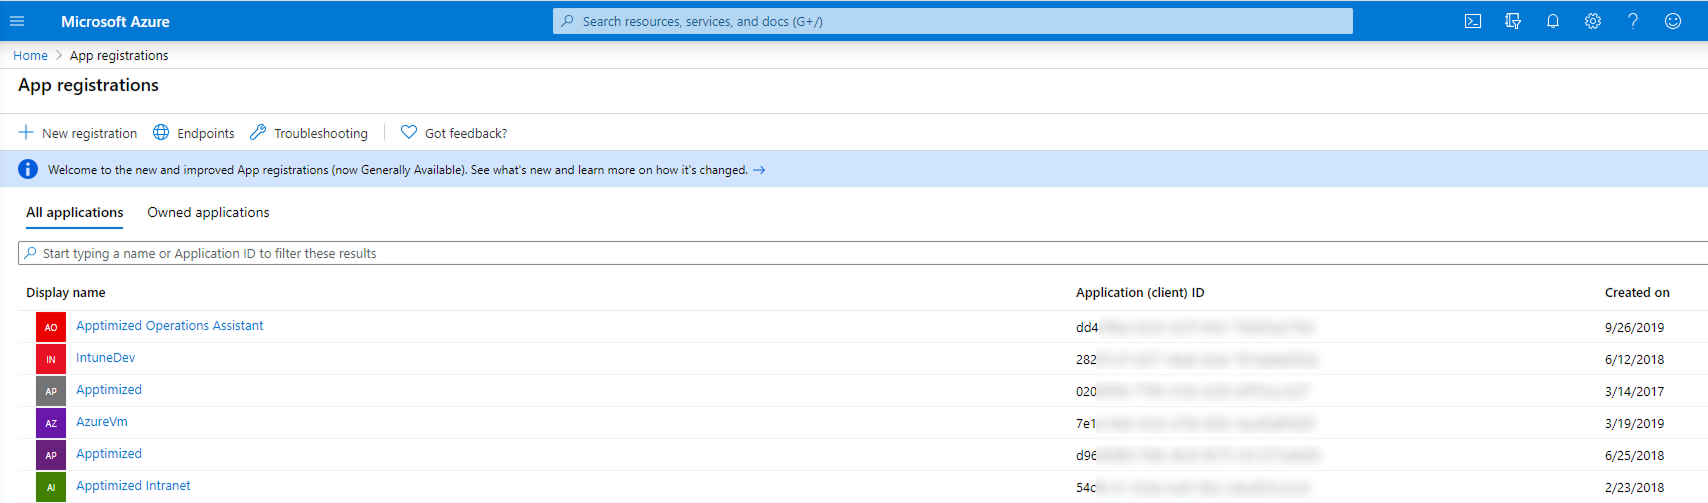](https://docs.apptimized.com/uploads/images/gallery/2025-08/group-2.png) The option to create a new application registration is available under the **New registration** option. [](https://docs.apptimized.com/uploads/images/gallery/2020-05/lcgEArRMyPn4ljJz-intune_05.png) Microsoft Azure portal shows the Create window when successful: [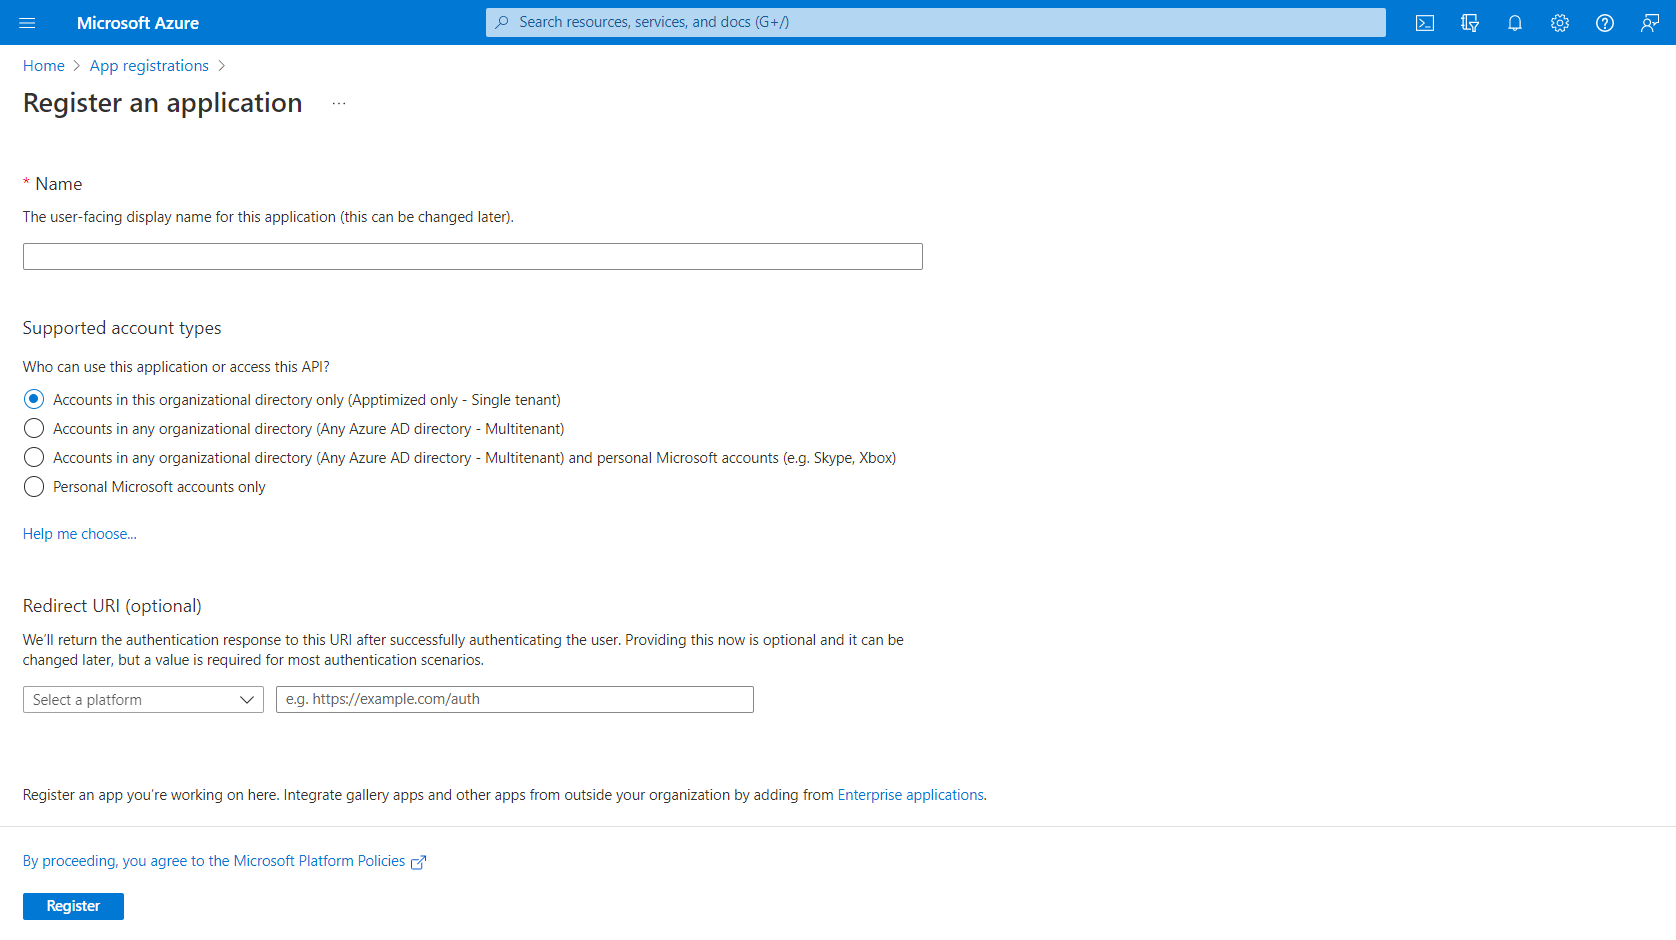](https://docs.apptimized.com/uploads/images/gallery/2022-08/BK5Q9Jma32fJJnFN-intune_06_01.png) To create a new application registration, a user fills in the fields in the form (see Table 1 and the [Microsoft Azure manual](https://docs.microsoft.com/en-us/azure/active-directory/develop/quickstart-register-app)). Table 1. A new application registration| **Field name** | **Details** |
| Name | This field sets a meaningful application name to display to users (i.e., **Apptimized Intune Test**) |
| Supported accounts | This option identifies types of accounts that can use the application. Three options available: - Accounts in this organizational directory only; - Accounts in any organizational directory; - Accounts in any organizational directory and personal Microsoft accounts; - Personal Microsoft account only. |
| Redirect URI | This setting is optional, and the values can be provided later. [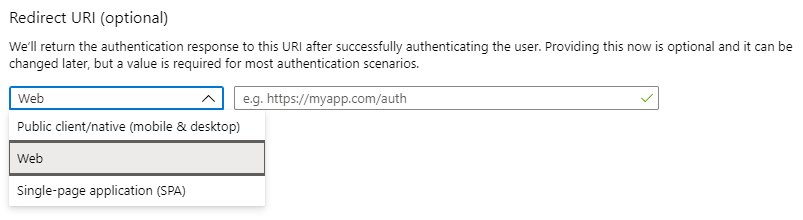](https://docs.apptimized.com/uploads/images/gallery/2020-05/dEYiRGrv0j8eCFmJ-intune_07.png) |
**Note.** When clicking on the **Add** button, the client secret value appears (i.e., **~\_fd-Y49~haNZ~g8RbDz9yQCF4KQ\_\_1j49**). A user must copy the value to the clipboard to use it in the client’s application code. It becomes inaccessible once a user leaves this page. The **Client secret** value correlates with the **Client secret** field when integrating **Intune** into the **Apptimized** portal.
[](https://docs.apptimized.com/uploads/images/gallery/2022-08/ksgCXV9lGzvrlvxw-intune_11_02.png) The option to [configure permissions](https://docs.microsoft.com/en-us/azure/active-directory/develop/v2-permissions-and-consent) to the application to call API is available under **All services** > **App registrations** > Select the application in the list > **Manage** menu > **API permissions** > Add a permission > **Microsoft Graph**. [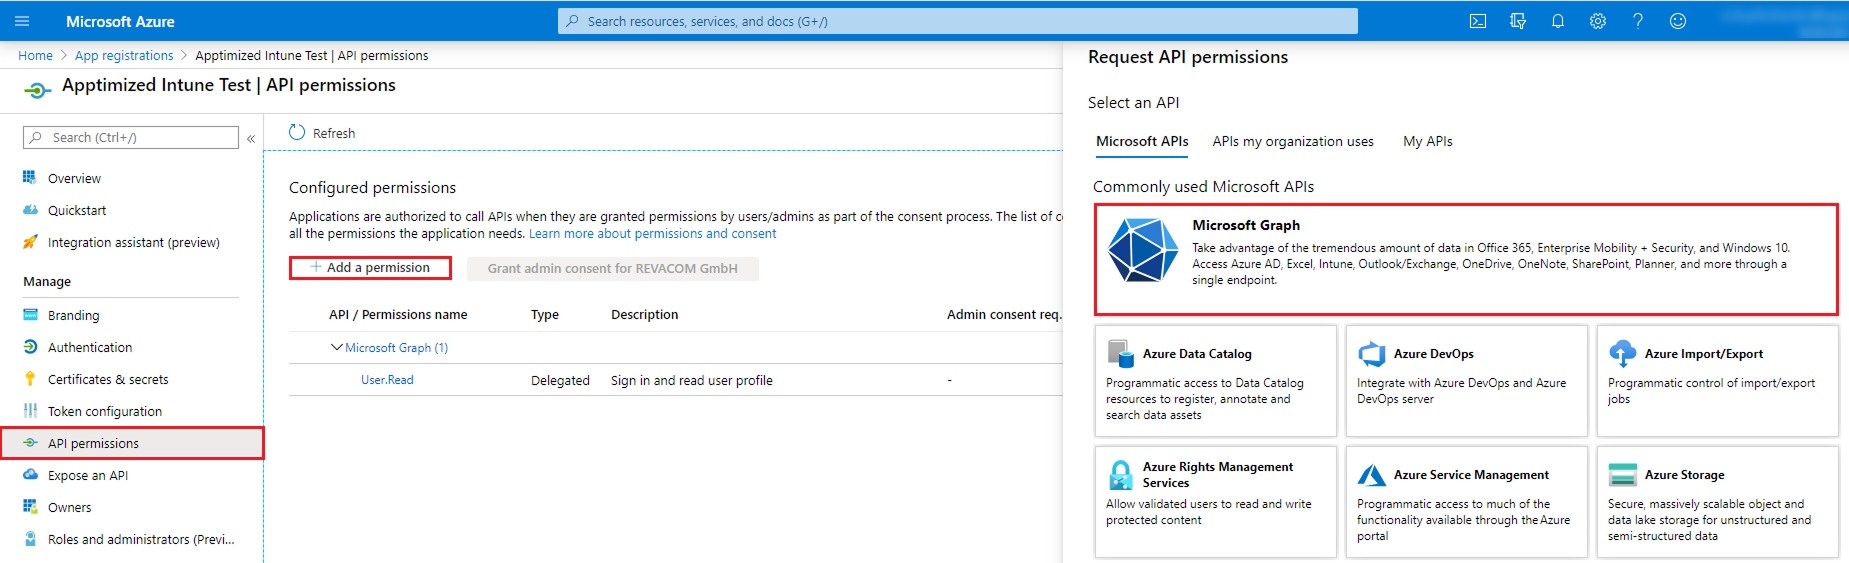](https://docs.apptimized.com/uploads/images/gallery/2025-08/group-4.png) **Microsoft Azure** portal shows the following screen when successful: [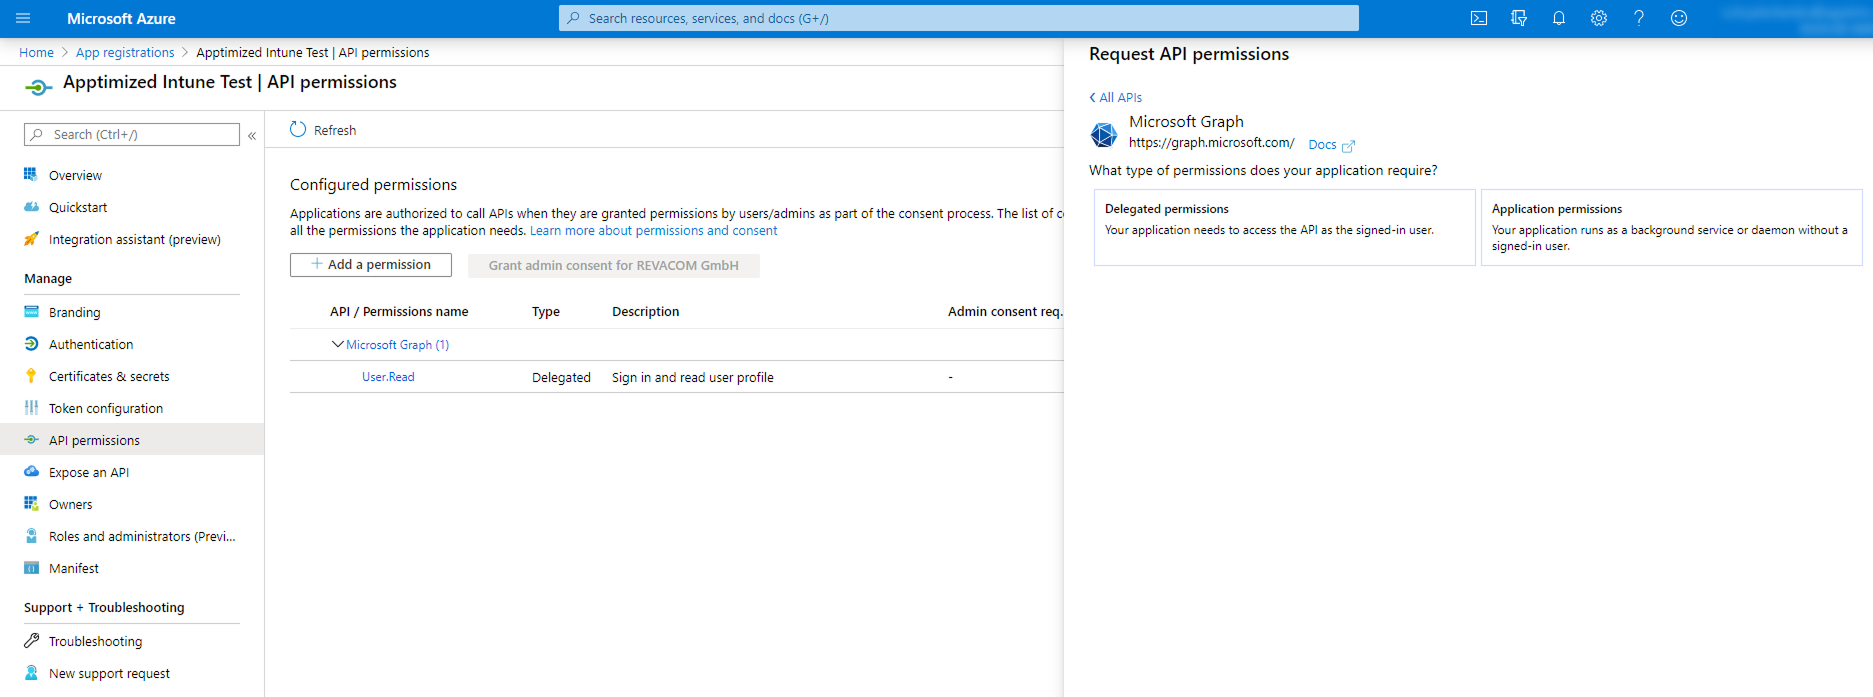](https://docs.apptimized.com/uploads/images/gallery/2025-08/group-5.png) The option to set the types of permissions to the application is available under the **Delegated permissions** button > Select the permissions from the list > **Add permissions** button. The screenshot below shows the list of enabled permissions: [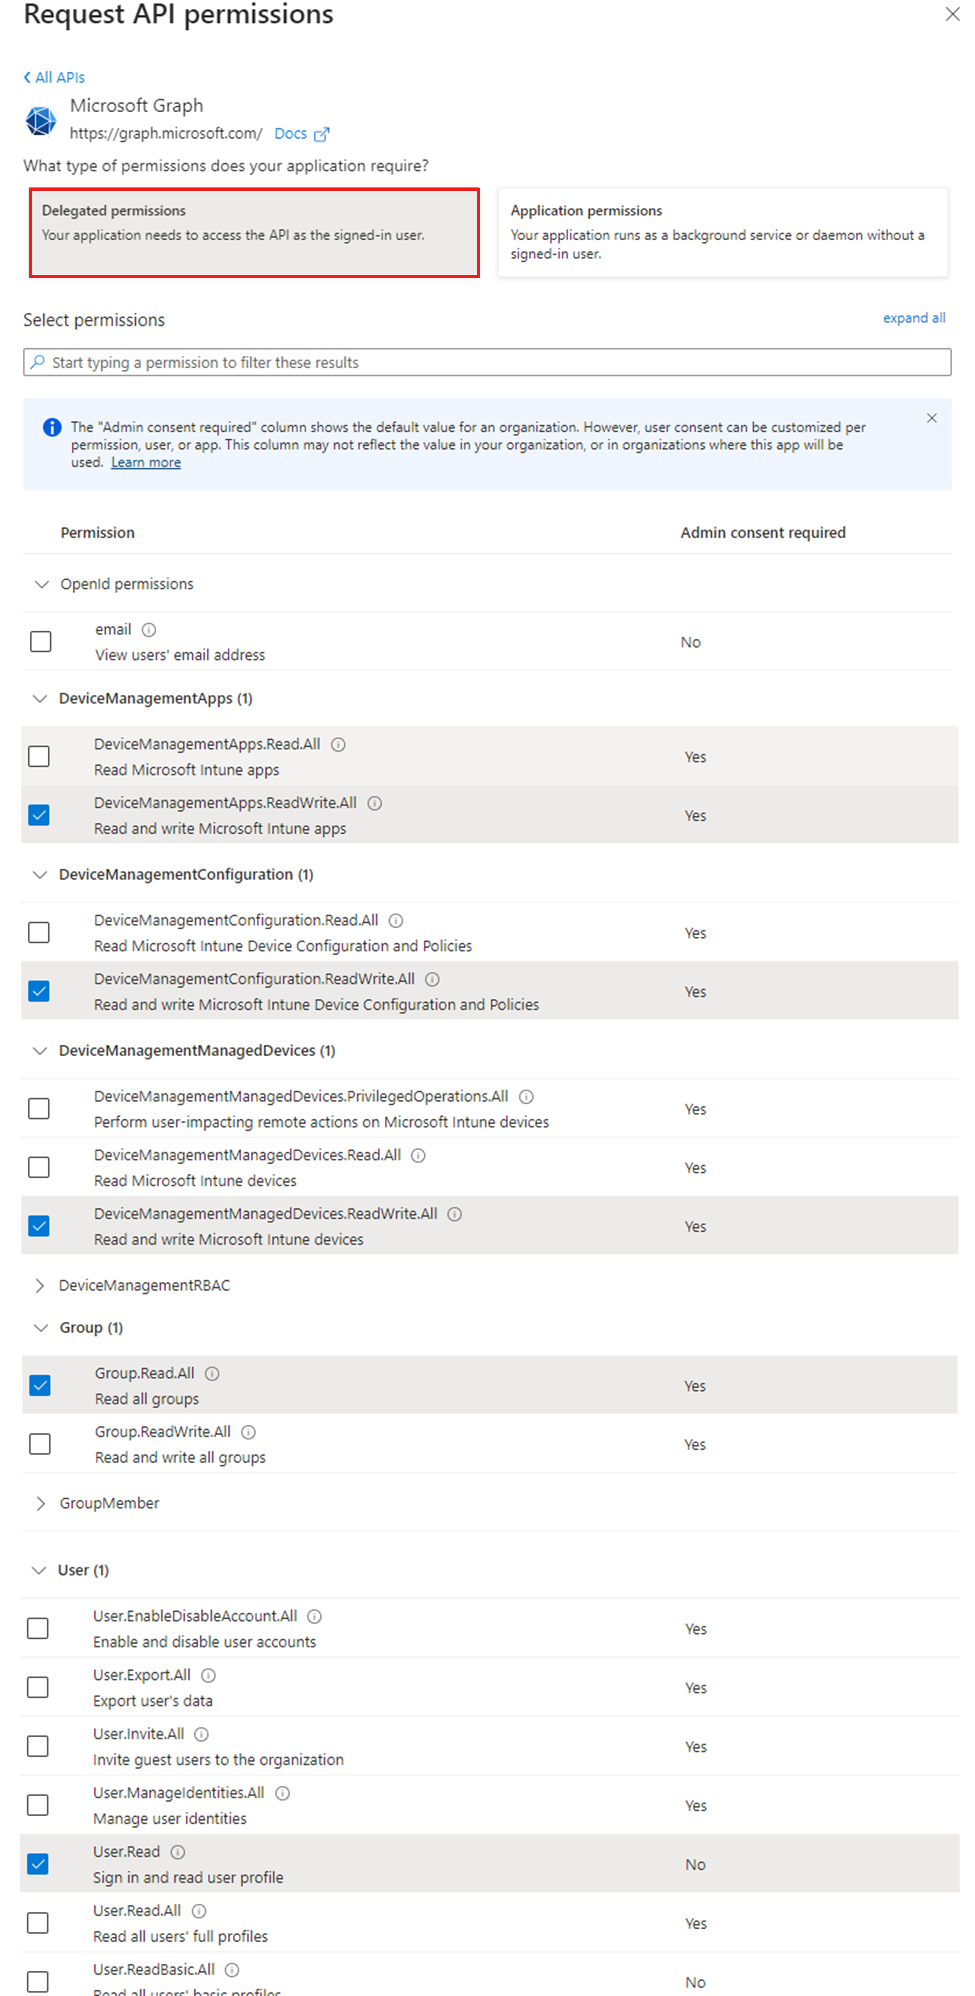](https://docs.apptimized.com/uploads/images/gallery/2024-03/intunepermissions1.png) Some delegated permissions can be consented by non-administrative users, but some higher-privileged permissions require administrator consent. The option to grant permissions is available under the **Grant admin consent for \[company name\]** button. [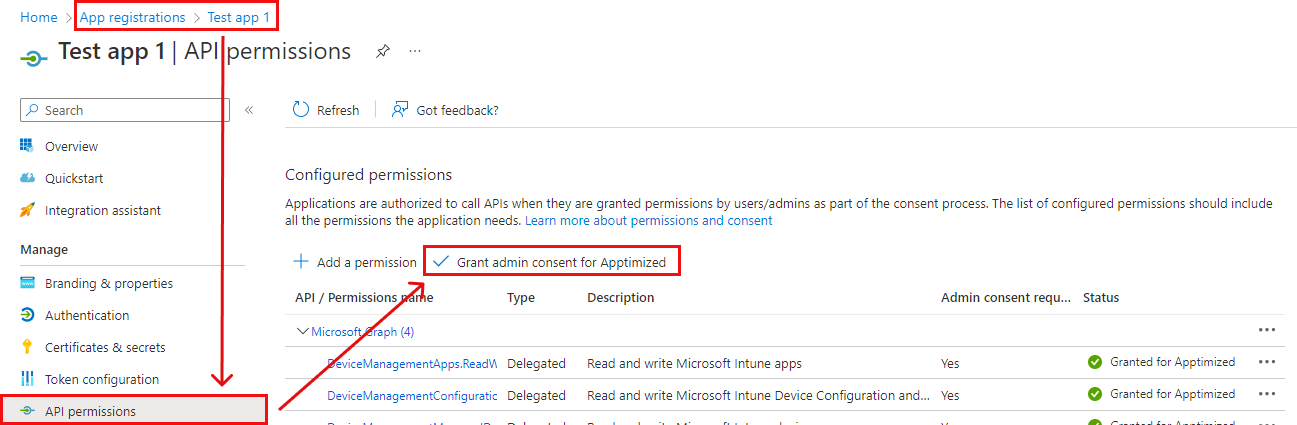](https://docs.apptimized.com/uploads/images/gallery/2022-11/7x9tcR8L6ovBVp9e-Intune_51_1.png)**Note.** If the application runs as a background service or daemon without a signed-in user, the required option is **Application permissions**. The **Applications permissions** are the permissions that are used by applications that run without a signed-in user present. Using Application permissions enables Apptimized users to push packages to Intune without requiring an own Intune access or even an AAD account in the target Azure directory. By configuring the use of application permissions, the API will be authorized to push packages to Intune without requiring an authenticated AAD Intune user with adequate permissions to provide this authorization. [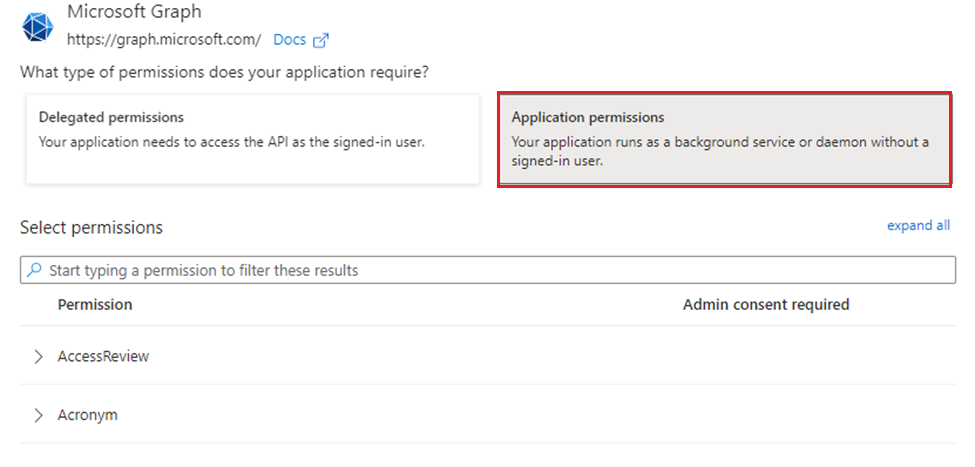](https://docs.apptimized.com/uploads/images/gallery/2024-03/intuneapppermisions.png) The **DeviceManagementApps** permissions in **Applications permissions** are identical to **Delegated permissions** group. [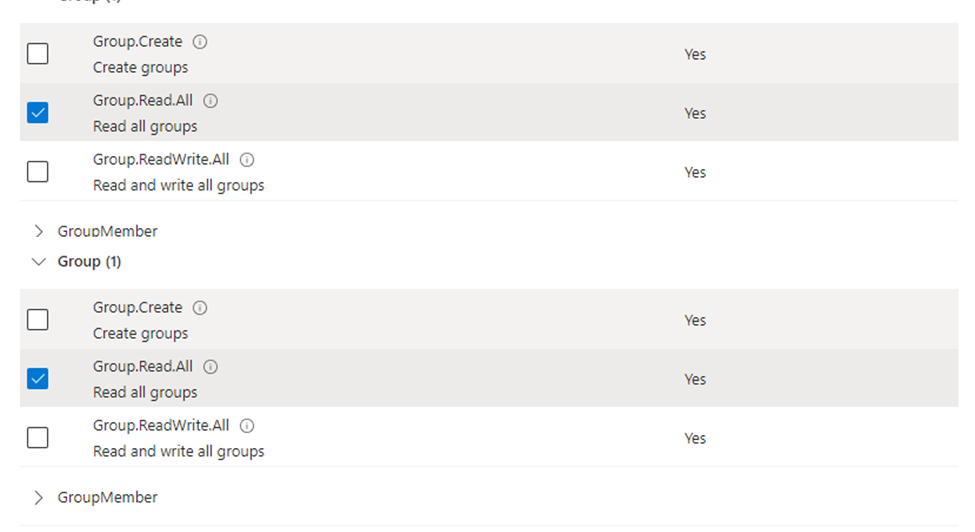](https://docs.apptimized.com/uploads/images/gallery/2024-03/permissionsintune.png)
##### **Assignment template** After connecting Intune environment, "Create assignment template" is available. [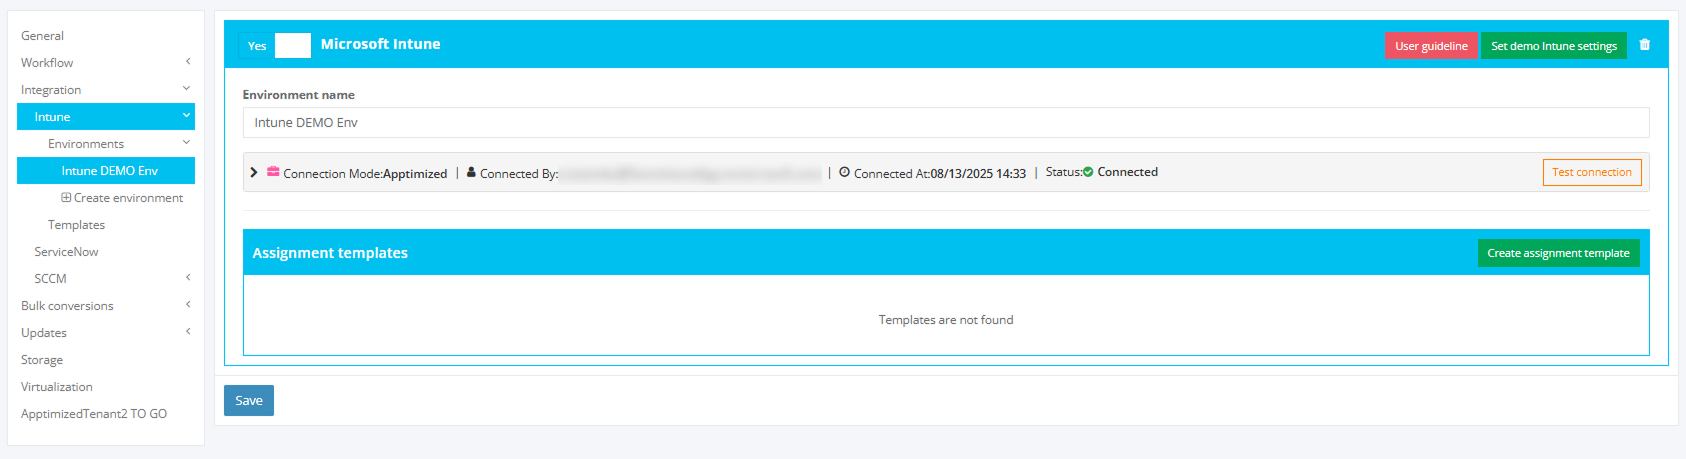](https://docs.apptimized.com/uploads/images/gallery/2025-08/group-7.png) Configurating template window [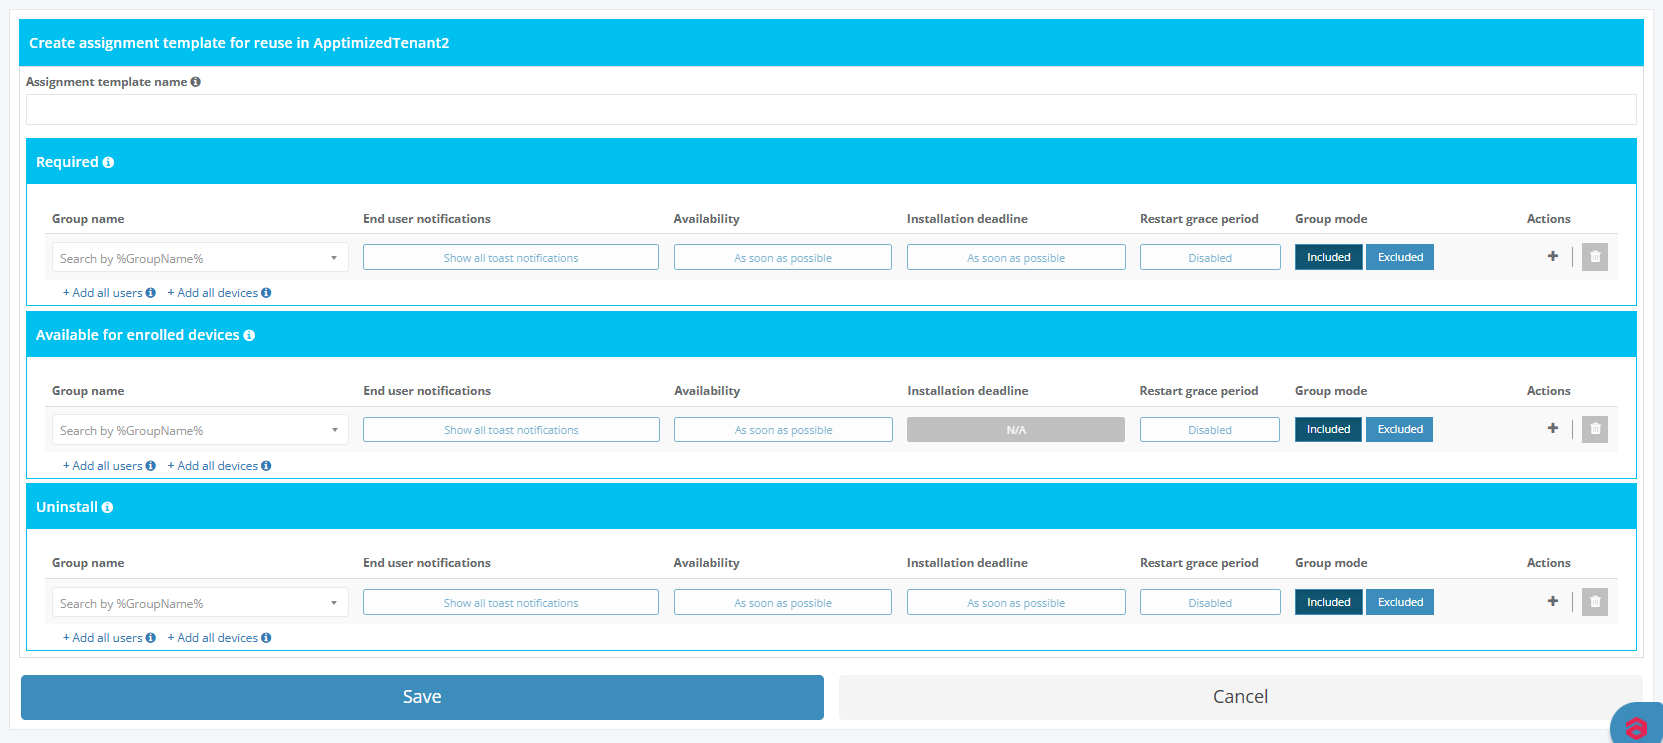](https://docs.apptimized.com/uploads/images/gallery/2025-08/group-7-2.PNG) List with created templates [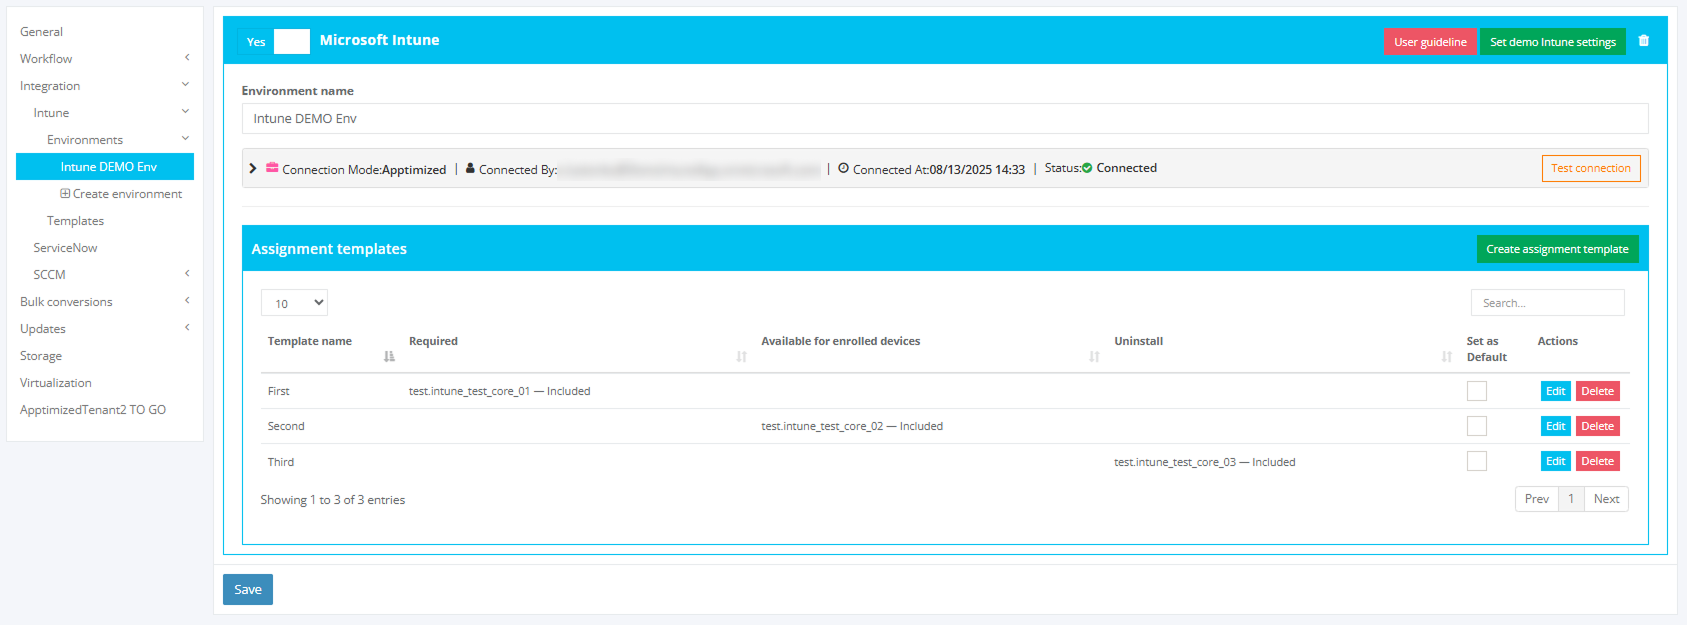](https://docs.apptimized.com/uploads/images/gallery/2025-08/group-6.png) ##### **Intune template** The option to create an Intune package template is available under Settings > Integration > Intune > Templates > Create template button. [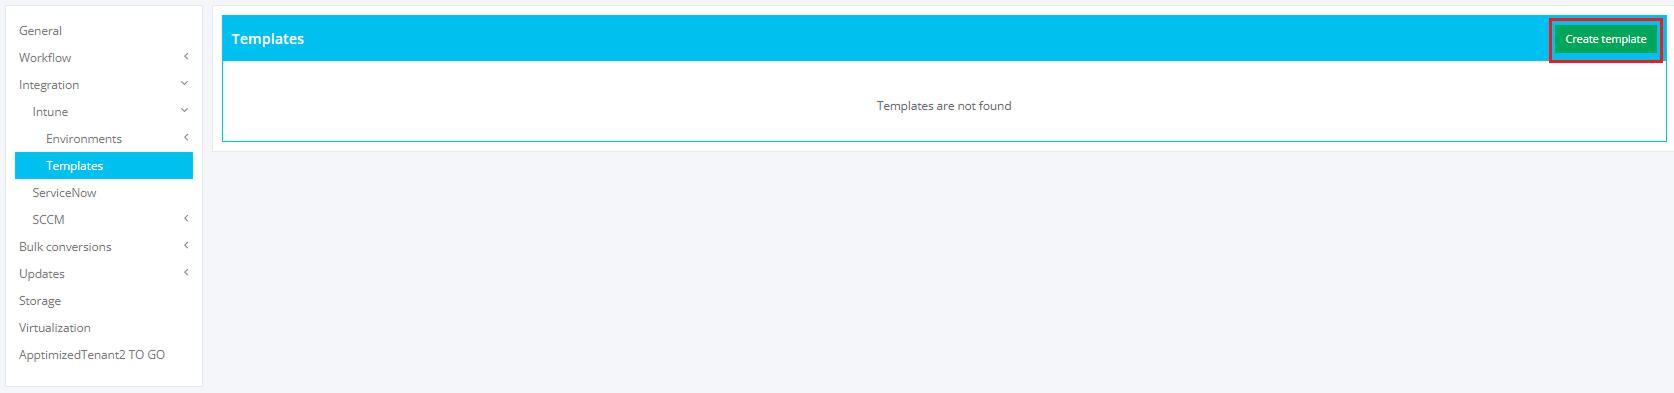](https://docs.apptimized.com/uploads/images/gallery/2026-06/intune-templates-create-template.png) Apptimized shows the template configuration page. [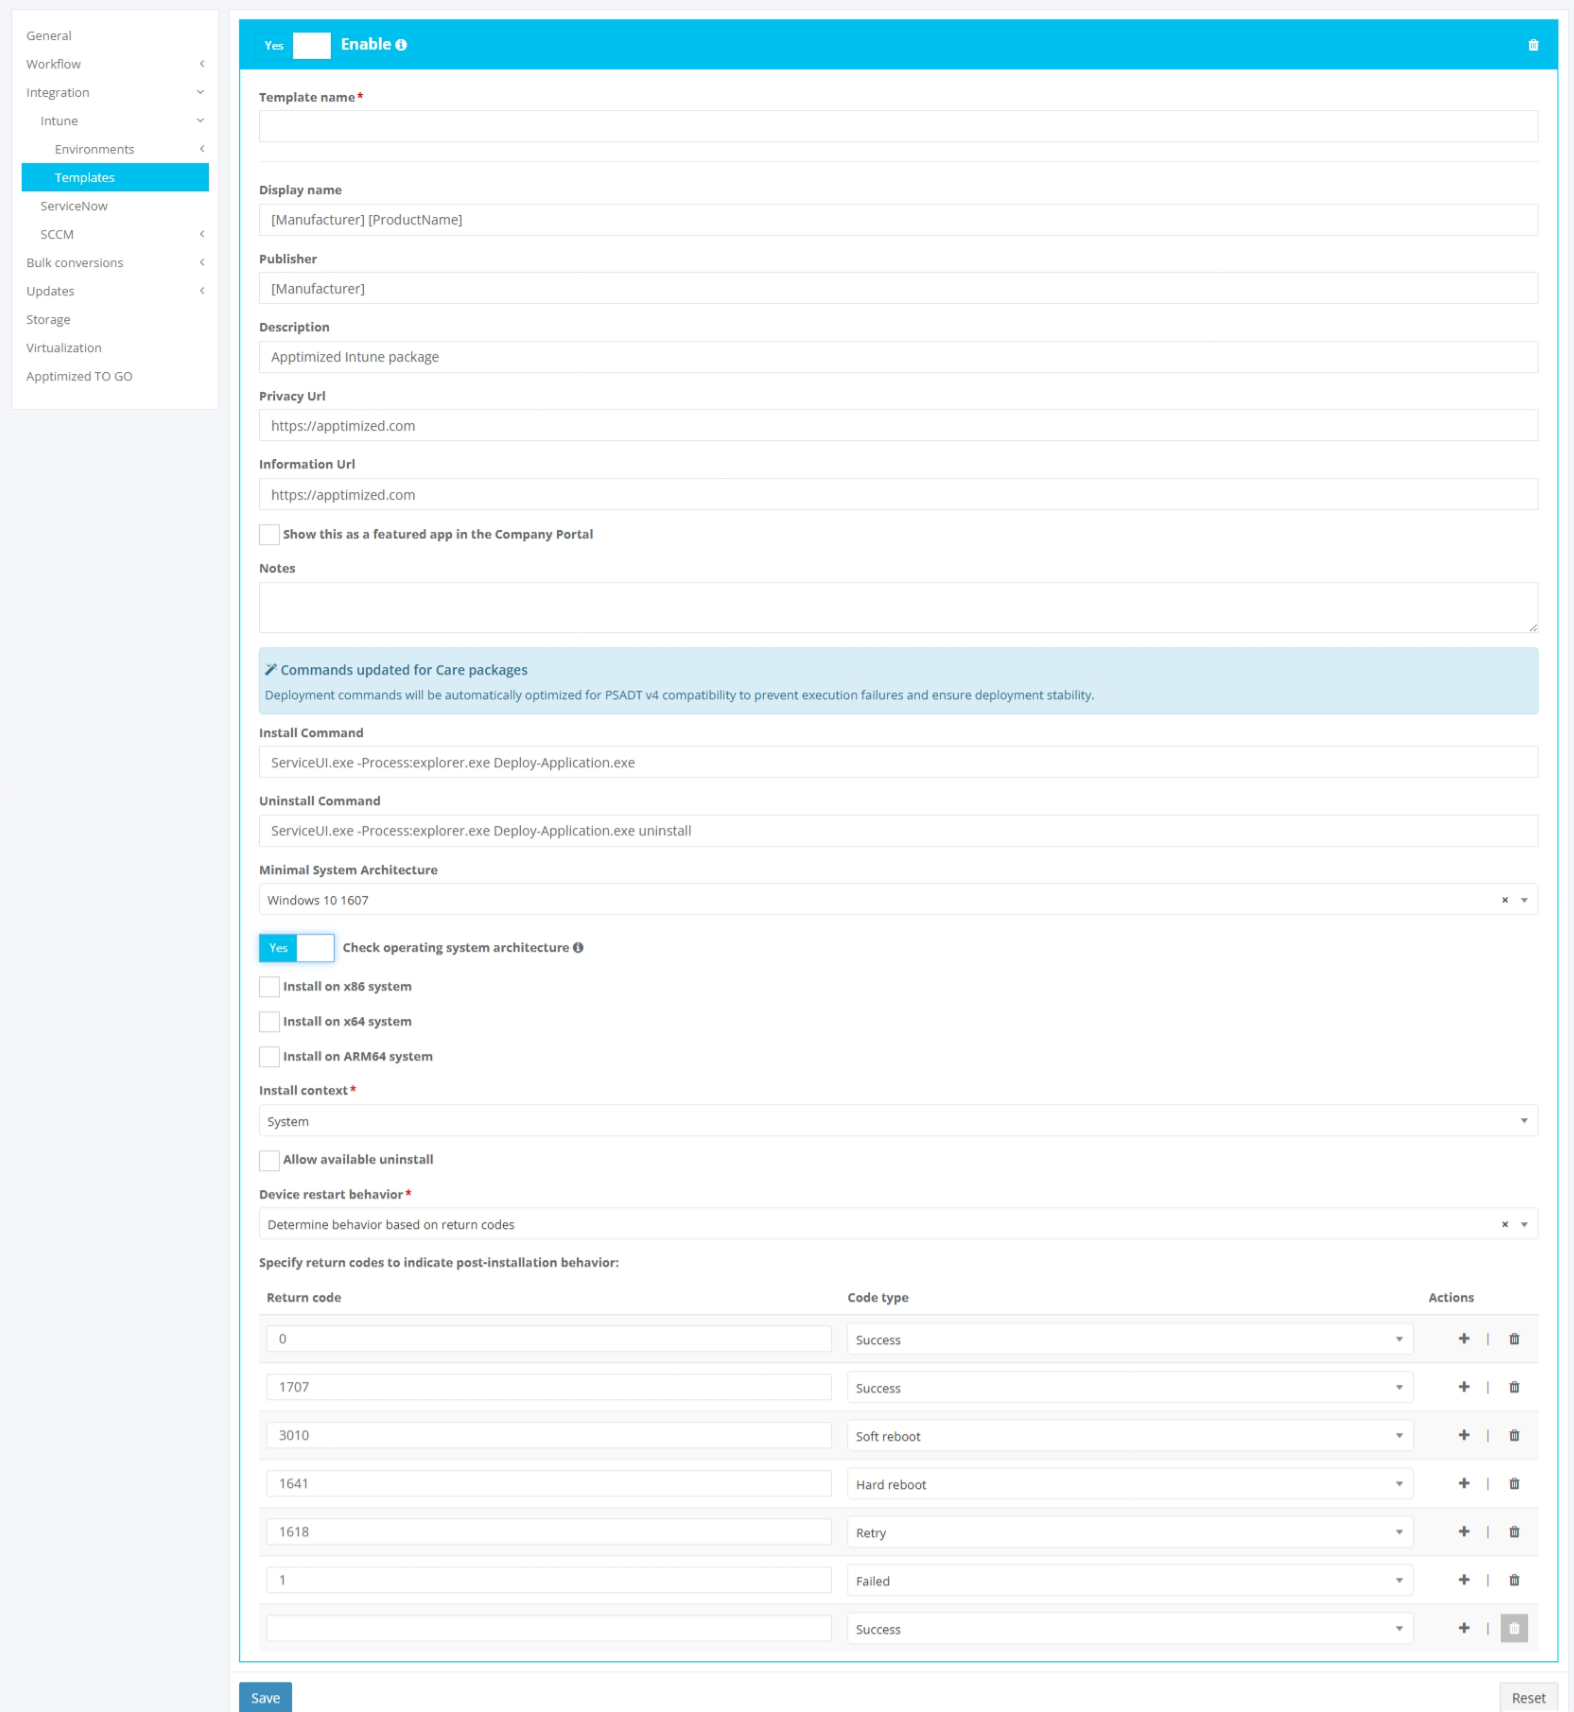](https://docs.apptimized.com/uploads/images/gallery/2026-06/template-configuration-menu.png) Apptimized shows the created template in the templates list when successful. [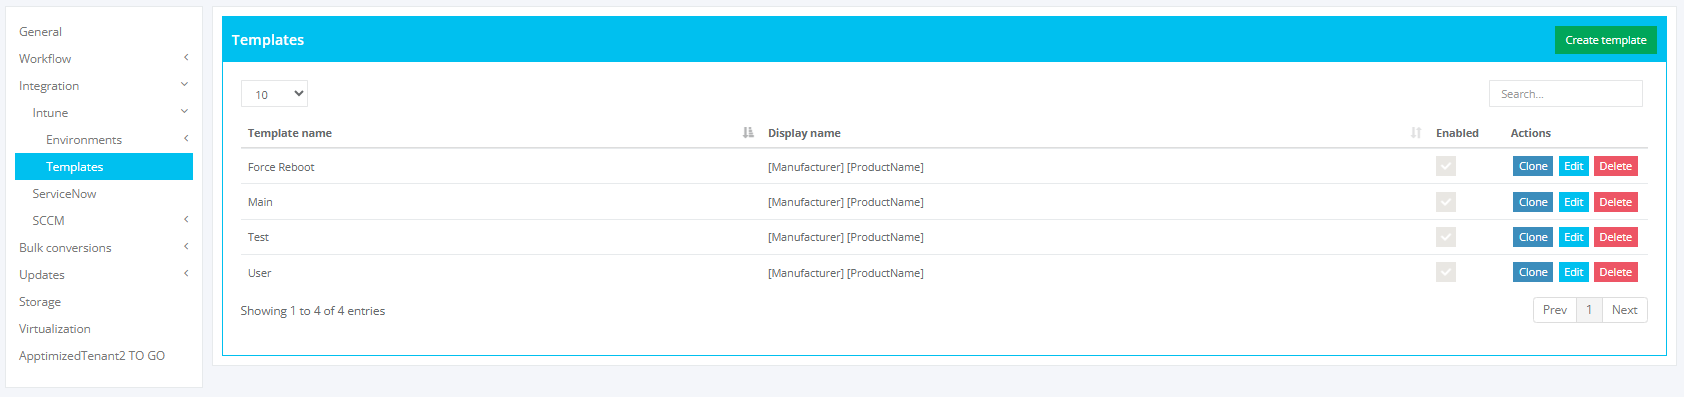](https://docs.apptimized.com/uploads/images/gallery/2025-08/5C8created.PNG) #### **ServiceNow** The option is disabled by default. [](https://docs.apptimized.com/uploads/images/gallery/2020-04/ImU73vSD6dEqZxoo-project_settings_32.png) ServiceNow becomes active when switched on and once the required settings are completed. All required fields are marked with an asterisk \*. [](https://docs.apptimized.com/uploads/images/gallery/2020-04/OpXQT5V5ZY1EiN2G-project_settings_32_1.png) The option to check the connection status with ServiceNow is available under the **Check ServiceNow Connection** button. Apptimized shows the following notification when successful: [](https://docs.apptimized.com/uploads/images/gallery/2020-04/FsWPxLYqrCowobrc-project_settings_36_3.PNG) To synchronize ServiceNow data with Apptimized, a user must map ServiceNow table fields with Apptimized table fields. To add additional fields to the list, click on the **plus** symbol. [](https://docs.apptimized.com/uploads/images/gallery/2020-04/v94o2KinWQlilqxW-project_settings_33.png) An additional field can be excluded from the list by clicking on the **bin** symbol. [](https://docs.apptimized.com/uploads/images/gallery/2020-04/sHY8GjpWWKuV6IyR-project_settings_34.png) The **Original column names** fields fill in with the ServiceNow system name of this value (i.e., **u\_app\_id**). [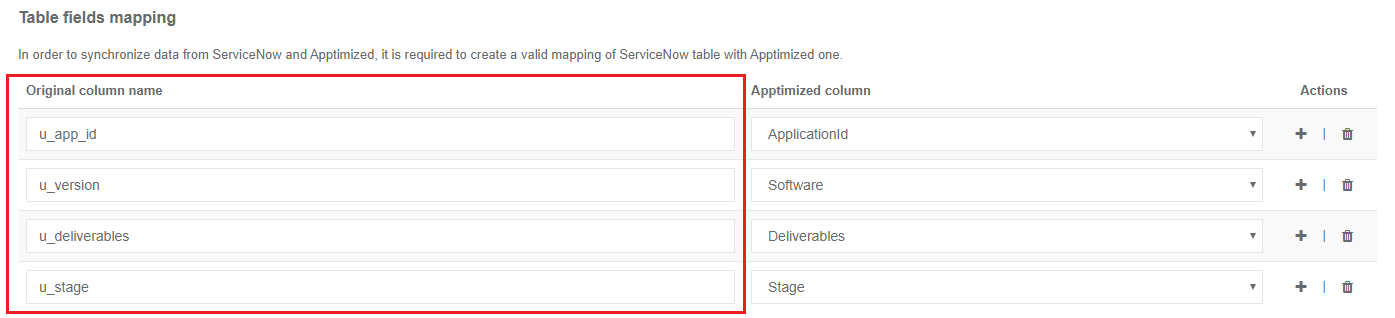](https://docs.apptimized.com/uploads/images/gallery/2020-04/SKK7AxXXscSZdKMw-project_settings_35.png) Settings are persisted on click to the **Save** button. [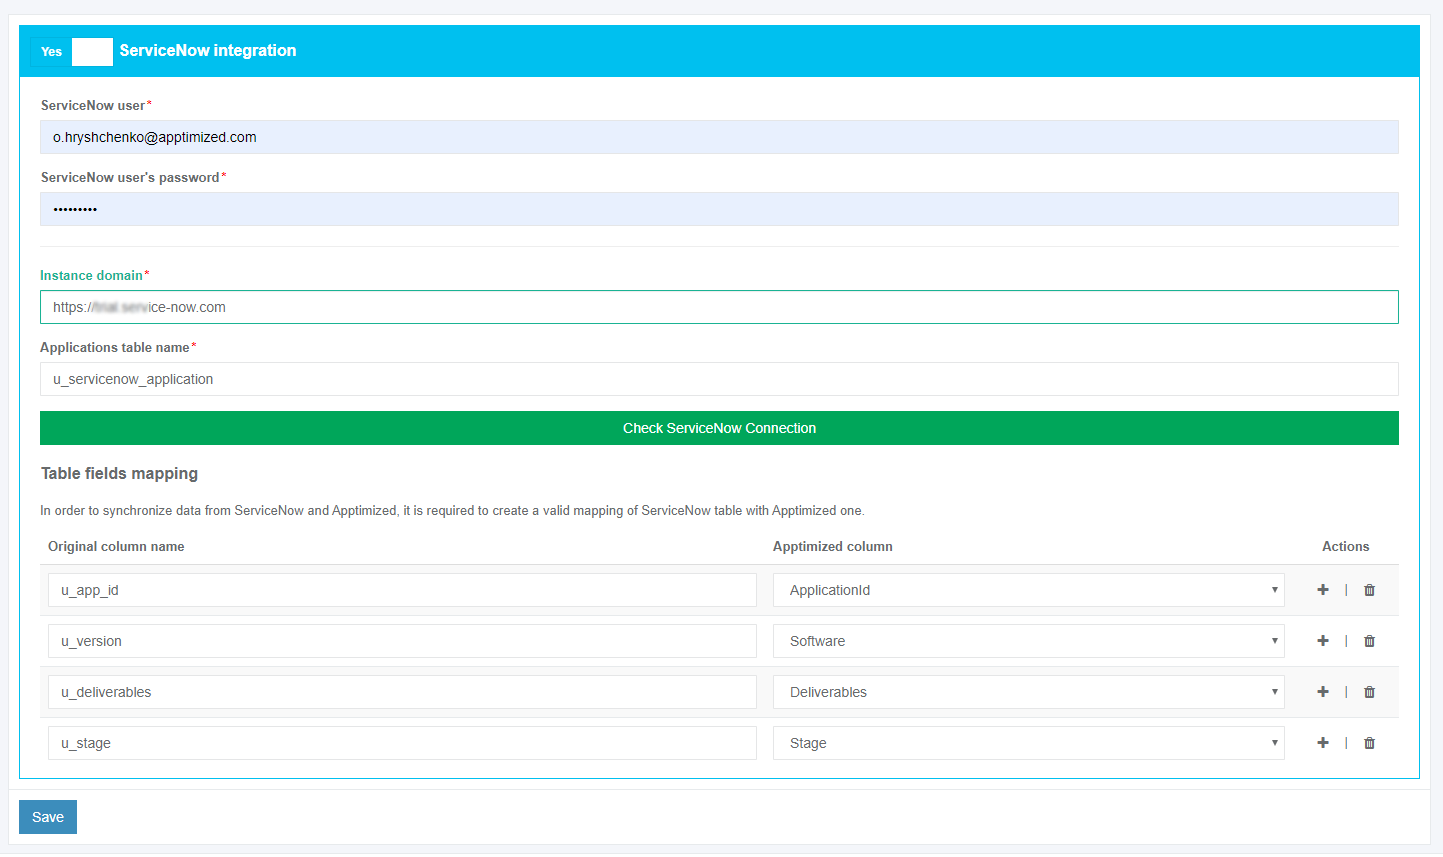](https://docs.apptimized.com/uploads/images/gallery/2020-04/FCegReySfDWA0ksi-project_settings_36.png) Apptimized shows the following notifications when successful: [](https://docs.apptimized.com/uploads/images/gallery/2020-04/OGBYJOtpX49Nb70o-project_settings_36_2.PNG) [](https://docs.apptimized.com/uploads/images/gallery/2020-04/eG94BfVqCSBN2Xcr-project_settings_36_1.png) #### **SCCM** The option is disabled by default. [](https://docs.apptimized.com/uploads/images/gallery/2021-02/9a5UZp7bJ0ZKDzz3-image-1612445003086.png) SCCM option becomes active when switched on and once the required settings are completed. ##### General settings The one-time configuration is available for project administrators under **Settings** in the project menu > **Integration** section > **SCCM** > **General**. [](https://docs.apptimized.com/uploads/images/gallery/2024-11/sccm1m.png) SCCM Connector becomes active when switched on and once the required settings are completed. [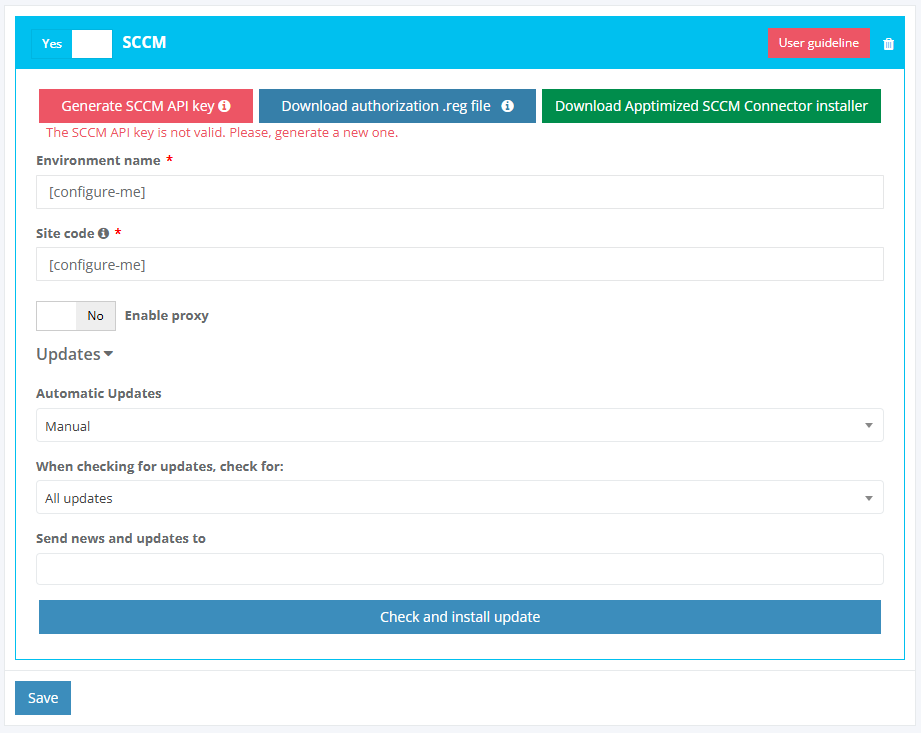](https://docs.apptimized.com/uploads/images/gallery/2024-11/sccm2.png) ##### SCCM Connector Initial Configuration A user must follow the next steps to complete the initial configuration of the SCCM Connector: **1. Setting Environment Details** - **Environment Name**: Enter a unique name to identify this SCCM environment. - **Site Code**: Specify the SCCM site code for the environment. **2. Configuring Proxy Settings (if required)** - **Using Default Windows Proxy Server**: Select **Yes** to use the default Windows proxy server. If **No** is selected, a **Proxy Address** field will appear, where you can manually enter the address of your proxy server. - **Using Default Windows Credentials**: Select **Yes** to use default Windows credentials for authentication. If **No** is selected, **Username** and **Password** fields will appear, which must be populated with the credentials for proxy access. **3. Updating Settings** - **Installation Type: Automatic **(updates will install automatically when available) or **Manual** (updates require manual installation). - **Update Types**: **All Updates** (the connector will check for all available updates) or **Critical Only** (only critical updates will be checked and applied). **4. Sending News and Updates To** - **Notification Recipient: **Select a user from your project team who will receive email notifications for connector updates and API key expiration reminders. [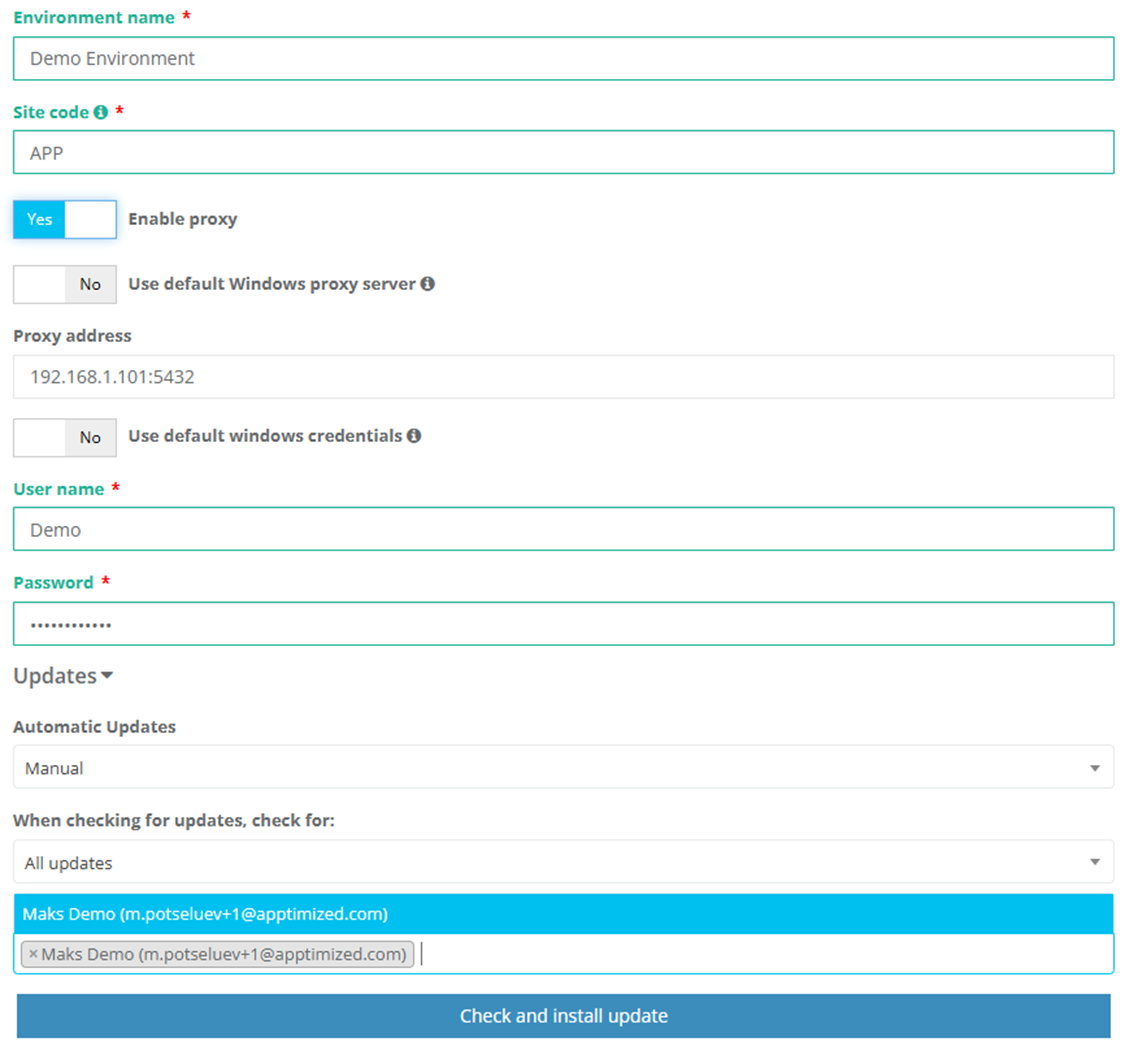](https://docs.apptimized.com/uploads/images/gallery/2024-11/image-155.png) Table 18. General Settings| **Settings** | **Details** |
| Environment name | A unique name to identify this environment at Apptimized Portal. |
| Site code | Site codes and site names identify sites in a Configuration Manager hierarchy. Configuration Manager Setup prompts for a site code and site name for the central administration site, and secondary site installation. [Learn more.](https://learn.microsoft.com/en-us/mem/configmgr/core/servers/deploy/install/prepare-to-install-sites) |
| Automatic updates | Indicates how a user would like Apptimized SCCM Connector application updates to be applied. The following types are: - **Automatic**: updates will install automatically when available. - **Manual**: updates require manual installation from Apptimized portal or directly on a target machine. |
| When checking for updates, check for | Selecting the types for updates to check for. The following types are: - **All updates:** the connector will check for all available updates and automatically install them if **Automatic updates** are enabled. - **Critical only:** only critical updates will be checked and applied. Minor updates will be ignored for automatic installation. |
| Send news and updates to | Allows selecting a user from a project team who will receive email notifications for new connector update releases API key expiration reminders. |
**Note.** SCCM connector can’t use Windows default proxy settings. A user enters manually the proxy settings (which are configured on a machine) into the Apptimized portal.
#### Generating SCCM API Key and Installing Apptimized SCCM Connector ##### Generating SCCM API Key A user should go to the **General** section in the portal and select **Generate SCCM API Key**. A modal window titled **Generate a New SCCM API Key** will appear. [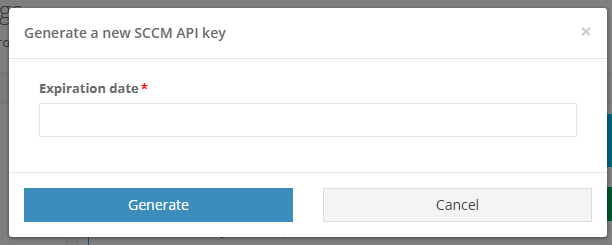](https://docs.apptimized.com/uploads/images/gallery/2024-12/modalwinowsccm.png) The user has to set the **Expiration date** using the calendar to specify how long the connector will be authorized to operate with this key. The user clicks **Generate** to create the API key. This key will be automatically applied to the connector installer. [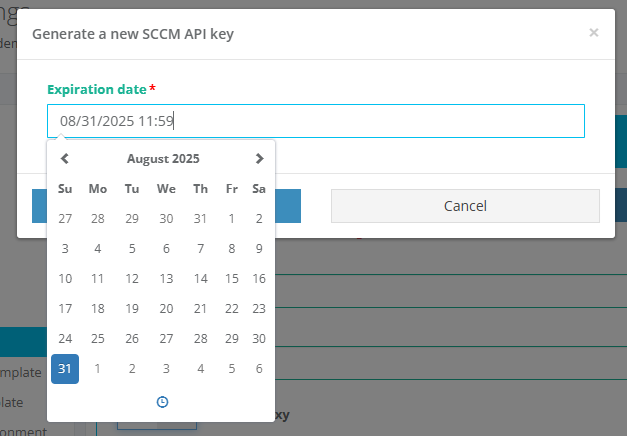](https://docs.apptimized.com/uploads/images/gallery/2024-12/newkeysccm.png) The modal can now be closed by clicking **Cancel**, or a .reg file containing the key can be downloaded to apply it to an existing SCCM Connector installation. [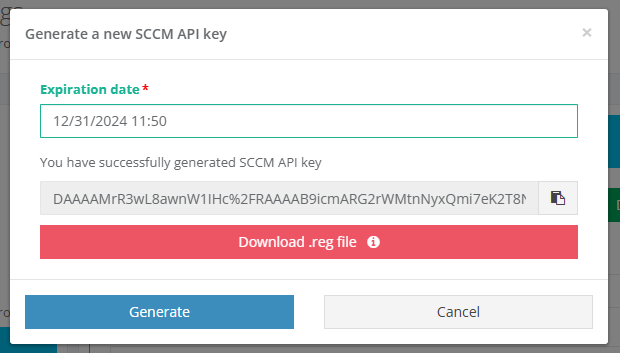](https://docs.apptimized.com/uploads/images/gallery/2024-12/downloadocancelsccm.png) When the key is generated successfully, the expiration date appears below the **Generate SCCM API Key** button. Additionally, a green key icon displays in the **SCCM Connector Status** bar, confirming the key is active. [](https://docs.apptimized.com/uploads/images/gallery/2024-12/generatedsccm.png) [](https://docs.apptimized.com/uploads/images/gallery/2024-12/greenkeybutton.png) ##### API Key Expiration Status Indicators To ensure seamless operation, the system provides visual indicators for the status of your API key. These indicators help you track the expiration of your API key and take timely action. The **Save** button can now be pressed to proceed with the **Connector installation**, or the Application or **Package template configuration** can be accessed. **Green Status**: [](https://docs.apptimized.com/uploads/images/gallery/2024-12/green-status.png) - The API key is active and valid. - No action is required. **Yellow Status**: [](https://docs.apptimized.com/uploads/images/gallery/2024-12/yellow-status.png) - The API key is nearing expiration, with 7 days or fewer remaining. - A notification email will be sent to the registered email address, alerting user to renew the key. **Red Status**: [](https://docs.apptimized.com/uploads/images/gallery/2024-12/red-status.png) - The API key has expired. - The system will cease to function with the expired key, and an additional email notification will be sent to inform user about the expiration. ##### API Key Expiration Display **[](https://docs.apptimized.com/uploads/images/gallery/2024-12/apikey-expiration-display.png)** To provide users with clear visibility into the validity of their API key, the expiration date and time are displayed directly under the **Generate SCCM API Key** button. **Email Notifications for API Key Expiration** To help users manage API key validity, the system automatically sends email notifications at critical points: 1. **One Week Before Expiration**: - An email will be sent when the API key enters the yellow status (7 days before expiration). - The email will include the expiration date and instructions for renewing the key. 3. **Upon Expiration**: - An email will be sent immediately after the API key enters the red status (expired). - The email will inform user the key is no longer valid and provide a link or instructions for generating a new key. #### Downloading and Installing Apptimized SCCM Connector A user downloads Apptimized **SCCM Connector installer** from the **portal**. [](https://docs.apptimized.com/uploads/images/gallery/2024-12/downloadsccmconnectorinstaller.png) The user runs the installer on a machine with an access to his SCCM environment.**Note**. The user has to ensure this machine has network permissions and connectivity to SCCM for seamless operation.
During installation, the connector will automatically apply the generated API key, or the user can use the **.reg file** to manually update an existing installation. ##### SCCM Connector Application Installation To install the **SCCM Connector application**, a user follows the next steps: **Downloading the exact installation files** - Downloading the **ZIP archive** containing the SCCM Connector installation files from the portal.[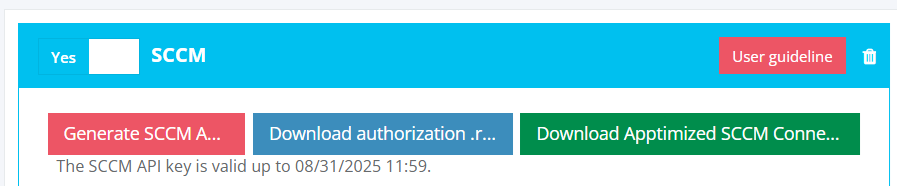](https://docs.apptimized.com/uploads/images/gallery/2024-12/ziparchive.png) - Extracting the contents of the archive to a location on a machine with access to the **Configuration Manager** console. [](https://docs.apptimized.com/uploads/images/gallery/2024-12/configmanagerc.png) **Running the Setup Wizard** - Locating the install.cmd file within the extracted folder. - Right-clicking on install.cmd and select **Run as Administrator** to open the SCCM Connector Setup Wizard with the required administrative privileges. - Clicking **Next** to proceed in the **Setup Wizard**. [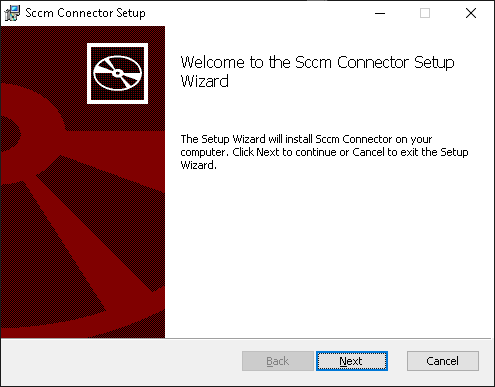](https://docs.apptimized.com/uploads/images/gallery/2024-12/setupwizard.png) **Selecting the Installation Type** A user chooses one of the following installation options based on his requirements: [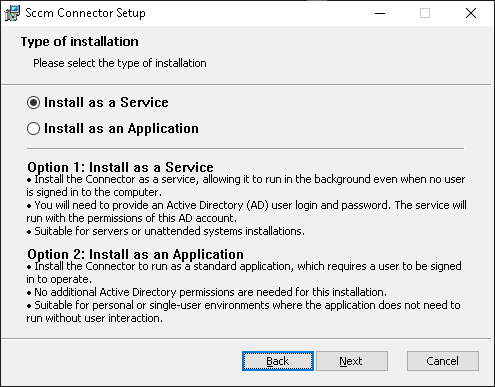](https://docs.apptimized.com/uploads/images/gallery/2024-12/picture9sccm.png) **If selecting Install as a Service:** - The connector will be installed as a Windows service, allowing it running in the background even in case no user is signed in. - On the next screen the user enters an **Active Directory Account Name** and **Password**. These credentials are needed to run and install the service. - The user has to ensure the account has the necessary permissions to communicate with the SCCM server. [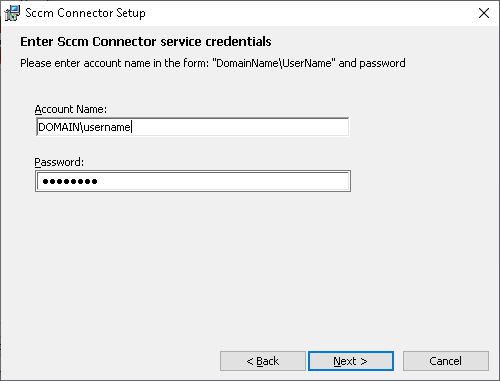](https://docs.apptimized.com/uploads/images/gallery/2024-12/credentialssccm.png) **If selecting Install as an Application:** - The connector will be installed as a standard, which requires the user to be signed in to operate. - No additional Active Directory permissions are required, and the user can proceed directly to the installation. [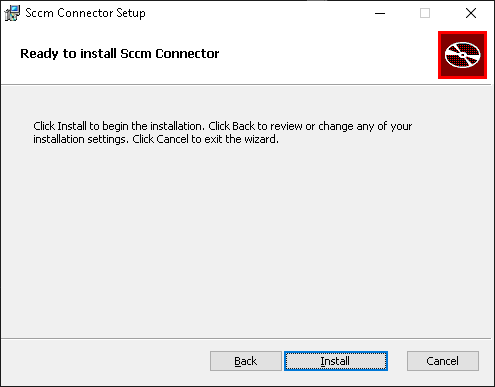](https://docs.apptimized.com/uploads/images/gallery/2024-12/installingsccm.png) Table 19. Types of Installation| **Installing as a Service** | **Installing as an Application** | |
| **Description** | Installs the SCCM Connector as a Windows service, allowing it to run in the background, even without a signed-in user. | Installs the SCCM Connector as a standard application, which requires a signed-in user to operate. |
| **Requirements** | Requires an Active Directory (AD) user login and password, as the service will use this account’s permissions. | No additional Active Directory permissions needed. |
| **Benefits** | Ideal for continuous operation, such as on servers or unattended systems where minimal user interaction is desired. | Suitable for personal or single-user environments where continuous background operation is unnecessary. |
**Note**. A user has to ensure that the AD account’s password doesn’t expire (if your policy allows) or consider a service account to prevent service interruptions.
##### Verifying Service Runs Under the Correct User After SCCM Connector Installation After installing the SCCM Connector as a service, a user should confirm the service is running under the newly created Active Directory (AD) user by following these steps: **Step 1: Verifying the SCCM Connector Service in Services** 1. **Opening the Services Management Console**: - On the server where the SCCM Connector was installed, the user presses **Windows + R**, typing services.msc, and pressing **Enter**. 2. **Locating the SCCM Connector Service**: - Finding the service named **Apptimized SCCM Connector** (or a similar name depending on the installation). [](https://docs.apptimized.com/uploads/images/gallery/2024-12/sccmconnectorproperties3.png) 3. **Checking the Log On Account** - Right-clicking on the **Apptimized SCCM Connector** service and selecting **Properties**. - Going to the **Log On** tab. - Ensuring **This account** is selected and that the **Account Name** and **Password** correspond to the newly created AD user (e.g., sccm\_connector\_user). - If the details do not match, updating the account information and click **OK**. [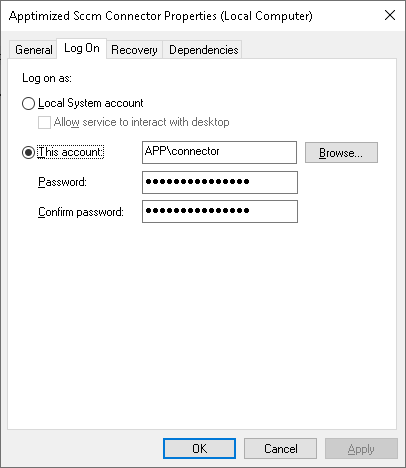](https://docs.apptimized.com/uploads/images/gallery/2024-12/checkinglogonacc.png) **Step 2: Confirming Service is Running Under the Correct User** 1. **Verifying the Service is Running**: - In the **Services** window, checking the **Status** column to ensure the **Apptimized SCCM Connector** service is listed as **Running**. 3. **Checking Event Viewer for Errors**: - Pressing **Windows + R**, type eventvwr.msc, and pressing **Enter** to open the **Event Viewer**. - Navigating to **Windows Logs** > **Application**. - Looking for events related to the **Apptimized SCCM Connector** service. Specifically, looking for **error messages** or **warnings** that might indicate issues with permissions or the service account. 5. **Testing SCCM Connectivity**: - Opening the **SCCM Environment Settings** at Apptimized portal and verifying the connector can communicate with the SCCM server (e.g., Connector status in Sccm Connector Status Bar should be **Connected**). [](https://docs.apptimized.com/uploads/images/gallery/2024-12/accountconnectedsccm.png) - If the connector fails to perform actions, confirming that the user account has the necessary SCCM permissions and the **Log On as a Service** rights are correctly applied. **Step 3: Troubleshooting Common Issues** **If the service doesn't start:** - Double-checking the AD user has the **Log on as a service** permission. - Ensuring the password for the user account is correct and not expired. - Checking the permissions on the **SCCM Connector** folder and files to ensure the service account has appropriate access. **If the service starts, but it doesn't communicate with SCCM:** - Confirming the user account is a member of the correct **SCCM administrative group** (e.g., **SCCM Admins** or **Application Administrator**). - Ensuring the user has the correct permissions to access the necessary **SCCM collections**. ### Application Template This section allows you to configure key settings for application deployment in SCCM. Define display and localized names, add administrative comments, organize applications in SCCM folders, and set options for task sequence auto-installation and distribution management during SCCM push. They will be used as default values for push to SCCM. The option to configure SCCM application template is available under **Project settings** > **Integration >** choose **SCCM Environment** > **Application template.** [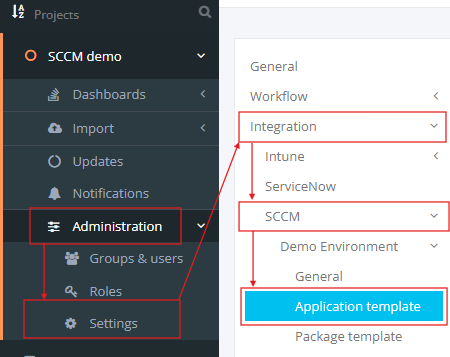](https://docs.apptimized.com/uploads/images/gallery/2024-12/apptemplate1.png) Apptimized shows the following screen when successful: [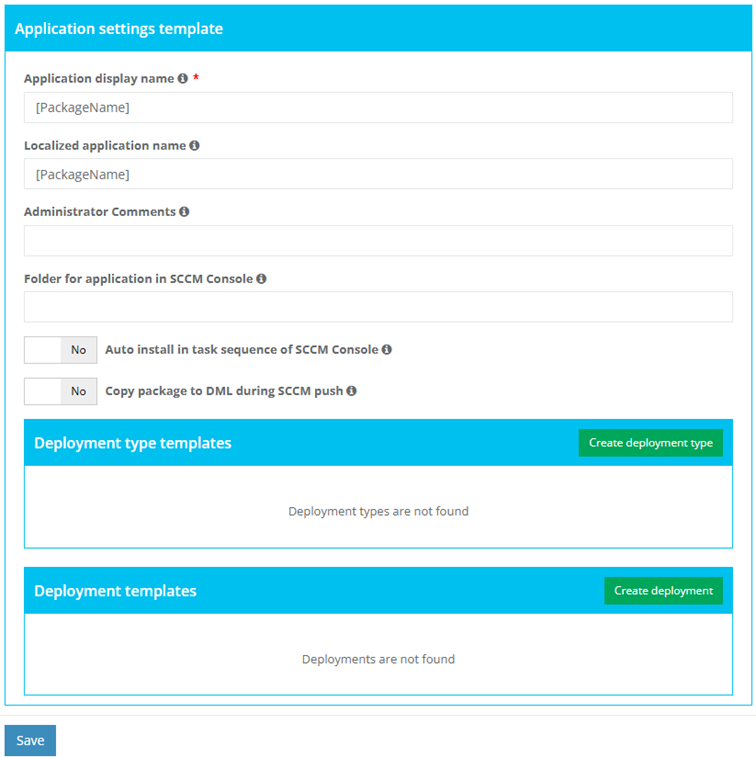](https://docs.apptimized.com/uploads/images/gallery/2024-12/apptemplate2.png) ##### Application Settings Template [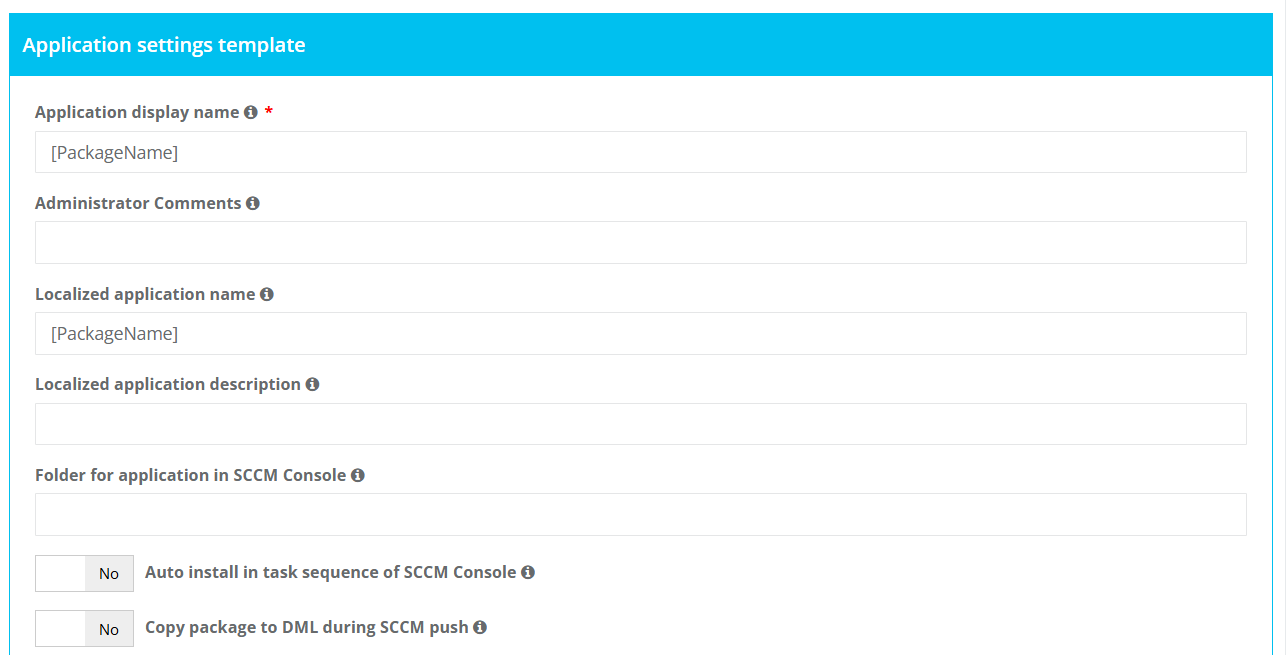](https://docs.apptimized.com/uploads/images/gallery/2026-05/application-settings-template.png) Table 1. Application template settings| **Setting** | **Description** |
| **Application Display Name** **(Required)** | The main name displayed for the application in the SCCM Console. This should be descriptive and easily identifiable for administrators. The default value is: **\[PackageName\]** for Workspace can be configured in Settings > Workspace > General > Packaging — Self Service settings > Package name. Dynamic variables in fields are allowed. |
| **Administrator Comments** | Notes or comments for administrators to document details about the application (e.g., purpose, version information). Dynamic variables in fields are allowed |
| **Localized Application Name** | The name shown for the application in localized language settings, if applicable. Useful for multi-language environments. The default value is: **\[PackageName\]** for Workspace can be configured in Settings > Workspace > General > Packaging — Self Service settings > Package name. Dynamic variables in fields are allowed. |
| **Localized Application Description** | The description shown for the application in Software Center localized language settings, if applicable. Useful for standardized application descriptions. The default value is empty. Dynamic variables in fields are allowed. |
| **Folder for Application in SCCM Console** | Specifies the folder location within the SCCM Console where this application will be organized. Helps with managing and locating applications efficiently. Example: - Dummy\\Folder; - Dummy. **Note.** The package will be created under the root if the value is empty. |
| **Auto Install in Task Sequence** | A Yes/No switch that determines whether the application is automatically included in SCCM task sequences for deployment. |
| **Copy Package to DML During SCCM Push** | A Yes/No switch that controls whether the application package is copied to the **Distribution Management Library (DML)** during the SCCM push process. |
| **Сategory ** | **Description ** |
| Template name | The field indicates the template name to help a user to identify templates in Apptimized portal. |
| Name | This field indicates the name of a deployment type. |
| Technology title | This field indicates the type of template installation. |
| Source folder | This field indicates the path to the location of the package source. |
| Path to executable | This field indicates the path to the location of the package source executable file. |
| **Settings** | **Description** | **Availability of settings depending on the Installer type** | |||
| MSI | Script Installer | AppV | |||
| Microsoft Application Virtualization 4 | Microsoft Application Virtualization 5 | ||||
| Deployment type template name | The field indicates the template name to help a user to identify templates in Apptimized portal. The default value is **Deployment type template name \[number\]**. This field is required. | + | + | + | + |
| Deployment type name | This field indicates the name of a deployment type. It is implemented during SCCM application deployment process and is sent to SCCM server. A user can set the **Deployment type name** manually or use the following dynamic variables: [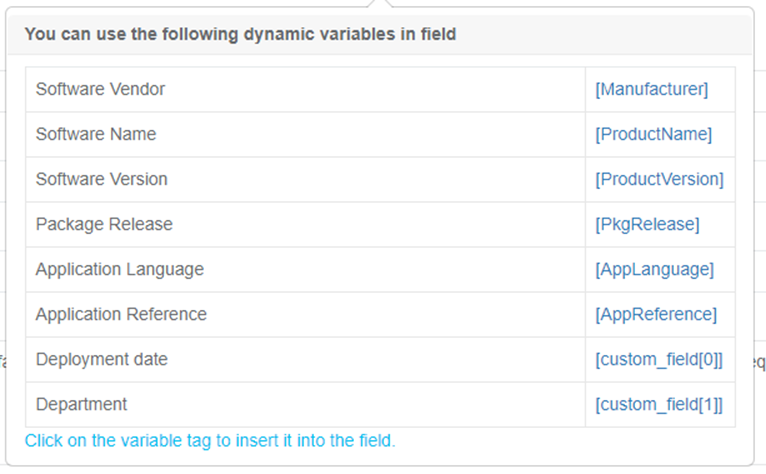](https://docs.apptimized.com/uploads/images/gallery/2024-12/deploymenttypename.png) This field is required. | + | + | + | + |
| Path to the source | This field indicates the path to the location of the package source. SCCM deployment template automatically generated this field. This field is required. | + | + | + | + |
| Path to the executable | This field indicates the path to the location of the package source executable file. A user can set the **Path to the executable** manually or use the following dynamic variables: [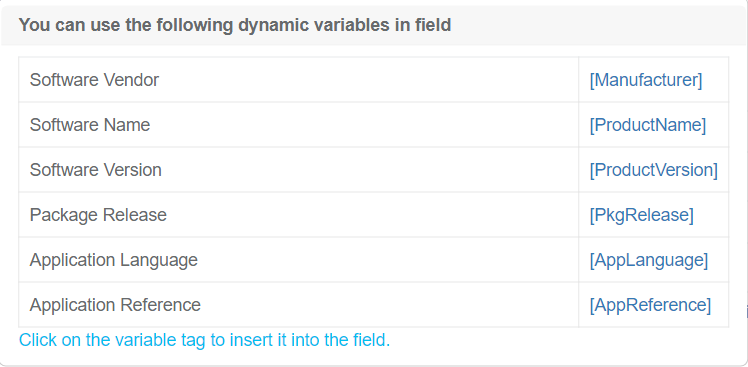](https://docs.apptimized.com/uploads/images/gallery/2024-12/pathtotheexecutable.png) This field is required. | + | + | + | + |
| Copy source to file share | This option allows to copy to the folder, the location of which was defined in field **Place for storing sources** in the **General** SCCM settings tab. | + | + | + | + |
| Installer type | This setting indicates the type of installer to use. The following installer types are available: - [MSI (Microsoft Installer)](https://docs.microsoft.com/en-us/windows/win32/msi/about-windows-installer); - [Script Installer](https://docs.microsoft.com/en-us/powershell/module/configurationmanager/add-cmdeploymenttype?view=sccm-ps#-scriptinstaller); - [AppV (Microsoft Application Virtualization 4)](https://docs.microsoft.com/en-us/microsoft-desktop-optimization-pack/appv-v4/); - [AppV (Microsoft Application Virtualization 5)](https://docs.microsoft.com/en-us/microsoft-desktop-optimization-pack/appv-v5/). The default value is **Script Installer**. | + | + | + | + |
| Script type for the detection method | This setting indicates the type of script content of the [detection method](https://docs.microsoft.com/en-us/configmgr/apps/deploy-use/create-applications#bkmk_dt-detect). The following script types for detection method are available: - [Powershell](https://docs.microsoft.com/en-us/powershell/scripting/overview?view=powershell-7); - [VB Script](https://docs.microsoft.com/en-us/previous-versions/sx7b3k7y%28v%3dvs.85%29); - [JScript](https://docs.microsoft.com/en-us/previous-versions/hbxc2t98(v=vs.85)). The default value is **Powershell**. | + | |||
| Detection script content template | This field specifies the script template of the detection method. It is possible to provide a custom template with mandatory variables in square brackets, indicating them in any order and quantity. The Connector replaces these variables with specific values during the deployment to SCCM. The default value is **Get-ItemProperty "HKLM:Software\\\[PackageName\]\\** **\[Manufacturer\]\\\[ApplicationName\]\\\[ApplicationVersion\]" -ErrorAction SilentlyContinue | Where { $\_.IsInstalled -eq 1 }** | + | |||
| Persist content in the client cache | This setting indicates the necessity to upload the application or package source to the client's machine or device cache. **Yes** or **No** options are available. The default value is **No**. | + | |||
| Installation command with parameters | This setting indicates the command to run during the package installation. The default value for the Script Installer is **Deploy-Application.exe -DeploymentType Install** The default value for the MSI Package is **msiexec /i "\\\\atd-dist01\\Public\\CM\\DTeam\\FeatureData\\OSD\\Tbreck\\Setup1.msi" or msiexec /i "\\\\atd-dist01\\Public\\CM\\DTeam\\FeatureData\\OSD\\Tbreck\\Setup1.msi" /qn** | + | + | ||
| Uninstallation command with parameters | This setting indicates the command to run during the package uninstallation. The default value is **Deploy-Application.exe -DeploymentType Uninstall** | + | |||
| Installation context | This option defines the context of the package installation. The following installation contexts are available: - install for the system; - install for a user; - install for the system if a resource is a device otherwise install for the user. The default value is **Install for the system**. This option corresponds to the term **Installation behaviour** in the SCCM admin console. | + | |||
| Should the user be logged on or not | This option defines the required user state when the installation starts. The following options are available: - only when no users are in the system; - only when a user logs in; - whether or not users are active in the system. The default value is **Whether or not users are active in the system**. This option corresponds to the term **Logon requirement** in the SCCM admin console. | + | |||
| Installation visibility for the user | This option defines the installation process visibility. The following options are available: - normal; - minimized; - maximized; - hidden. The default value is **Normal**. This option corresponds to the term **Installation program visibility** in the SCCM admin console. | + | |||
| Requires user interaction | This setting indicates if the user can be involved in the installation or uninstallation process. **Yes** or **No** options are available. The default value is **No**. | + | |||
| Identify deployment type information from a package file | This setting indicates the option of a manual (**Yes**) or automatic (**No**) deployment type information identification. The default value is **No**. | + | + | + | |
| The file where to get information | This field indicates the file with the deployment type information. The following options are available: - MSI file for MsiInstaller; - XML manifest for AppvInstaller; - AppV file for App5xInstaller. An installation type defines default value. | + | + | + | |
| What to do on a slow network | This option specifies actions with package sources in case of a slow network. Following options are available: - do nothing; - download; - download content for streaming. The default value is **Download**. | + | + | + | + |
| Maximum installation time (minutes) | This option indicates the maximum duration per installation in minutes. The default value is **120**. | + | + | + | + |
| Estimated installation time by default (minutes) | This option indicates the estimated duration per installation in minutes. The default value is 0. | + | + | + | + |
| Run installation program as a 32-bit process on 64-bit client | This setting forces the installer to launch as a 32-bit process on the 64-bit client. **Yes** or **No** options are available. The default value is **No**. | + | + | ||
| Administrator comments | This optional field corresponds to the term **Administrator comments** in the SCCM admin console. | + | + | + | + |
| **Сategory ** | **Description ** |
| Template name | The field indicates the template name to help a user to identify templates in Apptimized portal. |
| Name | This field indicates the name of a deployment type. |
| Distribution group | This field indicates group of users or devices where apps should be installed. |
| Collection type | This field indicates the type of collection required for application SCCM deployment. |
| Collection name | This field indicates the collection where apps should be installed. |
| Install or uninstall | This field indicates should application be installed/uninstalled on/from client machine. |
| Deploy purpose of the installation | This field defines if application is required to be installed or user can choose. |
| Set as default | This field defines which template should be used by default for SCCM autopush. |
| **Settings** | **Details** |
| Deployment template name | A unique name for the deployment template, allowing easy identification and reuse in future application deployments to SCCM. |
| Name of the default distribution group | Indicates the default group of users or devices where to Install applications. This setting corresponds to the term "**Distribution point group**" in the SCCM admin console. |
| Collection type | Indicates the type of collection where apps should be installed. The following types are: - Device - User |
| Collection name | Indicates the collection of devices where to install applications. This setting allows you to search and select from existing SCCM collections stored in the Apptimized database. To update the stored collections, click **Sync SCCM Collections** to the right of the **Collection Name** field. This sync will retrieve the latest collections from SCCM. [](https://docs.apptimized.com/uploads/images/gallery/2024-12/collectionname.png) The date of the last successful sync is displayed below the **Collection Name** field, helping you track when the collections were last updated. Collection list is updated automatically weekly. |
| Install or uninstall application | This setting indicates whether a task sequence action in SCCM Console can install the application. **Yes** or **No** options are available. |
| Deploy purpose of the installation | This option specifies whether the application deployment can is mandatory or optional. **Available** or **Required** options are available. |
| Setting | Description |
| Package name | This setting enables a user to set up the name for package template. This setting is **required**. The default value is: **\[Manufacturer\]\_\[ProductName\]\_\[ProductVersion\]\_\[AppLanguage\].** |
| Description | This setting enables a user to set an optional descriptions for the package template. |
| Where unzip package source | This setting enables a user to set up patch for unzipped package source files will be placed on. This section is **required**.
**Note. **In most cases, this field will be the same as **Source path **field value. |
| Use package name for the folder name | This setting enables a user to use package name as package folder name. The default value is **No**. |
| Source path | This setting enables a user to set up folder where the source is placed in zip file. The zip file name is ignored under clarifying the source path. This setting is **required**.
The default value is **\[Manufacturer\]\_\[ProductName\]\_\[ProductVersion\]\_\[AppLanguage\]**
**Note.** This path is relative to **Where unzip package source **field value. |
| Folder for package in SCCM Console | This setting enables a user to set up folder for package in SCCM Console.
Example:
- Dummy\\Folder;
- Dummy.
**Note.** The package will be created under the root if the value is empty. |
| Remove default User account | This setting enables a user to Remove user from Manage Access Account window, which is added to package by default. The default value is **Yes**. |
| Add account access | This setting enables a user to fill **Group name **and **Permission access level** fields. The default value is **Yes**. |
| Group name | This setting enables a user to fill name of the group that will be addedd to Manage Accont Acces window of SCCM servier. The fill within form is **\[domain\]\\\[groupName\]**. This setting is **required**. |
| Permission access level | This setting enables to set up permission access level for the specified user. The following levels available: - Read; - Change; - Full control; - No access. The default value is **Read**. |
| Set security scope | This setting enables to set up **Security scope **field to be specified. |
| Security scope | This setting enables a user to set up Security scope name that will be set to most (or all) packages. This setting is **required**. The default value is **Factory DPs**. |
| **Setting** | **Description** |
| Program name | This setting enables a user to set up the name of the program template. This setting is **required**. The default value is **Install.** |
| Command line | This setting enables a user to set up the command line of the program template. The default value is **install.cmd** |
| Start folder | This setting enables a user to set up he name of startup folder of the program template. |
| User interaction | This setting enables to set up interaction lever of user with package. The following levels available: - Hidden; - Minimized; - Normal; - Maximized. The default value is **Hidden**. |
| Program can run | This setting enables a user to define run context of package. The following contexts available: - Whether or not user is logged on; - Only when user is logged on; - Only when no user is logged on. The default value is **Whether or not user is logged on**. |
| Run mode | This setting enables a user to define permission level of package context run. This setting is available to change only if **Only when user is logged on **setting is set under **Program can run **setting. The following permission levels available: - Run with Administrative rights; - Run with user rights; The default value is **Run with Administrative rights**. |
| Allow users to view and interact with the program installation | This setting enables to allow users to view and interact with the program insallation. The default value is **No**. |
| Drive mode | This setting enables to define drive mode of the package installation / uninstallation. The following modes available: - Runs with UNC name; - Required drive letter - Requires specific drive letter (example: Z:). The default value is **Runs with UNC name**. |
| Allow this program to be installed from task sequence | This setting enables to allow the program to be installaed from the Install Package task sequecne without being deployed. The default value is **No**. |
| Select platfroms | This setting enables to select OS platforms where package can run.
The following platforms available:
- All Windows 10 (64-bit);
- All Windows 7 (64-bit);
- All Windows 8.1 (64-bit);
- All Windows Server 2008 R2 (64-bit);
- All Windows Server 2012 R2 (64-bit);
- All Windows Server 2016 (64-bit);
- All Windows 7 (32-bit).
**Note**. Empty field value is allowing any platform. |
| Estimated disk space | This setting enables to estimate disk space for packages if required. The value if unknown is 0 or empty. The default value is 0. |
| Select unit of a disk sace size | This setting enables to define unit f the disk space if the estimated disk space is set. The following units available: - KB; - MB; - GB. The default value is **MB**. |
| Maximum allowed run time (minutes) | This setting enables a user to set up maximum allowed run time in minutes. The default value is **120**. |
| Administrative comment | This optional field corresponds to the term **Administrator comments** in the SCCM admin console. |
| **Setting** | **Description** |
| Program name | This setting enables to set up program name to which deployment belongs to. This field is **required**. The default value is **Install**. |
| Collection type | This setting enables to indicate the collection type that will be loaded from the user SCCM server. This setting is **required**. The following types are available: - Device; - User. The default value is **Device**. |
| Limiting collection for the deployment | This setting enables settng limiting collection for the collection deployment. |
| Collection folder in SCCM Console | This setting enables setting up a collection path under the SCCM console. |
| Action | This setting enables set the action during deployment. The available action is **Install**. The value can not be changed. |
| Purpose | This setting enables the definition of the requirement of the installation/uninstallation process. The following values are available: - Available; - Required. The default value is **Available**. |
| Send wake-up packets | This setting enables to define sending [wake-up packets](https://docs.microsoft.com/en-us/mem/configmgr/core/clients/deploy/plan/plan-wake-up-clients) before deployment under SCCM. The default value is **No**. Note. This setting is available only if **Required **purpose is set. |
| Allow clients on a metered internet connection to download content after the installation deadline, which right incurs additional costs | This setting enables to allow clients on a metered internet connection to download content after the installation deadline, which right incurs additional costs. The default value is **No**. Note. This setting is available only if **Required **purpose is set. |
| Rerun behavior | This setting enables to specify rerunning deployment behavior on a client. The following values are available: - Always rerun program; - Never rerun deployed program; - Rerun if failed previous attempt; - Rerun if succeeded on the previous attempt. The default value is **Always rerun program**. Note. This setting is available only if **Required **purpose is set. |
| Recur every | The setting enables to specify a recurring interval. The default value is **1**. **Note**. This setting is available only if **Required **purpose is set. |
| Recurrence interval type | This setting enables selection of recurrence interval types for the schedule. The following options are available: - Days; - Hours; - Minutes. The default value is **Days**. **Note**. This setting is available only if **Required **purpose is set. |
| Schedule | This setting enables to schedule date and time for the deployment. **Note. **Time must be UTC. The time will be converted to the timezone of the User’s SCCM Server. This setting is** **available only if** Required **purpose is set. |
| Allow users to run the program independently of assignments | This setting enables users to run the program from Software Center. The default value is **Yes**. The value can not be changed. |
| Software installation | This setting enables a user to allow installation of the deployed software outside of maintenance windows. The default value is **No**. |
| System restart (if required to complete the installation) | This setting enables to set up system restarting outside a maintenance window. The default value is **No**. |
| Commit changes at deadline or during a maintenance window (requires restarts) | This setting enables to setting up write filters for embedded devices. The default value is **Yes**. **Note**. If this setting is not enabled, the content will be applied on the overlay and committed later. |
| Select the deployment option to use when a client uses a distribution point from a current boundary group | This setting enables to specify client behavior on a fast network. The following options are available to select: - Download content from distribution point and run locally; - Run program from the distribution point. The default value is **Download content from distribution point and run locally**. |
| Select the deployment option to use when a client uses a distribution point from a neighbor boundary group or the default site boundary group | This setting enables to specify client behavior on a slow network. The following options are available to select: - Download content from distribution point and run locally; - Do not run program; The default value is **Download content from distribution point and run locally**. |
| Allow clients to use distribution points from the default site boundary group | This setting enables allow clients to use shared content. The default value is **No**. |
**Note.** The multiple-choice option is available in the **Select platforms** field. For each selected item, a separate category will be created.
The following Windows platforms available: - Windows 7 DE - Windows 7 64-bit EN - Windows 10 64 bit EN (1809) - Windows 10 64 bit EN (1607) - Windows 10 64 bit DE (1607) - Windows 10 (1809) DE The option to delete the Windows platform from the list within the Project is available under the **Delete** button > **Confirm delete platform** modal window > **Delete** button. [](https://docs.apptimized.com/uploads/images/gallery/2020-12/H5qiW4Fm4Ex7oWsH-virtualization_05.png) To enable the Windows platform required in the self-service module, check the box in front of the platform name. To apply the virtualization general settings, click the **Save** button. #### **Providers** ##### **Azure switch****Note.** The Azure-side configuration is available under [**Azure Tenant VDI Provider Integration**](https://docs.apptimized.com/books/apptimized-platform-admin-manual/page/azure-tenant-vdi-provider-integration)
The Azure virtualization provider activates when the **Azure** switch is enabled. All required fields are marked with an asterisk \*. The option is disabled by default.| **Setting** | **Details** |
| Azure subscription name | This setting indicates the name of user’s Azure subscription (**portal.azure.com** > **Subscription** > **Subscription name**). |
| Subscription Id | This setting indicates the user’s subscription Id in Azure (**portal.azure.com** > **Subscription** > **Subscription Id**). |
| Client Id | This setting indicates the user (application) Id from Azure Active directory. |
| Client Secret | This setting indicates the client secret of the application from Azure Active directory. It is a secret string that an application uses to prove its identity when requesting a token. Also, it can be referred to as an application password. |
| Tenant Id | This setting indicates the directory (Tenant) Id of Application from Azure Active Directory. |
| Resource group | This setting indicates the resource group from **portal.azure.com**. It is a container that keeps related resources for an Azure solution. |
| Region | This setting indicates the region of a resource group at **portal.azure.com**. |
| Network name | This setting indicates the virtual network name from **portal.azure.com.** |
| Subnet name | This setting indicates the subnet name the virtual network from **portal.azure.com**. |
| VM size | This setting indicates a disk size of the VM.
VM disk size depends on a user subscription type.
The following types of sizes available:
- General purpose;
- Compute optimized;
- Memory optimized
- Storage optimized;
- GPU;
- High performance compute
[Learn more](https://docs.microsoft.com/en-us/azure/virtual-machines/sizes).
**Note**. It is necessary to select the size of the VM's that supports Generation 1 and 2 if any will be used. |
| OS disk type | This setting indicates a disk type of the VM. The following types available: - Standard HDD; - Standard SSD; - Premium SSD; - Ultra disk. |
| VMs limit | This setting indicates a maximum number of currently running VMs. **Yes** or **No** options are available. The default value is **No**. When the **VMs limit** switch is activated, a user must enter a number in the **Maximum number of currently running VMs** field. |
**Note**. The option to add a new Azure image becomes available after the Azure switch settings were set up.
| **Setting** | **Description** |
| Name | This setting defines the name for a new Azure image. The naming is a user preference. |
| Platform | This setting defines the name of Windows platform (i.e., **Windows 10**). |
| OS Build | This setting defines the operating system build that will be used (i.e., **18363.753** – is an OS build for Windows 10, version 1909). OS build is a timeline of minor build releases in between the major version number releases. |
| OS Version | This setting defines the operation system version that will be used. The following options available: - Windows 7; - Windows 8; - Windows 10. The default value is **Windows 10**. |
| OS Language | This setting defines the operating system language mode. The following options available: - EN; - DE. The default value is **EN**. |
| OS type | This setting defines the operating system type mode. The following options available: - Windows Server; - Desktop Windows. The default value is **Windows Server**. |
| Enabled | This setting indicates that the current image is enabled for use. |
| Disk generation | This setting defines the Hyper-V virtual machine generation. The following options available: - V1; - V2. |
| Link to VHD / Snapshot name | This setting indicates the link to VHD / Snapshot that is stored on **portal.azure.com** storage. |
| Windows username | This setting is automatically prefilling with the project creator data (i.e., **test.account@apptimized.com**). Setting a Windows username is a user preference and the automatically prefilling data can be changed. |
| Password for log in | This setting is automatically prefilling with the project creator data. Setting a login password is a user preference and the automatically prefilling data can be changed. |
| **Setting** | **Description** |
| Name | This setting defines the name for a new Azure image. The naming is a user preference. This field is required. |
| Platform | This setting defines the name of the Windows platform (i.e., **Windows 10**). |
| OS Build | This setting defines the operating system build that will be used (i.e., **18363.753** – is an OS build for Windows 10, version 1909). OS build is a timeline of minor build releases in between the major version number releases. |
| OS Version | This setting defines the operation system version that will be used. The following options available: - Windows 7; - Windows 8; - Windows 10. The default value is **Windows 10**. |
| OS Language | This setting defines the operating system language mode. The following options available: - EN; - DE. The default value is **EN**. |
| OS type | This setting defines the operating system type mode. The following options available: - Windows Server; - Desktop Windows. The default value is **Windows**. **Server**. |
| Enabled | This setting indicates that the current image is enabled for use. |
| Base snapshot | This setting defines the name of the snapshot (a captured state of a system in a particular time point). It is usually used as a back-up copy or as a basis to troubleshoot issues. This field is required. |
| Base image | This setting defines the name of the existed operating system image which can be used as a basis for this image. This field is required. |