| **Block name** | **Description** |
| Project stages statistics | This block shows the Project workflow steps statistics and status. Project steps statistics is provided in the form of the number of applications used in a particular step (module). Apptimized shows the following screen when the project gets some progress: [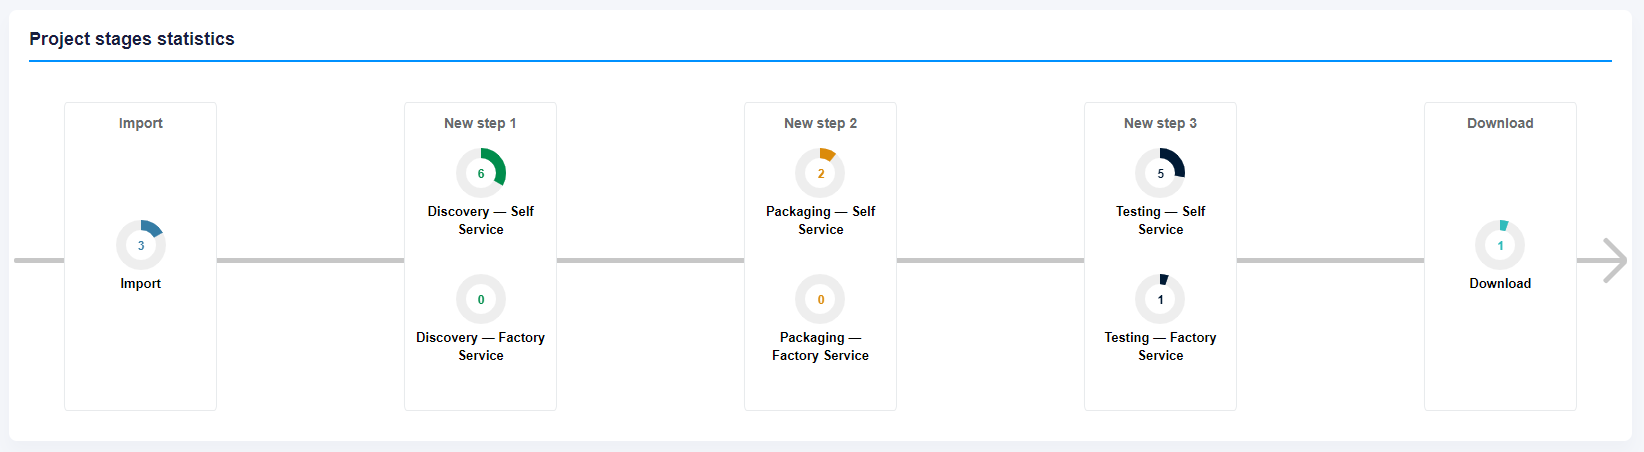](https://docs.apptimized.com/uploads/images/gallery/2020-07/W1WH2LDlJyiRPcwn-dashboards_overview_02.PNG) |
| Your assignments | This block shows a list of applications that are assigned to a user currently logged in. This block is configured as a table. Assignments data is grouped into the following categories: - Vendor - Software - Version - Language - Actions [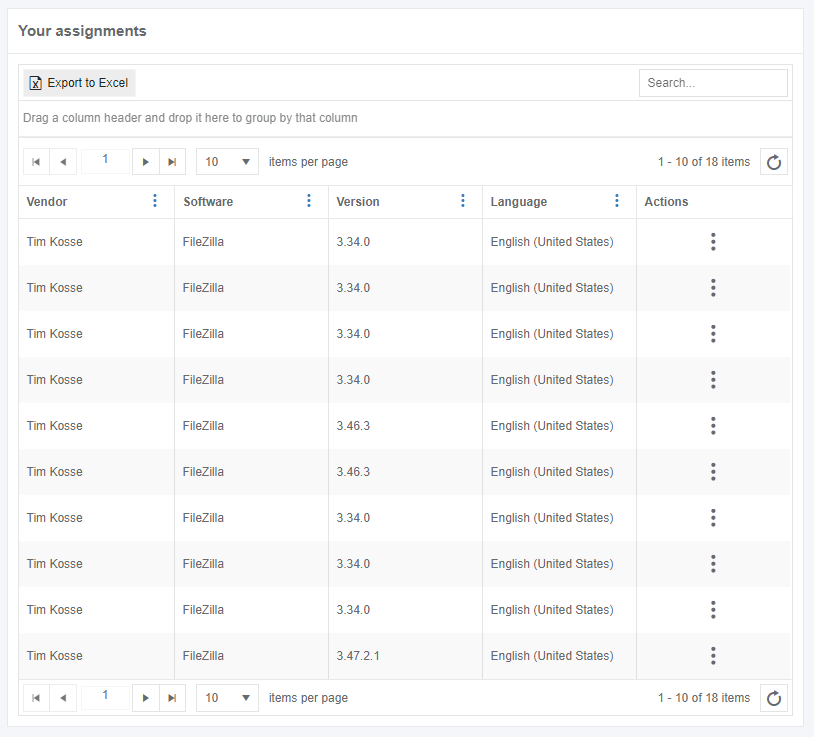](https://docs.apptimized.com/uploads/images/gallery/2020-07/mP7BvaXKMtS0gXgd-dashboards_overview_03.PNG) |
| Project basket | This block contains information about all applications that are used in this particular project. This block is configured as a table. Project basket data is grouped into the following categories: - Vendor - Software - Version - Language - Assignee - Actions [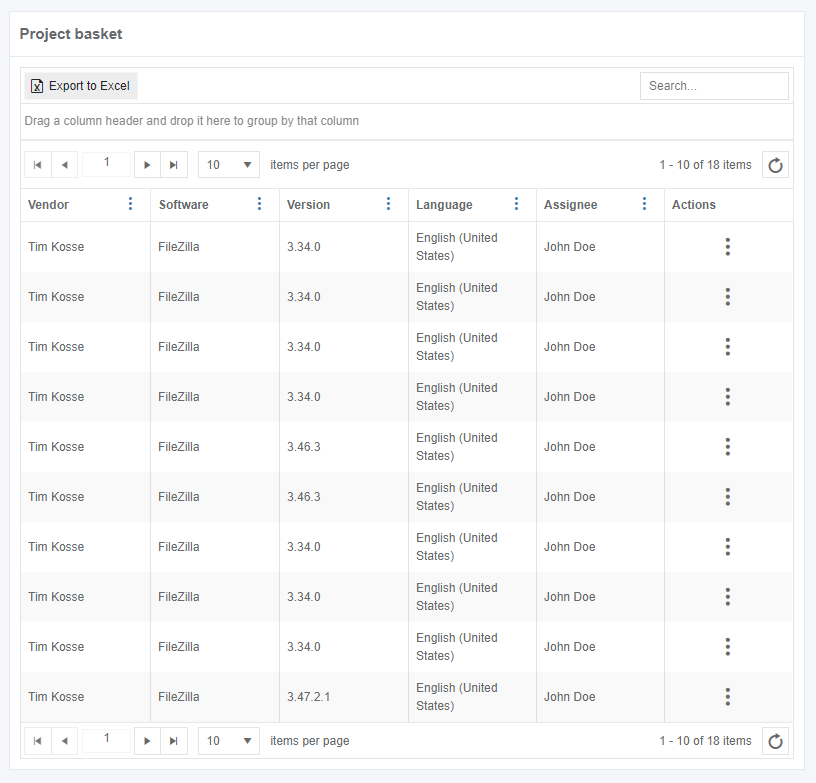](https://docs.apptimized.com/uploads/images/gallery/2020-07/zGxZkVxhWAmSEwXF-dashboards_overview_04.PNG) |
| Completed modules | This block shows the statistics of completed steps (modules) within the project. This block is configured as a chart. Each chart sector shows the number of applications completed a particular step (module). [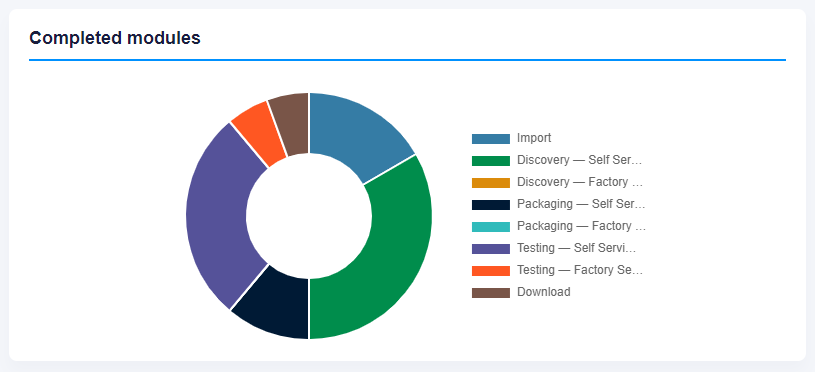](https://docs.apptimized.com/uploads/images/gallery/2020-07/w1FosJlixL0a6Wsa-dashboards_overview_05.PNG) |
| **Settings** | **Details** |
| Dashboard name | **Dashboard name** field allows users to set the dashboard name (e.g., “Demo dashboard”). There is no default value in this field. [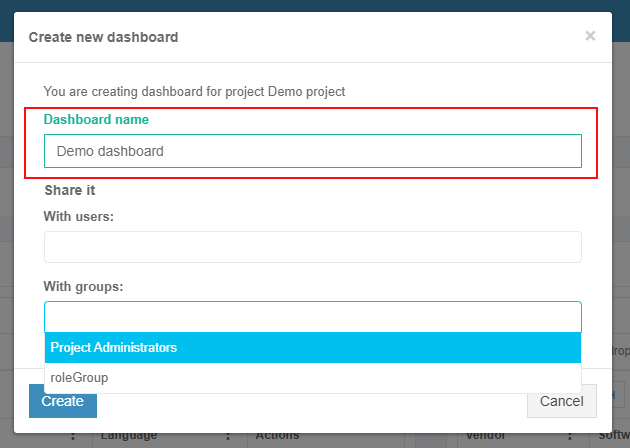](https://docs.apptimized.com/uploads/images/gallery/2020-12/nt2Tw7zWV89e1TpF-dashboard_01.png) |
| Share it | **Share it** option. Apptimized provides two options to share the dashboard: - Sharing with users - Sharing with groups (e.g., with “Project Administrators”) There is no default value in this field. [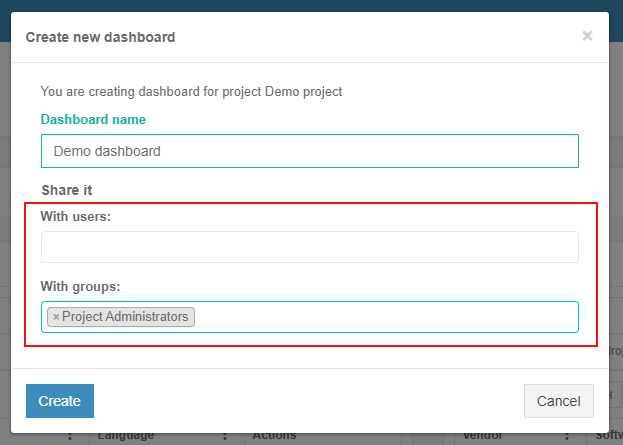](https://docs.apptimized.com/uploads/images/gallery/2020-12/vrax7mSlsWi8KcOR-dashboard_02.png) |
**Note**. If a user chooses **Chart widget** type, the field **Based on preset** appears in the modal window (see the [**Widget presets**](https://docs.apptimized.com/books/apptimized-platform-user-manual/page/dashboards#bkmrk-widget-presets%C2%A0)). [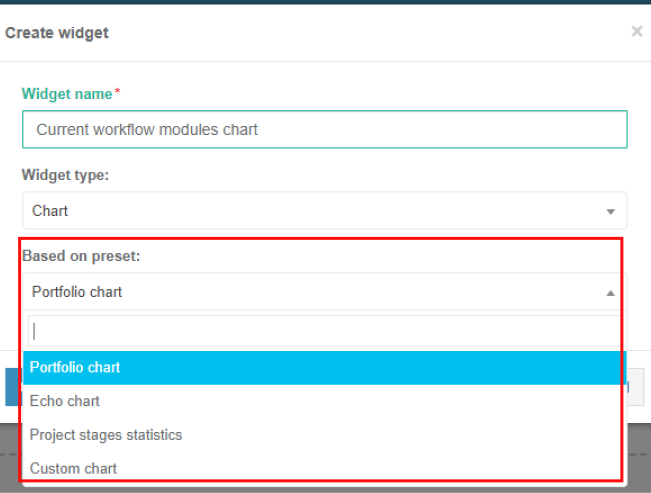](https://docs.apptimized.com/uploads/images/gallery/2020-12/lRogCGbDEK7KOGnC-dashboard_07.png)
The widget settings become active when clicking on the **Create** button. Apptimized shows the Widget when successful. The screenshot below shows a result for the creation of a **Chart** widget named “Portfolio”. [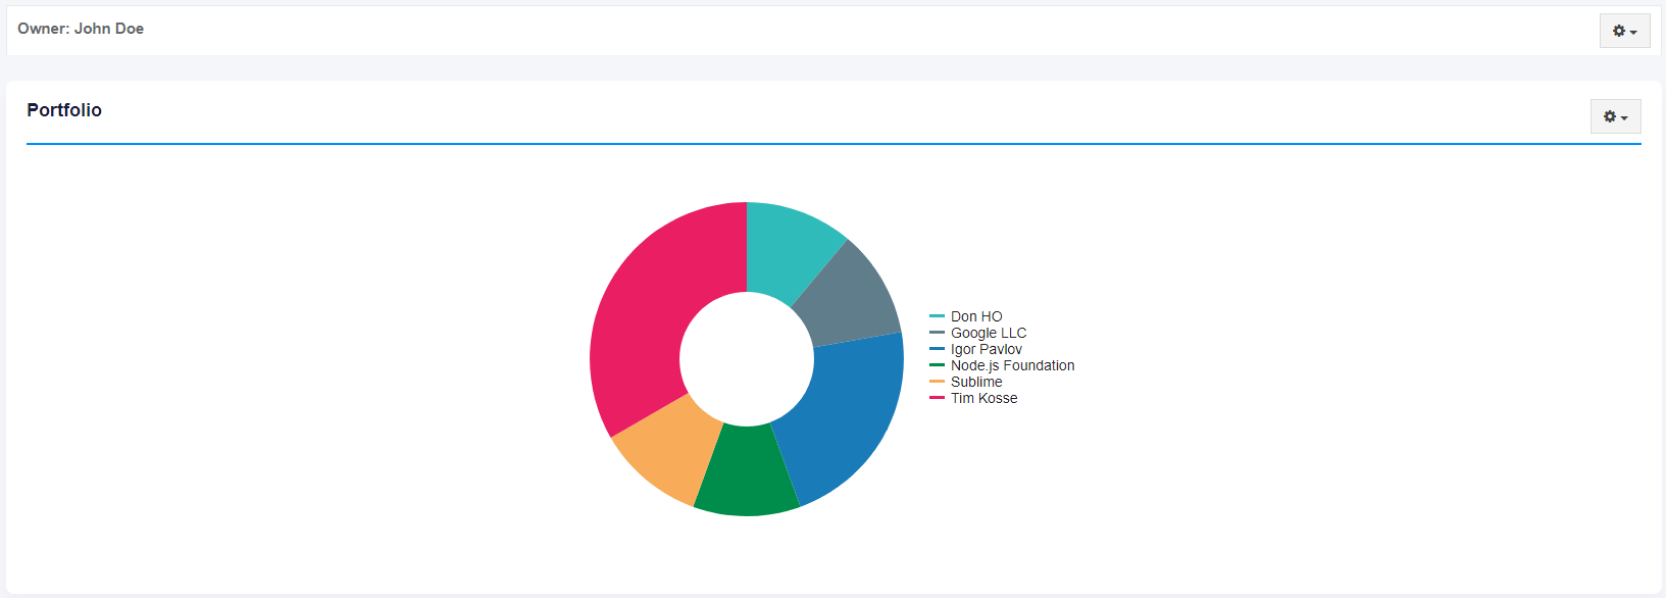](https://docs.apptimized.com/uploads/images/gallery/2020-12/re9C3vhsbqQZbQkZ-dashboard_06.png) The option to edit the layout for the dashboard is available under **Settings > Edit dashboard. ** **[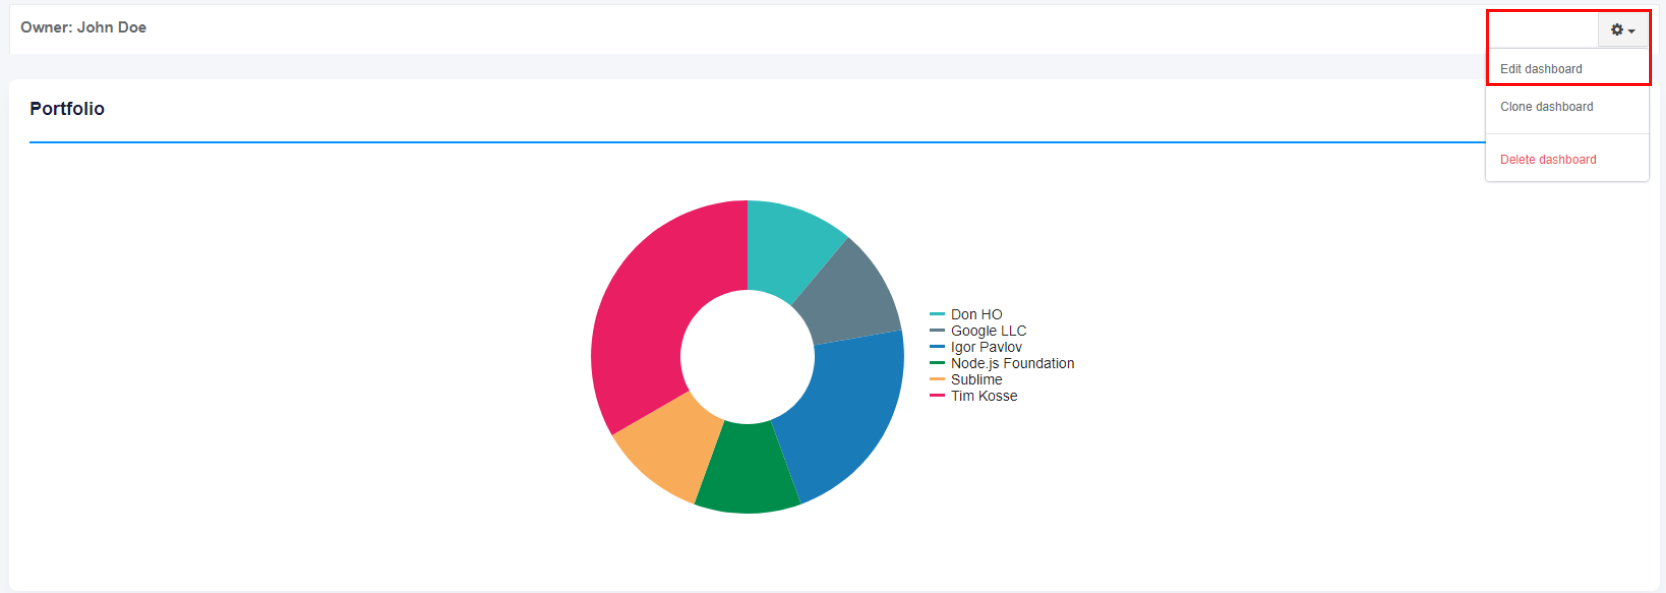](https://docs.apptimized.com/uploads/images/gallery/2020-12/CPJgVHha5q6DrW2e-dashboard_09.png)** Apptimized shows the following screen when successful: [](https://docs.apptimized.com/uploads/images/gallery/2020-12/wTJwndVKyPgagZWa-dashboard_10.png) The option to delete a block or a widget from a dashboard is available under **bin** symbol. [](https://docs.apptimized.com/uploads/images/gallery/2020-12/SGMOMCDI49i1dcQ6-dashboard_11.png) The option to change the owner is available under **Settings > Edit dashboard. ** **[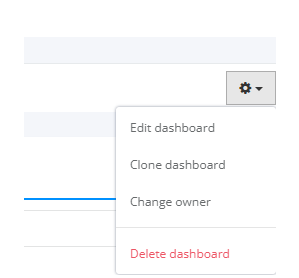](https://docs.apptimized.com/uploads/images/gallery/2024-11/change-owner.png)**The option is available for project and Global admins only.
##### Widget presets **Widget presets** are pre-configured and automatically generated presets available for **Chart widget** type. Every preset is based on the information in the project **Portfolio** (see the [**Portfolio**](https://docs.apptimized.com/books/apptimized-platform-user-manual/page/portfolio "Portfolio")). The option to choose a widget preset is available under **Based on preset** while widget creation (see the [**Add Widget**](https://docs.apptimized.com/books/apptimized-platform-user-manual/page/dashboards#bkmrk-add-widget)). [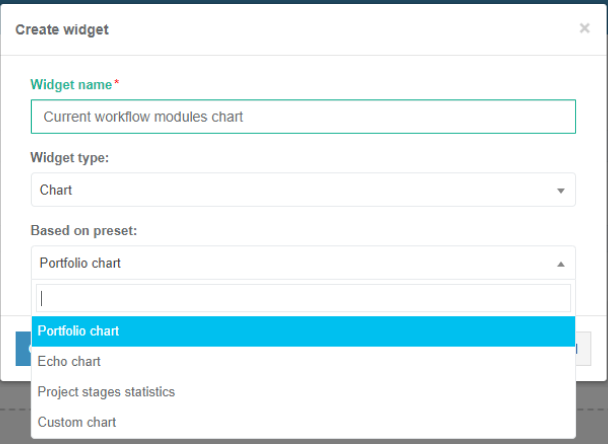](https://docs.apptimized.com/uploads/images/gallery/2020-12/U8IZrGEtrr3hpcyk-dashboard_12.png) The following **Based on preset** settings available:| **Setting** | **Details** |
| Portfolio chart | **Portfolio chart** is a setting indicating the option to create a **Chart **widget based on the application number in each workflow module (see the [**Overview dashboard**](https://docs.apptimized.com/books/apptimized-platform-user-manual/page/dashboards#bkmrk-overview-dashboard)). The default value is the **Portfolio chart**. The screenshot below shows a result for the creation of a widget based on the **Portfolio chart**: [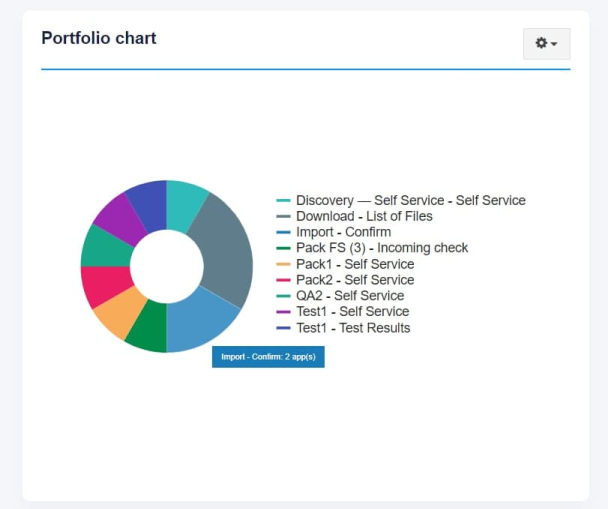](https://docs.apptimized.com/uploads/images/gallery/2020-12/bn2uzazdB5cDgP19-dashboard_13.png) The option to change Widget is available after creation (see [**Widget configuration**](https://docs.apptimized.com/books/apptimized-platform-user-manual/page/dashboards#bkmrk-widget-configuration)). |
| Echo chart | **Echo chart** is a setting indicating the option to create a **Chart **widget based on a user’s Echo test cases status. The screenshot below shows a result for the creation of a widget based on the **Echo chart**: [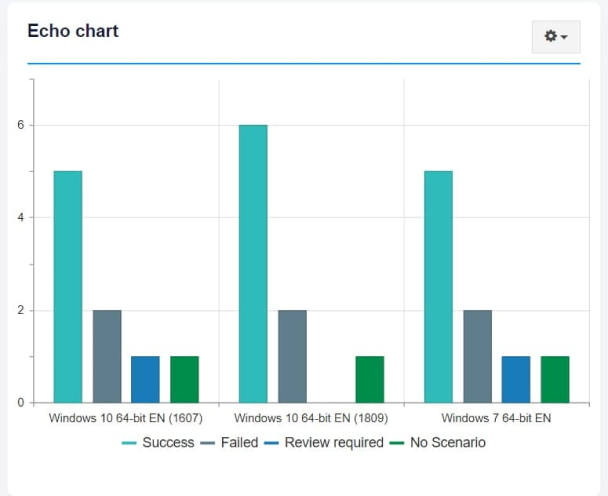](https://docs.apptimized.com/uploads/images/gallery/2020-12/U9xfqV3w0kv4RSSM-dashboard_14.png) The option to change Widget is available after creation (see [**Widget configuration**](https://docs.apptimized.com/books/apptimized-platform-user-manual/page/dashboards#bkmrk-widget-configuration)). |
| Project stages statistics | **Project stages statistics** is a setting indicating the option to create a **Chart** widget based on a user’s current project workflow steps statistics and status (see the [**Overview dashboard**](https://docs.apptimized.com/books/apptimized-platform-user-manual/page/dashboards#bkmrk-overview-dashboard)). The screenshot below shows a result for the creation of a widget based on **Project stages statistics**: [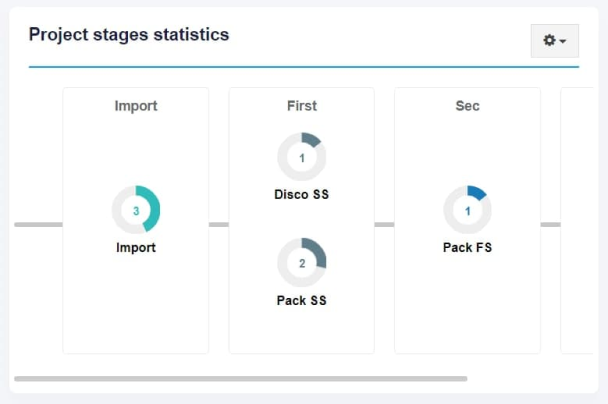](https://docs.apptimized.com/uploads/images/gallery/2020-12/1W39XnVvjILGVPMK-dashboard_15.png) The option to change Widget is not available after creation. |
| Custom chart | **Custom chart** is a setting indicating the option to create a **Chart** widget based on a user’s configurations and conditions (see the **[Widget configuration](https://docs.apptimized.com/books/apptimized-platform-user-manual/page/dashboards#bkmrk-widget-configuration)** and [**Widget conditions configuration**](https://docs.apptimized.com/books/apptimized-platform-user-manual/page/dashboards#bkmrk-widget-conditions%C2%A0co)). The screenshot below shows a few results for the creation of a widget based on the **Custom chart**: [](https://docs.apptimized.com/uploads/images/gallery/2020-12/HA3Kue2RLNUh3hBR-dashboard_16.png) [](https://docs.apptimized.com/uploads/images/gallery/2020-12/GienKh2tlDrmJxR2-dashboard_17.png) The widget view varies depending on the conditions configuration set by a user. The option to change Widget is available after creation (see [**Widget configuration**](https://docs.apptimized.com/books/apptimized-platform-user-manual/page/dashboards#bkmrk-widget-configuration)). |
**Note**. Step 1: The widget conditions block is the same for all widget types. Step 2: Widget appearance varies depending on widget type (see the [**Table widget appearance configuration**](https://docs.apptimized.com/books/apptimized-platform-user-manual/page/dashboards#bkmrk-table%C2%A0widget-appeara) and [**Chart widget appearance configuration**](https://docs.apptimized.com/books/apptimized-platform-user-manual/page/dashboards#bkmrk-chart%C2%A0widget-appeara)).
##### Widget conditions configuration The **Widget conditions** block sets the rules by which to apply applications search. This block consists of the condition groups list. Group consists of logical operators that should be applied to conditions below: • If all/any of these conditions are true/false; • Inner group conditions. The options to add a condition or a group of conditions are available under the** Add condition** and **Add group** buttons. [.png)](https://docs.apptimized.com/uploads/images/gallery/2021-09/TaD2Ne3fQAAycioW-dashboard_21_2-(1).png) [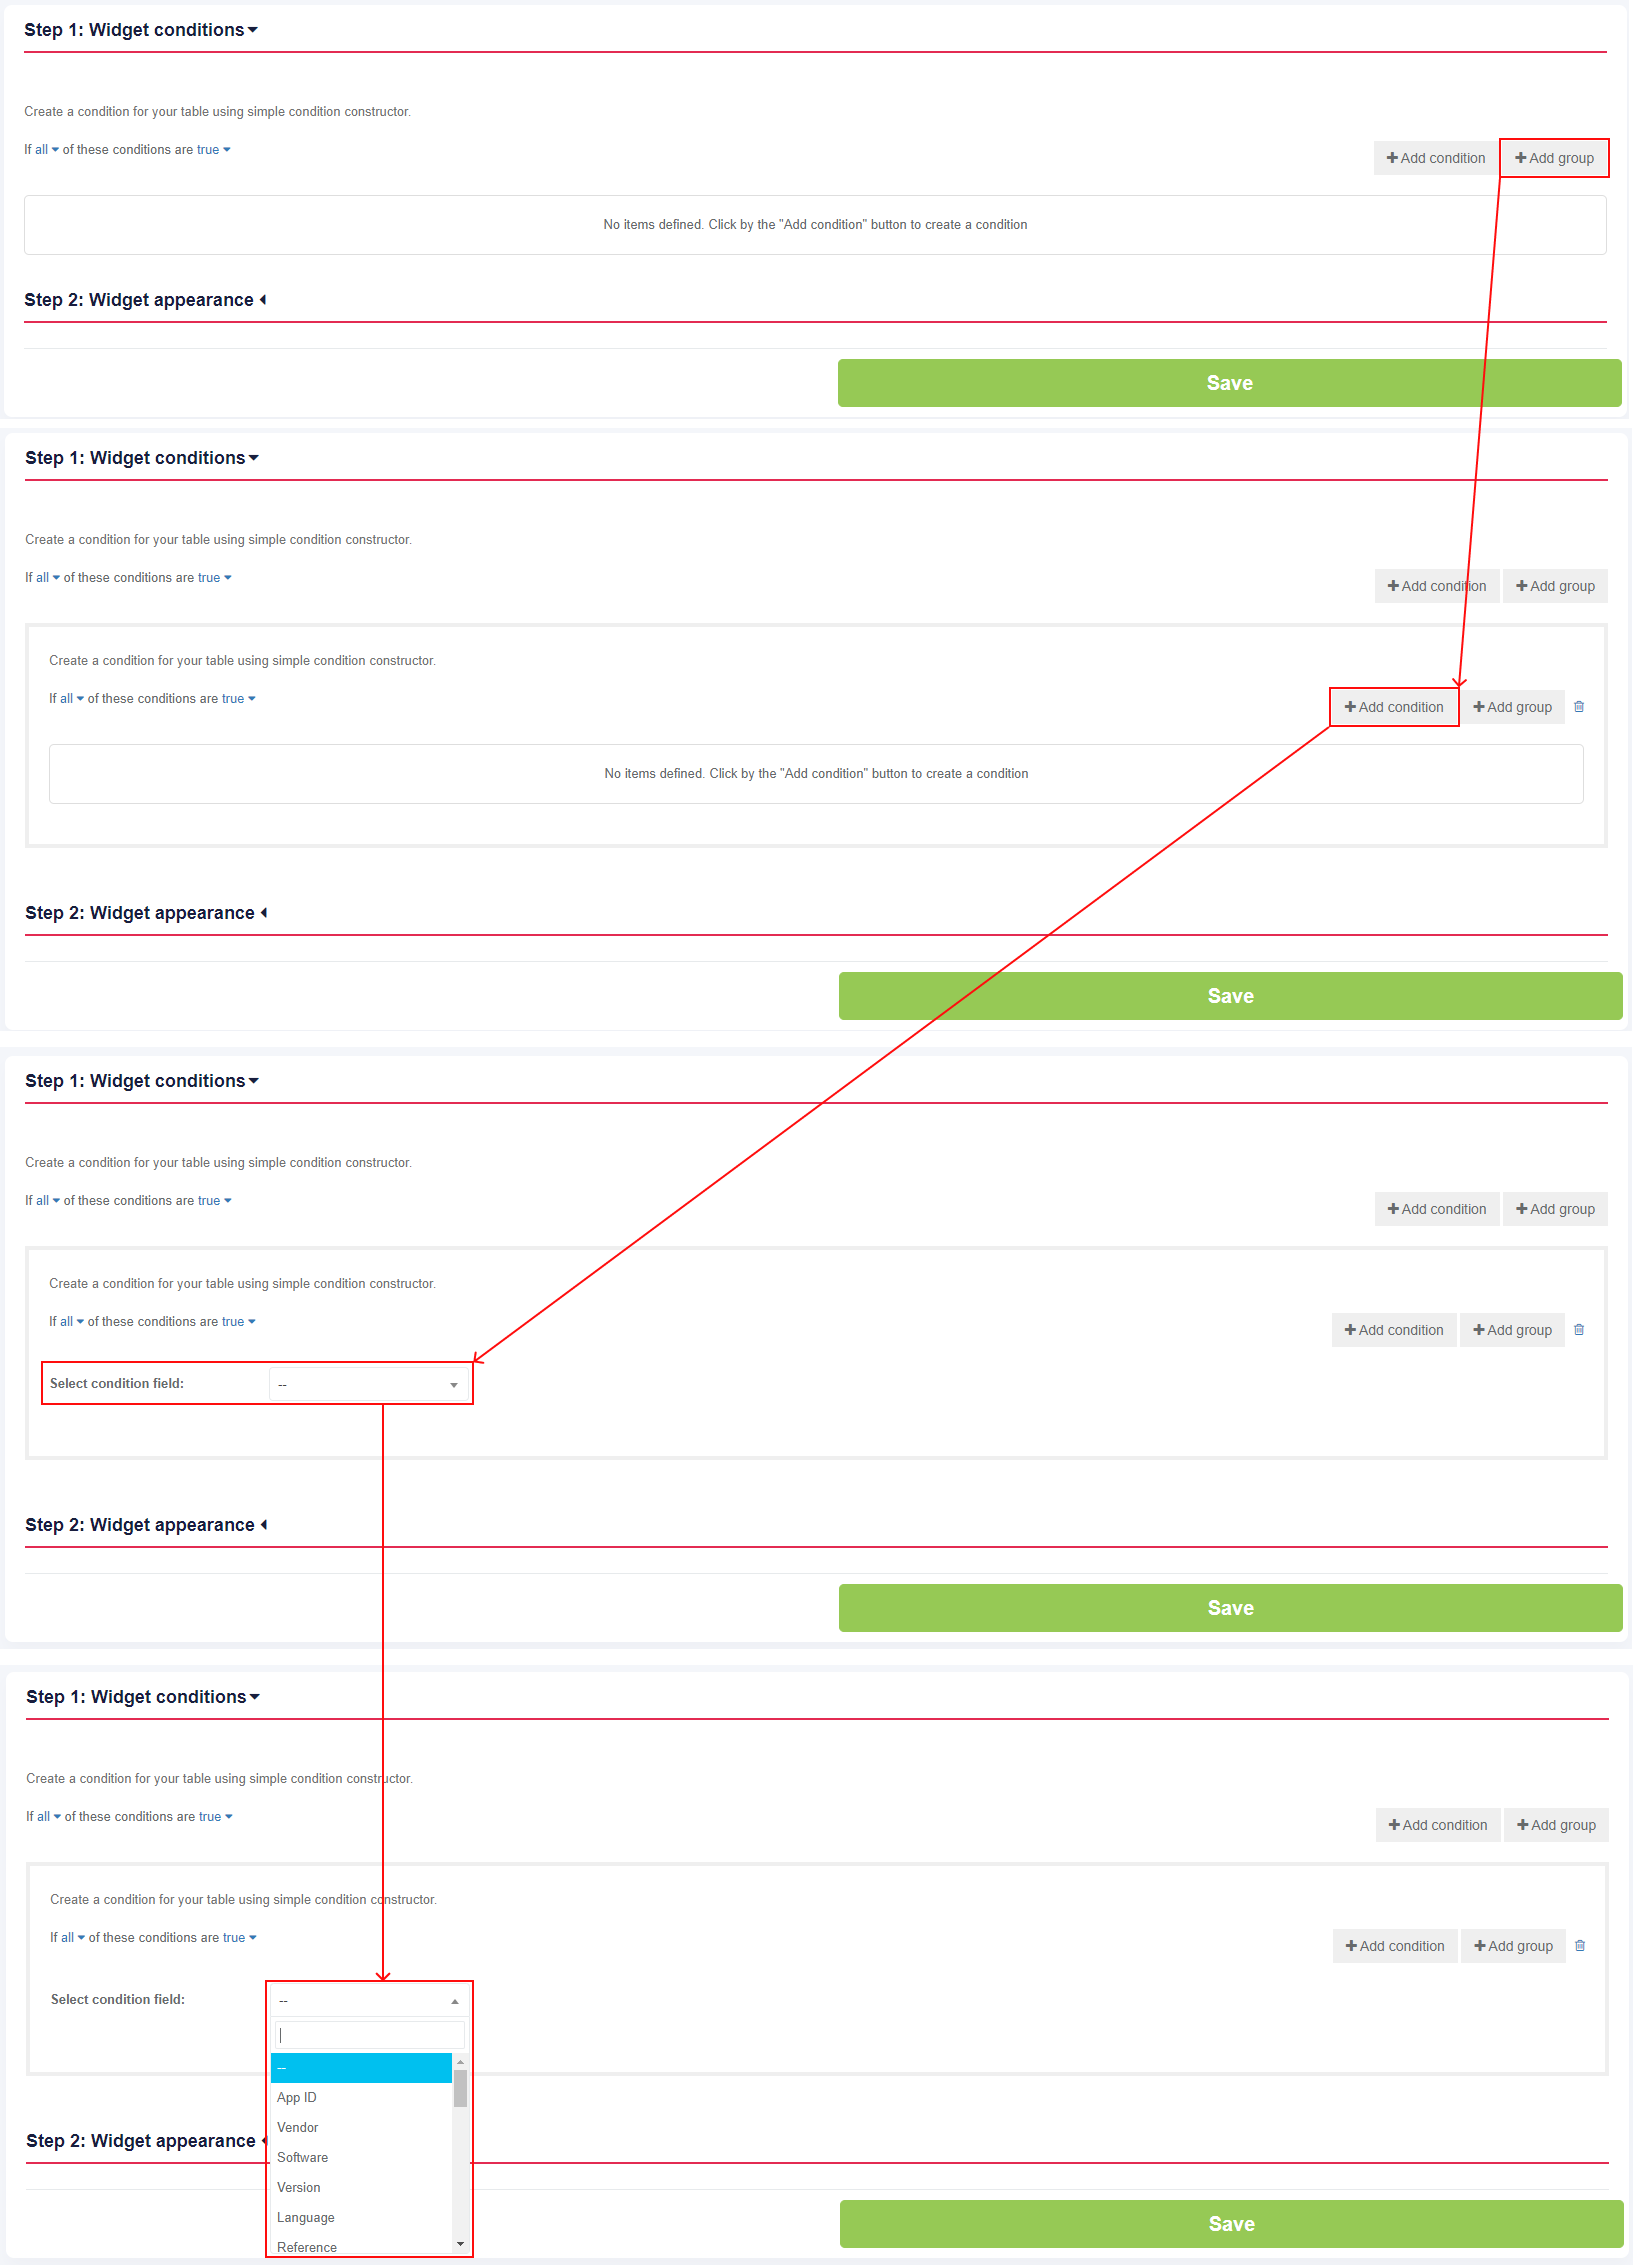](https://docs.apptimized.com/uploads/images/gallery/2021-09/OcuvQYfjyZeCD0IH-dashboard_22_2.png) The following table contains all widget condition settings, options, parameters and values:| **Condition setting** | **Condition setting options** | **Condition setting parameter** | **Condition setting value** |
| App ID | - Is less than - Is greater than | - | Number |
| Application owner | - Contains - Not in | **-** | - Current user - Users assigned to a project |
| Vendor Software Language Reference | - Is - Is not - Starts with - Ends with - Contains - Is null or empty | - | Integer |
| Version | - Is less than - Is - Is not - Is greater than | - | Integer |
| Echo | - Contains - Not in | - Pending - In progress - Success - Failed - Review required - Action required - No Scenario - Disabled - All | - |
| Updated Push To Sccm | - Is less than - Is - Is not - Is greater than | - Date - Current Date - Days Offset - Weeks Offset - Start of week - Start of month - Start of year - End of week - End of month - End of year | Date |
| Application’s prerequisites | - Contains - Not in | - | Applications uploaded to the project & packages |
| Origin | - Contains - Not in | - CSV import - Classic import - Intune Import - SCCM Import - Catalogue & UM Import | - |
| Stage | - Starts with - Ends with - Contains | - | Integer |
| Application’s parent | - Contains - Not in | - | Applications uploaded to the project & packages |
| Factory request type Factory Request platfom Factory request start date Factory request SLA On Time/Overdue Factory request status Factory request delivery date Factory request invoiced Factory request date of invoicing | - Packaging – Factory Service | - | - |
| Assignee | - All - Current - Discovery – Self Service - Packaging – Self Service - Testing – Self Service - Discovery – Factory Service - Packaging – Factory Service - Testing - Factory Service | - | Users assigned to a specific step. |
| Status | - Global - Discovery – Self Service - Packaging – Self Service - Testing – Self Service - Discovery – Factory Service - Packaging – Factory Service - Testing – Factory Service | - Is - Is not | - Incomplete - Complete |
| Start Module Time Finish Module Time | - Discovery – Self Service - Packaging – Self Service - Testing – Self Service - Discovery – Factory Service - Packaging – Factory Service - Testing – Factory Service | - Is less than - Is - Is not - Is greater than | - Date - Current Date - Days Offset - Weeks Offset - Start of week - Start of month - Start of year - End of week - End of month - End of year |
| Deliverable | - Import - Discovery – Self Service - Packaging – Self Service - Testing – Self Serivce - Discovery – Factory Service - Packaging – Factory Service - Testing – Factory Service | - Is | - Not available - Available |
| Test status | - Testing – Self Service - Testing – Factory Service | - Contains - Not in | - Untested - Success - Failed - Fixed |
**Note.** If the project Portfolio is shared with other projects within organization, the **Projects to include** field appears in the **Step 2: Widget appearance** block (see the [**Project settings**](https://docs.apptimized.com/books/apptimized-platform-user-manual/page/project-settings "Project settings")). The **Project to include** field allows a user to include applications from other organization's projects to the Widget. There is no default value for this field. [](https://docs.apptimized.com/uploads/images/gallery/2020-12/1mRRWxVQLTs8g1im-dashboard_35.png)
| Setting | Description |
| Widget name | The widget name field allows defining the widget name (e.g., Portfolio). |
| Default page size | This field allows defining number of items per table page. |
| Table Columns | This section allows setting up table columns container. |
| Ordering | This field allows arranging items in a sequence. The following criteria available: - Ascending; - Descending. The following items available: - App ID; - Application owner; - Vendor; - Software; - Version; - Language; - Assignee: All; - Updated; - Stage; - Assignee: Current. |
| Grouping | This field allows combining data into groups that have the same value in selected columns. The following items available: - App ID; - Application owner; - Vendor; - Software; - Version; - Language; - Assignee: All; - Updated; - Stage; - Assignee: Current. The following order settings available: - Ascending; - Descending. |
| Aggregates | This field allows defining high-level data composed from other more individual data by selected measurement for the column. The following aggregate options available: - Count; - Sum; - Average; - Min; - Max. |
| **Settings** | **Details** |
| Widget name | **The widget name **field allows defining the widget name (e.g., Portfolio). There is no default value for this field. [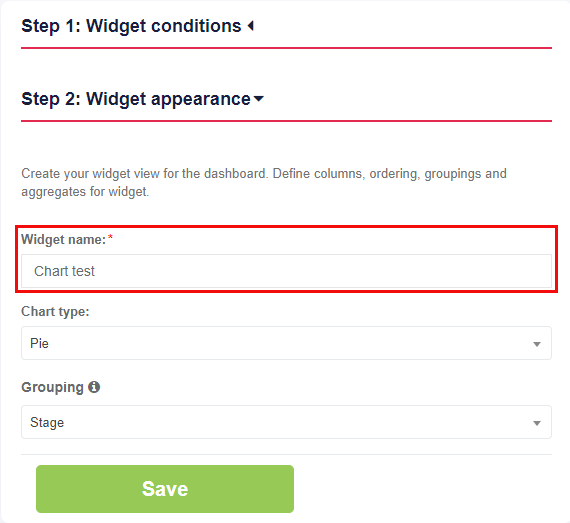](https://docs.apptimized.com/uploads/images/gallery/2021-09/c0qWAyrCjqimPN52-dashboard_28_2.png) |
| Chart type | **Chart type **field allows choosing a type for the chart. The following options available: - Pie - Bar The default value is **Pie**. [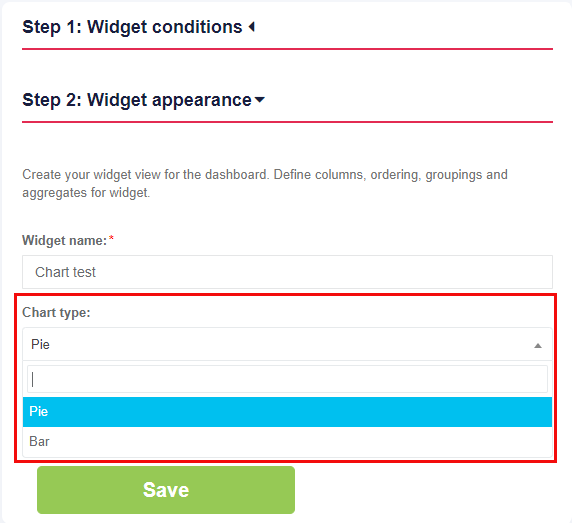](https://docs.apptimized.com/uploads/images/gallery/2021-09/AwzzVmyxcFievq8z-dashboard_29_2.png) |
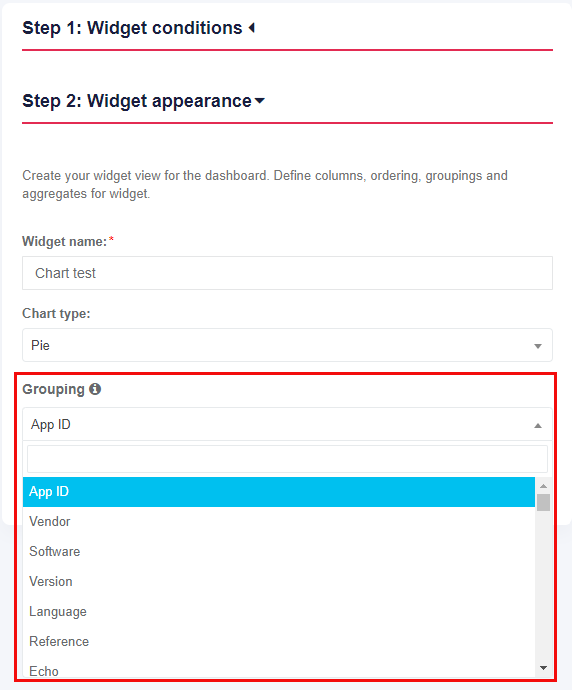
| Grouping | **The g****rouping** field allows combining data into groups.
The following options available:
- App ID
- Vendor
- Software
- Version
- Language
- Reference
- Echo
- Updated
- Application’s prerequisites
- Origin
- Stage
- Application’s parent
- Testcase status
- Echo platform
- Assignee
- Status
- Start module time
- Finish module time
- Deliverable
- Test status
- Push to Sccm
- Application owner
The default value is **App ID**.
[](https://docs.apptimized.com/uploads/images/gallery/2021-09/crB9GRJVlLIpz86w-dashboard_30_2.png)
**Note.** The options Assignee, Status, Start module time, Finish module time, Deliverable, and Test status varies depending on the project configuration (see the [**Create project**](https://docs.apptimized.com/books/apptimized-platform-user-manual/page/create-project "Create project")). |
**Note.** If the project Portfolio is shared with other projects within organization, the **Projects to include** field appears in the **Step 2: Project appearance** block (see the [**Project settings**](https://docs.apptimized.com/books/apptimized-platform-user-manual/page/project-settings "Project settings")). The **Project to include** field allows a user to include applications from other organization's projects to the Widget. There is no default value for this field. [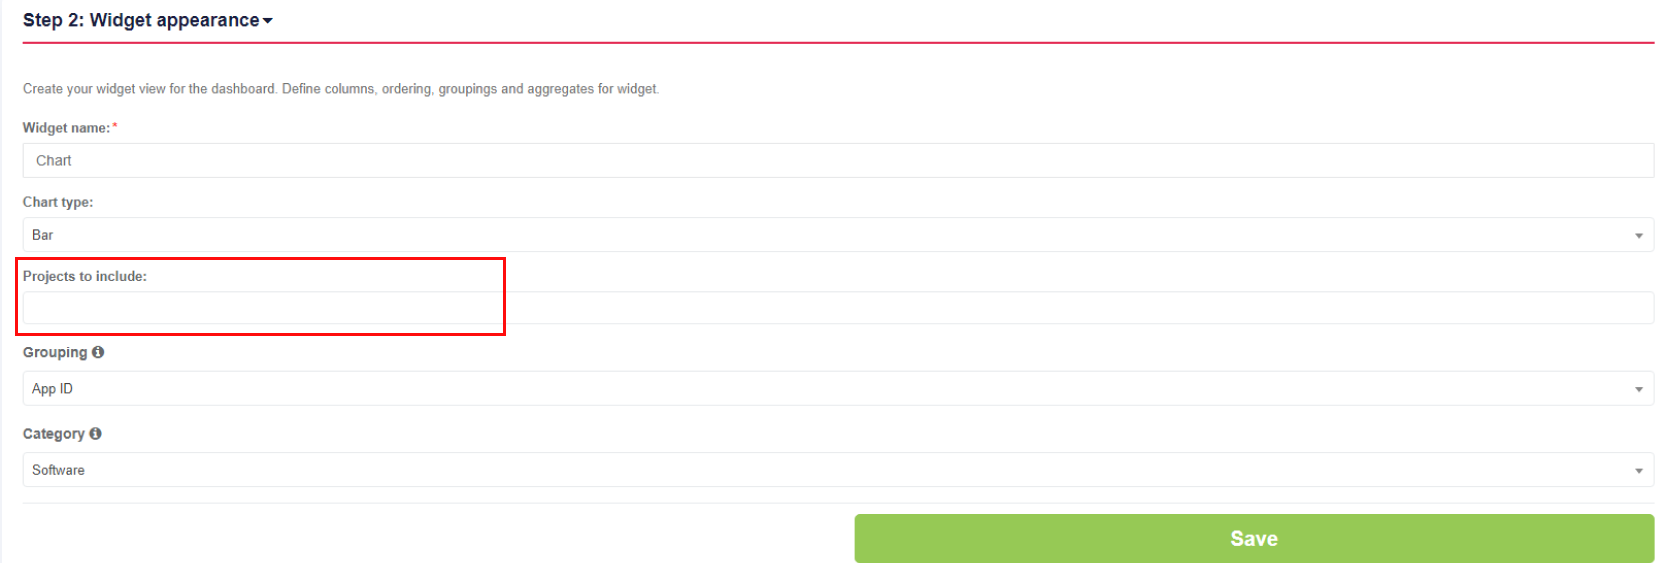](https://docs.apptimized.com/uploads/images/gallery/2021-09/rWJJ91ax7oRrz8Pd-dashboard_36_2.png)
The settings are applied when clicking the **Save** button. A chart widget appears on the project dashboard. [](https://docs.apptimized.com/uploads/images/gallery/2020-12/ZzU0pWsRpNvyKm06-dashboard_08.png) Apptimized shows the following screen when successful: [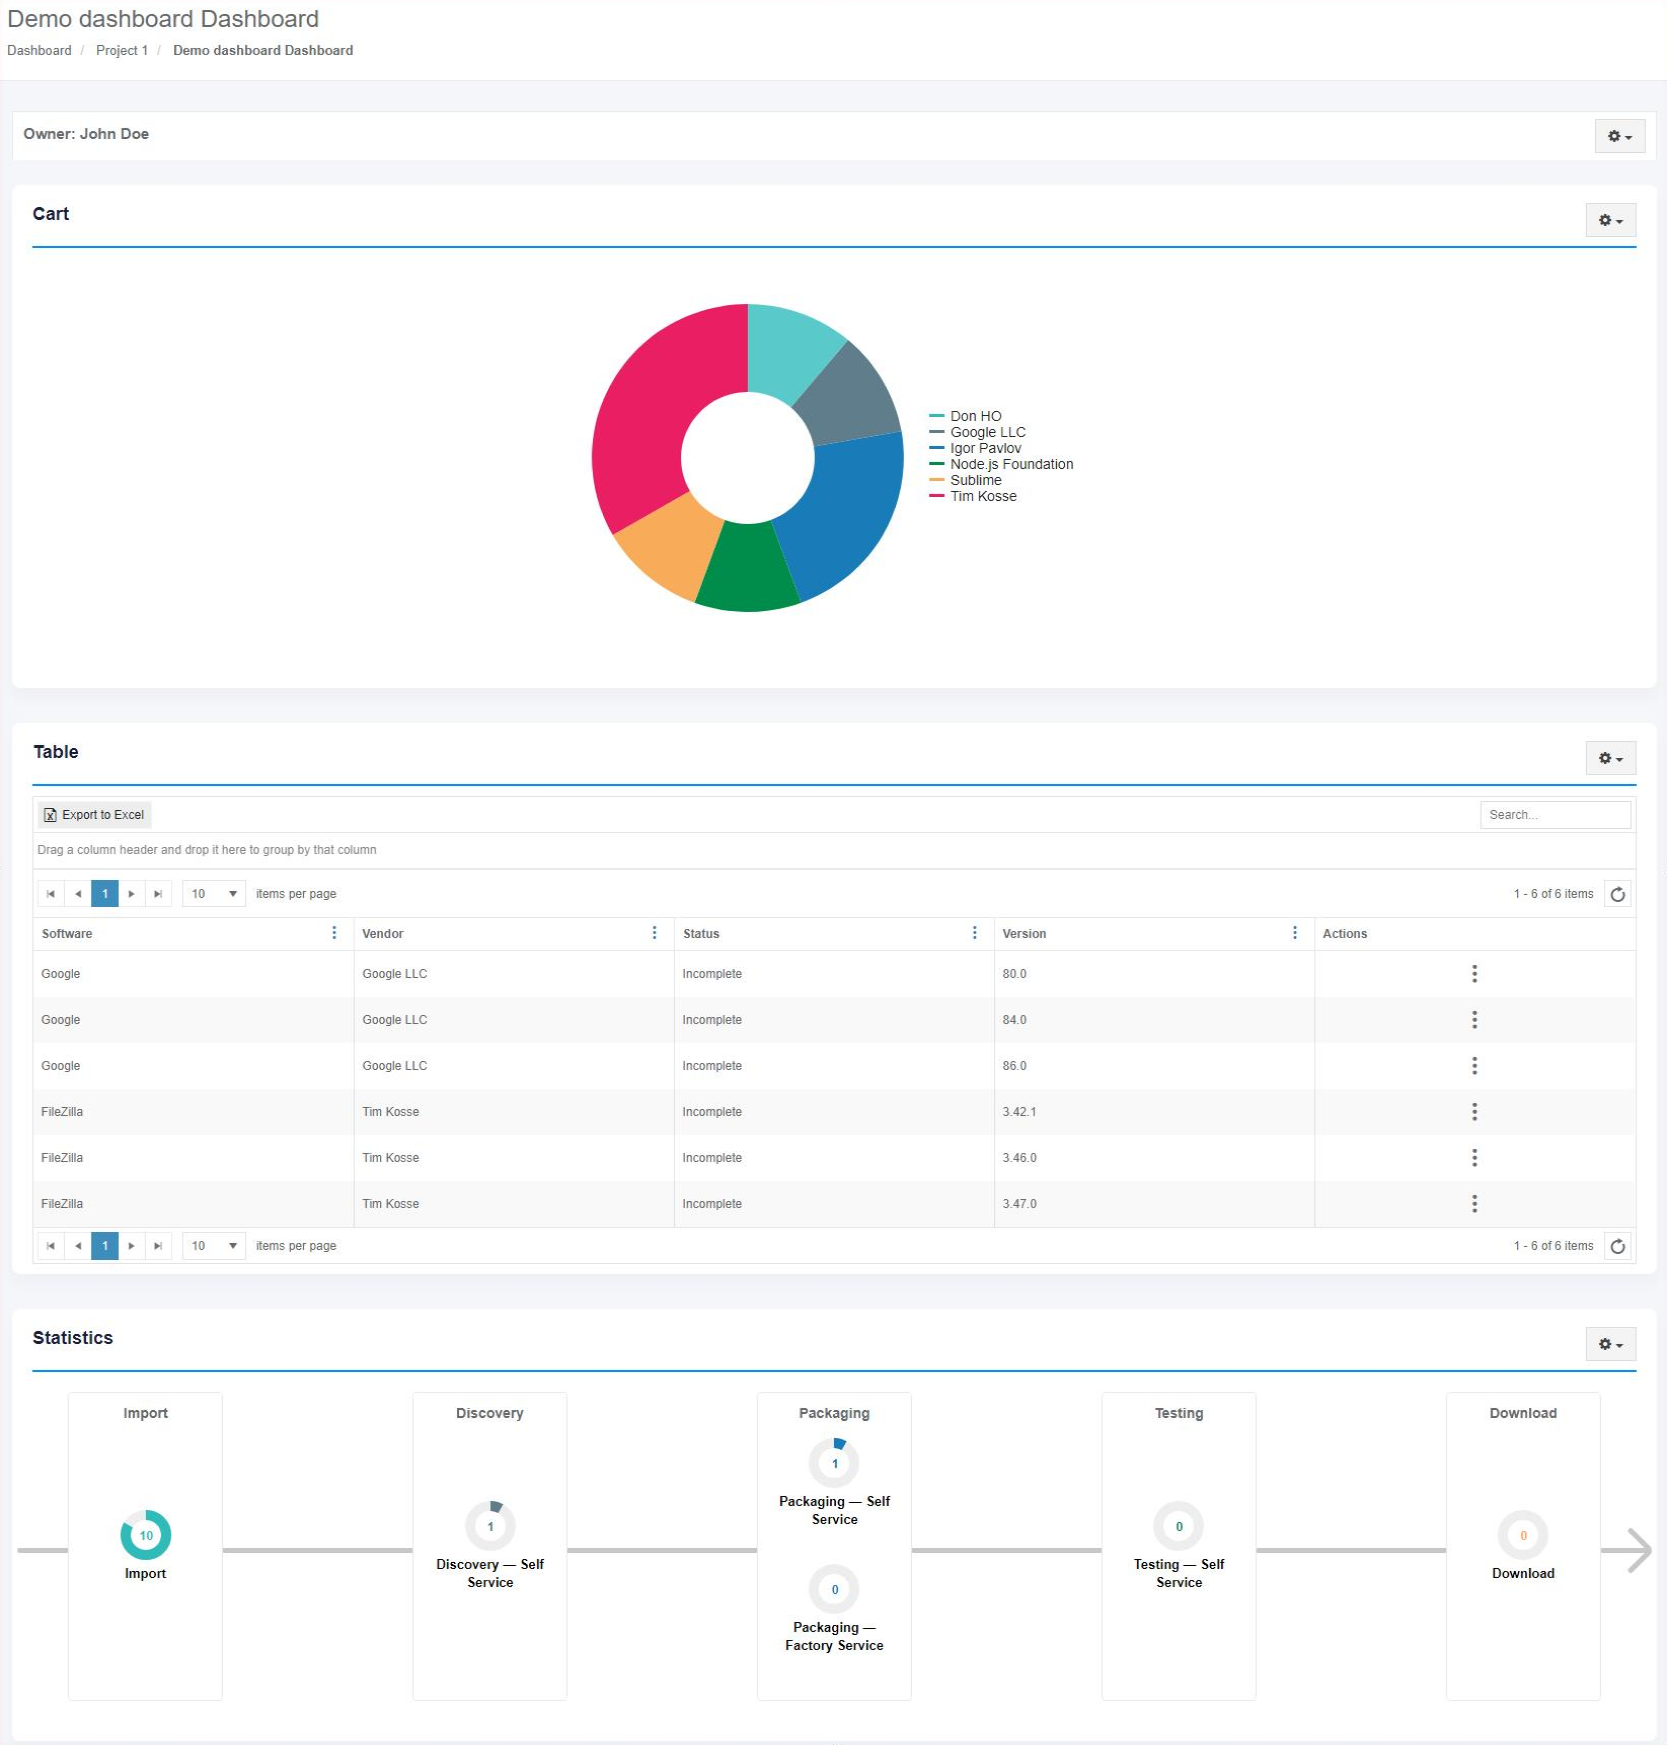](https://docs.apptimized.com/uploads/images/gallery/2020-12/VK6XCYrFTefJka4f-dashboard_31_1.png) ##### Echo consumption widget appearance configuration The screenshot below shows settings a user can apply to configure echo consuption widget appearance. [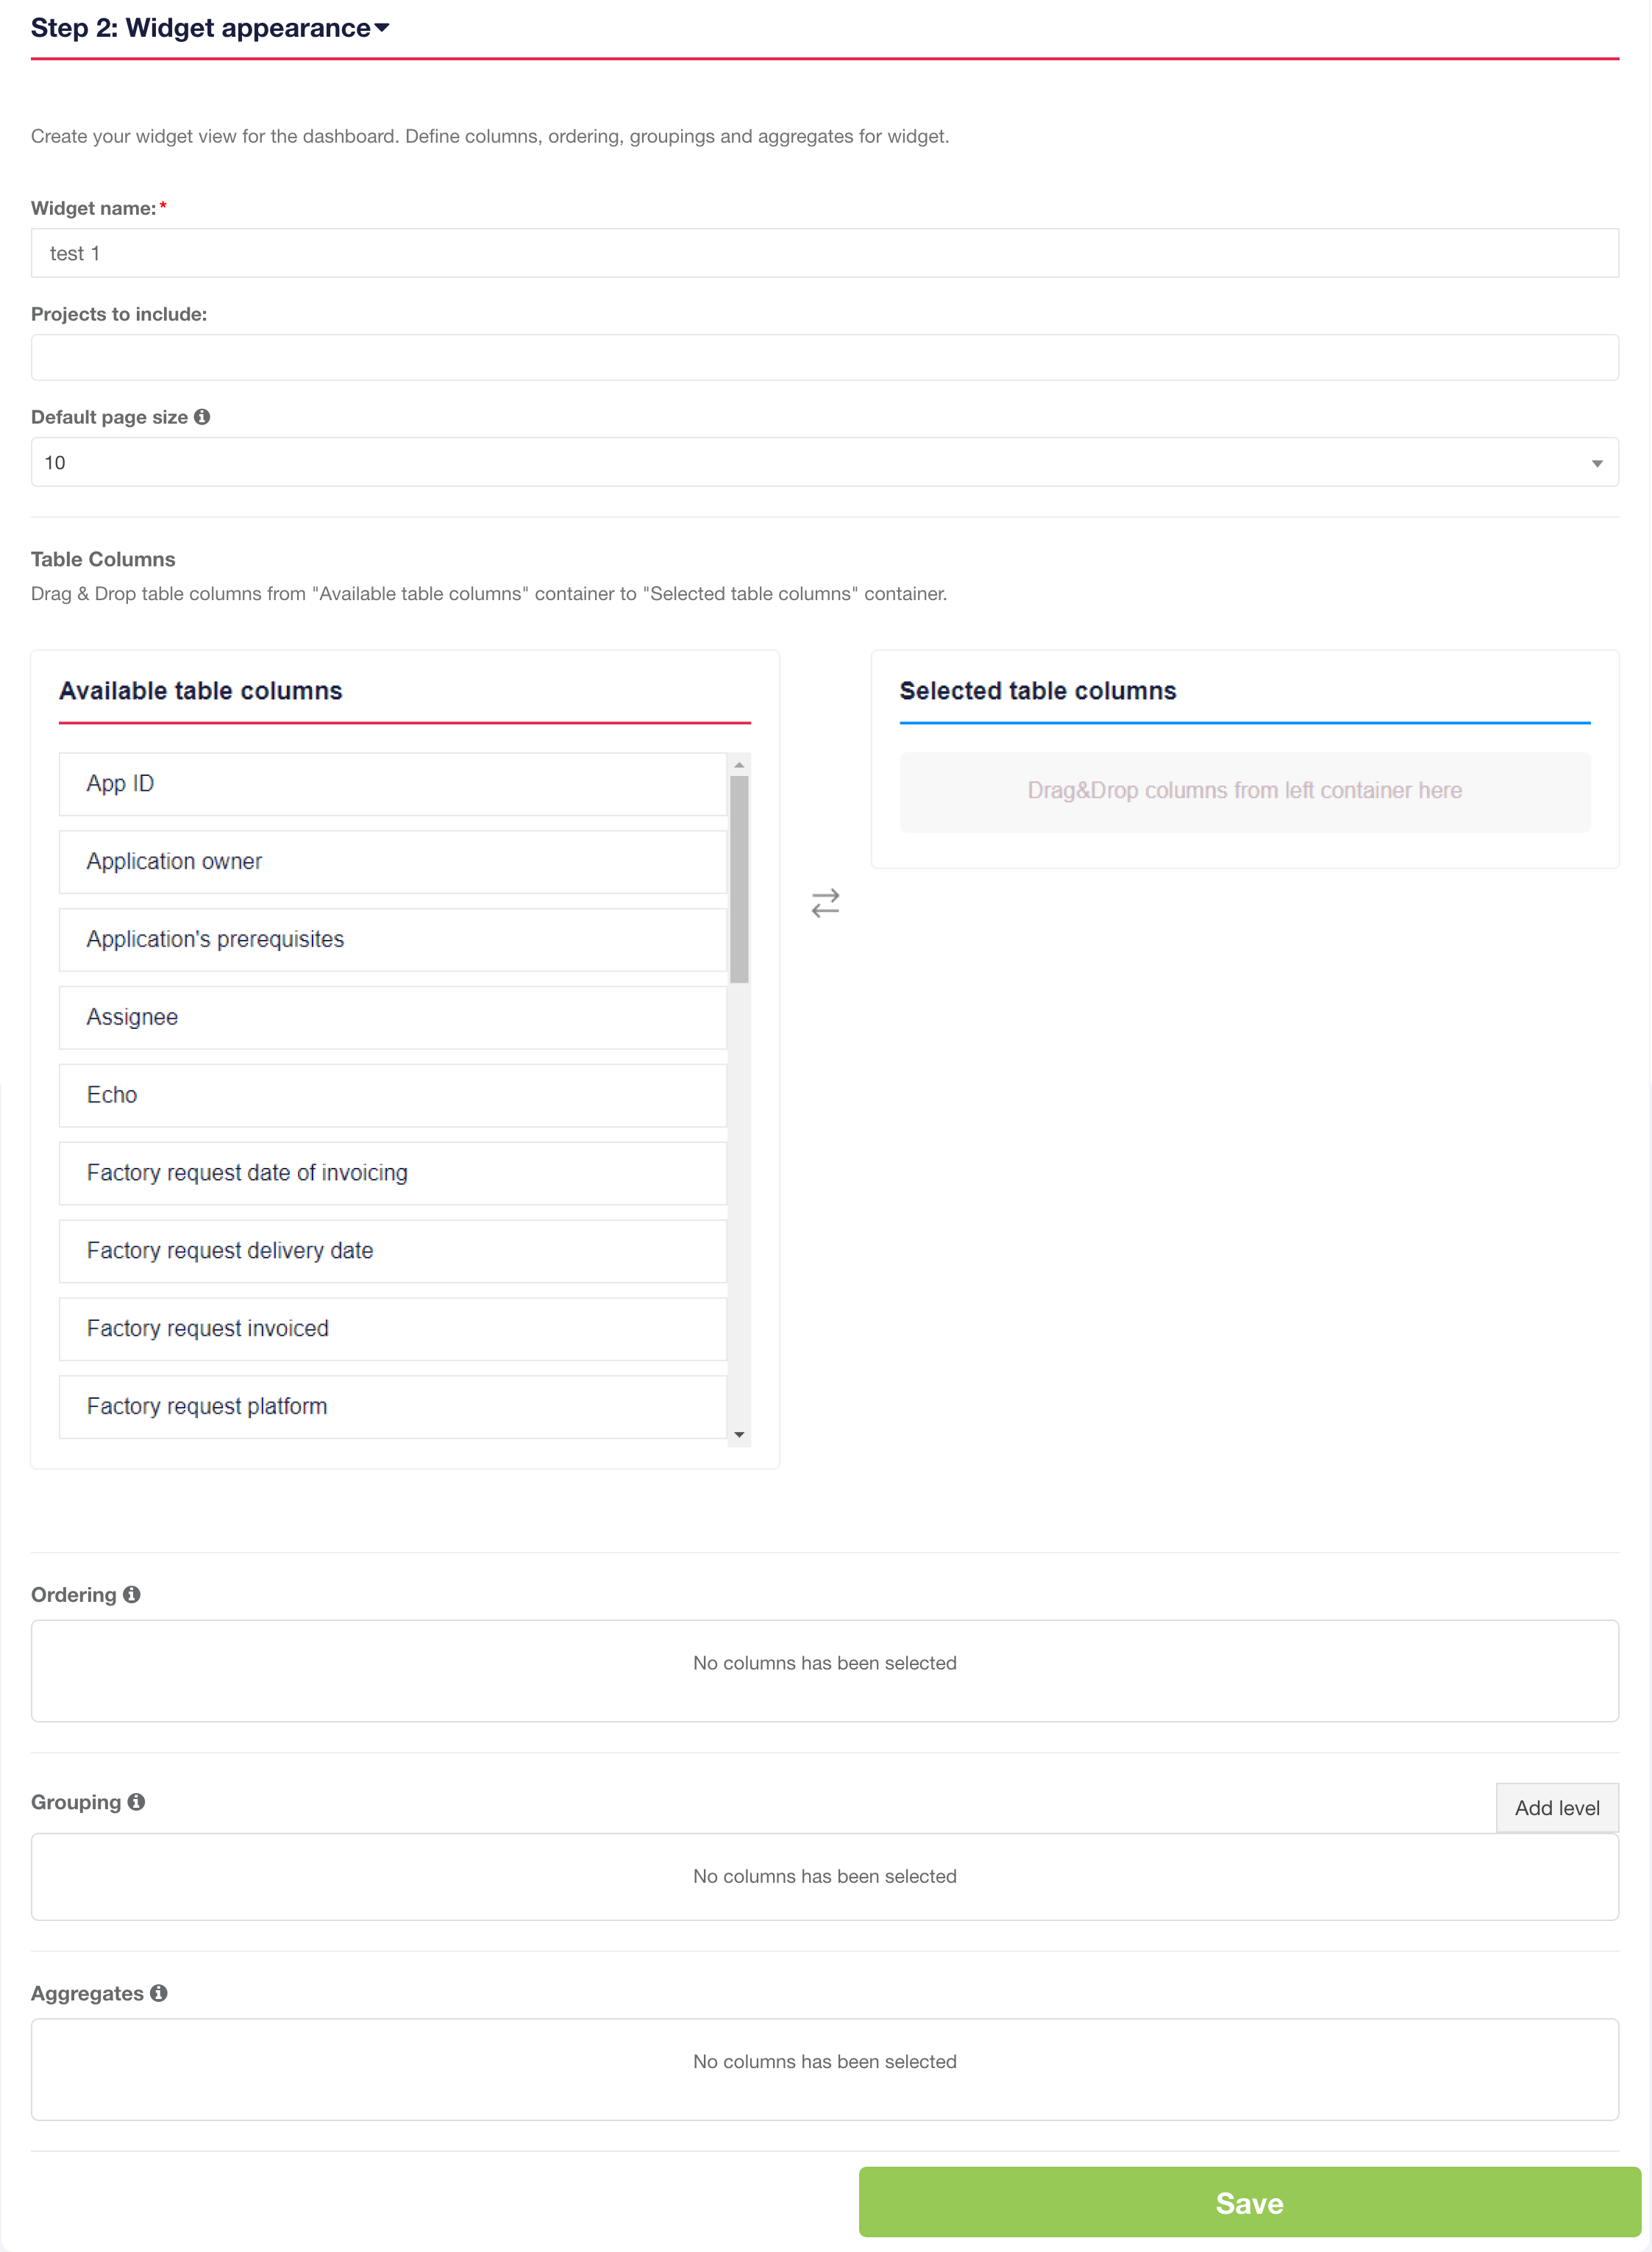](https://docs.apptimized.com/uploads/images/gallery/2022-02/C7CoS0mCELjFGjua-dashboards_30_x_2.png)**Note.** If the project Portfolio is shared with other projects within organization, the **Projects to include** field appears in the **Step 2: Widget appearance** block (see the [**Project settings**](https://docs.apptimized.com/books/apptimized-platform-user-manual/page/project-settings "Project settings")). The **Project to include** field allows a user to include applications from other organization's projects to the Widget. There is no default value for this field. [](https://docs.apptimized.com/uploads/images/gallery/2020-12/1mRRWxVQLTs8g1im-dashboard_35.png)
| **Setting** | **Description** |
| Widget name | The widget name field allows defining the widget name (e.g., Portfolio). |
| Default page size | This field allows defining number of items per table page. |
| Table Columns | This section allows setting up table columns container. |
| Ordering | This field allows arranging items in a sequence. |
| Grouping | This field allows combining data into groups that have the same value in selected columns. |
| Aggregates | This field allows defining high-level data composed from other more individual data by selected measurement for the column. |