# Push to SCCM as Application

Push to SCCM as Application

Deployment starts from the project portfolio.

[![sccm_27.png](https://docs.apptimized.com/uploads/images/gallery/2020-03/scaled-1680-/M7gjsM6O9hLl3hSp-sccm_27.png)](https://docs.apptimized.com/uploads/images/gallery/2020-03/M7gjsM6O9hLl3hSp-sccm_27.png)

<p class="callout info">The application should have a package file produced during the Packaging step (Factory or Self-Service). If the required file is missing, Apptimized shows the notification.  
  
[![sccm_15.png](https://docs.apptimized.com/uploads/images/gallery/2020-03/scaled-1680-/5lwmLAFlfpRUVX4K-sccm_15.png)](https://docs.apptimized.com/uploads/images/gallery/2020-03/5lwmLAFlfpRUVX4K-sccm_15.png)</p>

After locating the application in the list, the deployment process can be triggered by clicking the extended menu in the **Actions** column and selecting **Push to SCCM as Application**.

[![PortfolioSCCM.png](https://docs.apptimized.com/uploads/images/gallery/2024-12/scaled-1680-/portfoliosccm.png)
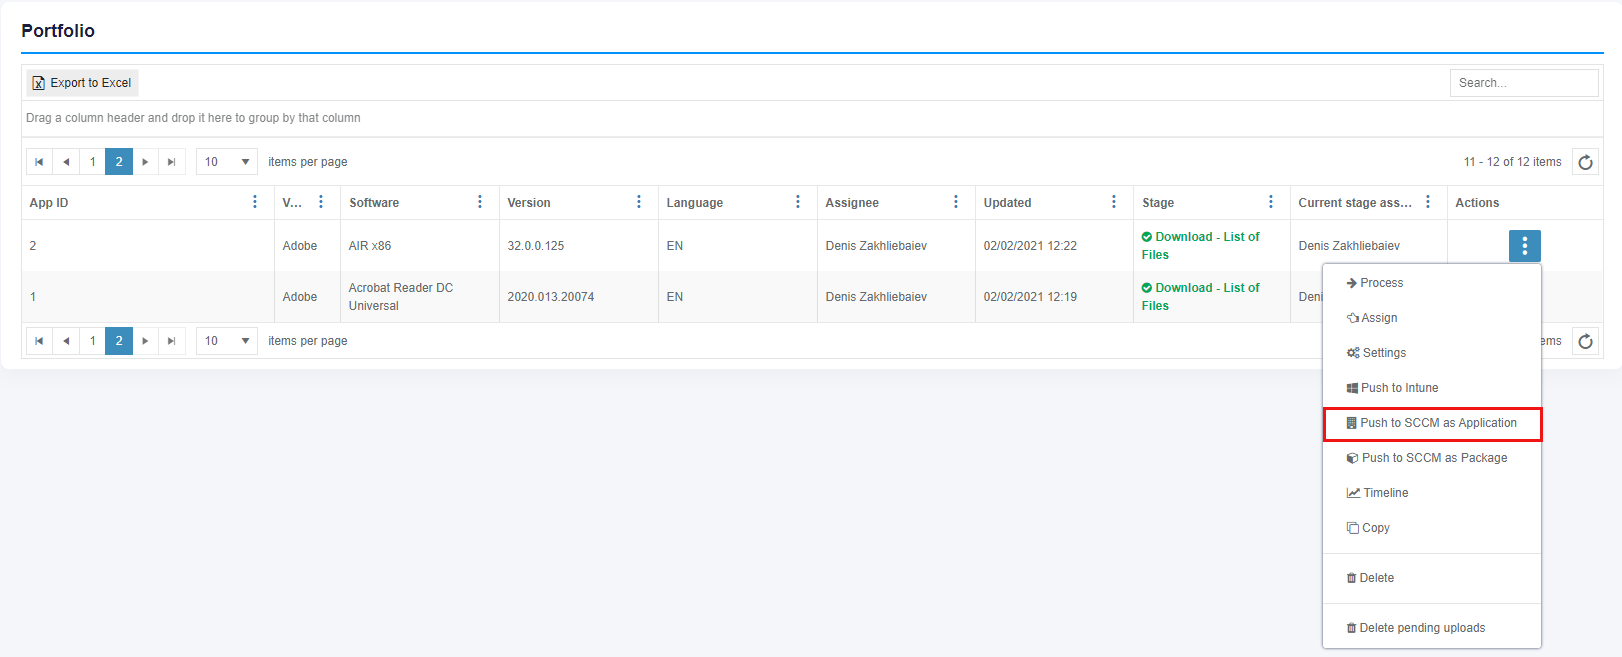
](https://docs.apptimized.com/uploads/images/gallery/2024-12/portfoliosccm.png)

Apptimized shows the following screen when successful:

[![sccm_31_01.png](https://docs.apptimized.com/uploads/images/gallery/2021-12/scaled-1680-/qIWzgEbwivBsPKpL-sccm_31_01.png)
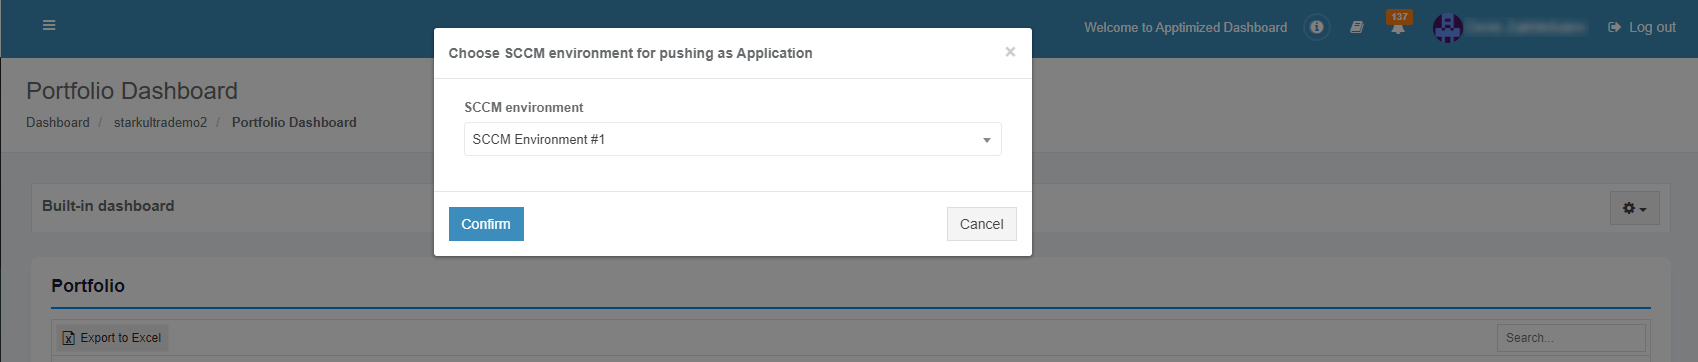
](https://docs.apptimized.com/uploads/images/gallery/2021-12/qIWzgEbwivBsPKpL-sccm_31_01.png)

The option to continue the deploying process is available after selecting the **SCCM environment** and clicking the **Confirm** button.

Apptimized shows the following screen when successful:

[![Pushtosccm.png](https://docs.apptimized.com/uploads/images/gallery/2024-12/scaled-1680-/pushtosccm.png)
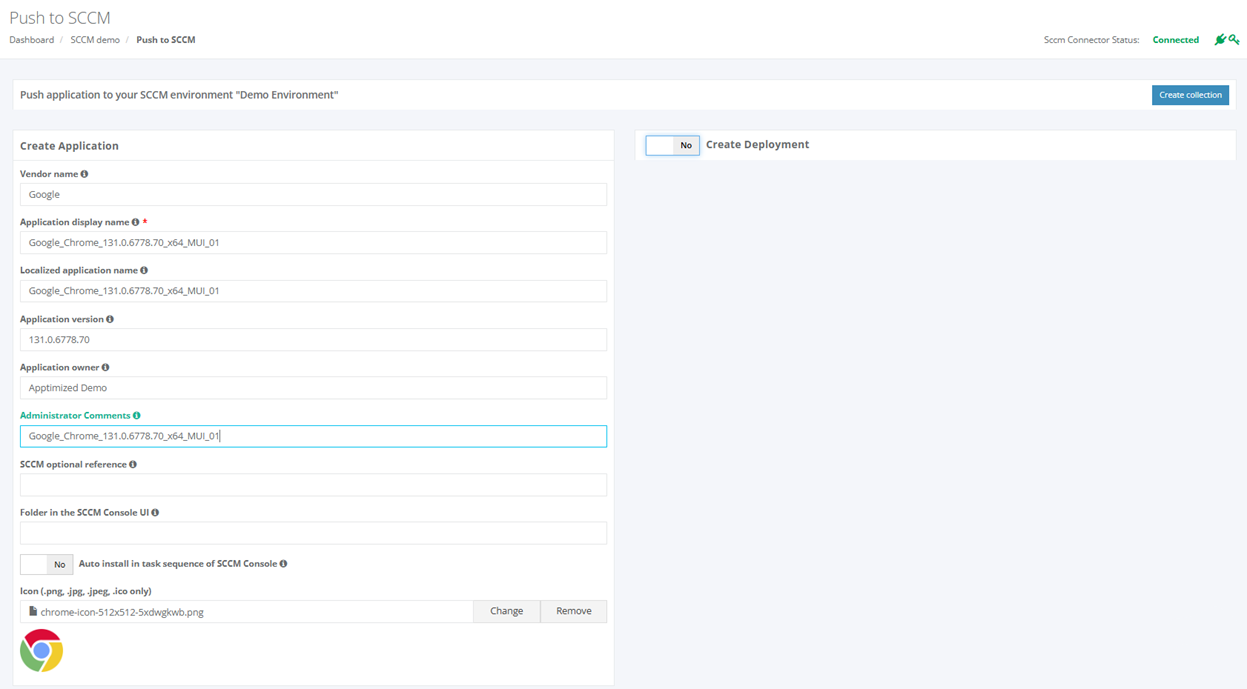
](https://docs.apptimized.com/uploads/images/gallery/2024-12/pushtosccm.png)

Before proceeding with application settings, ensure that the **SCCM Connector** is available and has a valid API key:

- **SCCM Connector Status Monitor**: Located in the upper-right corner of the page, this monitor displays the connection status.
- **SCCM Connection Status**: The status must show **Connected** to confirm that the connector is operational.
- **Indicator Icons**: Check that both the **connector** and **key** icons are green, indicating a latest connector version installed and valid API key.

This quick status check ensures that the SCCM Connector is fully functional, allowing seamless application management and deployment to SCCM.

[![SCCMstatus.png](https://docs.apptimized.com/uploads/images/gallery/2024-12/scaled-1680-/sccmstatus.png)](https://docs.apptimized.com/uploads/images/gallery/2024-12/sccmstatus.png)

 The application inherits default SCCM project settings. . Brief field descriptions are available by hovering the info icon ([![info.png](https://docs.apptimized.com/uploads/images/gallery/2020-07/scaled-1680-/rn4N9zcLXMfUeVtu-info.png)](https://docs.apptimized.com/uploads/images/gallery/2020-07/rn4N9zcLXMfUeVtu-info.png))

An application is scheduled for deployment by clicking on the **Save** button. Apptimized shows the following notification when successful:

[![image-1612435302794.png](https://docs.apptimized.com/uploads/images/gallery/2021-02/scaled-1680-/Hd33sHXtDvnKNoO3-image-1612435302794.png)
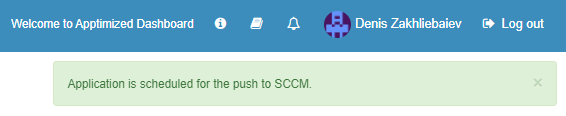
](https://docs.apptimized.com/uploads/images/gallery/2021-02/Hd33sHXtDvnKNoO3-image-1612435302794.png)

It takes a few minutes for SCCM objects to appear in the SCCM Admin Console.

Details of the deployment process components are described in the sections below.

### Create the application in SCCM

The creation of applications can be enabled by **Create Application** switch and editing appropriate settings if required. Brief field descriptions are available by hovering the info icon ([![info.png](https://docs.apptimized.com/uploads/images/gallery/2020-03/scaled-1680-/wmeTsIn3XGJj4EpS-info.png)](https://docs.apptimized.com/uploads/images/gallery/2020-03/wmeTsIn3XGJj4EpS-info.png)) located near every field.

[![createappinSCCM.png](https://docs.apptimized.com/uploads/images/gallery/2024-12/scaled-1680-/createappinsccm.png)
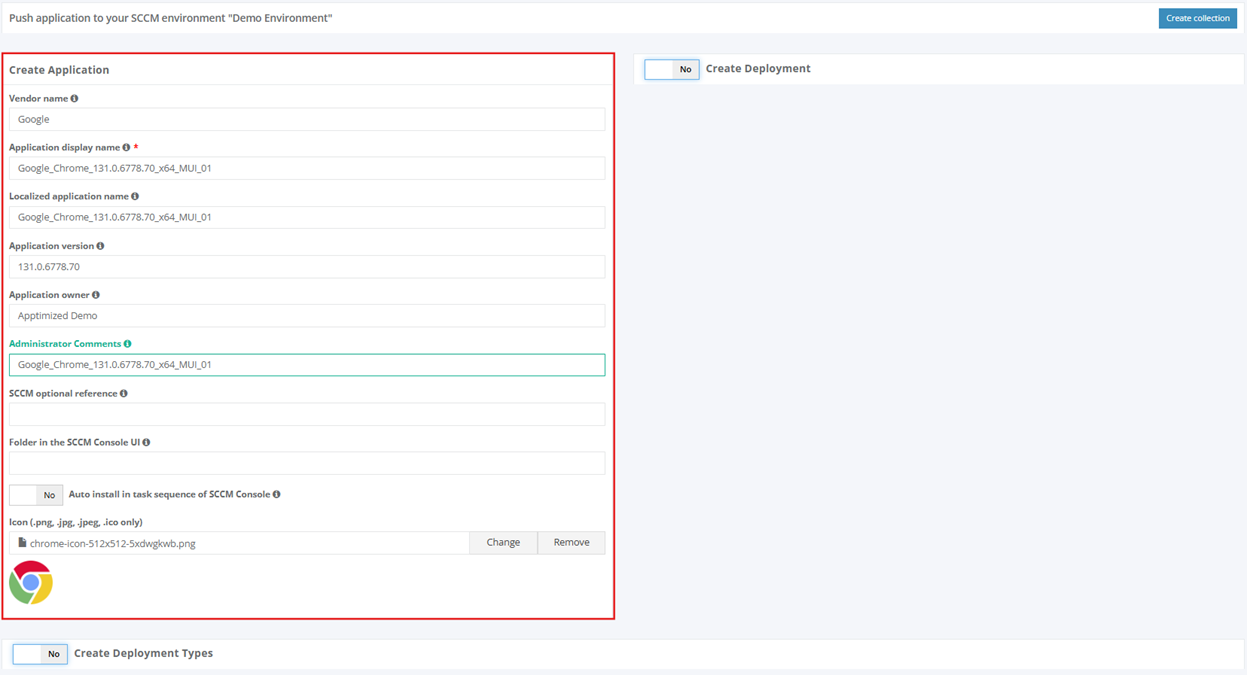
](https://docs.apptimized.com/uploads/images/gallery/2024-12/createappinsccm.png)

Table 4. Application settings

<table aria-rowcount="10" data-tablelook="1696" data-tablestyle="MsoTableGrid" id="bkmrk-settings%C2%A0-details%C2%A0-v" style="font-weight: 400;"><tbody><tr aria-rowindex="1"><td data-celllook="4369" style="width: 191px;">**<span data-contrast="none">Settings</span>**<span data-ccp-props="{"201341983":0,"335559740":259}"> </span>

</td><td data-celllook="4369" style="width: 618px;">**<span data-contrast="none">Details</span>**<span data-ccp-props="{"201341983":0,"335559740":259}"> </span>

</td></tr><tr aria-rowindex="2"><td data-celllook="4369" style="width: 191px;"><span data-contrast="none">Vendor name</span><span data-ccp-props="{"201341983":0,"335559740":259}"> </span>

</td><td data-celllook="4369" style="width: 618px;"><span data-contrast="none">The vendor name equals the vendor field of application in the project portfolio.</span><span data-ccp-props="{"201341983":0,"335559740":259}"> </span>

</td></tr><tr aria-rowindex="3"><td data-celllook="4369" style="width: 191px;"><span data-contrast="none">Application display name</span><span data-ccp-props="{"201341983":0,"335559740":259}"> </span>

</td><td data-celllook="4369" style="width: 618px;"><span data-contrast="none">The application name equals the application field of application in the project portfolio.</span><span data-ccp-props="{"201341983":0,"335559740":259}"> </span>

</td></tr><tr aria-rowindex="4"><td data-celllook="4369" style="width: 191px;"><span data-contrast="none">Localized Application name</span><span data-ccp-props="{"201341983":0,"335559740":259}"> </span>

</td><td data-celllook="4369" style="width: 618px;"><span data-contrast="none">The name of the application to be shown in SCCM console.</span><span data-ccp-props="{"201341983":0,"335559740":259}"> </span>

</td></tr><tr aria-rowindex="5"><td data-celllook="4369" style="width: 191px;"><span data-contrast="none">Application version</span><span data-ccp-props="{"201341983":0,"335559740":259}"> </span>

</td><td data-celllook="4369" style="width: 618px;"><span data-contrast="none">The application version equals the application version of the application in the project portfolio.</span><span data-ccp-props="{"201341983":0,"335559740":259}"> </span>

</td></tr><tr aria-rowindex="6"><td data-celllook="4369" style="width: 191px;"><span data-contrast="none">Application owner</span><span data-ccp-props="{"201341983":0,"335559740":259}"> </span>

</td><td data-celllook="4369" style="width: 618px;"><span data-contrast="none">Package creator name. The default value is the name of a current user.</span><span data-ccp-props="{"201341983":0,"335559740":259}"> </span>

</td></tr><tr aria-rowindex="7"><td data-celllook="4369" style="width: 191px;"><span data-contrast="none">Administrator Comments</span><span data-ccp-props="{"201341983":0,"335559740":259}"> </span>

</td><td data-celllook="4369" style="width: 618px;"><span data-contrast="none">This term corresponds to the term </span>**<span data-contrast="none">Administrator comments</span>**<span data-contrast="none"> in the SCCM admin console.</span><span data-ccp-props="{"201341983":0,"335559740":259}"> </span>

</td></tr><tr aria-rowindex="8"><td data-celllook="4369" style="width: 191px;"><span data-contrast="none">SCCM optional reference</span><span data-ccp-props="{"201341983":0,"335559740":259}"> </span>

</td><td data-celllook="4369" style="width: 618px;"><span data-contrast="none">Optional reference to the SCCM environment.</span><span data-ccp-props="{"201341983":0,"335559740":259}"> </span>

</td></tr><tr aria-rowindex="9"><td data-celllook="4369" style="width: 191px;"><span data-contrast="none">Folder in the SCCM Console UI</span><span data-ccp-props="{"201341983":0,"335559740":259}"> </span>

</td><td data-celllook="4369" style="width: 618px;"><span data-contrast="none">This setting indicates the folder for applications in SCCM Console UI. Applications can store in the main folder </span>**<span data-contrast="none">Applications</span>**<span data-contrast="none"> (default) or any subfolders.</span><span data-ccp-props="{"201341983":0,"335559740":259}"> </span>

</td></tr><tr aria-rowindex="10"><td data-celllook="4369" style="width: 191px;"><span data-contrast="none">Auto-install in task sequence of SCCM Console</span><span data-ccp-props="{"201341983":0,"335559740":259}"> </span>

</td><td data-celllook="4369" style="width: 618px;"><span data-contrast="none">This setting corresponds to the setting</span>**<span data-contrast="none"> Install or uninstall the application by default</span>**<span data-contrast="none"> in the </span>**<span data-contrast="none">Connection and default configuration</span>**<span data-contrast="none"> step (see </span>[<span data-contrast="none">Table 2</span>](https://docs.apptimized.com/link/6#bkmrk-table-2.-advanced-se)<span data-contrast="none">).</span><span data-ccp-props="{"201341983":0,"335559740":259}"> </span>

   
<span data-ccp-props="{"201341983":0,"335559740":259}"> </span>

</td></tr><tr><td style="width: 191px;">Icon (.png, .jpg, .jpeg, .ico only)</td><td style="width: 618px;">This setting allows to **Add**, **Change** or **Remove** the application icon for Software Center. Icons can have pixels dimensions of up to **<span style="font-size: 11.0pt; line-height: 107%; font-family: 'Aptos',sans-serif; mso-ascii-theme-font: minor-latin; mso-fareast-font-family: Aptos; mso-fareast-theme-font: minor-latin; mso-hansi-theme-font: minor-latin; mso-bidi-font-family: 'Times New Roman'; mso-bidi-theme-font: minor-bidi; mso-ansi-language: EN-US; mso-fareast-language: EN-US; mso-bidi-language: AR-SA;">512×512</span><span style="font-size: 11.0pt; line-height: 107%; font-family: 'Aptos',sans-serif; mso-ascii-theme-font: minor-latin; mso-fareast-font-family: Aptos; mso-fareast-theme-font: minor-latin; mso-hansi-theme-font: minor-latin; mso-bidi-font-family: 'Times New Roman'; mso-bidi-theme-font: minor-bidi; mso-ansi-language: EN-US; mso-fareast-language: EN-US; mso-bidi-language: AR-SA;">.</span>**</td></tr></tbody></table>


### Create the deployment type in SCCM

The creation of deployment type can be enabled by **Create Deployment Type** switch and editing appropriate settings if required. Brief field descriptions are available by hovering the info icon ([![info.png](https://docs.apptimized.com/uploads/images/gallery/2020-03/scaled-1680-/wmeTsIn3XGJj4EpS-info.png)](https://docs.apptimized.com/uploads/images/gallery/2020-03/wmeTsIn3XGJj4EpS-info.png)) located near every field.

[![sccm_27_01.png](https://docs.apptimized.com/uploads/images/gallery/2022-06/scaled-1680-/uYpXaycaD5Ckc998-sccm_27_01.png)](https://docs.apptimized.com/uploads/images/gallery/2022-06/uYpXaycaD5Ckc998-sccm_27_01.png)

The list of created deployment type templates (see [**Integration** ](https://docs.apptimized.com/books/apptimized-platform-admin-manual/page/integration)&gt; **Connection and default configuration** step) is available under the **Deployment types** block. All templates are disabled by default. A template becomes active when switched on.

[![image 158.png](https://docs.apptimized.com/uploads/images/gallery/2024-12/scaled-1680-/image-158.png)](https://docs.apptimized.com/uploads/images/gallery/2024-12/image-158.png)

To expand the deployment type template, click Yes button.

[![image.png](https://docs.apptimized.com/uploads/images/gallery/2025-06/scaled-1680-/ib8image.png)](https://docs.apptimized.com/uploads/images/gallery/2025-06/ib8image.png)

Once the **Deployment Type** is enabled, the **Template** section can be filled.

[![screencapture-next-dev-apptimized-Projects-applications-PushToSccm-2025-06-03-15_11_41.png](https://docs.apptimized.com/uploads/images/gallery/2025-06/screencapture-next-dev-apptimized-projects-applications-pushtosccm-2025-06-03-15-11-41.png)](https://docs.apptimized.com/uploads/images/gallery/2024-12/image-159.png)

You can modify the default template settings if necessary. These settings correspond to the SCCM integration configuration.

- **Sensitive fields** that contain valid values are highlighted in **green**.[![Screenshot 2025-06-03 151912.png](https://docs.apptimized.com/uploads/images/gallery/2025-06/scaled-1680-/screenshot-2025-06-03-151912.png)](https://docs.apptimized.com/uploads/images/gallery/2025-06/screenshot-2025-06-03-151912.png)
- If any required field is incorrect, the deployment type will be highlighted in **red**, and the specific fields with errors will also appear in **red**. [![Screenshot 2025-06-03 152142.png](https://docs.apptimized.com/uploads/images/gallery/2025-06/scaled-1680-/j9wscreenshot-2025-06-03-152142.png)](https://docs.apptimized.com/uploads/images/gallery/2025-06/j9wscreenshot-2025-06-03-152142.png)

When errors are present, the **Save** button will be disabled and push to SCCM will be impossible.

To correct the **Path to executable**:

1. Click the field and begin typing the correct folder name or the name of the file located in that folder.[![Screenshot 2025-06-03 153326.png](https://docs.apptimized.com/uploads/images/gallery/2025-06/scaled-1680-/screenshot-2025-06-03-153326.png)](https://docs.apptimized.com/uploads/images/gallery/2025-06/screenshot-2025-06-03-153326.png)
2. Select the correct folder or file from the suggestions. The correct value will be automatically inserted.[![Screenshot 2025-06-03 153014.png](https://docs.apptimized.com/uploads/images/gallery/2025-06/scaled-1680-/screenshot-2025-06-03-153014.png)](https://docs.apptimized.com/uploads/images/gallery/2025-06/screenshot-2025-06-03-153014.png)

- If the executable is in the **root directory**, click **Back to root folder** to navigate there.[![Screenshot 2025-06-03 153510.png](https://docs.apptimized.com/uploads/images/gallery/2025-06/scaled-1680-/screenshot-2025-06-03-153510.png)](https://docs.apptimized.com/uploads/images/gallery/2025-06/screenshot-2025-06-03-153510.png)
- If no executable is found at the specified path, review the available executables listed below the **Installation command with parameters** field.[![Screenshot 2025-06-03 153952.png](https://docs.apptimized.com/uploads/images/gallery/2025-06/scaled-1680-/screenshot-2025-06-03-153952.png)](https://docs.apptimized.com/uploads/images/gallery/2025-06/screenshot-2025-06-03-153952.png)

3. Copy and paste the correct path.[![Screenshot 2025-06-03 154037.png](https://docs.apptimized.com/uploads/images/gallery/2025-06/scaled-1680-/screenshot-2025-06-03-154037.png)](https://docs.apptimized.com/uploads/images/gallery/2025-06/screenshot-2025-06-03-154037.png)
4. Click **Validate**.

Once all required values are valid, you can proceed with pushing to SCCM.

### Create the deployment in SCCM

Creation of deployment can be enabled by **Create Deployment** switch and editing appropriate settings if required. Brief field descriptions are available by hovering the info icon ([![info.png](https://docs.apptimized.com/uploads/images/gallery/2020-03/scaled-1680-/wmeTsIn3XGJj4EpS-info.png)](https://docs.apptimized.com/uploads/images/gallery/2020-03/wmeTsIn3XGJj4EpS-info.png)) located near every field.

[![sccm_29_01.png](https://docs.apptimized.com/uploads/images/gallery/2022-06/scaled-1680-/RtZZdYFnoCzoeftD-sccm_29_01.png)](https://docs.apptimized.com/uploads/images/gallery/2022-06/RtZZdYFnoCzoeftD-sccm_29_01.png)

Table 5. Deployment settings

<table border="1" id="bkmrk-settings-details-col" style="width: 818px; height: 427px;"><tbody><tr style="height: 34px;"><td style="width: 197px; height: 34px;">**Settings**

</td><td style="width: 619px; height: 34px;">**Details**

</td></tr><tr><td style="width: 197px;">Name of default destribution group

</td><td style="width: 619px;">This setting corresponds to the setting **Name of a default distribution group** шn the **Connection and default configuration** step (see [Table 1](https://docs.apptimized.com/link/6#bkmrk-table-1.-basic-setti "Integration")).

</td></tr><tr style="height: 57px;"><td style="width: 197px; height: 57px;">Collection type

</td><td style="width: 619px; height: 57px;">This setting corresponds to the setting **Collection type** in the **Connection and default configuration** step (see [Table 1](https://docs.apptimized.com/link/6#bkmrk-table-1.-basic-setti "Integration")).

</td></tr><tr style="height: 56px;"><td style="width: 197px; height: 56px;">Collection name

</td><td style="width: 619px; height: 56px;">This setting corresponds to the setting **Collection name** in the **Connection and default configuration** step (see [Table 1](https://docs.apptimized.com/link/6#bkmrk-table-1.-basic-setti "Integration")).

</td></tr><tr style="height: 56px;"><td style="width: 197px; height: 56px;">Install or uninstall the application by default

</td><td style="width: 619px; height: 56px;">This setting corresponds to the setting **Install or uninstall the application by default** in the **Connection and default configuration** step (see [Table 2](https://docs.apptimized.com/link/6#bkmrk-table-2.-advanced-se "Integration")).

</td></tr><tr style="height: 56px;"><td style="width: 197px; height: 56px;">Deploy the purpose of the installation by default

</td><td style="width: 619px; height: 56px;">This setting corresponds to the setting **Deploy purpose of the installation by default** in the **Connection and default configuration** step (see [Table 2](https://docs.apptimized.com/link/6#bkmrk-table-2.-advanced-se "Integration")).

</td></tr><tr style="height: 56px;"><td style="width: 197px; height: 56px;">Deadline time

</td><td style="width: 619px; height: 56px;">This setting corresponds to the setting **Deadline time** in the **Connection and default configuration** step (see [Table 2](https://docs.apptimized.com/link/6#bkmrk-table-2.-advanced-se "Integration")).

</td></tr><tr style="height: 56px;"><td style="width: 197px; height: 56px;">Time zone of deadline

</td><td style="width: 619px; height: 56px;">This setting corresponds to the setting **Time zone of a deadline** in the **Connection and default configuration** step (see [Table 1](https://docs.apptimized.com/link/6#bkmrk-table-1.-basic-setti "Integration")).

</td></tr><tr style="height: 56px;"><td style="width: 197px; height: 56px;">Deadline date

</td><td style="width: 619px; height: 56px;">This setting sets the deadline date for the application installation.

The default value is set to the current date.

</td></tr></tbody></table>