| **Component** | **Description** |
| https://app.apptimized.com/ | Address for access to Apptimized Portal |
| wss://rdp-gw-v2.apptimized.com | Address for working with RDP connections in Apptimized Portal Granting permissions to communicate via WebSocket SSL protocol is needed |
| https://auth.apptimized.com/ | Address for single sign-on |
| https://admin.apptimized.com/ | Address for manage organization configurations |
https://apptimizedportalshare.file.core.windows.net | Address for download files from Apptimized Portal |
| https://screenshots.api.apptimized.technology | Address for screenshots storage |
| https://docs.apptimized.com/ | Address for Apptimized user documentation |
| \*.chatlio.com | Address for access to support chat widget |
| \*.swarm.apptimized.com | Address for Apptimized Portal virtualization service. Granting privileges on wildcards subdomains is needed. Granting permissions to connect via RDP protocol is needed |
| **Login** | **Password** |
| apptimized | apptimized |
| administrator | apptimized |
| **Component** | **Description** |
| CNAME | Record created with customer's DNS provider using the following configuration: CNAME %subdomain%.%customerdomain%.%TLD% = *apptimized-portal.azurewebsites.net* Example: *CNAME apps.greatcompany.com = apptimized-portal.azurewebsites.net* |
| TXT | Record created with customer's DNS provider using the following configuration: TXT = verification code = %customerdomain%.%TLD% Example: *TXT=7D86E8C065D4002DA1DC8E74C921D1EDAFA = greatcompany.com* |
| SSL certificate | Certificate in a form of PFX file + password combined into a PWD file. |
| Domain address | Address for custom Apptimized Portal whitelabeling. |
| DNS host | Name of Domain Name Server host. |
| Domain for mail sending | Address for email sending configuration. |
| **Component** | **Description** |
| https://app.apptimized.com/ | Address for access to Apptimized Portal |
| https://rdp-gw.apptimized.com/ | Address for working with RDP connections in Apptimized Portal |
| https://rdproxy.apptimized.com/ | Address for working with DRP connections in Apptimized Portal via proxy |
| https://screenshots.api.apptimized.technology/ | Address for screenshots storage |
| https://auth.apptimized.com/ | Address for single sign-on |
| \*.swarm.apptimized.com | Address for Apptimized Portal virtualization service. Granting privileges on wildcards subdomains is needed. Granting permissions to connect via RDP protocol is needed |
| \*.chatlio.com | Address for access to support chat widget |
The application should have a package file produced during the Packaging step (Factory or Self-Service). If the required file is missing, Apptimized shows the notification. [](https://docs.apptimized.com/uploads/images/gallery/2020-03/5lwmLAFlfpRUVX4K-sccm_15.png)
After locating the application in the list, the deployment process can be triggered by clicking the extended menu in the **Actions** column and selecting **Push to SCCM as Application**. [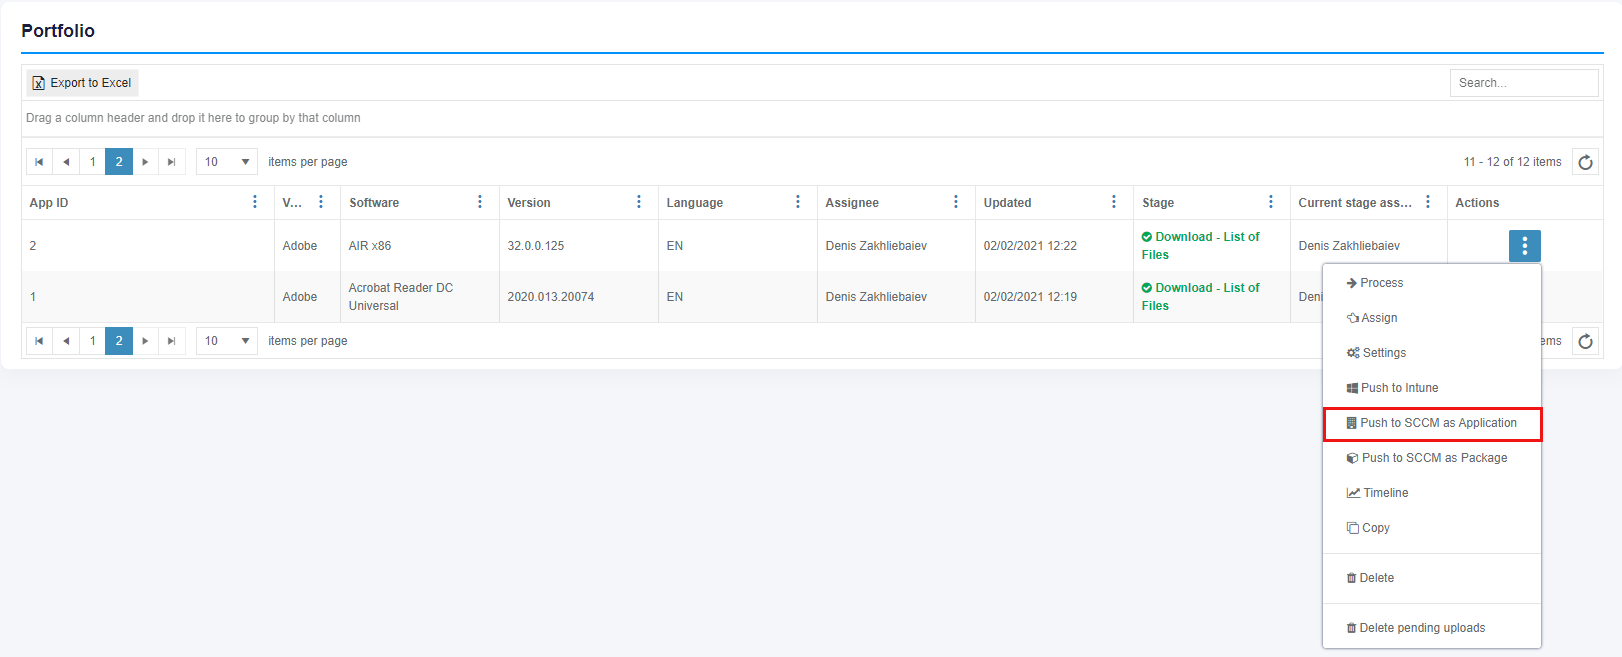](https://docs.apptimized.com/uploads/images/gallery/2024-12/portfoliosccm.png) Apptimized shows the following screen when successful: [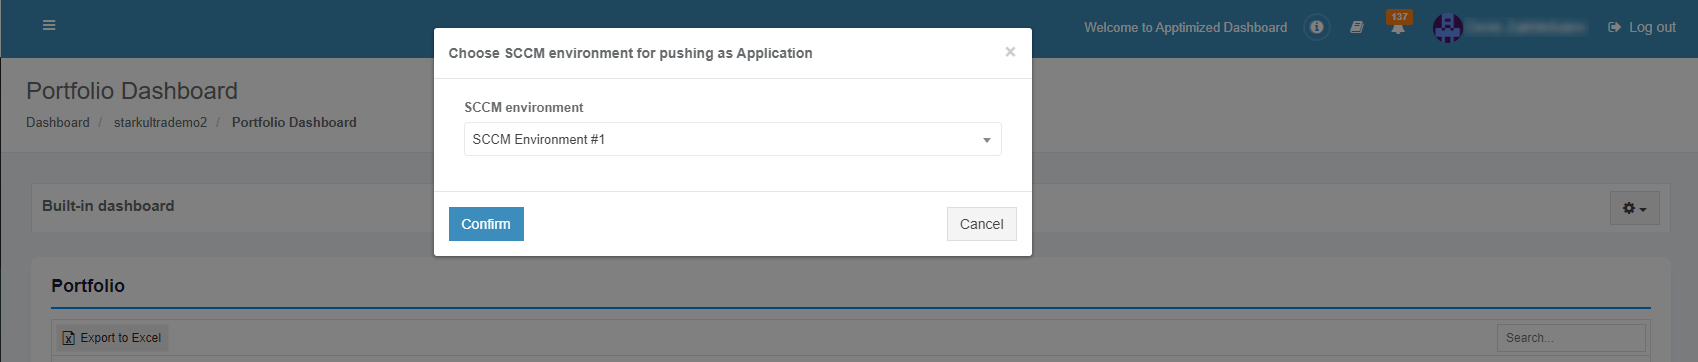](https://docs.apptimized.com/uploads/images/gallery/2021-12/qIWzgEbwivBsPKpL-sccm_31_01.png) The option to continue the deploying process is available after selecting the **SCCM environment** and clicking the **Confirm** button. Apptimized shows the following screen when successful: [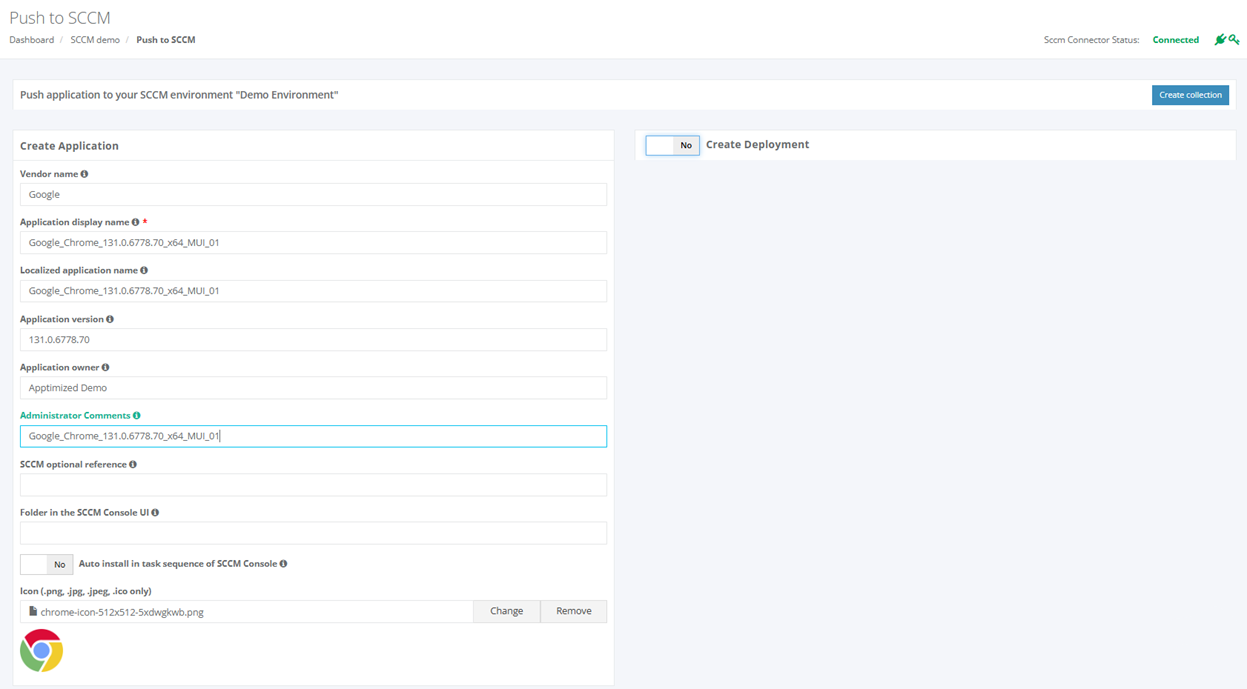](https://docs.apptimized.com/uploads/images/gallery/2024-12/pushtosccm.png) Before proceeding with application settings, ensure that the **SCCM Connector** is available and has a valid API key: - **SCCM Connector Status Monitor**: Located in the upper-right corner of the page, this monitor displays the connection status. - **SCCM Connection Status**: The status must show **Connected** to confirm that the connector is operational. - **Indicator Icons**: Check that both the **connector** and **key** icons are green, indicating a latest connector version installed and valid API key. This quick status check ensures that the SCCM Connector is fully functional, allowing seamless application management and deployment to SCCM. [](https://docs.apptimized.com/uploads/images/gallery/2024-12/sccmstatus.png) The application inherits default SCCM project settings. . Brief field descriptions are available by hovering the info icon ([](https://docs.apptimized.com/uploads/images/gallery/2020-07/rn4N9zcLXMfUeVtu-info.png)) An application is scheduled for deployment by clicking on the **Save** button. Apptimized shows the following notification when successful: [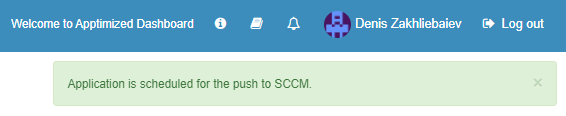](https://docs.apptimized.com/uploads/images/gallery/2021-02/Hd33sHXtDvnKNoO3-image-1612435302794.png) It takes a few minutes for SCCM objects to appear in the SCCM Admin Console. Details of the deployment process components are described in the sections below. ### Create the application in SCCM The creation of applications can be enabled by **Create Application** switch and editing appropriate settings if required. Brief field descriptions are available by hovering the info icon ([](https://docs.apptimized.com/uploads/images/gallery/2020-03/wmeTsIn3XGJj4EpS-info.png)) located near every field. [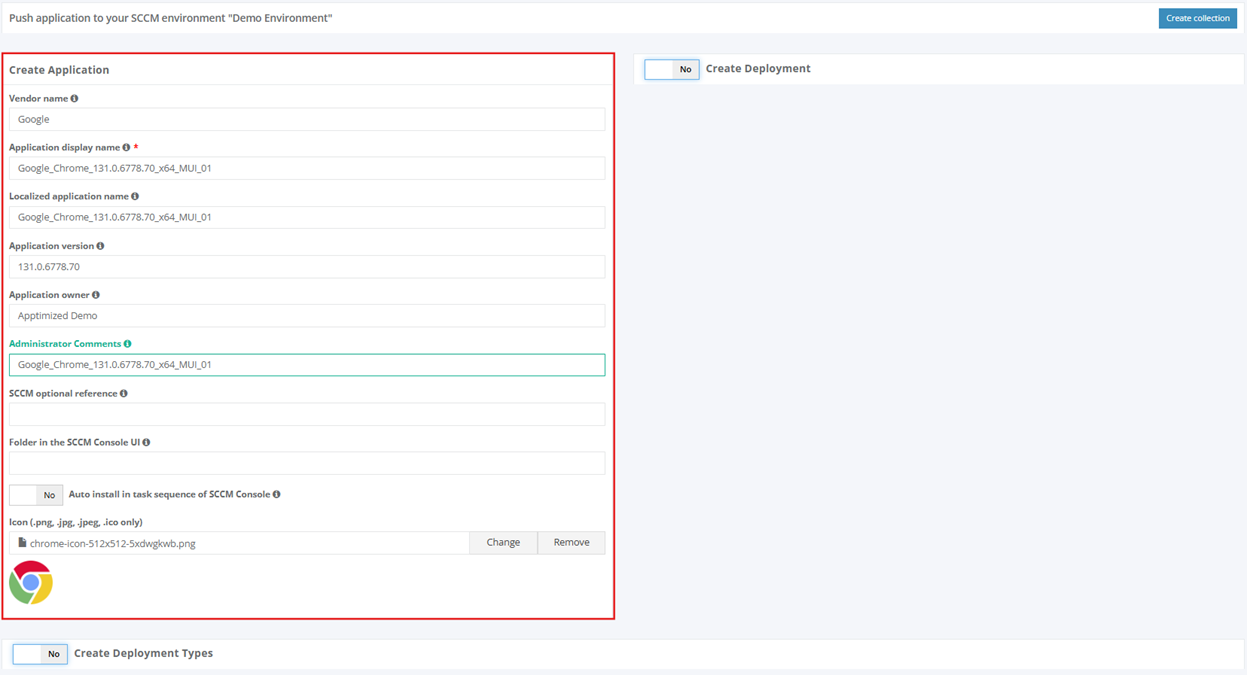](https://docs.apptimized.com/uploads/images/gallery/2024-12/createappinsccm.png) Table 4. Application settings| **Settings** | **Details** |
| Vendor name | The vendor name equals the vendor field of application in the project portfolio. |
| Application display name | The application name equals the application field of application in the project portfolio. |
| Localized Application name | The name of the application to be shown in SCCM console. |
| Application version | The application version equals the application version of the application in the project portfolio. |
| Application owner | Package creator name. The default value is the name of a current user. |
| Administrator Comments | This term corresponds to the term **Administrator comments** in the SCCM admin console. |
| SCCM optional reference | Optional reference to the SCCM environment. |
| Folder in the SCCM Console UI | This setting indicates the folder for applications in SCCM Console UI. Applications can store in the main folder **Applications** (default) or any subfolders. |
| Auto-install in task sequence of SCCM Console | This setting corresponds to the setting** Install or uninstall the application by default** in the **Connection and default configuration** step (see [Table 2](https://docs.apptimized.com/link/6#bkmrk-table-2.-advanced-se)). |
| Icon (.png, .jpg, .jpeg, .ico only) | This setting allows to **Add**, **Change** or **Remove** the application icon for Software Center. Icons can have pixels dimensions of up to **512×512.** |
| **Settings** | **Details** |
| Name of default destribution group | This setting corresponds to the setting **Name of a default distribution group** шn the **Connection and default configuration** step (see [Table 1](https://docs.apptimized.com/link/6#bkmrk-table-1.-basic-setti "Integration")). |
| Collection type | This setting corresponds to the setting **Collection type** in the **Connection and default configuration** step (see [Table 1](https://docs.apptimized.com/link/6#bkmrk-table-1.-basic-setti "Integration")). |
| Collection name | This setting corresponds to the setting **Collection name** in the **Connection and default configuration** step (see [Table 1](https://docs.apptimized.com/link/6#bkmrk-table-1.-basic-setti "Integration")). |
| Install or uninstall the application by default | This setting corresponds to the setting **Install or uninstall the application by default** in the **Connection and default configuration** step (see [Table 2](https://docs.apptimized.com/link/6#bkmrk-table-2.-advanced-se "Integration")). |
| Deploy the purpose of the installation by default | This setting corresponds to the setting **Deploy purpose of the installation by default** in the **Connection and default configuration** step (see [Table 2](https://docs.apptimized.com/link/6#bkmrk-table-2.-advanced-se "Integration")). |
| Deadline time | This setting corresponds to the setting **Deadline time** in the **Connection and default configuration** step (see [Table 2](https://docs.apptimized.com/link/6#bkmrk-table-2.-advanced-se "Integration")). |
| Time zone of deadline | This setting corresponds to the setting **Time zone of a deadline** in the **Connection and default configuration** step (see [Table 1](https://docs.apptimized.com/link/6#bkmrk-table-1.-basic-setti "Integration")). |
| Deadline date | This setting sets the deadline date for the application installation. The default value is set to the current date. |
The application should have a package file produced during the Packaging step (Factory or Self-Service). If the required file is missing, Apptimized shows the notification. [](https://docs.apptimized.com/uploads/images/gallery/2020-03/5lwmLAFlfpRUVX4K-sccm_15.png)
After locating the application in the list, the deployment process can be triggered by clicking the extended menu in the **Actions** column and selecting **Push to SCCM as Package**. [.png)](https://docs.apptimized.com/uploads/images/gallery/2021-11/jww7o9Ppy1i16fW9-sccm_21_01-(1).png) Apptimized shows the following screen when successful: [](https://docs.apptimized.com/uploads/images/gallery/2021-12/qIWzgEbwivBsPKpL-sccm_31_01.png) The option to continue the deploying process is available after selecting the **SCCM environment** and clicking the **Confirm** button. Apptimized shows the following screen when successful: [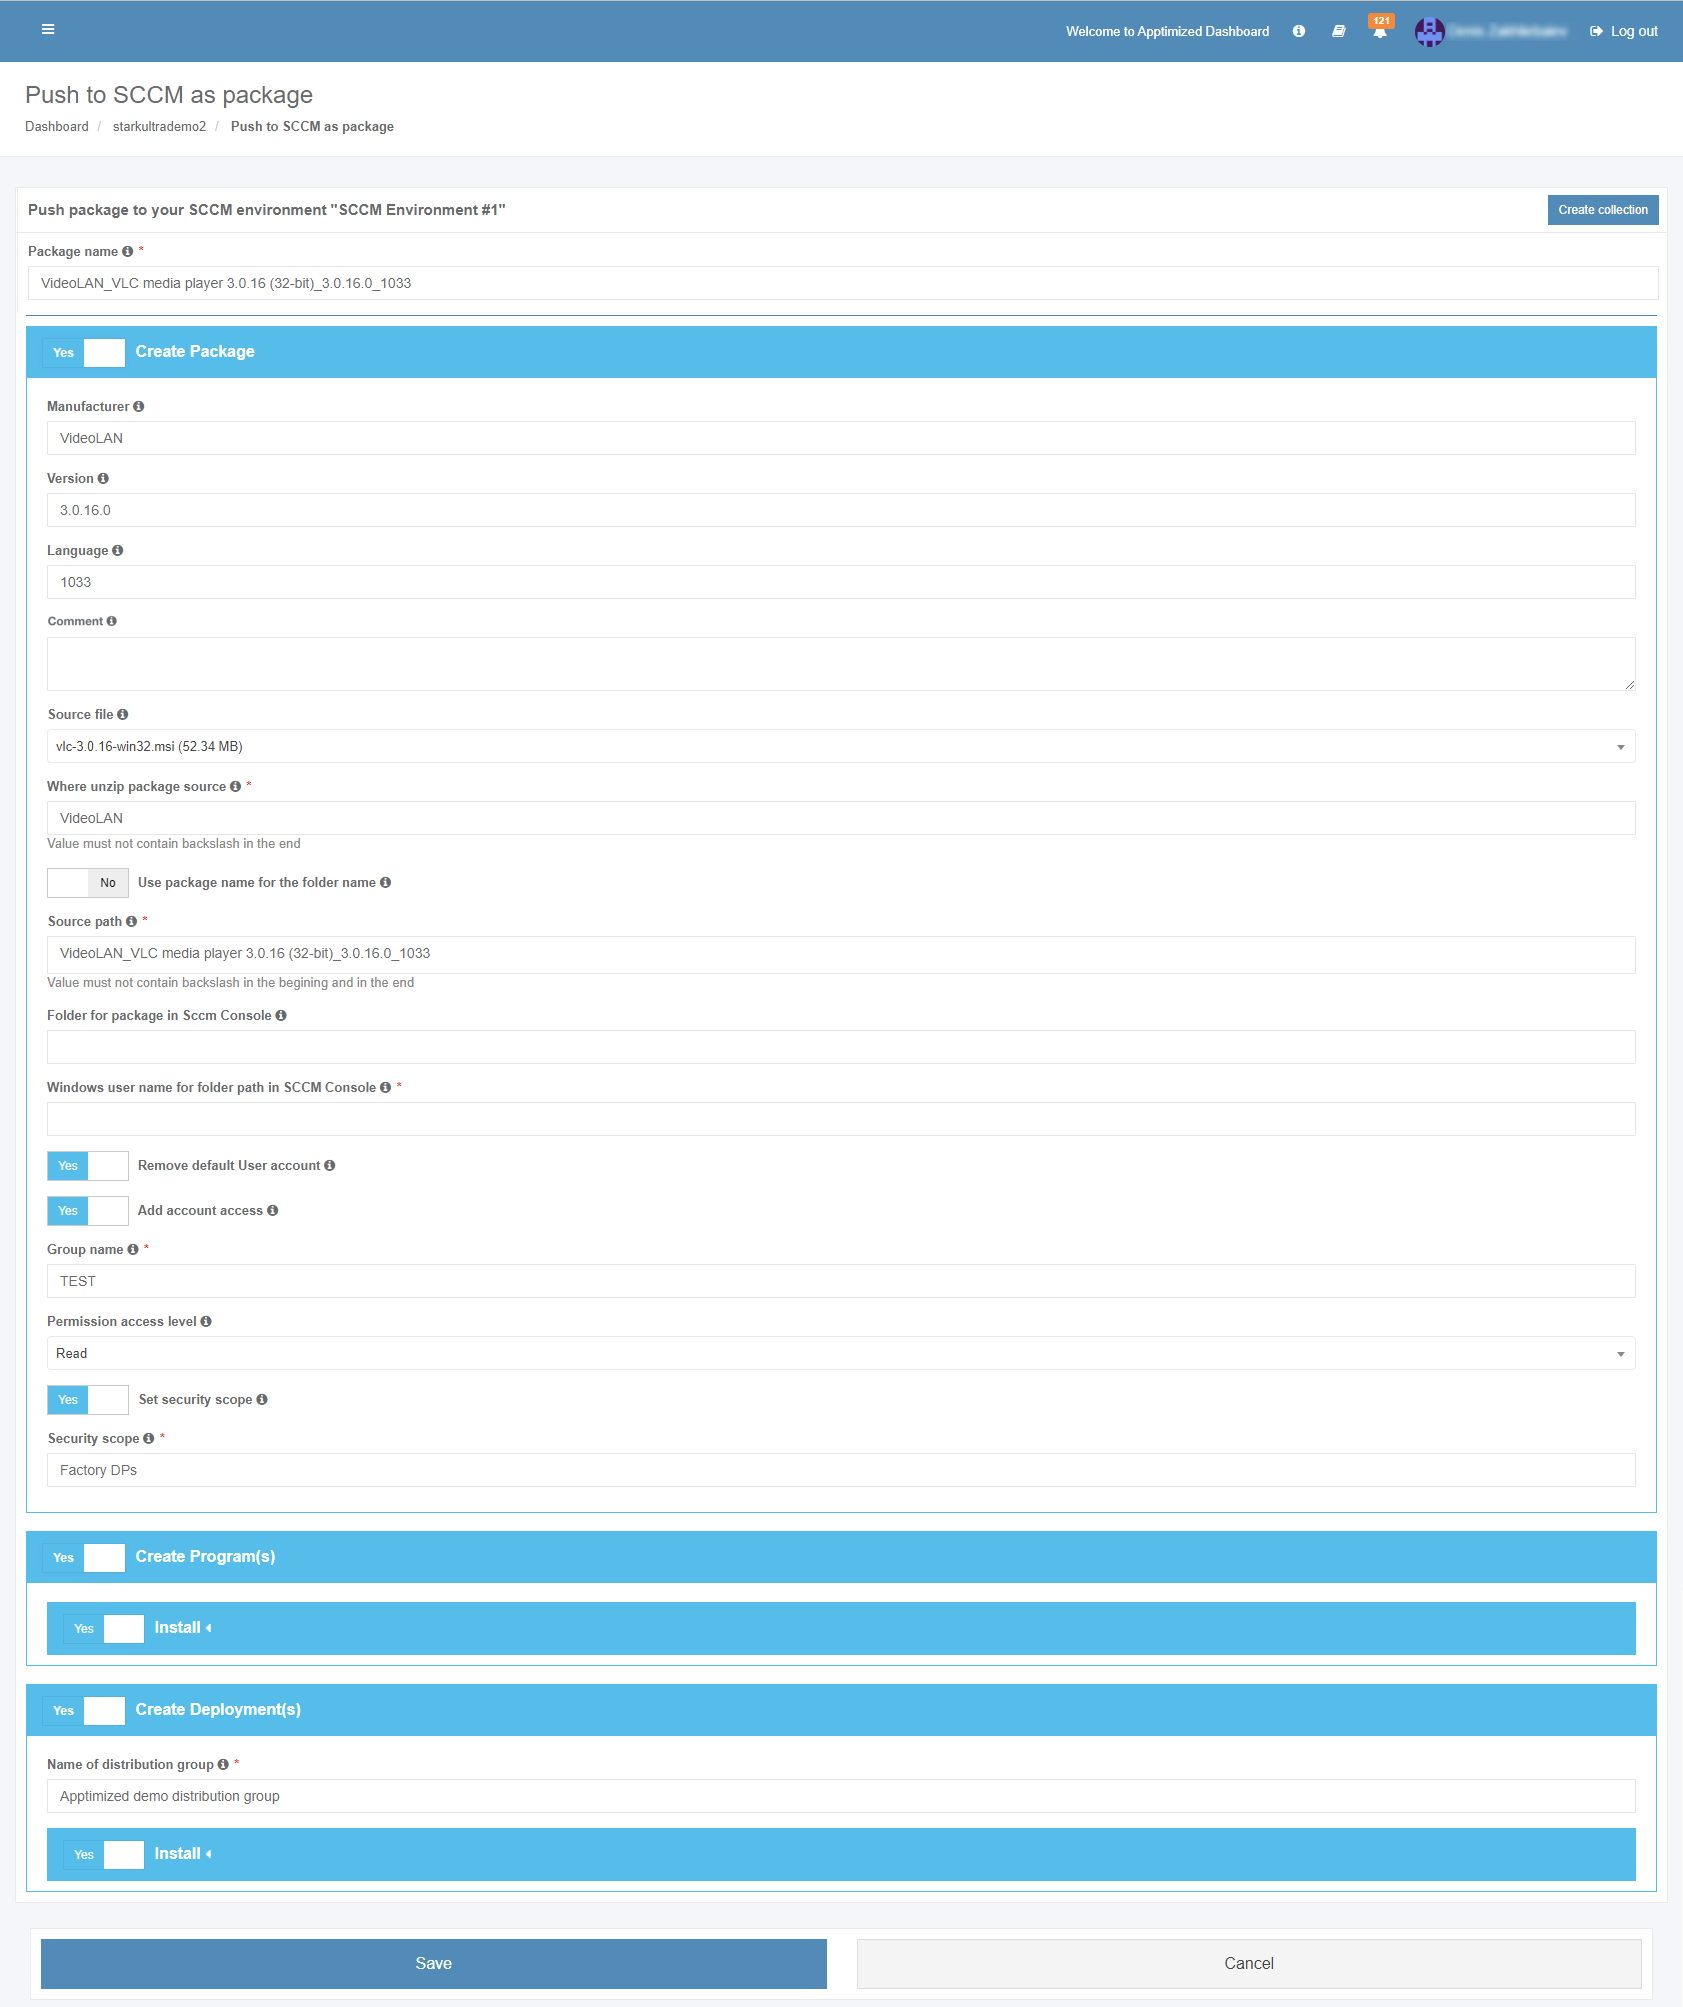](https://docs.apptimized.com/uploads/images/gallery/2022-04/9QZubXwtfYZqtULK-sccm_22_03.png) **The package name** option is the only option that requires manual verification and confirmation. The package inherits default SCCM project settings. . Brief field descriptions are available by hovering the info icon ([](https://docs.apptimized.com/uploads/images/gallery/2020-07/rn4N9zcLXMfUeVtu-info.png))**Note****.** Max length for a package name is 50 symbols.
The package is scheduled for deployment by clicking on the **Save** button. Apptimized shows the following notification when successful: [.png)](https://docs.apptimized.com/uploads/images/gallery/2021-11/PZ7Gcvp685CwvKa1-sccm_26_01-(1).png) It takes a few minutes for SCCM objects to appear in the SCCM Admin Console. Details of the deployment process components are described in the sections below. ##### Create the package in SCCM The creation of applications can be enabled by **Create Application** switch and editing appropriate settings if required. Brief field descriptions are available by hovering the info icon ([](https://docs.apptimized.com/uploads/images/gallery/2020-03/wmeTsIn3XGJj4EpS-info.png)) located near every field. [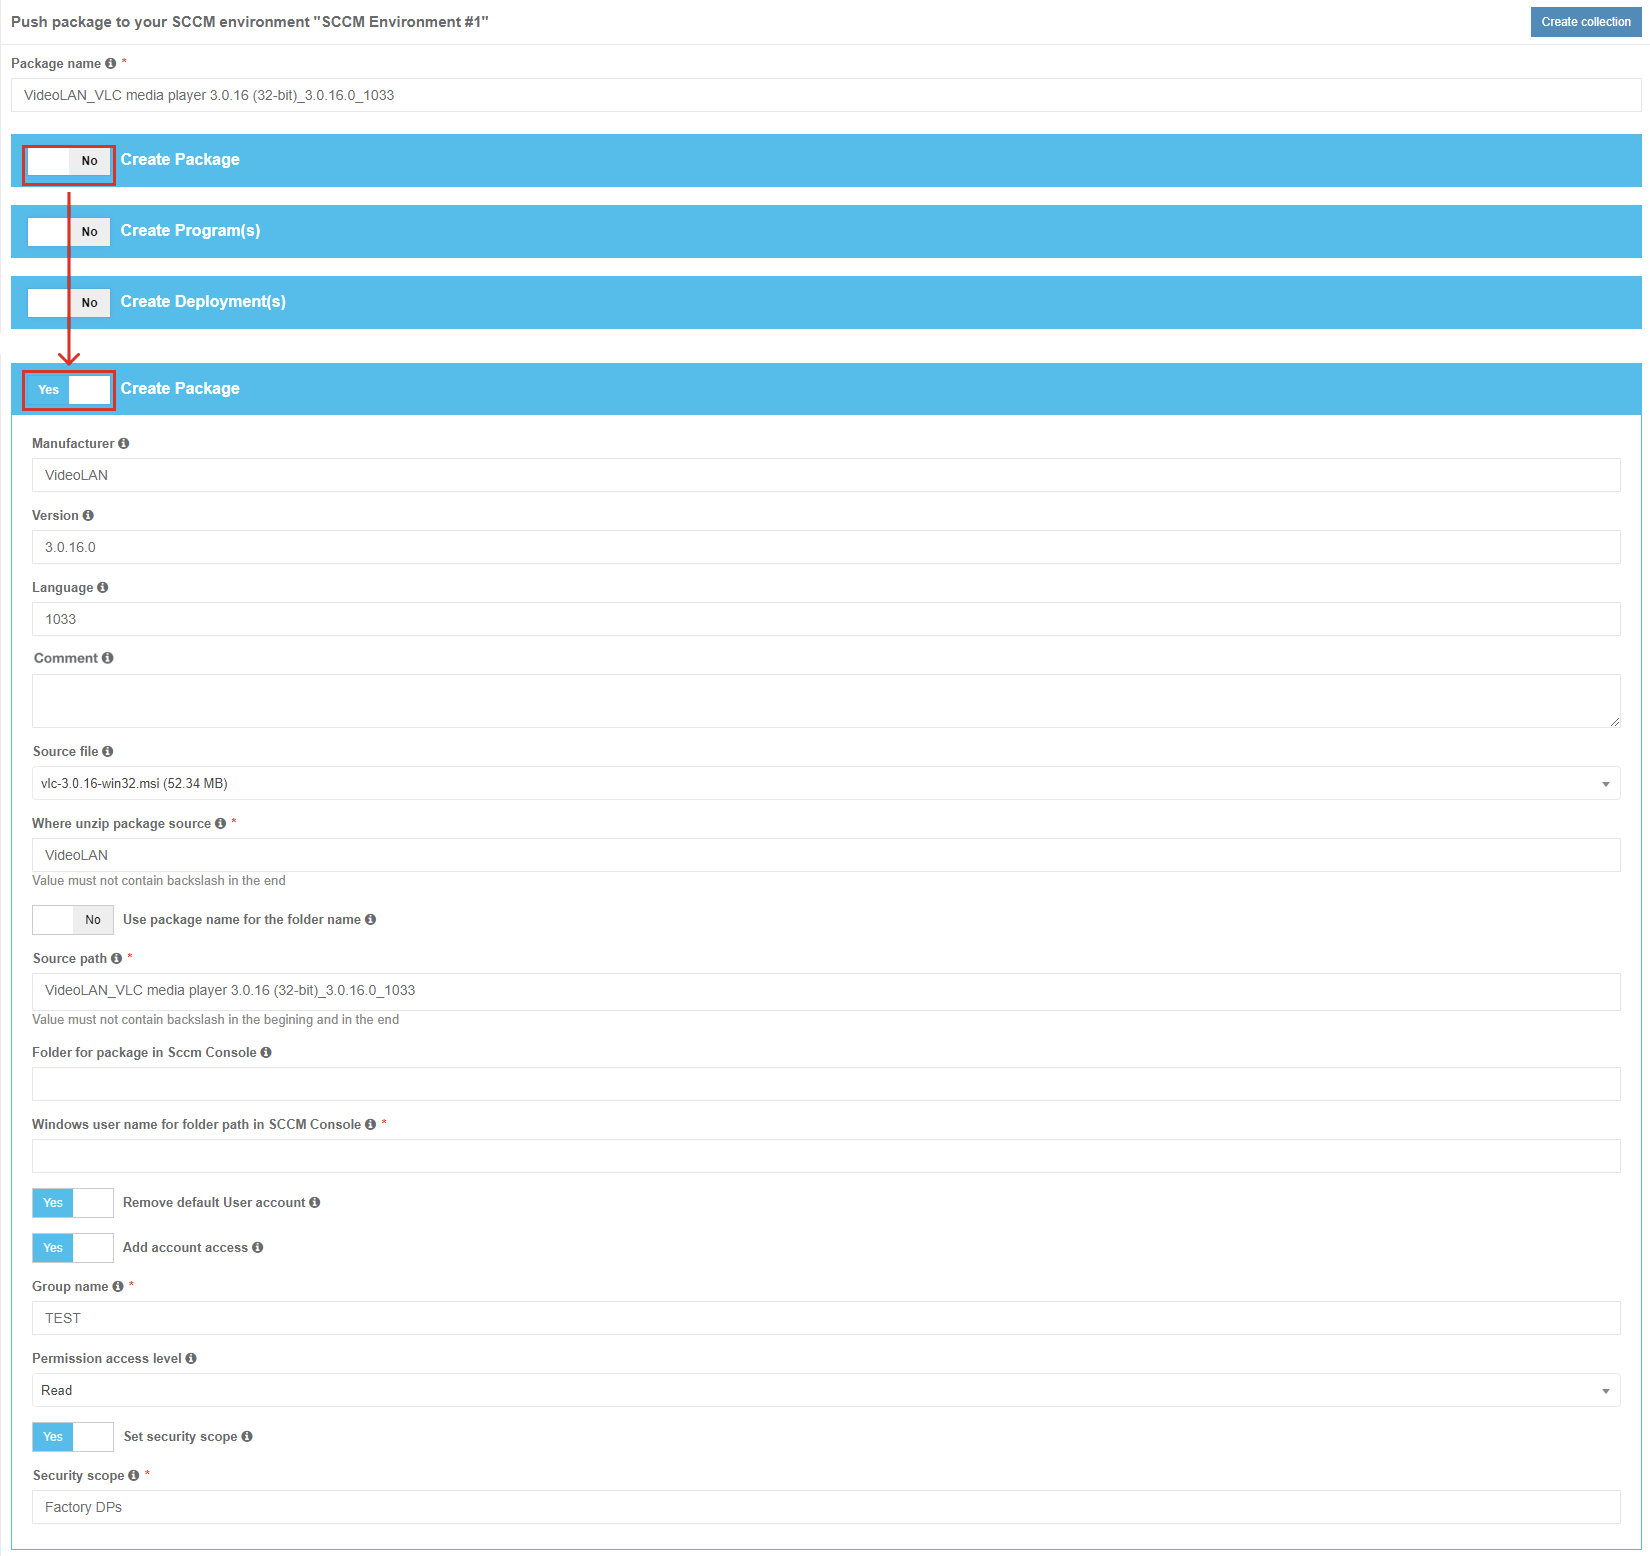](https://docs.apptimized.com/uploads/images/gallery/2022-04/FENT5vxfRRTNQr3B-sccm_23_03.png)| **Settings** | **Details** |
| Manufacturer | This setting equals the vendor field of application in the [project portfolio](https://docs.apptimized.com/link/246#bkmrk-table-1.-information). |
| Version | This setting equals the version field of the application in the [project portfolio](https://docs.apptimized.com/link/246#bkmrk-table-1.-information). |
| Language | This setting equals the language field of application in the [project portfolio](https://docs.apptimized.com/link/246#bkmrk-table-1.-information). |
| Сomment | This setting enables setting the optional description for the package. |
| Source file | This setting enables the selection of the package that will be deployed under SCCM. |
| Where unzip package source | This setting corresponds to **Where unzip package source setting** under **Project Settings** > **Integration** > **SCCM** > **Package template**. (see [Table 4](https://docs.apptimized.com/link/6#bkmrk-table%C2%A04.%C2%A0package%C2%A0tem)) |
| Use package name for the folder name | This setting corresponds to **Use package name for the folder name** setting under **Project Settings** > **Integration** > **SCCM** > **Package template**. (see [Table 4](https://docs.apptimized.com/link/6#bkmrk-table%C2%A04.%C2%A0package%C2%A0tem)) |
| Source path | This setting corresponds to **Source path** setting under **Project Settings** > **Integration** > **SCCM** > **Package template**. (see [Table 4](https://docs.apptimized.com/link/6#bkmrk-table%C2%A04.%C2%A0package%C2%A0tem)) |
| Folder for package in Sccm Console | This setting corresponds to **Folder for package in Sccm Console** setting under **Project Settings** > **Integration** > **SCCM** > **Package template**. (see [Table 4](https://docs.apptimized.com/link/6#bkmrk-table%C2%A04.%C2%A0package%C2%A0tem)) |
| Windows user name for folder path in SCCM Console | This setting indicates the user name of user under Windows OS for folder path in SCCM Console. |
| Remove default User account | This setting corresponds to **Remove default User account** setting under **Project Settings** > **Integration** > **SCCM** > **Package template**. (see [Table 4](https://docs.apptimized.com/link/6#bkmrk-table%C2%A04.%C2%A0package%C2%A0tem)) |
| Add account access | This setting corresponds to **Add account access** setting under **Project Settings** > **Integration** > **SCCM** > **Package template**. (see [Table 4](https://docs.apptimized.com/link/6#bkmrk-table%C2%A04.%C2%A0package%C2%A0tem)) |
| Group name | This setting corresponds to **Group name** setting under **Project Settings** > **Integration** > **SCCM** > **Package template**. (see [Table 4](https://docs.apptimized.com/link/6#bkmrk-table%C2%A04.%C2%A0package%C2%A0tem)) |
| Permission access level | This setting corresponds to **Permission access level** setting under **Project Settings** > **Integration** > **SCCM** > **Package template**. (see [Table 4](https://docs.apptimized.com/link/6#bkmrk-table%C2%A04.%C2%A0package%C2%A0tem)) |
| Set security scope | This setting corresponds to **Set security scope** setting under **Project Settings** > **Integration** > **SCCM** > **Package template**. (see [Table 4](https://docs.apptimized.com/link/6#bkmrk-table%C2%A04.%C2%A0package%C2%A0tem)) |
| Security scope | This setting corresponds to **Security scope** setting under **Project Settings** > **Integration** > **SCCM** > **Package template**. (see [Table 4](https://docs.apptimized.com/link/6#bkmrk-table%C2%A04.%C2%A0package%C2%A0tem)) |
The checkbox **All applications** always relates to the current folder. The screen below shows the import of contained in the root **Applications** folder.
Applications can be excluded from import by unticking checkboxes in front of their names. [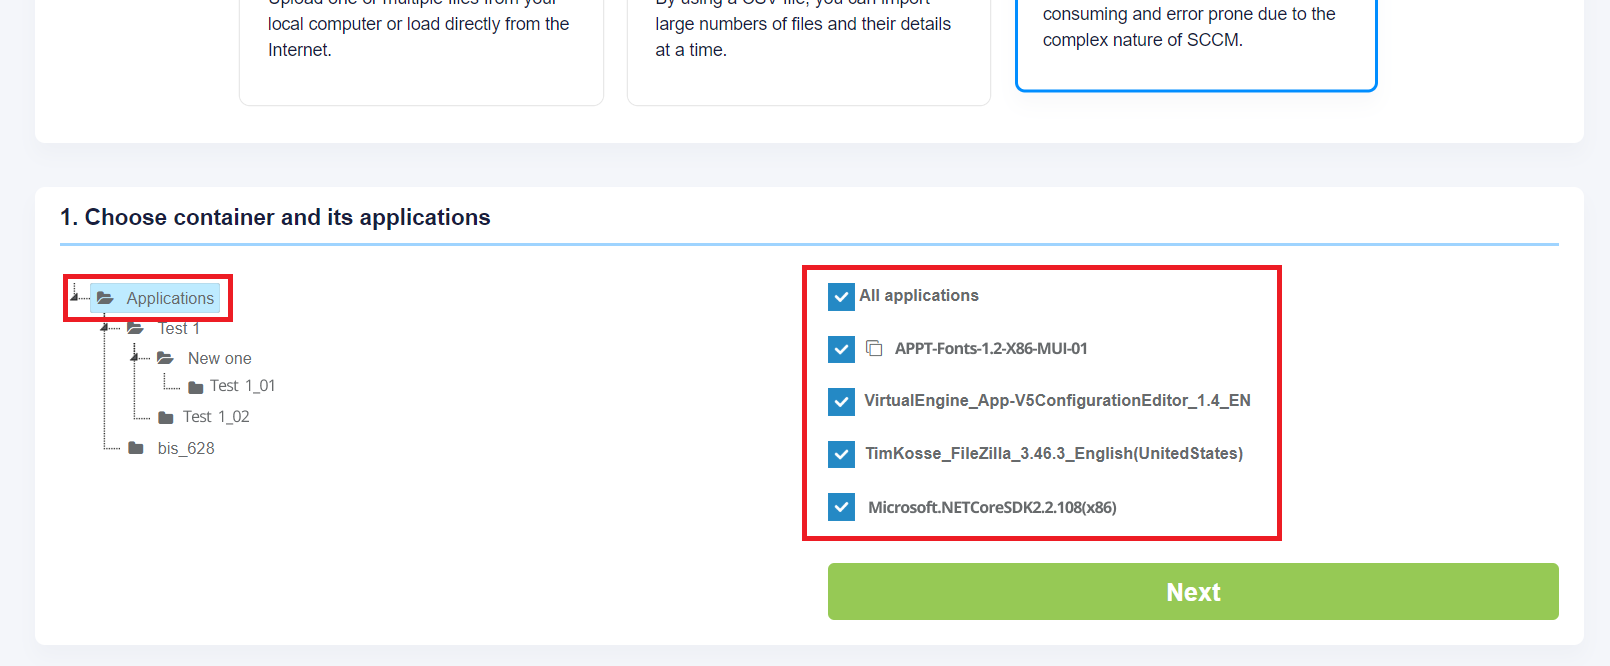](https://docs.apptimized.com/uploads/images/gallery/2020-04/zYxPLIhV3Rp2T9pf-sccm_module_03.png)The icon below means that this application already exists in the project portfolio but can be imported for a second time. As a result, this created duplicates in the project portfolio. [](https://docs.apptimized.com/uploads/images/gallery/2020-04/Jyi0LGvtlEZsCLcQ-sccm_module_04.png)
The import process starts by clicking on the **Next** button. It takes up to **30 minutes** and will depend on the number of applications and their size. “Set metadata” shows import candidates' meta information and provides the ability to update it to desired values. All required fields have \* in front of their label. [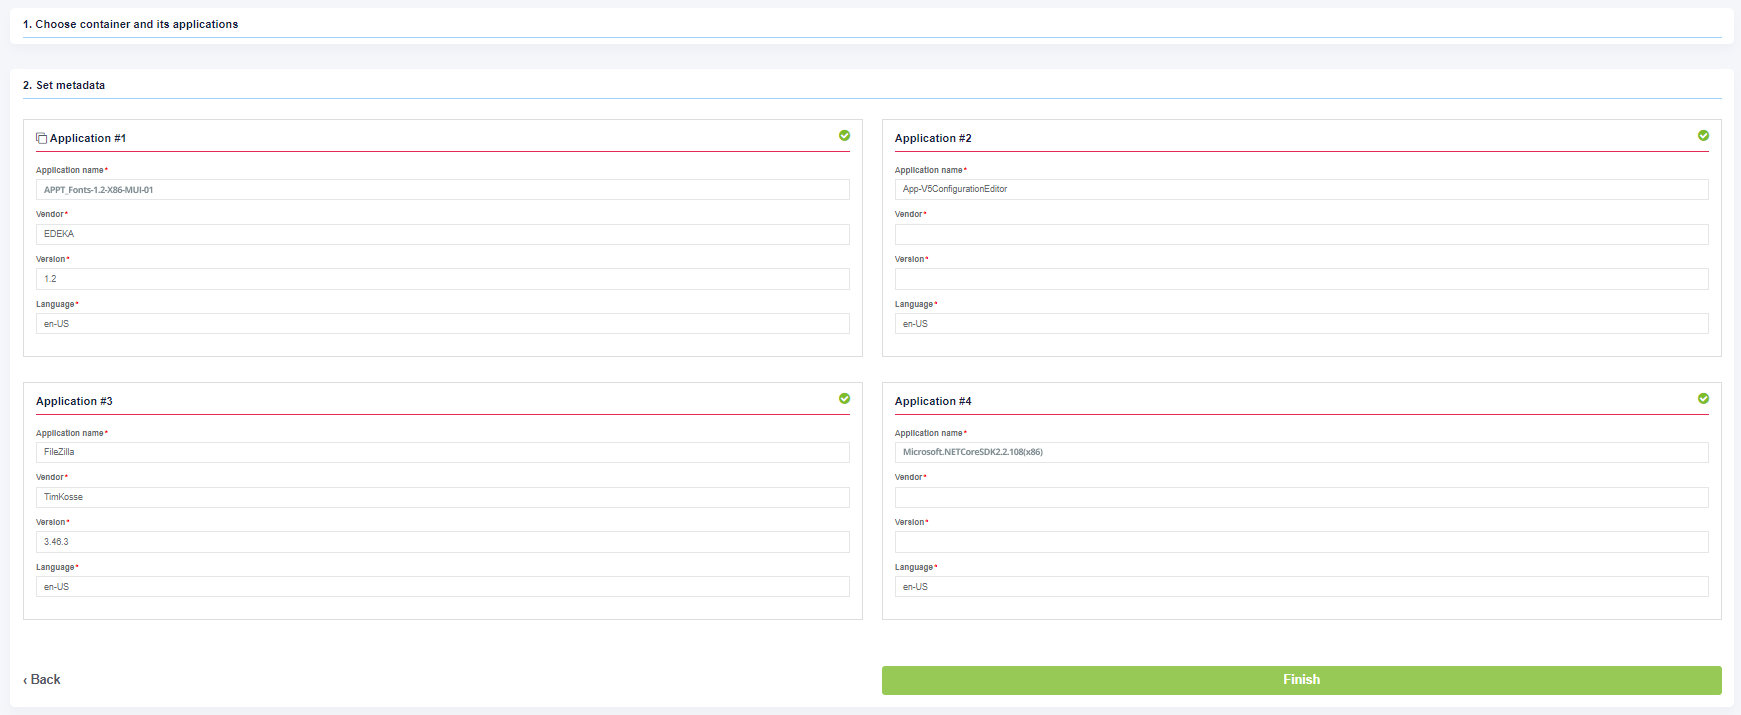](https://docs.apptimized.com/uploads/images/gallery/2020-04/Lyp1yNdT7Sc9HTFd-sccm_module_05.png) Exclude applications from the import by unticking the checkbox. [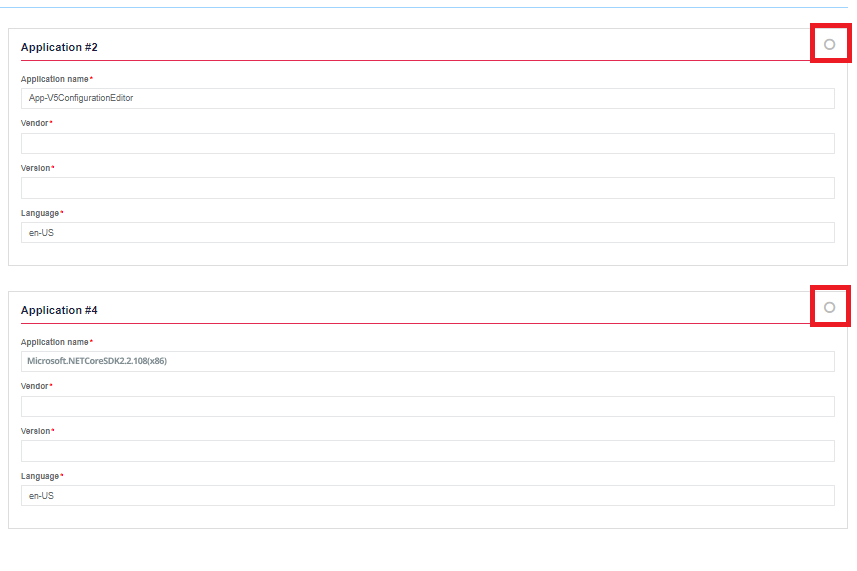](https://docs.apptimized.com/uploads/images/gallery/2020-03/Ty7FwEwZjuy2SN4h-sccm_44_2.png) The process reverts to the initial screen by clicking on the **Back** button and finalizes by clicking on the **Finish** button. Apptimized shows the following notification when successful: [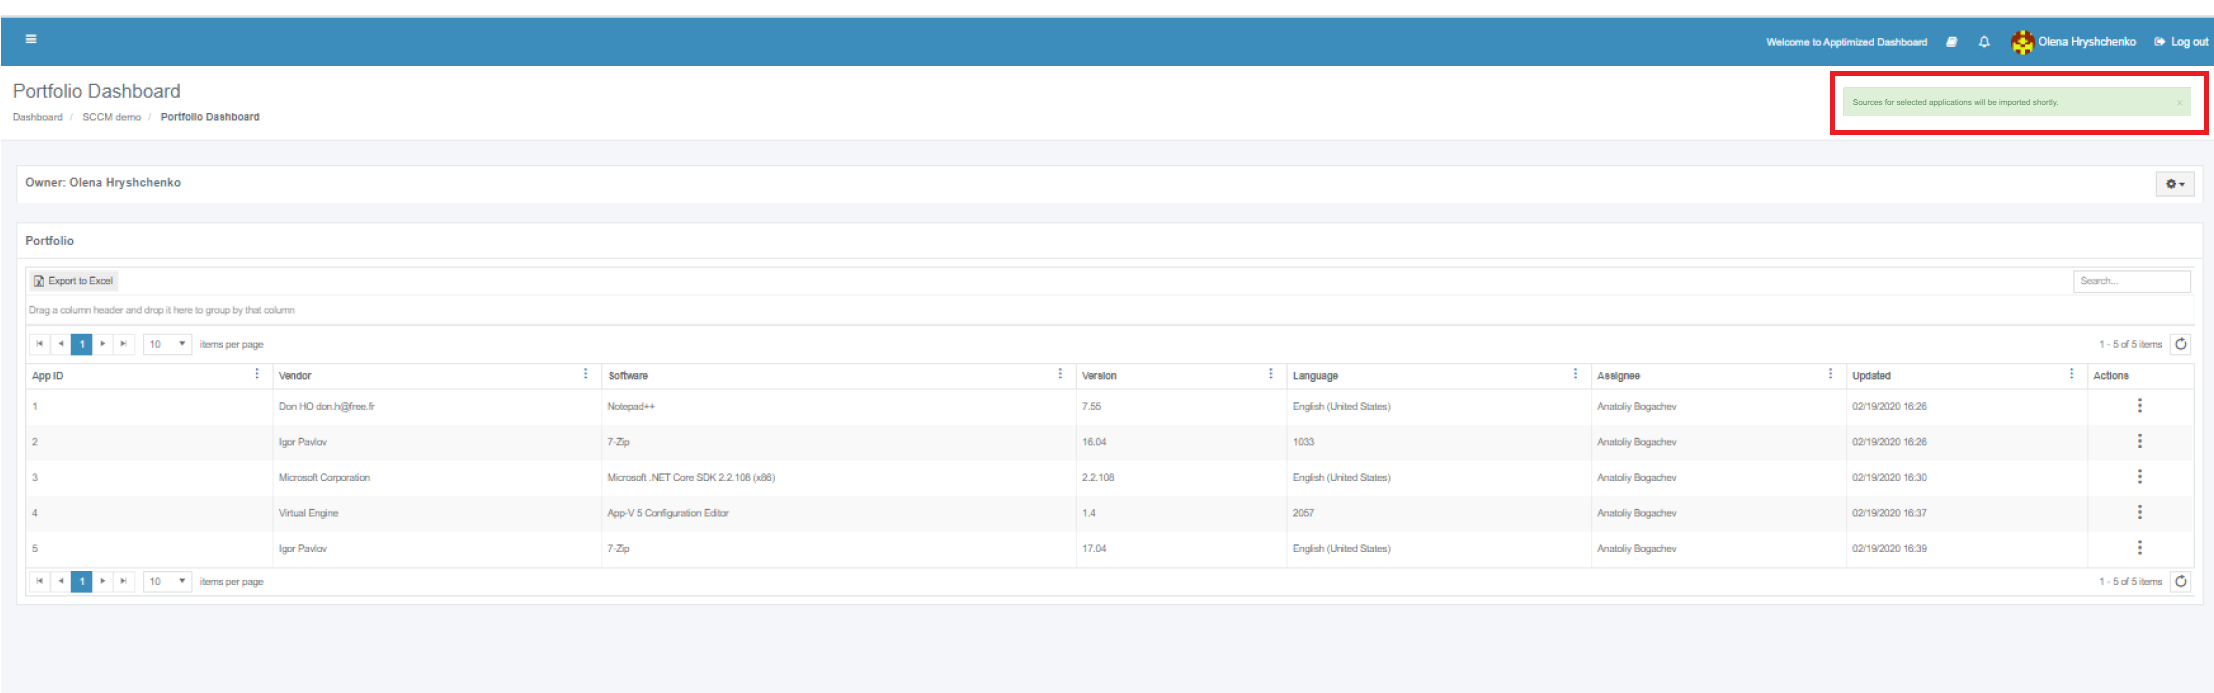](https://docs.apptimized.com/uploads/images/gallery/2020-03/rObzWVuuipTlcfx9-sccm_47_1.png) Imported applications immediately appear in the project portfolio. # SCCM Administration Guide # Integration SCCM Connector empowers Apptimized customers to: - import software estate from SCCM server to Apptimized project portfolio; - create an application in SCCM Console; - add the deployment type to application with automatic media transfer; - start the deployment of an application. SCCM Connector Integration saves time and provides instant deployment of SCCM packages without the need to leave Apptimized. ### Requirements and limitations The following prerequisites apply for SCCM connector: - endpoint PC or VM with access to the 443 port of app.apptimized.com host; - endpoint membership in Active Directory domain; - Microsoft Windows Desktop (Windows 7 and above) or Server OS (Windows Server 2012 R2 and above) with installed .NET Framework 4.6.1; - write permissions for network share with packages source media for automatic media transfer; - administrator role for SCCM or permissions to create applications, deployment types, and deployments; - installed SCCM Administrator Console with a connection to the SCCM server. ### Integration configuration with Apptimized Initial integration to Apptimized requires a one-time configuration of SCCM Connector settings. It is required to establish a connection to the remote SCCM Environment. It is possible to override preconfigured settings during the creation of an object in SCCM if needed, so they take precedence over the template of settings defined during the initial setup. ### Connection and default configuration ##### SCCM Environment Apptimized enables a user to set up SCCM environments to perform with SCCM connector deployment integration. Each SCCM Environment is configured separately and can be used for any purpose. The option to create SCCM environment is available for project administrators under **Settings** in the project menu > **Integratio**n section > **SCCM** > New SCCM Environment [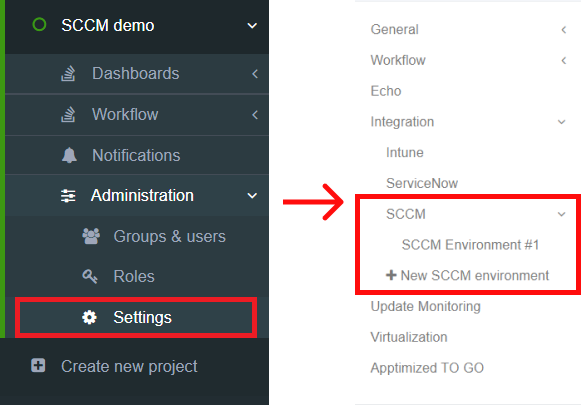](https://docs.apptimized.com/uploads/images/gallery/2021-12/dgumBva6jAdJeXWz-SCCM_24_01-2.png) Apptimized shows the following screen when successful: [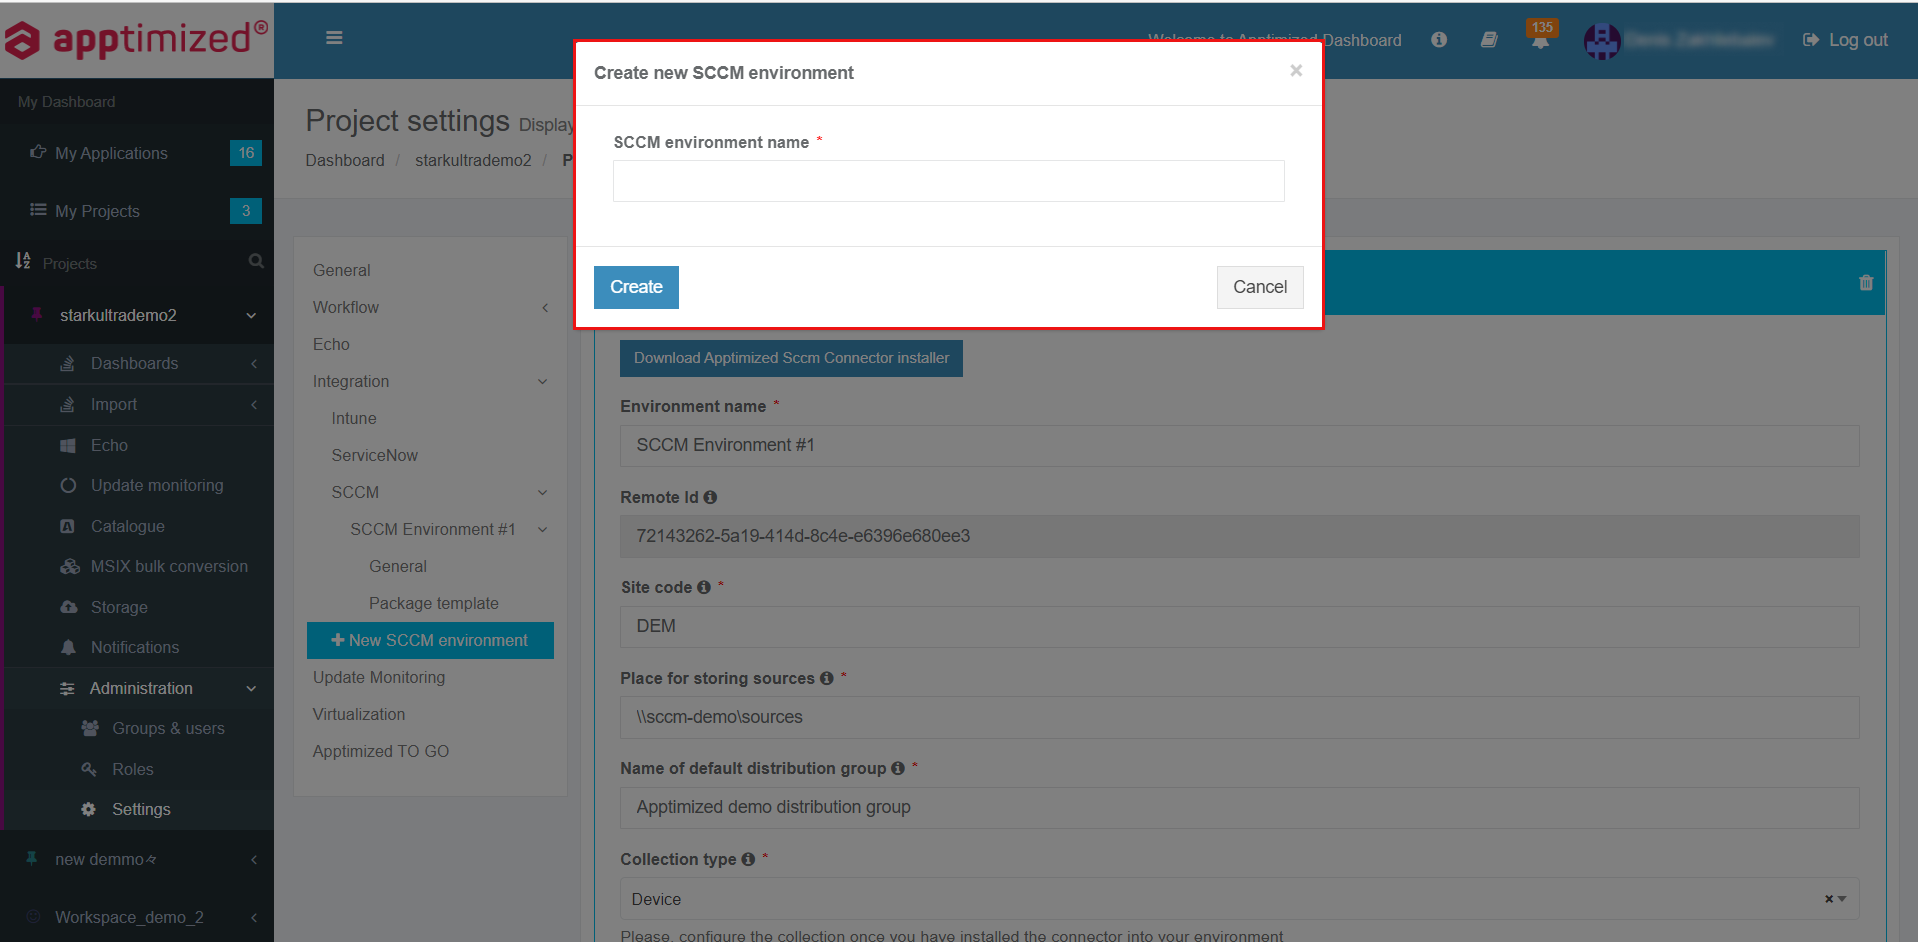](https://docs.apptimized.com/uploads/images/gallery/2021-12/sAlTB1mia6aGUWMT-sccm_25_03.png) THe option to set the name of SCCM Environment is available under **SCCM Environment name** field. The option to finish the creation process is available after setting the **SCCM Environment** name > **Create** button. Apptimized shows the created environment when successful: [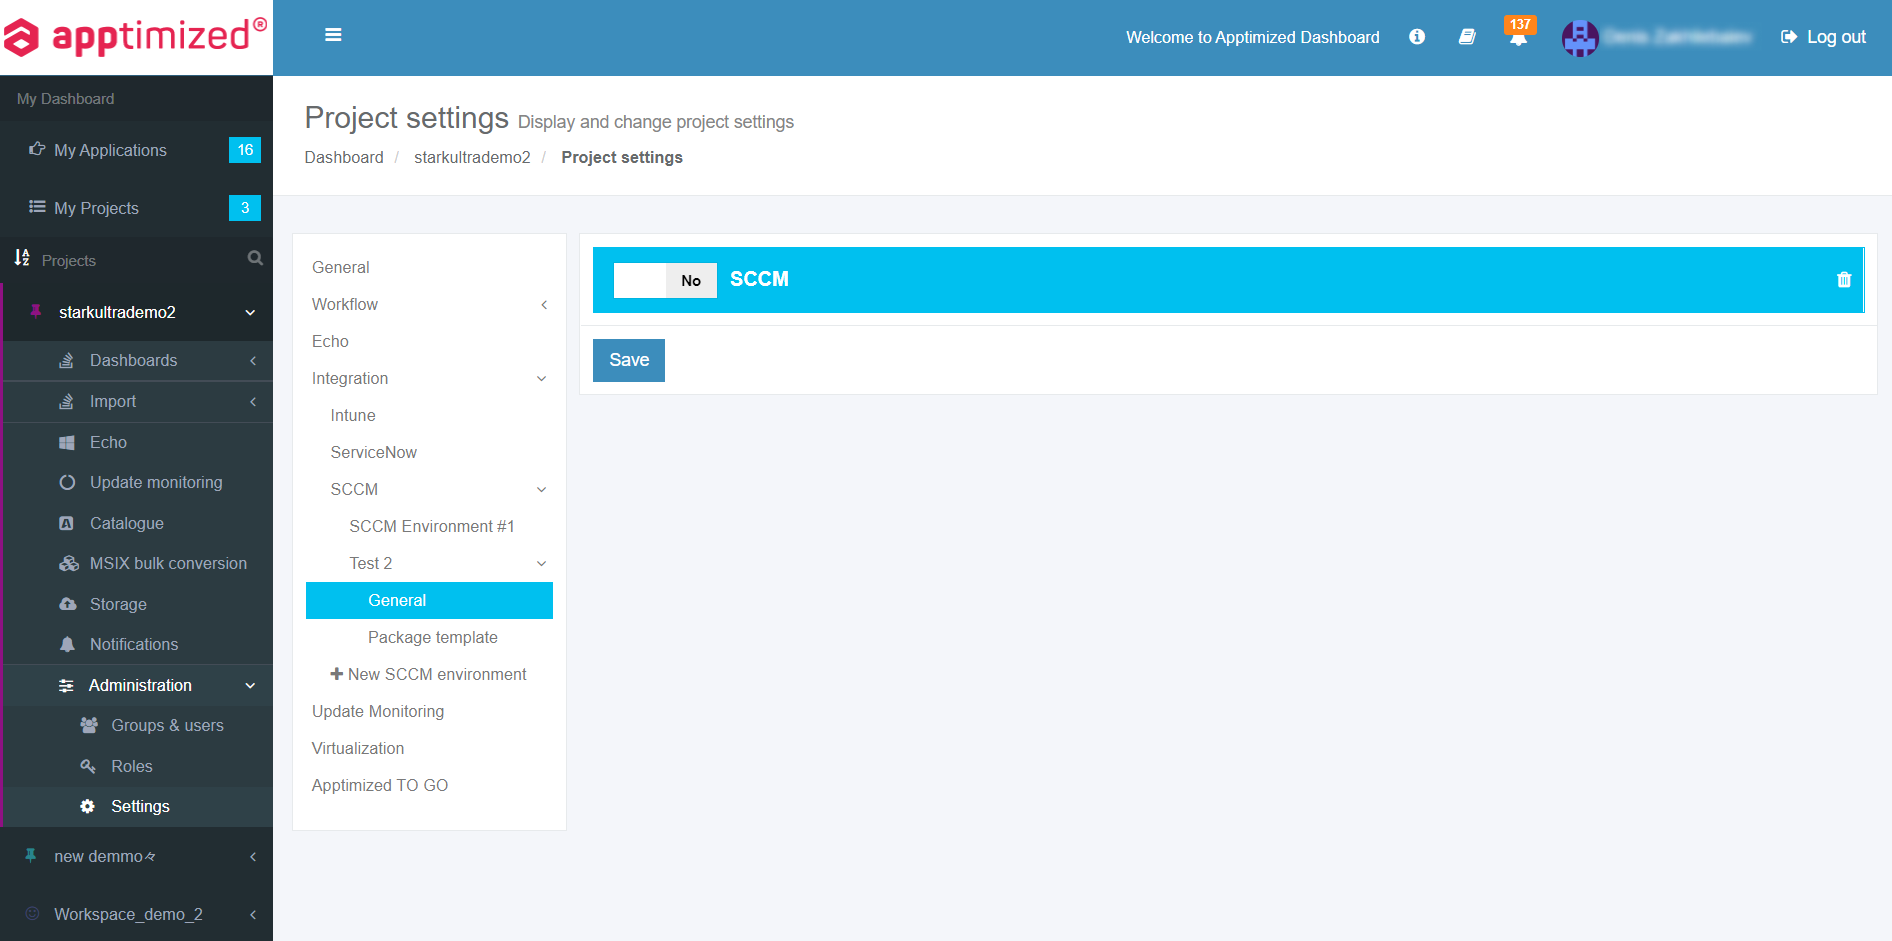](https://docs.apptimized.com/uploads/images/gallery/2021-12/VgaWvFRzkrFT0Zec-sccm_26_01.png) ##### General settings The one-time configuration is available for project administrators under **Settings** in the project menu > **Integration** section > **SCCM** > **General**. [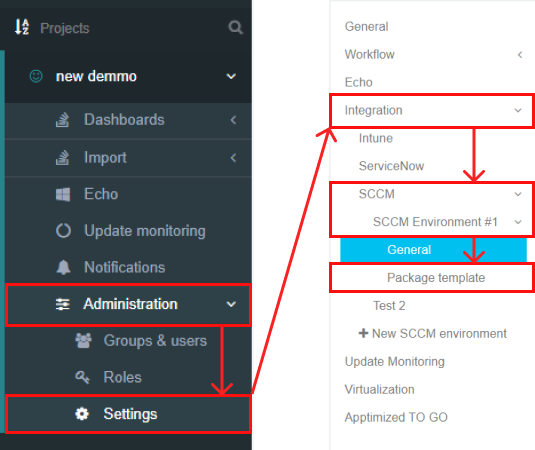](https://docs.apptimized.com/uploads/images/gallery/2021-12/PMQVtYvFOKHNj8Iv-sccm_11_03.png) SCCM Connector becomes active when switched on and once the settings are completed. [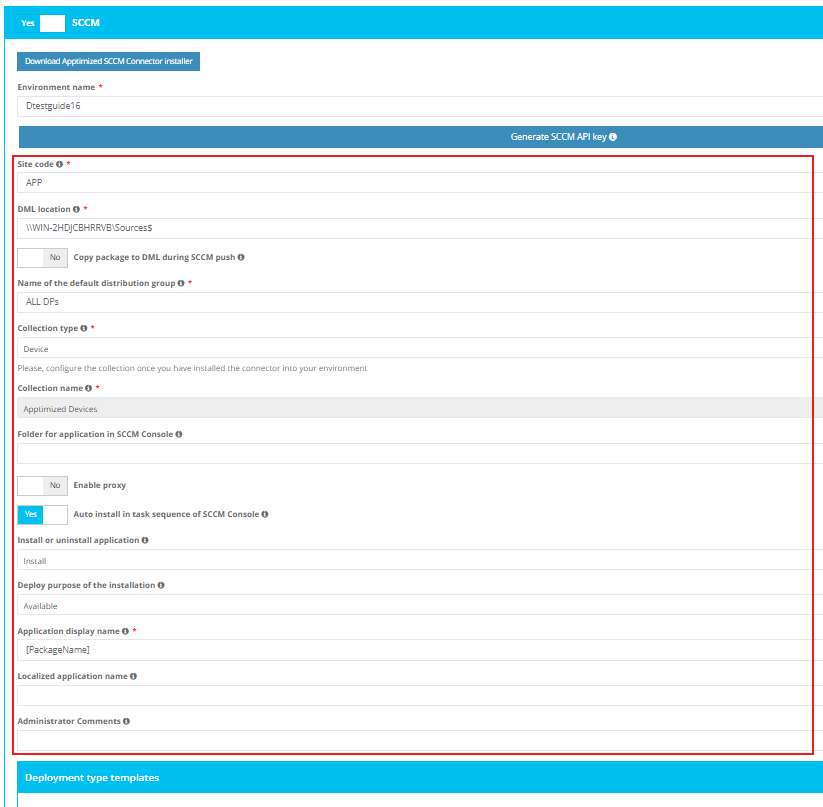](https://docs.apptimized.com/uploads/images/gallery/2024-03/sccmsettingstemplate.png) Table 1. General settings| **Settings** | **Details** |
| Environment name | The Environment name is the name of SCCM environment the SCCM connector operates in. |
| Remote ID | The remote ID is a unique identifier generated automatically for every project during its creation. Remote ID provides customer identification. The Remote ID is used during SCCM connector installation on customer's environment. |
| Site code | Site codes and site names identify sites in a Configuration Manager hierarchy. Configuration Manager Setup prompts for a site code and site name for the central administration site, and each primary site and secondary site installation. [Learn more.](https://docs.microsoft.com/en-us/configmgr/core/servers/deploy/install/prepare-to-install-sites) |
| DML Location | Secondary deployment target which packaged files will be copied to during the SCCM push in addition to the deployment type content library. |
| Name of the default distribution group | Indicates the default group of users or devices where to Install applications. This setting corresponds to the term "**Distribution point group**" in the SCCM admin console. |
| Collection type | Indicates the type of collection where apps should be installed. The following types are: - Device - User |
| Collection name | Indicates the collection of devices where to install applications. This setting corresponds to the term "**Collection name**" in the SCCM admin console. |
| Folder for application in SCCM Console | This field is optional and can stay blank.
If provided, overrides the default “**Application**” folder in SCCM Administrator Console as a target path for created application records.
Example: **Testfolder1\\testFolder2** or **Testfolder1\\testfolder2\\testfolder3**. |
| Install or uninstall the application | This setting indicates whether a task sequence action in SCCM Console can install the application. **Yes** or **No** options are available. |
| Deploy the purpose of the installation | This option specifies whether the application deployment can is mandatory or optional. **Available** or **Required** options are available. |
| Application display name | The name of the application to be shown in SCCM Console. |
| Localized application name | Specifies the application name for the English(US) default language. |
| Administrator comments | This optional field indicates the optional content with the dynamic variables can be filled by the user. |
Note. If **Use default Windows proxy server** switched to **Yes**, the **Proxy address** field disappears.
The option to set a **Proxy address** is available under the **Proxy address** field. [](https://docs.apptimized.com/uploads/images/gallery/2021-07/IBjyUv2bDjZ01rw5-sccm_06_04.png) ##### Deployment types templates settings This setting enables a user to implement multiple deployment types by creating multiple deployment templates within one project. The option to enable SCCM deployment templates becomes active when all required fields in the SCCM general tab are filled in. [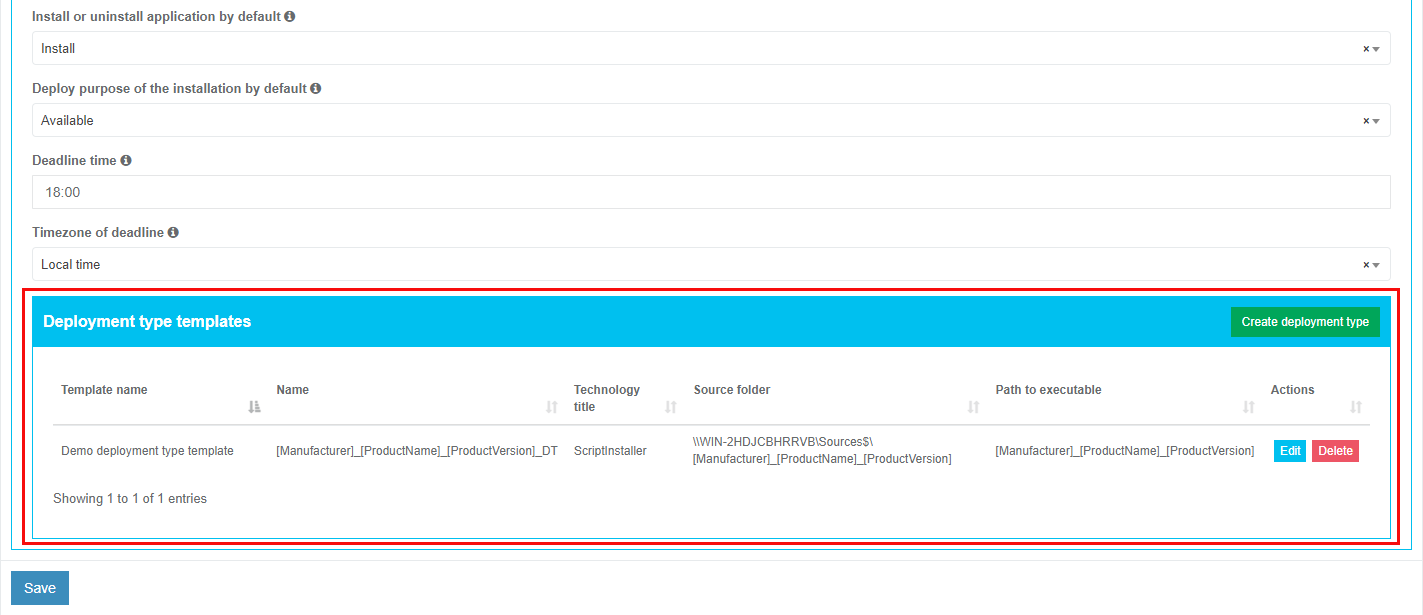](https://docs.apptimized.com/uploads/images/gallery/2021-11/fRU6q5aEMllwCKLk-sccm_03_01.png) The deployment types sections is displayed in 2 blocks: - Information block – this block contains detailed information about the Deployment templates; - Actions block – this block provides the options to operate with the deployment templates. [](https://docs.apptimized.com/uploads/images/gallery/2021-11/8XLAffjECI2IyzVe-sccm_05_01.png) Deployment type templates data is grouped into the following categories:| **Сategory ** | **Description ** |
| Template name | The field indicates the template name to help a user to identify templates in Apptimized portal. |
| Name | This field indicates the name of a deployment type. |
| Technology title | This field indicates the type of template installation. |
| Source folder | This field indicates the path to the location of the package source. |
| Path to executable | This field indicates the path to the location of the package source executable file. |
| **Settings** | **Description** | **Availability of settings depending on the Installer type** | |||
| MSI | Script Installer | AppV | |||
| Microsoft Application Virtualization 4 | Microsoft Application Virtualization 5 | ||||
| Deployment type template name | The field indicates the template name to help a user to identify templates in Apptimized portal. The default value is **Deployment type template name \[number\]**. This field is required. | + | + | + | + |
| Deployment type name | This field indicates the name of a deployment type. It is implemented during SCCM application deployment process and is sent to SCCM server. A user can set the **Deployment type name** manually or use the following dynamic variables: [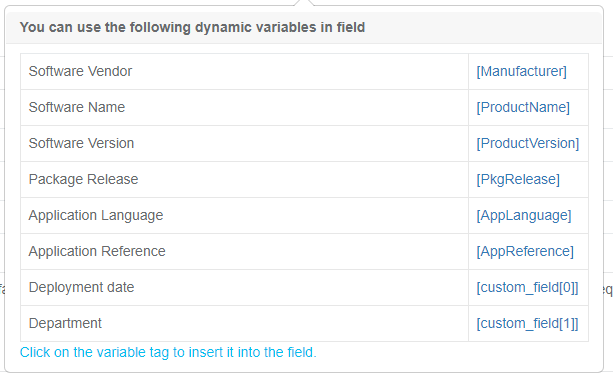](https://docs.apptimized.com/uploads/images/gallery/2020-07/HaMcsDfHOvB1BG7s-sccm_changes_03.PNG) This field is required. | + | + | + | + |
| Path to the source | This field indicates the path to the location of the package source. SCCM deployment template automatically generated this field. This field is required. | + | + | + | + |
| Path to the executable | This field indicates the path to the location of the package source executable file. A user can set the **Path to the executable** manually or use the following dynamic variables: [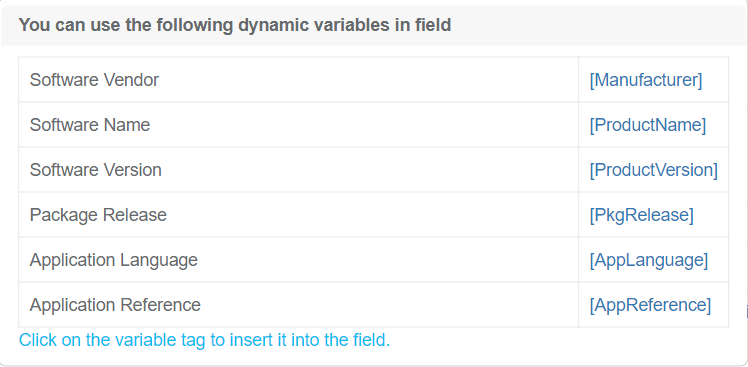](https://docs.apptimized.com/uploads/images/gallery/2021-02/e1EgqwCesELYfLQ1-image-1612449200206.png) This field is required. | + | + | + | + |
| Copy source to file share | This option allows to copy to the folder, the location of which was defined in field **Place for storing sources** in the **General** SCCM settings tab. | + | + | + | + |
| Installer type | This setting indicates the type of installer to use. The following installer types are available: - [MSI (Microsoft Installer)](https://docs.microsoft.com/en-us/windows/win32/msi/about-windows-installer); - [Script Installer](https://docs.microsoft.com/en-us/powershell/module/configurationmanager/add-cmdeploymenttype?view=sccm-ps#-scriptinstaller); - [AppV (Microsoft Application Virtualization 4)](https://docs.microsoft.com/en-us/microsoft-desktop-optimization-pack/appv-v4/); - [AppV (Microsoft Application Virtualization 5)](https://docs.microsoft.com/en-us/microsoft-desktop-optimization-pack/appv-v5/). The default value is **Script Installer**. | + | + | + | + |
| Script type for the detection method | This setting indicates the type of script content of the [detection method](https://docs.microsoft.com/en-us/configmgr/apps/deploy-use/create-applications#bkmk_dt-detect). The following script types for detection method are available: - [Powershell](https://docs.microsoft.com/en-us/powershell/scripting/overview?view=powershell-7); - [VB Script](https://docs.microsoft.com/en-us/previous-versions/sx7b3k7y%28v%3dvs.85%29); - [JScript](https://docs.microsoft.com/en-us/previous-versions/hbxc2t98(v=vs.85)). The default value is **Powershell**. | + | |||
| Detection script content template | This field specifies the script template of the detection method. It is possible to provide a custom template with mandatory variables in square brackets, indicating them in any order and quantity. The Connector replaces these variables with specific values during the deployment to SCCM. The default value is **Get-ItemProperty "HKLM:Software\\\[PackageName\]\\** **\[Manufacturer\]\\\[ApplicationName\]\\\[ApplicationVersion\]" -ErrorAction SilentlyContinue | Where { $\_.IsInstalled -eq 1 }** | + | |||
| Persist content in the client cache | This setting indicates the necessity to upload the application or package source to the client's machine or device cache. **Yes** or **No** options are available. The default value is **No**. | + | |||
| Installation command with parameters | This setting indicates the command to run during the package installation. The default value for the Script Installer is **Deploy-Application.exe -DeploymentType Install** The default value for the MSI Package is **msiexec /i "\\\\atd-dist01\\Public\\CM\\DTeam\\FeatureData\\OSD\\Tbreck\\Setup1.msi" or msiexec /i "\\\\atd-dist01\\Public\\CM\\DTeam\\FeatureData\\OSD\\Tbreck\\Setup1.msi" /qn** | + | + | ||
| Uninstallation command with parameters | This setting indicates the command to run during the package uninstallation. The default value is **Deploy-Application.exe -DeploymentType Uninstall** | + | |||
| Installation context | This option defines the context of the package installation. The following installation contexts are available: - install for the system; - install for a user; - install for the system if a resource is a device otherwise install for the user. The default value is **Install for the system**. This option corresponds to the term **Installation behaviour** in the SCCM admin console. | + | |||
| Should the user be logged on or not | This option defines the required user state when the installation starts. The following options are available: - only when no users are in the system; - only when a user logs in; - whether or not users are active in the system. The default value is **Whether or not users are active in the system**. This option corresponds to the term **Logon requirement** in the SCCM admin console. | + | |||
| Installation visibility for the user | This option defines the installation process visibility. The following options are available: - normal; - minimized; - maximized; - hidden. The default value is **Normal**. This option corresponds to the term **Installation program visibility** in the SCCM admin console. | + | |||
| Requires user interaction | This setting indicates if the user can be involved in the installation or uninstallation process. **Yes** or **No** options are available. The default value is **No**. | + | |||
| Identify deployment type information from a package file | This setting indicates the option of a manual (**Yes**) or automatic (**No**) deployment type information identification. The default value is **No**. | + | + | + | |
| The file where to get information | This field indicates the file with the deployment type information. The following options are available: - MSI file for MsiInstaller; - XML manifest for AppvInstaller; - AppV file for App5xInstaller. An installation type defines default value. | + | + | + | |
| What to do on a slow network | This option specifies actions with package sources in case of a slow network. Following options are available: - do nothing; - download; - download content for streaming. The default value is **Download**. | + | + | + | + |
| Maximum installation time (minutes) | This option indicates the maximum duration per installation in minutes. The default value is **120**. | + | + | + | + |
| Estimated installation time by default (minutes) | This option indicates the estimated duration per installation in minutes. The default value is 0. | + | + | + | + |
| Run installation program as a 32-bit process on 64-bit client | This setting forces the installer to launch as a 32-bit process on the 64-bit client. **Yes** or **No** options are available. The default value is **No**. | + | + | ||
| Administrator comments | This optional field corresponds to the term **Administrator comments** in the SCCM admin console. | + | + | + | + |
| Setting | Description |
| Package name | This setting enables a user to set up the name for package template. This setting is **required**. The default value is: **\[Manufacturer\]\_\[ProductName\]\_\[ProductVersion\]\_\[AppLanguage\].** |
| Comment | This setting enables a user to set an optional descriptions for the package template. |
| Where unzip package source | This setting enables a user to set up patch for unzipped package source files will be placed on. This section is **required**.
**Note. **In most cases, this field will be the same as **Source path **field value. |
| Use package name for the folder name | This setting enables a user to use package name as package folder name. The default value is **No**. |
| Source path | This setting enables a user to set up folder where the source is placed in zip file. The zip file name is ignored under clarifying the source path. This setting is **required**.
The default value is **\[Manufacturer\]\_\[ProductName\]\_\[ProductVersion\]\_\[AppLanguage\]**
**Note.** This path is relative to **Where unzip package source **field value. |
| Folder for package in SCCM Console | This setting enables a user to set up folder for package in SCCM Console.
Example:
- Dummy\\Folder;
- Dummy.
**Note.** The package will be created under the root if the value is empty. |
| Remove default User account | This setting enables a user to Remove user from Manage Access Account window, which is added to package by default. The default value is **Yes**. |
| Add account access | This setting enables a user to fill **Group name **and **Permission access level** fields. The default value is **Yes**. |
| User name | This setting enables a user to fill name of the user that will be addedd to Manage Accont Acces window of SCCM servier. The fill within form is **\[domain\]\\\[userName\]**. This setting is **required**. |
| Permission access level | This setting enables to set up permission access level for the specified user. The following levels available: - Read; - Change; - Full control; - No access. The default value is **Read**. |
| Set security scope | This setting enables to set up **Security scope **field to be specified. |
| Security scope | This setting enables a user to set up Security scope name that will be set to most (or all) packages. This setting is **required**. The default value is **Factory DPs**. |
| **Setting** | **Description** |
| Program name | This setting enables a user to set up the name of the program template. This setting is **required**. The default value is **Install.** |
| Command line | This setting enables a user to set up the command line of the program template. The default value is **install.cmd** |
| Start folder | This setting enables a user to set up he name of startup folder of the program template. |
| User interaction | This setting enables to set up interaction lever of user with package. The following levels available: - Hidden; - Minimized; - Normal; - Maximized. The default value is **Hidden**. |
| Program can run | This setting enables a user to define run context of package. The following contexts available: - Whether or not user is logged on; - Only when user is logged on; - Only when no user is logged on. The default value is **Whether or not user is logged on**. |
| Run mode | This setting enables a user to define permission level of package context run. This setting is available to change only if **Only when user is logged on **setting is set under **Program can run **setting. The following permission levels available: - Run with Administrative rights; - Run with user rights; The default value is **Run with Administrative rights**. |
| Allow users to view and interact with the program installation | This setting enables to allow users to view and interact with the program insallation. The default value is **No**. |
| Drive mode | This setting enables to define drive mode of the package installation / uninstallation. The following modes available: - Runs with UNC name; - Required drive letter - Requires specific drive letter (example: Z:). The default value is **Runs with UNC name**. |
| Allow this program to be installed from task sequence | This setting enables to allow the program to be installaed from the Install Package task sequecne without being deployed. The default value is **No**. |
| Select platfroms | This setting enables to select OS platforms where package can run.
The following platforms available:
- All Windows 10 (64-bit);
- All Windows 7 (64-bit);
- All Windows 8.1 (64-bit);
- All Windows Server 2008 R2 (64-bit);
- All Windows Server 2012 R2 (64-bit);
- All Windows Server 2016 (64-bit);
- All Windows 7 (32-bit).
**Note**. Empty field value is allowing any platform. |
| Estimated disk space | This setting enables to estimate disk space for packages if required. The value if unknown is 0 or empty. The default value is 0. |
| Select unit of a disk sace size | This setting enables to define unit f the disk space if the estimated disk space is set. The following units available: - KB; - MB; - GB. The default value is **MB**. |
| Maximum allowed run time (minutes) | This setting enables a user to set up maximum allowed run time in minutes. The default value is **120**. |
| Administrative comment | This optional field corresponds to the term **Administrator comments** in the SCCM admin console. |
| **Setting** | **Description** |
| Program name | This setting enables to set up program name to which deployment belongs to. This field is **required**. The default value is **Install**. |
| Collection type | This setting enables to indicate the collection type that will be loaded from the user SCCM server. This setting is **required**. The following types are available: - Device; - User. The default value is **Device**. |
| Limiting collection for the deployment | This setting enables settng limiting collection for the collection deployment. |
| Collection folder in SCCM Console | This setting enables setting up a collection path under the SCCM console. |
| Action | This setting enables set the action during deployment. The available action is **Install**. The value can not be changed. |
| Purpose | This setting enables the definition of the requirement of the installation/uninstallation process. The following values are available: - Available; - Required. The default value is **Available**. |
| Send wake-up packets | This setting enables to define sending [wake-up packets](https://docs.microsoft.com/en-us/mem/configmgr/core/clients/deploy/plan/plan-wake-up-clients) before deployment under SCCM. The default value is **No**. Note. This setting is available only if **Required **purpose is set. |
| Allow clients on a metered internet connection to download content after the installation deadline, which right incurs additional costs | This setting enables to allow clients on a metered internet connection to download content after the installation deadline, which right incurs additional costs. The default value is **No**. Note. This setting is available only if **Required **purpose is set. |
| Rerun behavior | This setting enables to specify rerunning deployment behavior on a client. The following values are available: - Always rerun program; - Never rerun deployed program; - Rerun if failed previous attempt; - Rerun if succeeded on the previous attempt. The default value is **Always rerun program**. Note. This setting is available only if **Required **purpose is set. |
| Recur every | The setting enables to specify a recurring interval. The default value is **1**. **Note**. This setting is available only if **Required **purpose is set. |
| Recurrence interval type | This setting enables selection of recurrence interval types for the schedule. The following options are available: - Days; - Hours; - Minutes. The default value is **Days**. **Note**. This setting is available only if **Required **purpose is set. |
| Schedule | This setting enables to schedule date and time for the deployment. **Note. **Time must be UTC. The time will be converted to the timezone of the User’s SCCM Server. This setting is** **available only if** Required **purpose is set. |
| Allow users to run the program independently of assignments | This setting enables users to run the program from Software Center. The default value is **Yes**. The value can not be changed. |
| Software installation | This setting enables a user to allow installation of the deployed software outside of maintenance windows. The default value is **No**. |
| System restart (if required to complete the installation) | This setting enables to set up system restarting outside a maintenance window. The default value is **No**. |
| Commit changes at deadline or during a maintenance window (requires restarts) | This setting enables to setting up write filters for embedded devices. The default value is **Yes**. **Note**. If this setting is not enabled, the content will be applied on the overlay and committed later. |
| Select the deployment option to use when a client uses a distribution point from a current boundary group | This setting enables to specify client behavior on a fast network. The following options are available to select: - Download content from distribution point and run locally; - Run program from the distribution point. The default value is **Download content from distribution point and run locally**. |
| Select the deployment option to use when a client uses a distribution point from a neighbor boundary group or the default site boundary group | This setting enables to specify client behavior on a slow network. The following options are available to select: - Download content from distribution point and run locally; - Do not run program; The default value is **Download content from distribution point and run locally**. |
| Allow clients to use distribution points from the default site boundary group | This setting enables allow clients to use shared content. The default value is **No**. |
| **Component** | **Details** |
| 1\. Apptimized Portal | The platform where Apptimized customer manages projects portfolios. Requires an active project with enabled and configured SCCM connector settings. |
| **Component** | **Details** |
| 2\. Customer Environment | Information technology environment, including software, hardware, and systems (e.g., endpoint PCs, VMs, servers, networks).
The access of endpoint PC or VM to the 443 port of the app.apptimized.com host is a prerequisite. |
| 2.1. Proxy server | This component is optional. A proxy server is a third party between the customer and the service (the Apptimized Portal). A proxy server manages the requests sent by the customer and completes them depending on the system's preferences. |
| 2.2. Apptimized SCCM connector | A tool that enables customers to deploy ready-made packages directly from Apptimized to an SCCM environment and to upload applications from the SCCM server to Apptimized for testing purposes or further processing. It connects Apptimized Portal and SCCM Admin Console via HTTPS long-polling strategy, where the SCCM connector pulls data from the Apptimized portal every 10 seconds. The SCCM connector must be launched on a local PC by the domain administrator or domain user. Runs on platforms: Microsoft Windows Desktop (Windows 7 and above) or Server OS (Windows Server 2012 R2 and above) with installed .NET Framework 4.6.1 |
| 2.3. SCCM administrator console | Console to manage applications in the customer environment. |
| 2.4. Customer SCCM server | Customer’s server where the SCCM is installed. |
Site code - **DEM**; Path to the SCCM console - **C:\\Program Files (x86)\\Microsoft Configuration Manager\\AdminConsole\\bin**; Path to the network share - **\\\\WIN-2HDJCBHRRVB\\Sources$\\incoming\\TimKosse\_FileZilla\_3.46.3\_English(United States)**.
- package metadata;Package name - **TimKosse\_FileZilla\_3.46.3\_English(United States)**; Application version - **3.46.3**; Application vendor - **Tim Kosse**; Application name - **FileZilla**; Application language - **English(United States);** Auto-install in task sequence of SCCM console - **Yes;** Application owner - **The default value is customer's name (i.e. John Doe);** Application description (optional) - Will be sent, if something has been indicated; SCCM optional reference (optional) - Will be sent, if something has been indicated; Folder in the SCCM console UI - **Applications/Test 1**.
- an application (package) sources in **.zip** format;An archive in **.zip** format contains a PSADT Wrapper and a package source in **.msi** format.
- a deployment type information;Deployment type name - **TimKosse\_FileZilla\_3.46.3\_English(United States)\_DT**; Path to the source in SCCM environment network - **\\\\WIN-2HDJCBHRRVB\\Sources$\\incoming\\TimKosse\_FileZilla\_3.46.3\_English(United States)**; Name of the default distribution group - **Demo Distribution Group**; Installer type - **Script Installer;** Script type for the detection method - **Powershell;** Detection script content - **Get-ItemProperty "HKLM:Software\\ TimKosse\_FileZilla\_3.46.3\_English(United States)\\TimKosse\\FileZilla \\3.46.3" -ErrorAction SilentlyContinue | Where { $\_.IsInstalled -eq 1 }**; Persist content in client cache - **Yes**; Installation command with parameters - **Deploy-Application.exe -DeploymentType Install**; Uninstallation command with parameters - **Deploy-Application.exe -DeploymentType Uninstall**; What to do on slow network - **Download**; Maximum installation time (minutes) - **120**; Estimated installation time by default (minutes) - 0; Run installation program as a 32-bit process on 64-bit client - **No**; Admin comment (optional) - Will be sent, if something has been indicated.
- deployment information for the application/package;Collection name - **Demo devices;** Install or uninstall the application by default - **Install**; Deploy purpose of the installation by default - **Available;** Deadline date - **02.02.2020 00:00;** Deadline time - **18:00**; Time zone of a deadline - **Local time**.
**Inbound information** - a data sent to the Apptimized Portal: - a response to the outbound information commands (result - OK); - request to get information with remote ID parameterRemote ID - **1745a854-2d9a-4f99-8a04-d511882f7028**.
##### Case 2. A customer imports **TimKosse\_FileZilla\_3.46.3\_English(United States)** from SCCM. **Outbound information** - a data sent from the Apptimized Portal: - the SCCM administrator console connection parameters;Site code - **DEM**; Path to the SCCM console - **C:\\Program Files (x86)\\Microsoft Configuration Manager\\AdminConsole\\bin**; Path to the network share - **\\\\WIN-2HDJCBHRRVB\\Sources$\\incoming\\ TimKosse\_FileZilla\_3.46.3\_English(United States)**.
- a command to get a list of applications in the SCCM administrator console; ``` Get-WmiObject -Namespace ROOT\SMS\Site_$SiteCode ` -Query "SELECT * FROM SMS_ObjectContainerNode WHERE ObjectType='6000'" | ` Select-Object -Property Name, ContainerNodeID, ParentContainerNodeId; ``` - a command to get metadata of applications in the SCCM administrator console; ``` GetApplicationsMetadata(string stringPsApps) => SccmResultHelper.ConvertToSccmObjects( ExecutePsCommand($"Get-CMApplication | `" + $"Select-Object -Property LocalizedDisplayName, SDMpackageXML | `" + $"Where-Object {{({stringPsApps}).Contains($_.LocalizedDisplayName)}} | `" + $"Select-Object -ExpandProperty SDMpackageXML", out _)); ``` - a command to get an application (package) sources in the SCCM administrator console. The SCCM Connector will receive the path to the SCCM application source from SCCM application metadata. It will be zipped and sent to the Apptimized Portal. Inbound information** - a data sent to the Apptimized Portal: - request to get information with remote ID parameterRemote ID - **1745a854-2d9a-4f99-8a04-d511882f7028.**
- an application (package) sources in **.zip** format;An archive in **.zip** format contains a PSADT Wrapper and a package source in **.msi** format.
- a list of SCCM applications (or one specific application)An application - **TimKosse\_FileZilla\_3.46.3\_English(United States)**; An application related data: "Path":"/Test 1", "ContainerId":"16777218", "ResourceId":"Res\_810274514", "IsDuplicated":false.
- an application's metadata in the SCCM administrator console;Package name - **TimKosse\_FileZilla\_3.46.3\_English(United States)**; Application version - **3.46.3**; Application vendor - **Tim Kosse**; Application name - **FileZilla**; Application language - **English(United States).**
### Communication methods The SCCM Connector is configured to communicate with the Apptimized Portal using HTTPS protocol. The text box below provides the certificate details:Issued by – K Software certificate Authority (DV) 2 [https://sectigo.com/legal](https://sectigo.com/legal) Version – V3 Signature algorithm – sha256RSA Signature hash algorithm – sha256 Public key – RSA (2048 Bits) TLS – 1.2
The Powershell commands are implemented to communicate the SCCM Connector with the SCCM Console. The text box below provides the commands list depending on the client's activities. 1. **Push to SCCM:** - Import-Module .\\ConfigurationManager.psd1; - New-CMApplication; - Add-CMDeploymentType; - Add-CMMsiDeploymentType; - Start-CMContentDistribution; - Start-CMApplicationDeployment; - Move-CMObject -FolderPath; - Set-ExecutionPolicy -ExecutionPolicy RemoteSigned -Scope Process -Force. 2. **Import from SCCM:** - Import-Module .\\ConfigurationManager.psd1; - Get-CMApplication; - Get-WmiObject; - Set-ExecutionPolicy -ExecutionPolicy RemoteSigned -Scope Process -Force. # Security and limitations To ensure security Apptimized complies with the following cybersecurity standards: - ISO 15408; - ISO/IEC 27001; - ISO/IEC 27002; - ANSI/ISA 62443 (Formerly ISA-99); - IEC 62443; A military-grade security protocol ([TLS/SSL](https://docs.microsoft.com/en-us/windows-server/security/tls/tls-ssl-schannel-ssp-overview)) is used by Apptimized to provide privacy and data integrity between two or more communicating applications. Apptimized safety audit entails a network scan of its resources to identify vulnerabilities and non-penetration. The screenshot below shows the vulnerability report provided by **Detectify** for **app.apptimized.com**. [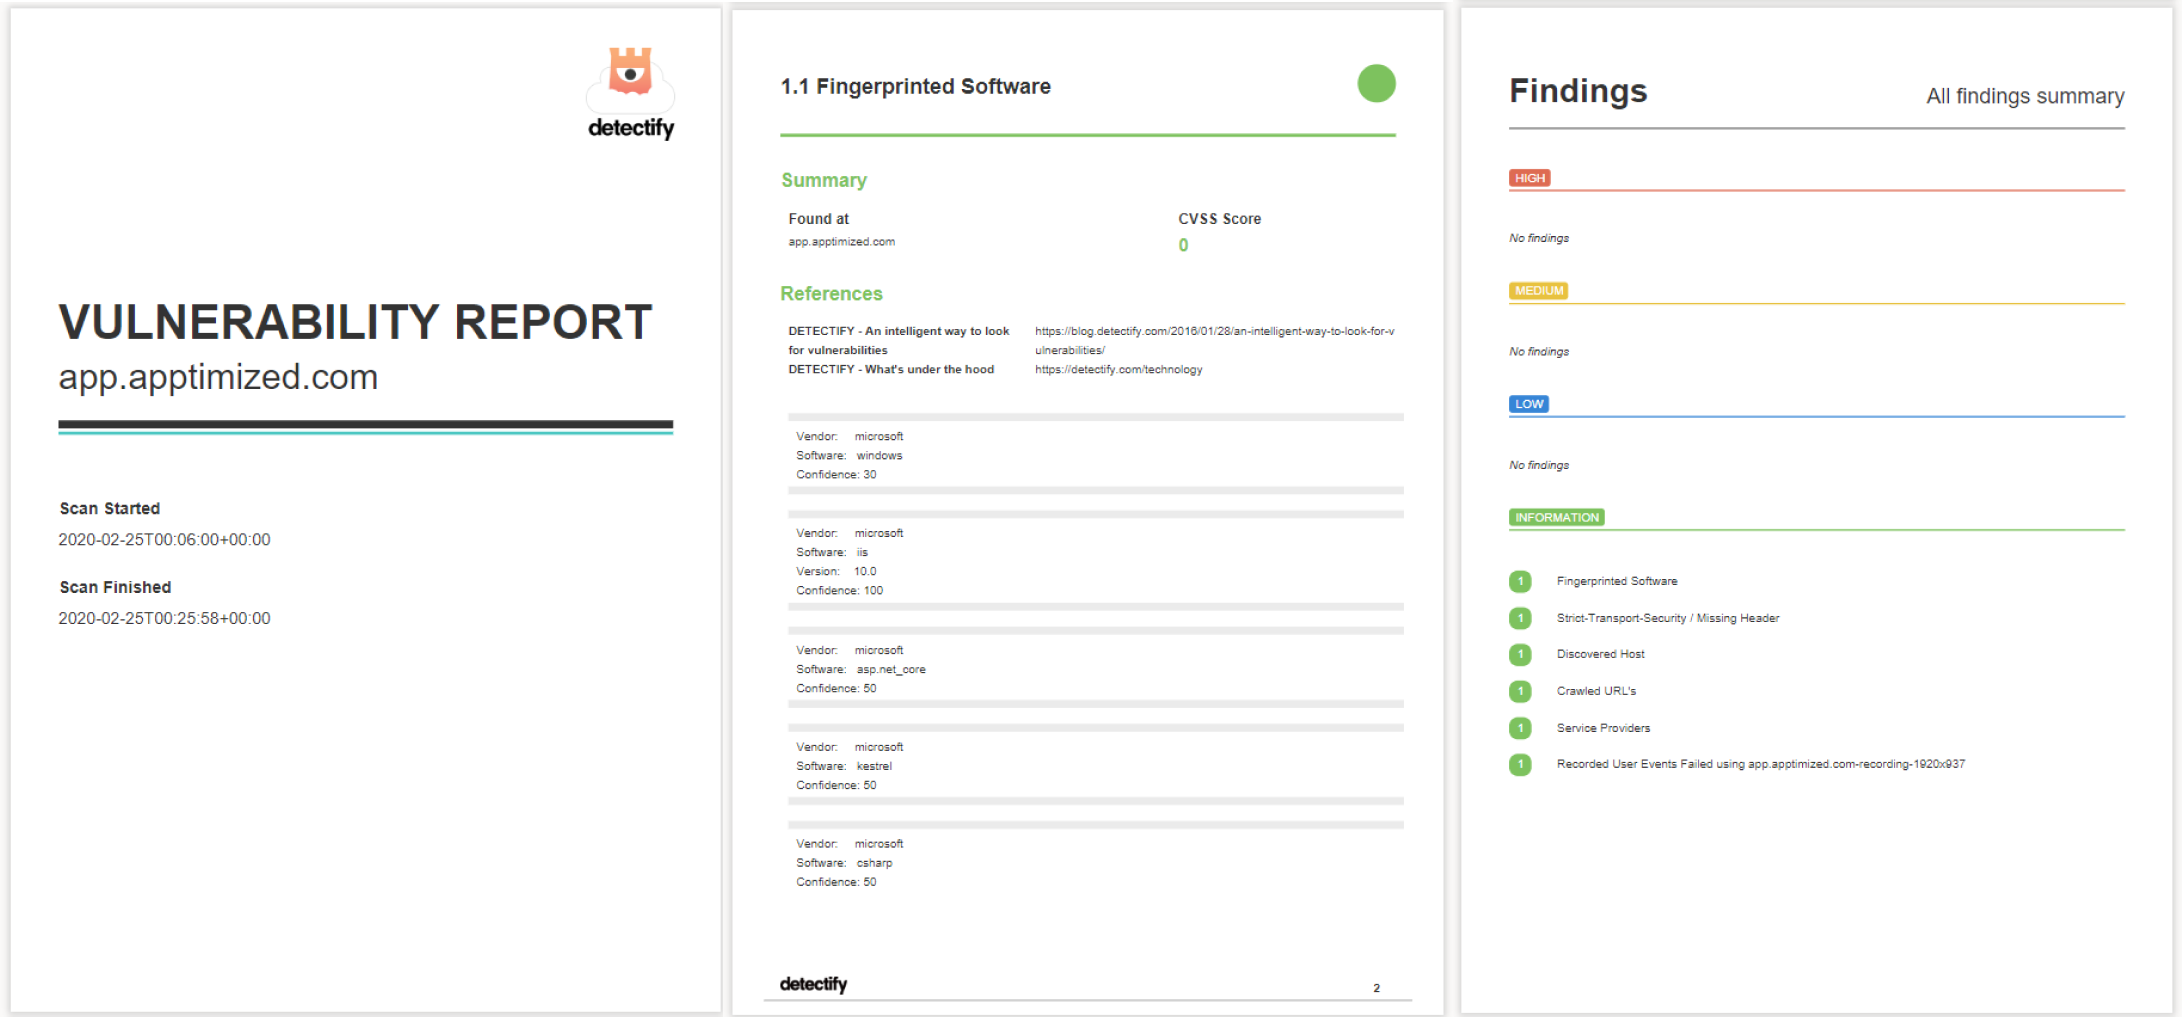](https://docs.apptimized.com/uploads/images/gallery/2020-03/MmESvmM2142UiAbc-sccm_adm_03_4.png) The screenshots below show the SSL report of **app.apptimized.com**. [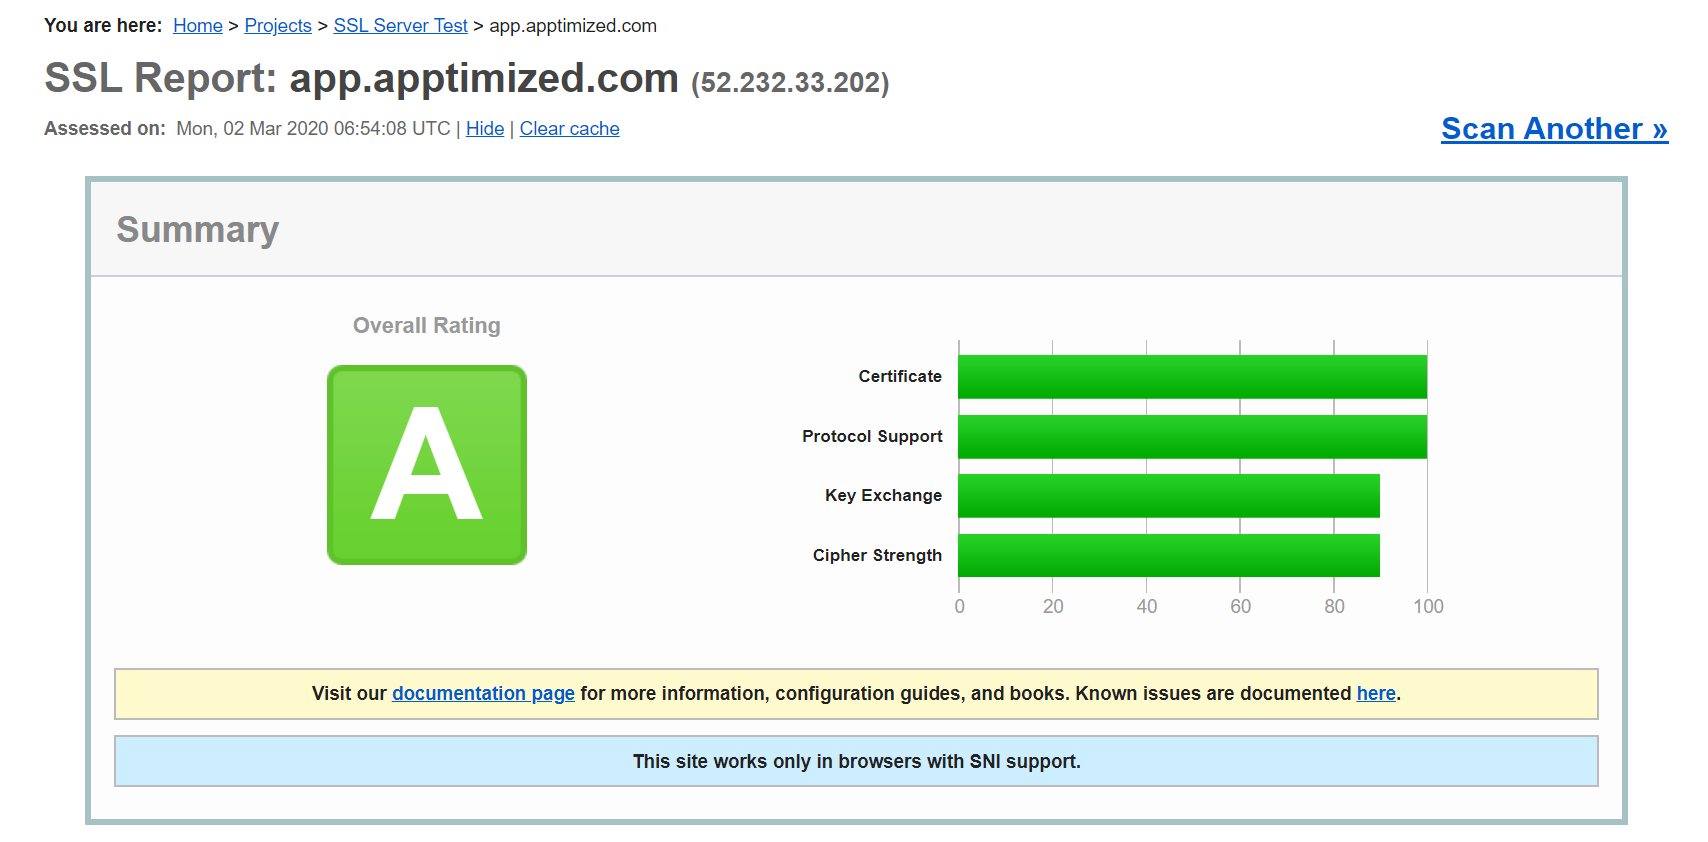](https://docs.apptimized.com/uploads/images/gallery/2020-03/FDOxbDM9eImMUoJX-sccm_adm_05_1.png) [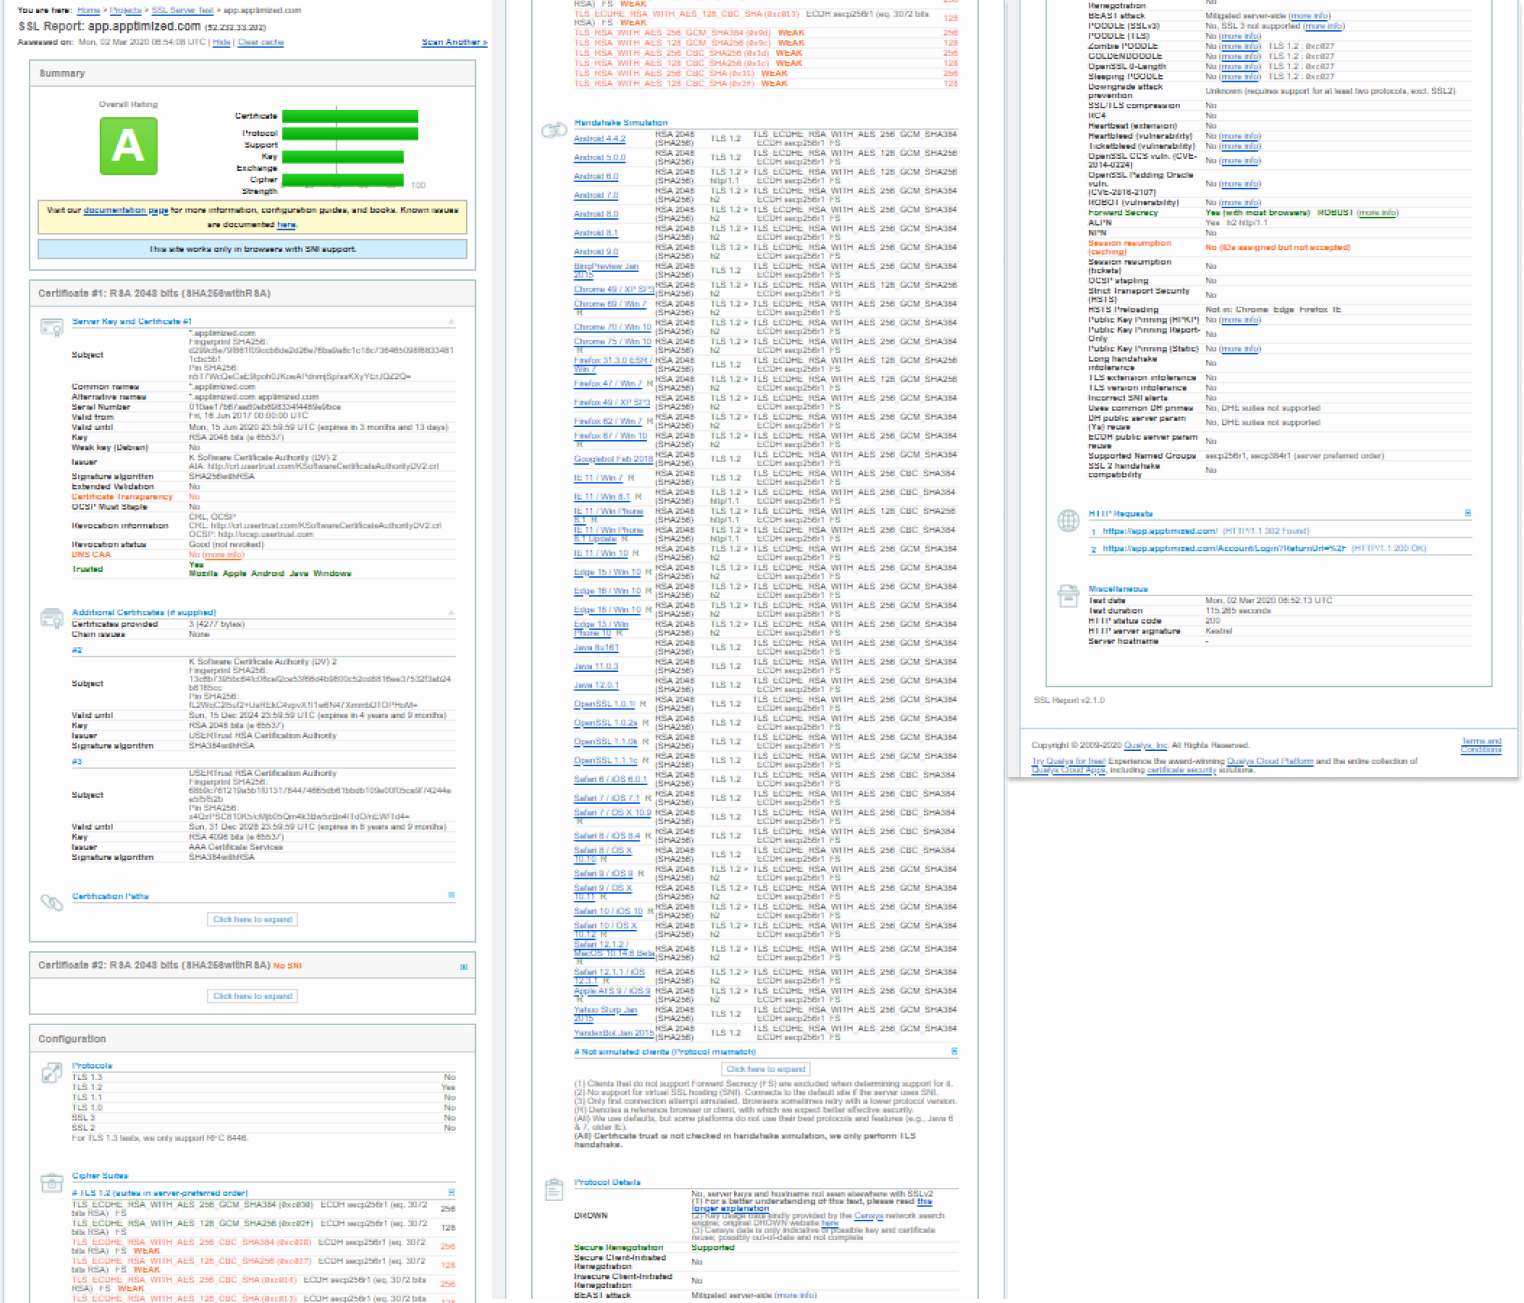](https://docs.apptimized.com/uploads/images/gallery/2020-03/ochmWF8LIzubGeyF-sccm_adm_05_5.png) The SCCM connector must be launched on a local PC by the domain administrator or domain user. Domain user must have the permissions to: - create applications, deployment types, and deployments; - write permissions for network share with packages source media for automatic media transfer. # Technical workflows ### Push to SCCM workflow The figure below shows the push to the SCCM workflow. The instructions for SCCM connector integration are considered in the [Apptimized SCCM connector integration user manual](https://docs.apptimized.com/books/apptimized-platform-admin-manual/page/integration "Integration"). [](https://docs.apptimized.com/uploads/images/gallery/2020-03/P8yGeoawkOAREXaR-Push-to-SCCM.png) ### Import from SCCM workflow The figure below shows the import from the SCCM workflow. The instructions for import from SCCM are considered in the [Apptimized SCCM connector integration user manual](https://docs.apptimized.com/books/apptimized-platform-admin-manual/page/integration "Import from SCCM"). [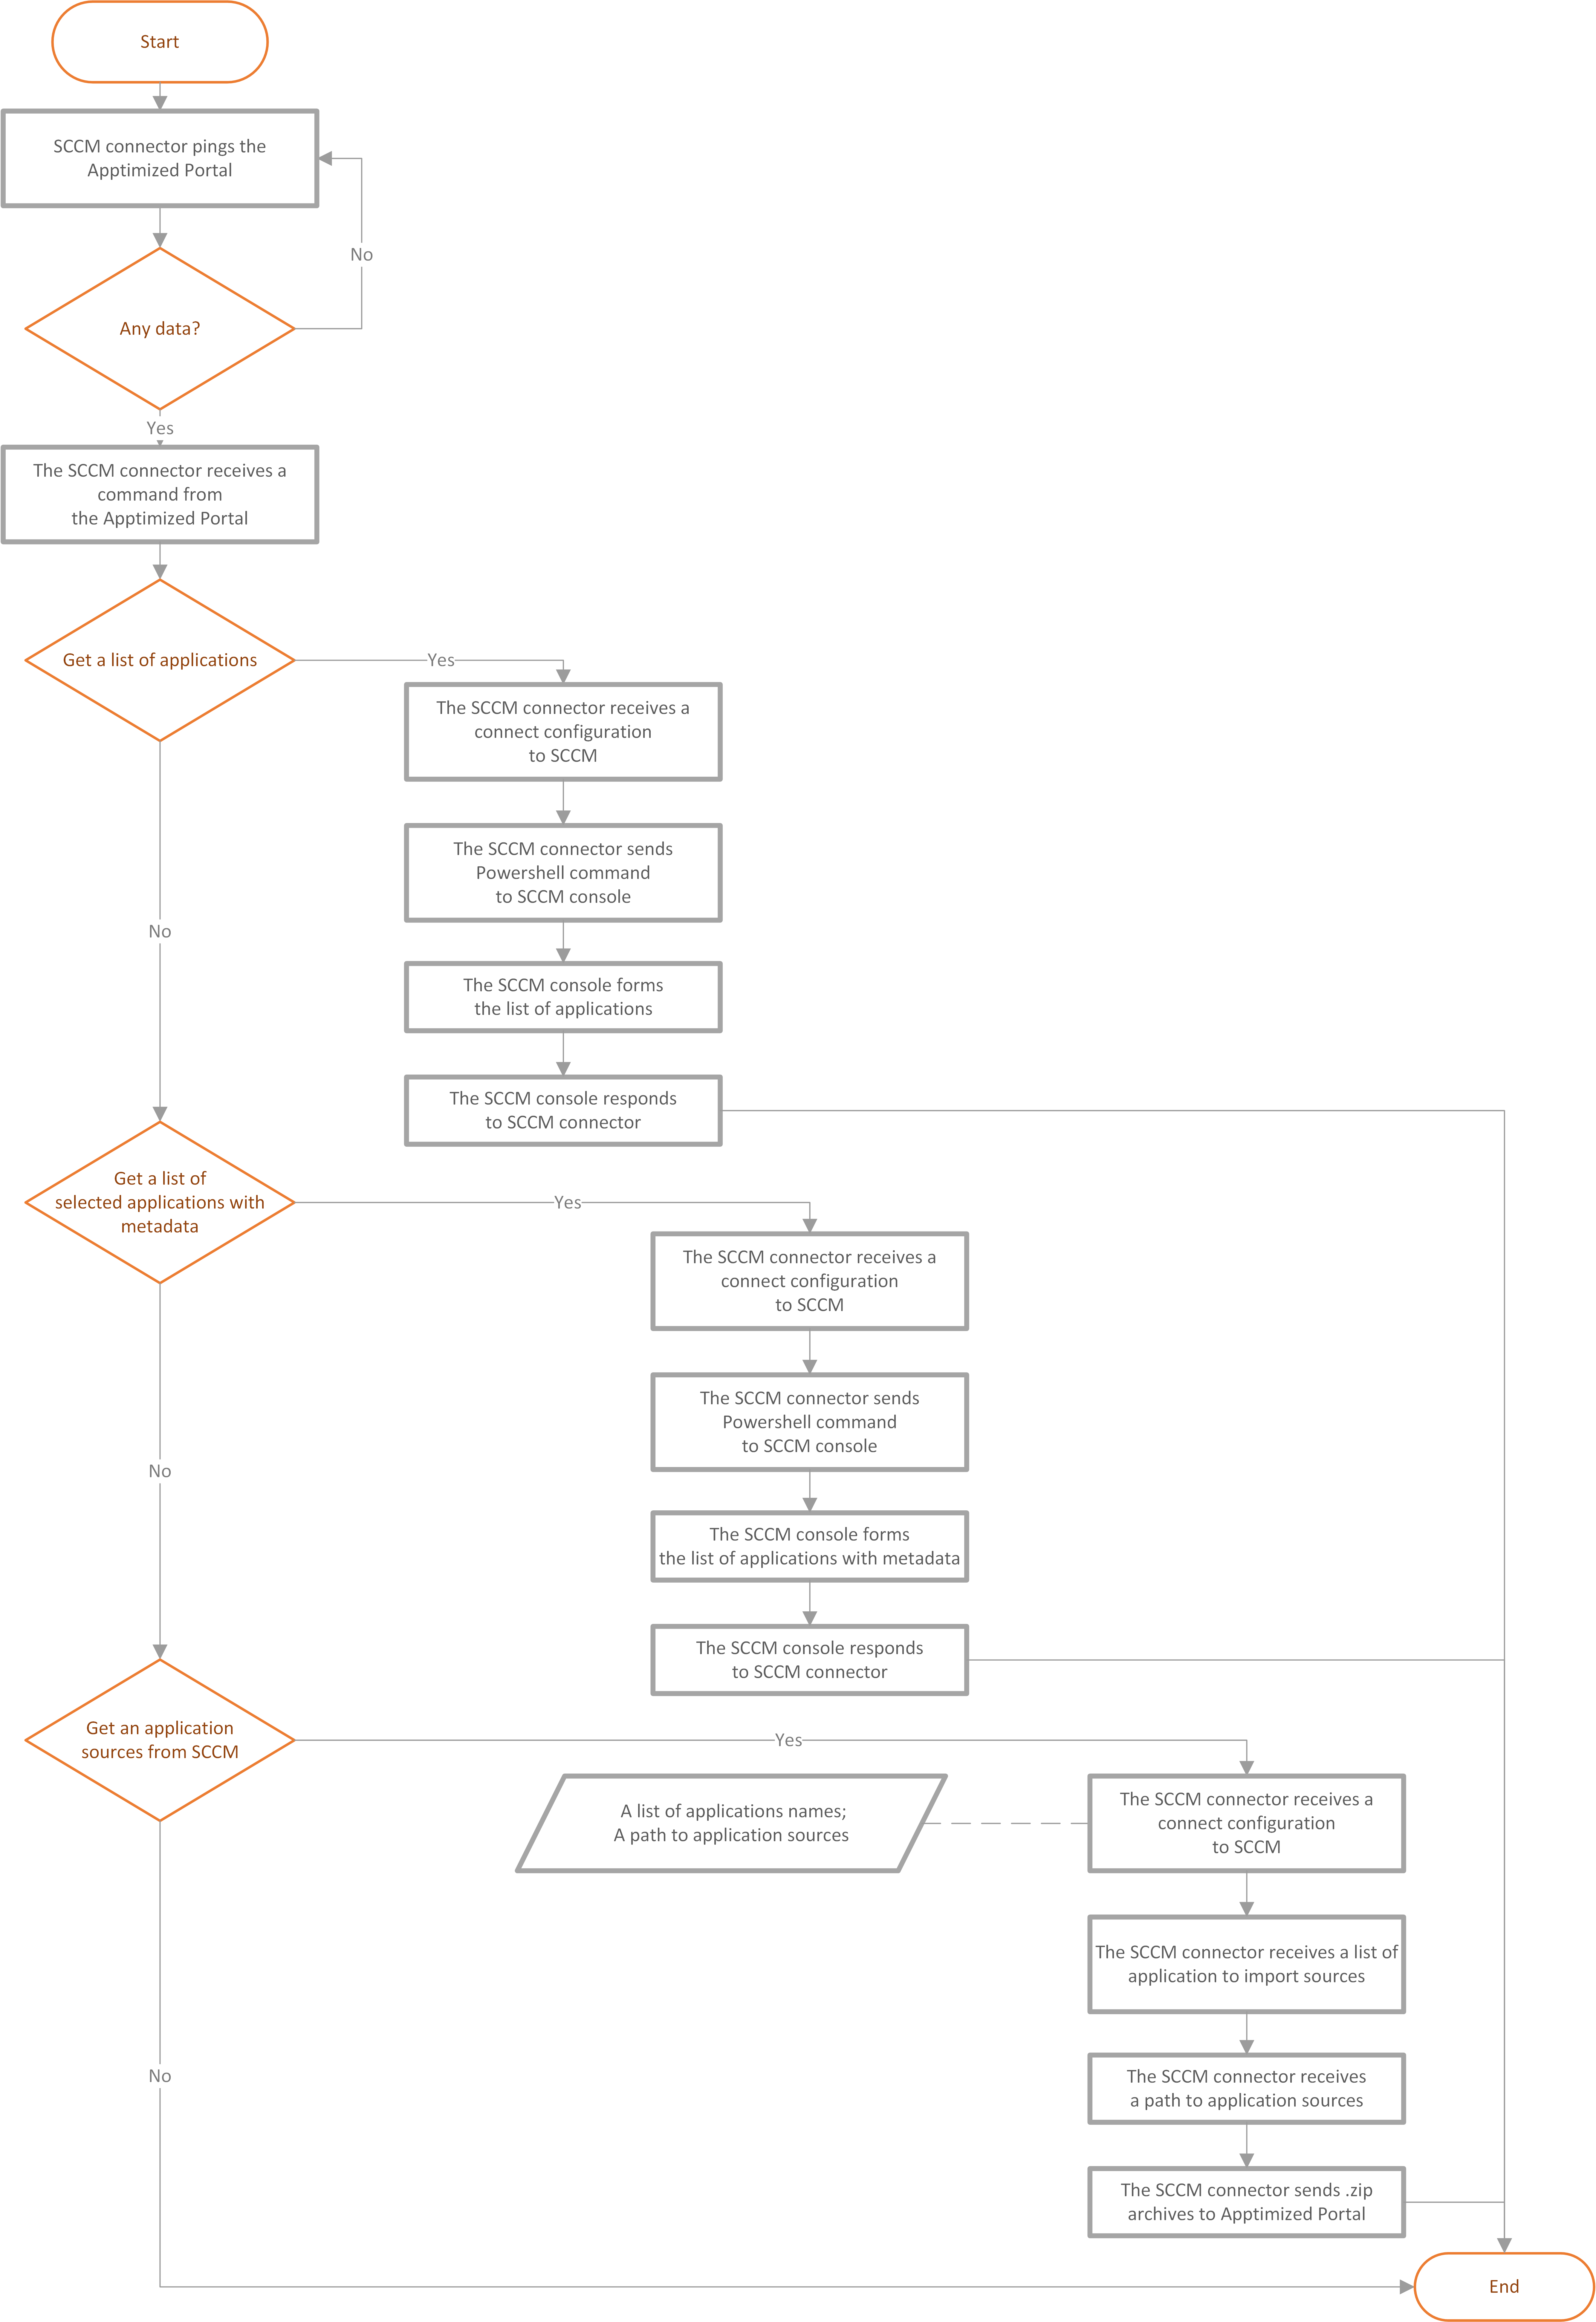](https://docs.apptimized.com/uploads/images/gallery/2020-03/R0fksfo8TlIYxME8-Import-from-SCCM.png) # Intune User Guide # Introduction **[Intune](https://docs.microsoft.com/en-us/mem/intune/fundamentals/what-is-intune)** is a cloud-based service that focuses on mobile device management (MDM) and mobile application management (MAM) which enables the following: - To be 100% cloud with Intune, or to be co-managed with Configuration Manager and Intune; - To set rules and configure settings on personal and organization-owned devices to access data and networks; - To deploy and authenticate apps on devices (both on-premises and mobile); - To control the way users access and share information; - To stay compliant with company security requirements. Integration **Intune** with **Apptimized** saves time and enables a user to upload, update, and manage the ready-made packages without the need to leave Apptimized. Initial integration to **Apptimized** requires a one-time configuration of settings in the [**Microsoft** **Azure**](https://portal.azure.com/) portal and the [**Apptimized portal**](https://app.apptimized.com/), namely: - Application registrations in the Microsoft Azure portal; - Assigning permissions to a user to work with Microsoft Intune from the Microsoft Azure portal; - Integration of the application from the Microsoft Azure portal into the Apptimized portal. # Integration #### Integration **Your Project → Administration → Settings → Integration → Intune → Environments → Create environment**  Put a name for your environment on the Apptimized Portal and press "**Create**". 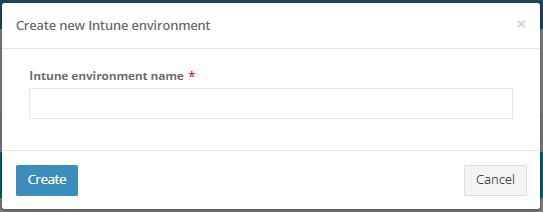**Then you will faced massage about that your environment was created. **
 [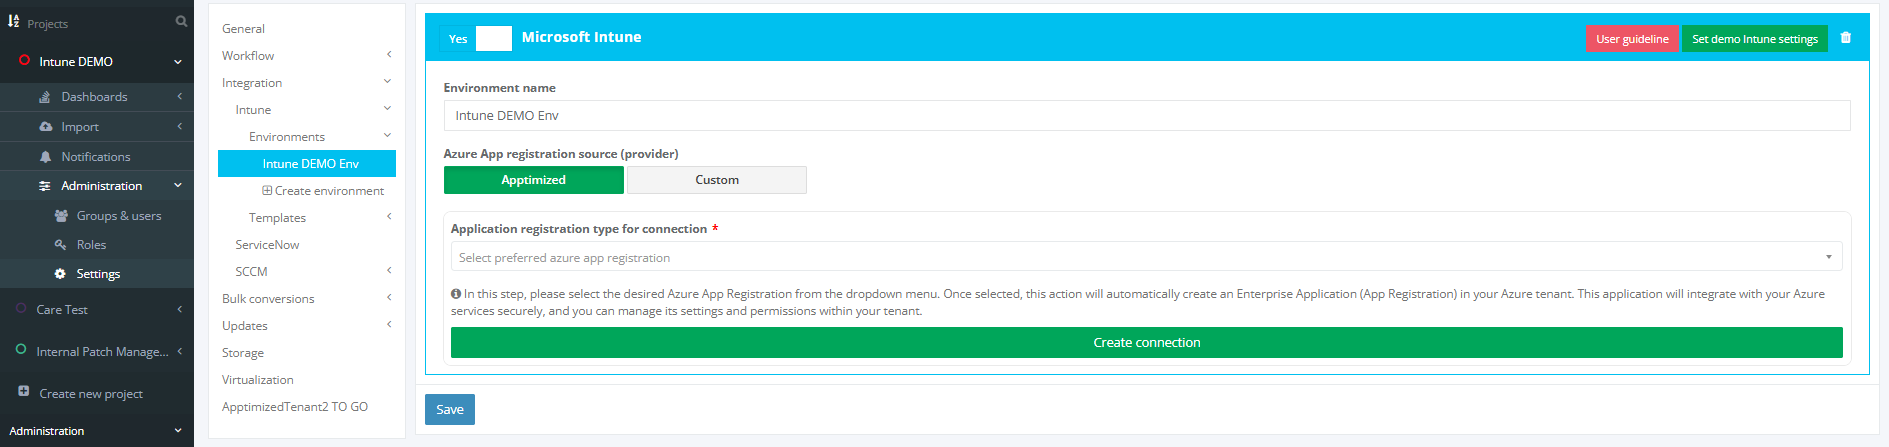](https://docs.apptimized.com/uploads/images/gallery/2025-03/main.PNG) The **Care** is available under the **Project **menu > **Updates** After creating your project on the Apptimized Portal you have two options for integrating your Intune environment. - **Apptimized** – use Apptimized provided App Registration - **Custom** – use own App Registration connection  ##### **Apptimized connection** In the “**Application registration type for connection**” you can choose: - Connection with Application permissions - Connection only with Delegated permissions In this step, please select the desired Azure App Registration from the dropdown menu. Once selected, this action will automatically create an Enterprise Application (App Registration) in your Azure tenant. This application will integrate with your Azure services securely, and you can manage its settings and permissions within your tenant. [](https://docs.apptimized.com/uploads/images/gallery/2025-03/two.PNG) Then press “**Create connection**” button: [](https://docs.apptimized.com/uploads/images/gallery/2025-03/connection-button.PNG)In case if you have enough permissions for this operation (Global Admin role) you will faced the next window:
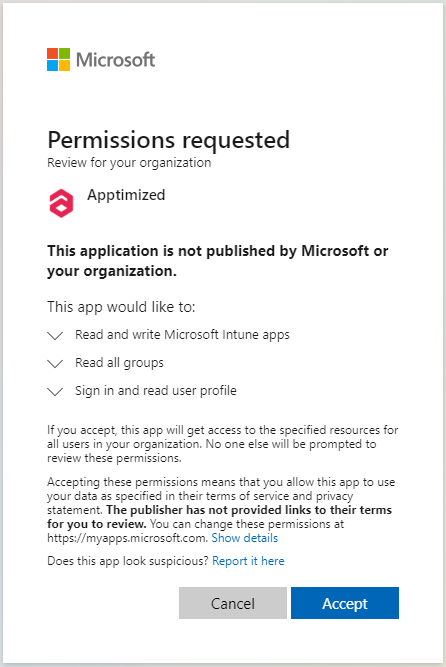
After pressing “Accept” connection with your environment will be created and it will back you to the your created 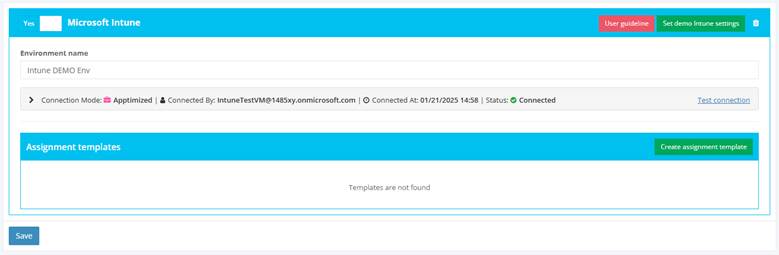If all went well you would face the status - “**Connected**”
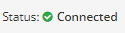
And if something went wrong – “**Error**”
In this case please press: **“Test connection”** button: It will update information aboud status of your Intune connection**If status don’t change, please contact support.**
Also here you can see: - **Connection Mode**: Apptimized or Custom - **Connected By**: User who made autorization - **Connected At**: Time when authorization was doneIn case if you do not have enough permissions, but your Enterprise application settings allow you request it, you will face the next window.
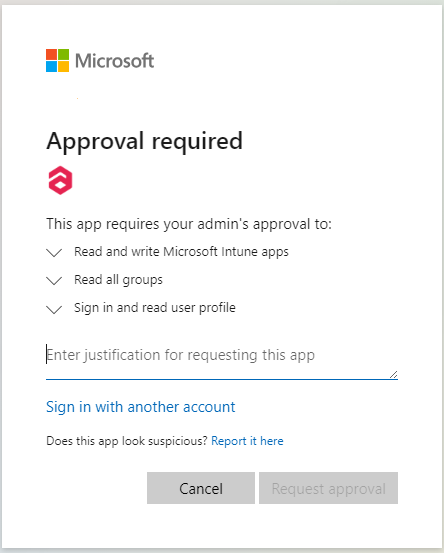
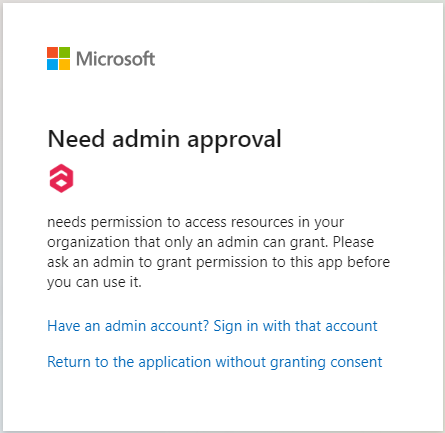
After pressing “**Request approval**” email will be sent to your Admin and you will see next window.
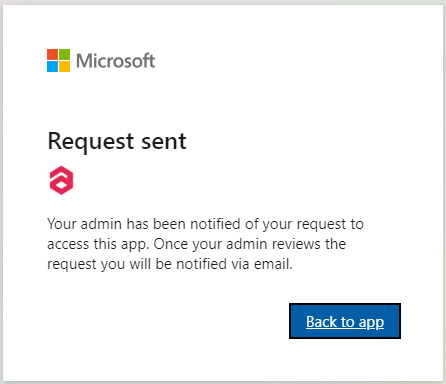
After pressing "**Back to app**” you will back to the Intune Environment page. [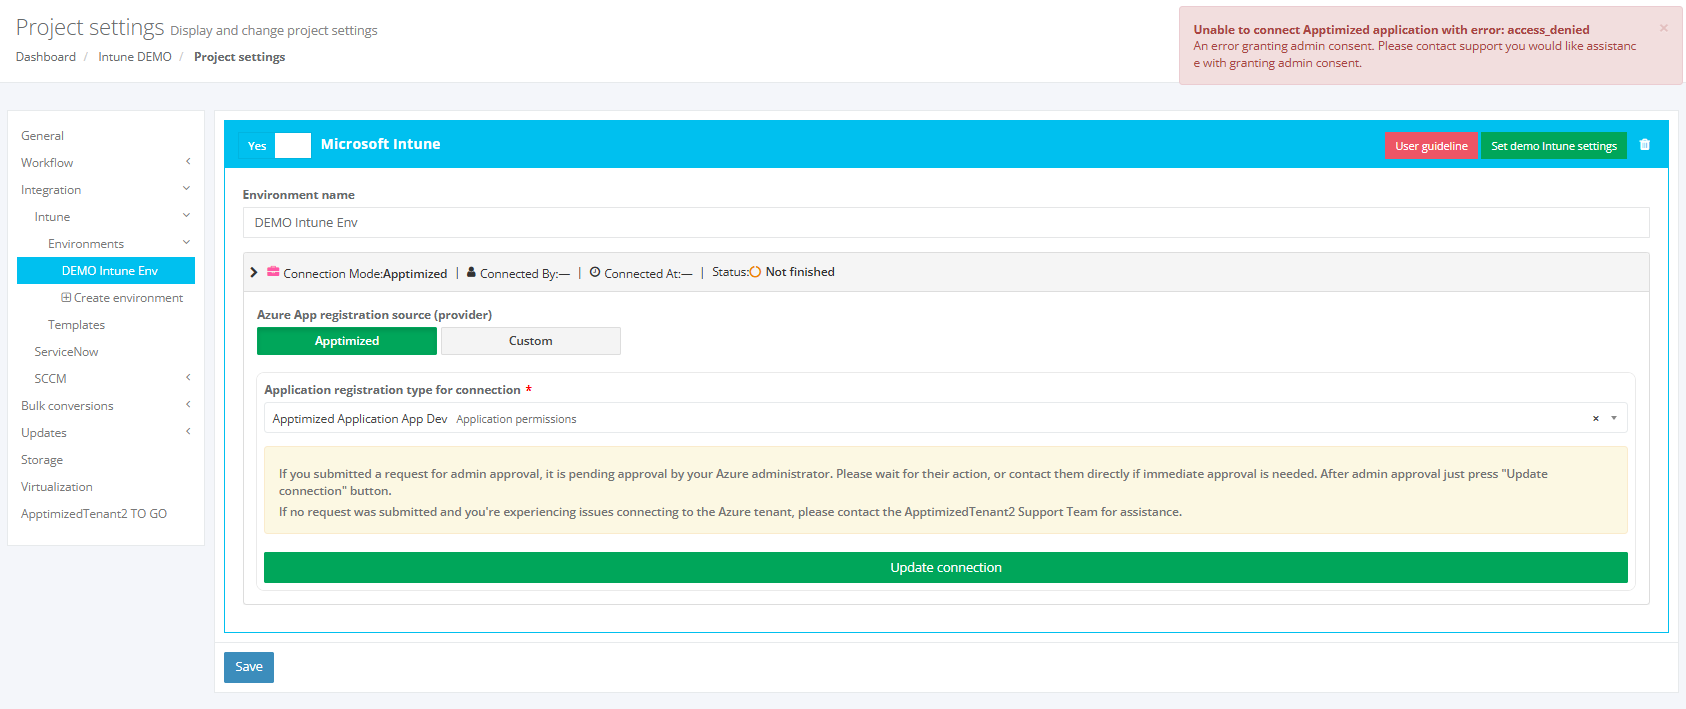](https://docs.apptimized.com/uploads/images/gallery/2025-09/VeEintune-environment-page.PNG) In this case, the status will be “Not finished”. [](https://docs.apptimized.com/uploads/images/gallery/2025-09/image.png) Also, you will face the next warning (it's ok). [](https://docs.apptimized.com/uploads/images/gallery/2025-09/g5wimage.png) And now you need to wait approval from your Admin by Email message.
> Email Example: > > [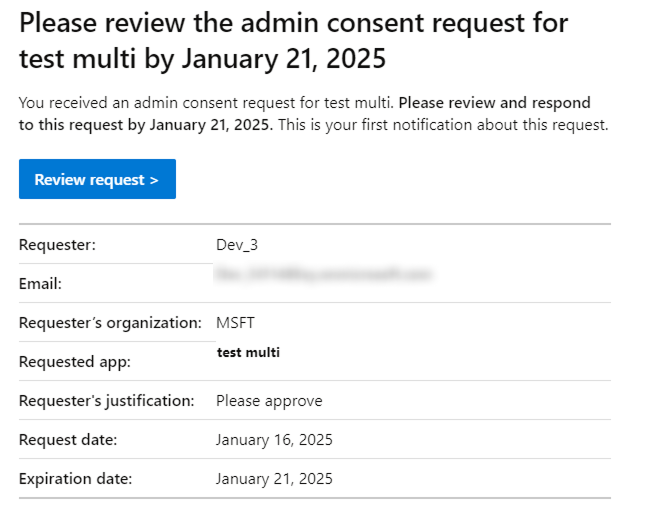](https://docs.apptimized.com/uploads/images/gallery/2025-08/lDegroup-1.png) > > > After Admin approval you will get the next message on your Email. > Example: > > 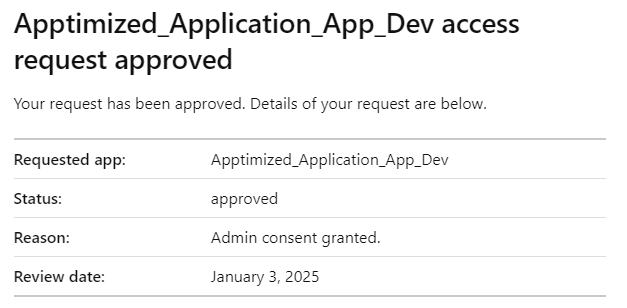 After that you need to go to the Intune Environment setting page of your created environment and press “**Update connection**” button. [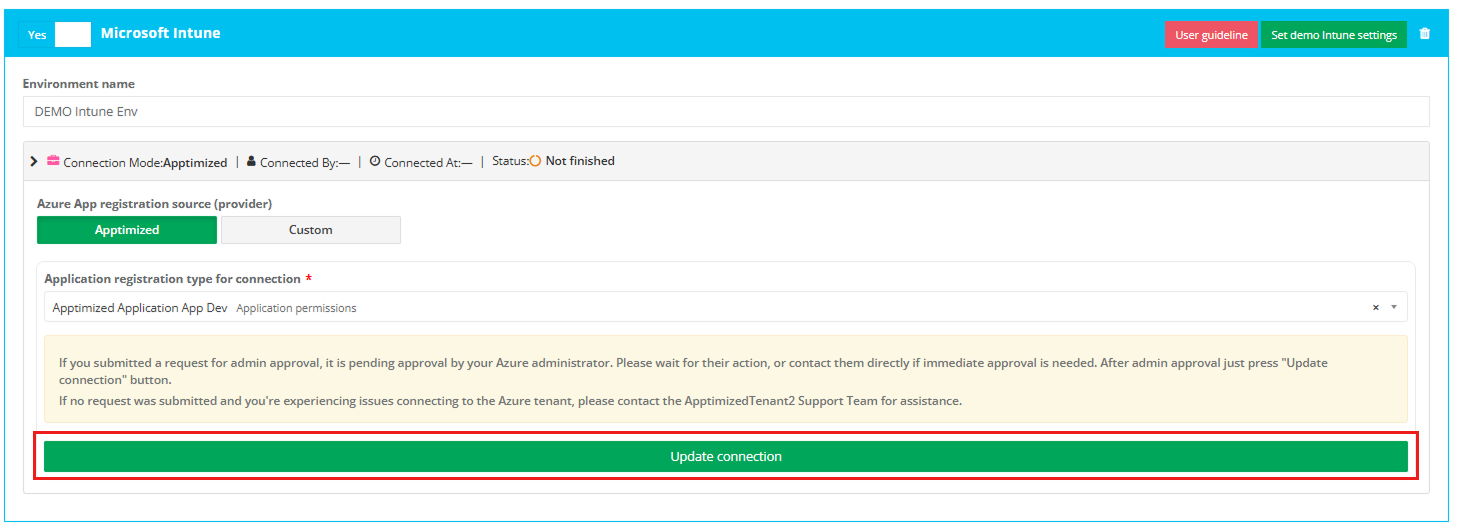](https://docs.apptimized.com/uploads/images/gallery/2025-09/group-8.png) If the request is approved, the status will change to “Connected”, and the environment will be ready for work. [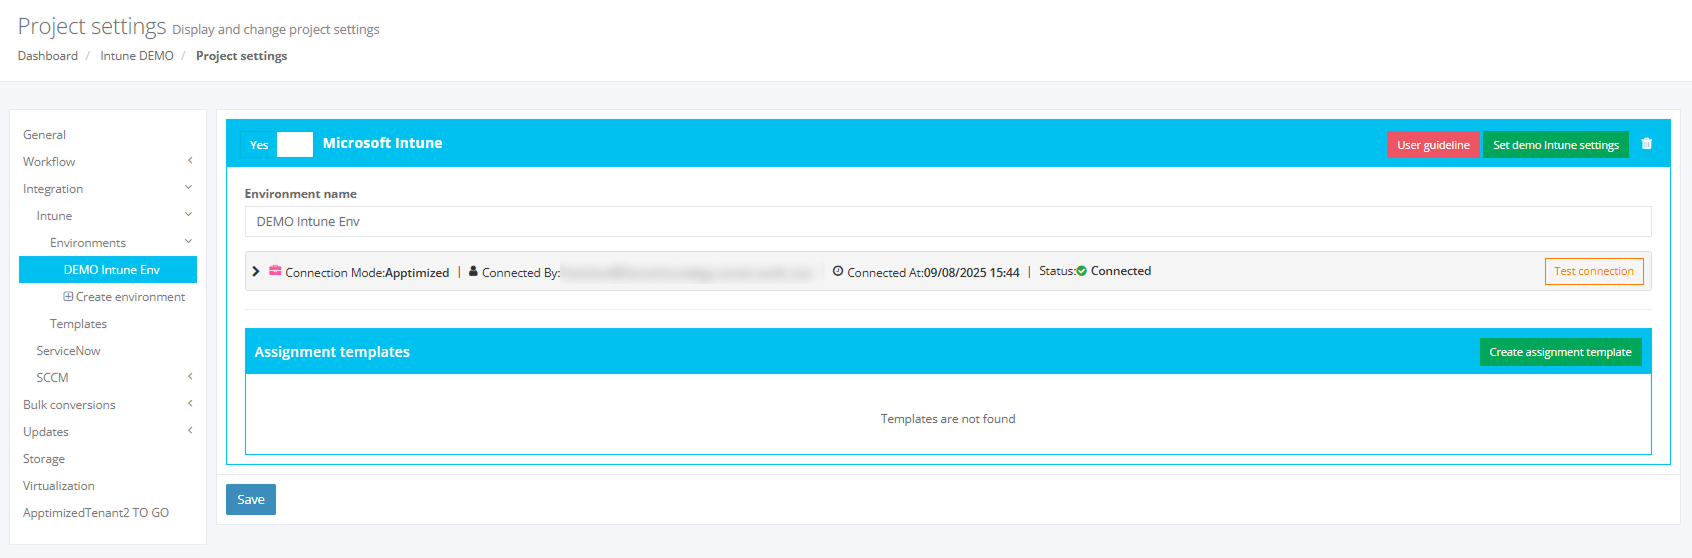](https://docs.apptimized.com/uploads/images/gallery/2025-09/group-9.png) If you get the window with the approval request, it means that your request has not been approved yet or denied.In case if you do not have enough permissions and can not request it you will faced the next window:
In this case you can create this type of connection only with Global Administrator permission.   **Setting that allow you to request Admin consent:**  --- ##### **Custom connection** The application registration is carried out in the Microsoft Azure portal via administrative credentials. A user can choose one of the following types of accounts: A tenant admin account; - A tenant user account (with the enabled **“Users can register applications”** setting). The option to open an application registration page is available under: - **Microsoft Azure** portal > **Azure services** > **App registrations**; [](https://docs.apptimized.com/uploads/images/gallery/2020-05/ql2t7GeHU7oa1KFn-intune_01.png) - **Microsoft Azure** portal > Search > Enter a search request (i.e., “App registrations”) > Select the service in the list > **App registrations**; [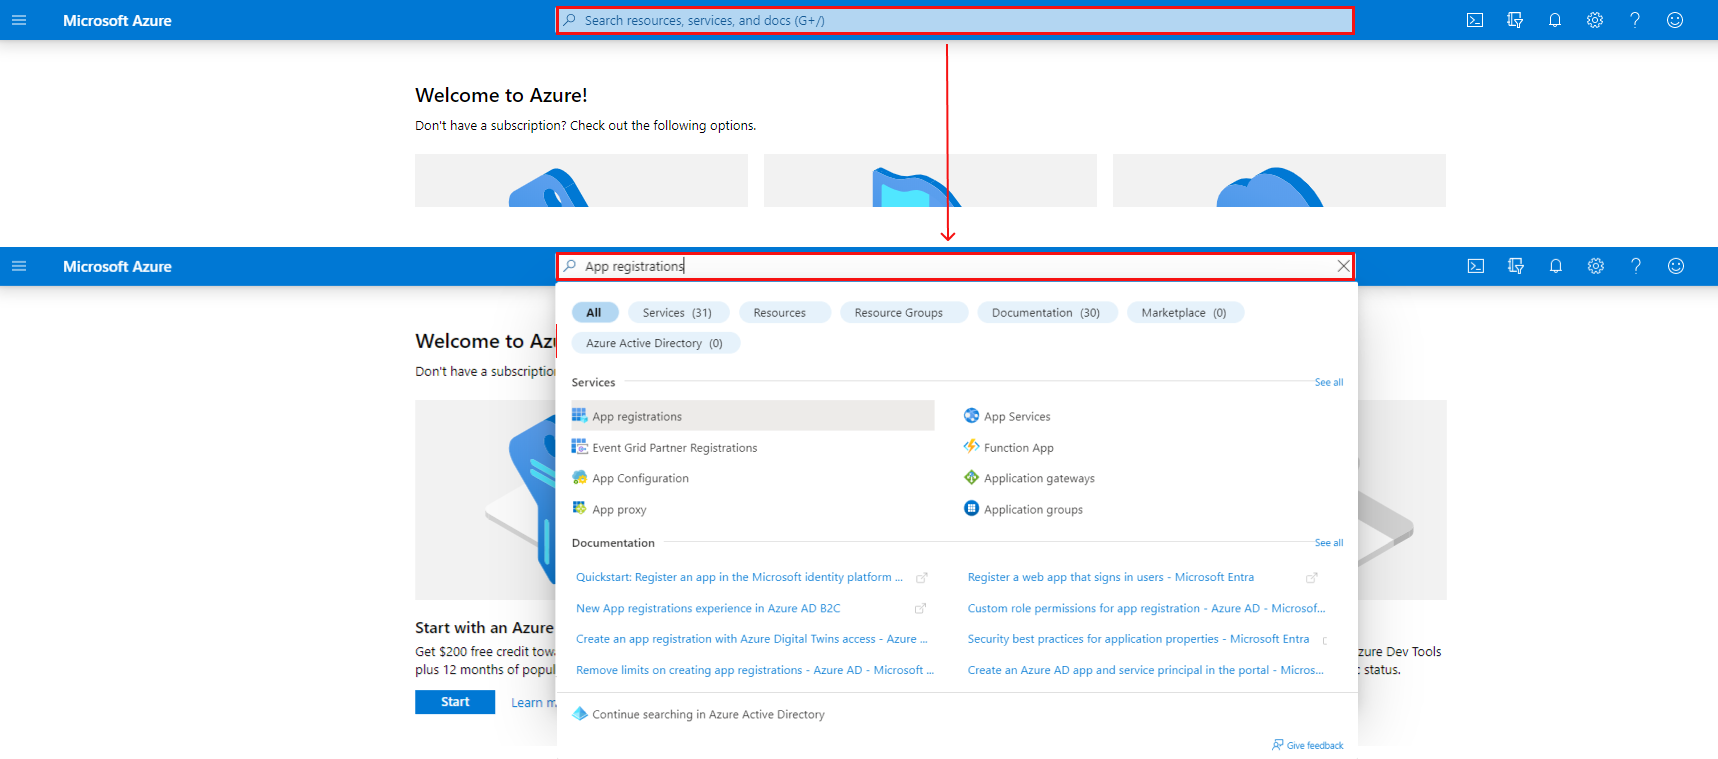](https://docs.apptimized.com/uploads/images/gallery/2022-08/q7ncDCyqN1eH0oih-intune_02_02.png) - **Microsoft Azure** portal > Menu > All services > Enter a search request (i.e., “App registrations”) > Select the service in the list > **App registrations**. [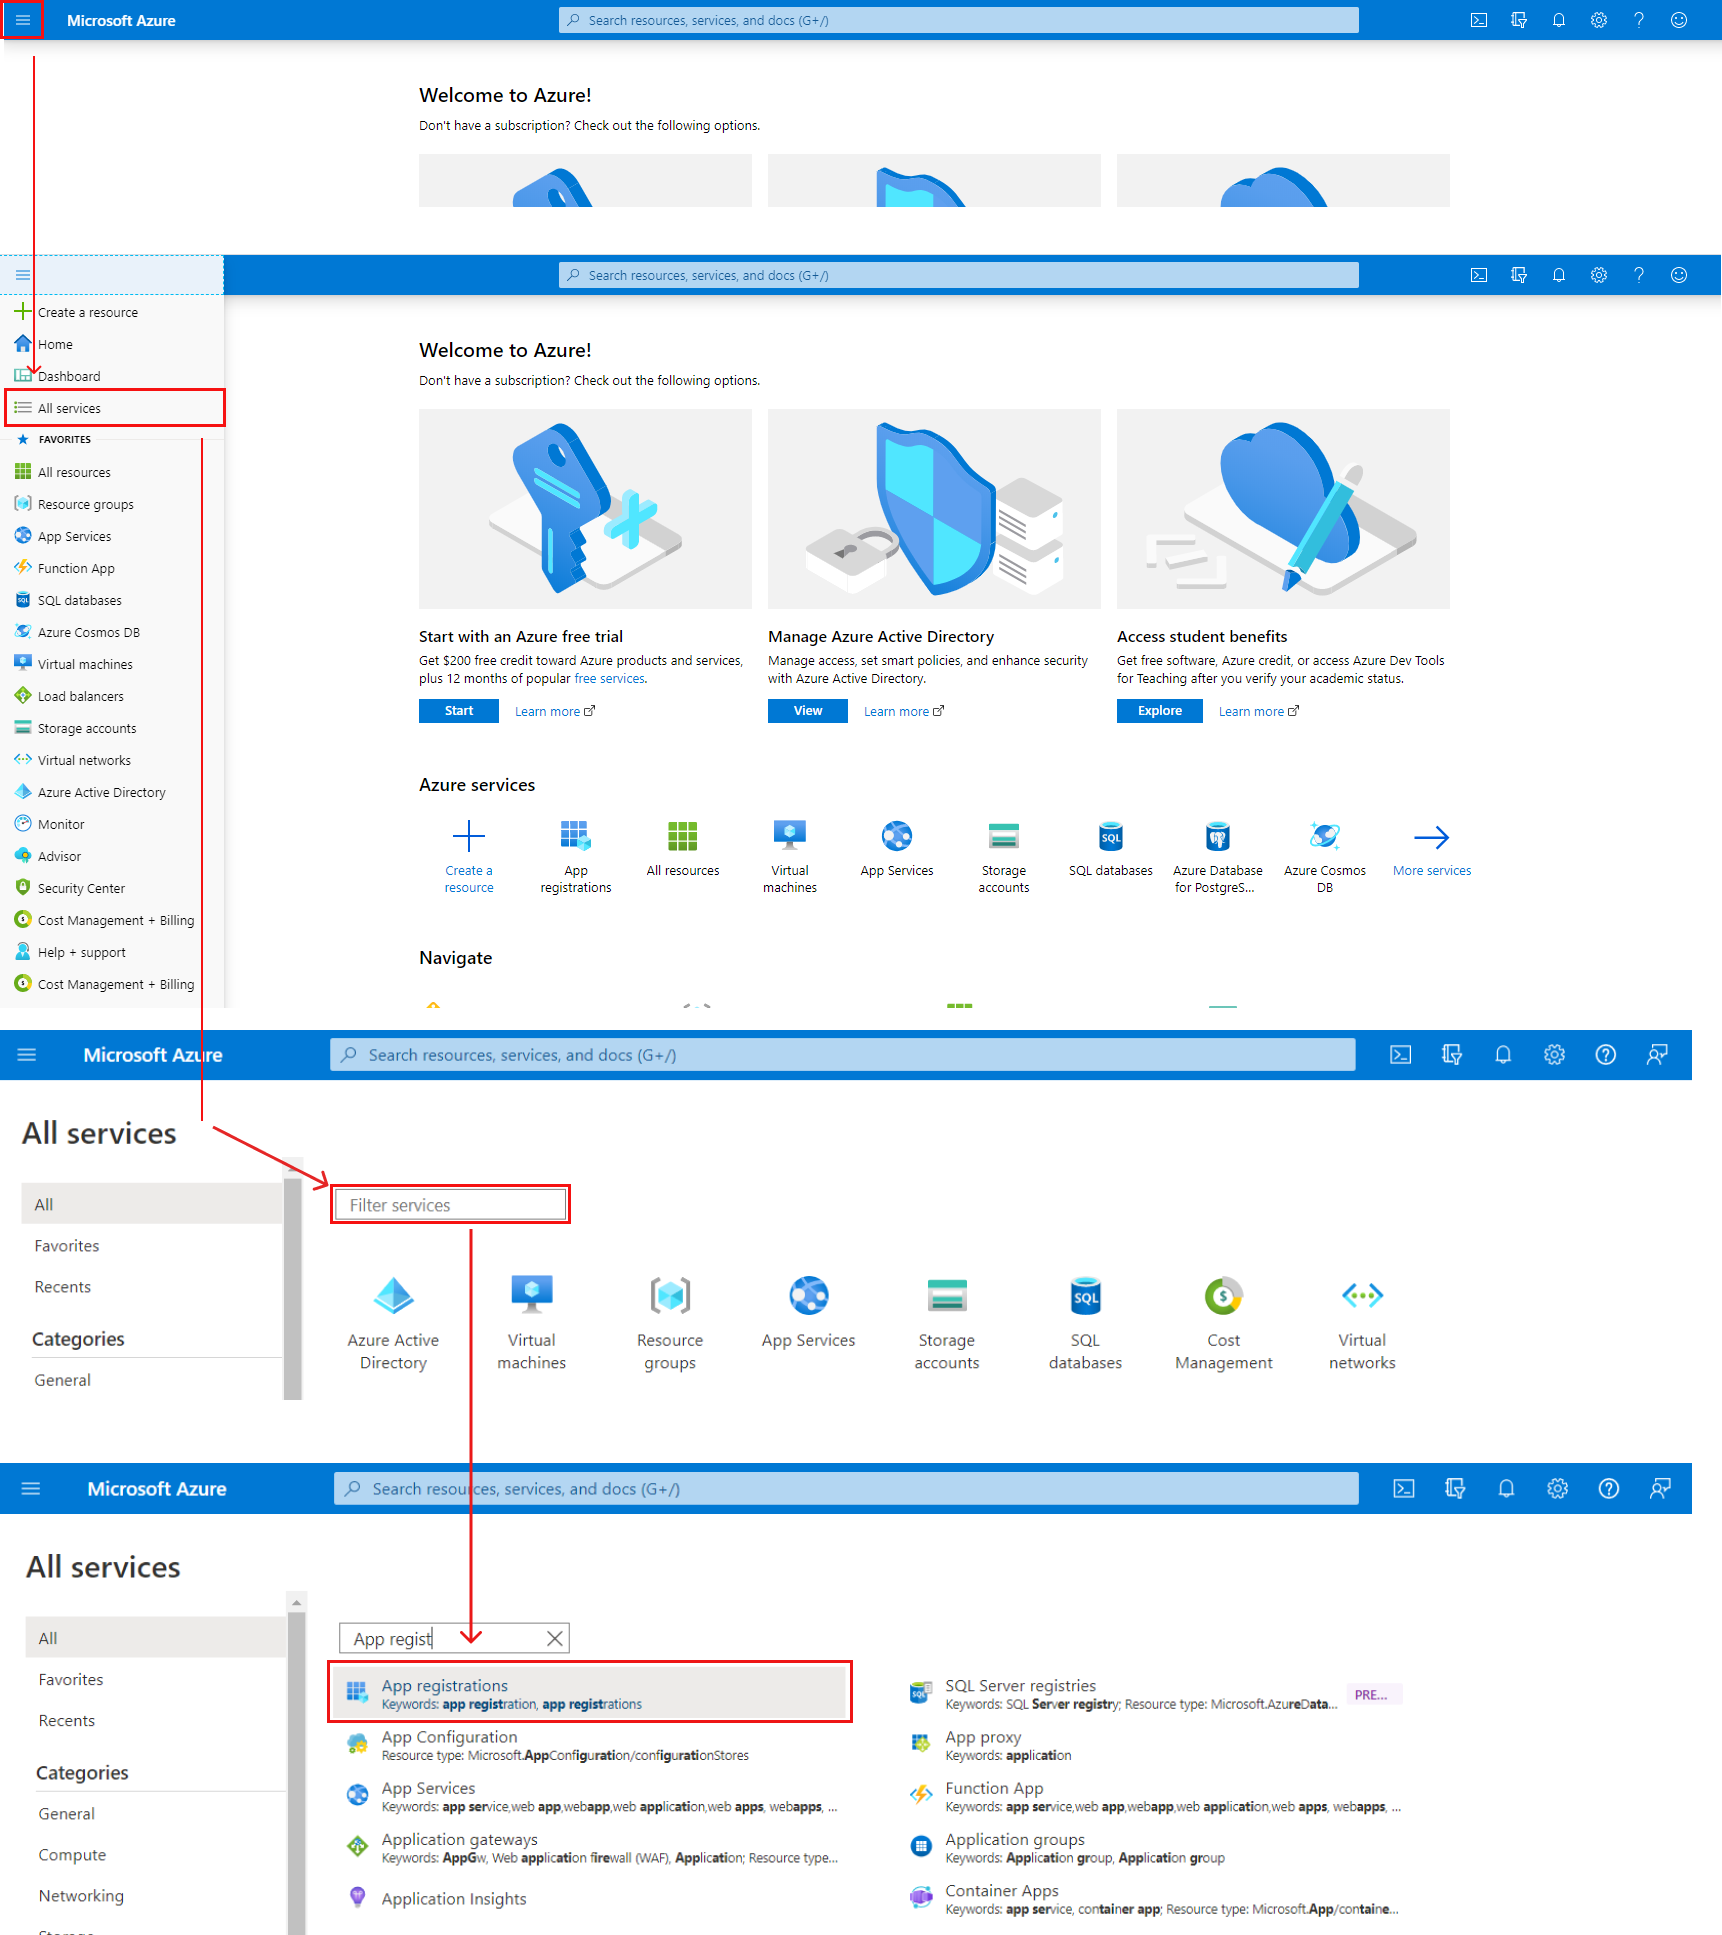](https://docs.apptimized.com/uploads/images/gallery/2022-08/yC2QnvLLANcWCJZq-intune_03_03.png) **Microsoft Azure** portal shows the screen when successful: [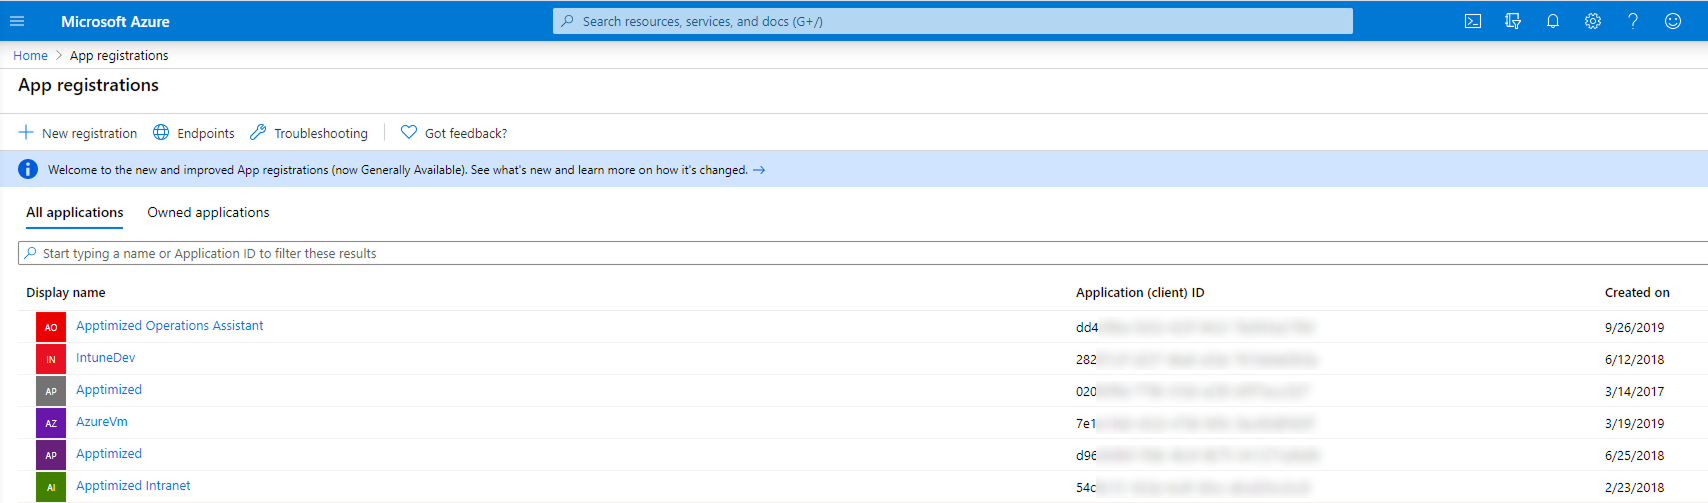](https://docs.apptimized.com/uploads/images/gallery/2025-08/Az2group-2.png) The option to create a new application registration is available under the **New registration** option. [](https://docs.apptimized.com/uploads/images/gallery/2020-05/lcgEArRMyPn4ljJz-intune_05.png) Microsoft Azure portal shows the Create window when successful: [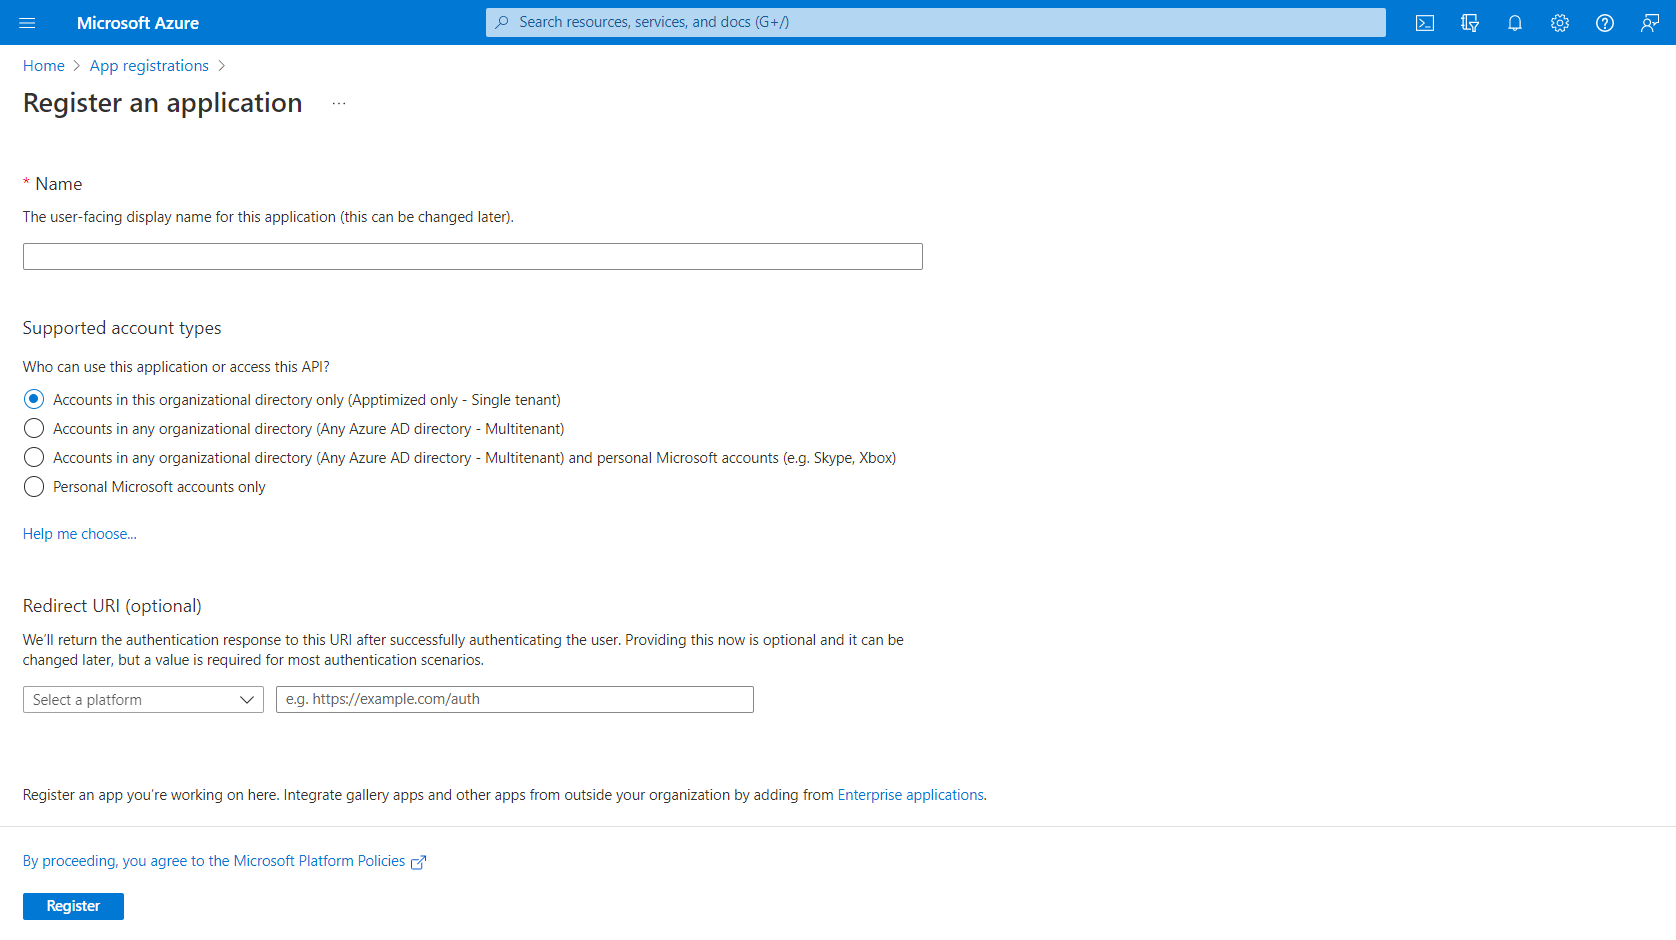](https://docs.apptimized.com/uploads/images/gallery/2022-08/BK5Q9Jma32fJJnFN-intune_06_01.png) To create a new application registration, a user fills in the fields in the form (see Table 1 and the [Microsoft Azure manual](https://docs.microsoft.com/en-us/azure/active-directory/develop/quickstart-register-app)). Table 1. A new application registration| **Field name** | **Details** |
| Name | This field sets a meaningful application name to display to users (i.e., **Apptimized Intune Test**) |
| Supported accounts | This option identifies types of accounts that can use the application. Three options available: - Accounts in this organizational directory only; - Accounts in any organizational directory; - Accounts in any organizational directory and personal Microsoft accounts; - Personal Microsoft account only. |
| Redirect URI | This setting is optional, and the values can be provided later. [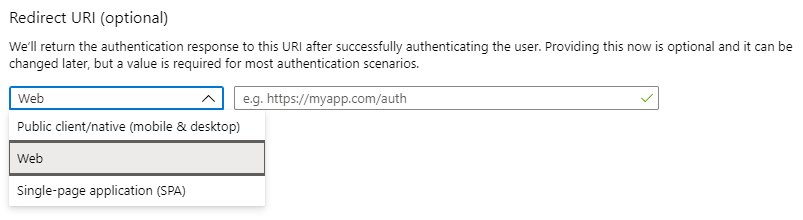](https://docs.apptimized.com/uploads/images/gallery/2020-05/dEYiRGrv0j8eCFmJ-intune_07.png) |
**Note.** When clicking on the **Add** button, the client secret value appears (i.e., **~\_fd-Y49~haNZ~g8RbDz9yQCF4KQ\_\_1j49**). A user must copy the value to the clipboard to use it in the client’s application code. It becomes inaccessible once a user leaves this page. The **Client secret** value correlates with the **Client secret** field when integrating **Intune** into the **Apptimized** portal.
[](https://docs.apptimized.com/uploads/images/gallery/2022-08/ksgCXV9lGzvrlvxw-intune_11_02.png) The option to [configure permissions](https://docs.microsoft.com/en-us/azure/active-directory/develop/v2-permissions-and-consent) to the application to call API is available under **All services** > **App registrations** > Select the application in the list > **Manage** menu > **API permissions** > Add a permission > **Microsoft Graph**. [](https://docs.apptimized.com/uploads/images/gallery/2025-08/zKfgroup-4.png) **Microsoft Azure** portal shows the following screen when successful: [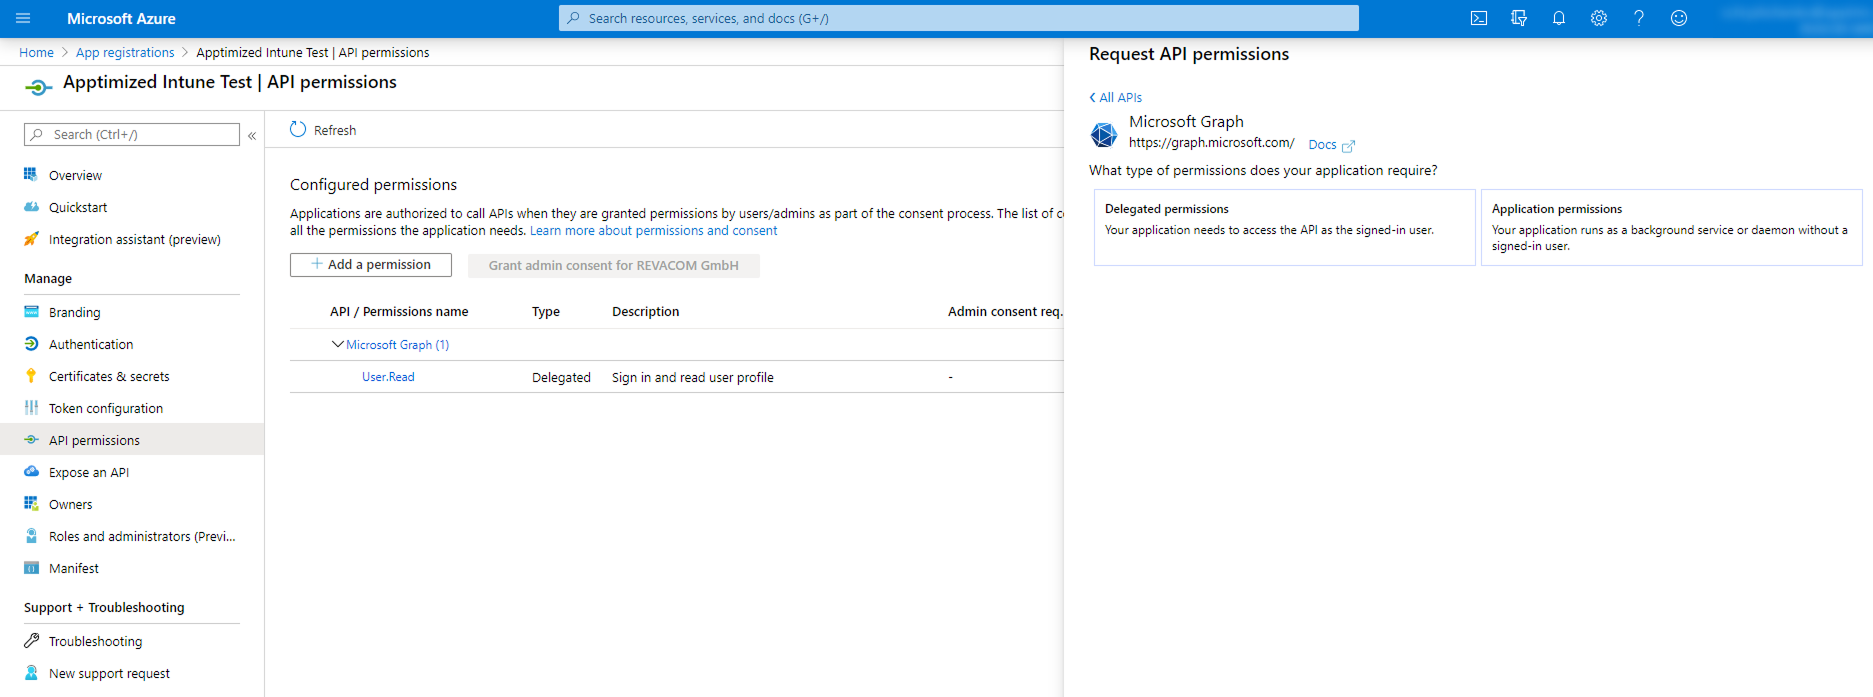](https://docs.apptimized.com/uploads/images/gallery/2025-08/82egroup-5.png) The option to set the types of permissions to the application is available under the **Delegated permissions** button > Select the permissions from the list > **Add permissions** button. The screenshot below shows the list of enabled permissions: [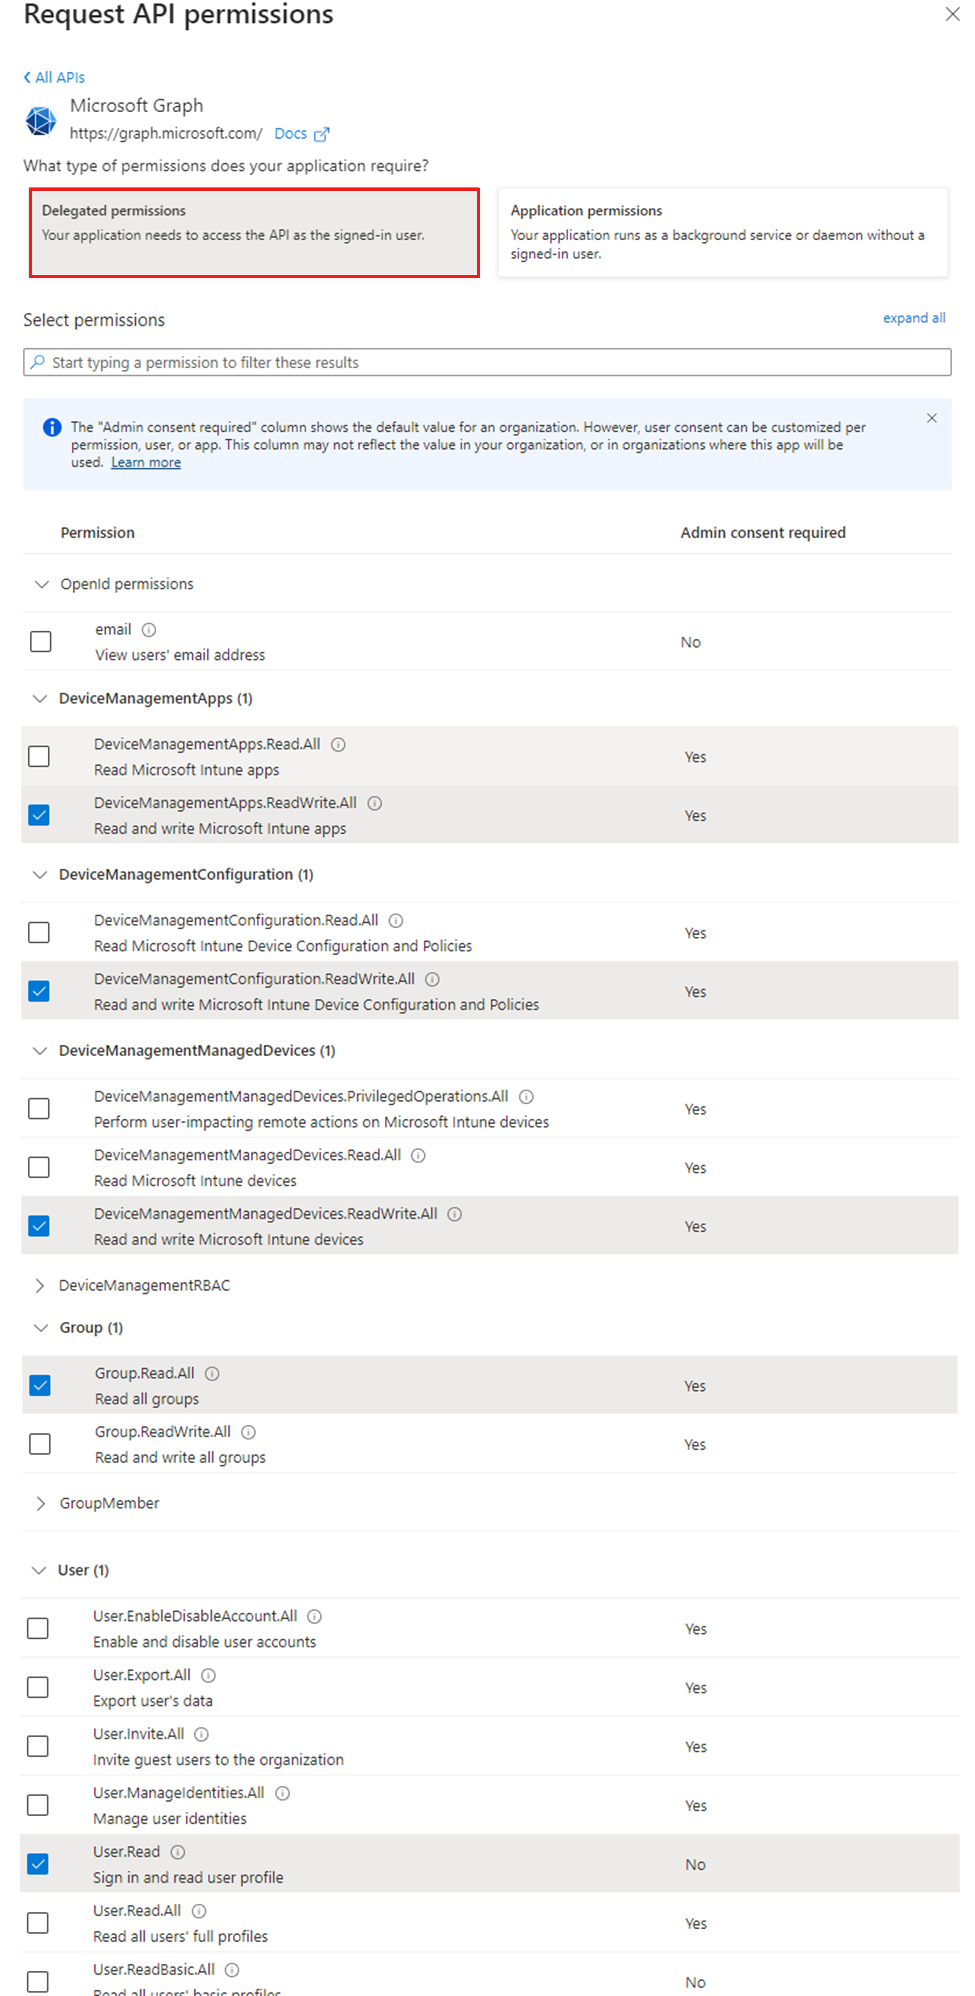](https://docs.apptimized.com/uploads/images/gallery/2024-03/intunepermissions1.png) Some delegated permissions can be consented by non-administrative users, but some higher-privileged permissions require administrator consent. The option to grant permissions is available under the **Grant admin consent for \[company name\]** button. [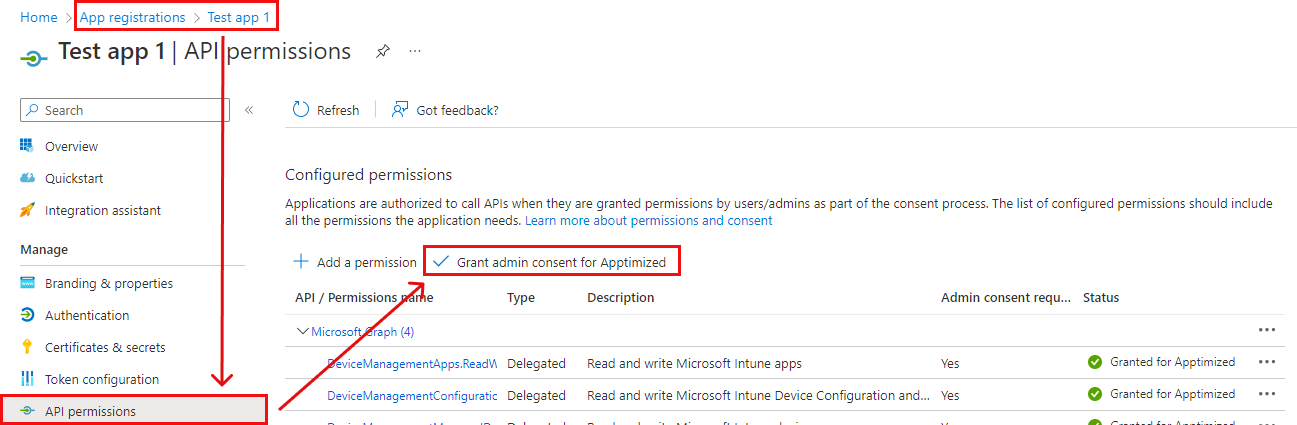](https://docs.apptimized.com/uploads/images/gallery/2022-11/7x9tcR8L6ovBVp9e-Intune_51_1.png)**Note.** If the application runs as a background service or daemon without a signed-in user, the required option is **Application permissions**. The **Applications permissions** are the permissions that are used by applications that run without a signed-in user present. Using Application permissions enables Apptimized users to push packages to Intune without requiring an own Intune access or even an AAD account in the target Azure directory. By configuring the use of application permissions, the API will be authorized to push packages to Intune without requiring an authenticated AAD Intune user with adequate permissions to provide this authorization. [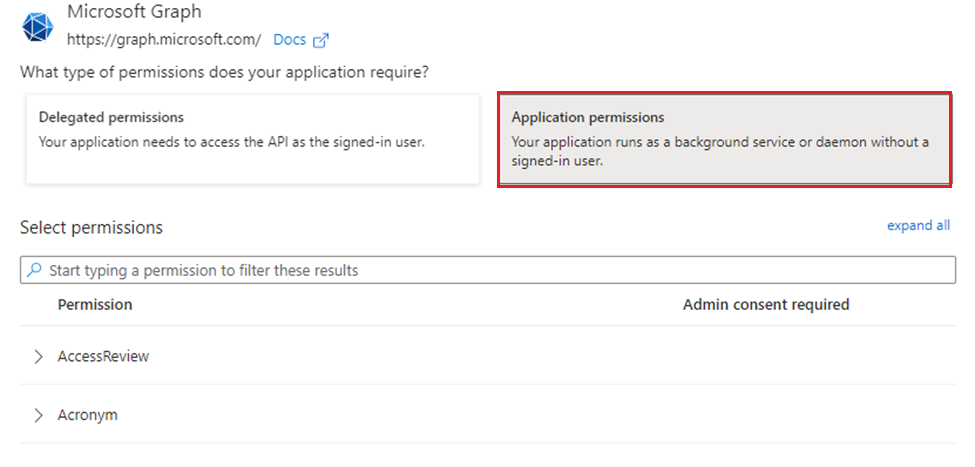](https://docs.apptimized.com/uploads/images/gallery/2024-03/intuneapppermisions.png) The **DeviceManagementApps** permissions in **Applications permissions** are identical to **Delegated permissions** group. [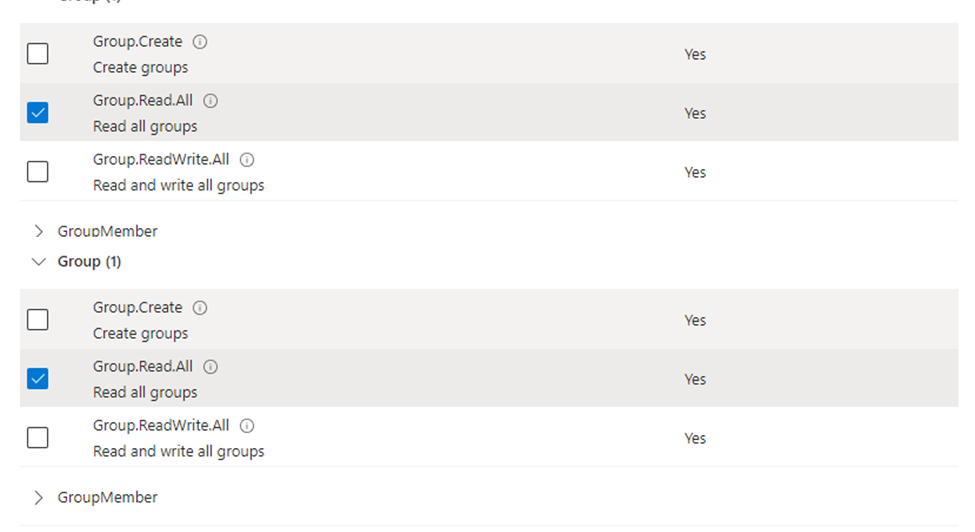](https://docs.apptimized.com/uploads/images/gallery/2024-03/permissionsintune.png)
##### **Assignment template** After connecting Intune environment, "Create assignment template" is available. [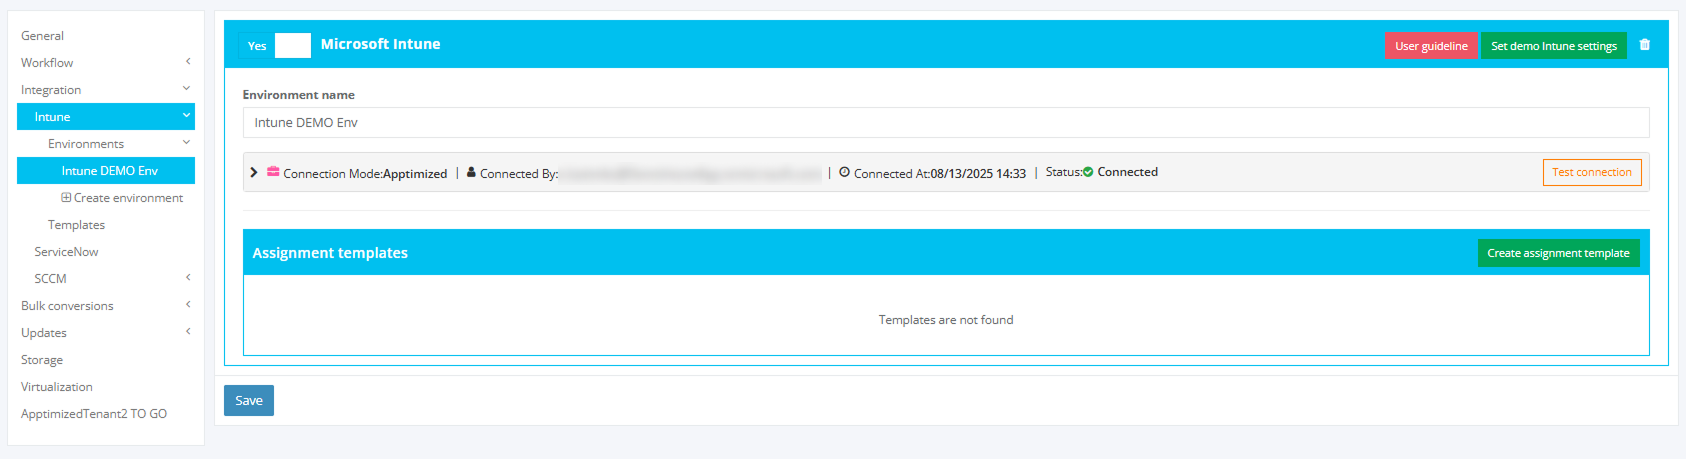](https://docs.apptimized.com/uploads/images/gallery/2025-08/xYFgroup-7.png) Configurating template window [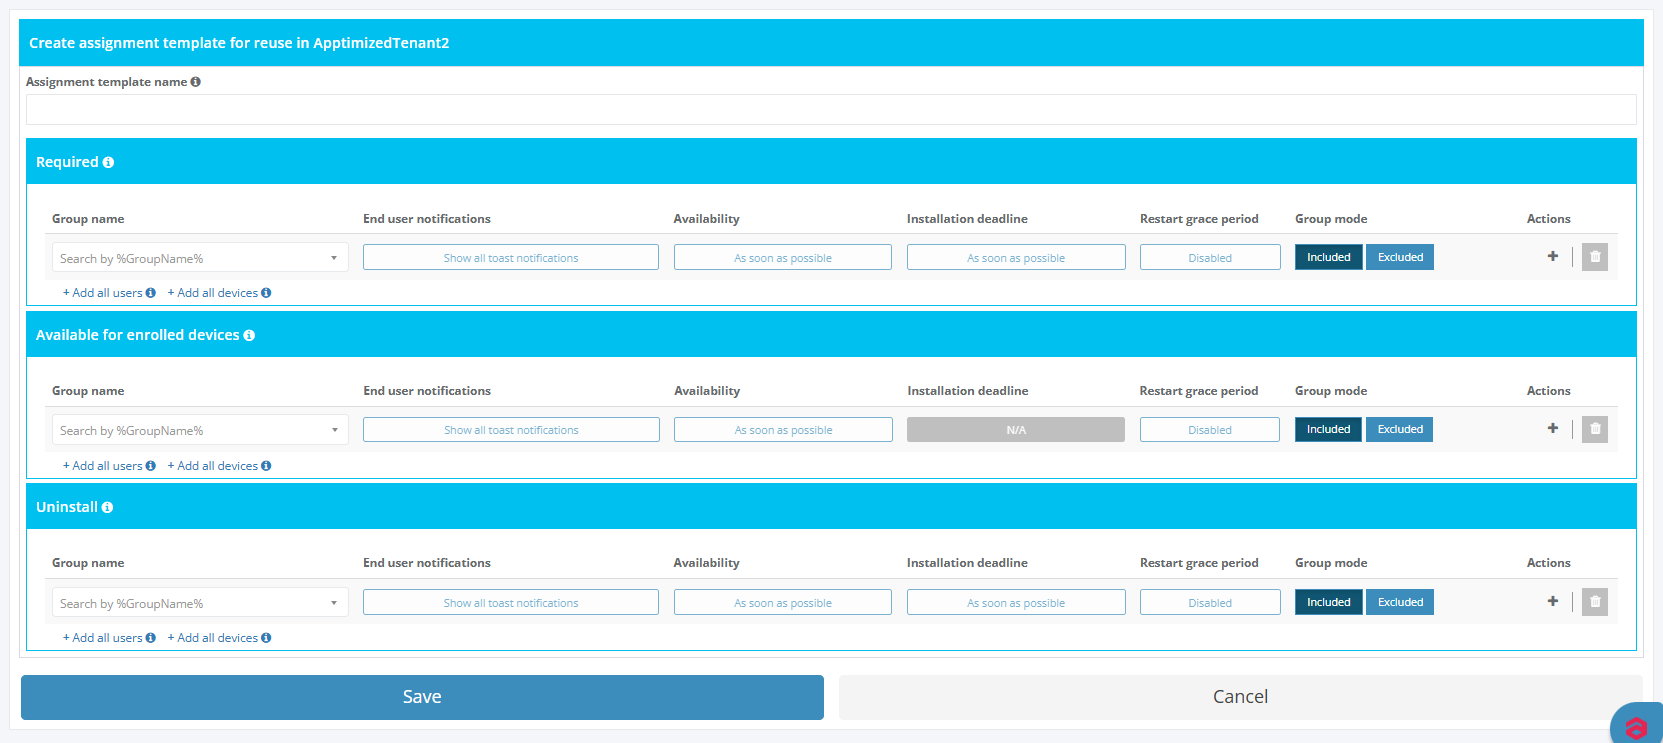](https://docs.apptimized.com/uploads/images/gallery/2025-08/zOOgroup-7-2.PNG) List with created templates [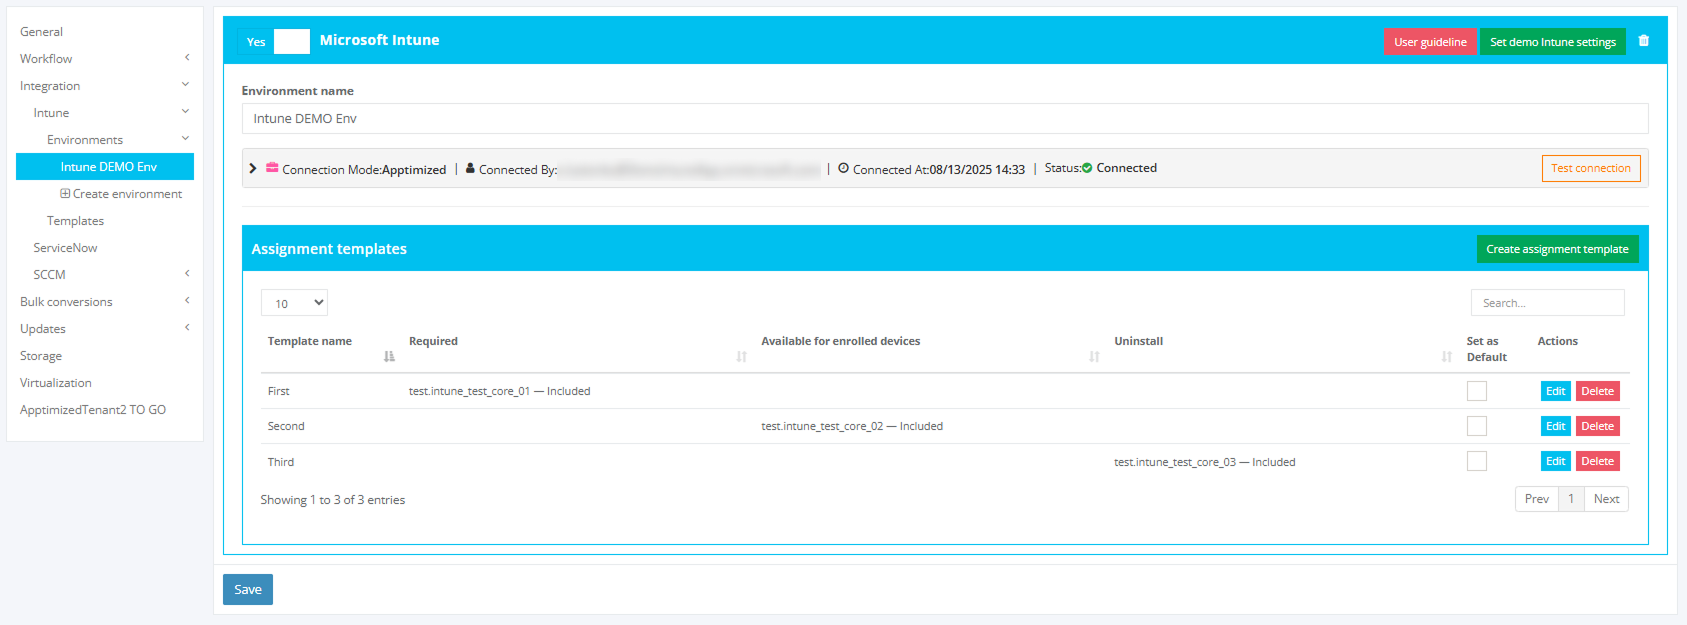](https://docs.apptimized.com/uploads/images/gallery/2025-08/ZhRgroup-6.png) ##### **Intune template** Creating [](https://docs.apptimized.com/uploads/images/gallery/2025-08/VXOmain.PNG) Configuration menu [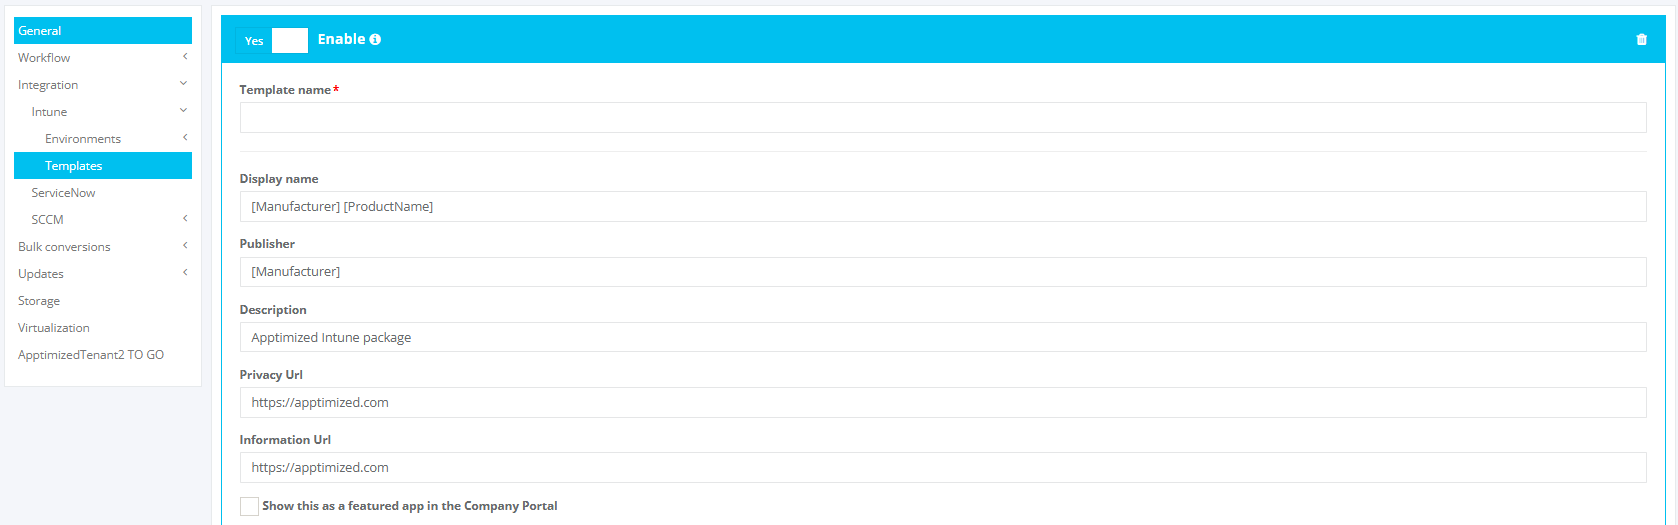](https://docs.apptimized.com/uploads/images/gallery/2025-08/create.PNG) List with created templates [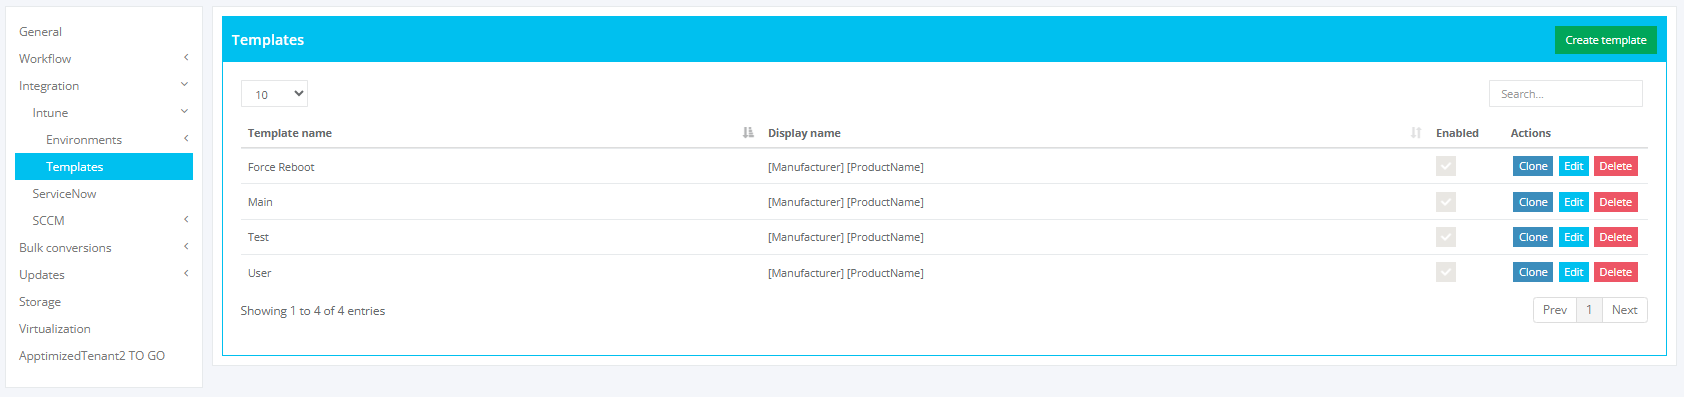](https://docs.apptimized.com/uploads/images/gallery/2025-08/5C8created.PNG) ##### **Integration of the application from the Microsoft Azure portal into the Apptimized portal** The one-time configuration is available for project administrators under the **Project** menu > **Administration** > **Settings** > Integration section > **Intune**. [](https://docs.apptimized.com/uploads/images/gallery/2020-05/NtaZSECAxPcl6tTM-intune_22.png) **Intune** becomes active when switched on and once the required settings are completed. All required fields are marked with an asterisk \*. [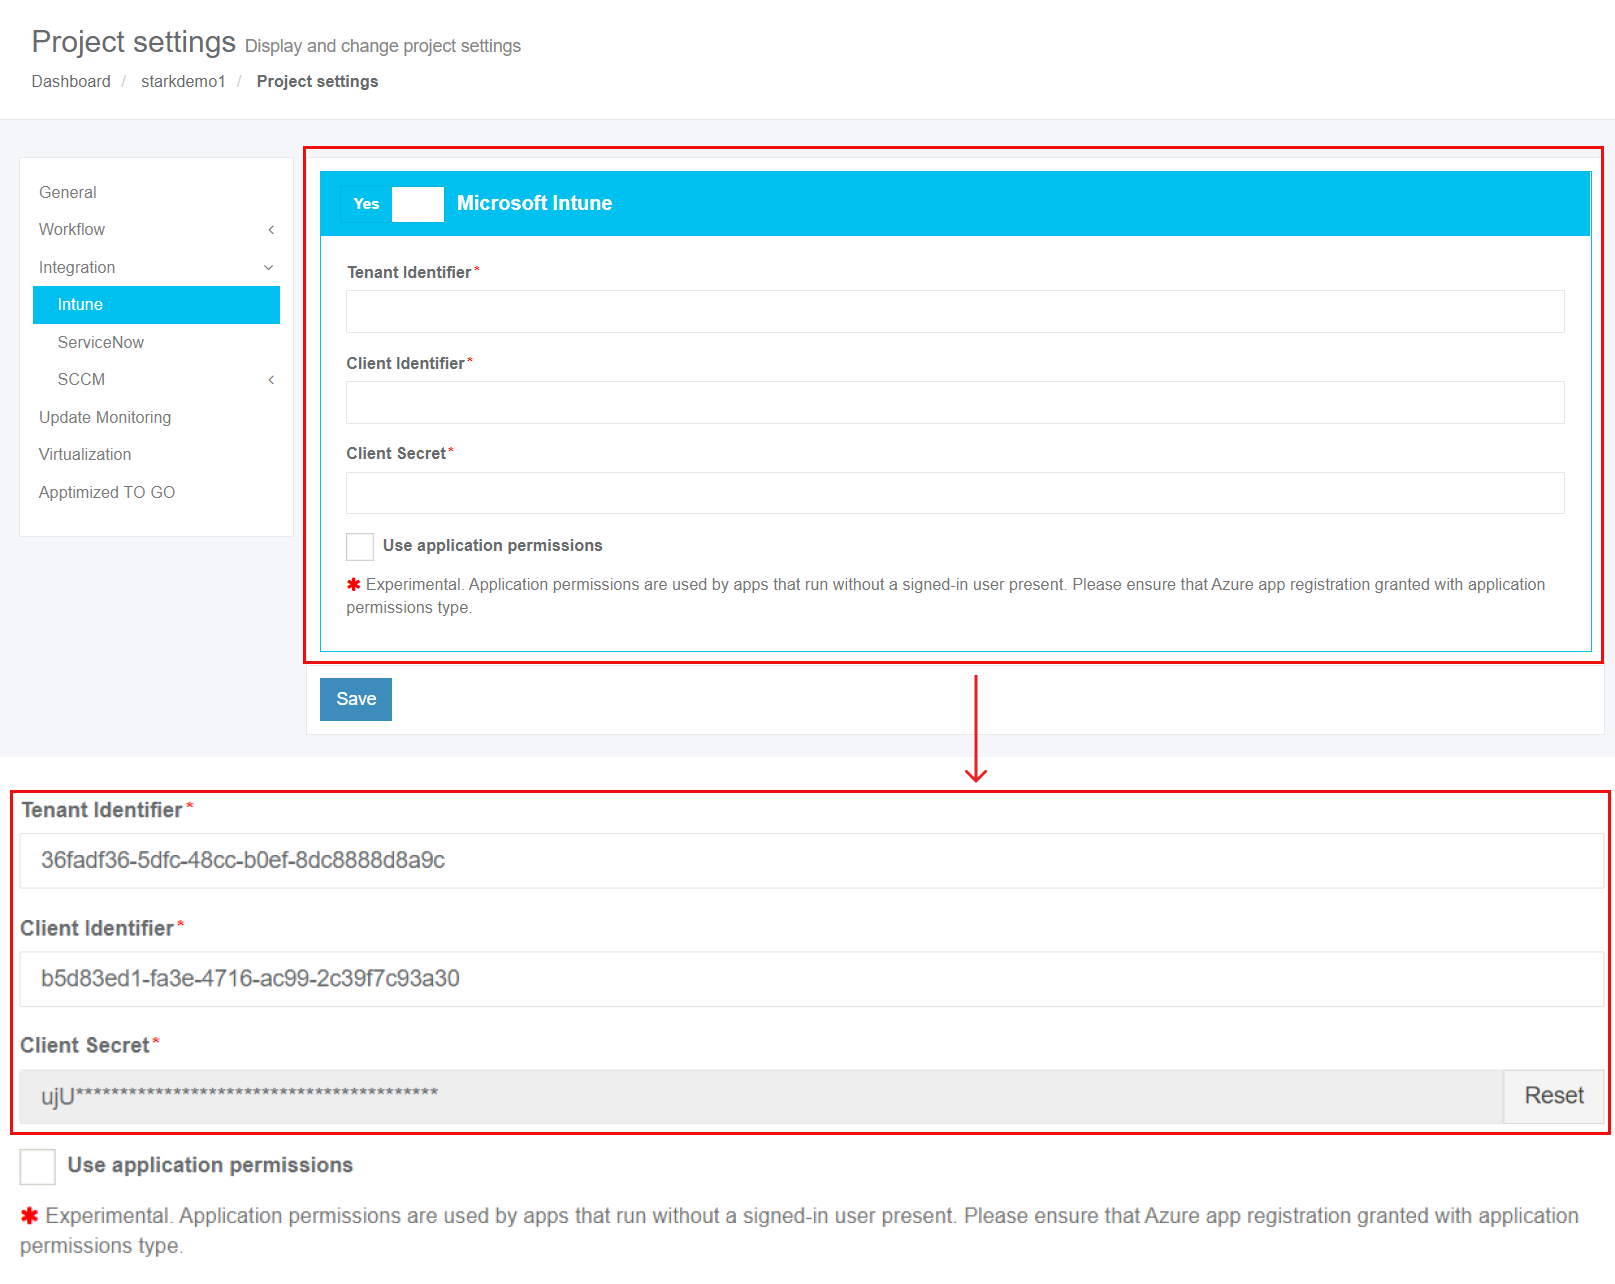](https://docs.apptimized.com/uploads/images/gallery/2021-12/4gqSRUSIBNFOGS8Q-intune_23_2.png) Table 2. Basic settings| **Settings** | **Details** |
| Tenant Identifier | The **Tenant Identifier** corresponds to the term **Directory (tenant) ID** in the **Microsoft Azure** portal. The Directory (tenant) ID is a unique identifier generated automatically by the Microsoft Azure portal for every application during its creation. [](https://docs.apptimized.com/uploads/images/gallery/2020-05/fw0KzOjRiNVogdTB-intune_25_1.png) |
| Client Identifier | The **Client Identifier** corresponds to the term **Application (client) ID** in the **Microsoft Azure** portal. The Application (client) ID is a unique identifier generated automatically by the Microsoft Azure portal for every application during its creation. [](https://docs.apptimized.com/uploads/images/gallery/2020-05/Z0tLJtUsY8NZG6bs-intune_25_2.png) |
| Client Secret | The **Client Secret** corresponds to the term **Value of secret** in the **Microsoft Azure** portal. The **Client Secret** is a unique identifier generated automatically by the Microsoft Azure portal for every application during its creation. [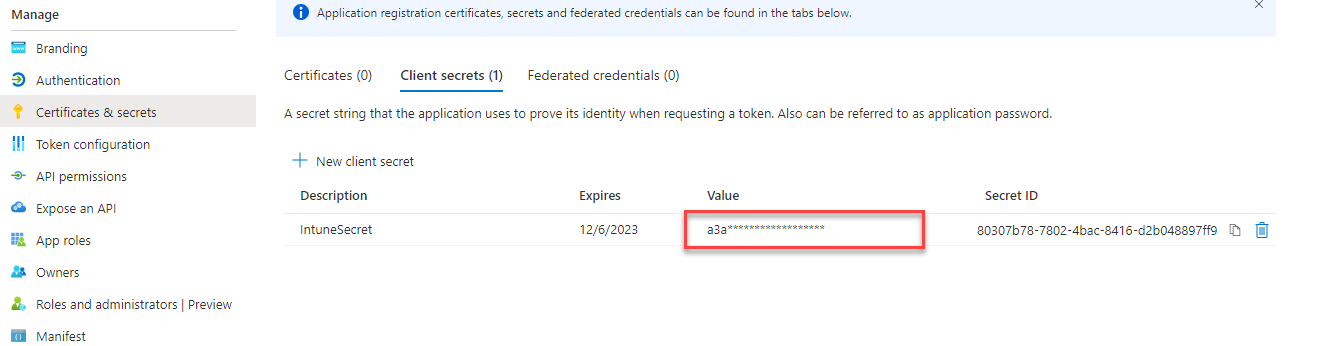](https://docs.apptimized.com/uploads/images/gallery/2021-12/SDy363ecyaq35vzd-intune_42.png) [Learn more](#bkmrk-application-registra). |
| Use applications permissions | The **Use application permissions **correspond to the term [**Applications permissions**](https://docs.apptimized.com/link/110#bkmrk-note.-if-the-applica) in the **Microsoft Azure **portal. The **Applications permissions** are the permissions that are used by applications that run without a signed-in user present. Using Application permissions enables Apptimized users to push packages to Intune without requiring an own Intune access or even an AAD account in the target Azure directory. By configuring the use of application permissions, the API will be authorized to push packages to Intune without requiring an authenticated AAD Intune user with adequate permissions to provide this authorization. [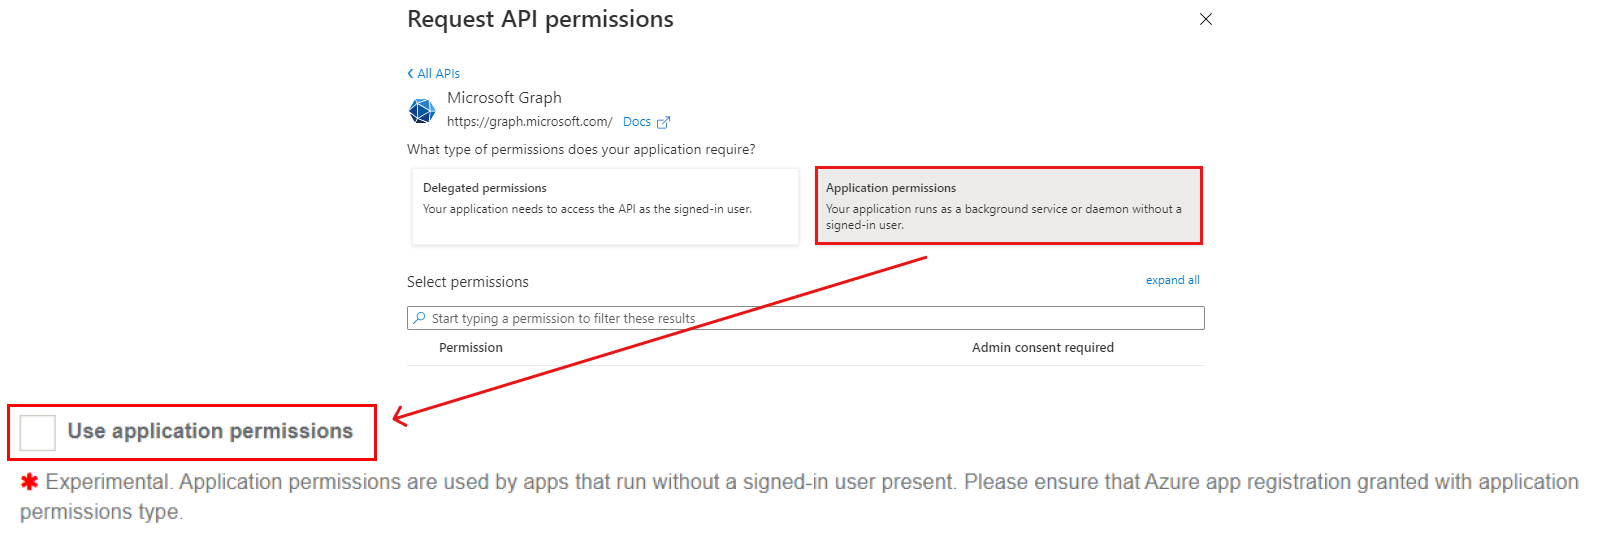](https://docs.apptimized.com/uploads/images/gallery/2021-12/njgHHWqpr71fI9Zd-intune_end_2.png) |
| **Metadata** | **Details** |
| Application ID | The application ID is a unique identifier generated automatically for every application during its upload. Application ID provides application identification. |
| Reference | This field is optional and can stay blank. This field provides additional comments from a customer to the Apptimized portal (i.e. internal application ID). |
| Vendor | This field defines the vendor name (i.e. Tim Kosse). This is a required field. |
| Software | This field defines the application name (i.e. FileZilla). This is a required field. |
| Version | This field defines the application version (i.e. 3.46.3). This is a required field. |
| Language | This field defines the application language (i.e. English (United States)). This is a required field. |
| A previous version of an application | This field defines if the previous version of the application is available in the portfolio. The default value is **None, it is the first version of the application in the portfolio**. A click opens a dropdown list to select the previous version of the application from the list. |
| Enable Echo | This option defines if Echo is needed to be enabled. The Echo is enabled by default. |
A prerequisite may be a specific application that must be installed before the target application.
A field "**Select media type for** …" is filled automatically can be changed if needed. A prerequisite is added by clicking on the **Save** button. Apptimized shows the following notification when successful: [](https://docs.apptimized.com/uploads/images/gallery/2020-03/uynQC32RqzBfxMhM-to_go_16.png) Current prerequisites can be changed by clicking on the **Edit** **prerequisites** button and by following the same set of operations as for adding a prerequisite. [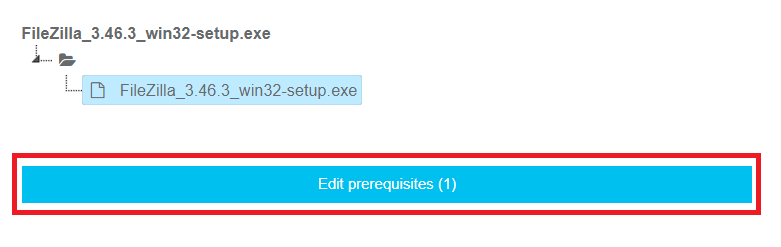](https://docs.apptimized.com/uploads/images/gallery/2020-03/8hkyypxwFMXxJN1Z-to_go_15.png) The **Metadata** step finalizes by clicking on the **Finish** button. A **Transition screen** for application immediately appears where the **Workflow scheme** and modalities for interaction with the application (namely discovery, packaging, testing) are available. [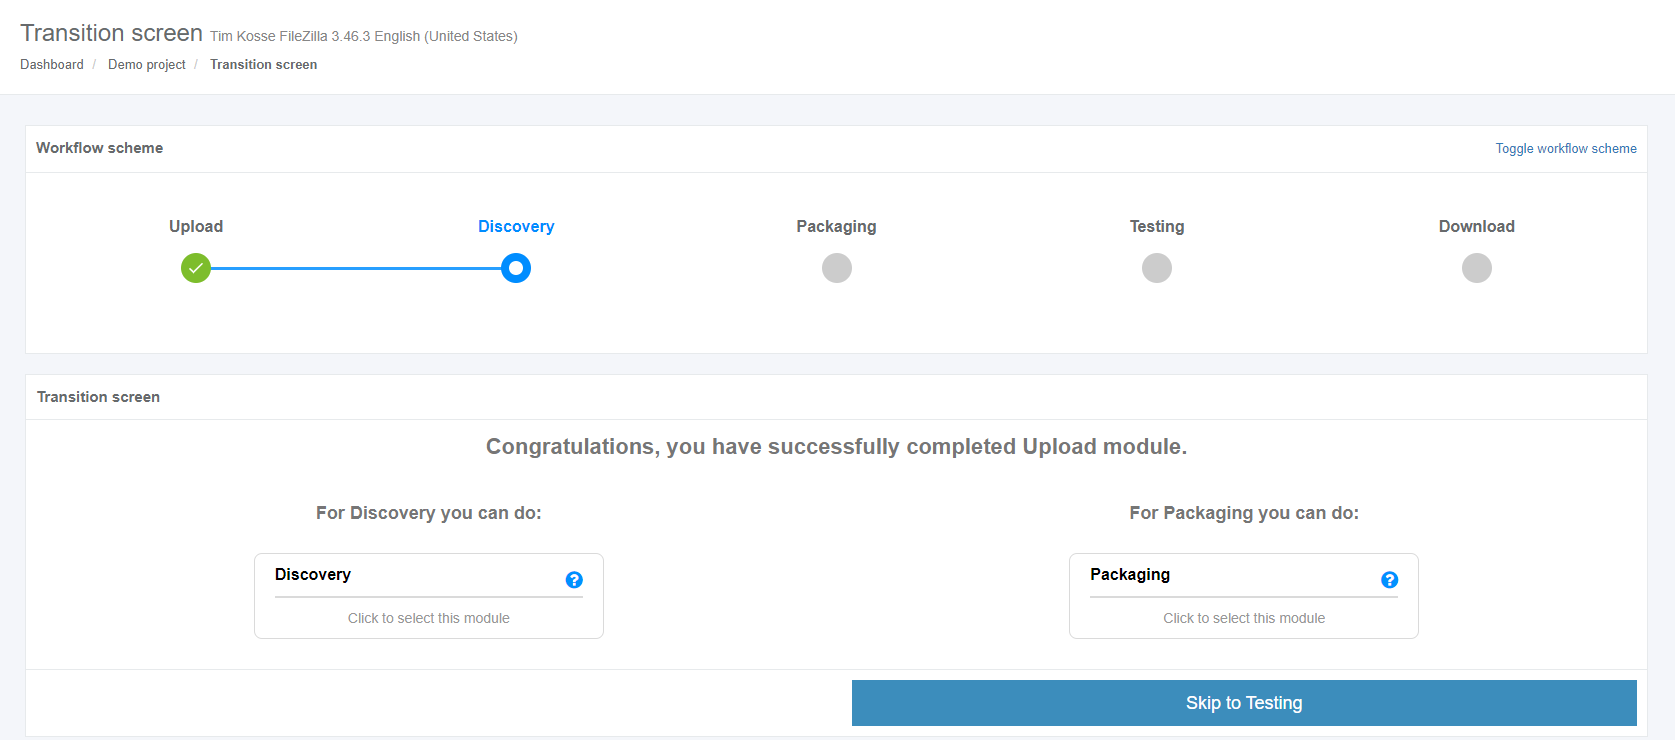](https://docs.apptimized.com/uploads/images/gallery/2020-03/MUPMaHIf3KkZXkcC-to_go_17.png) **Apptimized TO GO** can be used only for **Discovery** and **Testing**. # Run the Apptimized TO GO agent Launching **Apptimized TO GO** agent is available in two options: **Download To Go file** or **Use a deployment code.** #### **Using a TO GO file** When clicking on the **Download TO GO** **file** button a file becomes available on the customer's PC in the **Downloads** folder. [](https://docs.apptimized.com/uploads/images/gallery/2020-03/TvwyZLrHYHrj4HIK-to_go_20_1.png) **Apptimized TO GO** **agent** launches when clicking on the **Apptimized - TO GO Manifest** file (i.e. **70116.Apptimized.togo**). [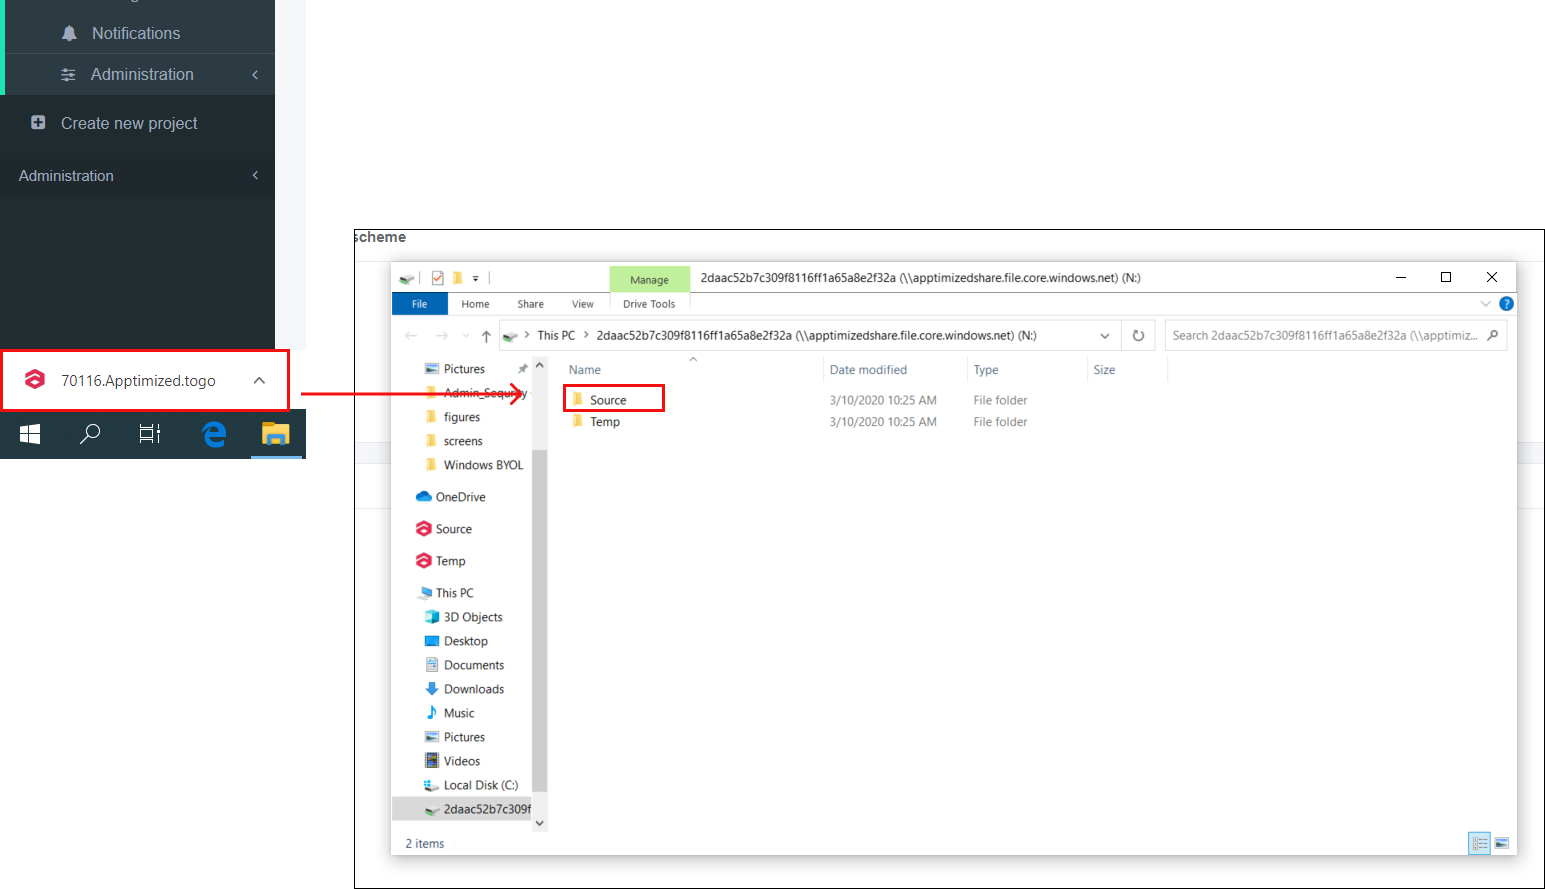](https://docs.apptimized.com/uploads/images/gallery/2020-03/lOvBbLqzFMS9uarx-to_go_20_3.png) A guide recording process via **Apptimized TO GO agent** starts. A customer needs to navigate to the files to be installed. As it is shown on the screenshot below the file is available in the **Source** folder. [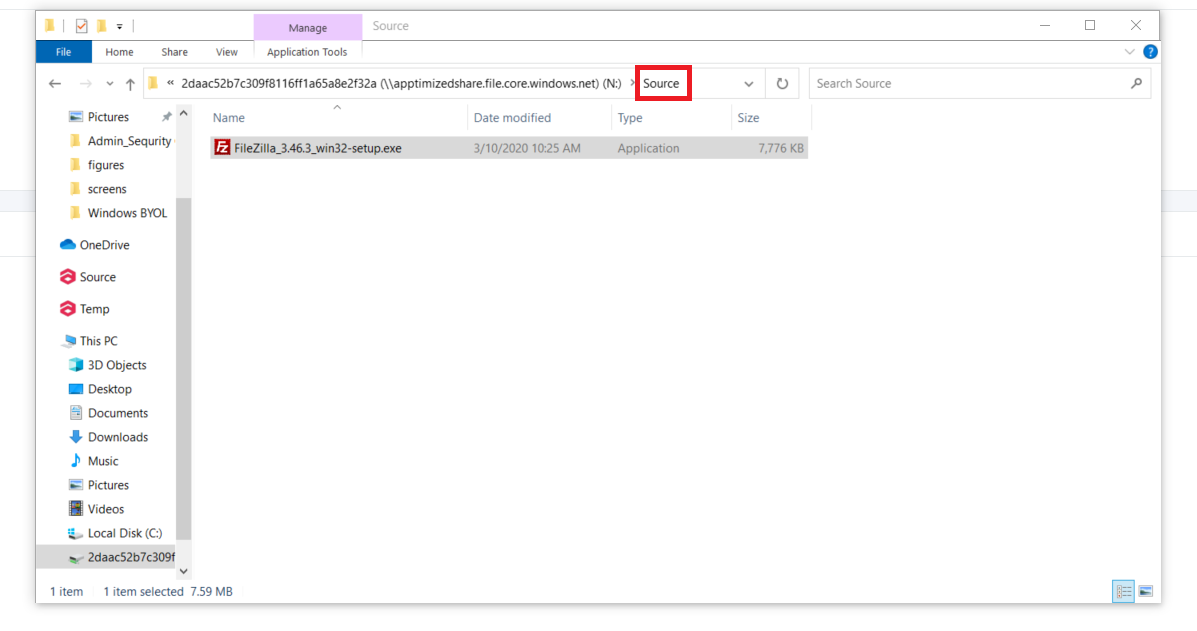](https://docs.apptimized.com/uploads/images/gallery/2020-03/FZtgGWeXdZjQtVsw-to_go_24.png) The initial preparation process may take a while. [](https://docs.apptimized.com/uploads/images/gallery/2020-03/goy1TaIXgQwcs5vO-to_go_22_2.png) To transfer a customer experience to Apptimized all installation and configuration steps with the application must be proceeded. [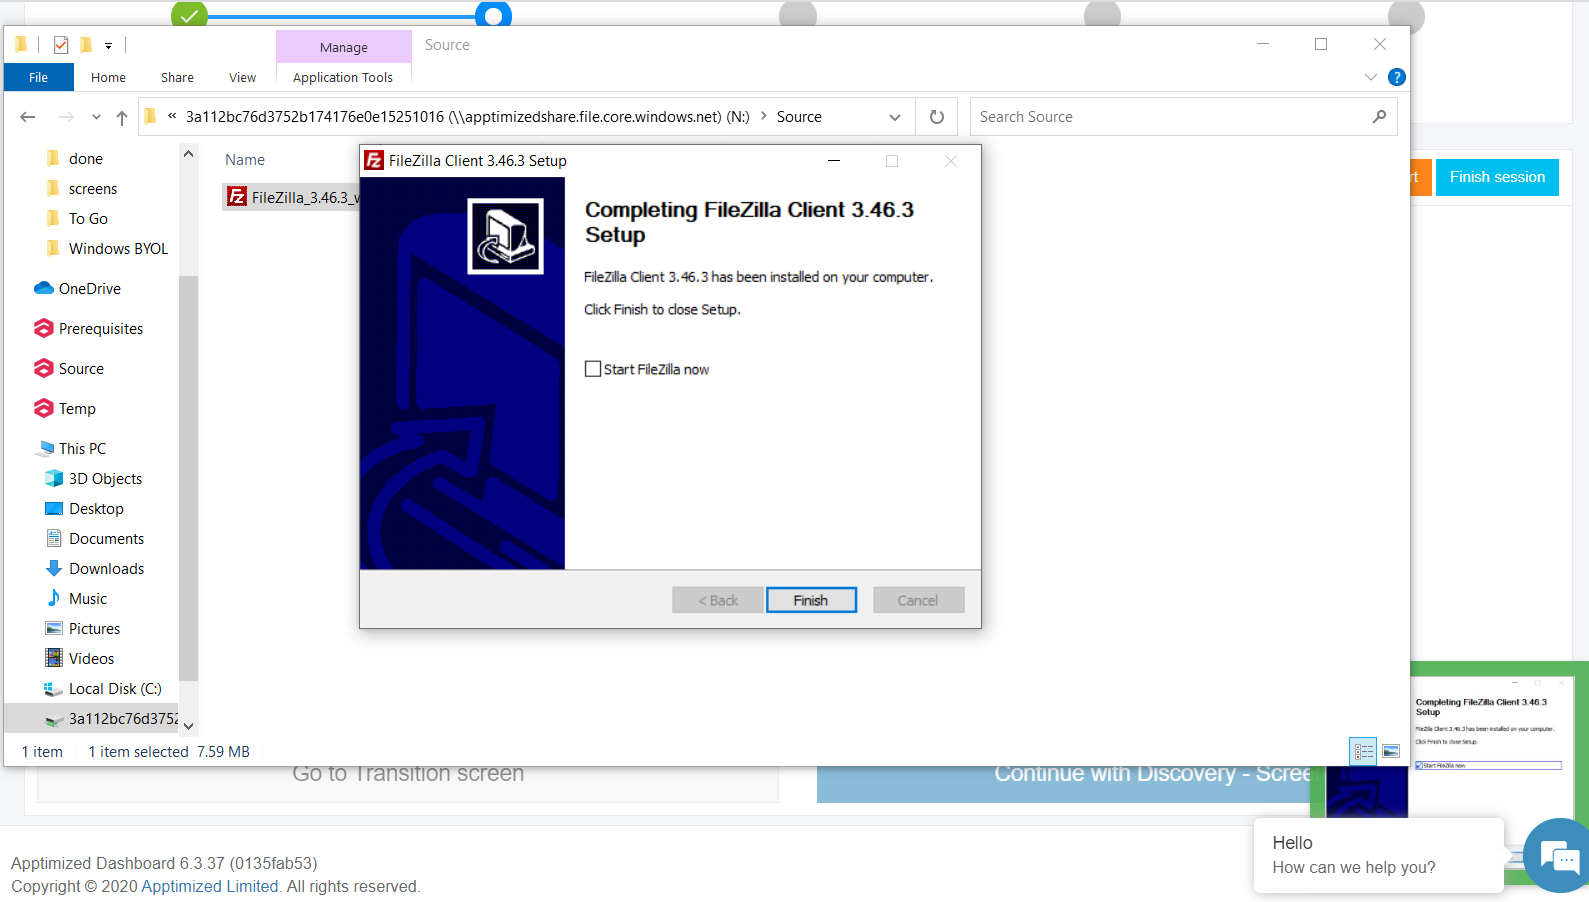](https://docs.apptimized.com/uploads/images/gallery/2020-03/xKQZo5veuF9sEX0m-to_go_25.png) The session finishes by clicking on the **Finish session** button. [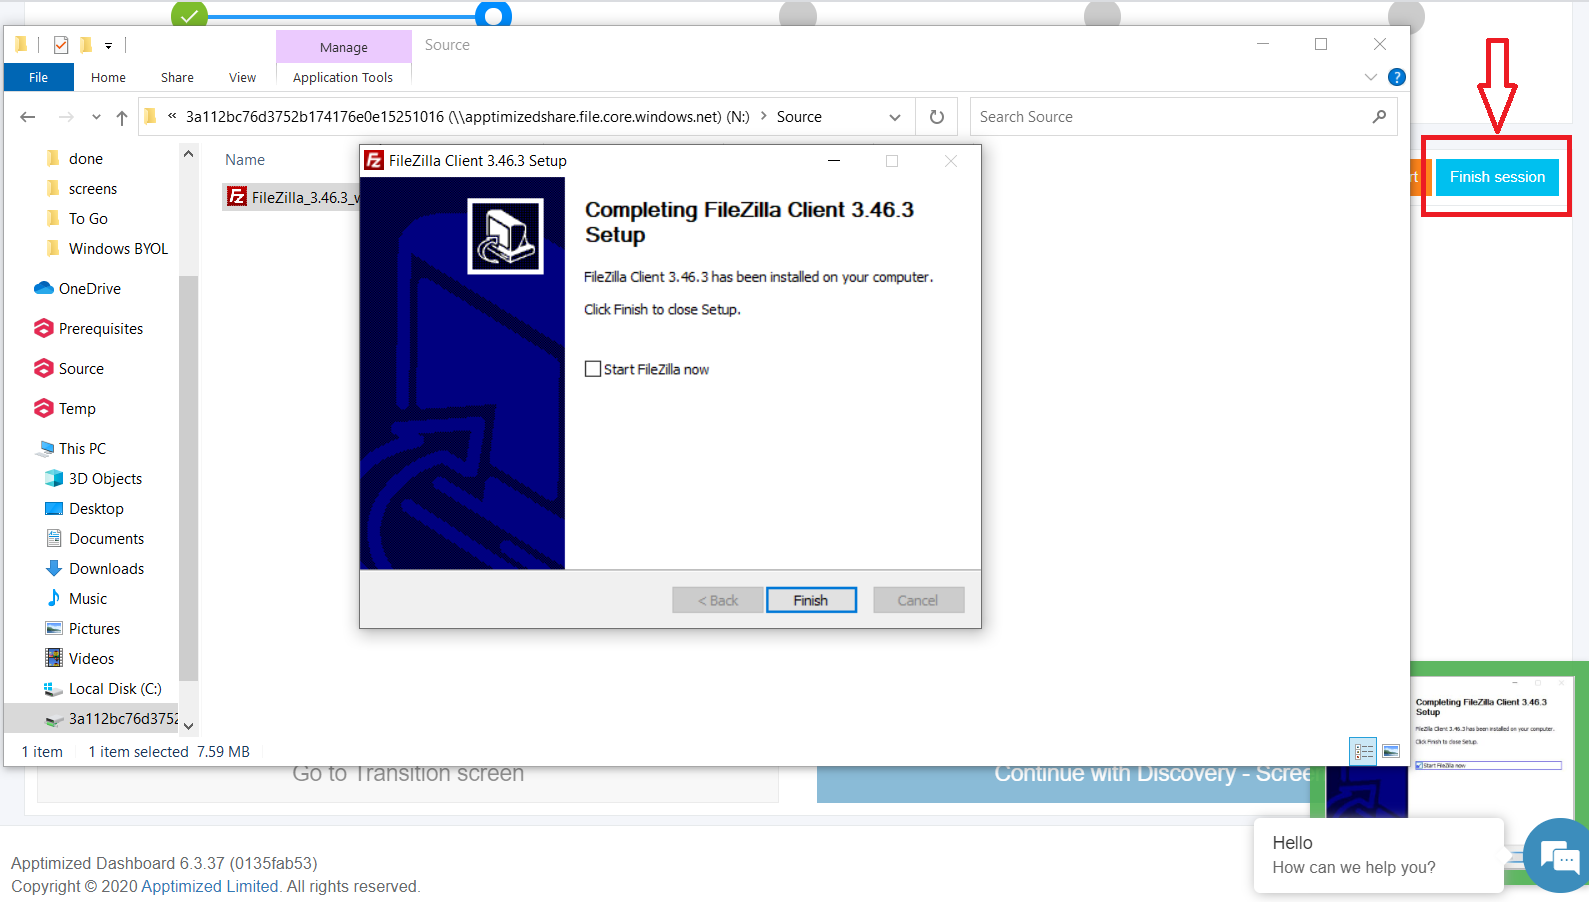](https://docs.apptimized.com/uploads/images/gallery/2020-03/zsbURxQ6G4xu79kL-to_go_26.png) The following notifications will appear when successful: [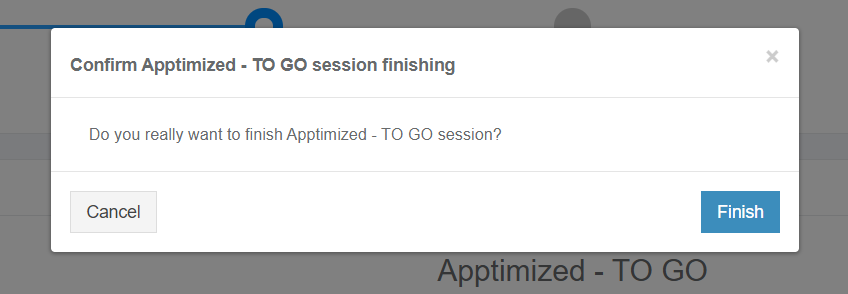](https://docs.apptimized.com/uploads/images/gallery/2020-03/KPlqJa7etv6ypCCK-to_go_28.png) [](https://docs.apptimized.com/uploads/images/gallery/2020-03/VDRFucllQW7ZURvf-to_go_27.png) ##### #### **Using a deployment code** The text will be copied to a clipboard when clicking on a deployment code. [.png)](https://docs.apptimized.com/uploads/images/gallery/2020-03/nzqoaPFp1DVOaRFx-29-(2).png) To establish a connection of a customer machine with Apptimized in the cloud the **Apptimized TO GO** agent launches from the **Start** menu. Then the deployment code must be entered into a pop-up window. [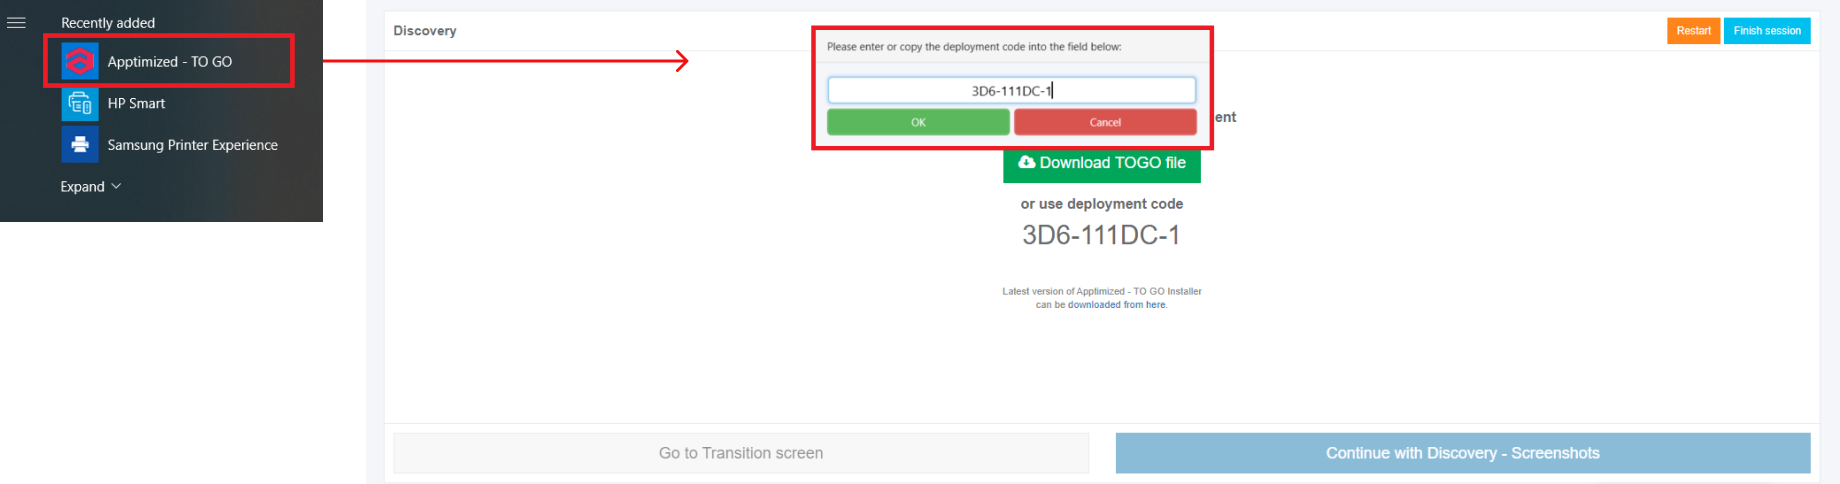](https://docs.apptimized.com/uploads/images/gallery/2020-03/SnlaeoMuZvlM5TXp-to_go_22_1.png) Apptimized Files with uploaded files will be automatically uploaded to the folder after clicking on the **OK** button: [.PNG)](https://docs.apptimized.com/uploads/images/gallery/2020-03/7njQVGUhplkEGXB4-33-(3).PNG) A guide recording process via **Apptimized TO GO agent** starts. A customer needs to navigate to the files to be installed. As it is shown on the screenshot below the file is available in the **Source** folder. [](https://docs.apptimized.com/uploads/images/gallery/2020-03/FZtgGWeXdZjQtVsw-to_go_24.png) The initial preparation process may take a while. [](https://docs.apptimized.com/uploads/images/gallery/2020-03/goy1TaIXgQwcs5vO-to_go_22_2.png) To transfer a customer experience to Apptimized all installation and configuration steps with the application must be proceeded. [](https://docs.apptimized.com/uploads/images/gallery/2020-03/xKQZo5veuF9sEX0m-to_go_25.png) The session finishes by clicking on the **Finish session** button. [](https://docs.apptimized.com/uploads/images/gallery/2020-03/zsbURxQ6G4xu79kL-to_go_26.png) The following notifications will appear when successful: [](https://docs.apptimized.com/uploads/images/gallery/2020-03/KPlqJa7etv6ypCCK-to_go_28.png) [](https://docs.apptimized.com/uploads/images/gallery/2020-03/VDRFucllQW7ZURvf-to_go_27.png) # Discovery via Apptimized TO GO Agent Before implementing the **Discovery** via **Apptimized TO GO** the [application must be imported](https://docs.apptimized.com/books/apptimized-platform-admin-manual/page/apptimized-to-go-integration "Apptimized TO GO integration") to the project. Using the **Discovery** module, a customer can record a guide to install and configure the application. Customer’s actions are automatically captured as step-by-step screenshots and further described in textual format automatically. Before sending a document (which is available in PDF and HTML formats) to Apptimized, the customer can change the scenario that they recorded (i.e., to swap screenshots, to edit comments for each screenshot or to delete unnecessary screenshots). The discovery process starts by clicking on the **Discovery** module on the Transition screen. [](https://docs.apptimized.com/uploads/images/gallery/2020-03/g6sAEB0WmTOZhNbC-to_go_17_1.png) Apptimized shows the following interface when successful: [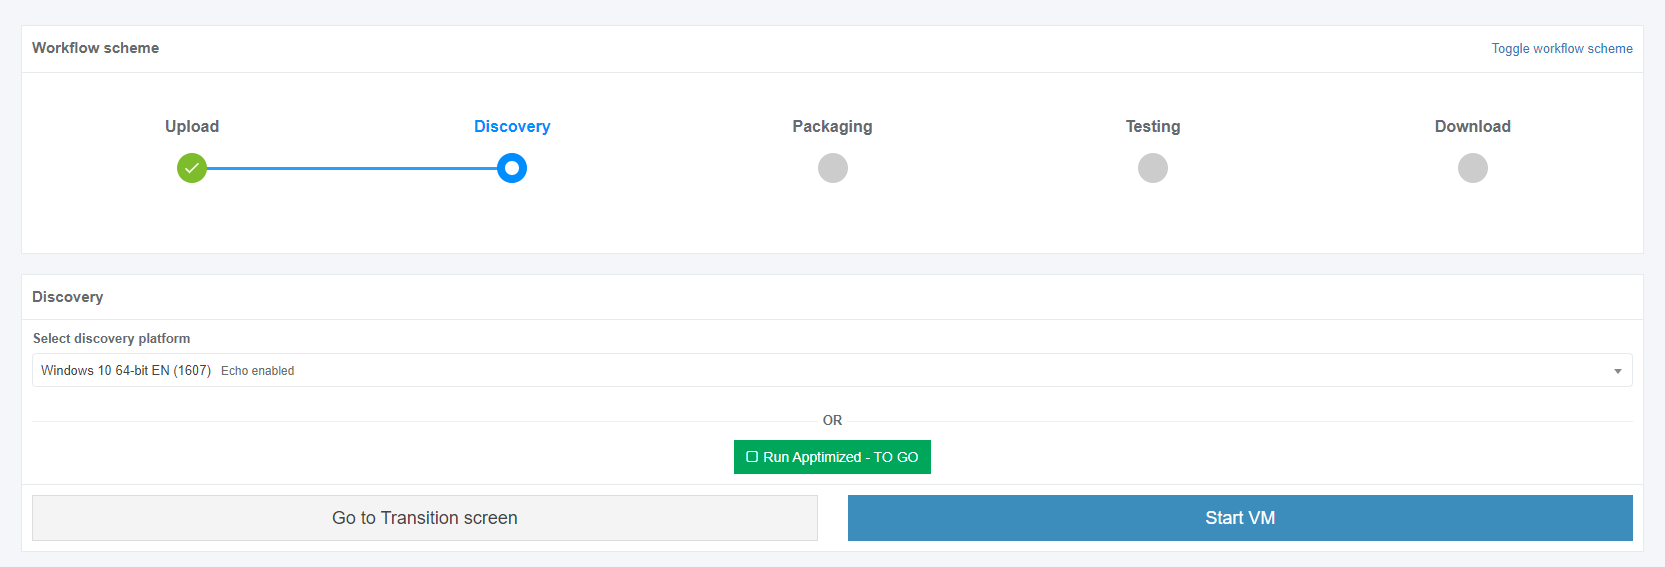](https://docs.apptimized.com/uploads/images/gallery/2020-03/edaRKPapDmlRLOIz-to_go_18_1.png) A field "**Select discovery platform**" is filled automatically and can be changed if needed. [](https://docs.apptimized.com/uploads/images/gallery/2020-03/xyRLkGAXg3B1VcqD-to_go_18.png) The **Apptimized To Go** is enabled by ticking the checkbox and clicking on the **Run Apptimized - To Go** button. [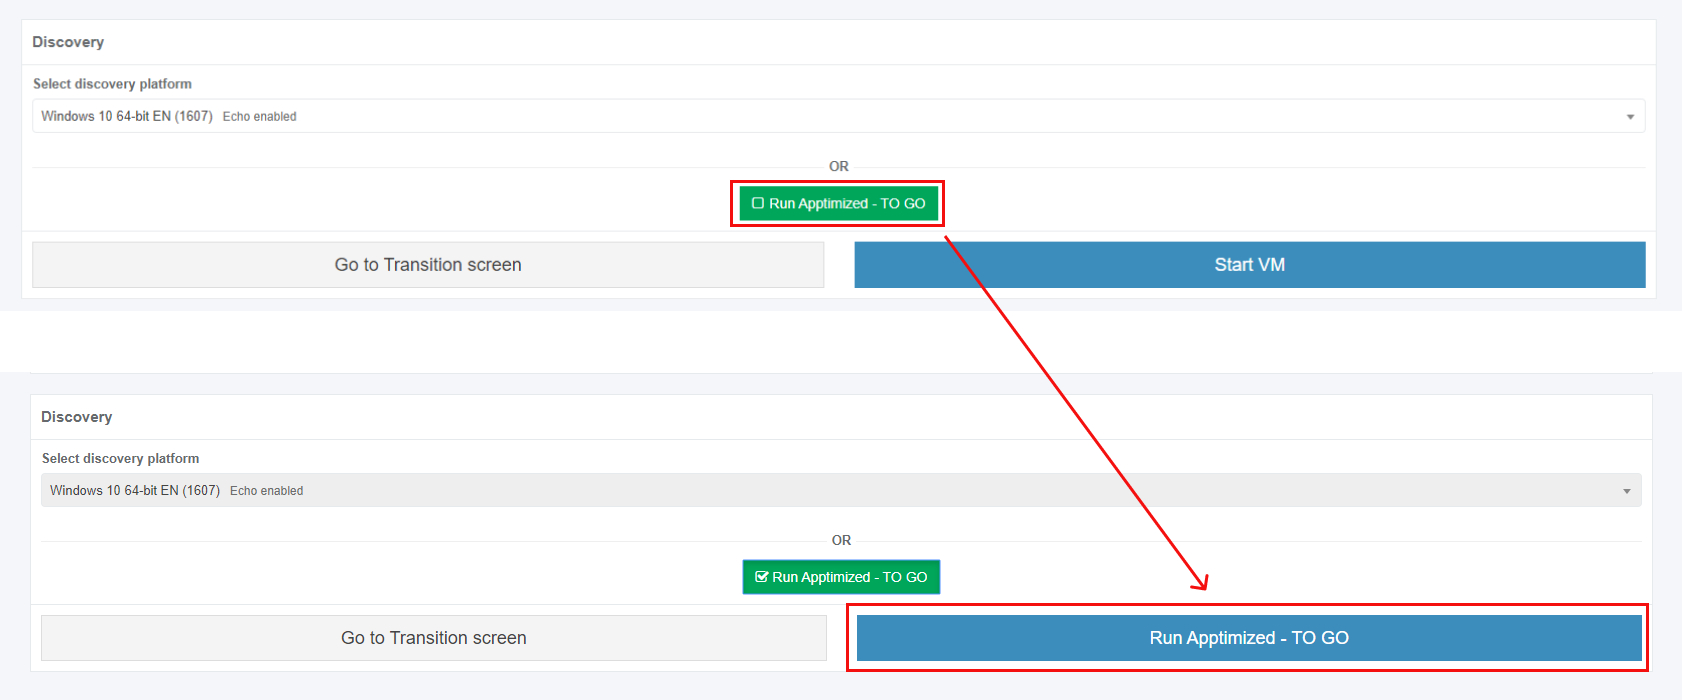](https://docs.apptimized.com/uploads/images/gallery/2020-03/RXqWOPoEzaenFuEA-to_go_19.png) The files synchronizing process may take a while. In case of success, Apptimized shows the following interface: [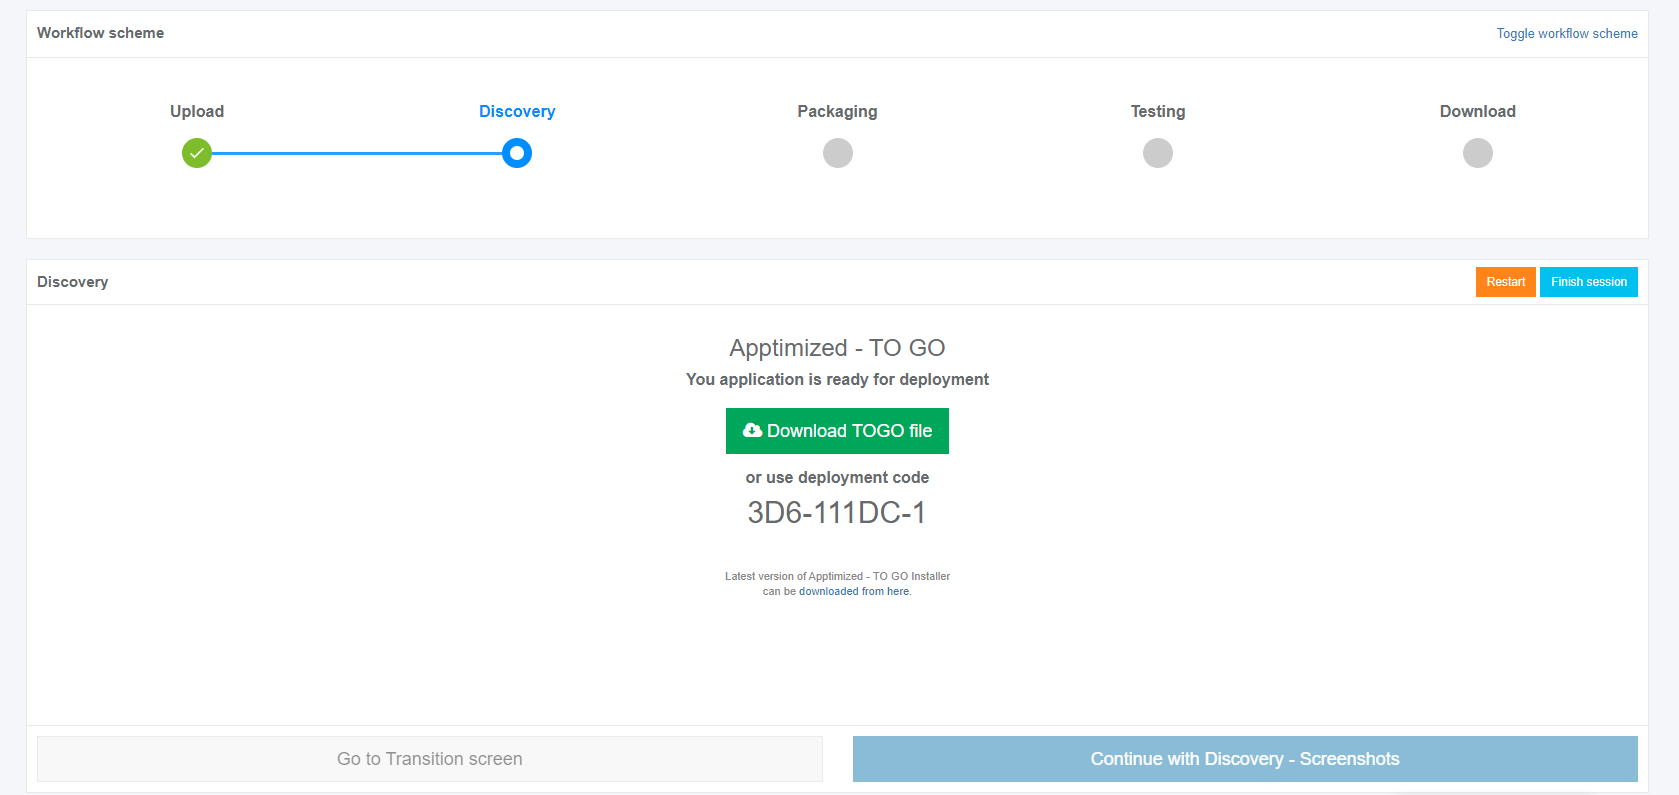](https://docs.apptimized.com/uploads/images/gallery/2020-03/BtfwGEVu3aUsI44a-to_go_20.png) The instructions to launch **Apptimized TO GO agent** were provided in the paragraph "[Run the Apptimized TO GO agent](https://docs.apptimized.com/books/apptimized-platform-admin-manual/page/run-the-apptimized-to-go-agent "Launching Apptimized TO GO agent")". The following interface will appear when recording session with **Apptimized TO GO agent** finishes: [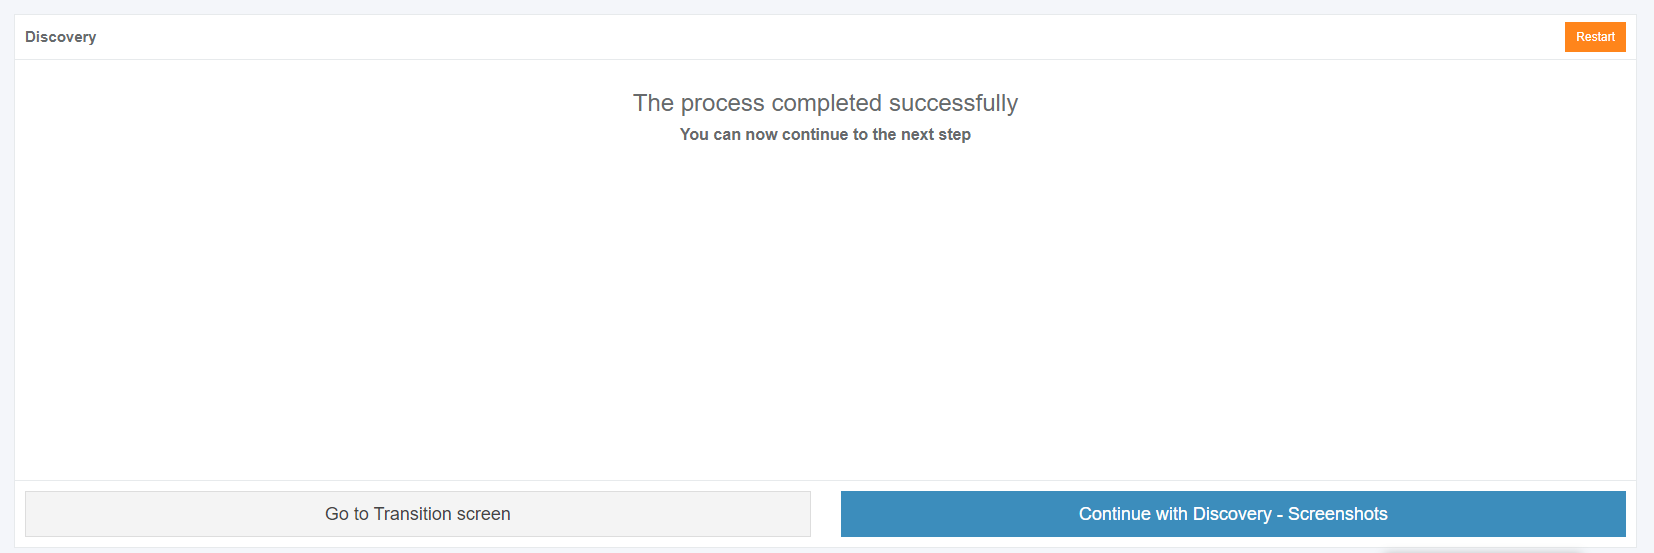](https://docs.apptimized.com/uploads/images/gallery/2020-03/K4eEnhJIakEoWzmN-to_go_29.png) Screenshots editing mode becomes active when clicking on the **Continue with Discovery - Screenshots** button. Screenshots can be excluded from discovery by clicking on the **Delete** button. [.png)](https://docs.apptimized.com/uploads/images/gallery/2020-03/nDCPNpZneFMifFaY-41-(2).png) Screenshots can be excluded from discovery in a multiple mode by unticking checkboxes in front of their ID and clicking on the **Delete selected screenshots** button. [.PNG)](https://docs.apptimized.com/uploads/images/gallery/2020-03/Hg3YH3vskTdt4wCj-52-(2).PNG) Screenshots sequence can be changed in discovery by clicking on the **Up** or **Down** buttons. [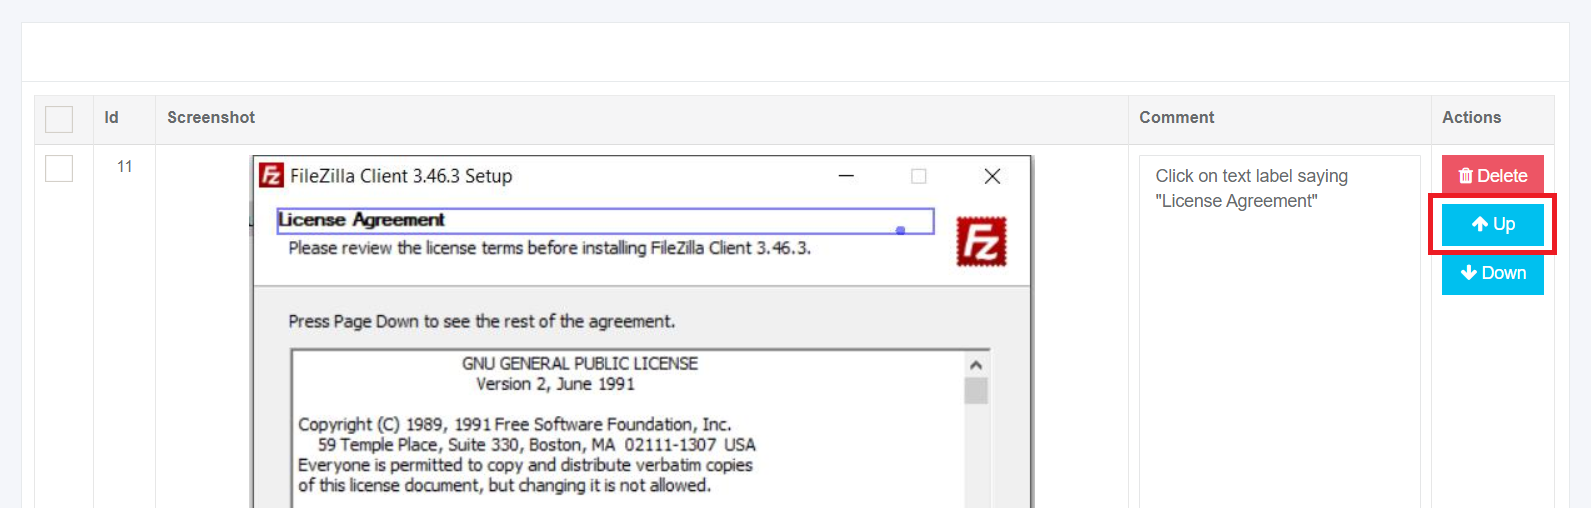](https://docs.apptimized.com/uploads/images/gallery/2020-03/WPOQnKA7WXddSlpf-to_go_32_1.png) [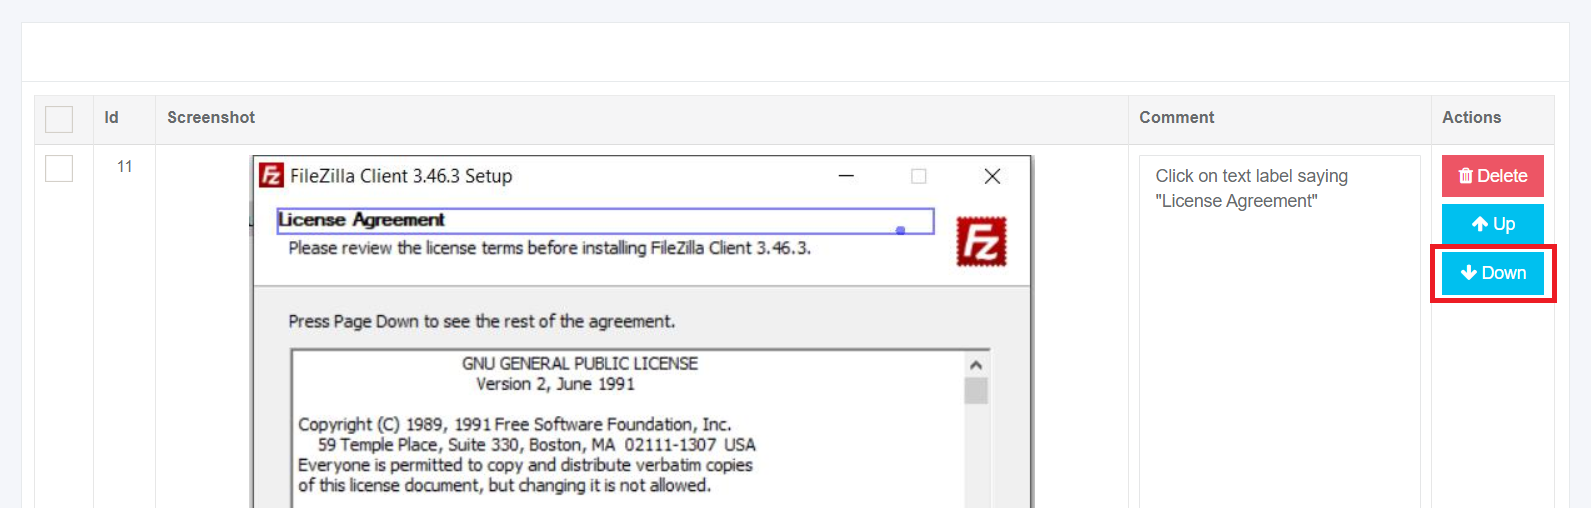](https://docs.apptimized.com/uploads/images/gallery/2020-03/tnVgsFVsTgqwAcZn-to_go_32_2.png) Comments to the screenshots can be edited by clicking on the comment cell. [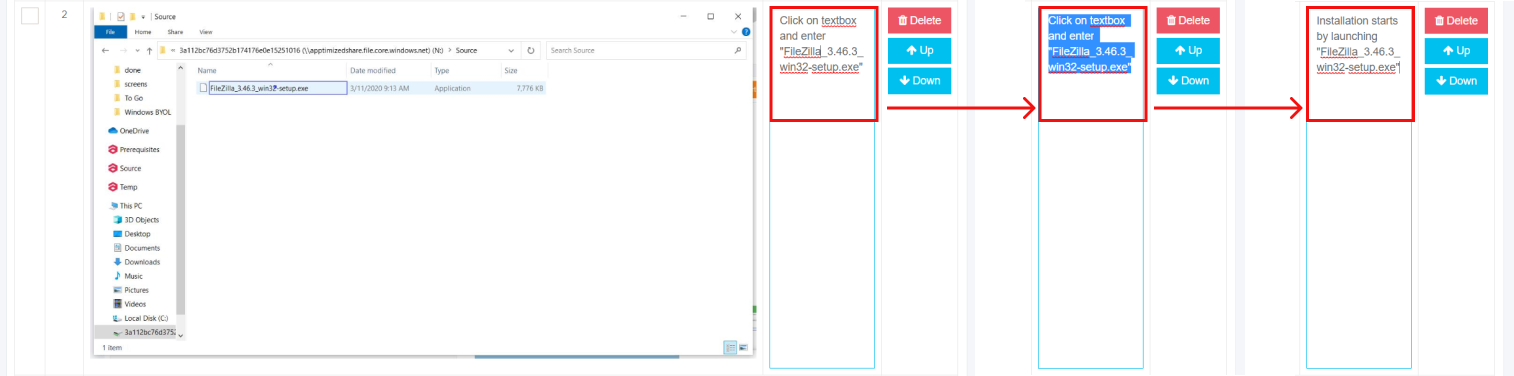](https://docs.apptimized.com/uploads/images/gallery/2020-03/98KvWYS2QjTwrZSA-to_go_33.png) The field **Additional comment (Optional)** can stay blank. Screenshots editing mode finalizes when clicking on the **Save changes** button. [](https://docs.apptimized.com/uploads/images/gallery/2020-03/ARLYAxz2JfszcxD6-to_go_33_4.png) Apptimized shows the following interface when successful: [](https://docs.apptimized.com/uploads/images/gallery/2020-03/9bcoSTYzcvohz25F-to_go_34.png) The generated document is available in PDF and HTML formats. Download starts when clicking on the **Download generated HTML document** or **Download generated PDF document** buttons. A discovery document can be edited by clicking on the **Edit generated document** button. The document editing finalizes by clicking on the **Save** button. [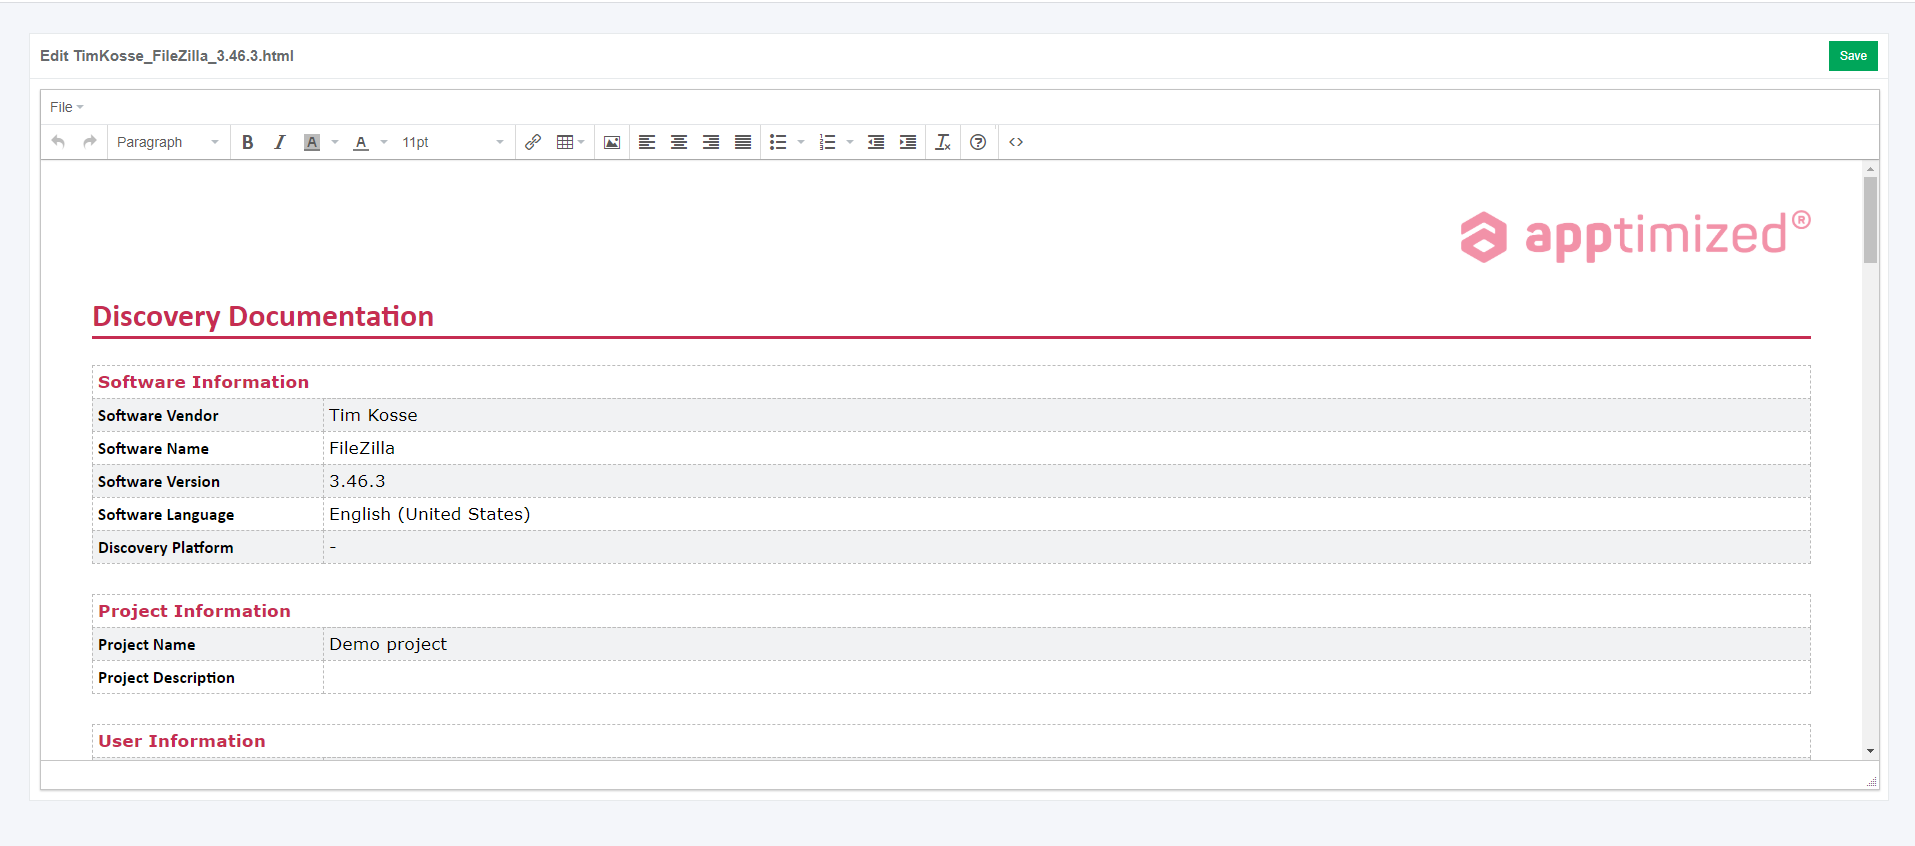](https://docs.apptimized.com/uploads/images/gallery/2020-03/GH21gbxc2sAOaXHG-to_go_35_1.png) The process reverts to the screenshots editing mode by clicking on the **Revert to Discovery - Screenshots** button and finalizes by clicking on the **Finish** button. # Testing via Apptimized TO GO Agent Before implementing the **Testing** via **Apptimized TO GO** the [application must be imported](https://docs.apptimized.com/books/apptimized-platform-admin-manual/page/apptimized-to-go-integration "Apptimized TO GO integration") to the project. Using the **Testing** module, a customer can record a guide to install and configure the application. Also, a testing option can be enabled and the status of the testing can be set. The testing process starts by clicking on the **Skip for Testing** button (before or after discovery step) and clicking in the **Testing** module on the Transition screen. [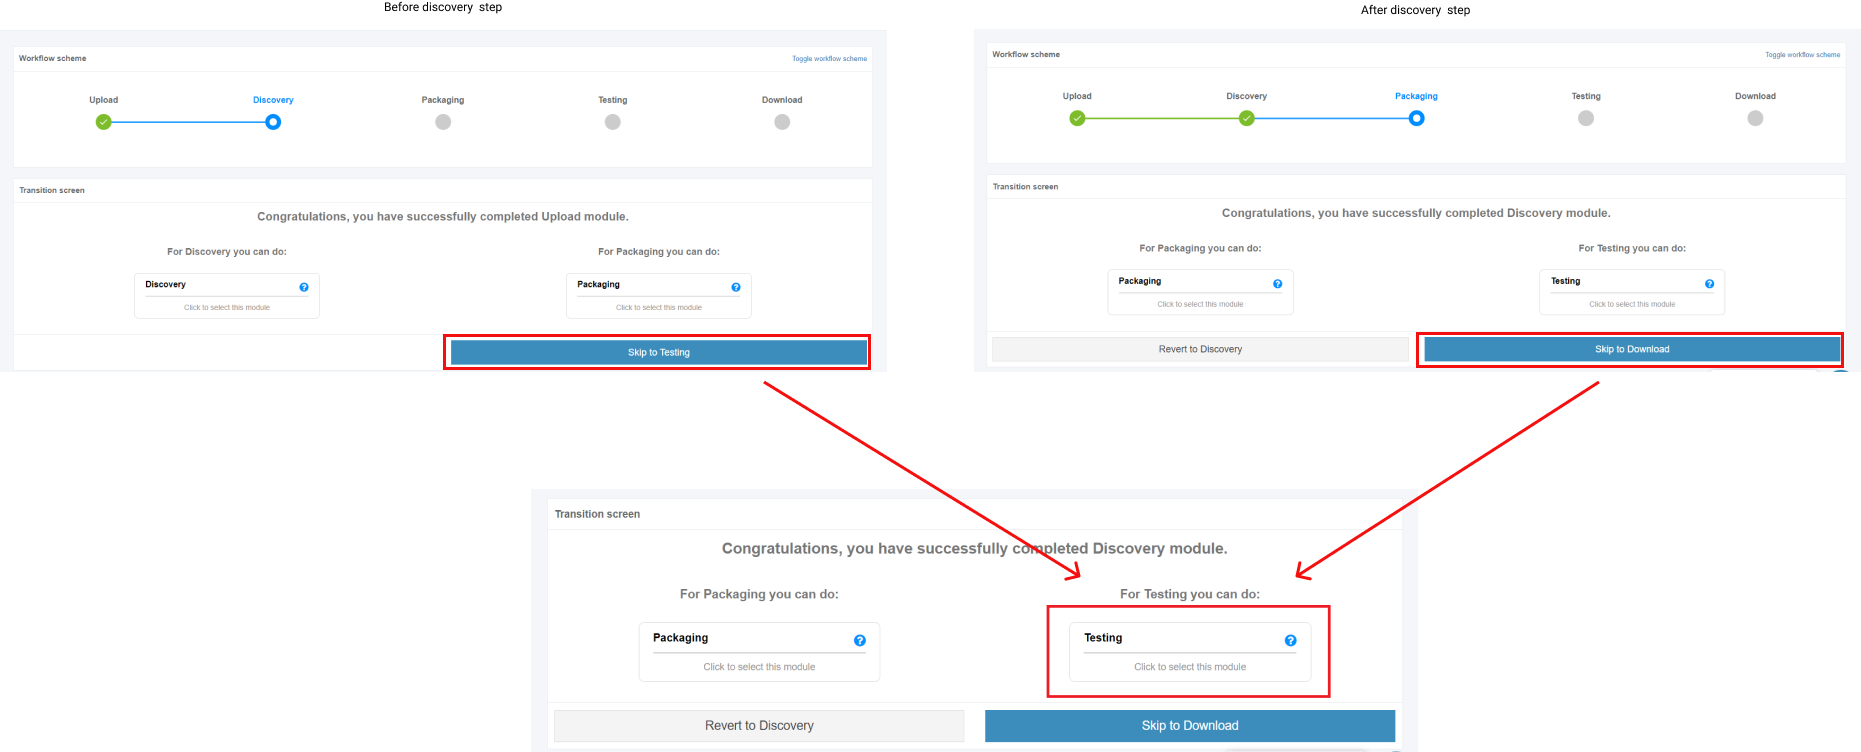](https://docs.apptimized.com/uploads/images/gallery/2020-03/7iPHpzd36RAxHsrU-to_go_39.png) Apptimized shows the following interface when successful: [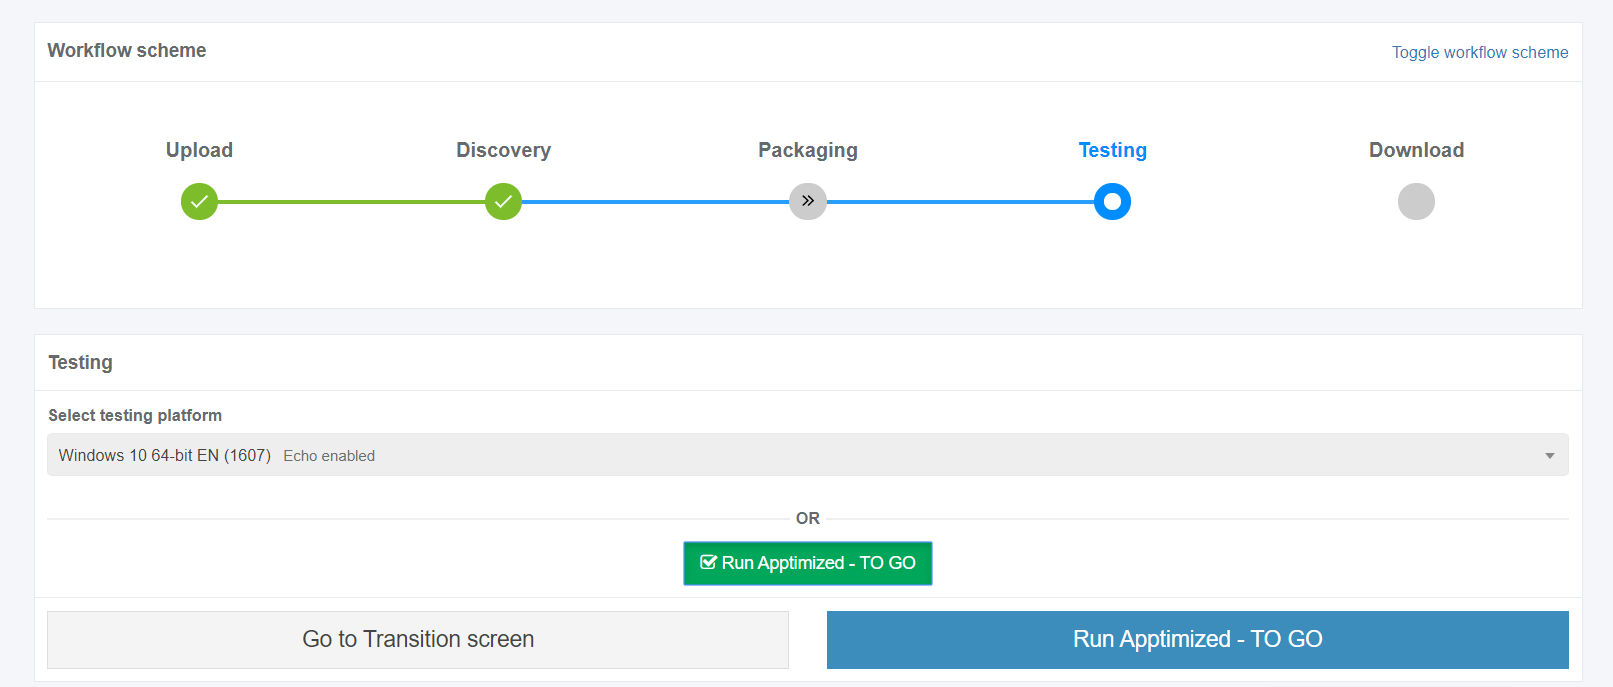](https://docs.apptimized.com/uploads/images/gallery/2020-03/CJaIQN0ozo89EhDS-to_go_40.png) A field "**Select discovery platform**" is filled automatically and can be changed if needed. The **Apptimized To Go** is enabled by ticking the checkbox and clicking on the **Run Apptimized - To Go** button. The files synchronizing process may take a while. In case of success, Apptimized shows the following interface: [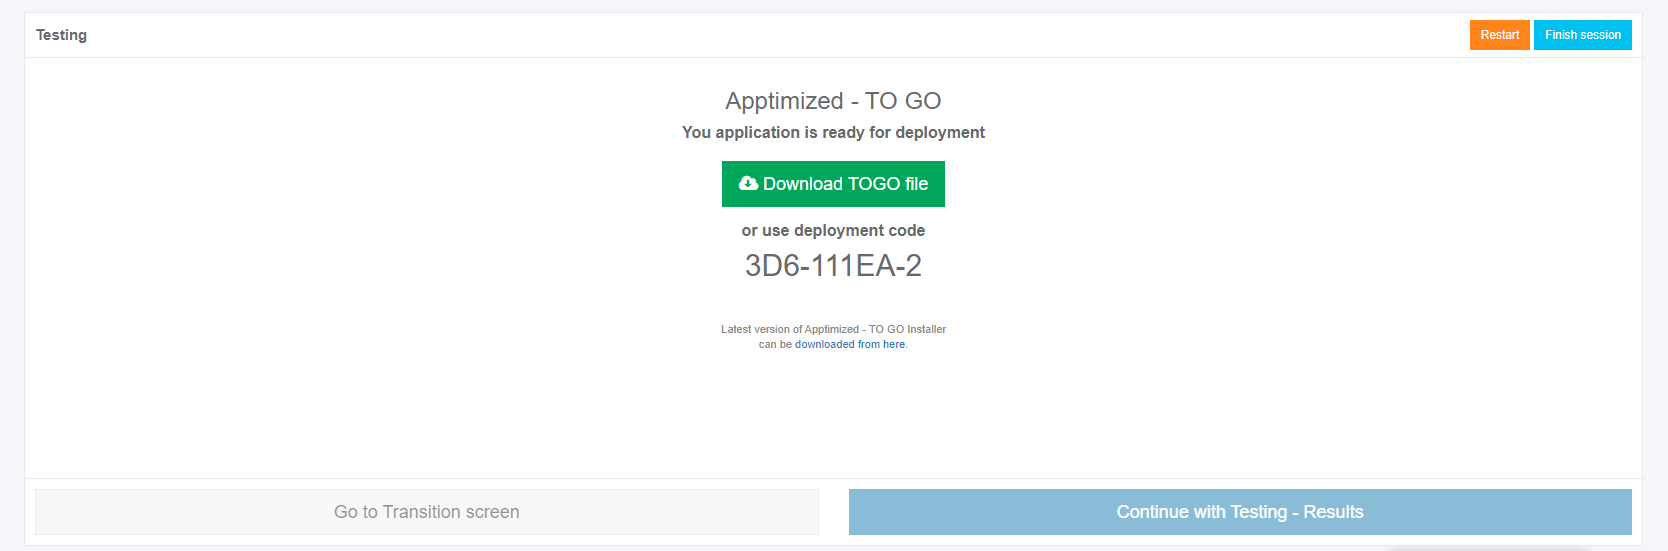](https://docs.apptimized.com/uploads/images/gallery/2020-03/chXvZICyTi5VZS9H-to_go_41.png) The instructions to launch **Apptimized TO GO agent** were provided in the paragraph "[Run the Apptimized TO GO agent](https://docs.apptimized.com/books/apptimized-platform-admin-manual/page/run-the-apptimized-to-go-agent "Launching Apptimized TO GO agent")". The following interface will appear when recording session with **Apptimized TO GO agent** finishes: [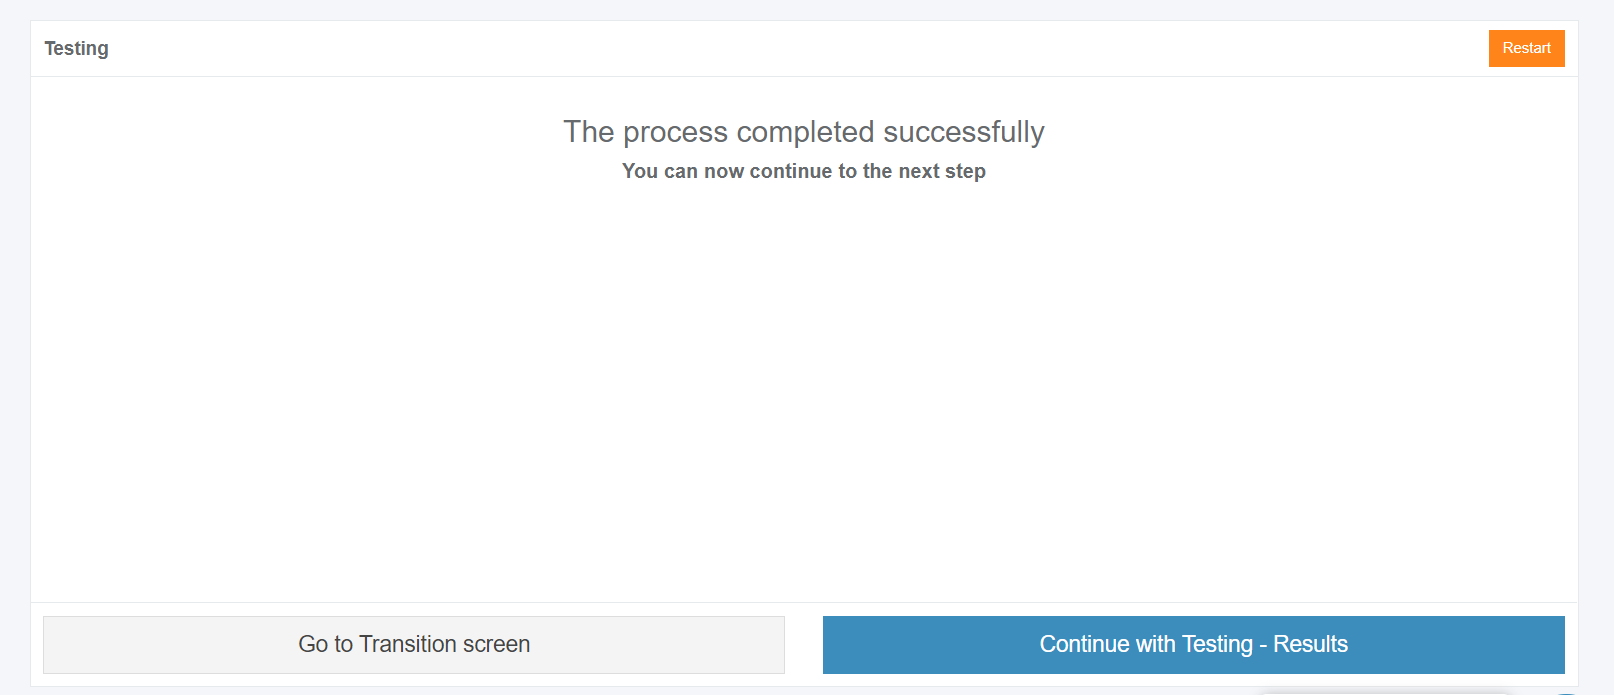](https://docs.apptimized.com/uploads/images/gallery/2020-03/zMjmcXC4NQ91kEL9-to_go_37.png) Screenshots editing mode becomes active when clicking on the **Continue with Testing - Results** button. Apptimized shows the following interface when successful: [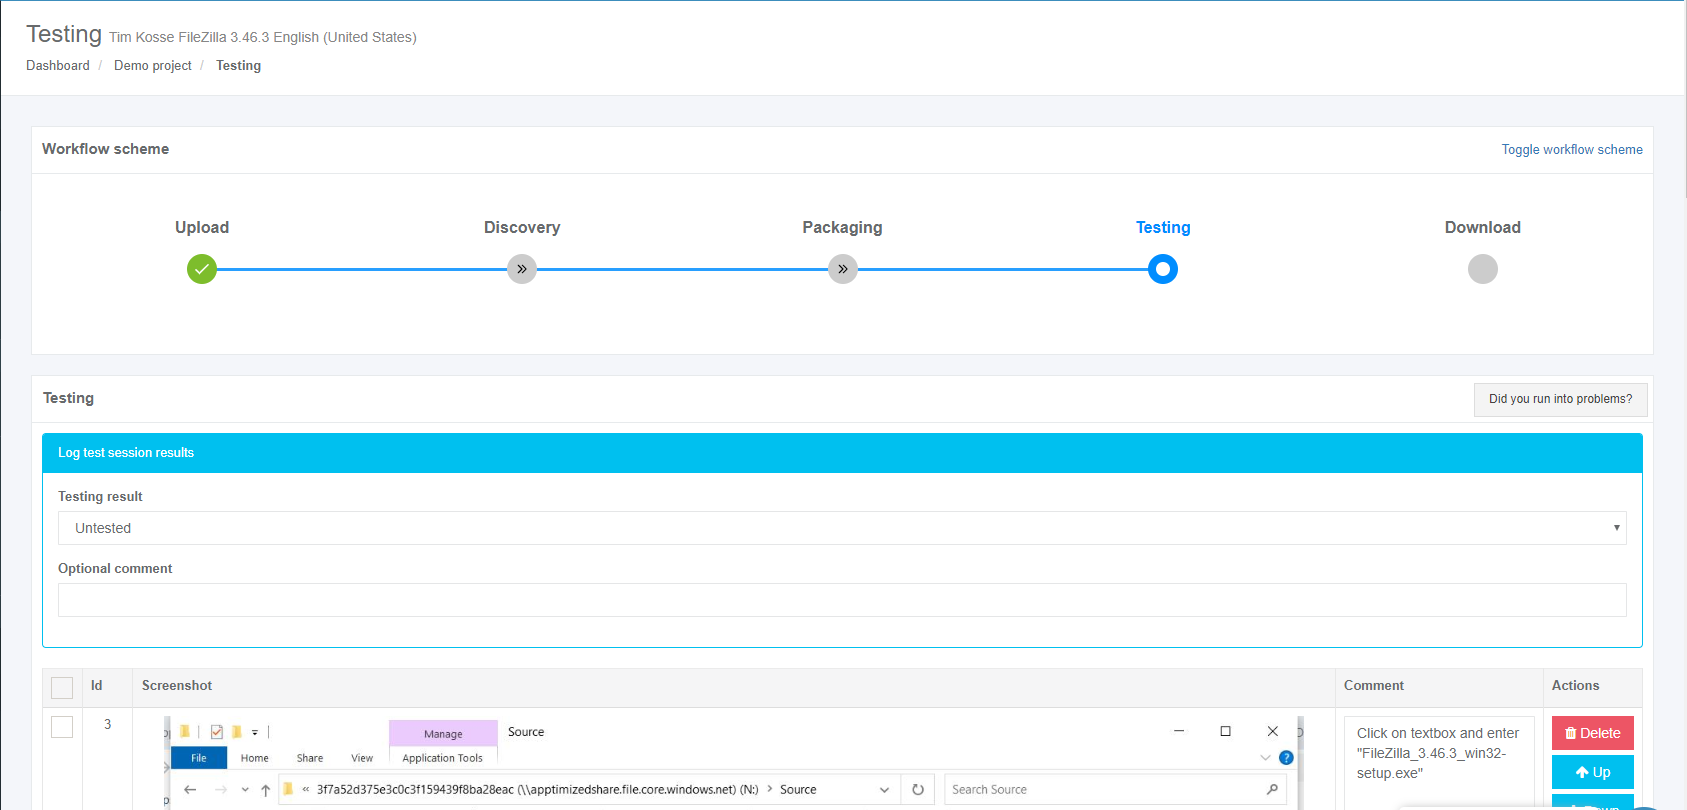](https://docs.apptimized.com/uploads/images/gallery/2020-03/8ivNtExL3gnLL7sF-to_go_42.png) The following options to log test session results are available: - Untested; - Success; - Failed. The default value is **Untested**. [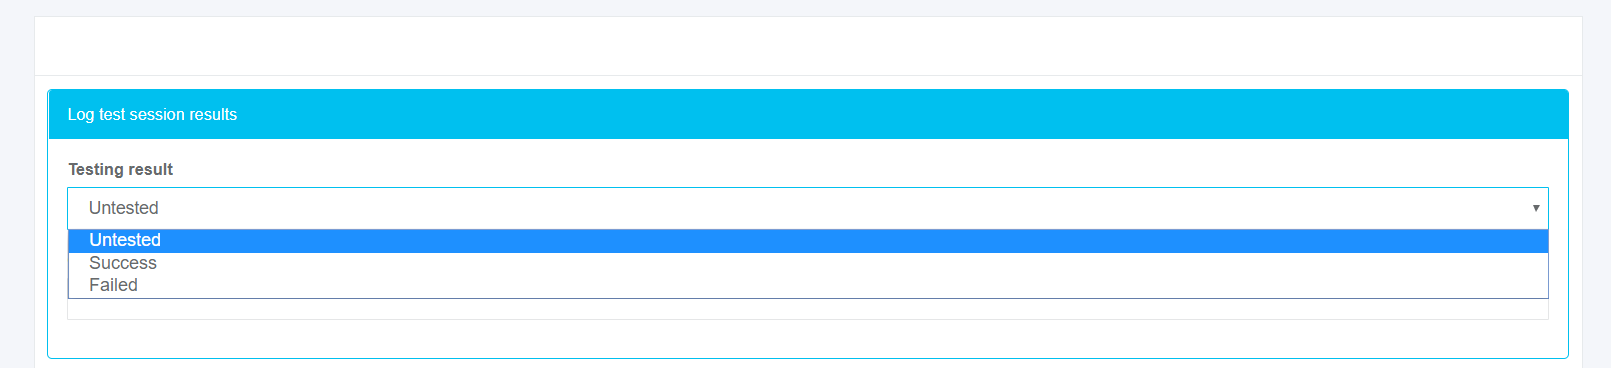](https://docs.apptimized.com/uploads/images/gallery/2020-03/wQ3JQVfDuaqN7IFI-to_go_42_2.png) The field **Optional comment** can stay blank. Screenshots can be excluded from discovery by clicking on the **Delete** button. [.png)](https://docs.apptimized.com/uploads/images/gallery/2020-03/nDCPNpZneFMifFaY-41-(2).png) Screenshots can be excluded from discovery in a multiple mode by unticking checkboxes in front of their ID and clicking on the **Delete selected screenshots** button. [.PNG)](https://docs.apptimized.com/uploads/images/gallery/2020-03/Hg3YH3vskTdt4wCj-52-(2).PNG) Screenshots sequence can be changed in discovery by clicking on the **Up** or **Down** buttons. [](https://docs.apptimized.com/uploads/images/gallery/2020-03/WPOQnKA7WXddSlpf-to_go_32_1.png) [](https://docs.apptimized.com/uploads/images/gallery/2020-03/tnVgsFVsTgqwAcZn-to_go_32_2.png) Comments to the screenshots can be edited by clicking on the comment cell. [](https://docs.apptimized.com/uploads/images/gallery/2020-03/98KvWYS2QjTwrZSA-to_go_33.png) The field **Additional comment (Optional)** can stay blank. [](https://docs.apptimized.com/uploads/images/gallery/2020-03/3mWW4zscqa243gO5-to_go_43.png) Screenshots editing mode finalizes when clicking on the **Save changes** button. Apptimized shows the following interface when successful: [](https://docs.apptimized.com/uploads/images/gallery/2020-03/9sFKRERFa8R9Napl-to_go_43_1.png) The generated document is available in PDF and HTML formats. Download starts when clicking on the **Download generated HTML document** or **Download generated PDF document** buttons. A testing document can be edited by clicking on the **Edit generated document** button. The document editing finalizes by clicking on the **Save** button. [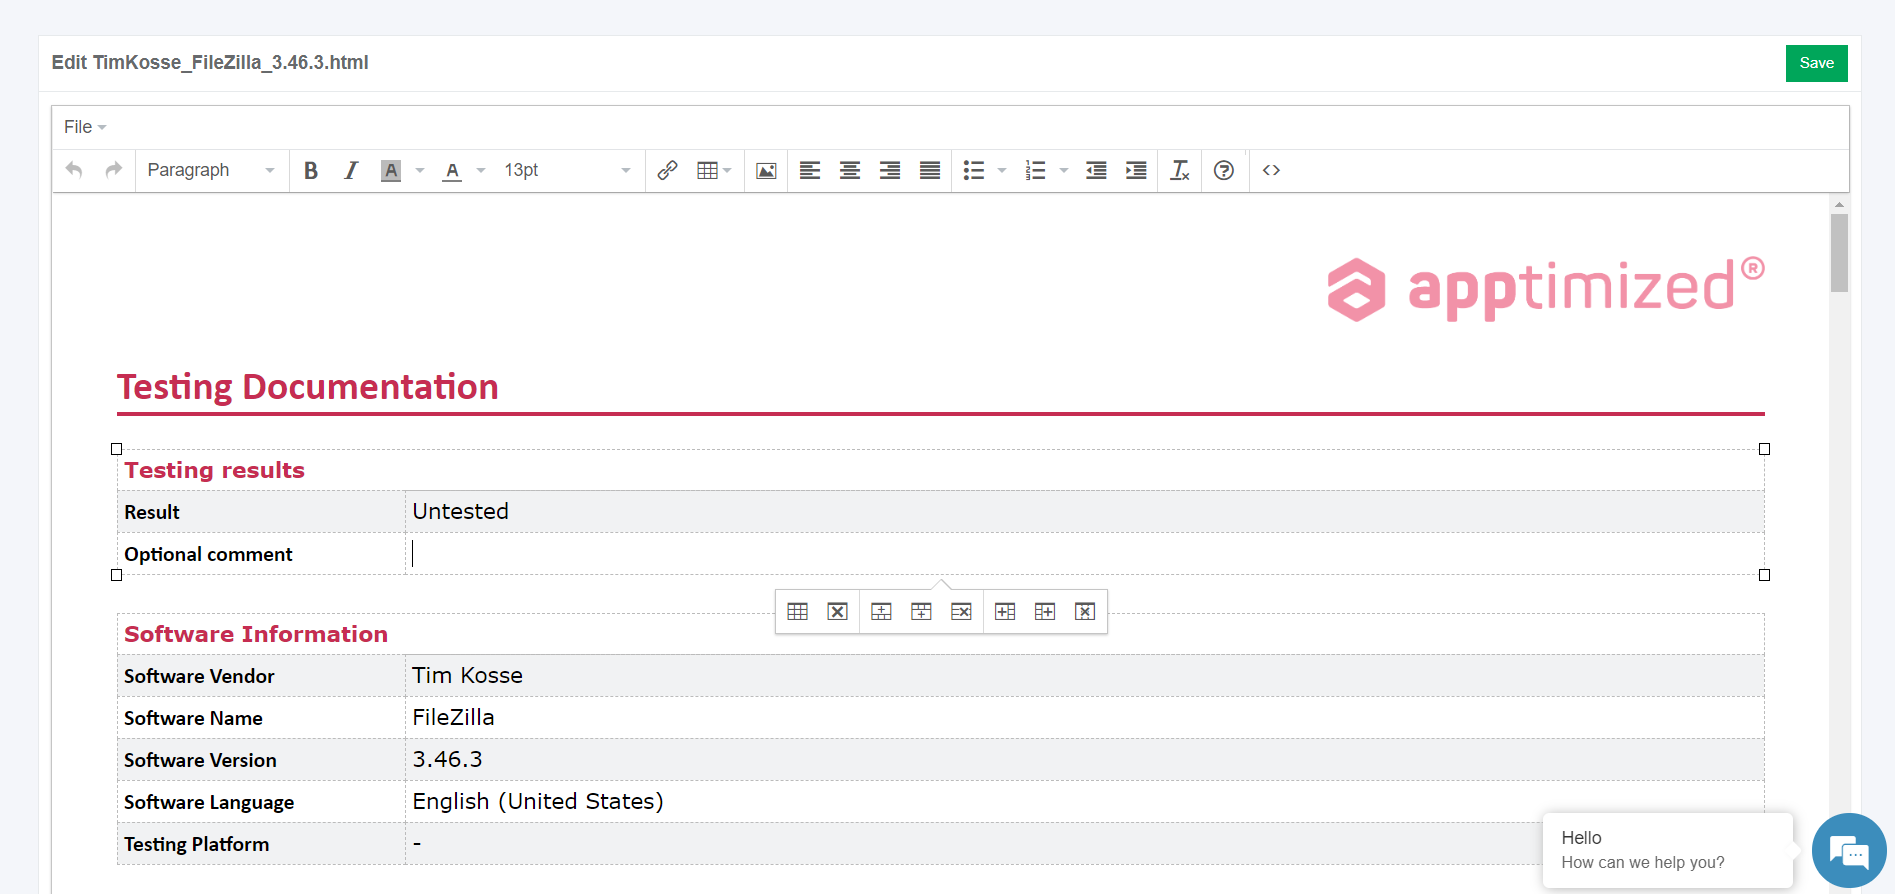](https://docs.apptimized.com/uploads/images/gallery/2020-03/81QuWDcq6wC67C3y-to_go_35.png) The process reverts to the screenshots editing mode by clicking on the **Revert to Testing - Results** button and finalizes by clicking on the **Finish** button. [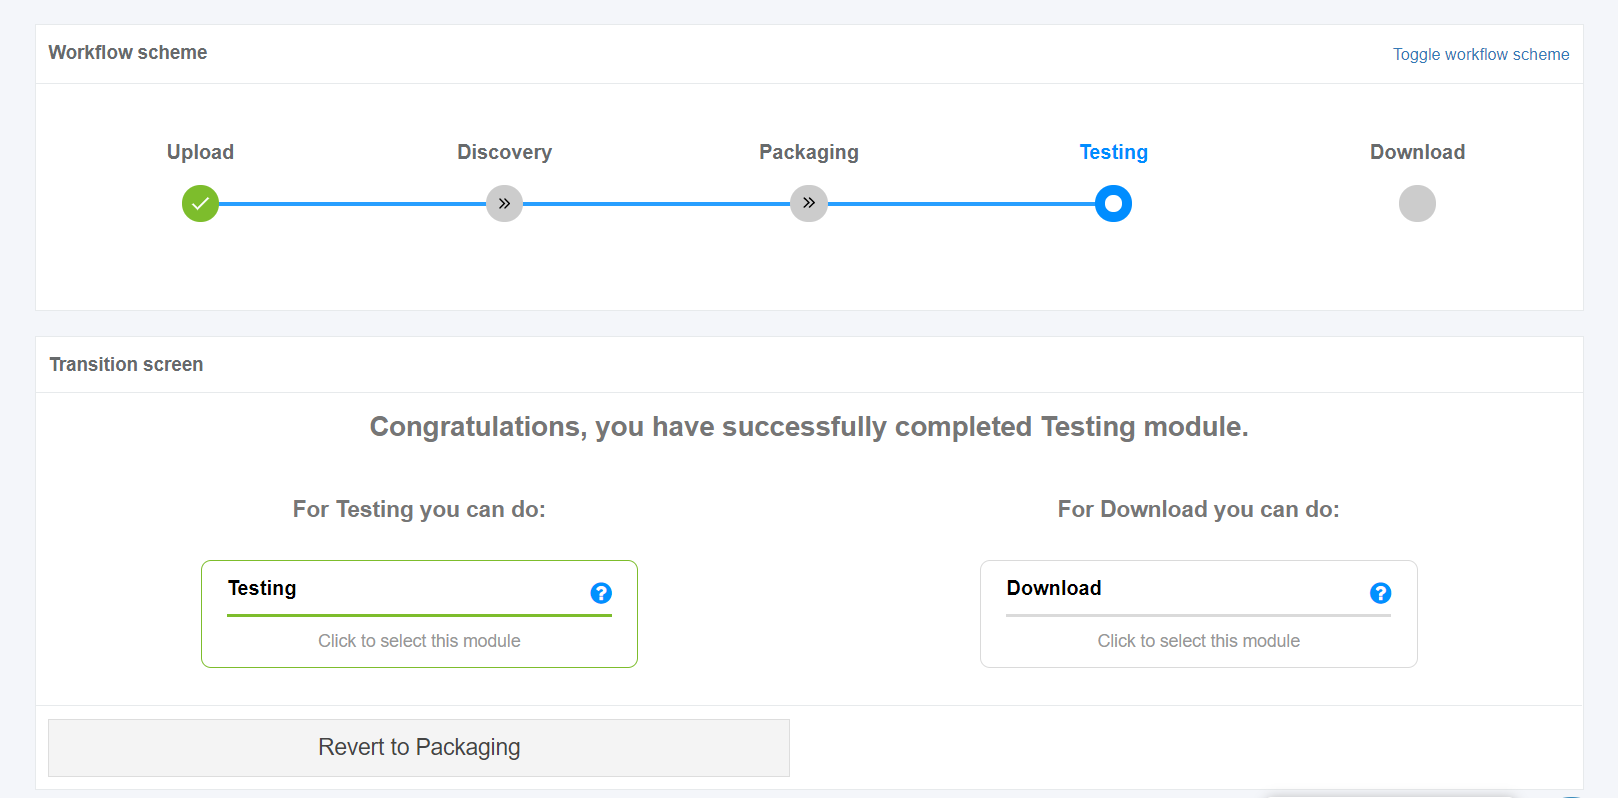](https://docs.apptimized.com/uploads/images/gallery/2020-03/6JYhV1F7S3sn5z31-to_go_44.png) # Download the documentation The download process starts by clicking on the **Download** module on the Transition screen: [](https://docs.apptimized.com/uploads/images/gallery/2020-03/LFUfIak69CnkdafU-to_go_45.png) Apptimized shows the following interface when successful: [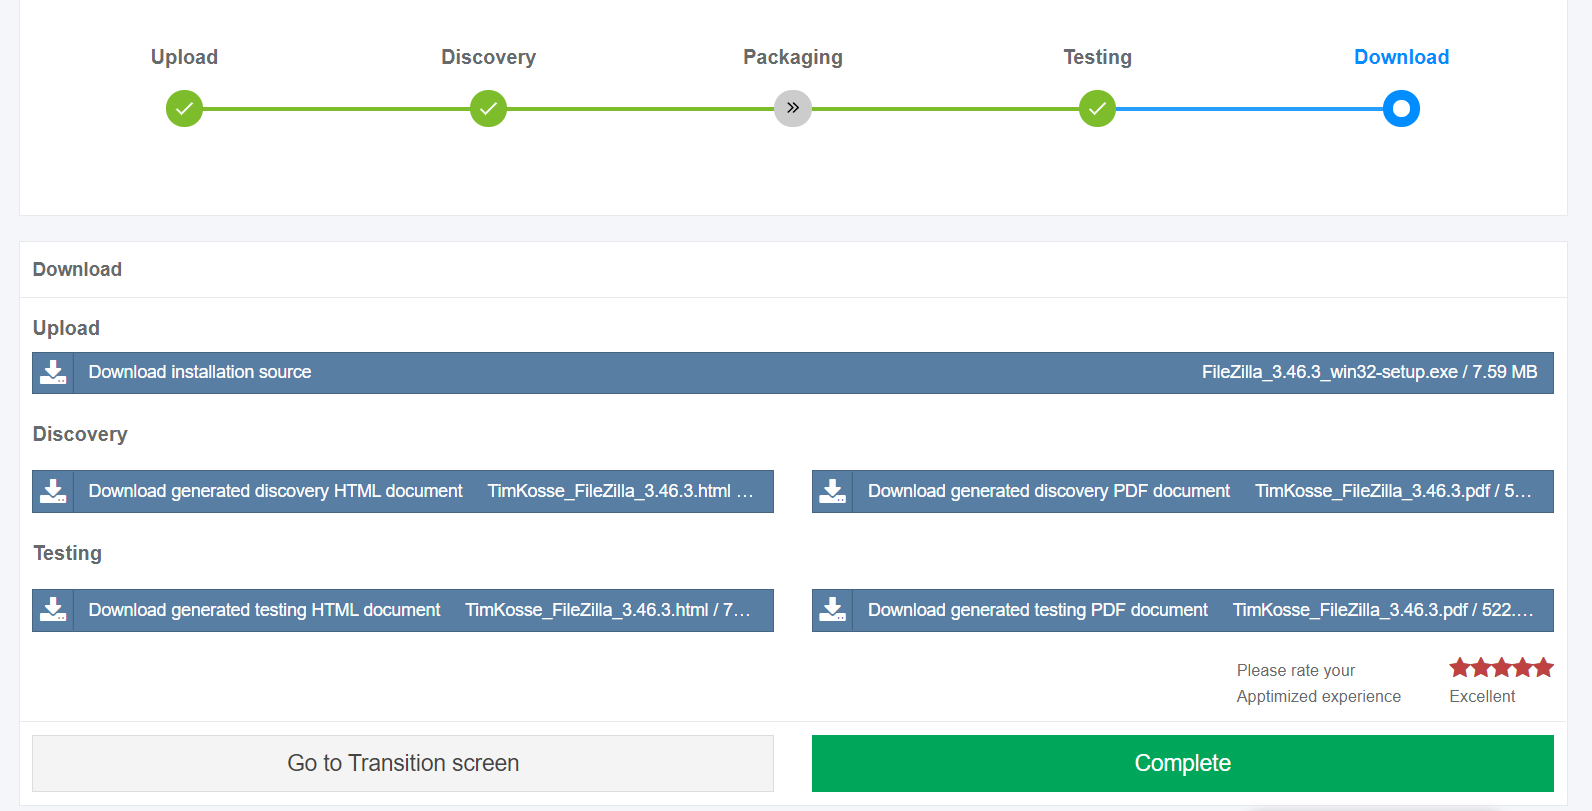](https://docs.apptimized.com/uploads/images/gallery/2020-03/5TYBArtfcPsb8uCi-to_go_46.png) The process reverts to the initial screen by clicking on the **Revert to Transition screen** button. The process finalizes by rating the Apptimized experience and clicking on the **Complete** button. Apptimized shows the following notification when successful: [](https://docs.apptimized.com/uploads/images/gallery/2020-03/3wkmYICXYij5INag-to_go_47.png) # Apptimized TO GO Agent Administration Guide # Apptimized TO GO Agent infrastructure ### Infrastructure components Apptimized TO GO allows a customer to turn a local machine, PC's or VM's into Apptimized VM so that they can be used for discovery and testing. Apptimized TO GO can be used for discovery and testing on local test PCs or VMs in the customer's own environment. Apptimized TO GO infrastructure depends on the type of solution a customer chooses (see Cases 1). ##### Case 1. A customer implements Apptimized TO GO agent only to automate discovery and testing within on-premises PCs and VMs. The figure below shows the scheme of the Apptimized TO GO agent infrastructure. [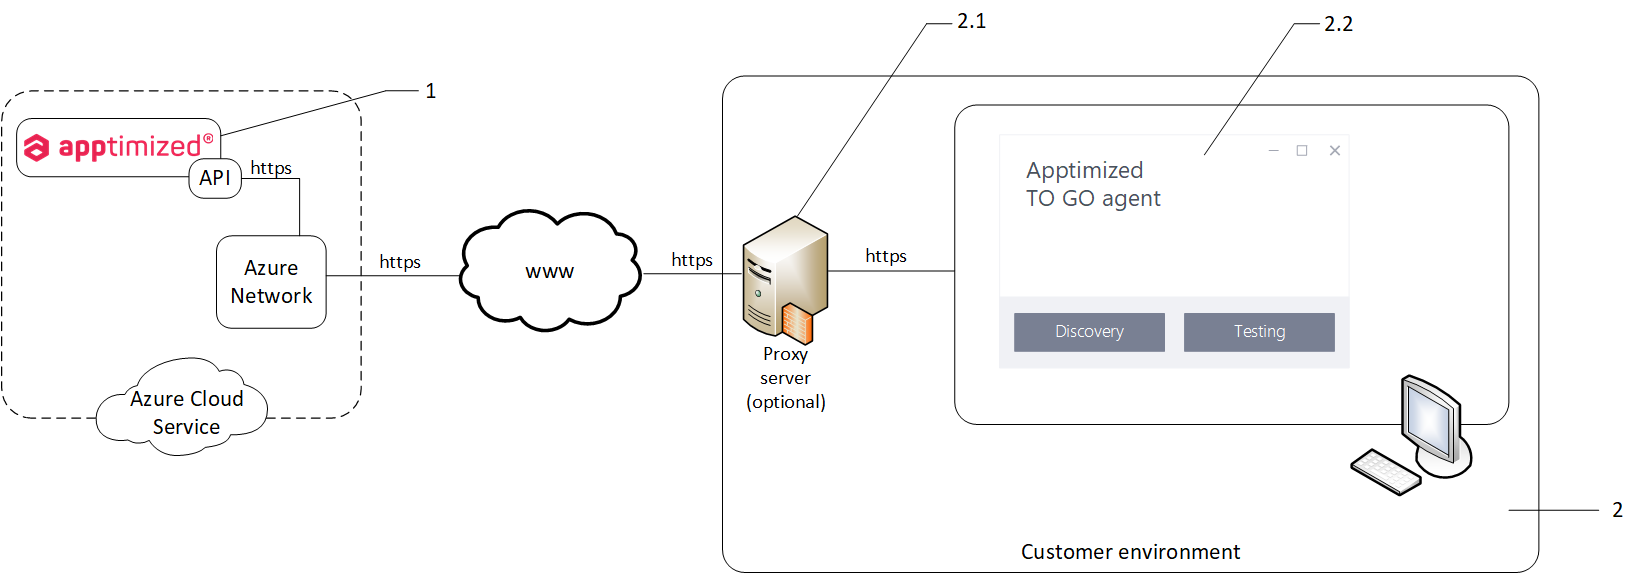](https://docs.apptimized.com/uploads/images/gallery/2020-03/zikQC4xsIPTXHR2M-infr_01.png) The infrastructure components details are described in Table 1. Table 1. Infrastructure components| **Component** | **Details** |
| 1\. Apptimized Portal | The platform where Apptimized customer manages projects portfolios. Requires an active project with enabled and configured Apptimized TO GO settings. Technical requirement for working in Apptimized: 1\. Browsers: - Google Chrome (version 75.0 or above); - Mozilla Firefox (version 60.0 or above); - Apple Safari (version 12.0 or above); - Internet Explorer with (version 11.0); - Microsoft Edge with version 83 and above. 2. Enabled Java-script in browser; 3\. Speed of internet connections – min 50 Mb/s. 4\. Enabled firewall white list: https://app.apptimized.com/; https://rdp-gw.apptimized.com/; https://cdn.apptimized.com; https://screenshots.api.apptimized.technology; https://auth.apptimized.com; \*.swarm.apptimized.com; \*.chatlio.com |
| 2\. Customer Environment | Information technology environment, including software, hardware, and systems (e.g., endpoint PCs, VMs, servers, networks).
The access of endpoint PC or VM to the 80 and 443 port of the app.apptimized.com host is a prerequisite. Microsoft Windows Desktop (Windows 7 and above) or Server OS (Windows Server 2012 R2 and above) with installed .NET Framework 4.6.1. |
| 2.1. Proxy server | This component is optional. A proxy server is a third party between the customer and the service (the Apptimized Portal). A proxy server manages the requests sent by the customer and completes them depending on the system's preferences. |
| 2.2. Apptimized TO GO agent | Apptimized TO GO agent is a software that sends information from the VM to Apptimized (i.e., screenshots, user actions, etc.), and does not control VM in any case. Apptimized TO GO agent allows a customer to turn a local machine, PC's or VM's into Apptimized VM so that they can be used for discovery and testing. The Apptimized TO GO agent must be installed and launched on a local PC by the local administrator. |
Issued by – K Software certificate Authority (DV) 2 [https://sectigo.com/legal](https://sectigo.com/legal) Version – V3 Signature algorithm – sha256RSA Signature hash algorithm – sha256 Public key – RSA (2048 Bits) TLS – 1.2
The information flow content depends on the type of customer activity (see Cases 2-3). ##### Case 2. A customer discovers/ tests **TimKosse\_FileZilla\_3.46.3\_English(United States)** via **Apptimized TO GO agent**. To run the **Apptimized TO GO agent** a deployment code is used. **Outbound information** - a data sent from the Apptimized Portal: - network share connection parametersShare UNC path - **\\\\\\\\apptimizedshare.file.core.windows.net\\\\78d2a2cccf7dfd9e4154fa04f98e1e7f;** Share Login - **AZURE\\\\apptimized;** Share Password - **+Tnqfi81aTbPI7nuE9E8j5nXxGGs52jBNcysKA4a6MhK9GFNb0Ti8dlu1ZtpCjNOFy5P8MvPVGGVZkEo6DggjQ==**
- an application metadata;Application vendor - **Tim Kosse**; Application name - **FileZilla**; Application version - **3.46.3**; Application language - **English(United States)**
- an action mode metadata;Echo enabled - **True;** Mode - **Discovery**; Self service mode - **No**.
**Inbound information** - a data sent to the Apptimized Portal: - a request to receive the manifest; - records of the customer's actions. ``` "Type": 10, "HasKeyboardFocus": true, "Text": "hello", "InitialText": null, "Id": "7167ac61f40342d89cf061f61cab6d49", "ProducerId": null, "Window": { "Title": "*new 2 - Notepad++", "Screenshot": in base64 string format ``` ##### Case 3. A customer discovers/ tests **TimKosse\_FileZilla\_3.46.3\_English(United States)** via **Apptimized TO GO agent**. To run the **Apptimized TO GO agent** a TO GO file is used. **Outbound information** - a data sent from the Apptimized Portal: - TO GO file - **Apptimized.togo.** **Inbound information** - a data sent to the Apptimized Portal: - records of the customer's actions. ``` "Type": 10, "HasKeyboardFocus": true, "Text": "hello", "InitialText": null, "Id": "7167ac61f40342d89cf061f61cab6d49", "ProducerId": null, "Window": { "Title": "*new 2 - Notepad++", "Screenshot": in base64 string format ``` # Security To ensure security Apptimized complies with the following cybersecurity standards: - ISO 15408; - ISO/IEC 27001; - ISO/IEC 27002; - ANSI/ISA 62443 (Formerly ISA-99); - IEC 62443; A military-grade security protocol ([TLS/SSL](https://docs.microsoft.com/en-us/windows-server/security/tls/tls-ssl-schannel-ssp-overview)) is used by Apptimized to provide privacy and data integrity between two or more communicating applications. Apptimized safety audit entails a network scan of its resources to identify vulnerabilities and non-penetration. The screenshot below shows the vulnerability report provided by **Detectify** for **app.apptimized.com**. [](https://docs.apptimized.com/uploads/images/gallery/2020-03/MmESvmM2142UiAbc-sccm_adm_03_4.png) The screenshots below show the SSL report of **app.apptimized.com**. [](https://docs.apptimized.com/uploads/images/gallery/2020-03/FDOxbDM9eImMUoJX-sccm_adm_05_1.png) [](https://docs.apptimized.com/uploads/images/gallery/2020-03/ochmWF8LIzubGeyF-sccm_adm_05_5.png) # Technical workflows ### Using a TO GO file workflow The figure below shows a workflow when a TO GO file is used to run the Apptimized TO GO agent. The instructions to run the Apptimized TO GO agent are considered in the **Apptimized TO GO user manual**. [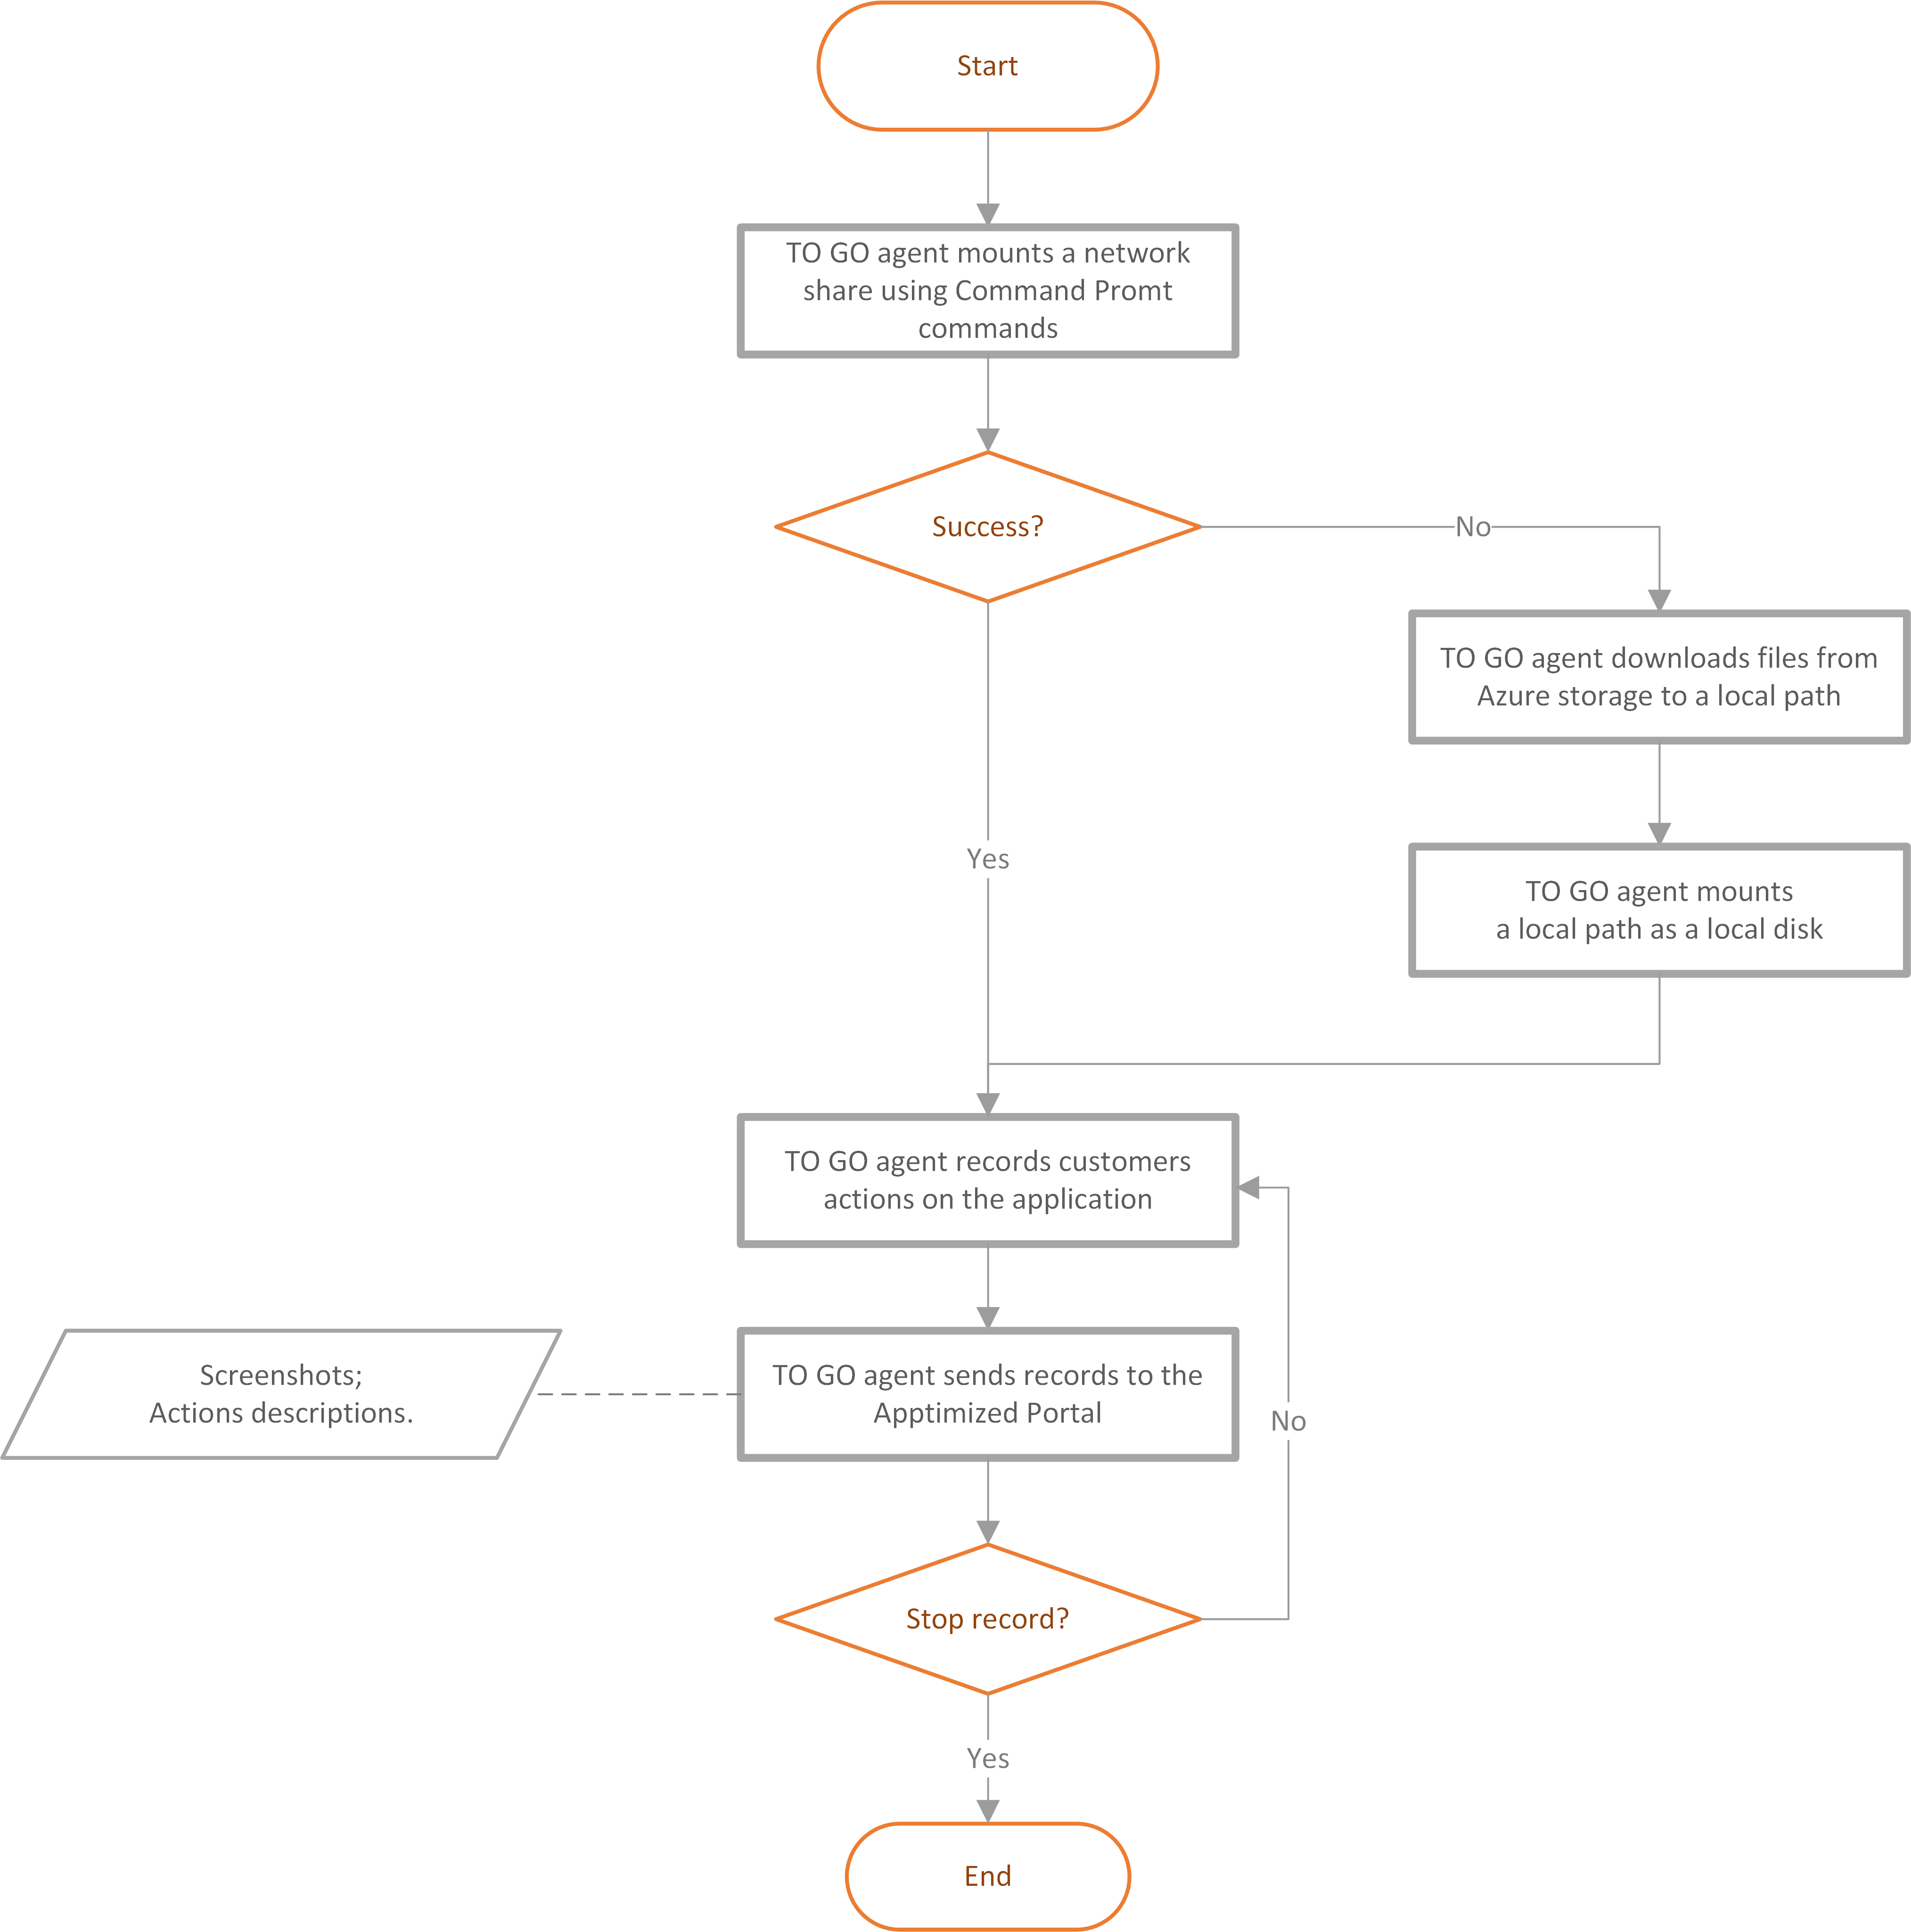](https://docs.apptimized.com/uploads/images/gallery/2020-03/pvHtW3obG9lcmstn-workflow_file.png) ### Using a deployment code workflow The figure below shows a workflow when a deployment file is used to run the Apptimized TO GO agent. The instructions to run the Apptimized TO GO agent are considered in the **Apptimized TO GO user manual**. [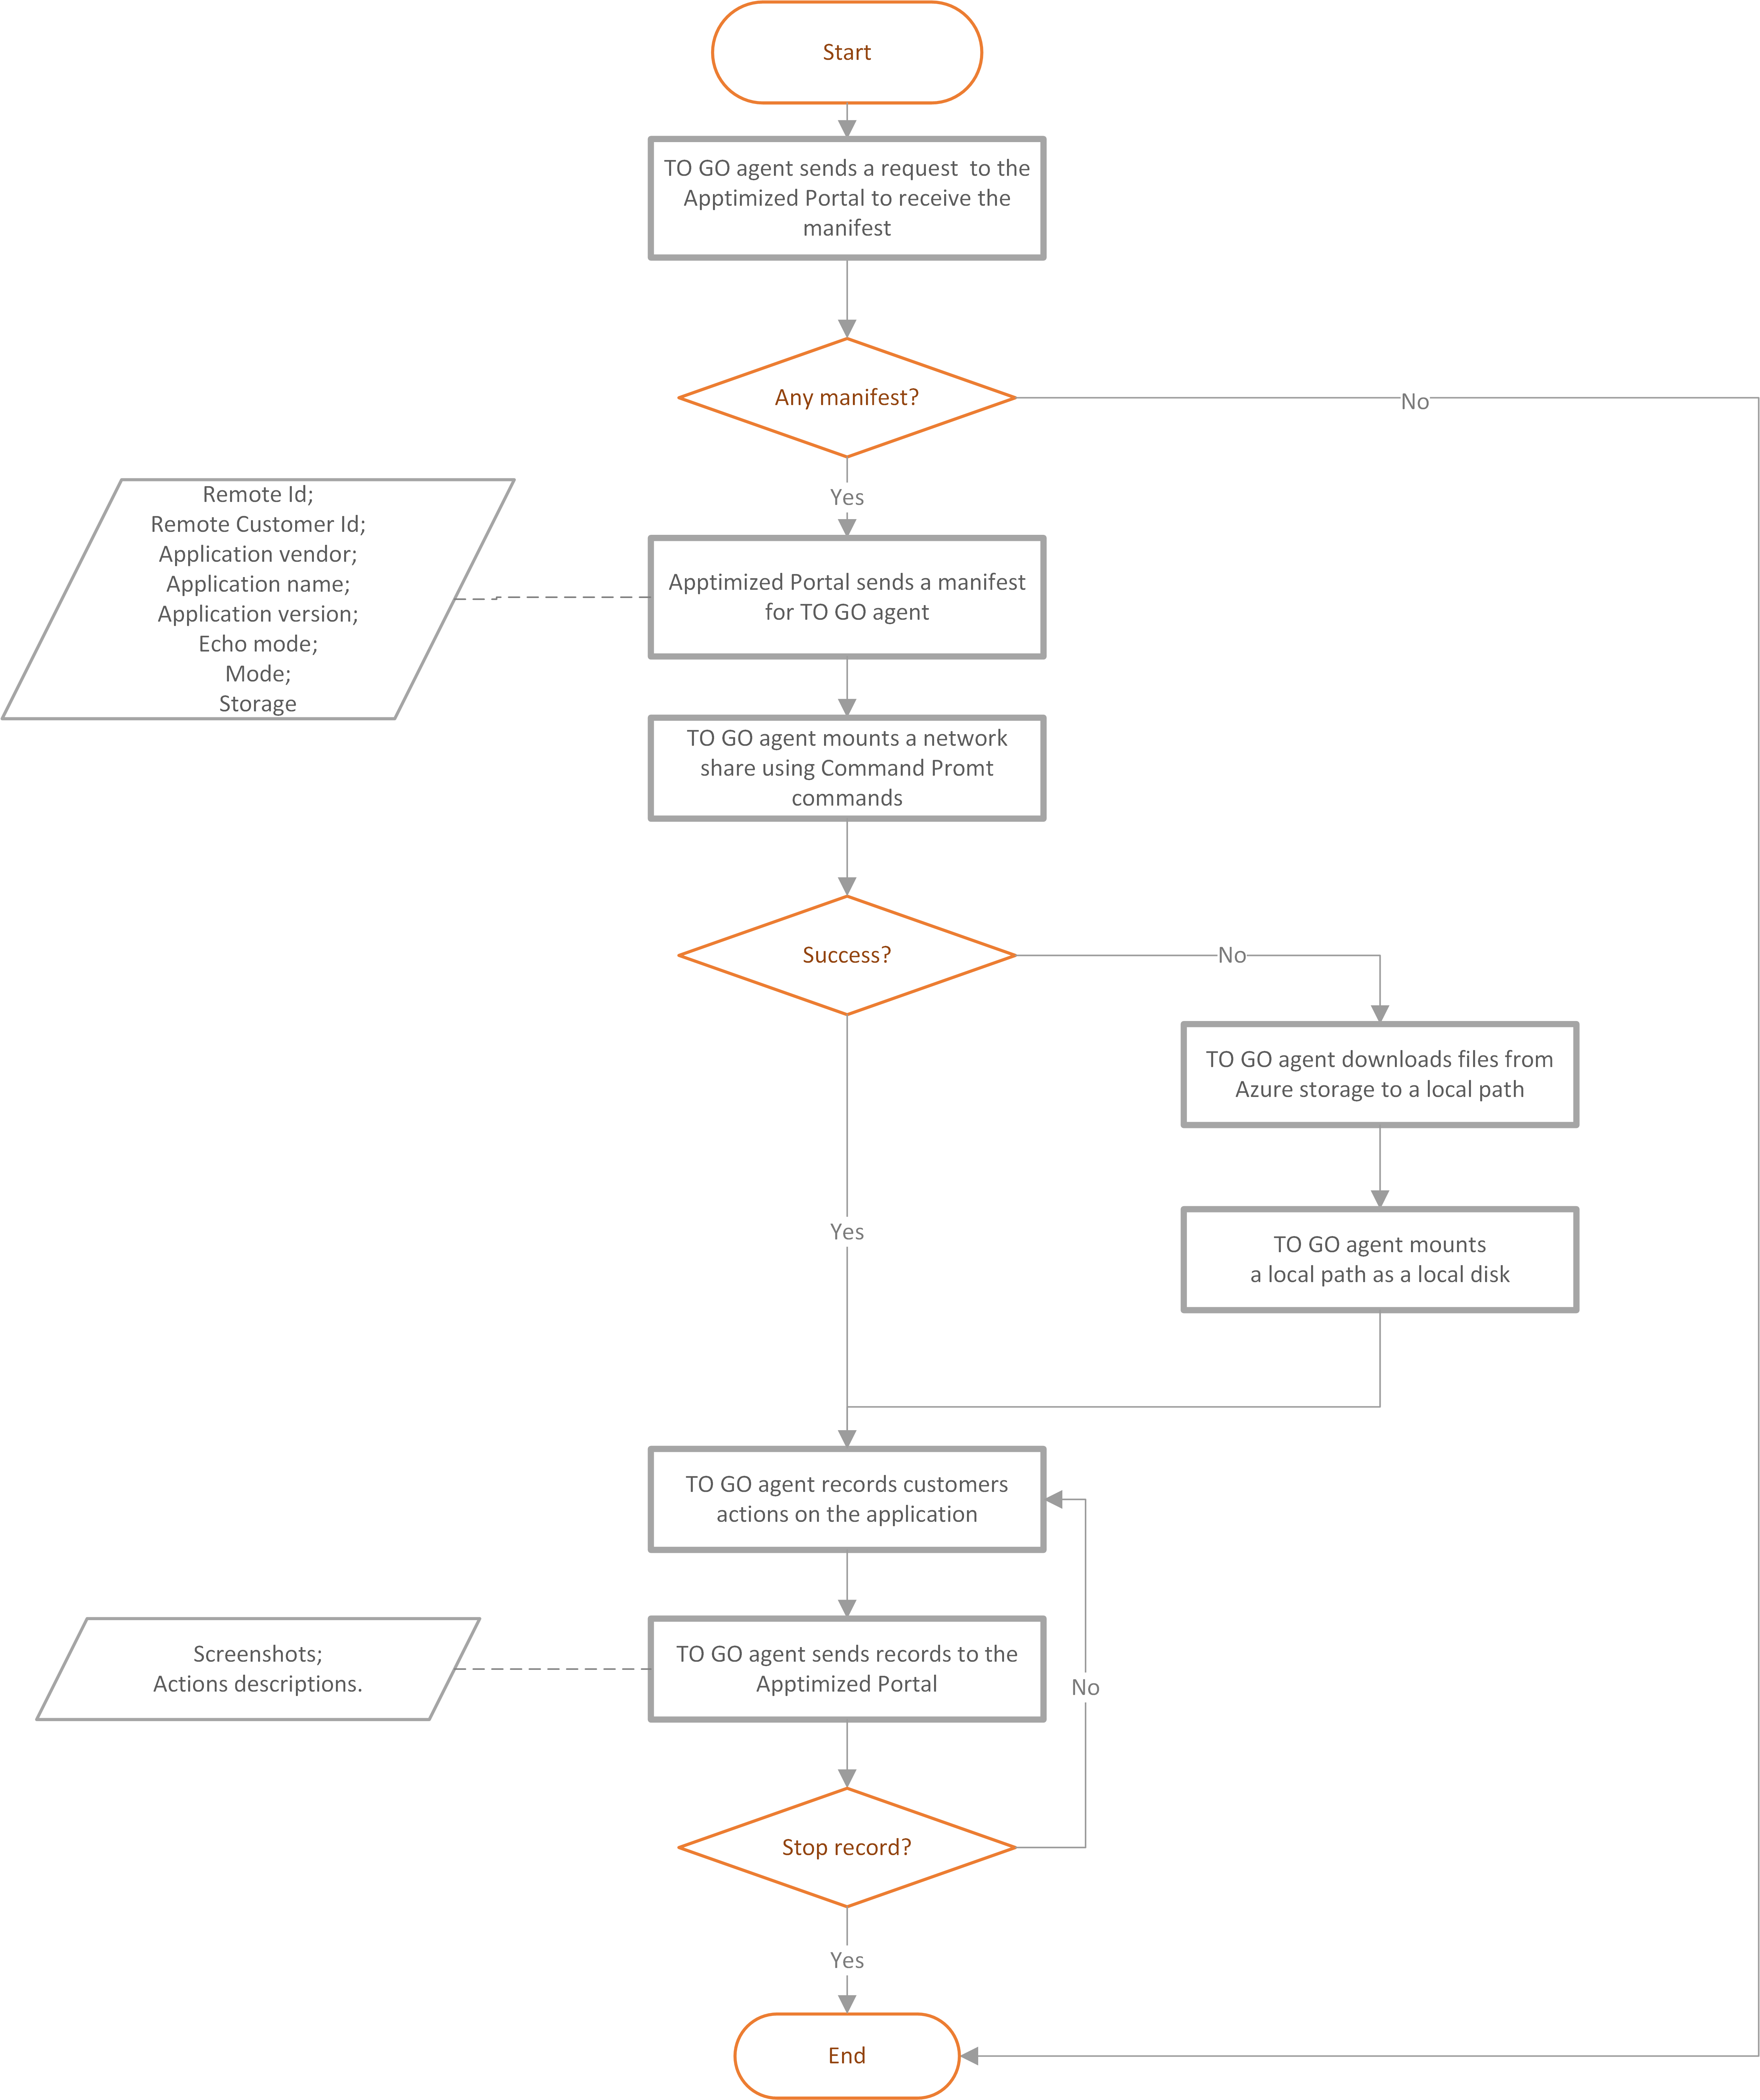](https://docs.apptimized.com/uploads/images/gallery/2020-03/QrPVxOfn730IGw9J-workflow_code.png) ### Using a TO GO hypervisor connector workflow [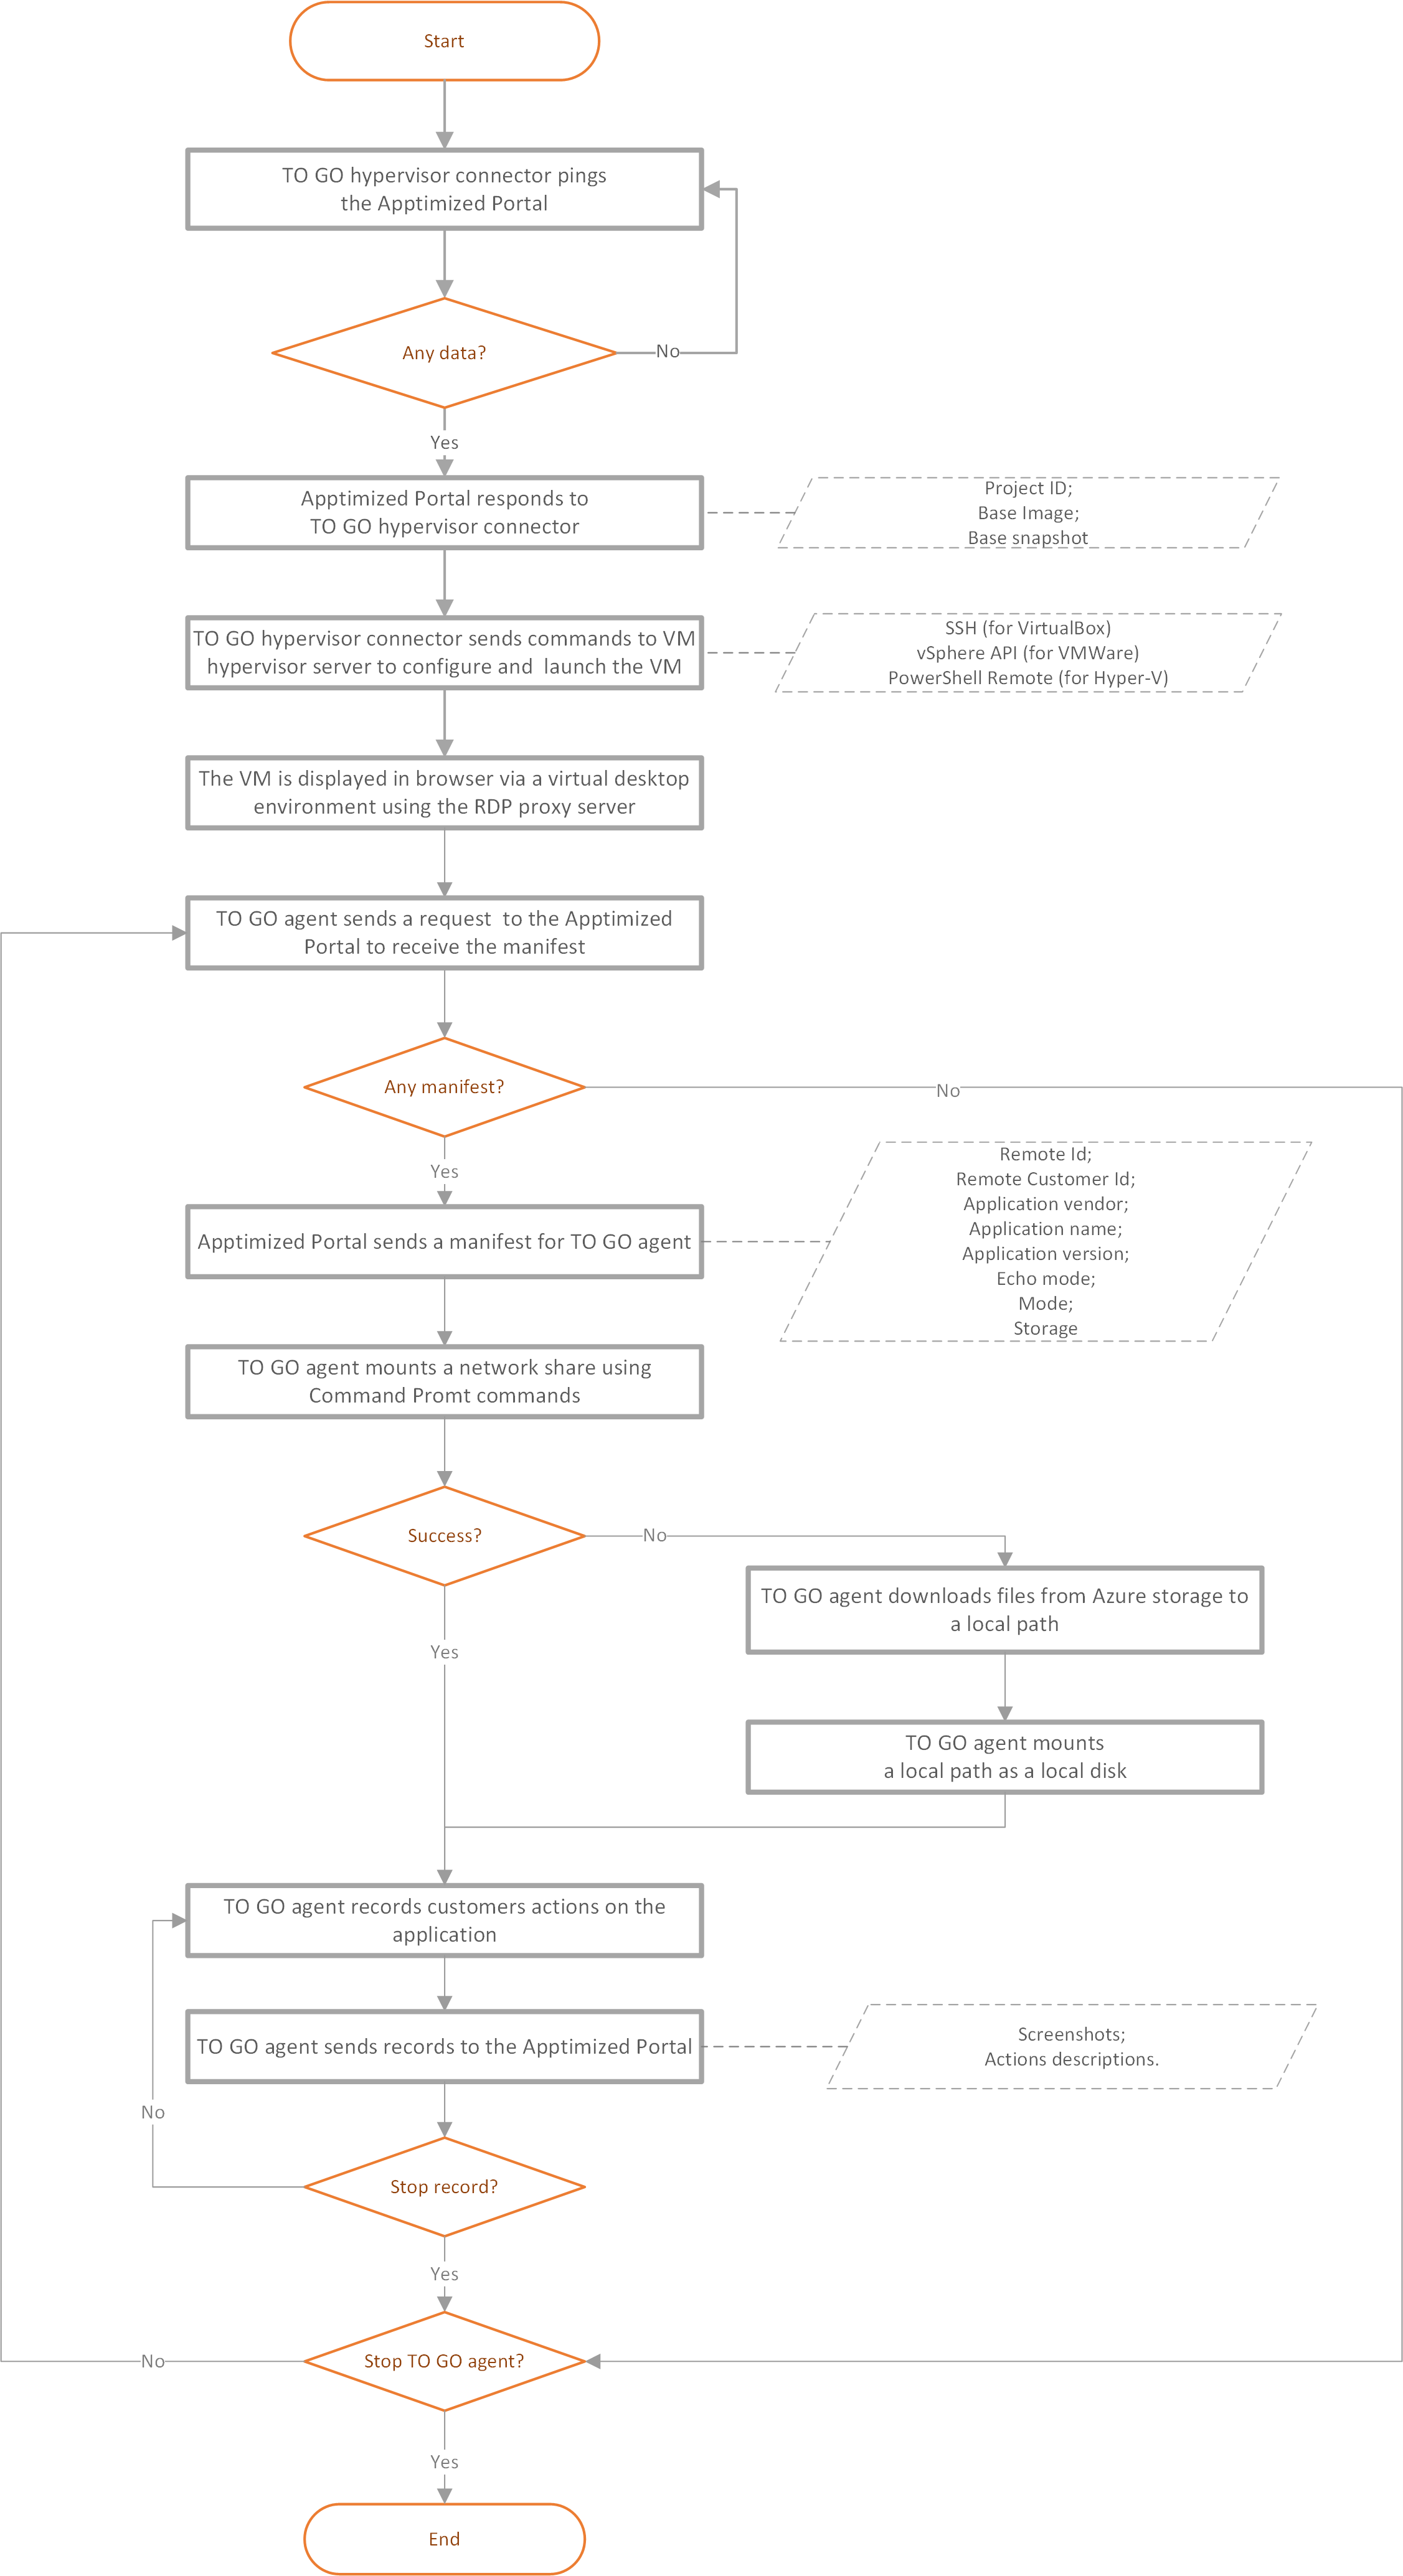](https://docs.apptimized.com/uploads/images/gallery/2020-06/cQ1sluzl2QiBc5ga-to-go-hypervisor_workflow.png) # Azure Tenant VDI Provider Integration This manual page refers to the Azure-side configuration of the virtualization provider. The Apptimized-side configuration is available under [**Azure Switch**](https://docs.apptimized.com/books/apptimized-platform-user-manual/page/project-settings#bkmrk-providers). ##### Application Registration The option to register the application under the Azure Portal is available under **Azure Active Directory > App registrations > New registration** (see [Application registrations](https://docs.apptimized.com/books/apptimized-platform-admin-manual/page/integration-f61#bkmrk-application-registra)). **Application (Client) Id, Directory (Tenant) Id, Client Secret** are required under the [**Azure Switch** ](https://docs.apptimized.com/books/apptimized-platform-user-manual/page/project-settings#bkmrk-providers)configuration. ##### Resource group creation The option to create a resource group is available under **portal.azure.com > Resource Groups > Create**. **[.png)](https://docs.apptimized.com/uploads/images/gallery/2021-07/JAaUFb6Q9esZjMDu-vdi_1-(2).png)** **Microsoft Azure** portal shows the following screen when successful: [.png)](https://docs.apptimized.com/uploads/images/gallery/2021-07/6u73uRYCEY0mCSsU-vdi_2-(1).png) The option to set up resource group name is available under the **Resource group** field. [.png)](https://docs.apptimized.com/uploads/images/gallery/2021-07/TzcBfOT17W8A9QZ8-vdi_3-(1).png) The option to select the region for the resource group is available under the **Region** field. [.png)](https://docs.apptimized.com/uploads/images/gallery/2021-07/optdRrhHT4bQ939x-vdi_4-(1).png)**Note.** **Resource Group** name & Region must be used in configuring [**Azure Switch**](https://docs.apptimized.com/books/apptimized-platform-admin-manual/page/integration-f61#bkmrk-application-registra)
The option to review the resource group is available under the **Review + create** button. [.png)](https://docs.apptimized.com/uploads/images/gallery/2021-07/CeNuo8e8z6Cf8BVu-vdi_5-(1).png) Microsoft Azure portal shows the following screen when successful: [.png)](https://docs.apptimized.com/uploads/images/gallery/2021-07/ucoa1TOXQyOAq4Sa-vdi_6-(2).png)**Note**. If the validation was successful, the following notification appears: [.png)](https://docs.apptimized.com/uploads/images/gallery/2021-07/bASGUDqeYZxLnUfN-vdi_8-(1).png)
The option to create a resource group is available under the **Create** button. [.png)](https://docs.apptimized.com/uploads/images/gallery/2021-07/mqa3pTcelAAWKEjA-vdi_7-(1).png) Microsoft Azure portal shows the following notification when successful. Created resource group appears in the list of resource groups. [.png)](https://docs.apptimized.com/uploads/images/gallery/2021-07/C1YKw7aFtUzinsSj-vdi_9-(1).png) ##### Resource group permission issuance The option to give permissions to the resource group is available under **Resource group > Choose group > Access control (IAM)**. [.png)](https://docs.apptimized.com/uploads/images/gallery/2021-07/THHVZUueHCp8ysn5-vdi_10-(1).png) The option to add Role assignment is available under **Add > Add role assignment**. [.png)](https://docs.apptimized.com/uploads/images/gallery/2021-07/bcNj2lomAi2T6GY3-vdi_11-(1).png) Microsoft Azure portal shows the following window when successful: [.png)](https://docs.apptimized.com/uploads/images/gallery/2021-07/HXGQp52P5tCAzAFA-vdi_12-(1).png) The option to assign roles is available under the **Role drop-down list**. The necessary roles for the Azure VDI configuration are: **Virtual Machine Contributor, Network Contributor, Disk Snapshot Contributor.** [.png)](https://docs.apptimized.com/uploads/images/gallery/2021-07/vGH48p3lUrEpXQBt-vdi_13-(1).png)**Note**. Only one role can be assigned per one action.
The option to add role assignment to the application is available under the **Select** field. Selected members will appear below the section. [.png)](https://docs.apptimized.com/uploads/images/gallery/2021-07/mGcEYeMelfdhT7BS-vdi_14-(1).png) The option to submit changes is available under the **Save** button. [.png)](https://docs.apptimized.com/uploads/images/gallery/2021-07/2WA5azLNZ7e4KD81-vdi_15-(1).png) ##### Virtual Network Creation The option to create virtual networks is available under **portal.azure.com > Virtual networks > Create**. [.png)](https://docs.apptimized.com/uploads/images/gallery/2021-07/njFQ7SbX7mU8LGel-vdi_16-(2).png)**Note.** The network creation will heavily depend on Azure networking configuration.
Microsoft Azure portal shows the following screen when successful: [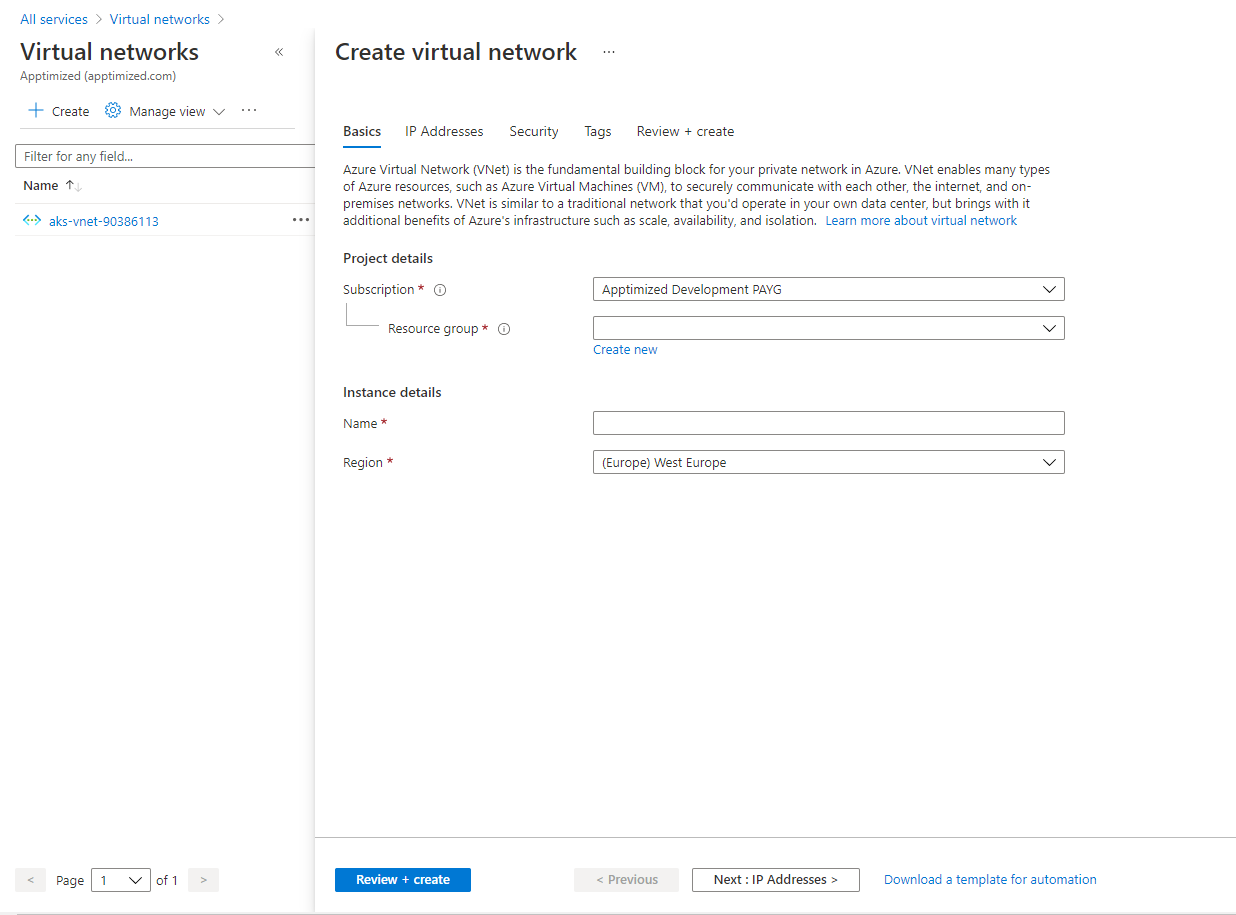](https://docs.apptimized.com/uploads/images/gallery/2021-07/iVEAGJI78izGiGwm-image-22.png) The ability to create a virtual network becomes available after setting up **Resource group, Name, Region, Address space field & Subnet**. The option to set up **Resource group, Name,** and **Region** is available under the **Basics** tab. [.png)](https://docs.apptimized.com/uploads/images/gallery/2021-07/De5EzYnkHeYZx81U-vdi_17-(1).png) The option to set up a Resource group is available under the Resource group drop-down list. [.png)](https://docs.apptimized.com/uploads/images/gallery/2021-07/74gIOhIEgm90pyKI-vdi_18-(1).png)**Note.** The resource group must be the one that was created in a previous chapter.
The option to set up a **Name** is available under the **Name** field. [.png)](https://docs.apptimized.com/uploads/images/gallery/2021-07/igvmLqjS6LsjfkpS-vdi_19-(1).png) The option to set up a **Region** is available under the **Region** field. [.png)](https://docs.apptimized.com/uploads/images/gallery/2021-07/UKy1LLNnDUwf9YIM-vdi_20-(1).png)**Note.** The region must be equal to the resource group region.
The option to set up IP Addresses is available under the **IP Addresses** tab. [.png)](https://docs.apptimized.com/uploads/images/gallery/2021-07/ioYp4bZUfN6ddUsF-vdi_21-(2).png) The option to add an IPv4 address is available under the IPv4 address space. [.png)](https://docs.apptimized.com/uploads/images/gallery/2021-07/NcrfaJFAlxp0KrGu-vdi_22-(2).png) The option to add a subnet address is available under **Add subnet** button. [.png)](https://docs.apptimized.com/uploads/images/gallery/2021-07/H6fFRtvsqnKnvl73-vdi_23-(2).png) Microsoft Azure portal shows the following screen when successful: [.png)](https://docs.apptimized.com/uploads/images/gallery/2021-07/OyD5WgnCDwShvqaQ-vdi_24-(1).png) The option to add a Subnet name is available under the **Subnet name** field. [.png)](https://docs.apptimized.com/uploads/images/gallery/2021-07/oAJ7E6rsG3feUCwr-vdi_25-(1).png) The option to add the Subnet address range is available under the **Subnet address range** field. [.png)](https://docs.apptimized.com/uploads/images/gallery/2021-07/yOivw3FWxygRChQL-vdi_26-(1).png) The option to finish Add subnet process is available under **Add** button. [.png)](https://docs.apptimized.com/uploads/images/gallery/2021-07/Zmh8UwZFebIOymGl-vdi_27-(1).png) The option to continue the creation process is available under the **Review + create** button. [.png)](https://docs.apptimized.com/uploads/images/gallery/2021-07/ZD8vlPEp7Ywvt31P-vdi_28-(1).png) Microsoft Azure portal shows the following screen when successful: [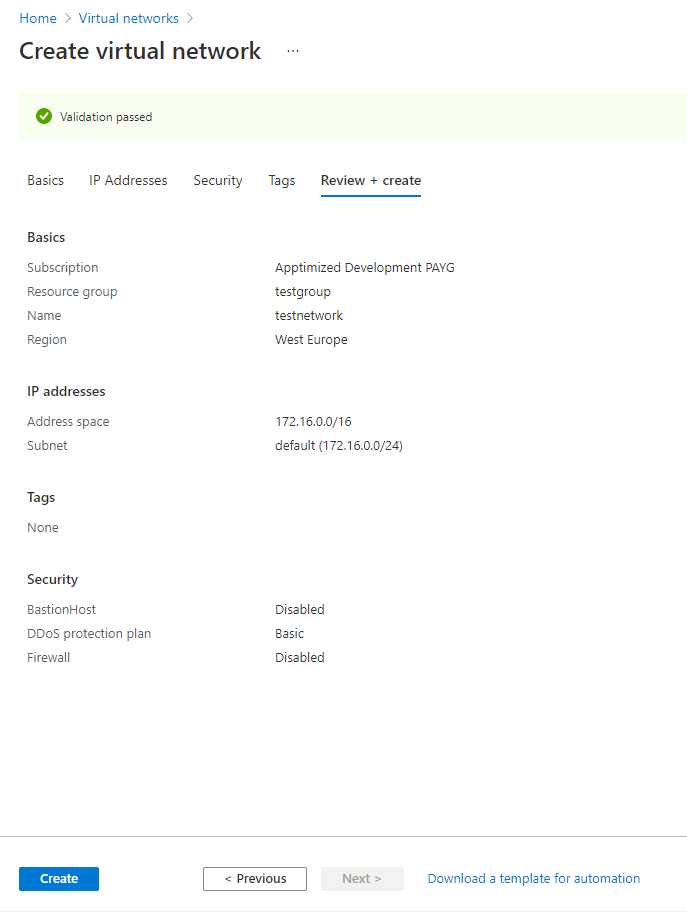](https://docs.apptimized.com/uploads/images/gallery/2021-07/GZnyWWOhnnaH725n-vdi_29.png) The option to create a virtual network is available under the **Create** button. [.png)](https://docs.apptimized.com/uploads/images/gallery/2021-07/Fb3HBS66iBGadNlV-vdi_30-(1).png) Microsoft Azure portal shows the following notification when successful: [.png)](https://docs.apptimized.com/uploads/images/gallery/2021-07/mBZLUT7QkKwiACcx-vdi_31-(1).png) Microsoft Azure portal shows the following screen after the creation process is finished: [.png)](https://docs.apptimized.com/uploads/images/gallery/2021-07/GFaKh15aIBh9yDy1-vdi_32-(2).png)**Note.** Virtual Network name & Subnet name are required under the [Azure Switch](https://docs.apptimized.com/books/apptimized-platform-user-manual/page/project-settings#bkmrk-azure-switch-0) configuration in Apptimized Portal
##### Network Security Group Creation The option to create Network Security Groups is available under **portal.azure.com > Network security groups > Create**. [.png)](https://docs.apptimized.com/uploads/images/gallery/2021-07/8kfTn61jJDIfYCuD-vdi_32-(3).png) Microsoft Azure portal shows the following screen when successful: [.png)](https://docs.apptimized.com/uploads/images/gallery/2021-07/aWQVhrUiHIBTkoGV-vdi_33-(1).png) The option to select a resource group is available under the **Resource group** drop-down list. [.png)](https://docs.apptimized.com/uploads/images/gallery/2021-07/ZrvdDw0ua1obm9Fr-vdi_34-(1).png) The option to set up a name is available under the **Name** field. [.png)](https://docs.apptimized.com/uploads/images/gallery/2021-07/qMpEY8jgRYiE8Gyi-vdi_35-(1).png) The option to set up a **region** is available under the **Region** field. [.png)](https://docs.apptimized.com/uploads/images/gallery/2021-07/zhSJHI01V20WKf8s-vdi_36-(1).png) The option to review the Network Security Group is available under the **Review + Create** button. [.png)](https://docs.apptimized.com/uploads/images/gallery/2021-07/rvUvm2O3znw9HI1x-vdi_37-(1).png) Microsoft Azure portal shows the following screen when successful: [.png)](https://docs.apptimized.com/uploads/images/gallery/2021-07/WDI56r89A8MI4fqO-vdi_38-(1).png) The option to finish the creation process is available under the **Create** button. [.png)](https://docs.apptimized.com/uploads/images/gallery/2021-07/l4sXE6o2x8IU15cg-vdi_39-(1).png) Microsoft Azure portal shows the following screen when successful: [.png)](https://docs.apptimized.com/uploads/images/gallery/2021-07/61dx5Wi9pItEtJ3P-vdi_40-(2).png) ##### Associate subnet with Network Security Group The option to associate subnet from Virtual network with Network security group is available under **portal.azure.com > Network security group >** **select group > Subnets > Associate**. **[.png)](https://docs.apptimized.com/uploads/images/gallery/2021-07/42Pp8MMeOTNeYzIe-vdi_40-(3).png)** Microsoft Azure portal shows the following screen when successful: [.png)](https://docs.apptimized.com/uploads/images/gallery/2021-07/wR85ENyTbmDvgU5q-vdi_41-(2).png) The option to choose a Virtual network is available under the **Virtual network** drop-down list. [.png)](https://docs.apptimized.com/uploads/images/gallery/2021-07/Ye4i0c5asGqkvN3k-vdi_42-(1).png) Microsoft Azure portal shows the following screen when the network was selected: [.png)](https://docs.apptimized.com/uploads/images/gallery/2021-07/ohbg6Nc0ofi4wj3o-vdi_43-(1).png) The option to choose Subnet is available under the **Subnet** drop-down list: [.png)](https://docs.apptimized.com/uploads/images/gallery/2021-07/9x9yZMUUH3EwIyud-vdi_44-(1).png) The option to Associate subnet is available under the OK button: [.png)](https://docs.apptimized.com/uploads/images/gallery/2021-07/nEGWepXVdCyBkZQX-vdi_45-(1).png) Microsoft Azure portal shows the following screen when successful: [.png)](https://docs.apptimized.com/uploads/images/gallery/2021-07/k8nmTQz91ZfsPjGd-vdi_46-(1).png) ##### Inbound security rule creation The option to restrict access to VM is available under **portal.azure.com > Network Security Group > Inbound security rules > Add**. [.png)](https://docs.apptimized.com/uploads/images/gallery/2021-07/CfX9kFPfWa3JTrp3-vdi_47-(1).png) Microsoft Azure portal shows the following screen when successful: [.png)](https://docs.apptimized.com/uploads/images/gallery/2021-07/mCKB9Wn7aNgqWFUG-vdi_48-(1).png) The option to select the Source filter option is available under the **Source** drop-down list. The required option is **IP addresses.** The screenshot below shows the procedure for inbound security role adding (**Source** drop-down list > **Select IP Addresses** > Enter 78.47.106.224 address under the **Source IP Address / CIDR range** field > Select **RDP** under the **Service** field > **Add** button): [.png)](https://docs.apptimized.com/uploads/images/gallery/2021-07/Kr8XSHLLlcl7QTsp-vdi_49-(1).png) Microsoft Azure portal shows the following screen when successful: [.png)](https://docs.apptimized.com/uploads/images/gallery/2021-07/Wn98xMKJ6JefaO85-vdi_50-(1).png) ##### .vhd File Creation The option to start .vhd file setup process creation is available under the **Hyper-V manager (**see [**Creating a VHD**](https://docs.microsoft.com/en-us/windows-server/virtualization/hyper-v/manage/create-vhdset-file)) The option to convert .vhdx disk format to .vhd is available under **Hyper-V Manager > Select computer > Action > Edit disk > Next > Select disk > Next > Convert > Next > VHD > Next >** **Finish**. [.png)](https://docs.apptimized.com/uploads/images/gallery/2021-07/YTr7IS32MiVLwL25-vdi_51_1-(1).png) [.png)](https://docs.apptimized.com/uploads/images/gallery/2021-07/k9hr9DSHxbO4908f-vdi_52-(3).png) ##### VM healthiness checkout The option to check the healthiness and consistency of VM is available under the elevated PowerShell windows and command: Chkdsk /f ##### VHD Configuration VHD configuration consists of setting up the Boot Configuration Data (BCD) settings, the disk SAN policy, the Coordinated Universal Time (UTC), configuring power profile, environmental variables, resetting the Windows services to startup settings, configuring RDP options, Windows Firewall rules, and disabling the Windows Defender under the PowerShell command prompt. The option to start configuration is available by enabling PowerShell script execution. This is available by entering the PowerShell command: **Set-ExecutionPolicy –ExecutionPolicy Unrestricted -Force** [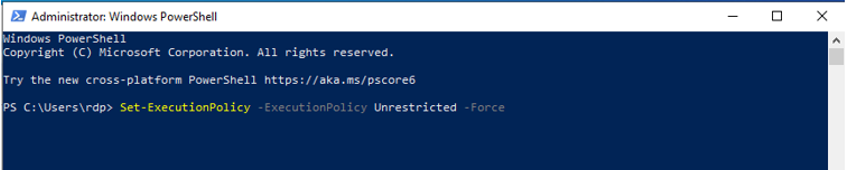](https://docs.apptimized.com/uploads/images/gallery/2021-07/Kk49DMDoYv9l7OeG-image-90.png) The option to set the Boot Configuration Data (BCD) settings is available by entering the PowerShell commands: bcdedit /set "{bootmgr}" integrityservices enable bcdedit /set "{default}" device partition=C: bcdedit /set "{default}" integrityservices enable bcdedit /set "{default}" recoveryenabled Off bcdedit /set "{default}" osdevice partition=C: bcdedit /set "{default}" bootstatuspolicy IgnoreAllFailures #Enable Serial Console Feature bcdedit /set "{bootmgr}" displaybootmenu yes bcdedit /set "{bootmgr}" timeout 5 bcdedit /set "{bootmgr}" bootems yes bcdedit /ems "{current}" ON bcdedit /emssettings EMSPORT:1 EMSBAUDRATE:115200**Note.** No application should use port 3389. The option to see which ports are used on the VM is available under the command **netstat – anob.**
The option to set the disk SAN policy to **Onlineall** is available under the following commands via CMD: diskpart san policy=onlineall exit The option to set Coordinated Universal Time for Windows is available under the following commands via PowerShell: Set-ItemProperty -Path 'HKLM:\\SYSTEM\\CurrentControlSet\\Control\\TimeZoneInformation' -Name "RealTimeIsUniversal" -Value 1 -Type DWord -Force Set-Service -Name w32time -StartupType Automatic The option to set the power profile to high performance is available under the command via PowerShell powercfg /setactive SCHEME\_MIN The option to set the environmental variables TEMP and TMP to their default values is available under the following commands via PowerShell: Set-ItemProperty -Path 'HKLM:\\SYSTEM\\CurrentControlSet\\Control\\Session Manager\\Environment' -Name "TEMP" -Value "%SystemRoot%\\TEMP" -Type ExpandString -Force Set-ItemProperty -Path 'HKLM:\\SYSTEM\\CurrentControlSet\\Control\\Session Manager\\Environment' -Name "TMP" -Value "%SystemRoot%\\TEMP" -Type ExpandString -Force The option to reset the Windows services startup settings is available under the following commands via PowerShell: Get-Service -Name bfe | Where-Object { $\_.StartType -ne 'Automatic' } | Set-Service -StartupType 'Automatic' Get-Service -Name dhcp | Where-Object { $\_.StartType -ne 'Automatic' } | Set-Service -StartupType 'Automatic' Get-Service -Name dnscache | Where-Object { $\_.StartType -ne 'Automatic' } | Set-Service -StartupType 'Automatic' Get-Service -Name IKEEXT | Where-Object { $\_.StartType -ne 'Automatic' } | Set-Service -StartupType 'Automatic' Get-Service -Name iphlpsvc | Where-Object { $\_.StartType -ne 'Automatic' } | Set-Service -StartupType 'Automatic' Get-Service -Name netlogon | Where-Object { $\_.StartType -ne 'Manual' } | Set-Service -StartupType 'Manual' Get-Service -Name netman | Where-Object { $\_.StartType -ne 'Manual' } | Set-Service -StartupType 'Manual' Get-Service -Name nsi | Where-Object { $\_.StartType -ne 'Automatic' } | Set-Service -StartupType 'Automatic' Get-Service -Name TermService | Where-Object { $\_.StartType -ne 'Manual' } | Set-Service -StartupType 'Manual' Get-Service -Name MpsSvc | Where-Object { $\_.StartType -ne 'Automatic' } | Set-Service -StartupType 'Automatic' Get-Service -Name RemoteRegistry | Where-Object { $\_.StartType -ne 'Automatic' } | Set-Service -StartupType 'Automatic' The option to turn on RDP and update remote-desktop registry settings is available under the following actions: - Accessing remote access at the system settings is available under **Control panel > Allow remote access to your computer > Allow remote connections to this computer - Apply [.png)](https://docs.apptimized.com/uploads/images/gallery/2021-07/VkZafa6jtg36BkSu-vdi_53-(1).png)** - Enabling **Remote Desktop Protocol** under the PowerShell commands: Set-ItemProperty -Path 'HKLM:\\SYSTEM\\CurrentControlSet\\Control\\Terminal Server' -Name "fDenyTSConnections" -Value 0 -Type DWord –Force Set-ItemProperty -Path 'HKLM:\\SOFTWARE\\Policies\\Microsoft\\Windows NT\\Terminal Services' -Name "fDenyTSConnections" -Value 0 -Type DWord –Force - Setting up RDP port (3389) under the PowerShell command: Set-ItemProperty -Path 'HKLM:\\SYSTEM\\CurrentControlSet\\Control\\Terminal Server\\Winstations\\RDP-Tcp' -Name "PortNumber" -Value 3389 -Type DWord –Force - Enabling network interface listener under the PowerShell command: Set-ItemProperty -Path 'HKLM:\\SYSTEM\\CurrentControlSet\\Control\\Terminal Server\\Winstations\\RDP-Tcp' -Name "LanAdapter" -Value 0 -Type DWord -Force - Configuring the network-level-authentication (NLA) mode for the RDP connections under the PowerShell commands: Set-ItemProperty -Path 'HKLM:\\SYSTEM\\CurrentControlSet\\Control\\Terminal Server\\WinStations\\RDP-Tcp' -Name "UserAuthentication" -Value 1 -Type DWord –Force Set-ItemProperty -Path 'HKLM:\\SYSTEM\\CurrentControlSet\\Control\\Terminal Server\\WinStations\\RDP-Tcp' -Name "SecurityLayer" -Value 1 -Type DWord –Force Set-ItemProperty -Path 'HKLM:\\SYSTEM\\CurrentControlSet\\Control\\Terminal Server\\WinStations\\RDP-Tcp' -Name "fAllowSecProtocolNegotiation" -Value 1 -Type DWord -Force - Setting up the keep-alive value under the PowerShell commands: Set-ItemProperty -Path 'HKLM:\\SOFTWARE\\Policies\\Microsoft\\Windows NT\\Terminal Services' -Name "KeepAliveEnable" -Value 1 -Type DWord –Force Set-ItemProperty -Path 'HKLM:\\SOFTWARE\\Policies\\Microsoft\\Windows NT\\Terminal Services' -Name "KeepAliveInterval" -Value 1 -Type DWord –Force Set-ItemProperty -Path 'HKLM:\\SYSTEM\\CurrentControlSet\\Control\\Terminal Server\\Winstations\\RDP-Tcp' -Name "KeepAliveTimeout" -Value 1 -Type DWord -Force - Reconnecting under the PowerShell commands: Set-ItemProperty -Path 'HKLM:\\SOFTWARE\\Policies\\Microsoft\\Windows NT\\Terminal Services' -Name "fDisableAutoReconnect" -Value 0 -Type DWord –Force Set-ItemProperty -Path 'HKLM:\\SYSTEM\\CurrentControlSet\\Control\\Terminal Server\\Winstations\\RDP-Tcp' -Name "fInheritReconnectSame" -Value 1 -Type DWord –Force Set-ItemProperty -Path 'HKLM:\\SYSTEM\\CurrentControlSet\\Control\\Terminal Server\\Winstations\\RDP-Tcp' -Name "fReconnectSame" -Value 0 -Type DWord -Force - Limiting the number of concurrent connections under the PowerShell command: Set-ItemProperty -Path 'HKLM:\\SYSTEM\\CurrentControlSet\\Control\\Terminal Server\\Winstations\\RDP-Tcp' -Name "MaxInstanceCount" -Value 4294967295 -Type DWord -Force - Removing self-signed certificates tied to the DRP listener under the PowerShell command: if ((Get-Item -Path 'HKLM:\\SYSTEM\\CurrentControlSet\\Control\\Terminal Server\\WinStations\\RDP-Tcp').Property -contains "SSLCertificateSHA1Hash") { Remove-ItemProperty -Path 'HKLM:\\SYSTEM\\CurrentControlSet\\Control\\Terminal Server\\WinStations\\RDP-Tcp' -Name "SSLCertificateSHA1Hash" -Force } The option to configure or disable Windows firewall rules is available under the following actions: - Turning on Windows firewall on the three profiles (domain, standard, public) under the PowerShell command: Set-NetFirewallProfile -Profile Domain, Public, Private -Enabled True - Allowing WinRM through the firewall profiles and enabling the PowerShell remote service under the PowerShell commands: Enable-PSRemoting –Force Set-NetFirewallRule -DisplayName "Windows Remote Management (HTTP-In)" -Enabled True - Enabling the firewall rules allowing the RDP traffic under the PowerShell command: Set-NetFirewallRule -DisplayGroup "Remote Desktop" -Enabled True - Enabling the file and printer sharing rule allowing the VM to respond to a ping command inside the virtual network under the PowerShell command: Set-NetFirewallRule -DisplayName "File and Printer Sharing (Echo Request - ICMPv4-In)" -Enabled True The option to install VM extensions is available under the **Azure Virtual Machine Agent** (see [**Azure Virtual Machine Agent**](https://docs.microsoft.com/en-us/azure/virtual-machines/extensions/agent-windows)). The option to disable Windows Defender is available under the following PowerShell script: ***\# Disable Firewall*** **Start-Process "$($env:windir)\\System32\\netsh.exe" -ArgumentList "advfirewall set allprofiles state off";** ***\#Disable Windows Defender*** **New-ItemProperty "hklm:\\SOFTWARE\\Policies\\Microsoft\\Windows Defender" -Name "DisableAntiSpyware" -Value 1 -Force;** **Remove-ItemProperty "hklm:\\SOFTWARE\\Microsoft\\Windows\\CurrentVersion\\Run" -Name "SecurityHealth" -Force;** **Remove-ItemProperty "hklm:\\SOFTWARE\\Microsoft\\Windows\\CurrentVersion\\Run" -Name "WindowsDefender" -Force;** ***\# Disabling password complexity*** **secedit /export /cfg c:\\secpol.cfg** **(GC C:\\secpol.cfg).Replace("PasswordComplexity = 1", "PasswordComplexity = 0") | Out-File C:\\secpol.cfg** **secedit /configure /db c:\\windows\\security\\local.sdb /cfg c:\\secpol.cfg /areas SECURITYPOLICY** **rm -force c:\\secpol.cfg -confirm:$false** ***\# Configure Computer power to better perfomance and disable turn off display*** **Start-Process "powercfg" -ArgumentList "/SETACTIVE 8c5e7fda-e8bf-4a96-9a85-a6e23a8c635c" -Wait;** **Start-Process "powercfg" -ArgumentList "/CHANGE monitor-timeout-ac 0" -Wait;** ***\# Show file extensions in File Explorer*** **New-ItemProperty "hkcu:\\Software\\Microsoft\\Windows\\CurrentVersion\\Explorer\\Advanced" -Name "HideFileExt" -Value 0 -Force;** ***\# Set password to the Administrator acc and autologon*** **$computer=$env:COMPUTERNAME;** **$userid="{user\_name}"; #*Enter your username*** **$password="{password}"; #*Enter your password*** **$user=\[adsi\]("WinNT://$($computer)/$($userid), user");** **$user.psbase.invoke("SetPassword", $password);** **New-ItemProperty "hklm:\\SOFTWARE\\Microsoft\\Windows NT\\CurrentVersion\\Winlogon" -Name "AutoAdminLogon" -Value "1" -Force;** **New-ItemProperty "hklm:\\SOFTWARE\\Microsoft\\Windows NT\\CurrentVersion\\Winlogon" -Name "DefaultUserName" -Value $userid -Force;** **New-ItemProperty "hklm:\\SOFTWARE\\Microsoft\\Windows NT\\CurrentVersion\\Winlogon" -Name "DefaultPassword" -Value $password -Force;** The option to disable the “allow PC to be discoverable on this network” dialog is available by adding the following registry key under the Registry Editor: ***HKEY\_LOCAL\_MACHINE\\System\\CurrentControlSet\\Control\\Network\\NewNetworkWindowOff*** The option to disable UAC (User Account Control) is available under **User Account Control** settings: [.png)](https://docs.apptimized.com/uploads/images/gallery/2021-07/Ih9bTZxMvKJf9O92-vdi_54-(1).png) The option to turn on .NET Framework 3.5 is available under the .NET Framework installer (see [**Installation Guide**](https://docs.microsoft.com/en-us/dotnet/framework/install/dotnet-35-windows-10)). The option to install the APE driver and other software is available by the [**following link**](https://apptimizedportalshare.blob.core.windows.net/vm-utils/config_vm.zip)**.****Note.** It is recommended to turn off Windows updates on VM.
##### Virtual Image (VHD) Uploading The option to upload .vhd to blob storage is available under the Storage account container. The option to create Storage account is available under portal.azure.com > **Storage Accounts > Create > Select resource group > Set up account name > Set up resource group region > Review + create > Create**. [.png)](https://docs.apptimized.com/uploads/images/gallery/2021-07/GlGiHrXsH7xYK2TT-vdi_55-(1).png) [.png)](https://docs.apptimized.com/uploads/images/gallery/2021-07/CFQkBB7zWjLaPHX6-vdi_56-(1).png) Microsoft Azure Portal shows the following screen when successful: [.png)](https://docs.apptimized.com/uploads/images/gallery/2021-07/Lnf0SXU8wyilKpuB-vdi_57-(2).png) The option to create container inside the Storage account is available under **portal.azure.com** > **Storage Account** > **Select storage account** > **Containers** > **Create** > **Set the name of container** > **Create**. [.png)](https://docs.apptimized.com/uploads/images/gallery/2021-07/FEYI4yBAHj5qc5Hl-vdi_57-(3).png) [.png)](https://docs.apptimized.com/uploads/images/gallery/2021-07/5zkJNAkZzO9ToMsy-vdi_58-(1).png) Microsoft Azure Portal shows the following screen when successful: [.png)](https://docs.apptimized.com/uploads/images/gallery/2021-07/WUN90crx9mm0BtOP-vdi_59-(1).png) The option to upload .vhd file to container is available under **portal.azure.com > Storage Accounts > select storage account > Containers > select the Container > Upload > Select file > Select Blob type – Page type >** Mark **Upload .vhd files as page blobs > Upload**. [.png)](https://docs.apptimized.com/uploads/images/gallery/2021-07/g0B2kHA6uIXO3XkL-vdi_60-(1).png) [.png)](https://docs.apptimized.com/uploads/images/gallery/2021-07/jereT09FRw6ndsCN-vdi_61-(1).png) Microsoft Azure portal shows the following screen when successful: [.png)](https://docs.apptimized.com/uploads/images/gallery/2021-07/9nCuLgltAoykTReP-vdi_62-(2).png) The option to copy URL of the uploaded file is available under **portal.azure.com > Storage Accounts >** select Storage Account > **Container** > **Select container > Select file > Copy URL**. This is needed for VM Image creation under the Apptimized Portal. [.png)](https://docs.apptimized.com/uploads/images/gallery/2021-07/xPMd6znfevp5yizC-vdi_63-(1).png) ##### Azure disk snapshot configuration The option to configure Azure disk snapshot is available after the VM creation and configuration. The option to create VM on the portal.azure.com is available under **Services > Virtual Machines** (see [Quickstart - Create a Windows VM in the Azure portal - Azure Virtual Machines | Microsoft Docs](https://docs.microsoft.com/en-us/azure/virtual-machines/windows/quick-create-portal) )**Note.** RDP must be enabled on VM (add a link to RDP mentioned part of the doc).
The option to configure the VM is available under the [following actions](https://docs.apptimized.com/link/272#bkmrk-vhd-configuration). ##### Azure VM snapshot creation The option to create a snapshot of Azure VM under **Microsoft Azure Portal** is available under portal.azure.com > **Virtual Machines** > select VM > **Disks** > select disk > **Create snapshot** **[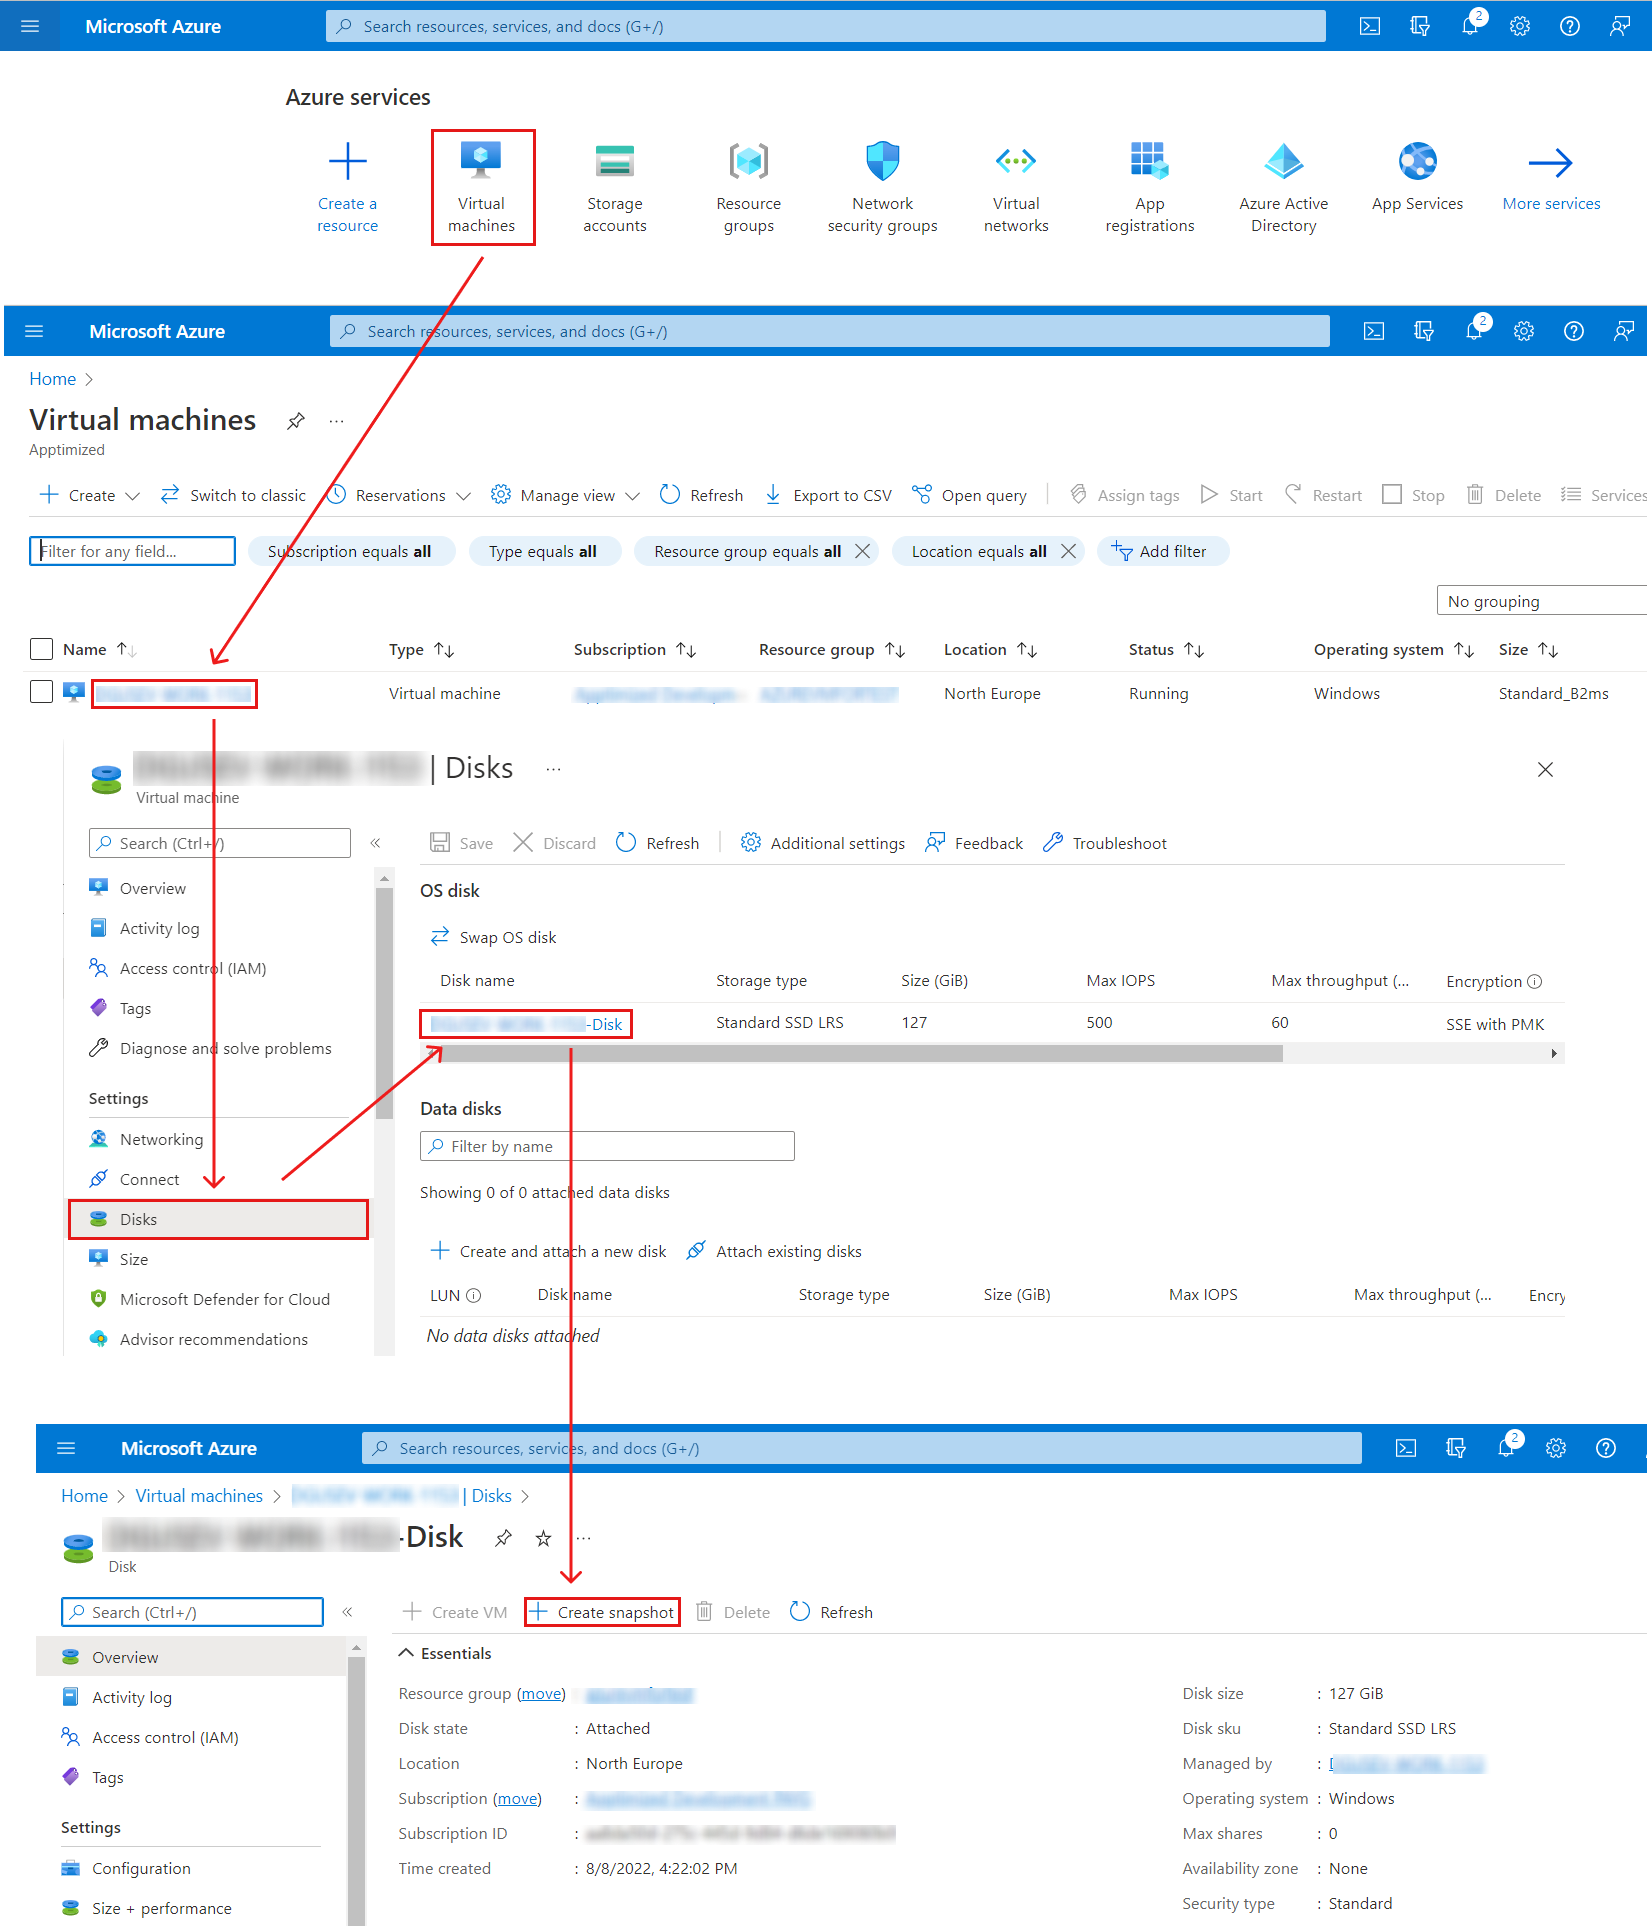](https://docs.apptimized.com/uploads/images/gallery/2022-08/AxATjtkMhiZdh42q-azure_01.png)** Microsoft Azure portal shows the following screen when successful: [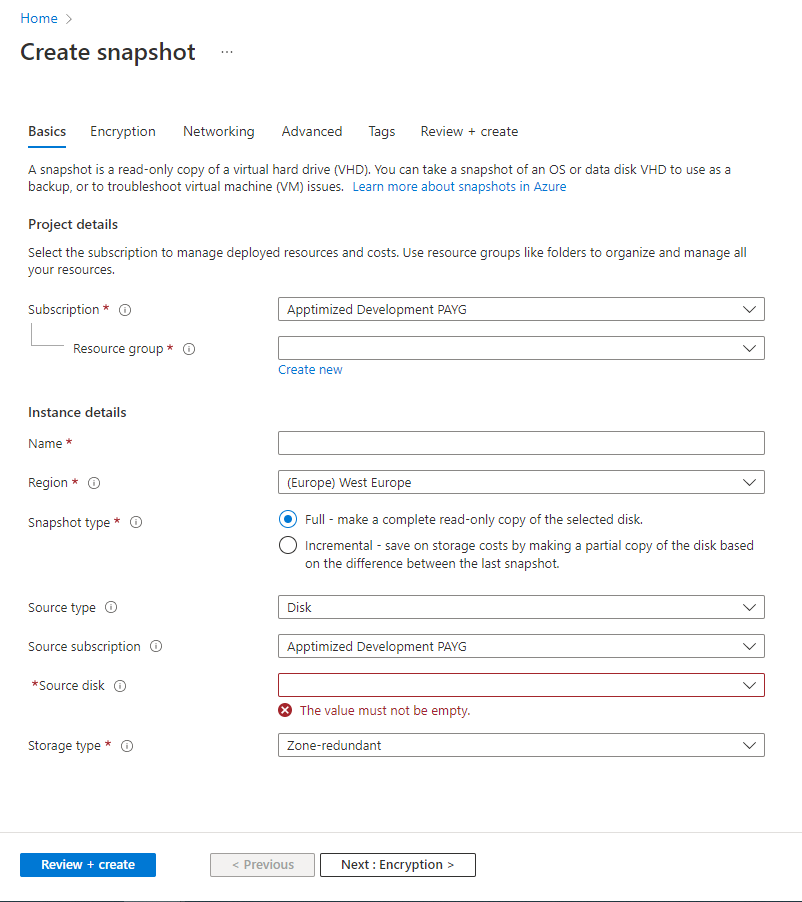](https://docs.apptimized.com/uploads/images/gallery/2022-08/rxKUPLPVG0U68024-azure_02.png) The option to create snapshot is available by following actions: selection **Resource group >** setting the **Snapshot name** > Selection **the Source disk >** setting **Encryption settings >** setting **Networking settings > Review + create > Create** [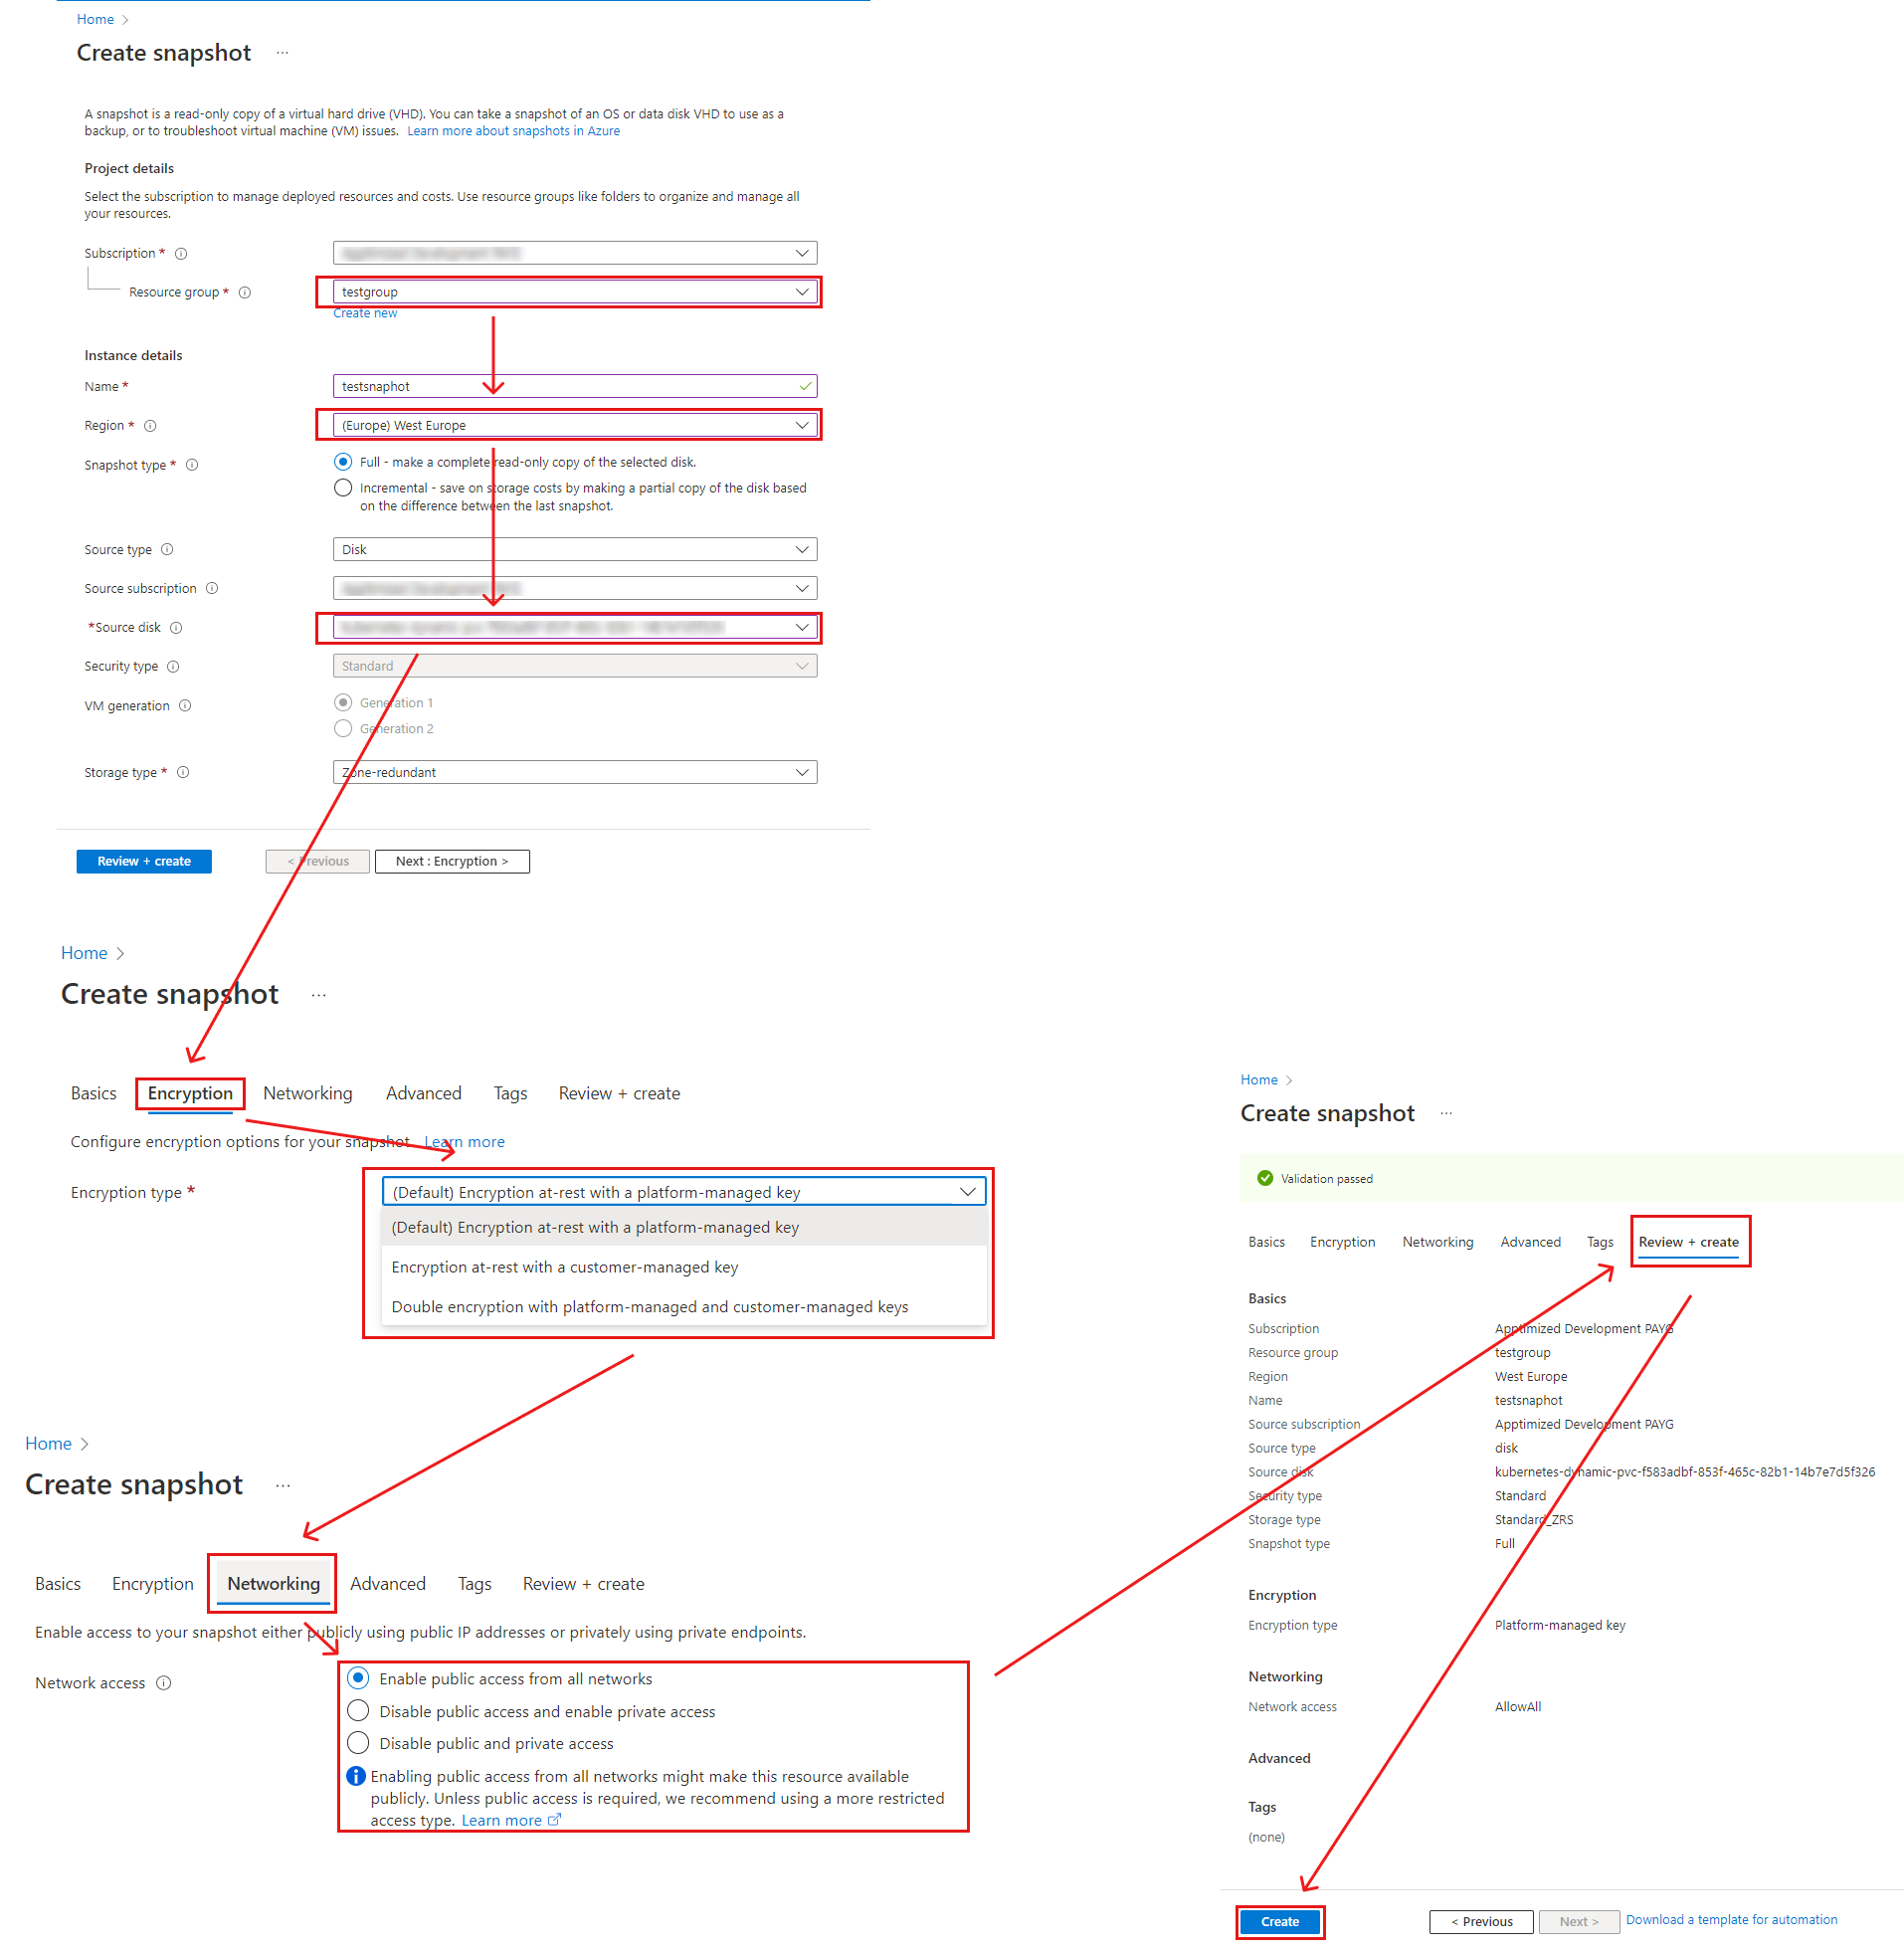](https://docs.apptimized.com/uploads/images/gallery/2022-08/LJqqaxLyYNecc7CT-azure_03.png) Microsoft Azure portal shows the following notification when successful: [.png)](https://docs.apptimized.com/uploads/images/gallery/2022-08/43BgVIIEMPj2yPBA-azure_04-(1).png) Copying the snapshot name is **required** for VM image creation under Apptimized Portal # Apptimized TO GO Hypervisor User Guide # Apptimized TO GO Hypervisor Integration #### Enable Apptimized TO GO hypervisor connector The one-time configuration is available for project administrators under **Settings** in the project menu > **Virtualization providers** option > **To** **Go** switch. [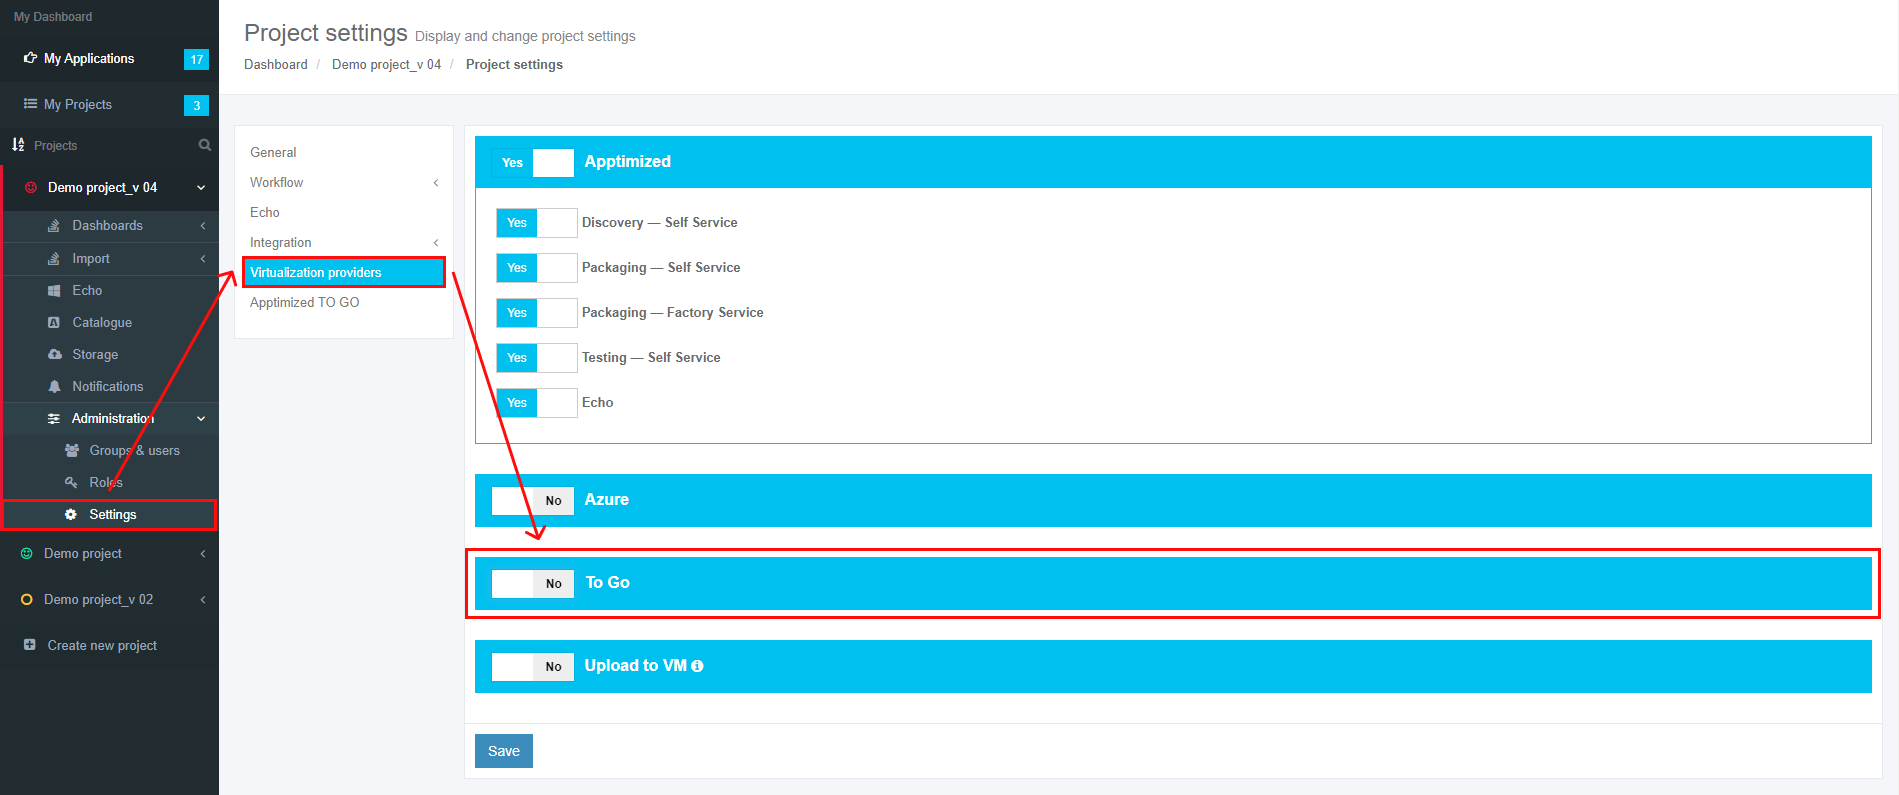](https://docs.apptimized.com/uploads/images/gallery/2020-06/K6BJjfNYXChpTteo-to_go_hyp_04.png) Apptimized shows the following screen when successful: [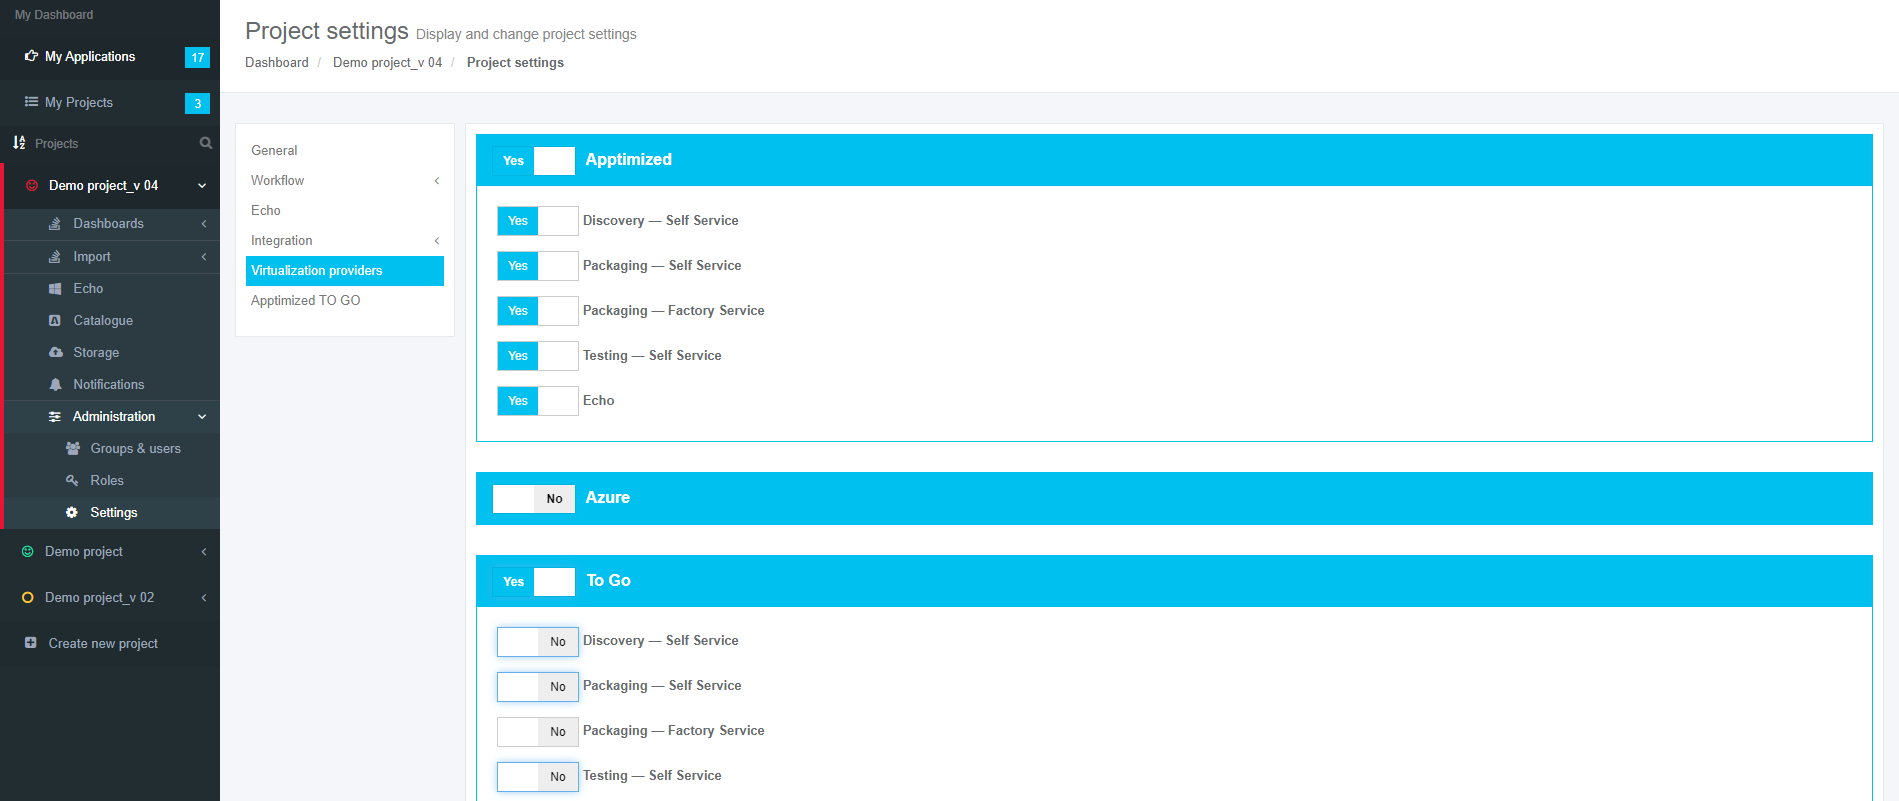](https://docs.apptimized.com/uploads/images/gallery/2020-06/JBqQ242KrjeJVktF-to_go_hyp_05.png) The **To Go** switch enables the TO GO hypervisor connector implementation within the project. [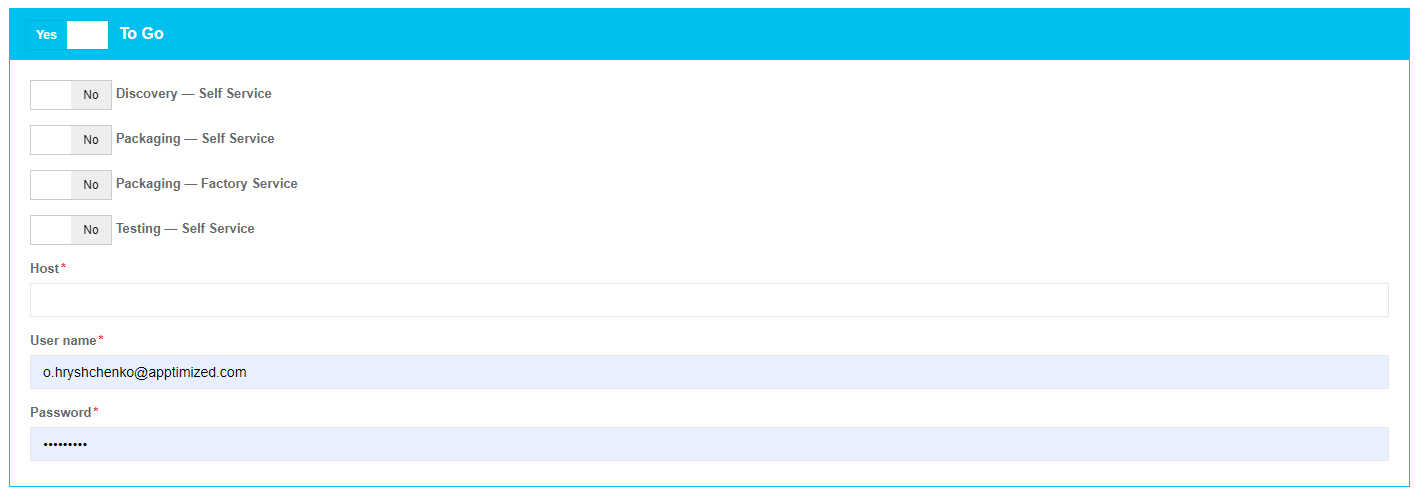](https://docs.apptimized.com/uploads/images/gallery/2020-04/IhTLseYiKg2RFe1y-project_settings_26.png) The option to specify within what workflow step the TO GO hypervisor connector will be implemented enables when the switch is activated in front of the step name. The **User name** and **Password** fields come prefilled. The **Host** field defines the IP address or DNS name of a resource that contains Virtual Machines (i.e., **10.159.11.2:1233** or **somesite.hive.com**). When the value to the **Host** field is added, the **Create new image** button appears. [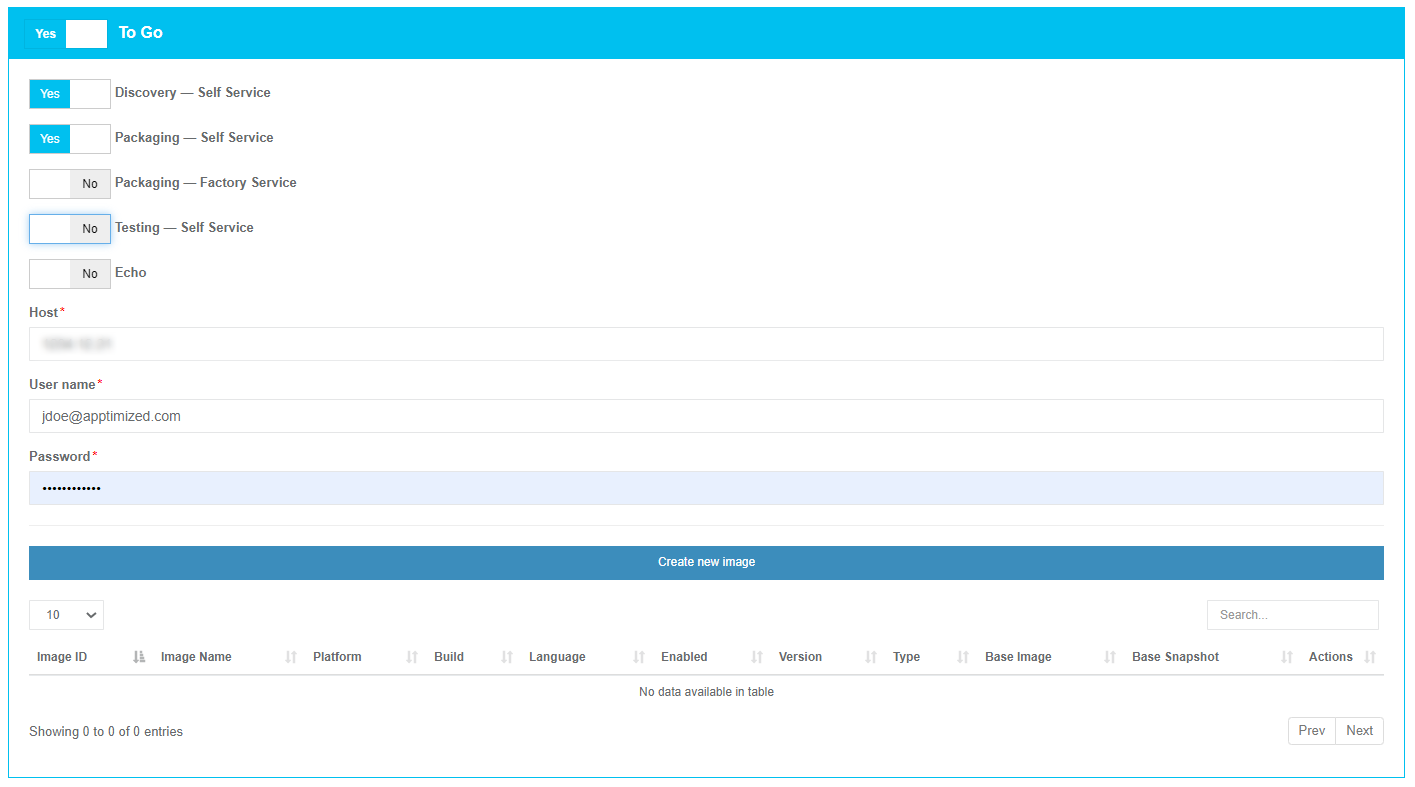](https://docs.apptimized.com/uploads/images/gallery/2020-06/6unDZyjSEWaghabG-to_go_hyp_01.png) The option to create a custom operating system image is available under the **Create new image** button. Apptimized shows the following modal window (all required fields are marked with an asterisk \*): [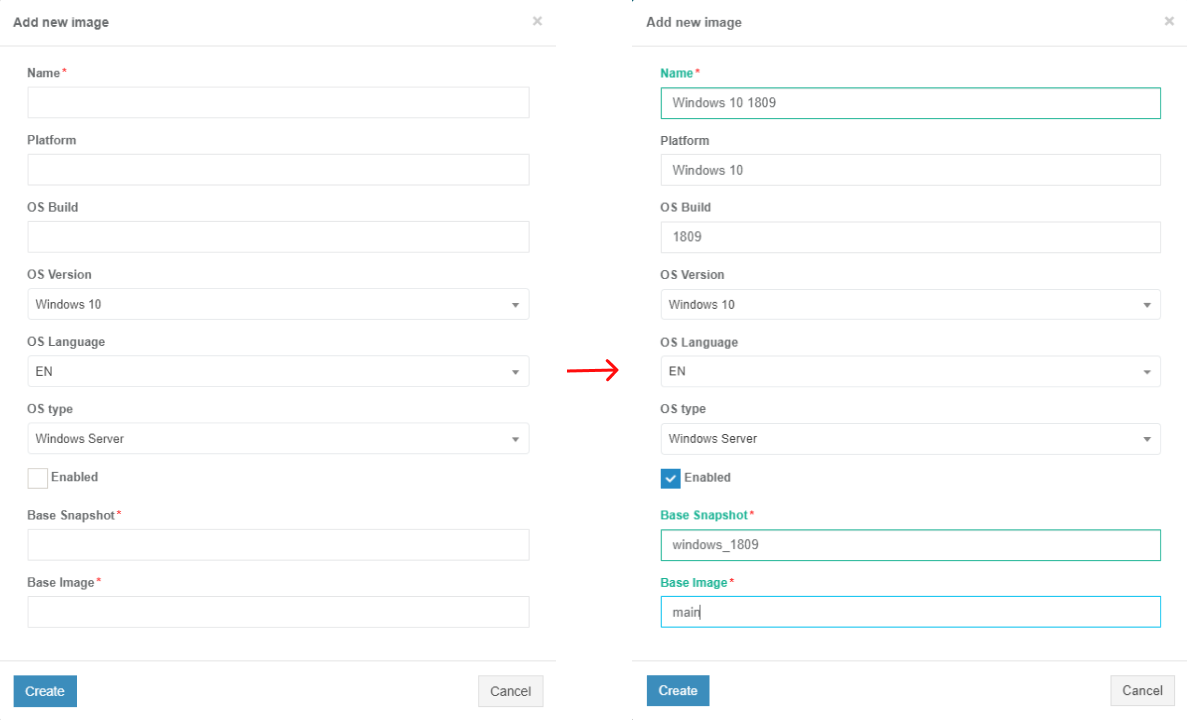](https://docs.apptimized.com/uploads/images/gallery/2020-06/F1h8TZFFg3J2AT9c-to_go_hyp_03.png) The created custom operating system image must contain the installed **TO GO agent**. Otherwise, the VM will not be available via a virtual desktop environment using the RDP proxy server. The VM becomes in the ready status when TO GO agent sends a request to the Apptimized Portal to receive the manifest. Table 2. Image settings| **Setting** | **Description** |
| Name | This setting defines the name for a new Azure image. The naming is a user preference. This field is required. |
| Platform | This setting defines the name of the Windows platform (i.e., **Windows 10**). |
| OS Build | This setting defines the operating system build that will be used (i.e., **18363.753** – is an OS build for Windows 10, version 1909). OS build is a timeline of minor build releases in between the major version number releases. |
| OS Version | This setting defines the operation system version that will be used. The following options available: - Windows 7; - Windows 8; - Windows 10. The default value is **Windows 10**. |
| OS Language | This setting defines the operating system language mode. The following options available: - EN; - DE. The default value is **EN**. |
| OS type | This setting defines the operating system type mode. The following options available: - Windows Server; - Desktop Windows. The default value is **Windows**. **Server**. |
| Enabled | This setting indicates that the current image is enabled for use. |
| Base snapshot | This setting defines the name of the snapshot (a captured state of a system in a particular time point). It is usually used as a back-up copy or as a basis to troubleshoot issues. This field is required. |
| Base image | This setting defines the name of the existed operating system image which can be used as a basis for this image. This field is required. |
**Note**. When the TO GO hypervisor connector option is implemented for the project, a customer receives the full scope of the Apptimized [discovery ](https://docs.apptimized.com/books/apptimized-platform-user-manual/page/discovery)and [testing ](https://docs.apptimized.com/books/apptimized-platform-user-manual/page/testing)functionality on VMs with the custom operating system image.
# Apptimized TO GO Hypervisor Administration Guide # Apptimized TO GO Hypervisor infrastructure ### Infrastructure components Apptimized TO GO allows a customer to turn a local machine, PC's or VM's into Apptimized VM so that they can be used for discovery and testing. Apptimized TO GO can be used for discovery and testing on local test PCs or VMs in the customer's own environment. Apptimized TO GO infrastructure depends on the type of solution a customer chooses (see Case 1). ##### Case 1. A customer implements Apptimized TO GO agent with the TO GO hypervisor connector scenario. The figure below shows the scheme of the Apptimized TO GO infrastructure. [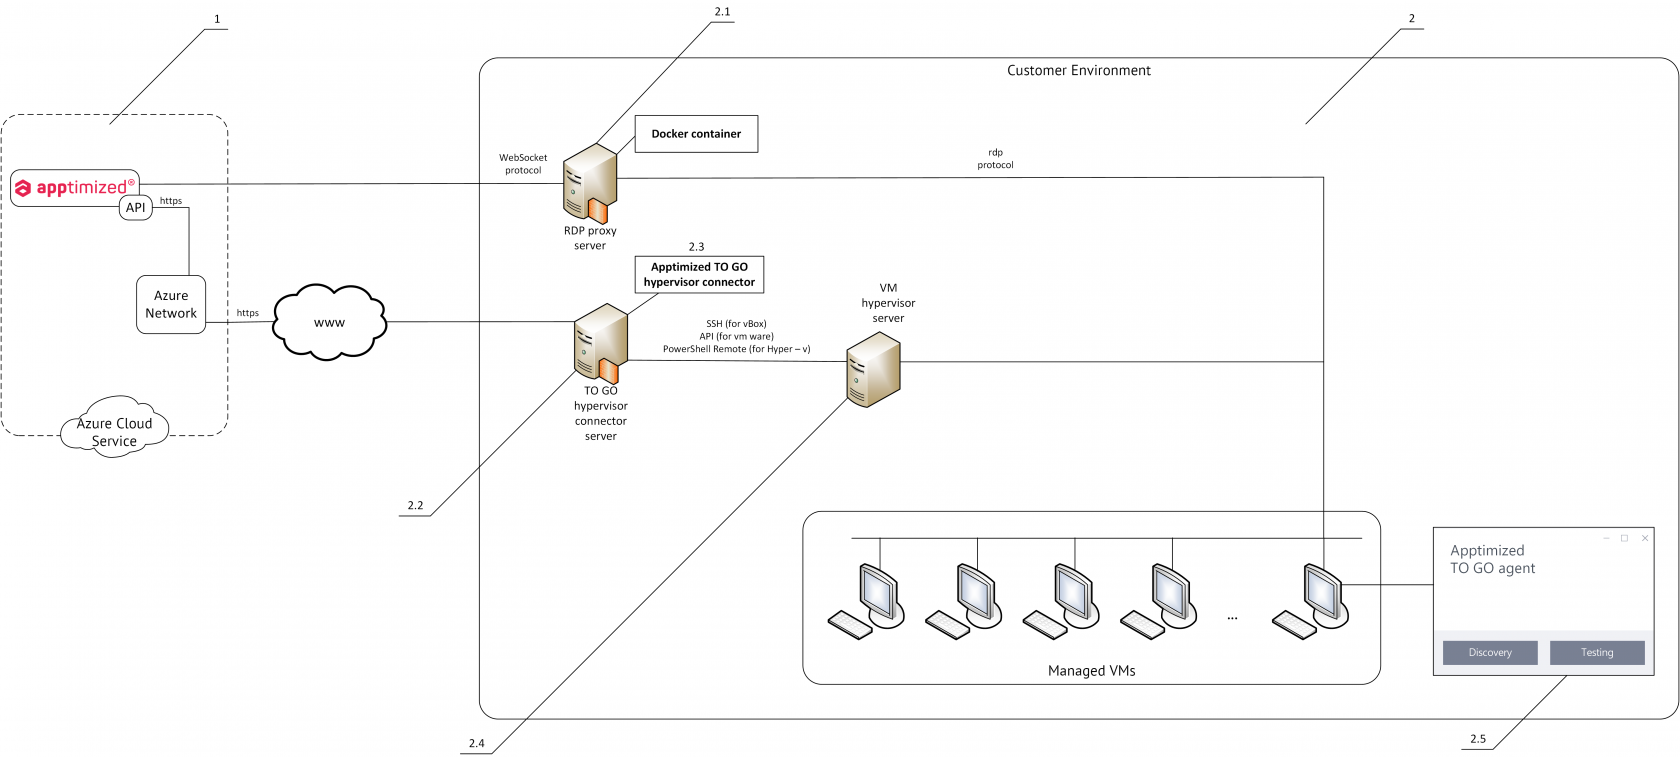](https://docs.apptimized.com/uploads/images/gallery/2020-06/ArrtNFtzozKQydLq-to-go-hypervisor-infr.png) The infrastructure components details are described in Table 1. Table 1. Infrastructure components| **Component** | **Details** |
| 1\. Apptimized Portal | The platform where Apptimized customer manages projects portfolios. Requires an active project with enabled and configured Apptimized TO GO settings. Technical requirement for working in Apptimized: 1\. Browsers: - Google Chrome (version 75.0 or above); - Mozilla Firefox (version 60.0 or above); - Apple Safari (version 12.0 or above); - Internet Explorer with (version 11.0); - Microsoft Edge with version 83 and above. 2. Enabled Java-script in browser; 3\. Speed of internet connections – min 50 Mb/s. 4\. Enabled firewall white list: https://app.apptimized.com/; https://rdproxy.apptimized.com/; https://cdn.apptimized.com; \*.chatlio.com |
| 2\. Customer Environment | Information technology environment, including software, hardware, and systems (e.g., endpoint PCs, VMs, servers, networks).
The access of endpoint PC or VM to the 80 and 443 port of the app.apptimized.com host is a prerequisite. |
| 2.1. RDP proxy server | RDP proxy server is a third party between the customer and the service (the Apptimized Portal). RDP proxy server helps to provide a rather high level of protection of customer’s sensitive data and valuable information and to achieve anonymity.
A [Docker](https://www.docker.com/) engine versions 19.03 and above are used.
Docker container is used to provide a virtual desktop environment using the RDP proxy server.
A Docker container image is a lightweight, standalone, executable package of software that includes a full asset portfolio of functionality to run an application (i.e., code, runtime, system tools, system libraries and settings).
ks uniformly despite differences for instance between development and staging[\[1\]](#_ftn1).
RDP proxy server is used to display VM in browser. Otherwise, it can be skipped.
**Note.** A minimal specification for RDP proxy server (to handle 15 VM’s at the same time) are the following: 2 cores of VCPU; 8 Gb of RAM; 80 Gb disk storage; 1 Gigabit Internet connectivity. |
| 2.2. TO GO hypervisor server | This is a server with functionality to manage TO GO hypervisor connector. |
| 2.3. TO GO hypervisor connector | Apptimized TO GO hypervisor connector is a software that manages the VMs inside customer infrastructure (e.g., launching them, stopping, making snapshots, etc.). A simplified scheme of the Apptimized TO GO hypervisor connector: [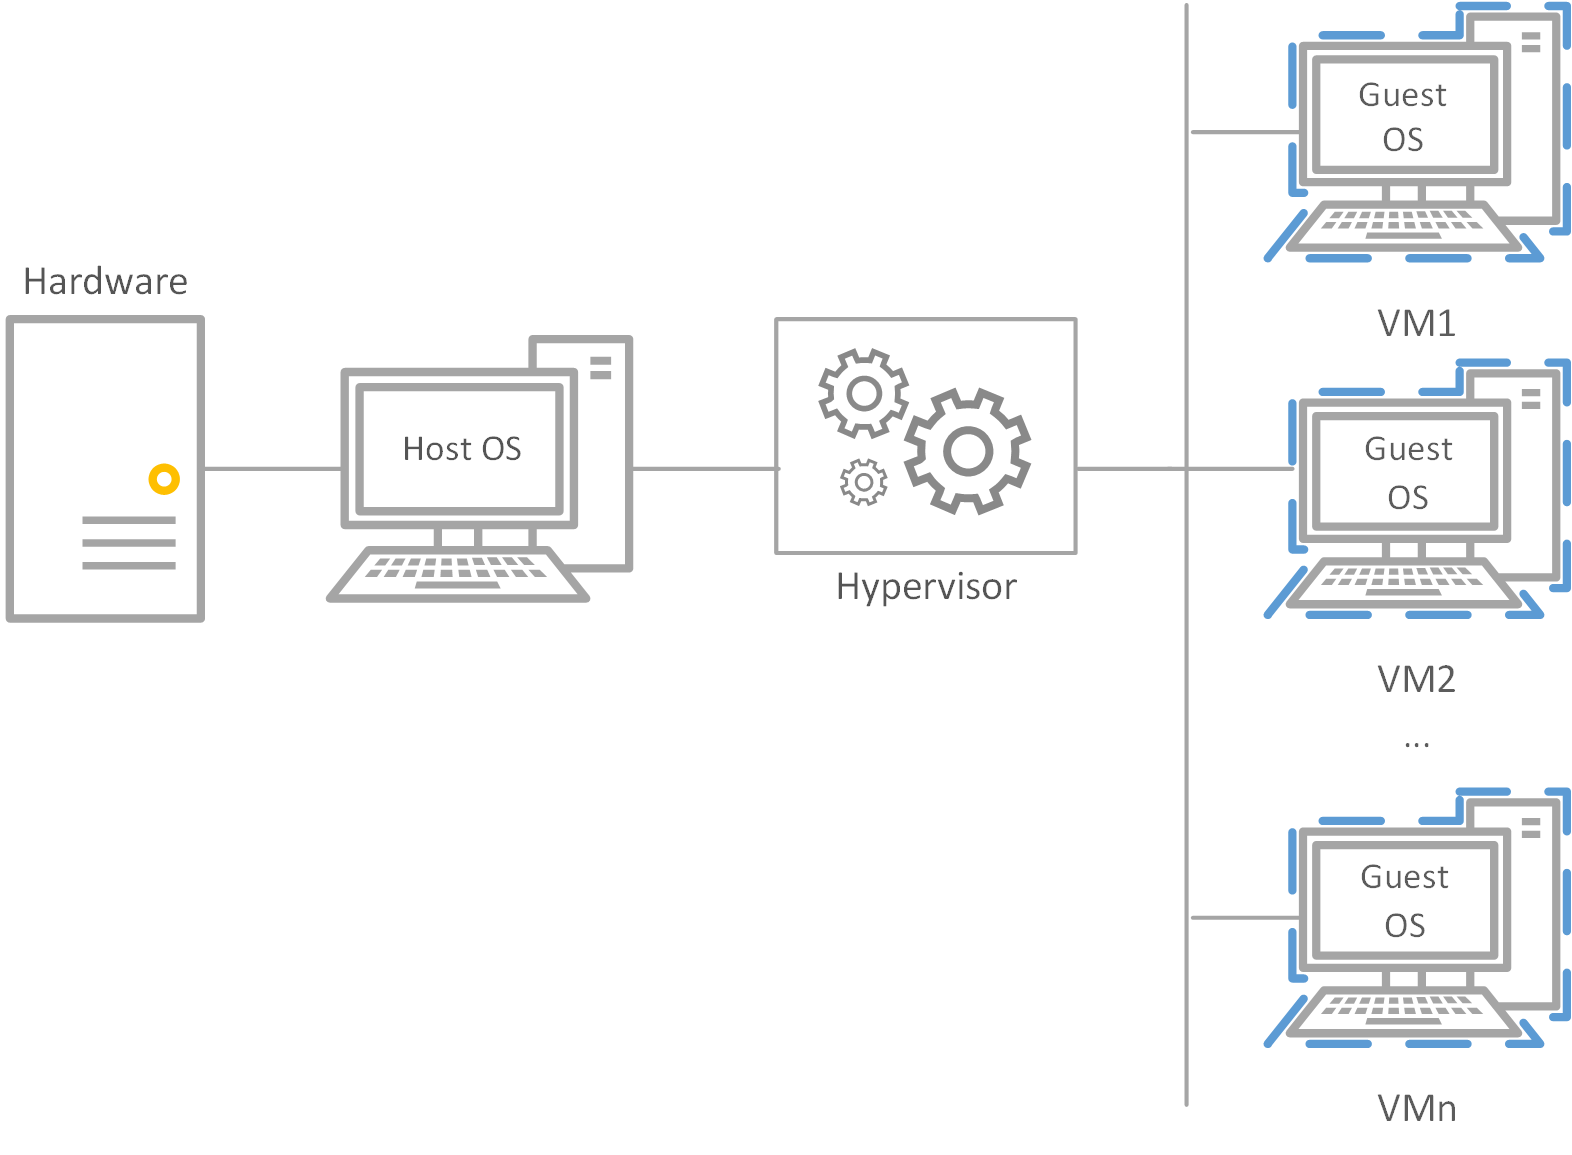](https://docs.apptimized.com/uploads/images/gallery/2020-06/cU6CD7YfPCrp9XyR-hypervisor-scheme.png) The following scripting languages implement depending on what virtualization software is used: - SSH (for VirtualBox); - vSphere API (for VMWare); - PowerShell Remote (for Hyper-V). |
| 2.4. VM hypervisor | This is a server which controls all VM infrastructure |
| 2.5. Apptimized TO GO agent | Apptimized TO GO agent is a software that sends information from the VM to Apptimized (i.e., screenshots, user actions, etc.), and does not controls VM in any case. Apptimized TO GO agent allows a customer to turn a local machine, PC's or VM's into Apptimized VM so that they can be used for discovery and testing. The Apptimized TO GO agent must be installed and launched on a local PC by the local administrator. |